


Jerry Bates P-51B Build "Hell Yes Let's Go!!!"
 10-26-2016, 09:47 AM
#101

My Feedback: (60)
Join Date: Dec 2001
Location: Litchfield Park,
AZ
Posts: 7,677
Likes: 0
Received 25 Likes
on
23 Posts
Just FYI, the leading edge extension on the B and D model Mustangs is substantially different. If you are concerned with scale fidelity the Hangar 9 D model wing will need to be modified in this area.
 10-26-2016, 01:30 PM
#102
Thread Starter
My Feedback: (13)

Join Date: Oct 2003
Location: C/S CO
Posts: 730
Likes: 0
Received 0 Likes
on
0 Posts
I agree with you on this however both the B and D have a taper near the root. The D taper extends out a bit farther. Not sure how concerned sjhanc is with the slight difference.
Last edited by propwashed; 10-26-2016 at 01:33 PM.
10-26-2016, 01:49 PM
#103
My Feedback: (60)
Join Date: Dec 2001
Location: Litchfield Park,
AZ
Posts: 7,677
Likes: 0
Received 25 Likes
on
23 Posts
All Mustangs from the prototype through the C model had the same, smaller, leading edge extension. The D and the K model share the larger extension. The only production version of the Mustang with a straight leading edge was the H model. The difference in size between the A/B/C and the D/K versions is substantial (see Platt plans below) and would be easily noticed on a 1/5 scale model, IMHO. Of course the OP may not concerned with this at all which is OK too, just pointing out something that he may or may not already be aware of.

 10-26-2016, 01:54 PM
#104
My Feedback: (60)
Join Date: Dec 2001
Location: Litchfield Park,
AZ
Posts: 7,677
Likes: 0
Received 25 Likes
on
23 Posts
PS - Isn't the H9 wing about 9 inches too small in span? It is about 1/5.5 scale while the Bates airplane is a full 1/5 scale. This probably accounts for why the full width of the H9 D wing fits the fuselage saddle of the narrower chord Bates B model.
10-26-2016, 05:05 PM
#105

I placed my H9 wing on top of the Jerry Bates plans. You are correct, the dogleg on the wing leading edge does add chord length that prevents using this H 9 wing without modifying the dogleg part of the H 9 wing. Since I am looking for an easy build I won't attempt to make it fit. The argument about scale outline is not necessary. Modelers have been buying the Top Flite Mustang since it was first released as a B model, but with a D model wing outline. They later changed the model into a D model in kit form and even later as an ARF D model. and all with the same wing planform. Since I fly stand-off or sportsman scale the difference in wing outline doesn't concern me.
In reply to the other question about the H9 wing span, it is 89 inches, the same as the Jerry Bates Mustang.
In reply to the other question about the H9 wing span, it is 89 inches, the same as the Jerry Bates Mustang.
10-26-2016, 05:29 PM
#107
Thread Starter
My Feedback: (13)
Join Date: Oct 2003
Location: C/S CO
Posts: 730
Likes: 0
Received 0 Likes
on
0 Posts
prepping the front canopy frame for glassing
the receiving slot for the leading edge of the malcom hood. still need final shaping on the exterior.
After much thought I have determined it will be too timely and difficult to get the malcom to function properly. The plastic will not hold shape well enough to slide back and forth and close properly. Even with a well engineered frame and sliding assembly it seems unlikely that it will function well. I will most likely have to settle for removal only.
10-26-2016, 08:38 PM
#108
My Feedback: (60)
Join Date: Dec 2001
Location: Litchfield Park,
AZ
Posts: 7,677
Likes: 0
Received 25 Likes
on
23 Posts
Doh! I was thinking of the old Hangar 9 1.50 size Mustang which has an 80 inch span. Not sure why it did not occur to me that you were referring to the newer 60cc H9 offering, forgot all about that one. Sorry for the confusion.
10-27-2016, 07:53 PM
#110
Thread Starter
My Feedback: (13)
Join Date: Oct 2003
Location: C/S CO
Posts: 730
Likes: 0
Received 0 Likes
on
0 Posts
Started building the stab. Nothing too exciting here just building off the plans. I'll probably use Fliteskin on the elevator surfaces. Actually I was thinking of using the fliteskin on all the surfaces wings and tail. Any thoughts???
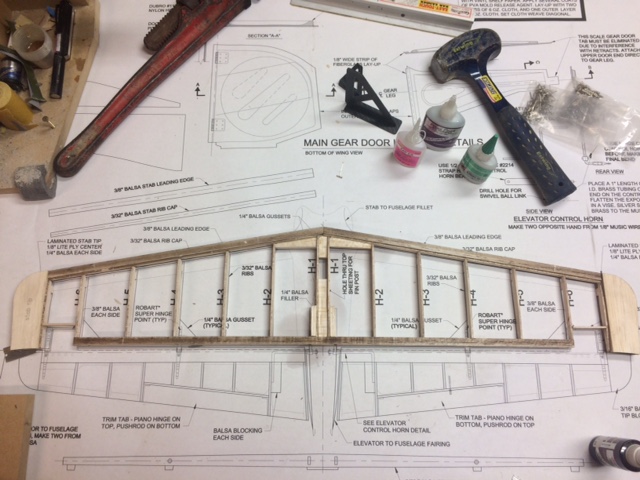


As you can see it requires some industrial size tools!.....
As you can see it requires some industrial size tools!.....
Last edited by propwashed; 10-27-2016 at 08:56 PM.
10-28-2016, 05:12 AM
#112
Thread Starter
My Feedback: (13)
Join Date: Oct 2003
Location: C/S CO
Posts: 730
Likes: 0
Received 0 Likes
on
0 Posts
Hi Vic, I have 1/16"X1/4" balsa strips to cap all the ribs and structure if I go with the Fliteskin. The heavy tools on the bench were use for leading and trailing edge hold downs during gluing. And then to smash it all up if I don't like something! 
 10-28-2016, 02:07 PM
#114
I received my box of cut parts from Bob Holman today. I laid the plans for the stabilizers out on the workbench, then went through the wood kit for the stab parts. As soon as I finish with the weekend's flying I wil start constructing the stabs and control surfaces. The quality of the wood from Bob Holman is very good, I wish the ARF manufacturer's wood used in their models could be upgraded to this grade of wood.
10-29-2016, 10:26 PM
#118
Thread Starter
My Feedback: (13)
Join Date: Oct 2003
Location: C/S CO
Posts: 730
Likes: 0
Received 0 Likes
on
0 Posts
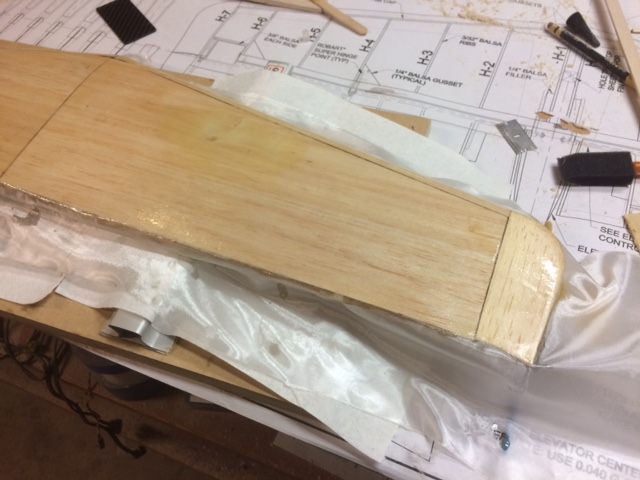
Worked on the stab again today. Built a hinge for the control horns similar to the CB Tatone strap hinges which are not easy to find at the moment. Cut it all out of 2mm CF. Got that fitted up then proceeded to sheet the stab and glass it. Also soldered up the control horns/wire. They are made from 1/8" music wire with 1/8" ID brass tube crimped and soldered on as indicated on the plans.


10-30-2016, 12:11 PM
#119
Thread Starter
My Feedback: (13)
Join Date: Oct 2003
Location: C/S CO
Posts: 730
Likes: 0
Received 0 Likes
on
0 Posts
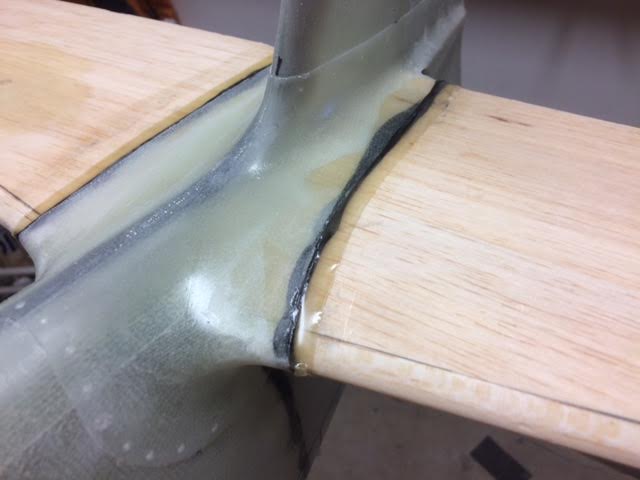
Got the stab installed on the fuse this morning. Fitment was really good. Once it was centered and square to the fuse I started to glass it in and fill the fuse joint to stab with CF strands and resin. I will do the same on the bottom side then add some glass to the interior through the rear of the vertical fin.


Last edited by propwashed; 10-30-2016 at 12:13 PM.
10-30-2016, 04:32 PM
#120
Thread Starter
My Feedback: (13)
Join Date: Oct 2003
Location: C/S CO
Posts: 730
Likes: 0
Received 0 Likes
on
0 Posts
Worked on the fillet blend and reinforced the stab trailing edges with CF strands. I always chip up the fragile TE's during construction so I decided to fix that problem. **Note how beat up the edge is in the second pick.


11-03-2016, 06:31 PM
#124
Thread Starter
My Feedback: (13)
Join Date: Oct 2003
Location: C/S CO
Posts: 730
Likes: 0
Received 0 Likes
on
0 Posts
Finished the rear scoop exit. Next will be the scoop door. I've been trying out a new product and I'm very happy with it. The USC Autobody Icing finishing putty. It's super lightweight, very easy to sand and super fine filling of gaps and holes. It feathers out to a 0% edge with very little effort. Mixes similar to any body filler with a cream hardener (blue) but much thinner and easy to spread. Ready to sand 5-8 min. Standard acetone cleanup. I've used a similar 3M product in the past however this was available and works great. Sandpaper grit sizes 120-150-220 then primer.


