


Jerry Bates P-51B Build "Hell Yes Let's Go!!!"

 11-27-2016, 01:33 PM
#177

I worked out the retract gear mounts for the Robart air set that I have on hand. A problem I have always had with them is the lack of space in the mount area to get them in. I always have to do a lot of grinding on the wood mounts and even on the retract frame to wiggle them into the hole. If the flanges were a little larger the mounting rails could be further apart, making it an easier fit. This JB Mustang though, has a wider rib spacing allowing some room for a better mount design. I have replaced the airply mounts supplied with the BH wood kit with A/C grade plywood and am actually mounting the retracts on a separate ply mount below the main ply mount. I can easily get the small mount onto the retracts, then bolt the assembly to the main ply mount that goes into the wing. I will glue hardwood blocks into the retract well for attaching the main ply mounts to with wood screws. This makes the whole assembly easily removable for repairs after a bad landing. In the event of an overload on the gear the wood screws will give and I can repair it by installing a new piece of wood.
I used a version of this in my first H9 P-51 to repair it after the first bad landing easily tore all the imitation fake wood out of that plane. I was able to use a Hobbico hot knife to slice through the fake glue the manufacturer used in the plane. I got the original parts out intact and used them for patterns to make real wood parts installed using actual real glue (Gorilla).
When I got the second H9 P-51 I used the same method to mount the retracts only made it all removable. I must have gotten better at landing because I haven't had to work on the gear at all. I am using a combination of Robart parts for the Top Flite Mustang and the H9 Mustang's Struts and wheels in the second H9 P-51. The same parts combination is going into this JB Mustang. This setup evolved over a lot of years and gives me trouble-free retract cycles along with cheaper parts when I need them.
11-27-2016, 07:46 PM
#178

Thread Starter
My Feedback: (13)

Join Date: Oct 2003
Location: C/S CO
Posts: 730
Likes: 0
Received 0 Likes
on
0 Posts
Glad to here your moving forward on the build. If you have time takes some pics and post the progress on here. It would be nice to see what all you are describing in you're posts.
I decided it was time to install the rear side windows. I made patterns by taping a sheet of paper over the opening and sketching lightly with a pencil to get the outline of the window opening. then I add another line approx 3/16" larger all the way around. Trimming that outer line and transferring it on to the clear plastic for cutting. Once cut to the correct larger shape I covered both side with low tack painters tape and trim off the edges perfectly with a razor blade. I then inserted the lenses into the fuse for positioning and marking the outer window opening onto the tape with a fine sharpie. Then trim off the tape at the outline with a razor blade. Scuff the exposed edge and glue in place. I also went ahead a removed the upper part of former F11(the lower part of the armor plate) called F9 on the plans to make the window install and detailing out the radio bay much easier. This will allow me to build and install the equipment as welll as the roll over "A" brace that sits behind the armor plate.


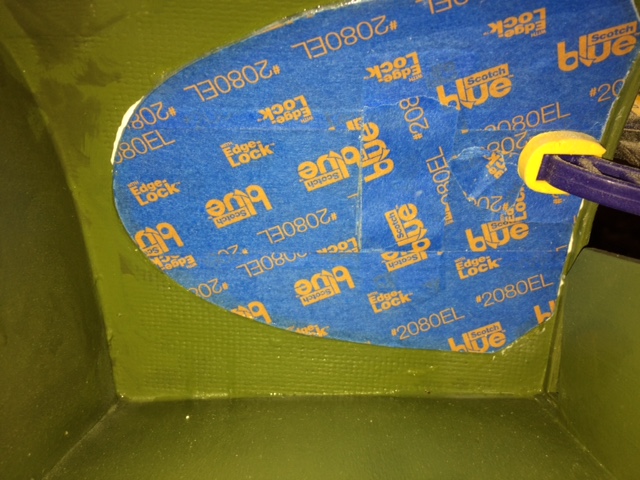


I decided it was time to install the rear side windows. I made patterns by taping a sheet of paper over the opening and sketching lightly with a pencil to get the outline of the window opening. then I add another line approx 3/16" larger all the way around. Trimming that outer line and transferring it on to the clear plastic for cutting. Once cut to the correct larger shape I covered both side with low tack painters tape and trim off the edges perfectly with a razor blade. I then inserted the lenses into the fuse for positioning and marking the outer window opening onto the tape with a fine sharpie. Then trim off the tape at the outline with a razor blade. Scuff the exposed edge and glue in place. I also went ahead a removed the upper part of former F11(the lower part of the armor plate) called F9 on the plans to make the window install and detailing out the radio bay much easier. This will allow me to build and install the equipment as welll as the roll over "A" brace that sits behind the armor plate.
11-28-2016, 01:51 AM
#179
I spent all of Sunday working on the vette. The r/h turn signal suddenly stopped working and you can't risk driving a Vette in this state with a light out. The method of bulb removal I found on the internet didn't work so, considering the faded state of the lens I removed inner panels and got the whole t/sig. assembly out to rebuild it. The bulb is good but it had run very hot in there so the problem was a socket that had high resistance. A search at the NAPA store, (he found the socket by pulling boxes and looking inside) got me a new part. I polished up the lens and downloaded wiring diagrams. It turns out that the hazard switch is a mini computer and the high resistance had also burned a contact in the sw. I found a fix that drills a hole in a spot on the sw. case and spray electronics cleaner inside. Pushing the hazard button many times and spraying cleaner got the sw. working. Only trouble now is I have 1 clear shiny light and one dull faded light on the other side. More parts are arriving today.
You do really nice work on your planes, I wish I had the patience to detail a plane that well. The last P-51 B that I built from a kit and spent 3 years detailing only lasted one day (5 flights, failed new HTC servo). this was only the first slow motion crash I was able to blame on a flap servo. I am a flyer first so I build for sport scale competition. Extra detail not visible from 25 feet I leave for after the test flight phase is done(usually 20-30 flts). I am considering removing the cockpit section to reinforce this area in the fuse and have a removable hatch for concealed switches and retract valve access. I have found that rigging the retracts with the plane inverted on the stand means nothing when it is upright with prop blast doing its thing on struts and main doors. I also leave the main doors off until the gear work properly in flight.
I get several other club members to hold it off the ground while I cycle the gear with takeoff power blasting the gear. I concentrate on building light for better all around perfomance. I hope to have the entire airframe together by the next week so I can do the first CG check and I tape all of the radio gear on to maintain the CG. I find that getting a new plane to this point gets me excited so I have an incentive to finish it for the first test filght.
I will have it all ready to take pictures soon.
11-28-2016, 02:30 AM
#180
I have almost all of the load-bearing wing structure in place and you know what? There ain't any load-bearing structure. One 2 inch deep run of airply is all there is. The center rib join is all butt joints. The design relies on fiberglass wing skin for the integrity of the wing spars. Even my glass/balsa-sheet skinned foam wings had at least one full-depth hard ply wing joiner for dealing with high-G loads. I am going to add a spar splice to the wing while I have good access to this area.
11-28-2016, 07:26 AM
#181
Thread Starter
My Feedback: (13)
Join Date: Oct 2003
Location: C/S CO
Posts: 730
Likes: 0
Received 0 Likes
on
0 Posts
I think I may be replacing the upper and lower spars with basswood instead of the balsa called out on the plans. I do plan on skinning the wing with flightskin. I may also be adding some CF reinforcement to the joiner
11-28-2016, 11:49 AM
#182
I forgot about the balsa spars, I didn't even consider them, I installed spruce spars. I plan to cut a slot behind the spars for a 1/8 A/C ply joiner out to the outside gear rib and another in front of the spars. A lite ply piece behind the leading edge will box the gear nicely. I am using the wood that came with a TF GS P-51 foam wing kit I bought years ago and never got around to building. I will also install extra dummy ribs that start behind the LE and continue back to 1/2 the distance between the spars and the trailing edge. I wil have to cut slots in the spar reinforements to accommodate the dummy ribs. I have been doing this to my TF wings for years, going back to my first TF P-51D arf losing its right wing during a slow roll in formation with another warbird. That one had a wing joiner that consisted of thick balsa laminated with fake imitation chinese plywood. Light, but no strength whatsoever. I removed the piece remaining in the left wing and broke it with my hands.
This is the reason I will install 1/8 A/C grade ply longerons (top and bottom) from the firewall back to behind the wing trailing edge. My second TF arf broke its fuse at the trailing edge of the wing during a high speed pass. I have viewed HD pixs of Jimmy Leeward's P-51 before his crash showing the fuse sides behind the wing wrinkled (Tin canning). The amount of weight gain with these mods is negligable, lightening holes can be cut in the ply that won't affect the strength of the ply.
This is the reason I will install 1/8 A/C grade ply longerons (top and bottom) from the firewall back to behind the wing trailing edge. My second TF arf broke its fuse at the trailing edge of the wing during a high speed pass. I have viewed HD pixs of Jimmy Leeward's P-51 before his crash showing the fuse sides behind the wing wrinkled (Tin canning). The amount of weight gain with these mods is negligable, lightening holes can be cut in the ply that won't affect the strength of the ply.
 12-01-2016, 07:24 PM
#188
Top Flite sells a B model canopy and a conversion kit for the kit version. I originally bought their B canopy but was not impressed with the quality. It is wavy and not very clear and can't be polished out. I got a very good canopy from Fiberglass Specialties along with engine cowlings and belly scoops, all good quality. I never used the B conversion kit for the razorback, just mount the B canopy and built up the rear with a couple of trangular formers and thick sides and a top block sanded down to get the shape. If you cut the ARF or kit D model deck off above the 1/4 inch longeron back to the fin then sand it down to the longeron you can glue another 1/4 inch longeron on top to use as a base to mount the side sheets. I think I used 3/8 thick sheet for the sides and a 3/4 inch top block. Most of the wood is sanded off to get the right shape with a compromise at the top of the horizontal, which is mounted too low on the TF planes. You need to be careful to get the right side view profile for the curve from the canopy back down to the base of the fin. A lot of modelers make the mistake of sanding the top in a straight line, not real obvious but Mustang nuts will spot that mistake right away.
The rear deck I built for the first D model conversion survived a bad crash along with the tail section so I bought another ARF fuse, cut down the rear deck and removed the vertical fin including the rudderpost. I then glued the entire rear deck and tail fins onto the new fuse, sanded the glue joints down and had a B fuse in a couple of hours work. This fuse has way more than 300 flights on it and a couple of crashes and is cracking at a previous repair down the right side of the fuse at the instrument panel base. I have temporarily retired it until I can get the time to strip the covering and repair the stress cracking. I may glass it before restoring the Betty Jane finish.
I own both D and B TF P-51 models and the B is definitely a better performing airframe. It flies straighter and has less drag for higher top speeds and longer climbs. In my area no one else is flying a B model so it is nice to have something different on the flight line. Some of the event announcers are confused by it and call it a P-40 or even a Bf109. Got to keep em guessing. I get excellent performance with a DA 50r for power and used electric power for around 100 flights for even better performance turning a 4 blade prop.
12-02-2016, 04:21 PM
#189
Thread Starter
My Feedback: (13)
Join Date: Oct 2003
Location: C/S CO
Posts: 730
Likes: 0
Received 0 Likes
on
0 Posts
Just got the radio deck behind the seat detailed out as far as I'm going to take it for now. I wanted to get this area buttoned up so I could put it behind me and get ready for the wing construction. I constructed the radio and tray from thin CF on my cnc and mounted it on balsa rails. There were several different radios and configurations in that area it was hard to choose which way to go. It's also very hard to get real good views of behind the seat. This is what I came up with. It's definitely not perfect to scale but it will add enough detail on the line and in the air for the looky-loos.


12-04-2016, 11:16 AM
#192
Thread Starter
My Feedback: (13)
Join Date: Oct 2003
Location: C/S CO
Posts: 730
Likes: 0
Received 0 Likes
on
0 Posts
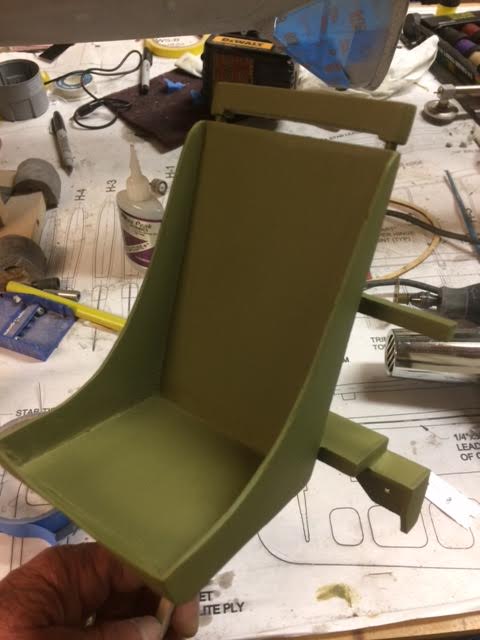
Constructed the pilot seat last night. Basically built straight from Jerry's plans. All balsa and the two brass tubes


-complete with Luftwaffe pilot lol!
-complete with Luftwaffe pilot lol!
Last edited by propwashed; 12-04-2016 at 07:23 PM.
12-05-2016, 08:49 AM
#195
Like he said.
I finally got a break from the Vette work to put in time on the B model. I have all but the left flap framed up, got a lot of sanding to do. After I installed the 2 left wing spars they developed a warp to the rear. I had to soak everything in ammonia and jig it straight, then let it dry for a couple of days. It seems to have worked so I installed all of the left wing parts except the LE balsa, wing tips, and sheeting. I will let it set a few days to see if the warp comes back but with the framing in place the wing structure seems to be stable. It is hard keeping up with all of the balsa washout tabs. They keep breaking off and getting glued back on. I will be glad when I can sheet it so I can remove the tabs for good. The balsa is so soft I had to reinforce some tabs.
I finally got a break from the Vette work to put in time on the B model. I have all but the left flap framed up, got a lot of sanding to do. After I installed the 2 left wing spars they developed a warp to the rear. I had to soak everything in ammonia and jig it straight, then let it dry for a couple of days. It seems to have worked so I installed all of the left wing parts except the LE balsa, wing tips, and sheeting. I will let it set a few days to see if the warp comes back but with the framing in place the wing structure seems to be stable. It is hard keeping up with all of the balsa washout tabs. They keep breaking off and getting glued back on. I will be glad when I can sheet it so I can remove the tabs for good. The balsa is so soft I had to reinforce some tabs.
12-06-2016, 12:38 AM
#200
I am installing the Robart pin hinges and hinge sockets. The sockets make the control surfaces removable for repairs and also reinforce the pins, making a very rigid and friction free hinge. The hinging methods I use I developed over considerable time and experience. Giant scale planes don't tolerate loose, sloppy, hinges or servo linkages very well, and binding or out of alignment hinges will cause servo battery problems as well.
I have already added the wood reinforcement blocks inside the structures to carry the hinge sockets. In the case of the ailerons, the thin structure doesn't allow hinge pockets so I will glue the pins into the ailerons after I am sure the alignment is correct. I have a drilling jig for these hinge points that properly centers the drilled holes.
I will have to cut back on the time I spend on the P-51 this week to work on an electrical issue the Vette has with its battery wiring and cables, although the rainy weather that moved in overnight may change that. I don't have a garage for the cars, the Vette has its own car cover for protection from bird s**t and rain but that limits work on it to fair weather. I can't complain about rain, its the first measurable amount we have had in 5-6 months. The lawn is in bad shape. My grass usually grows through the winter but not this year. Might be due to the mythical global warming the pres-elect says never happened. Last year we didn't have a single grass-killing freeze and that may happen this year as well. Flying opportunities are more numerous though. I have three giant scale planes flight ready this year, never happened before.