#1

Hot Rod Todd , 01-03-2017 08:55 AM

 Today
TodayI thought provide some information on my newest model, a 1/4 scale (96") Lavochkin LA-7. Chad at Taildragger RC had some good deals that I couldn't resist, so I thought I'd take a chance on this large ARF. I won't get too detailed in the build, but I'll show some things I found and steps I take to improve the model.
Initial impressions are that it comes packed well, and arrived with no damage. The is two parts that bolt together allowing it to be shipped in multiple smaller boxes. The fuse is typical of many Chinese made ARF's, and seems to be decent quality. The fiberglass is thicker than some, and the glue joints seem well done. It has a large hatch that removes from the top which includes the canopy/cockpit, and two piece wings with a wing tube. The wings and tail surfaces are painted fabric. I'd like it if they were glassed, but I thought I'd leave them thinking I could always glass them in a future season if I want to. Hinges are scale type and use 1/8" hinge points (replaceable with robart). WIngs and tail surfaces seemed to fit very well.
Here's a photo of the plane on my pool table.

The fuse is large, and the cowl has plenty of room for the engine I'll be using, a DLE-120cc twin.

Some things I didn't like. The tailwheel they provide is not scale at all, using springs hooked to the rudder like a giant extra. I'll be installing a retractable tailwheel from Century Jet retracts. Because the Anderson La-7 is the same exact size, many of the accessories designed for it should fit.
The plane is not very scale with many details missing. The scoop at the bottom of the fuse, the gun blisters, and many other scale details are totally absent. The canopy has the typical ARF look, and is not very accurate. The included main gear seems OK, but I replaced the retract units with Robart 635RS mains. I'll try to use the struts. The wheels are only 4.5" diameter and look dinky on this plane (curse of the Chinese ARF). The main gear is not scale, and has a very poor angle that will make it difficult to get it forward enough to prevent nose-overs. I noticed in another thread that someone totally re-engineered the mains to correct this, I'll try to make it acceptable without gutting the wing.
Stay tuned for more info and a bunch of updated photos showing my progress.
Initial impressions are that it comes packed well, and arrived with no damage. The is two parts that bolt together allowing it to be shipped in multiple smaller boxes. The fuse is typical of many Chinese made ARF's, and seems to be decent quality. The fiberglass is thicker than some, and the glue joints seem well done. It has a large hatch that removes from the top which includes the canopy/cockpit, and two piece wings with a wing tube. The wings and tail surfaces are painted fabric. I'd like it if they were glassed, but I thought I'd leave them thinking I could always glass them in a future season if I want to. Hinges are scale type and use 1/8" hinge points (replaceable with robart). WIngs and tail surfaces seemed to fit very well.
Here's a photo of the plane on my pool table.
The fuse is large, and the cowl has plenty of room for the engine I'll be using, a DLE-120cc twin.
Some things I didn't like. The tailwheel they provide is not scale at all, using springs hooked to the rudder like a giant extra. I'll be installing a retractable tailwheel from Century Jet retracts. Because the Anderson La-7 is the same exact size, many of the accessories designed for it should fit.
The plane is not very scale with many details missing. The scoop at the bottom of the fuse, the gun blisters, and many other scale details are totally absent. The canopy has the typical ARF look, and is not very accurate. The included main gear seems OK, but I replaced the retract units with Robart 635RS mains. I'll try to use the struts. The wheels are only 4.5" diameter and look dinky on this plane (curse of the Chinese ARF). The main gear is not scale, and has a very poor angle that will make it difficult to get it forward enough to prevent nose-overs. I noticed in another thread that someone totally re-engineered the mains to correct this, I'll try to make it acceptable without gutting the wing.
Stay tuned for more info and a bunch of updated photos showing my progress.
#2
Hot Rod Todd , 01-04-2017 06:54 AM
One of the first things I addressed was the tail wheel. The Century Jet retractable pneumatic tail wheel for the Anderson LA-7 seemed like the best choice. I was able to do some minor mods to the rear bulkhead and get it attached. By putting the cables through at the right point, the servo will maintain tension on the cables and keep it centered as it raises. To accomplish this, I program the radio to center the tail wheel as soon as it goes up. I'll have to figure out a way to have separate rudder/tail wheel servos.
Here's a picture of the mount, looking into the tail.
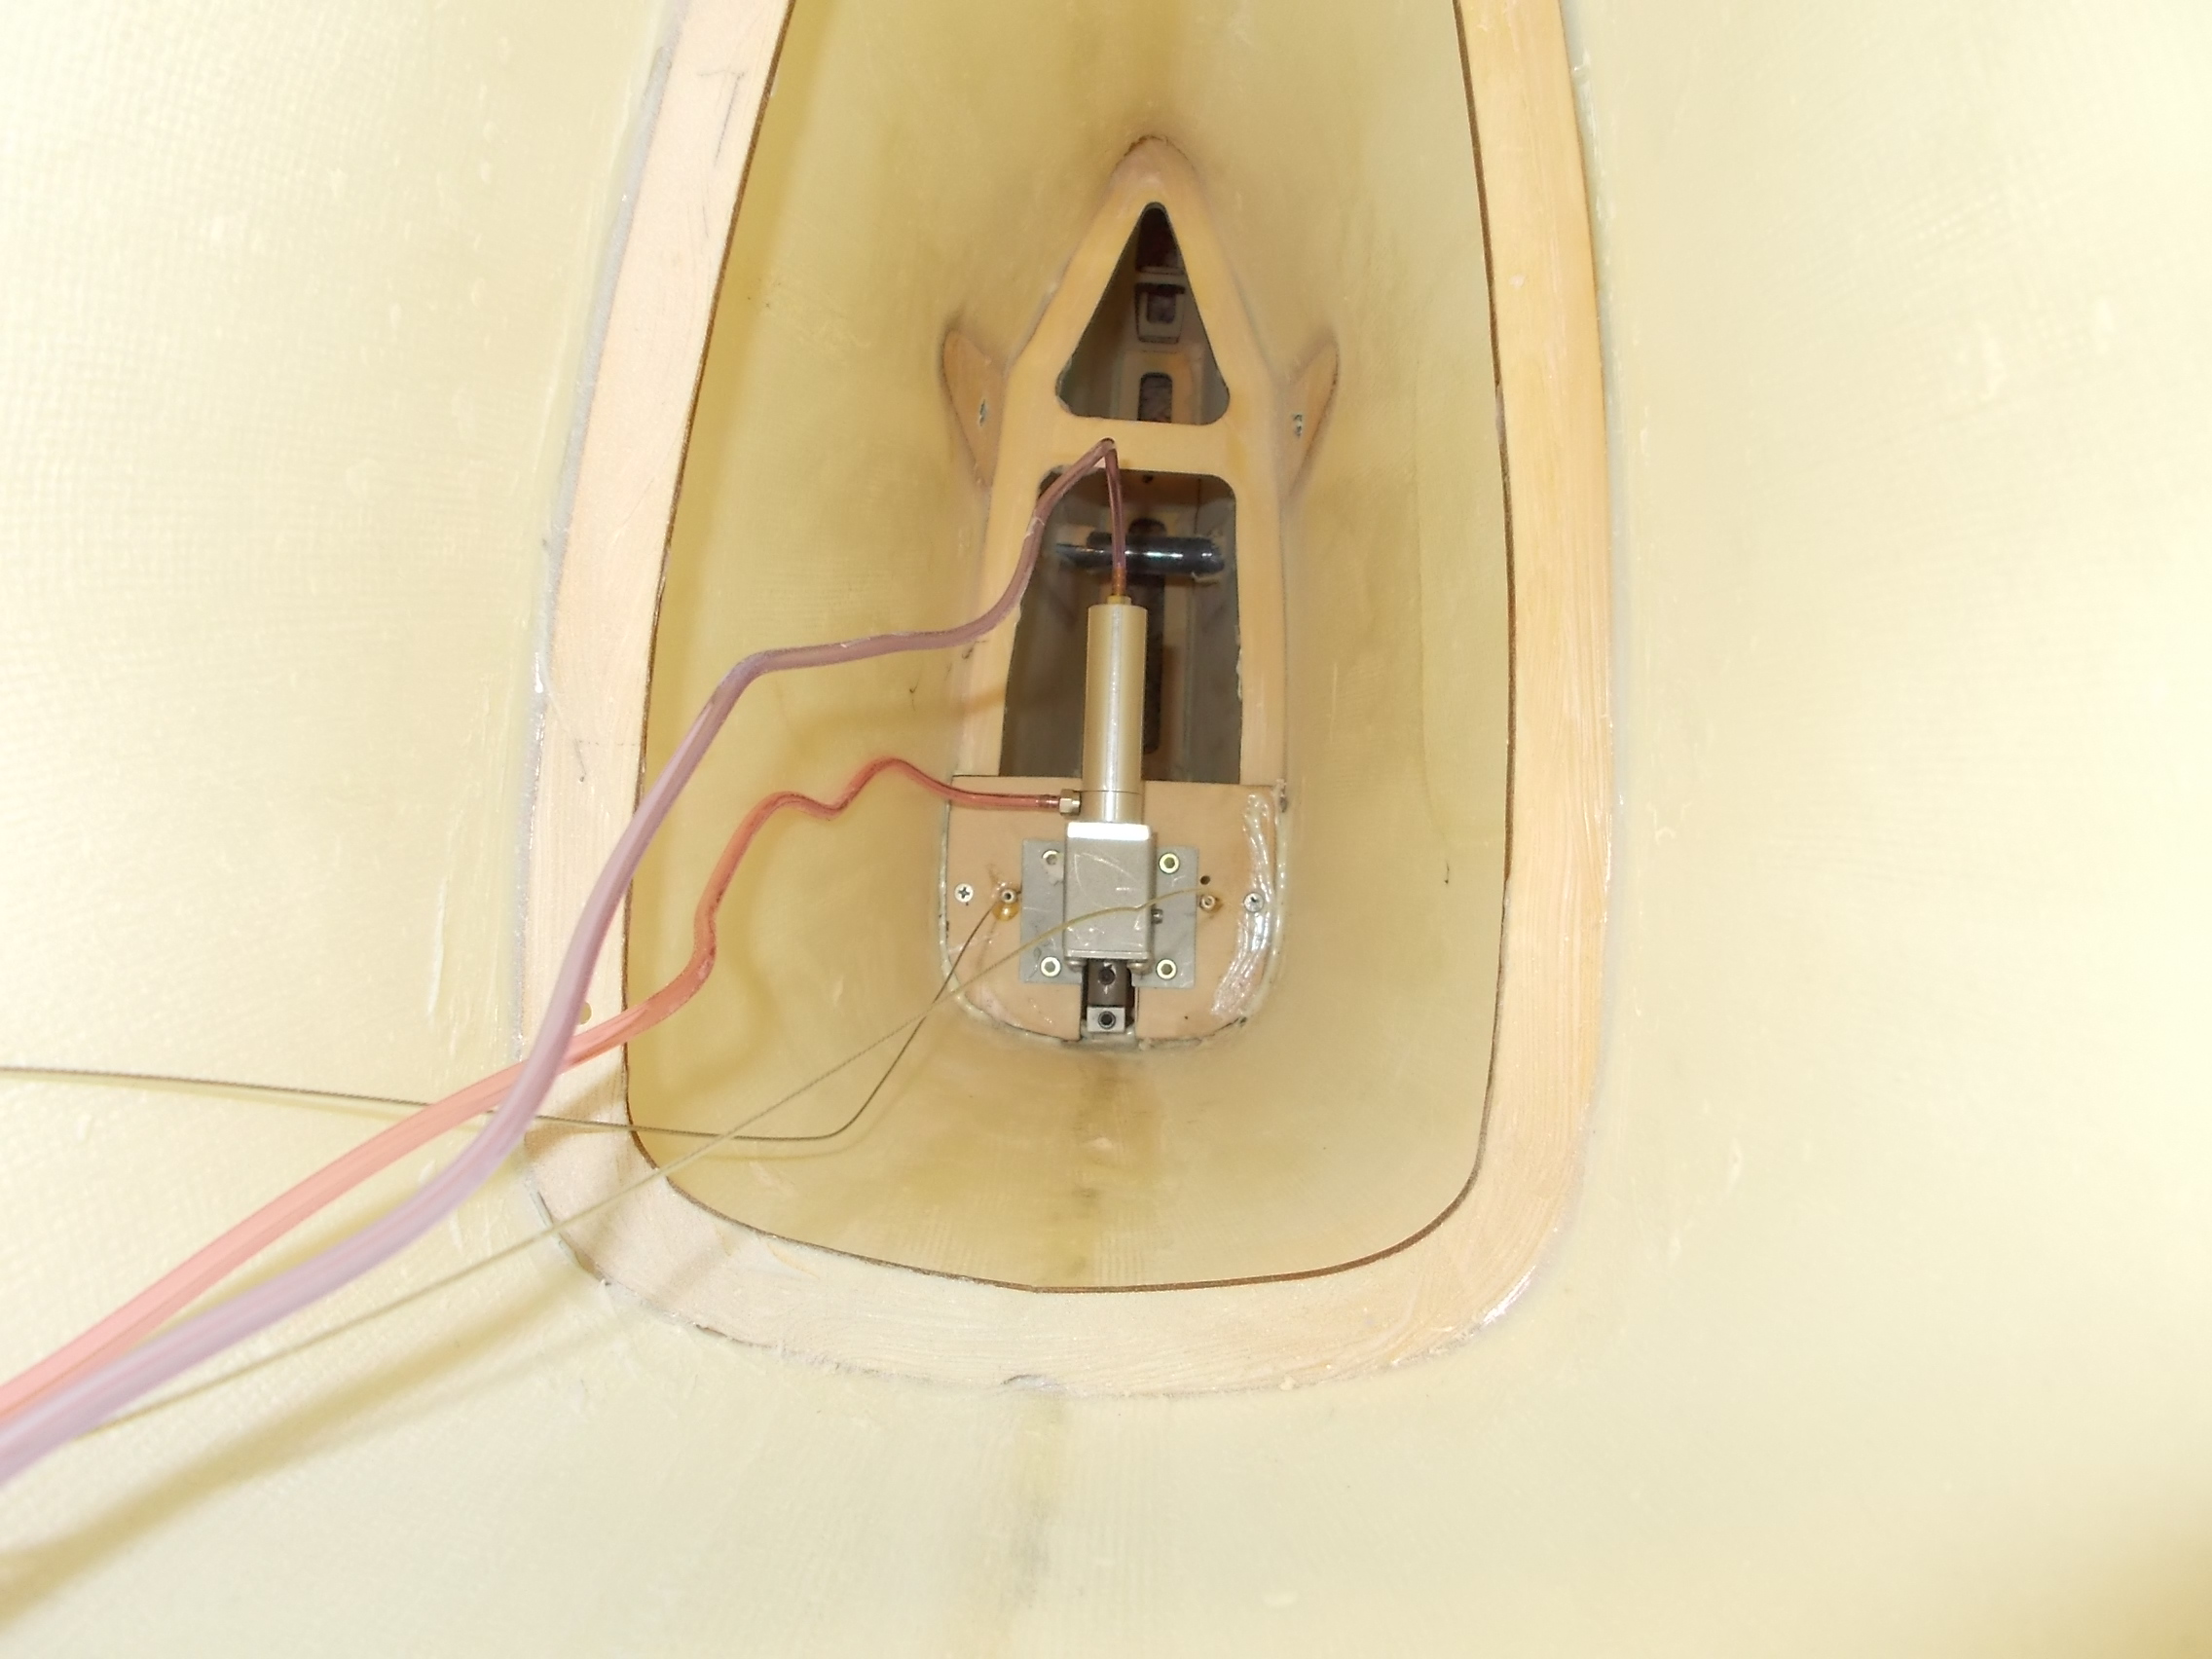
I decided not to put tail wheel doors on it, and made a rear cover. I found a can of Rustoleum paint that matches the light blue almost perfectly. It's called Satin finish Aqua, available at my local Wal-mart.

Even with a 2 3/4" wheel, it retracts into the tail completely.

Here's a picture of the mount, looking into the tail.
I decided not to put tail wheel doors on it, and made a rear cover. I found a can of Rustoleum paint that matches the light blue almost perfectly. It's called Satin finish Aqua, available at my local Wal-mart.
Even with a 2 3/4" wheel, it retracts into the tail completely.
#3
Hot Rod Todd , 01-04-2017 07:03 AM
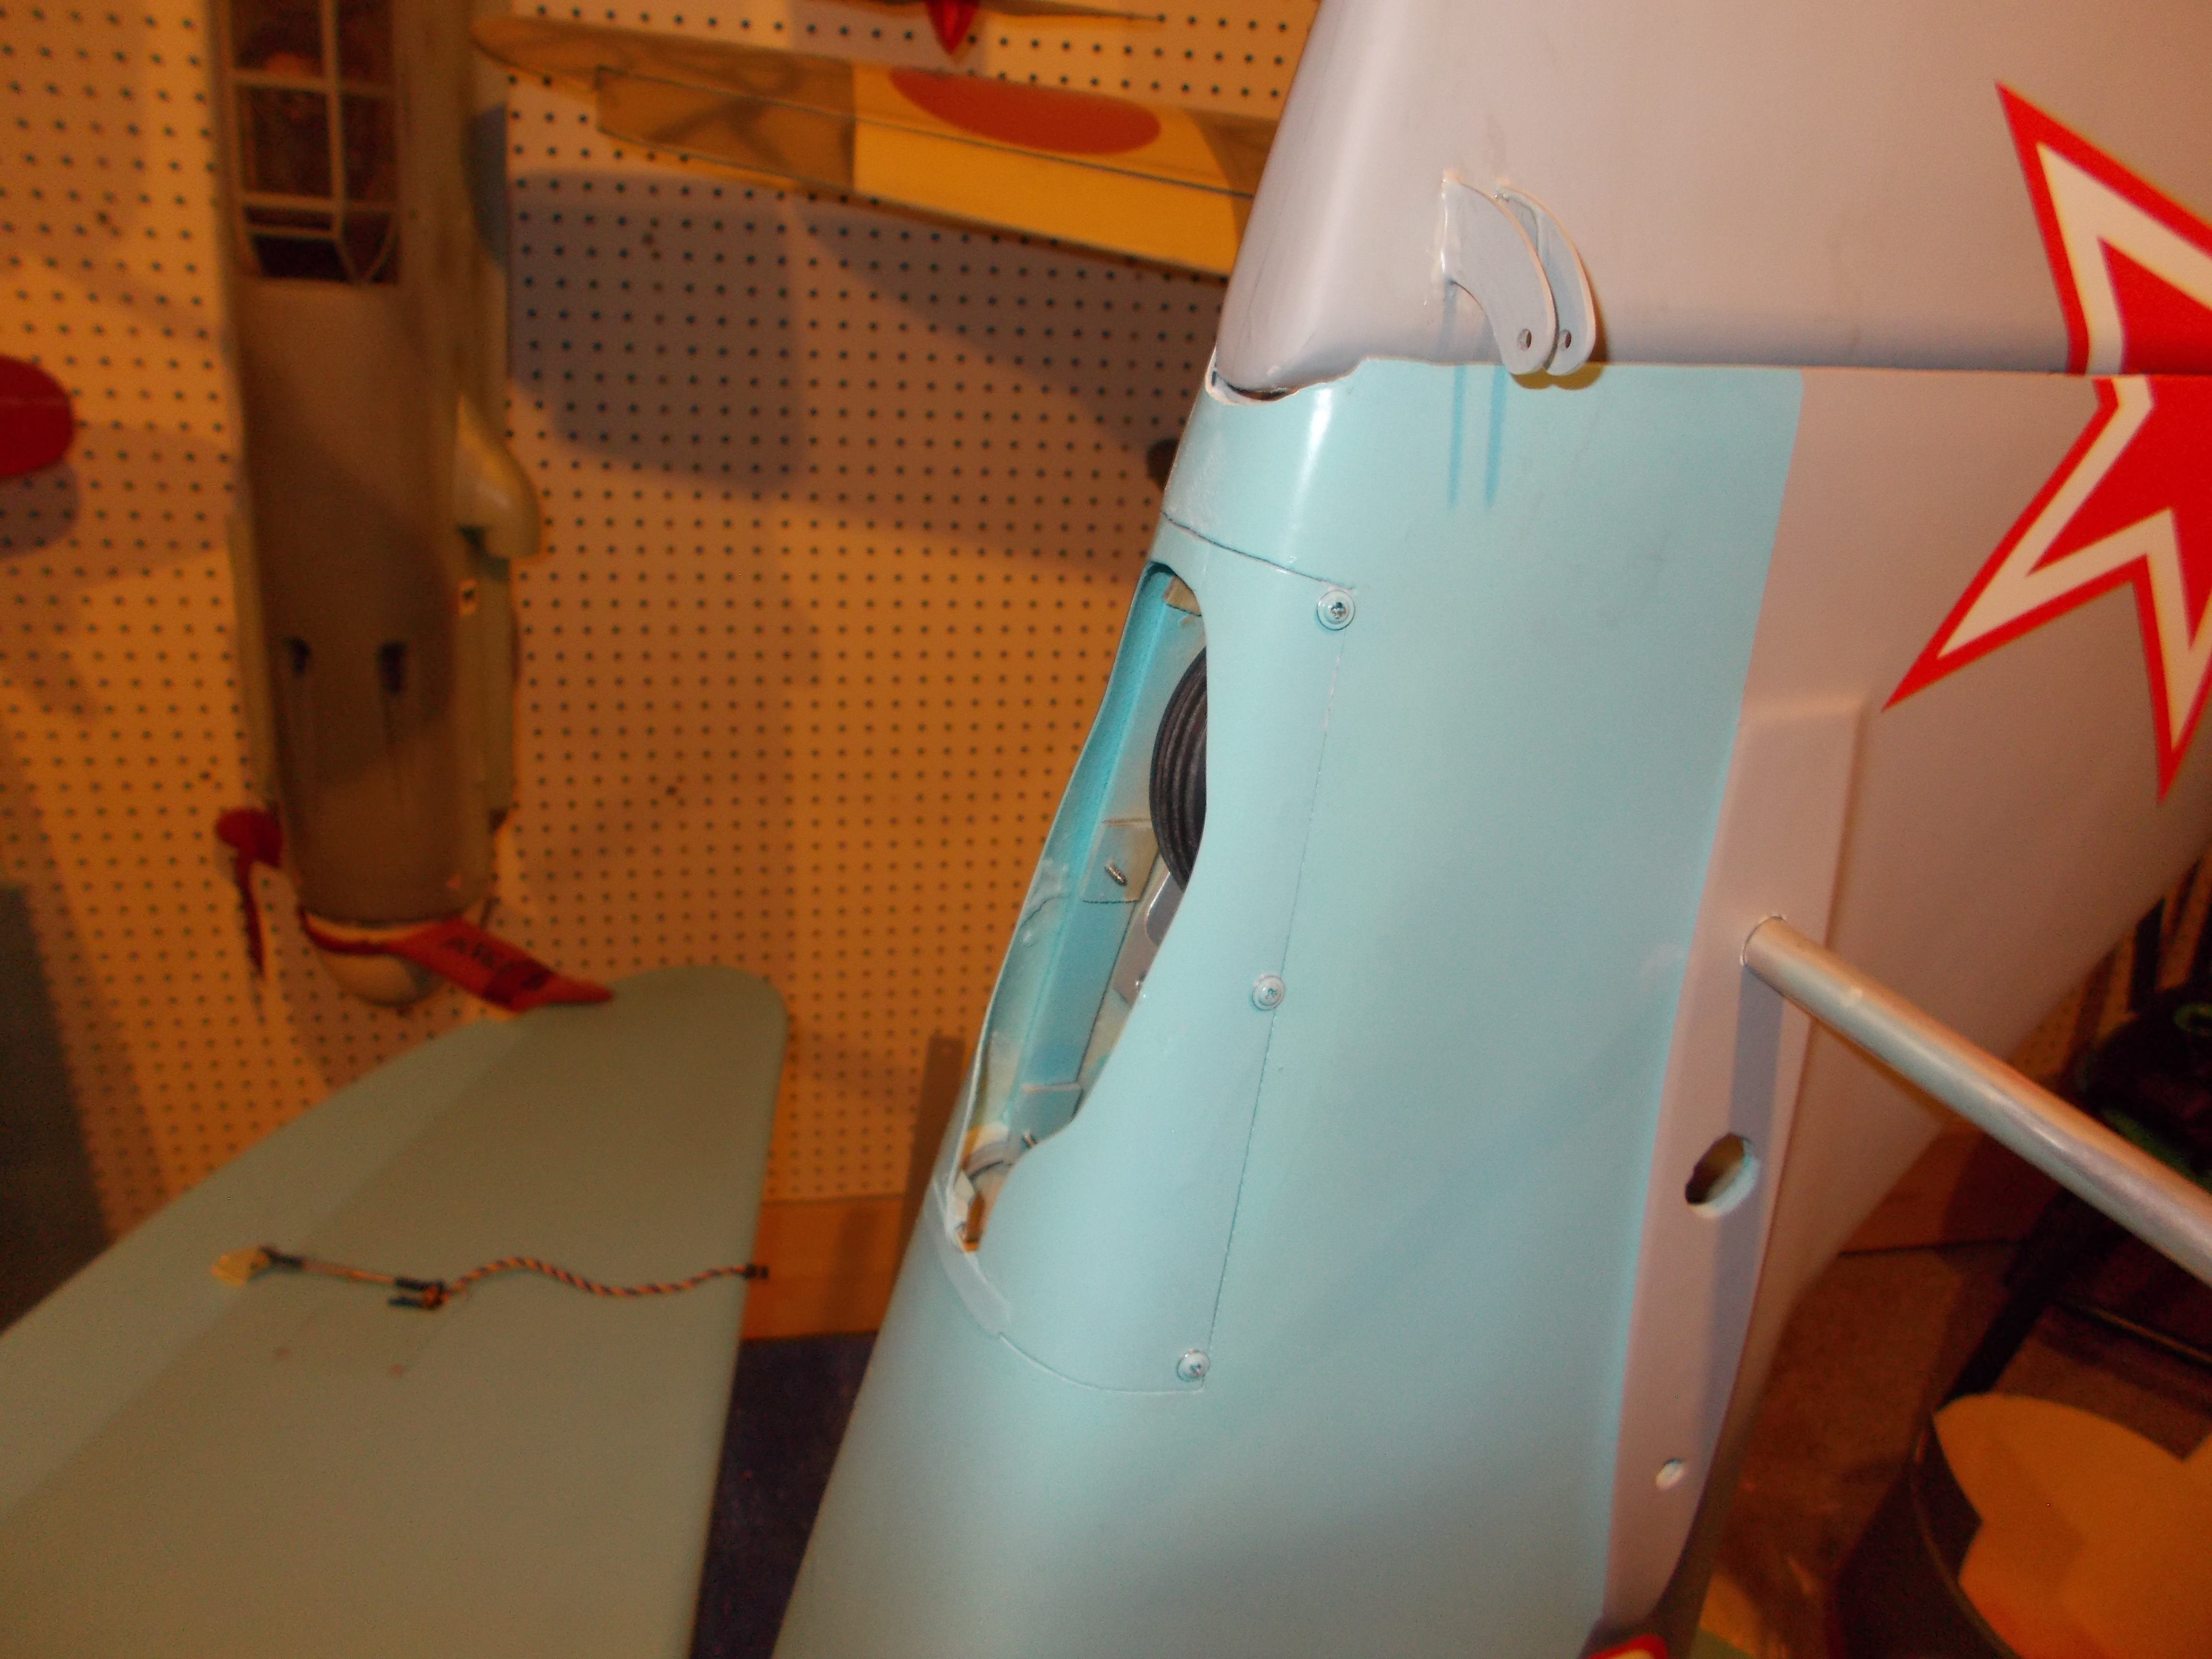
On to the main gear. I knew the little 4.5" wheels would not look good, so I found some 5.25" wheels from a friends stores. That's about as big as I could fit without major mods due to the angle the wheel has to have when in the well. (Scale size would be about 6.5", not possible without a major overhaul of the gear location).
With a little bit of grinding, the Robart 635RS mains dropped in. The stock struts had to be turned down just a touch to fit into the 1/2" strut ready gear. I made some wheel covers for the wheels to look a bit more scale.

I used some G10 fiberglass I had to make the strut covers. I decided to make the lower section attach to the axle, and was able to make it so it would slide up over the inner strut cover. I also enclosed the wheel well using some thin plastic sheet and balsa.


I noticed that the stock struts had a lot of play. The linkage had little pins and C-clips that were kind of loose. By using some 6-32 hardware I was able to replace the pins and tighten it up. I also modified the struts to accept 1/4" axles. The stock axles were tiny and I think they bent when I looked at them.

With a little bit of grinding, the Robart 635RS mains dropped in. The stock struts had to be turned down just a touch to fit into the 1/2" strut ready gear. I made some wheel covers for the wheels to look a bit more scale.
I used some G10 fiberglass I had to make the strut covers. I decided to make the lower section attach to the axle, and was able to make it so it would slide up over the inner strut cover. I also enclosed the wheel well using some thin plastic sheet and balsa.
I noticed that the stock struts had a lot of play. The linkage had little pins and C-clips that were kind of loose. By using some 6-32 hardware I was able to replace the pins and tighten it up. I also modified the struts to accept 1/4" axles. The stock axles were tiny and I think they bent when I looked at them.
#4
Hot Rod Todd , 01-04-2017 07:12 AM
The stock servo linkage is nice, and I decided to use it. I also had some aluminum horns to attach to the Hitec HS-5685MH servos I'm using. The fiberglass clevises provided are also nice, much like many jets use. Servos attach to the hatches, and the mounts seem plenty sturdy.

I replaced the stock hinges for Robart hinge points. One of the surfaces the holes were drilled a bit off (angle), so I had to enlarge the holes and use extra glue to make sure they moved properly. Other than that I'm happy about the way the surfaces went together. I did a bit of scale work to make the tail surfaces look like fabric, adding tape and some glue to get the right affect. Also added a light to the rudder (using a plastic bead).

I replaced the stock hinges for Robart hinge points. One of the surfaces the holes were drilled a bit off (angle), so I had to enlarge the holes and use extra glue to make sure they moved properly. Other than that I'm happy about the way the surfaces went together. I did a bit of scale work to make the tail surfaces look like fabric, adding tape and some glue to get the right affect. Also added a light to the rudder (using a plastic bead).
#5
Hot Rod Todd , 01-04-2017 07:24 AM
Since I know for certain I'll need some nose weight, I used some hardwood to strengthen the engine box. Aluminum angle was provide to strengthen the mount, but I replaced it with steel (adding about 1 lb). Attached the angle using goop, and hardware with blind nuts.

Brass weights will also be added to both sides of the box, also attached with goop and screws with blind nuts. Most likely even more weight will be needed once I get to the balancing process.

The DLE-120 will fit into the 12" diameter cowl without issue. I had to create some short stand-offs. Since I needed weight anyway, I used a stack of four washers. Here's a photo of the engine sitting in position (not attached).

The front hole in the cowl was too small, so I enlarged it a bit. I also added some pieces to the back to strengthen the flaps (exhaust on the real plane, cooling outlet on the model). I used some G10 and epoxy to attach them.

Here's a photo of the outlets. I added some aluminum tape for scale. It's a bit off from the real thing, but should provide enough air outlet for the DLE-120 cooling. I'll make a baffle on the inlet later that will look like the stock vanes.
Brass weights will also be added to both sides of the box, also attached with goop and screws with blind nuts. Most likely even more weight will be needed once I get to the balancing process.
The DLE-120 will fit into the 12" diameter cowl without issue. I had to create some short stand-offs. Since I needed weight anyway, I used a stack of four washers. Here's a photo of the engine sitting in position (not attached).
The front hole in the cowl was too small, so I enlarged it a bit. I also added some pieces to the back to strengthen the flaps (exhaust on the real plane, cooling outlet on the model). I used some G10 and epoxy to attach them.
Here's a photo of the outlets. I added some aluminum tape for scale. It's a bit off from the real thing, but should provide enough air outlet for the DLE-120 cooling. I'll make a baffle on the inlet later that will look like the stock vanes.
#6
Hot Rod Todd , 01-04-2017 07:31 AM
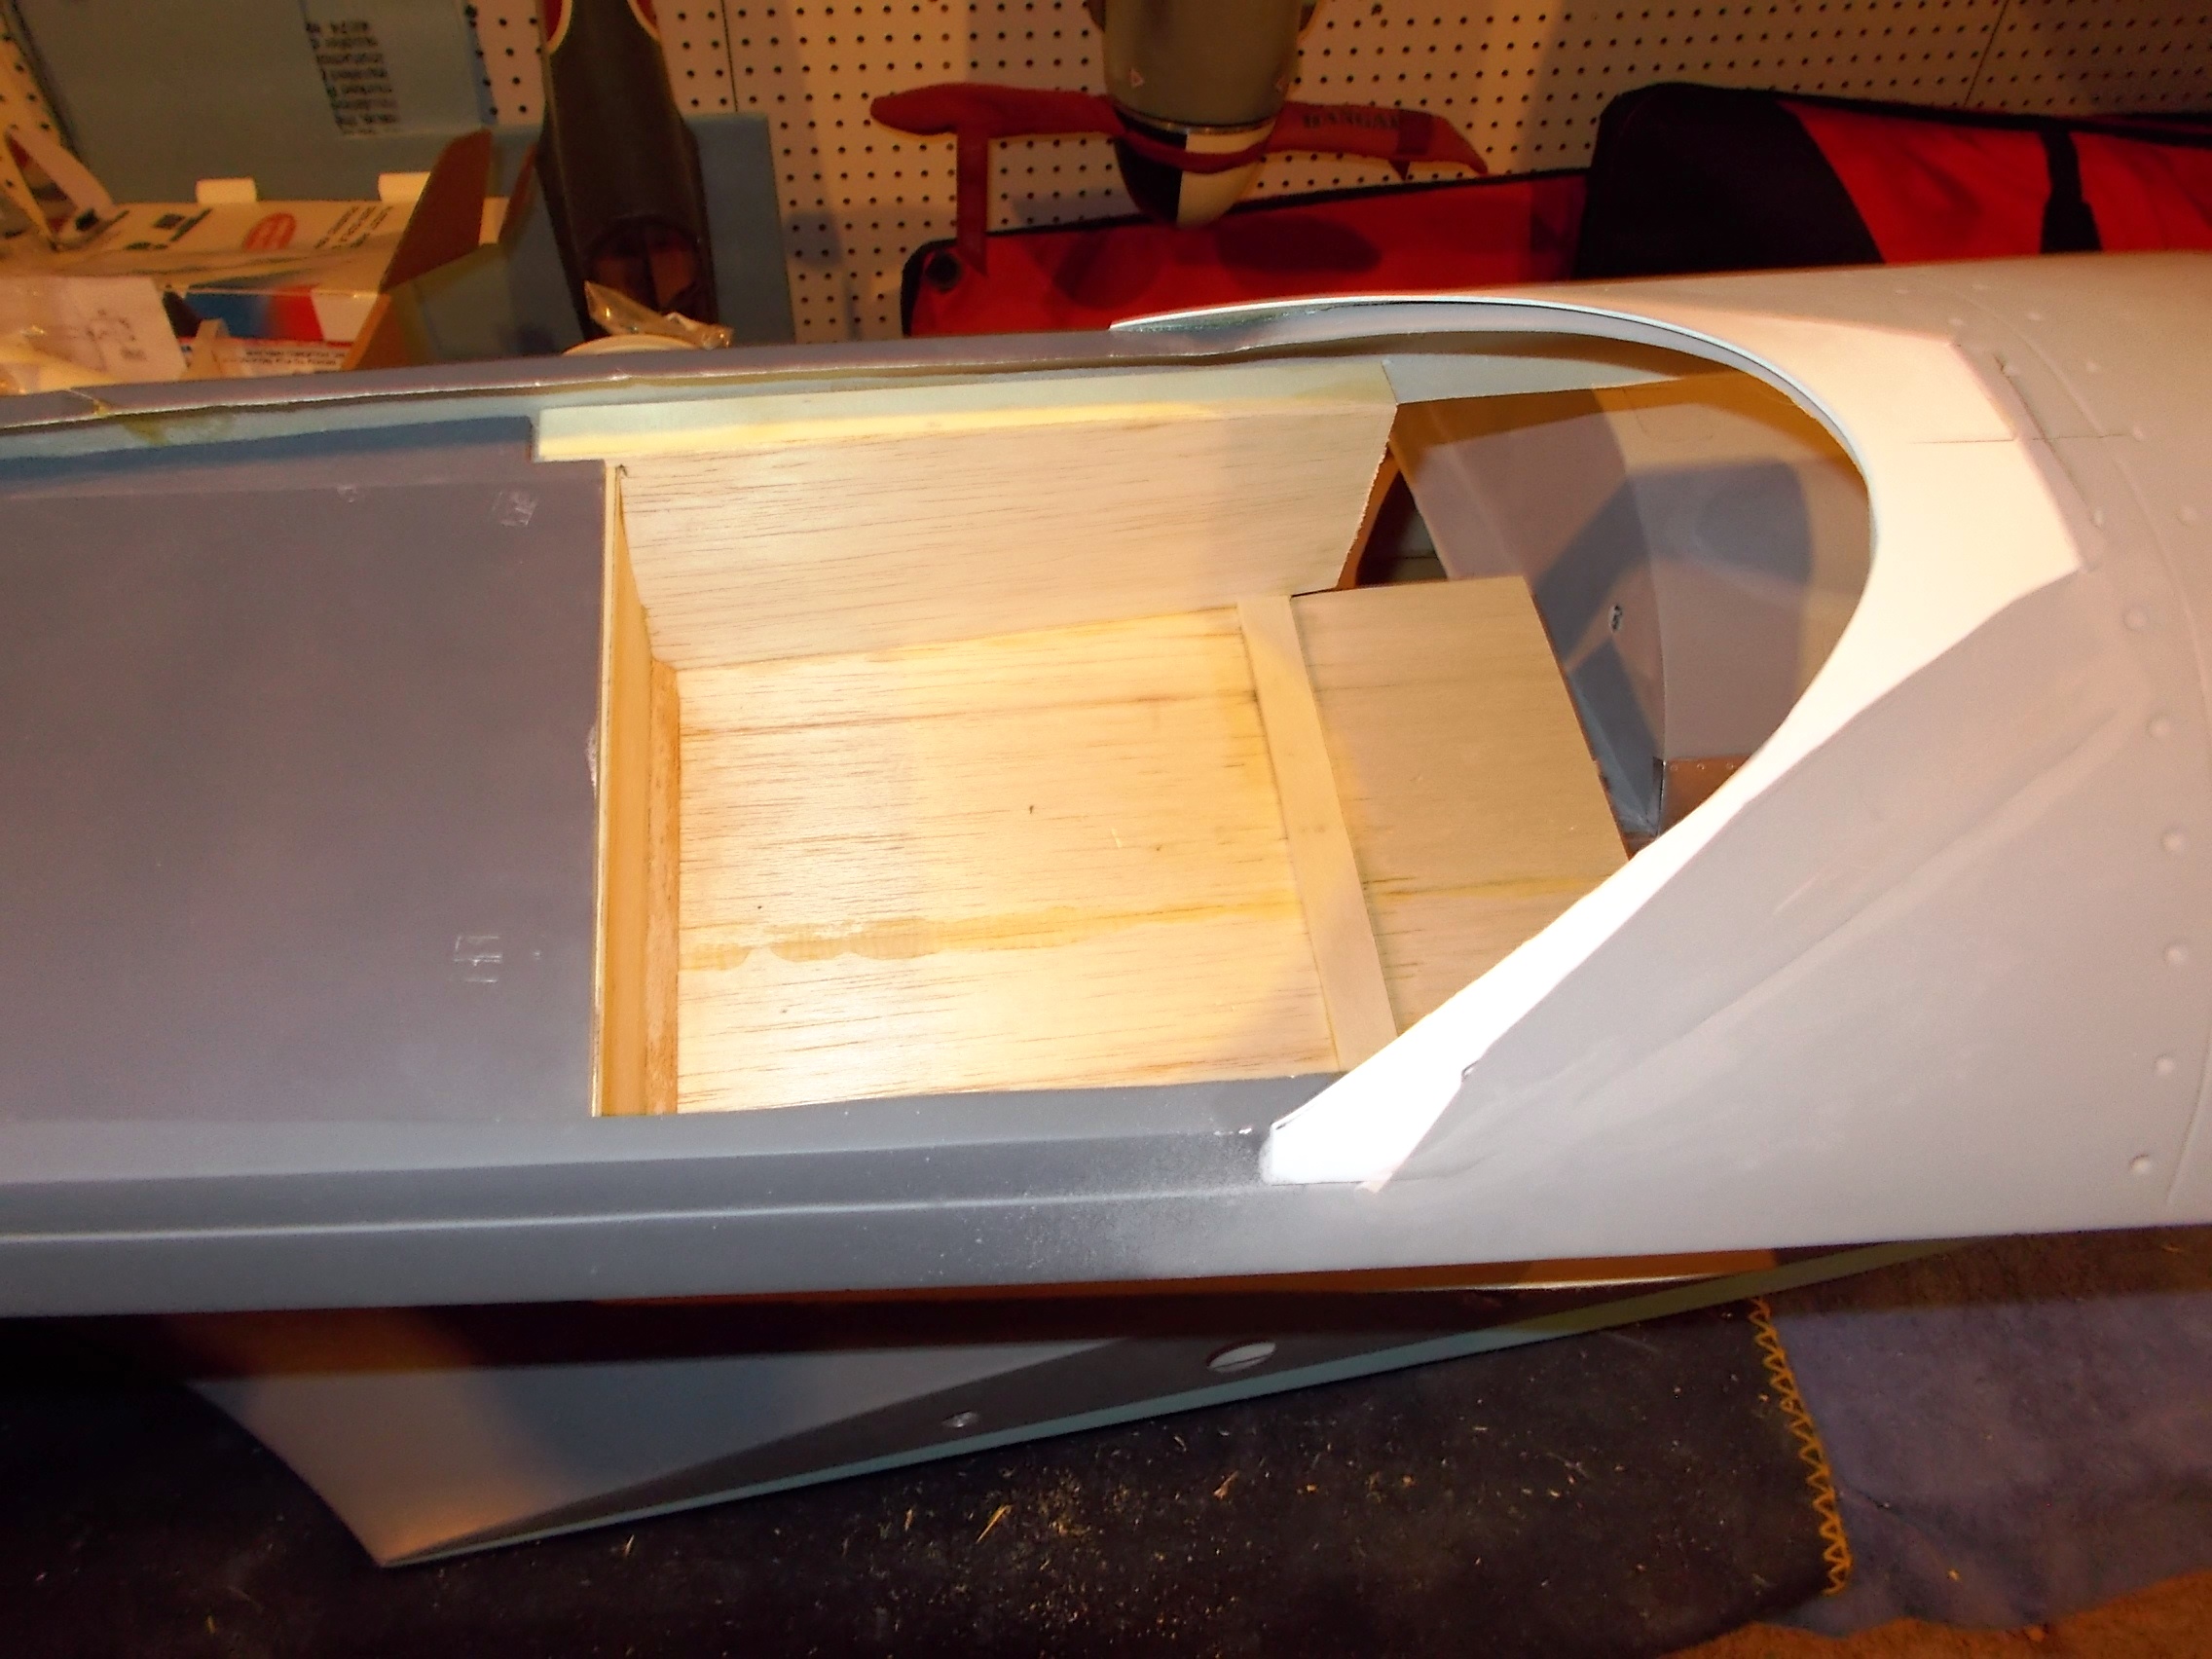
I received the belly scoop I ordered from VicRC.com. It looks the right size and shape, and should be plenty strong. I added a former so it could handle the wait of the fuse when laid on the ground. I'll attach and paint it later.

I also received a 15" pilot figure from Warbirdpilots.com. To make him look more "Russian" I took of the life jacket, changed the color of the helmet, and added some applets to his collar. I'll work on him more later when I install a cockpit. After some checking for size, I'll think he'll be close even though he's less than 1/4 scale.

I also received a 15" pilot figure from Warbirdpilots.com. To make him look more "Russian" I took of the life jacket, changed the color of the helmet, and added some applets to his collar. I'll work on him more later when I install a cockpit. After some checking for size, I'll think he'll be close even though he's less than 1/4 scale.
#8
Hello, very nice job.
i'm in France and i'm building the same plane with a Dle 111 for mine.
But with it, i can't put the stock muffler because of the engine box.
And canister seems to be too longer .
.
i need to "cut" the box

Have you got the same problem?
Regards
i'm in France and i'm building the same plane with a Dle 111 for mine.
But with it, i can't put the stock muffler because of the engine box.
And canister seems to be too longer
.i need to "cut" the box
Have you got the same problem?
Regards
#9
Hot Rod Todd , 01-09-2017 05:45 AM
I mounted a DLE-120 on mine, and I too had to do a bit of trimming on the engine box. Because I'll need nose weight anyway I added quite a bit of reinforcement to the firewall area to make up for any missing material.


#10
Hot Rod Todd , 01-09-2017 05:52 AM
I got some scale details completed. The blisters for the guns were made with 1/4" balsa, glued on with CA, then glassed. Some putty was added to give a smooth transition. Because of the hatch I had to put them quite a bit farther forward than would be correct. Notice one is a bit different shape than the other, just like on the real plane.

I made some gun outlets. I use aluminum tape to create the surrounding metal, and cut out the holes. Some tubing inside finished off the look
I needed a baffle for the engine cooling, so I decided to add the vanes that are used to control cooling on the LA-7. I used some aluminum tape once again to add the vanes. I also added a ring that will go behind the spinner to give the look of a deeper spinner (using a cool whip container). I didn't get it matched up perfectly, but it will work. Here's a picture of it with the spinner attached.
#11
Hot Rod Todd , 01-09-2017 05:57 AM
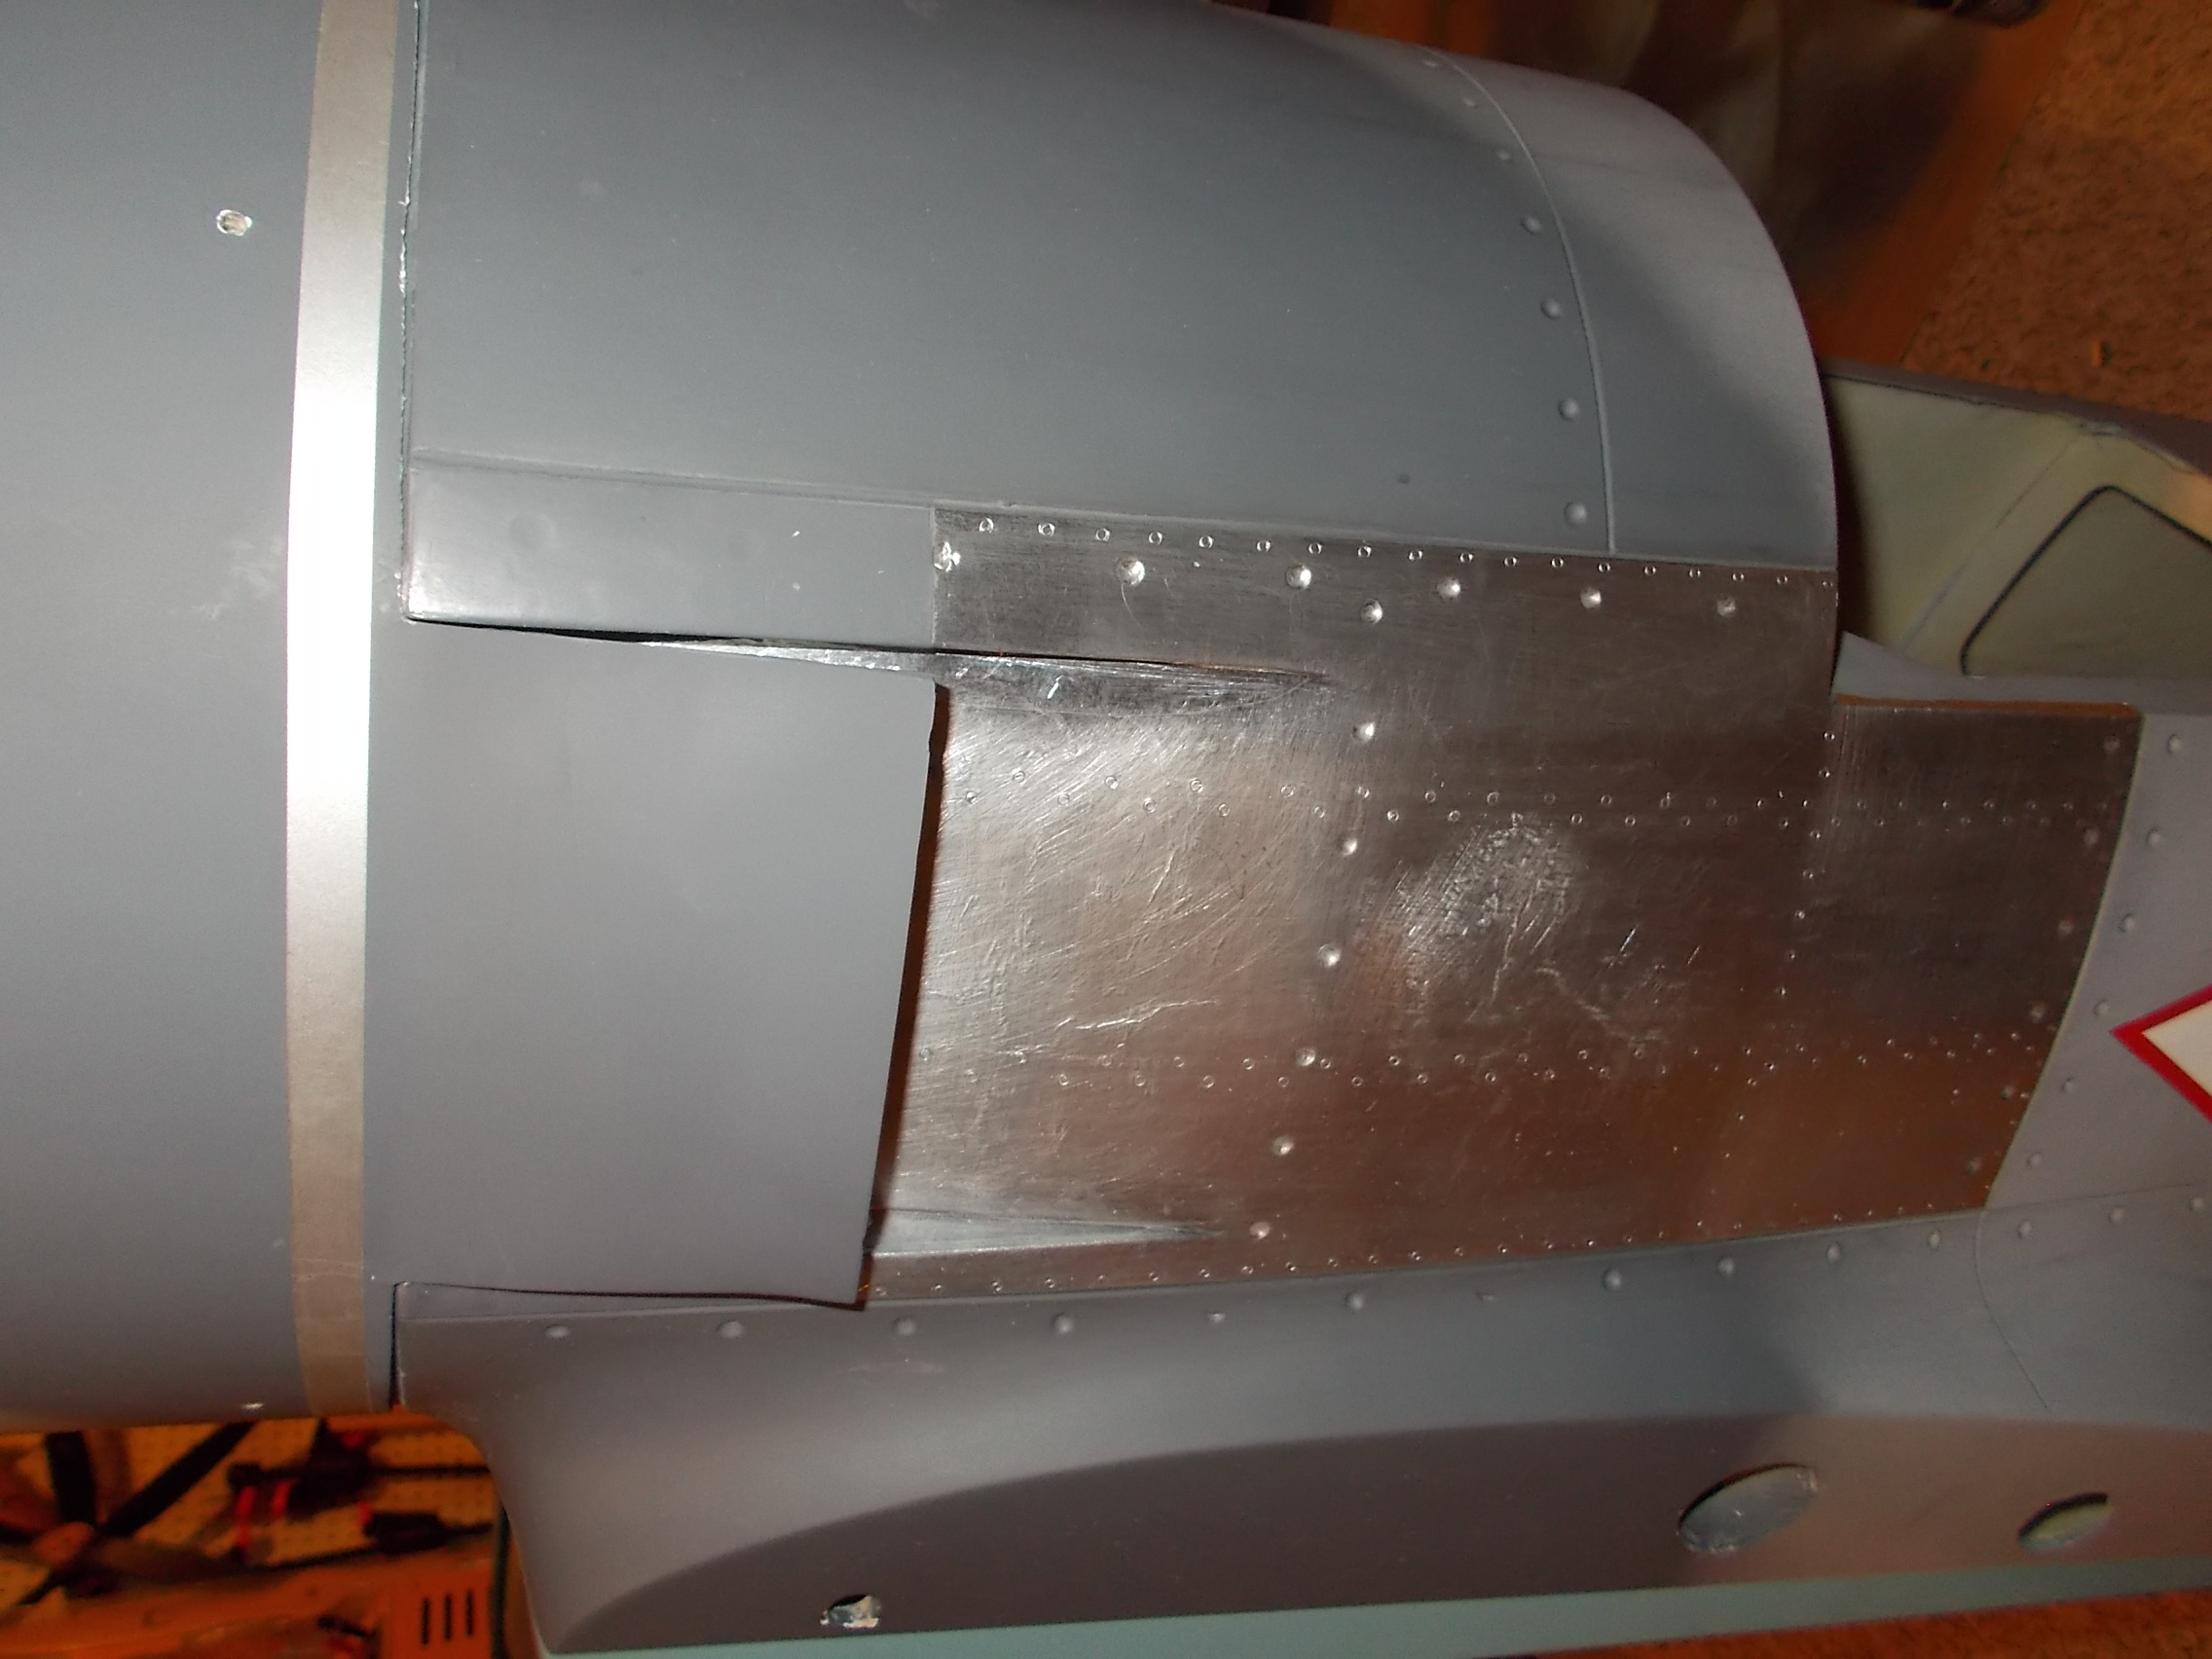
I mounted the oil cooler scoop using some screws and Zap glue. If it gets damaged I could remove it to repair or replace. Still have some painting to do, but here you can see the way it looks.

Once again I used some aluminum tape to create wing details like the leading edge wing slats and the seam on the wing. I'll paint them, and with a bit of weathering they'll look the part.

I used tape again and some small half-round plastic to make the hinges on top of the cowl and gun hood. They turned out fine as well, and add some needed detail to the plane to get rid of the "ARF" look. One of the last things I'll do is add the aluminum tape to the cowl mounting rings, since that will stay bare.

Once again I used some aluminum tape to create wing details like the leading edge wing slats and the seam on the wing. I'll paint them, and with a bit of weathering they'll look the part.
I used tape again and some small half-round plastic to make the hinges on top of the cowl and gun hood. They turned out fine as well, and add some needed detail to the plane to get rid of the "ARF" look. One of the last things I'll do is add the aluminum tape to the cowl mounting rings, since that will stay bare.
#12

taildragger21 , 01-09-2017 06:20 AM
Thats awesome todd.
Being winter is in full effect i think I may do some of these details to mine. It's still my favorite warbird to fly. Currently I am working on a cy miss america arf.
Being winter is in full effect i think I may do some of these details to mine. It's still my favorite warbird to fly. Currently I am working on a cy miss america arf.
#13
Really good job with the cowl's holes.
It's mt first warbird, and i would like to do simple for time (maybe after).
To rebuild the fire waal, i use a little "fiber" in the box (maybe too thin).
For the gaz servo, i put it in the anticipated location. But i 'm afraid by the muffler near it.


It's mt first warbird, and i would like to do simple for time (maybe after).
To rebuild the fire waal, i use a little "fiber" in the box (maybe too thin).
For the gaz servo, i put it in the anticipated location. But i 'm afraid by the muffler near it.
#14
Hot Rod Todd , 01-09-2017 07:29 AM
Most servo's can take heat pretty good, but to help minimize it I think I'll add a heat shield. I'll use some G10 fiberglass and cover it with a piece of aluminum tape to reflect some of the radiant heat from the muffler. I'll post photos when I get to that point. The muffler outlets should allow much of the heat to get out of the area. I would make sure you don't get too skimpy on the muffler holes in the cowl, and limit the inlet so you get plenty of airflow over the engine cooling fins. I didn't cut out much of the firewall, I figure I'll only make holes big enough for the tubing and wire to go through (most likely I'll have batteries on top of the box to help the nose weight).
#15
At the biginning, i cut the firewall to put canister. But i stay with the stock muffler finally.
I will add some aluminium corner in the box too (stronger and noise heavier)
maybe i will put the gaz servo into the box.
I will add some aluminium corner in the box too (stronger and noise heavier)
maybe i will put the gaz servo into the box.
#16
Hot Rod Todd , 01-10-2017 01:17 PM
Anyone who has one of these that keeps the stock paint scheme may want to get a shirt. www.warbirdshirts.com now has the LA-7 added to their long list of aircraft shirts. It's not on the website yet, but you can e-mail or call them. Ask for design #WB256
Here's the design.

Here's the design.
#17
Hot Rod Todd , 01-11-2017 05:42 AM
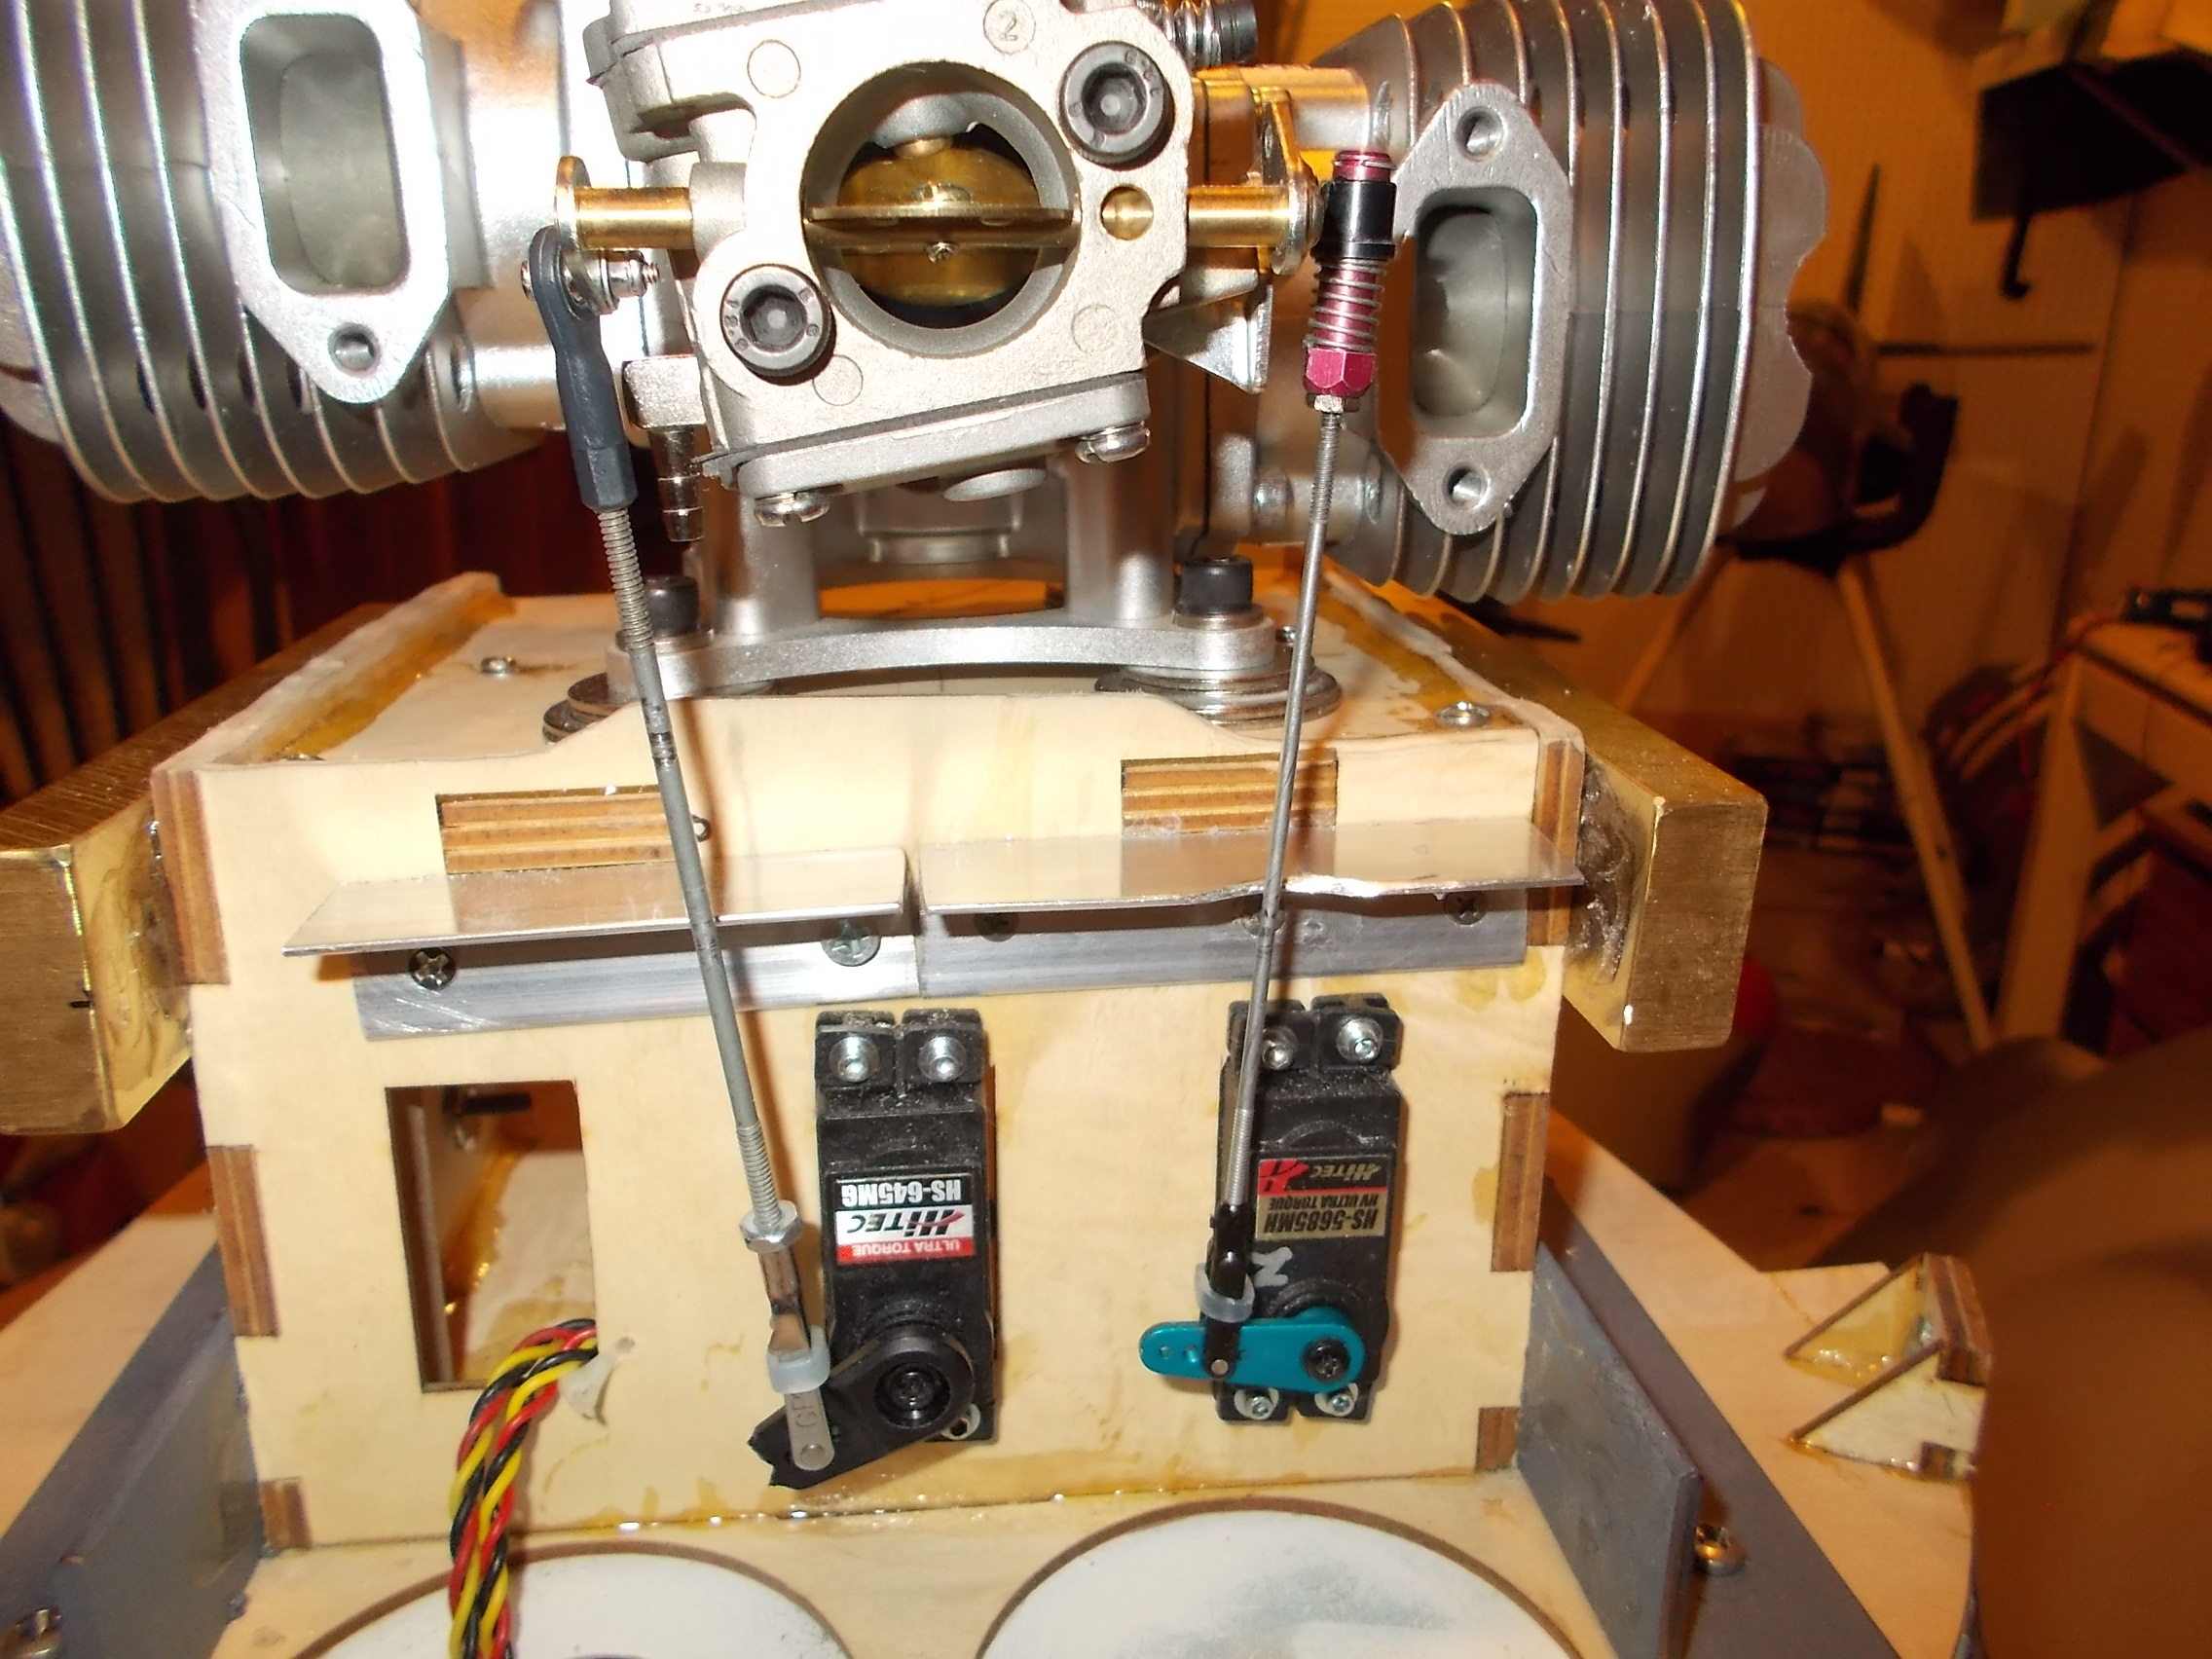
I'm mounting the choke and throttle servo on the box behind the engine. It gets some weight up front, and makes for a short and easy linkage. Because of the close proximity to the mufflers I thought it wise to add a heat shield. Because I'm not worried about adding nose weight, I used some aluminum angle, polished the side facing the muffler, and screwed and glued it to the box.

I added some scale trim tabs to the ailerons using thin fiberglass sheet. Here you can also see the tape I added to give a bit more scale detail.

I mounted the horizontal stabs to the fuse. Some machine screws and washers were provided. I drilled and tapped the aluminum rod to get a very tight fit. I had to do a bit of sanding to the fuse to get one of the stabs to fit flush, but in the end they fit well. I used a few dabs of silicone at the base of the stabs and some Loctite on the screws. There are threaded inserts in the stab that make this a more secure mounting than it first appeared. I'm happy with it, which is good since a failure here is death for the plane. If you mount the servos in the fuse you could also glue it together, but I decided to mount them in the stabs as shown for an easy installation.
I added some scale trim tabs to the ailerons using thin fiberglass sheet. Here you can also see the tape I added to give a bit more scale detail.
I mounted the horizontal stabs to the fuse. Some machine screws and washers were provided. I drilled and tapped the aluminum rod to get a very tight fit. I had to do a bit of sanding to the fuse to get one of the stabs to fit flush, but in the end they fit well. I used a few dabs of silicone at the base of the stabs and some Loctite on the screws. There are threaded inserts in the stab that make this a more secure mounting than it first appeared. I'm happy with it, which is good since a failure here is death for the plane. If you mount the servos in the fuse you could also glue it together, but I decided to mount them in the stabs as shown for an easy installation.
#18
Hot Rod Todd , 01-11-2017 05:45 AM
I decided that I would use the more scale canopy that I got from Larry at PCK. It was made for the Anderson LA-7, so it's not a perfect fit by any means. I had to fill in the front with some plastic. I'll be adding a bit of putty to the seam. The canopy will be a bit of work, and I haven't decided yet if I'd make it sliding, but most likely I will. Here's the hatch with the modification.

#19
Hot Rod Todd , 01-17-2017 12:10 PM
Spent quite a bit of time getting the canopy figured out. I should be able to make a sliding canopy without too much trouble. I decided to build a box for the cockpit. It will not be full depth, but with some creativity It should look the part.
I added the supercharger inlets on the leading edges of the wings. I cut out a shallow hole of the right shape, wicked a bunch of thin CA in, and painted it flat black. I have a little more detailing to do, but they turned out well.

Mounted the DLE-120 on the firewall, along with the brass weights. Hooked up the linkage for the choke and throttle servos. Notice the aluminum heat shield that should help prevent muffler heat from soaking into the servos. They'll be right behind the hole in the cowl for the exhaust, so it shouldn't be too hot.

I thought I'd make a latch so I could remove the hatch easily. This will allow me to mount many of the controls and switches inside. I purchased a strong metal hatch latch from Dreamworks jets and installed it. I added a bit of carbon fiber to the hatch hole to make sure it was strong. Should work, it's similar to what was on my TopRC Zero, and it worked fine.

I mounted the retract servo and valve on a board that will also double as a stop to hold the fuel tank in place. Here's a view up into the nose of the fuse showing the set-up. I have to keep the side areas clear so I can reach up into the front with the wing nut that holds on the wing (see the holes in the front of the wing mounts). You can also notice that I mounted a fuel dot in front of the right wing. Large air tank was strapped to the outer wing tube under the tray in the photo.

I added the supercharger inlets on the leading edges of the wings. I cut out a shallow hole of the right shape, wicked a bunch of thin CA in, and painted it flat black. I have a little more detailing to do, but they turned out well.
Mounted the DLE-120 on the firewall, along with the brass weights. Hooked up the linkage for the choke and throttle servos. Notice the aluminum heat shield that should help prevent muffler heat from soaking into the servos. They'll be right behind the hole in the cowl for the exhaust, so it shouldn't be too hot.
I thought I'd make a latch so I could remove the hatch easily. This will allow me to mount many of the controls and switches inside. I purchased a strong metal hatch latch from Dreamworks jets and installed it. I added a bit of carbon fiber to the hatch hole to make sure it was strong. Should work, it's similar to what was on my TopRC Zero, and it worked fine.
I mounted the retract servo and valve on a board that will also double as a stop to hold the fuel tank in place. Here's a view up into the nose of the fuse showing the set-up. I have to keep the side areas clear so I can reach up into the front with the wing nut that holds on the wing (see the holes in the front of the wing mounts). You can also notice that I mounted a fuel dot in front of the right wing. Large air tank was strapped to the outer wing tube under the tray in the photo.

#21
Hot Rod Todd , 02-01-2017 06:32 AM
I bolted on the tail, installed the pull-pull for the tailwheel and rudder, completed all of the servo wiring, installed the air system, and plumbed the fuel tank. I did a preliminary check of the CG, and I'm a bit back from the recommendation even without my cockpit detailing. I added a piece of angle iron onto the engine mounting bolts and bolted some lead to it. This added about another pound that hopefully will be enough after I add the cockpit detailing and pilot. Lots of progress, not many photos. I'll be moving on to the cockpit and canopy. Once that's done I'll be able to start the paint and detailing.


#22
Hot Rod Todd , 02-06-2017 06:57 AM
I got a dash and gunsight (available from iflytallies). All other details I had to make myself from scraps I had laying around. I made the cockpit shallow, so I painted the bottom black and modified the pilot to sit a bit flatter. The illusion is that the cockpit is full depth. This saves weight and makes it easier to get the hatch on and off. First I did the rear area. There were a couple of radio boxes in the rear area of the real LA-7.

I use aluminum tape to create the frame on the canopy. The back part of the canopy is made from the one that was supplied by the ARF. Add some details with a brass tube. I used balsa as much as I could, and some thin plastic. I made a armor glass for behind the pilot. The pilot is held in with some zip ties. He's a bit on the small side for quarter scale, but there's not many choices out there for large warbird pilots (he's 15" tall) Here's a good view of the gunsight and dash from the pilots view.
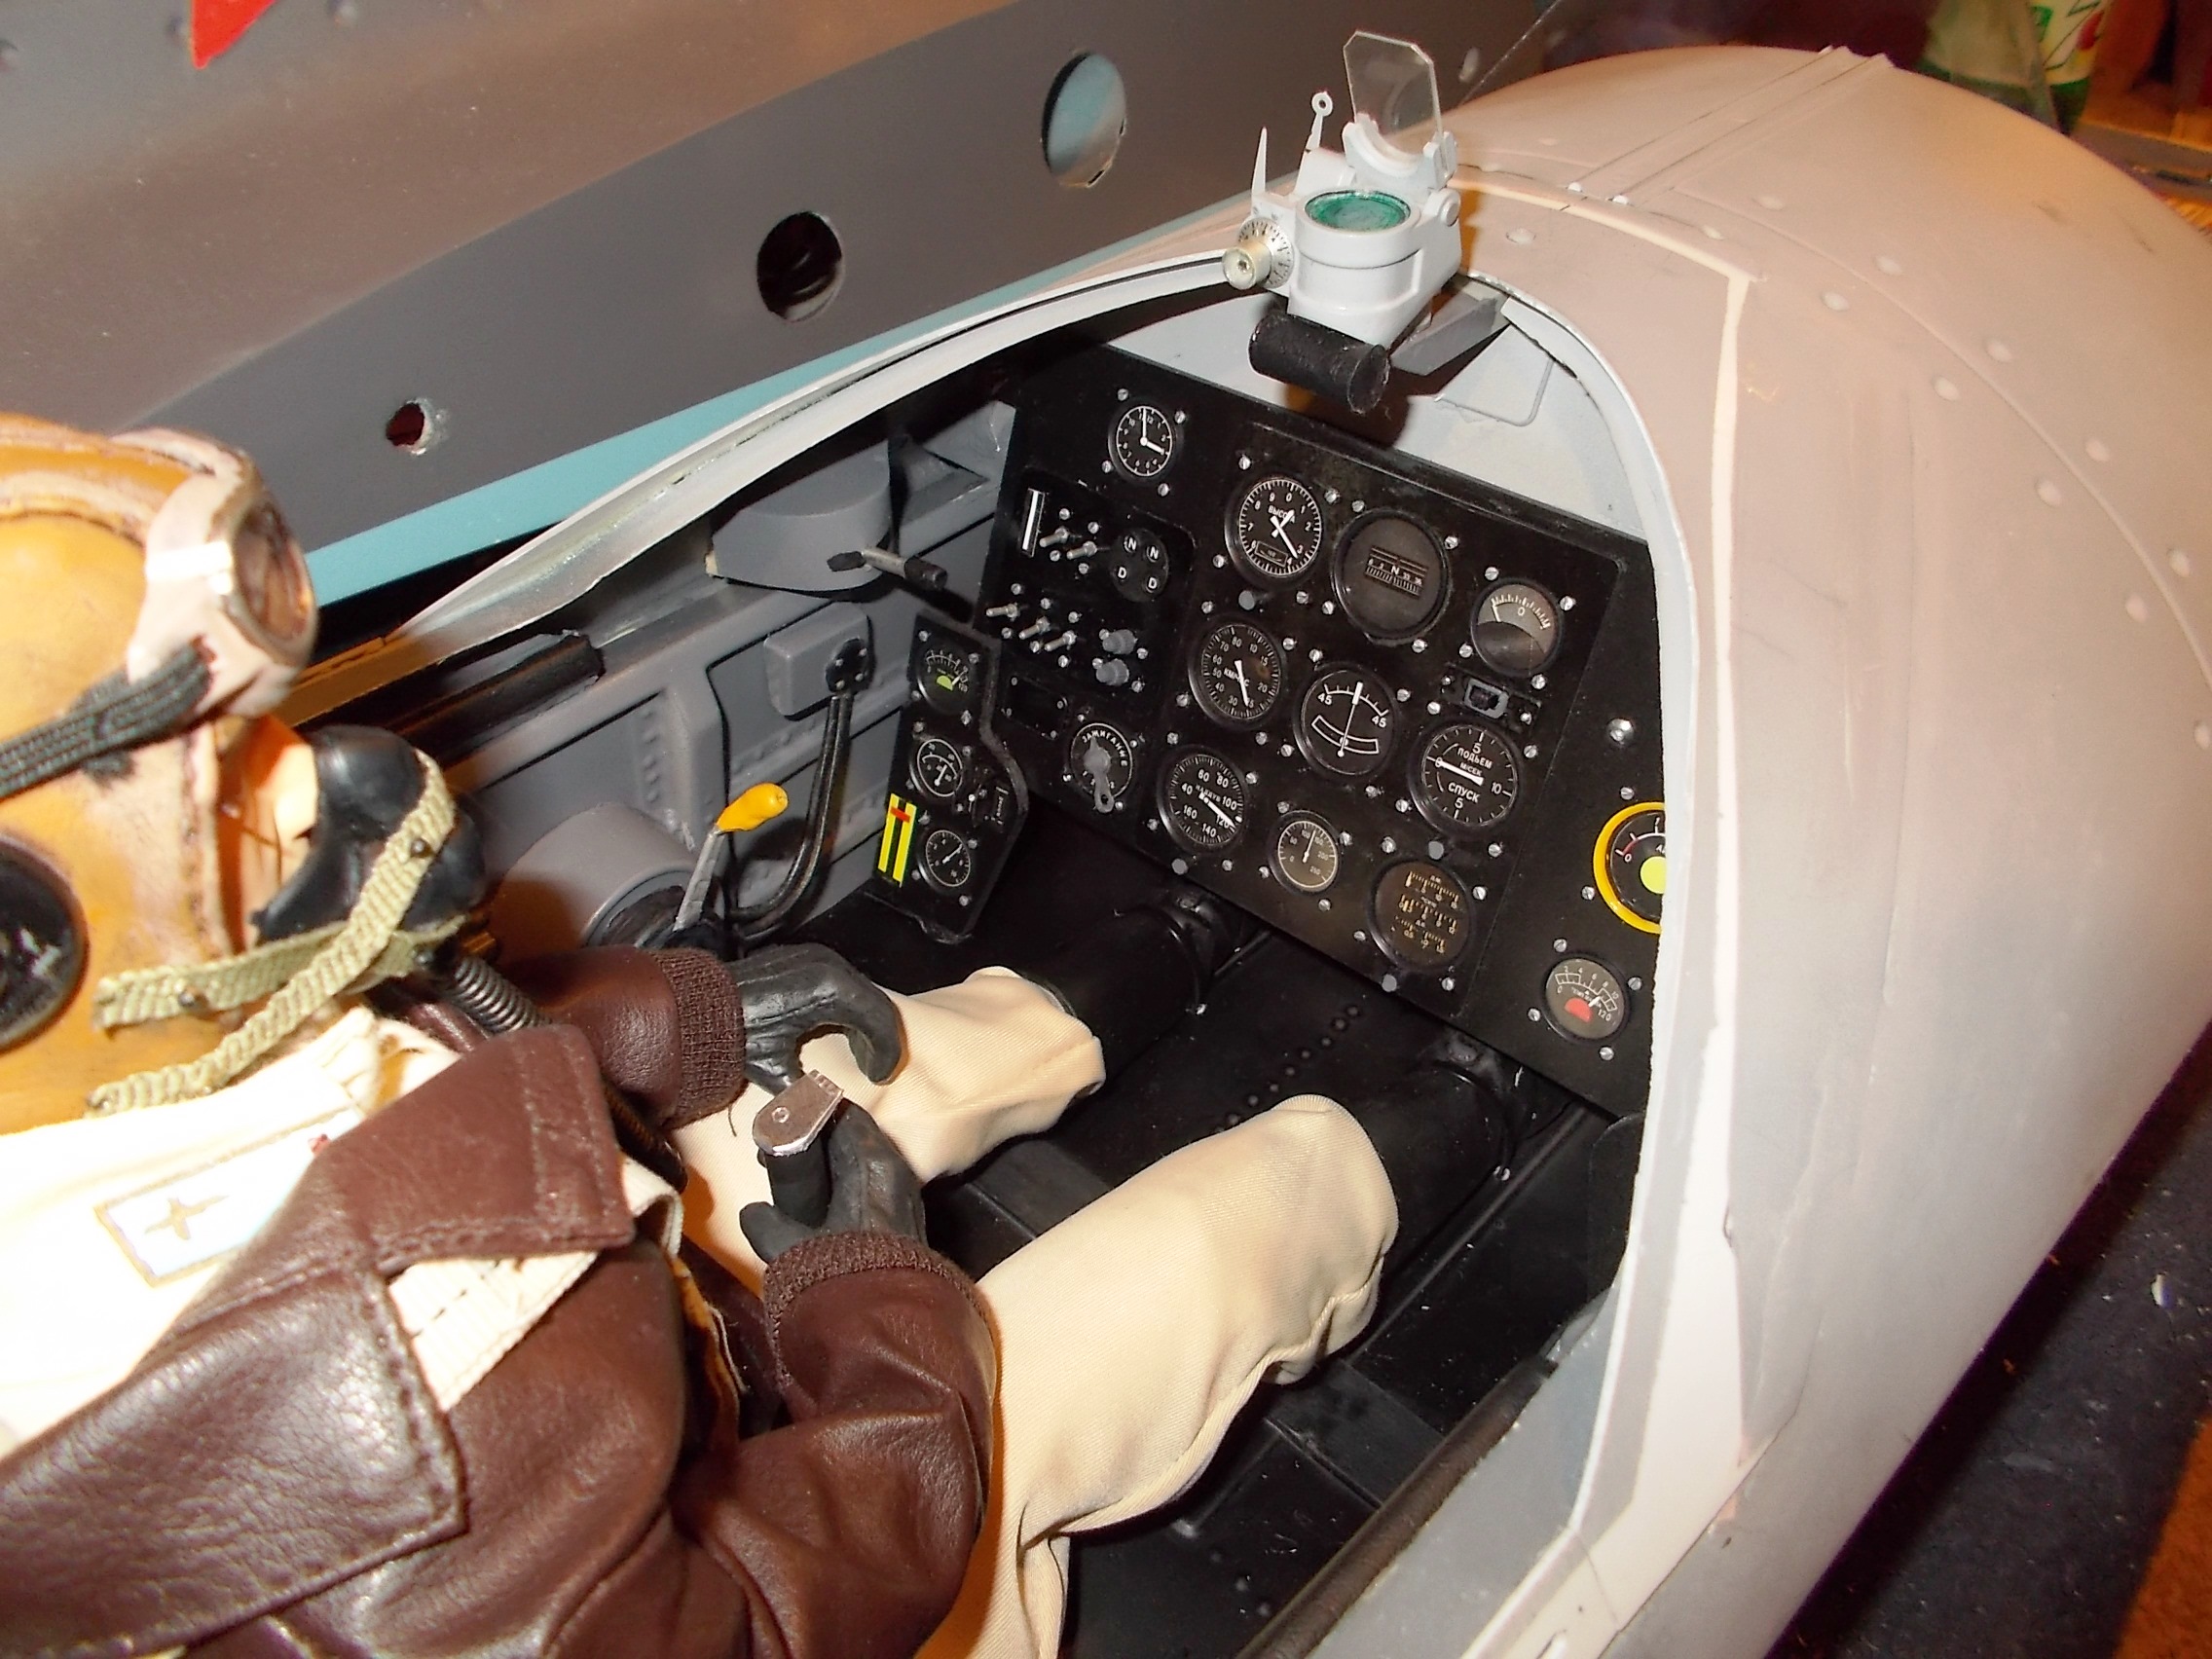
I created most of the cockpit details and mounted them onto the sidewalls prior to installing them. Most of the major controls are represented.


Prior to installing the cockpit, I had made sliding rails for the canopy to mount on. I used some plastic "H" beam from the hobby shop.

I mounted the canopy front and middle. These pieces were made for the Anderson LA-7, and look a lot more scale than the stock ARF canopy. I used Zap GOO to mount them, along with a couple of screws that locate the corners. Finish it off with the aluminum tape and some detailing with the brass tubing. Next I'll be masking off the cockpit to paint, and will start the painting, detailing, and weathering process.


I use aluminum tape to create the frame on the canopy. The back part of the canopy is made from the one that was supplied by the ARF. Add some details with a brass tube. I used balsa as much as I could, and some thin plastic. I made a armor glass for behind the pilot. The pilot is held in with some zip ties. He's a bit on the small side for quarter scale, but there's not many choices out there for large warbird pilots (he's 15" tall) Here's a good view of the gunsight and dash from the pilots view.
I created most of the cockpit details and mounted them onto the sidewalls prior to installing them. Most of the major controls are represented.
Prior to installing the cockpit, I had made sliding rails for the canopy to mount on. I used some plastic "H" beam from the hobby shop.
I mounted the canopy front and middle. These pieces were made for the Anderson LA-7, and look a lot more scale than the stock ARF canopy. I used Zap GOO to mount them, along with a couple of screws that locate the corners. Finish it off with the aluminum tape and some detailing with the brass tubing. Next I'll be masking off the cockpit to paint, and will start the painting, detailing, and weathering process.
#24
Looks great, Todd!
FYI, I've been recruited back to Iowa City.... so I'll hopefully get to see this fine specimen in person this summer!
All the best,
Noah
FYI, I've been recruited back to Iowa City.... so I'll hopefully get to see this fine specimen in person this summer!
All the best,
Noah
#25
Hot Rod Todd , 02-11-2017 07:11 AM
Great to hear you're back Noah, I'll look forward to seeing you on the midwest Warbird circuit.
Did the final detailing. Checked the balance and I'm right on what's recommended. All up weight comes in at 38lbs, which is not bad for a bird this size. Some small things to do, mount the right prop and balance the spinner, but it's pretty much ready to go. I have a spinner that's a bit more scale that I've been saving for a 3-blade prop. It doesn't feel like it will have nose over problems, so I might be able to do it. I'd hate to put a $140 carbon prop on a plane that noses over all the time. A big two blade on a 120 gasser could get very noisy.
Some of the final photos (sorry, too cold to take them outside so basement shots are the best I got for now).


Callie graphics provided the insignia for the cowl, as well us the Stars for the wings that didn't come on the ARF.


Pilot looks a bit small, but it's never easy to get 1/4 scale warbird pilots. Aluminum tape doubled up made convincing cowl rings.


Notice the "slats" on the wing leading edge. I used some aluminum tape and an airbrush to make them look more realistic.
That's about it, I'll post a maiden report, but here in Iowa that doesn't usually happen until May sometime. Most likely I'll get some better static shots outside once the weather is better.
I'll monitor the thread in case anyone has questions.
Did the final detailing. Checked the balance and I'm right on what's recommended. All up weight comes in at 38lbs, which is not bad for a bird this size. Some small things to do, mount the right prop and balance the spinner, but it's pretty much ready to go. I have a spinner that's a bit more scale that I've been saving for a 3-blade prop. It doesn't feel like it will have nose over problems, so I might be able to do it. I'd hate to put a $140 carbon prop on a plane that noses over all the time. A big two blade on a 120 gasser could get very noisy.
Some of the final photos (sorry, too cold to take them outside so basement shots are the best I got for now).
Callie graphics provided the insignia for the cowl, as well us the Stars for the wings that didn't come on the ARF.
Pilot looks a bit small, but it's never easy to get 1/4 scale warbird pilots. Aluminum tape doubled up made convincing cowl rings.
Notice the "slats" on the wing leading edge. I used some aluminum tape and an airbrush to make them look more realistic.
That's about it, I'll post a maiden report, but here in Iowa that doesn't usually happen until May sometime. Most likely I'll get some better static shots outside once the weather is better.
I'll monitor the thread in case anyone has questions.