


Meister 1/5th P-47 with Fiberglas fuselage, a rebirth of a build!
 01-25-2017, 05:07 AM
#1


I am getting back into building after a break. I keep coming back to the amazing P-47, I feel there is unfinished business there as I have yet to achieve the level of engineering and scale I want to see in this bird. This time I am going with the Fiberglas fuselage, built up wing and tail feathers. I will do the same detailing as to the hinges, inner cooker doirs, cowle flaps and sliding canopy.
The engine will be the DA 100 inline with scale exhaust. The scheame is not set, may do flight metal, or paint. I have ordered the wing kit and I'm setting up my shop. I have to start from scratch as I sold everything on the first build. I do have a few changes and improvements as this build has evolved even though it has been dormant.
TB
Last edited by TonyBuilder; 01-25-2017 at 05:09 AM.
 01-25-2017, 05:57 AM
#2
One thing I may change is the tail gear. On the first build I got the Sierra tail gear. It is nice but not as scale as I would like and harder to mount then the Robart. The Robart is easier to do the scale gear door coupling too.


Im leaning to go with the Robart
I will use the Sierra main gear as before, Sierra whiles with breaks.
TB
Im leaning to go with the Robart
I will use the Sierra main gear as before, Sierra whiles with breaks.
TB
02-02-2017, 04:46 AM
#4
This retract with servo mounted steering might be a good fit. I will have to make my own strut leg to take a stock offset arm but that's easy.


I can mount it vertical with a low profile servo or flat with a standard servo, will see once I get the fuselage.
TB
I can mount it vertical with a low profile servo or flat with a standard servo, will see once I get the fuselage.
TB
02-02-2017, 04:33 PM
#5
I haven't picked a scheame yet but I do want to do an aluminum foil finish. I love that look and would like to try some new and out of the box detailing. I like the way it takes paint and the weathering you can do. This will not be a competitive build but it will have my signature detailing and engineering in it.
Front runner is this scheame, Amy will be doing the noes art.

TB
Front runner is this scheame, Amy will be doing the noes art.
TB
02-02-2017, 06:07 PM
#6

Glad to see this Tony. We will be watching and learning. Thank you.
Just to give a bit of inspiration Not that you need it.


BTW, look closely at the line up of Meister P-47s. I think you will clearly be able to pick out the only one that is real aluminum vs painted simulations.
Just to give a bit of inspiration
Not that you need it. BTW, look closely at the line up of Meister P-47s. I think you will clearly be able to pick out the only one that is real aluminum vs painted simulations.
02-08-2017, 10:05 AM
#10
Sierra gear is on order, wing kit is on order, I am prepping my build space and getting the parts I need to do my tail wheel. I'm not building one from scratch but simply modifying the rodart tail assembly. I will make the "A" arm longer and a little more scale looking, and adding a longer offset leg for the 2-1/2" wheel. Otherwise it will mount and operat the same. Fowler flap system is in prototype production, aileron and elevator hinges are in production!
(Chomping at the bit)
TB
(Chomping at the bit)
TB
02-08-2017, 11:08 AM
#11
Interesting approach. I like the Sierra tail gear and find it to be basically bullet proof in operation, our primary consideration, and realistic looking enough. The installation poses no real issues. As with all experienced builders i think, new ideas and ways of doing things are always of interest, so I look forward to seeing your construction ideas come to life.
02-08-2017, 02:30 PM
#12
Interesting approach. I like the Sierra tail gear and find it to be basically bullet proof in operation, our primary consideration, and realistic looking enough. The installation poses no real issues. As with all experienced builders i think, new ideas and ways of doing things are always of interest, so I look forward to seeing your construction ideas come to life.
TB
02-11-2017, 03:58 AM
#13
The EME 120 is another engine choice. I had one in my 40% cub and it flew great, very reliable and strong. Typically twins are to wide and won't fit but you can get plug conversion to the ME8 plug and cap. This can shave as much as 3/8" per side for a total of 5/8". Expansion of the cowl would be needed and can be easily done.


TB
TB
02-11-2017, 03:03 PM
#14
Junior Member
Join Date: Nov 2013
Posts: 5
Likes: 0
Received 0 Likes
on
0 Posts
I just got the plans from Meister to build the 1/5 P-47. I have a DLA112 NIB. But was thinking of buying a Evolution 160cc radial motor. But someone said it would not fit in the cowl? I have not looked at the plans yet to see. But the Evolution 260cc is only $500 more so I was thinking of going 1/4 scale instead.
Plus I really would like elect retracts. But I have not found any yet?
Plus I really would like elect retracts. But I have not found any yet?
02-23-2017, 05:02 AM
#16
So while waiting on the big brown box I have been thinking about setup options. Currently I have the DX18 so I will start with that. With the AR12120 12ch and the expansion module I can get 18ch...I think? Next is to dole out the channels. I like to use individual channels unless I have to put them on a Y, I don't like that. A smart fly board would be preferred over Y harnesses but not sure how I could get more then 12ch.
So fare servos are looking like this:
(2ch) 2- ailerons (possible Y)
(2ch) 2- flaps
(1ch) 1-elevator (not doing slit elevator this time)
(1ch) 1- rudder (possible match box)
(1ch) 1-sterring (possible Match box)
(1ch) 1- throttle
(1ch) 1-choke
(1ch) 1- gear
(1ch) 1-canopy (liner servo)
(1ch) 1- cowl flaps (or match box mix with throttle)
(1ch) 2- inner cooler doors (match box mixed...) (liner servos)
(1ch) optical engine kill
(1ch) 2- breaks (possible match box mix)
1- landing light (match box mix)
(1ch) Gyro
That is a total of 17 servos and 16 channels and I could get 3 more. I don't know much about the expansion module but experience tells me I may only get a max of 16 fully adjustable channels.
Other options are upgrading to the new DX20
Demon Cortex
Batteries will be fromeco Lilos or A123 life bats.
At a minimum a smart fly reg to drop the voltage if I use Lilos.
Got to keep busy")
TB
So fare servos are looking like this:
(2ch) 2- ailerons (possible Y)
(2ch) 2- flaps
(1ch) 1-elevator (not doing slit elevator this time)
(1ch) 1- rudder (possible match box)
(1ch) 1-sterring (possible Match box)
(1ch) 1- throttle
(1ch) 1-choke
(1ch) 1- gear
(1ch) 1-canopy (liner servo)
(1ch) 1- cowl flaps (or match box mix with throttle)
(1ch) 2- inner cooler doors (match box mixed...) (liner servos)
(1ch) optical engine kill
(1ch) 2- breaks (possible match box mix)
1- landing light (match box mix)
(1ch) Gyro
That is a total of 17 servos and 16 channels and I could get 3 more. I don't know much about the expansion module but experience tells me I may only get a max of 16 fully adjustable channels.
Other options are upgrading to the new DX20
Demon Cortex
Batteries will be fromeco Lilos or A123 life bats.
At a minimum a smart fly reg to drop the voltage if I use Lilos.
Got to keep busy
TB
Last edited by TonyBuilder; 02-23-2017 at 05:16 AM.
02-25-2017, 06:21 AM
#17
Looking at servos, 6- for flight surfaces - HS-7950 TH HV, ailerons, flaps, rudder, and elevator. Steering, throttle and chock I have and I will get one for the cowl flaps, retract valve and breaks when I see what else I have laying around.
Just filled out my Tower order of stuff I need.......$800 +
TB
Just filled out my Tower order of stuff I need.......$800 +
TB
02-26-2017, 06:34 PM
#21
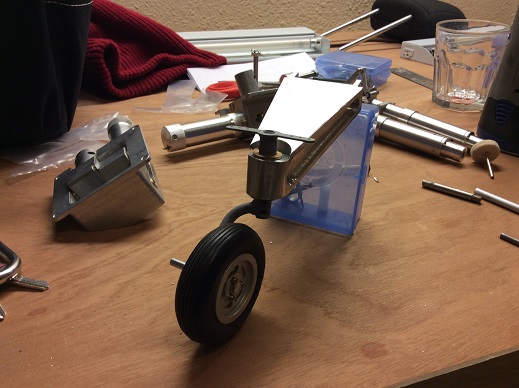
got some work in today on my tail wheel assembly modification. I'm not building it from scratch but just modifying the Robart retract. The stock retract is fine for the TFGS P-47 but I feel it is to small for the Meister. I am making a new "A" arm that will be about 20% longer. I will also make it a little more scale then the stock one.
starting with shaping the new arm and cutting it to fit the stock frame and stock leg, and steering arm.
I am working on it at Edwin's shop, he has some tools I don't have access at my place, thanks Edwin.


Nice having a mill to do the shaping.


I'm about half way there, but a good start.


Next week I will finish shaping and do the facing detailing, but it looks like it will fit and work.


I am getting a 2-1/2" wheel for this... and it begins!
TB
starting with shaping the new arm and cutting it to fit the stock frame and stock leg, and steering arm.
I am working on it at Edwin's shop, he has some tools I don't have access at my place, thanks Edwin.
Nice having a mill to do the shaping.
I'm about half way there, but a good start.
Next week I will finish shaping and do the facing detailing, but it looks like it will fit and work.
I am getting a 2-1/2" wheel for this... and it begins!
TB
Last edited by TonyBuilder; 02-26-2017 at 06:57 PM.
03-04-2017, 05:28 AM
#22
Work continues on the tail wheel assembly today. More shaping and I hope to get the A arm done today. I will rework the mounting and linkage as I want to use a larger stronger cylinder. The Ridart is to weak to handle the new tail wheel and the bay doors.

The componets of the tail wheel I'm thinking will be mounted directly to the ply former that will be fitted into the fuselage so I will work up a prototype of that as I go.

TB
The componets of the tail wheel I'm thinking will be mounted directly to the ply former that will be fitted into the fuselage so I will work up a prototype of that as I go.
TB
03-05-2017, 05:23 AM
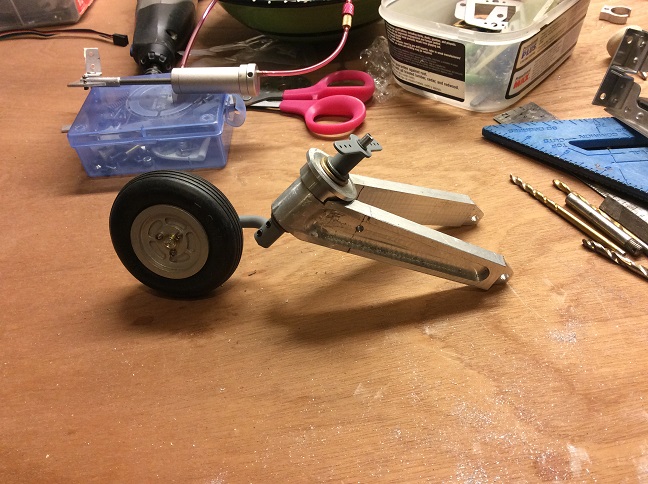
#23
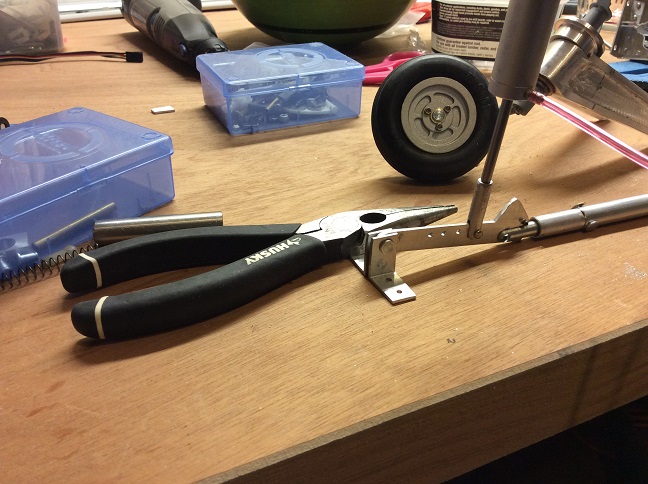
Progress,
Most of the shaping is done short of cutting the center out. Thanks to Edwin for letting me work in his shop. The taile wheel arm was cut an a two axis mill free hand. I have never used a mill before so a learning curve is in progress. This is just the rough cut and I still have some clean up to do and shaping, but its getting close.

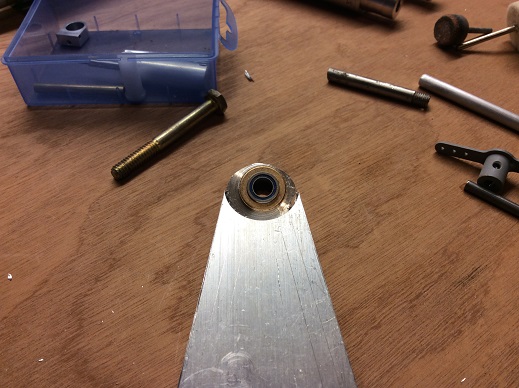
Two 3/8x1/2 bushings on top and bottom to house the 3/8x1/4 sealed flange bearings.
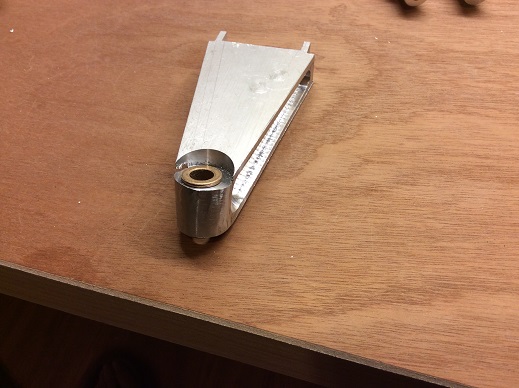
Bearings top and bottom.
I still need to make the post for the steering arm and lower wheel leg.
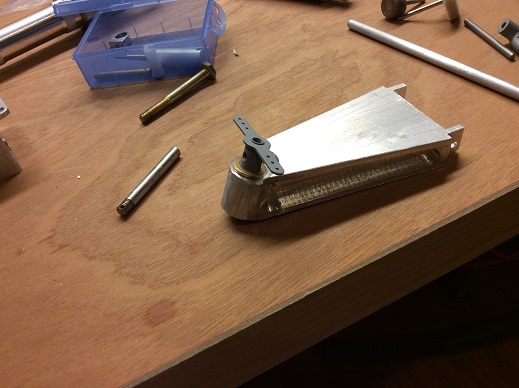
I will start to work on the mounting hardware and linkage.
I will be painting the A arm once it is all cleaned up and detailed.
TB
Most of the shaping is done short of cutting the center out. Thanks to Edwin for letting me work in his shop. The taile wheel arm was cut an a two axis mill free hand. I have never used a mill before so a learning curve is in progress. This is just the rough cut and I still have some clean up to do and shaping, but its getting close.
Two 3/8x1/2 bushings on top and bottom to house the 3/8x1/4 sealed flange bearings.
Bearings top and bottom.
I still need to make the post for the steering arm and lower wheel leg.
I will start to work on the mounting hardware and linkage.
I will be painting the A arm once it is all cleaned up and detailed.
TB
03-08-2017, 04:54 AM
#24
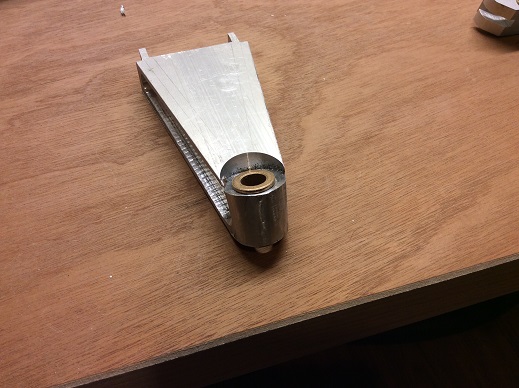
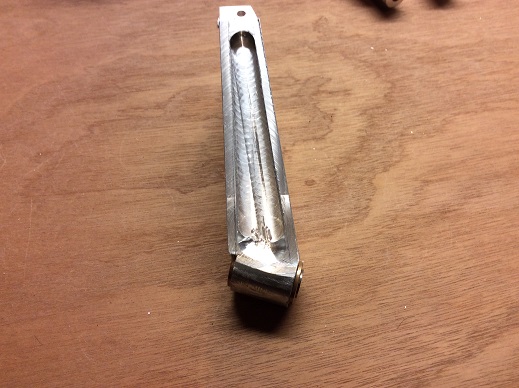
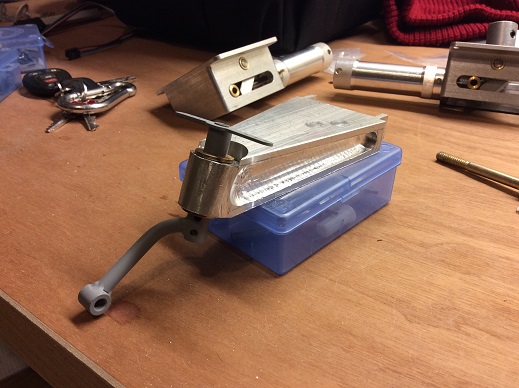
worked on the A arm and got it all cut out. Detailing and fabrication of the strut post, steering arm and linkage.
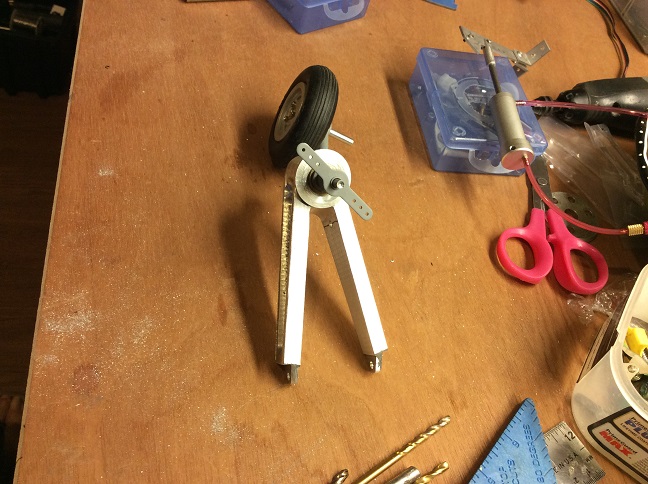
I had to fabricate a new linkage and i got the geometry figured out to get the wheel up and down the way I want it and with the new cylinder. I still need to make the mount.
TB
I had to fabricate a new linkage and i got the geometry figured out to get the wheel up and down the way I want it and with the new cylinder. I still need to make the mount.
TB
03-12-2017, 11:07 AM
#25
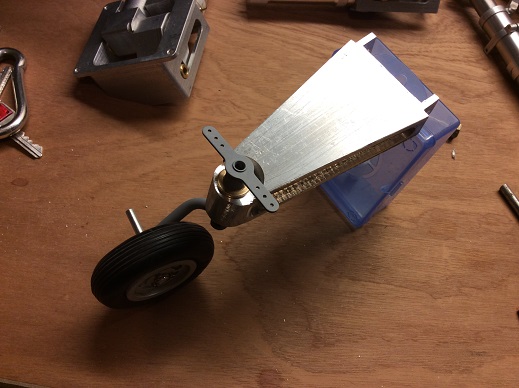
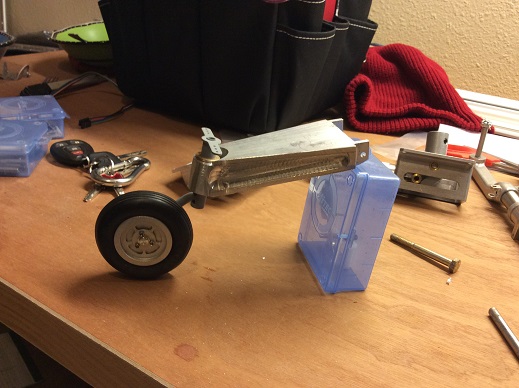
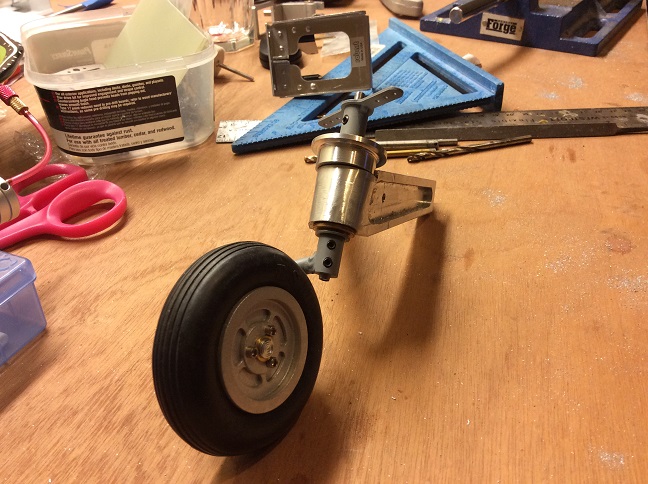
Tail wheel update.
Got the prototype all done done.


Then an I modified it to a more compact stand alone unit.


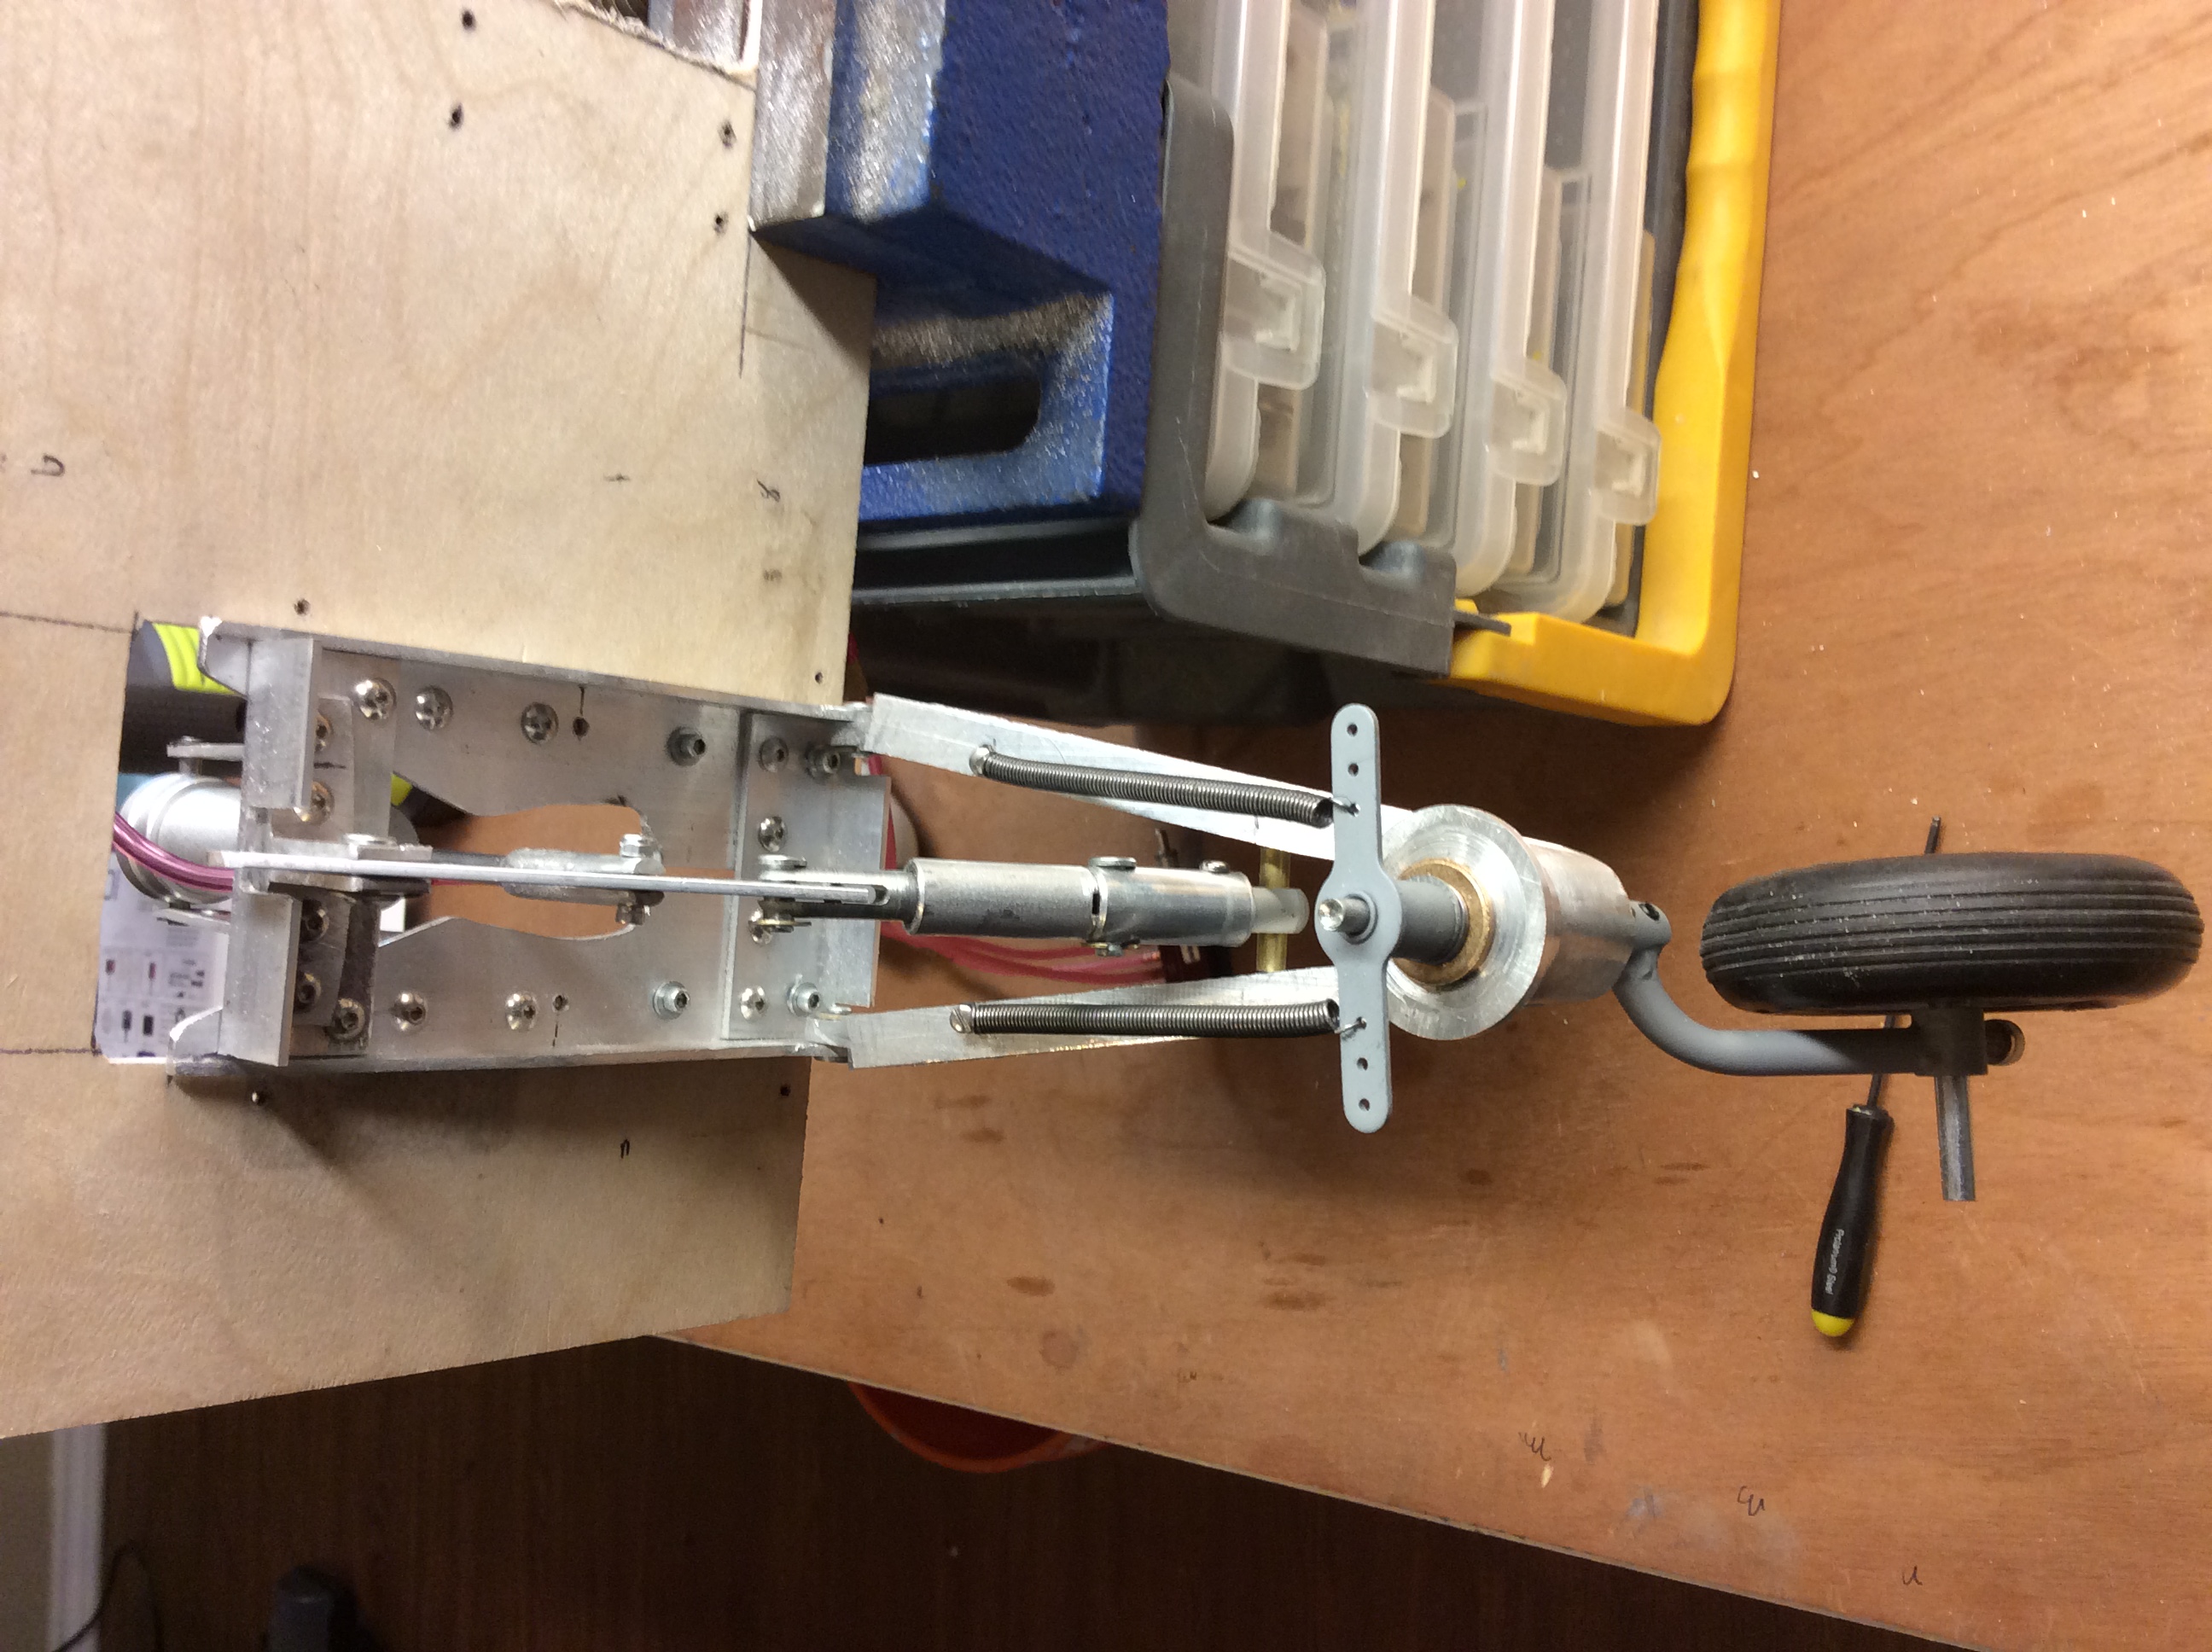

This will mount onto the rear former just before the bay doors.


The cylinder is crazy strong


Here is a video
http://youtu.be/cT6Pxd7ElOA
TB
Got the prototype all done done.
Then an I modified it to a more compact stand alone unit.
This will mount onto the rear former just before the bay doors.
The cylinder is crazy strong
Here is a video
http://youtu.be/cT6Pxd7ElOA
TB
Last edited by TonyBuilder; 03-12-2017 at 01:00 PM.