


ESM F7F Tigercat Build


The following users liked this post:
Smiley Jack (07-02-2020)
 07-10-2018, 12:42 AM
#53

Thread Starter

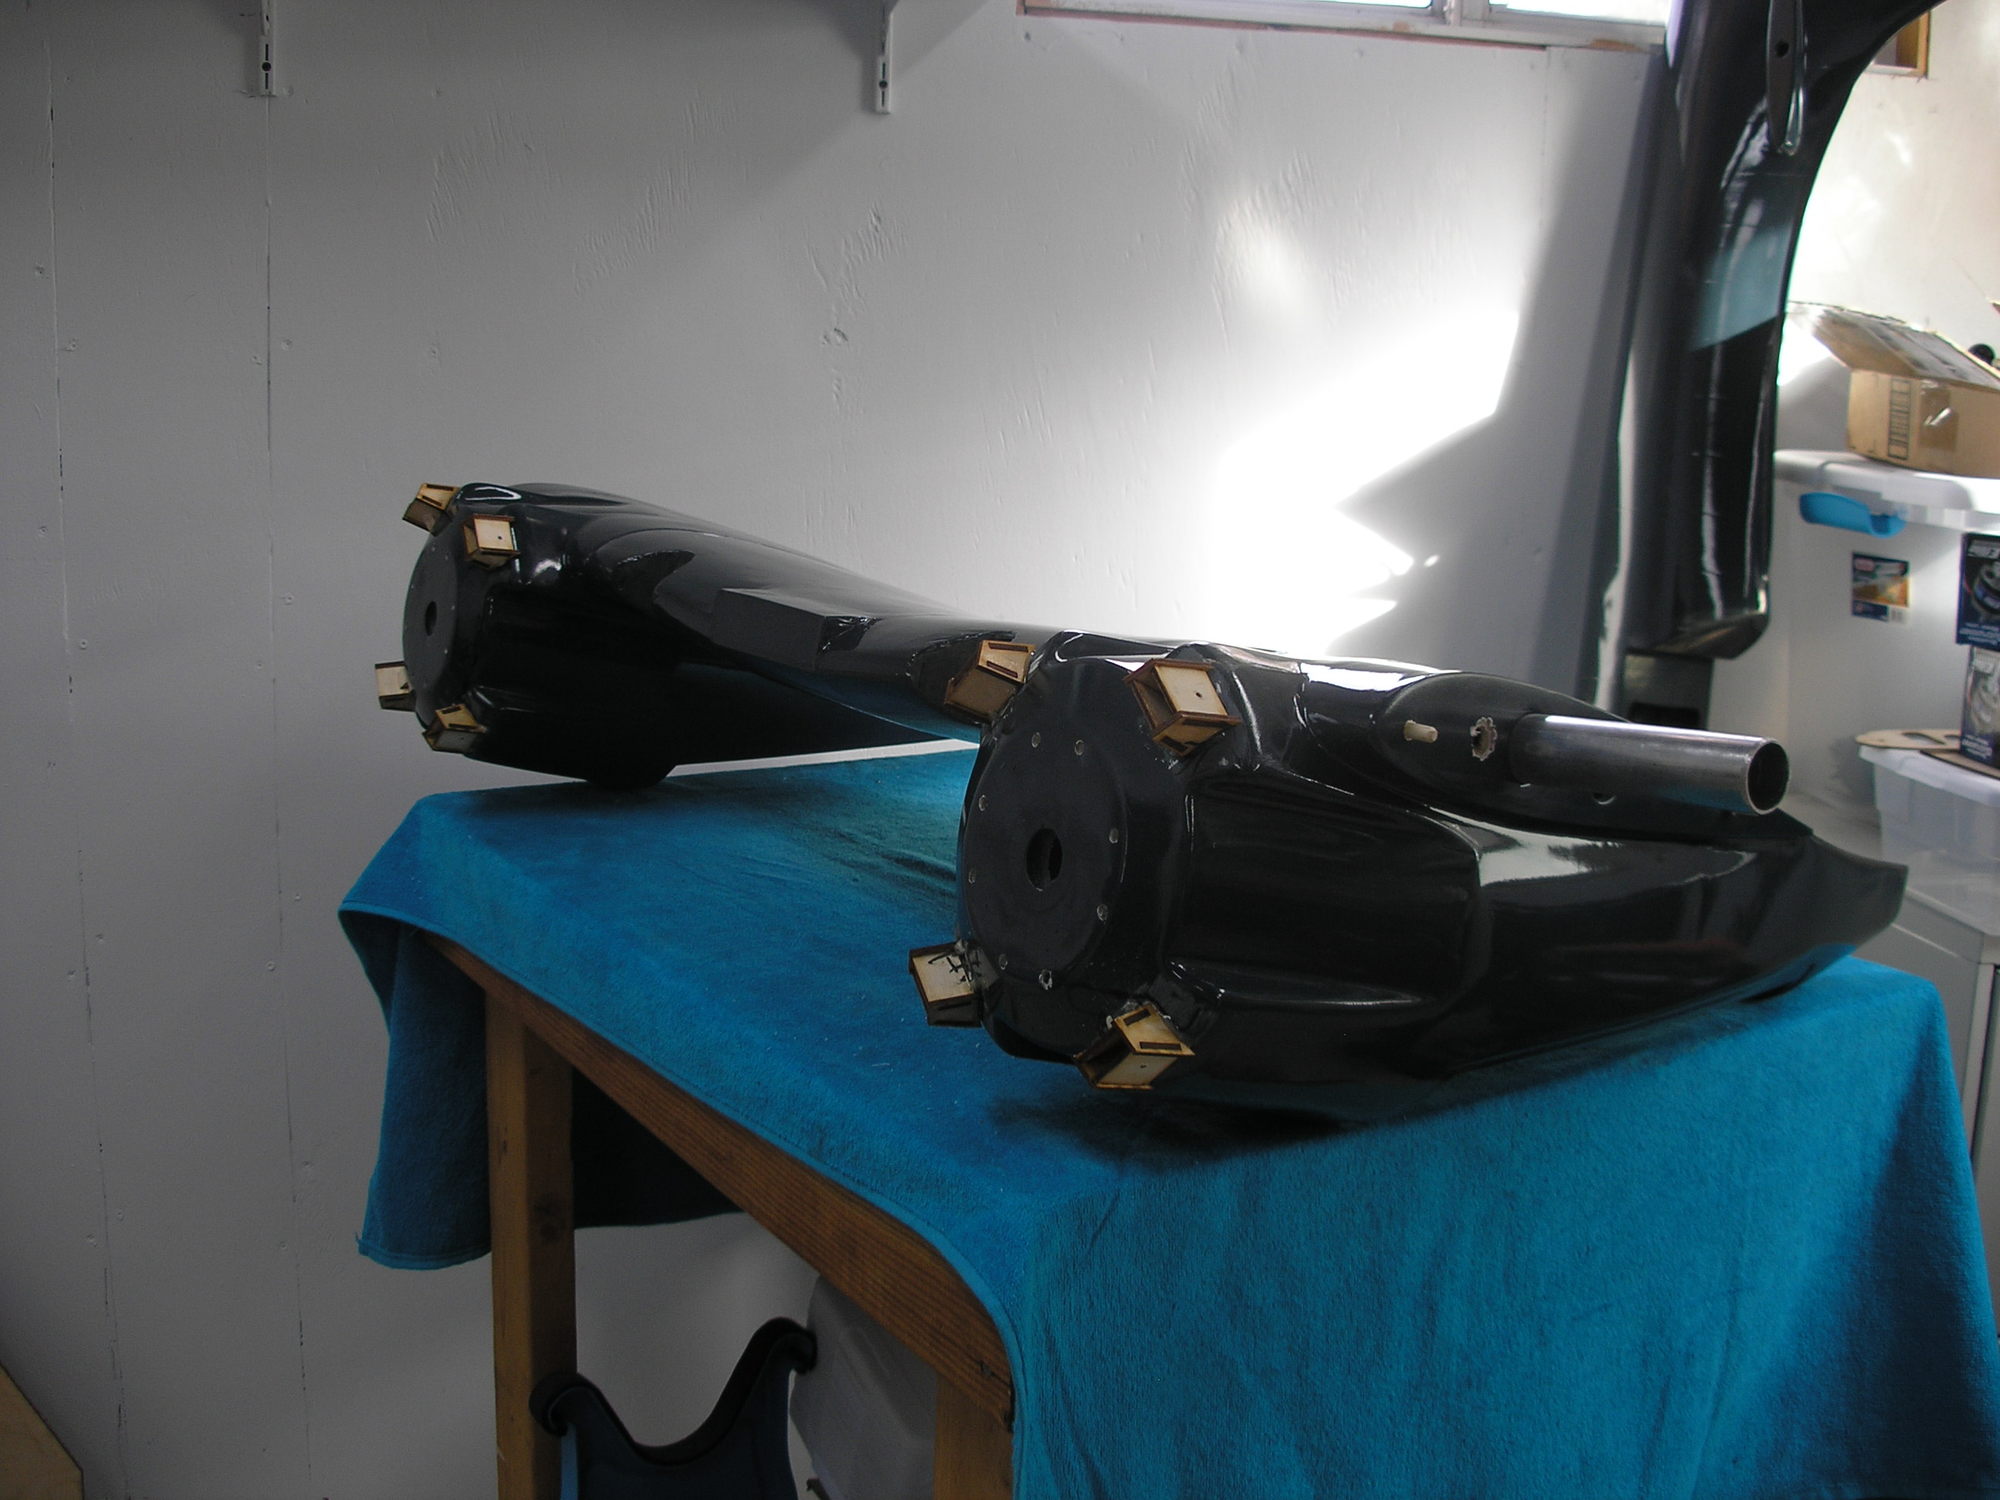
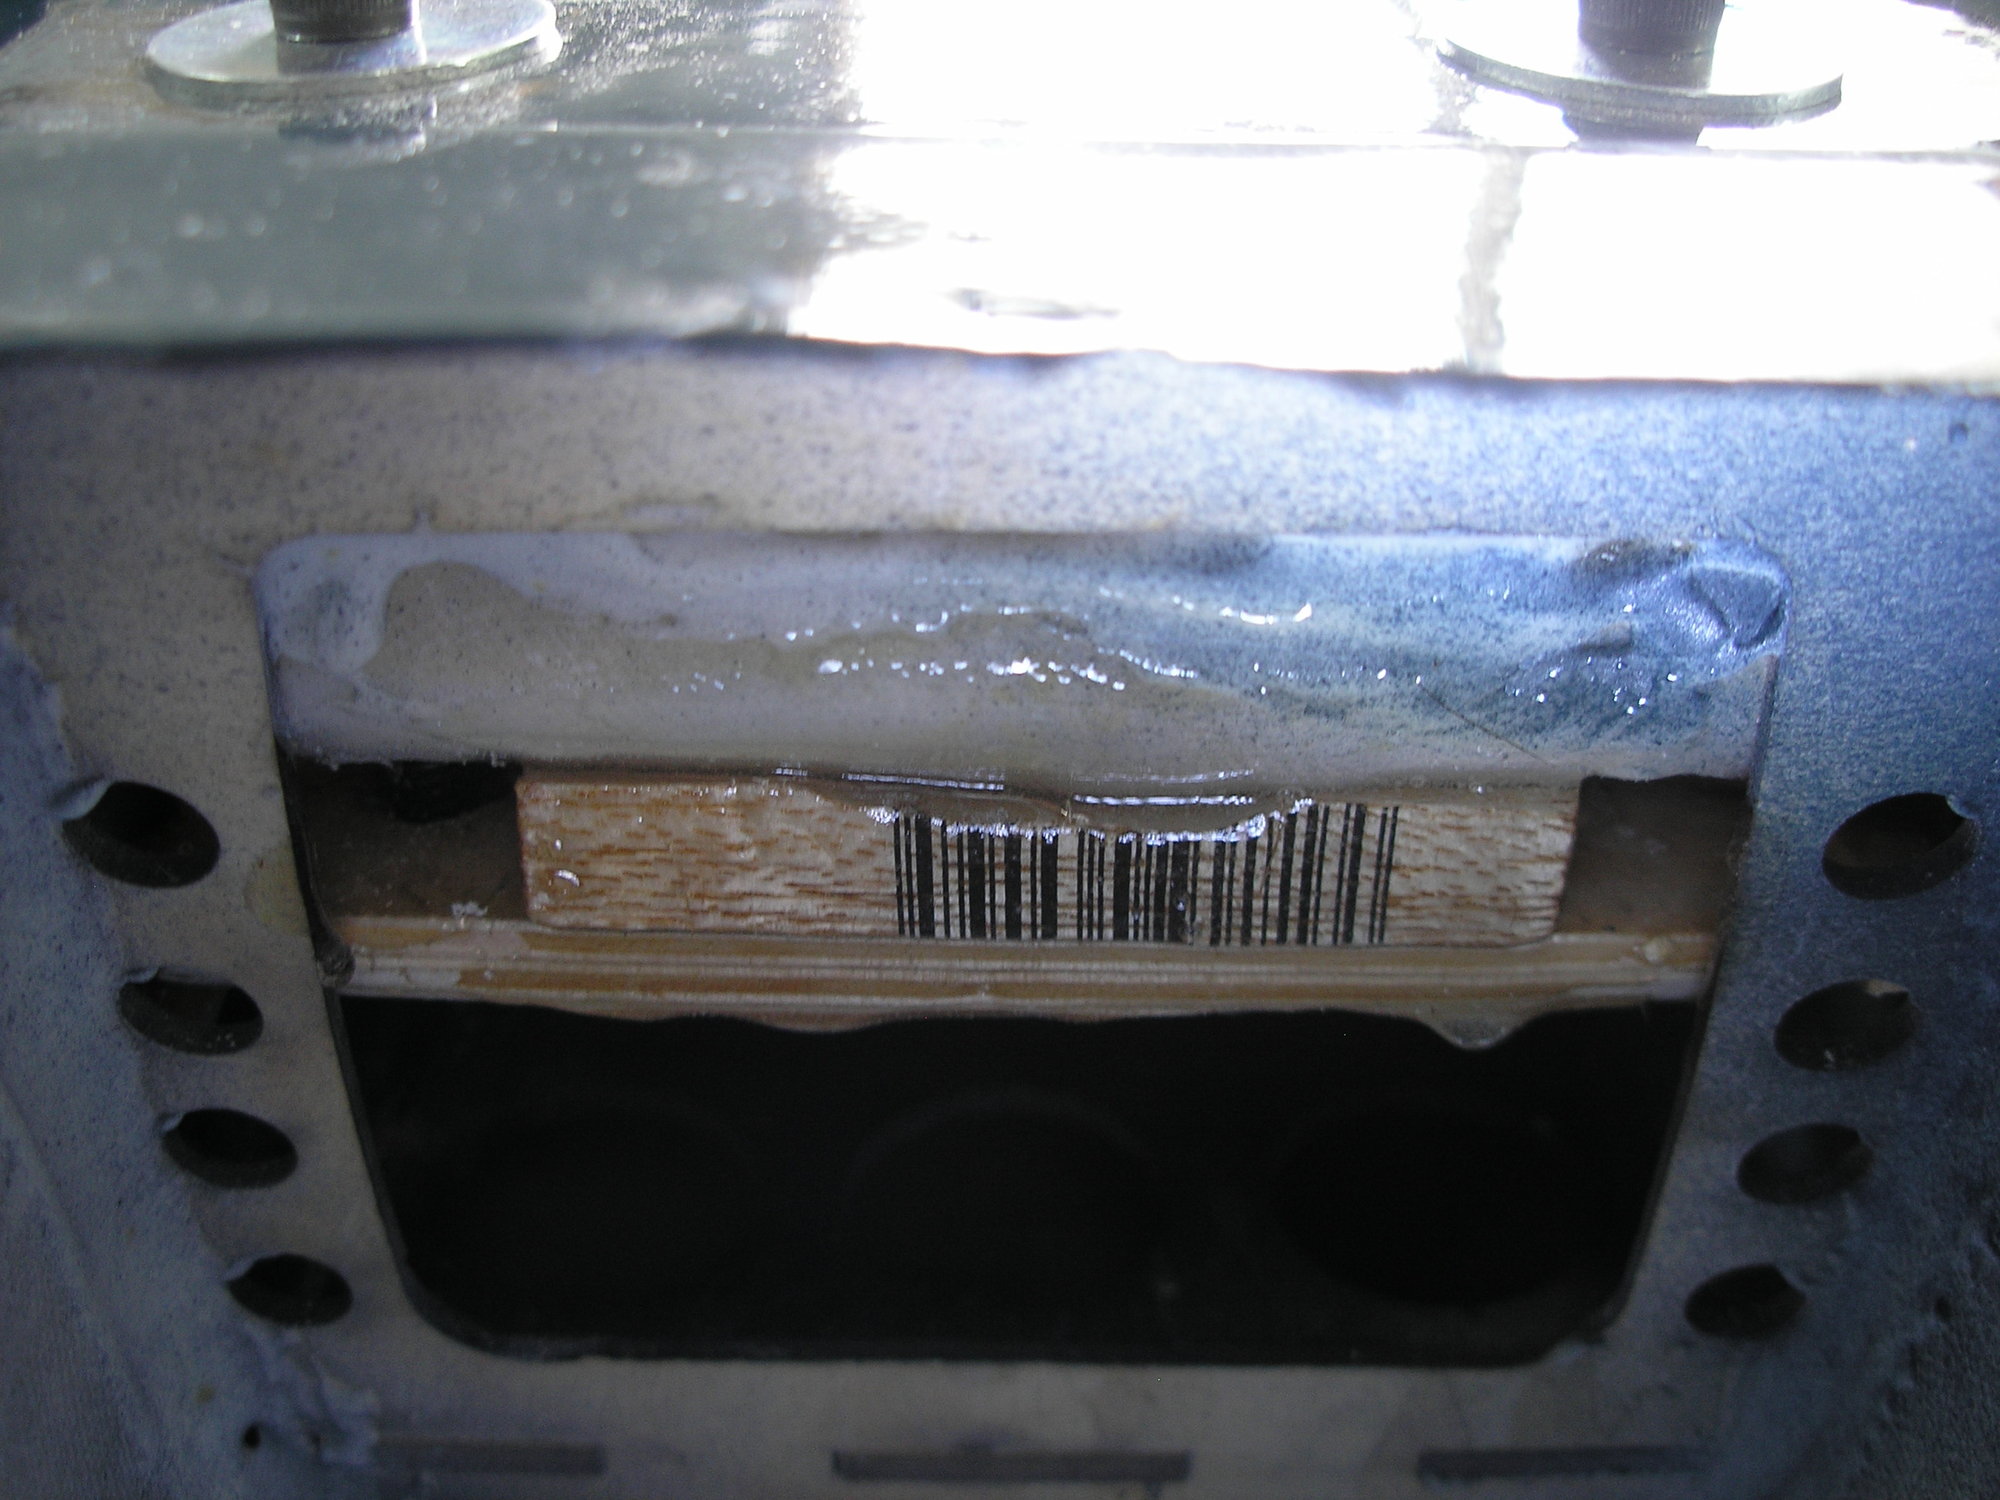
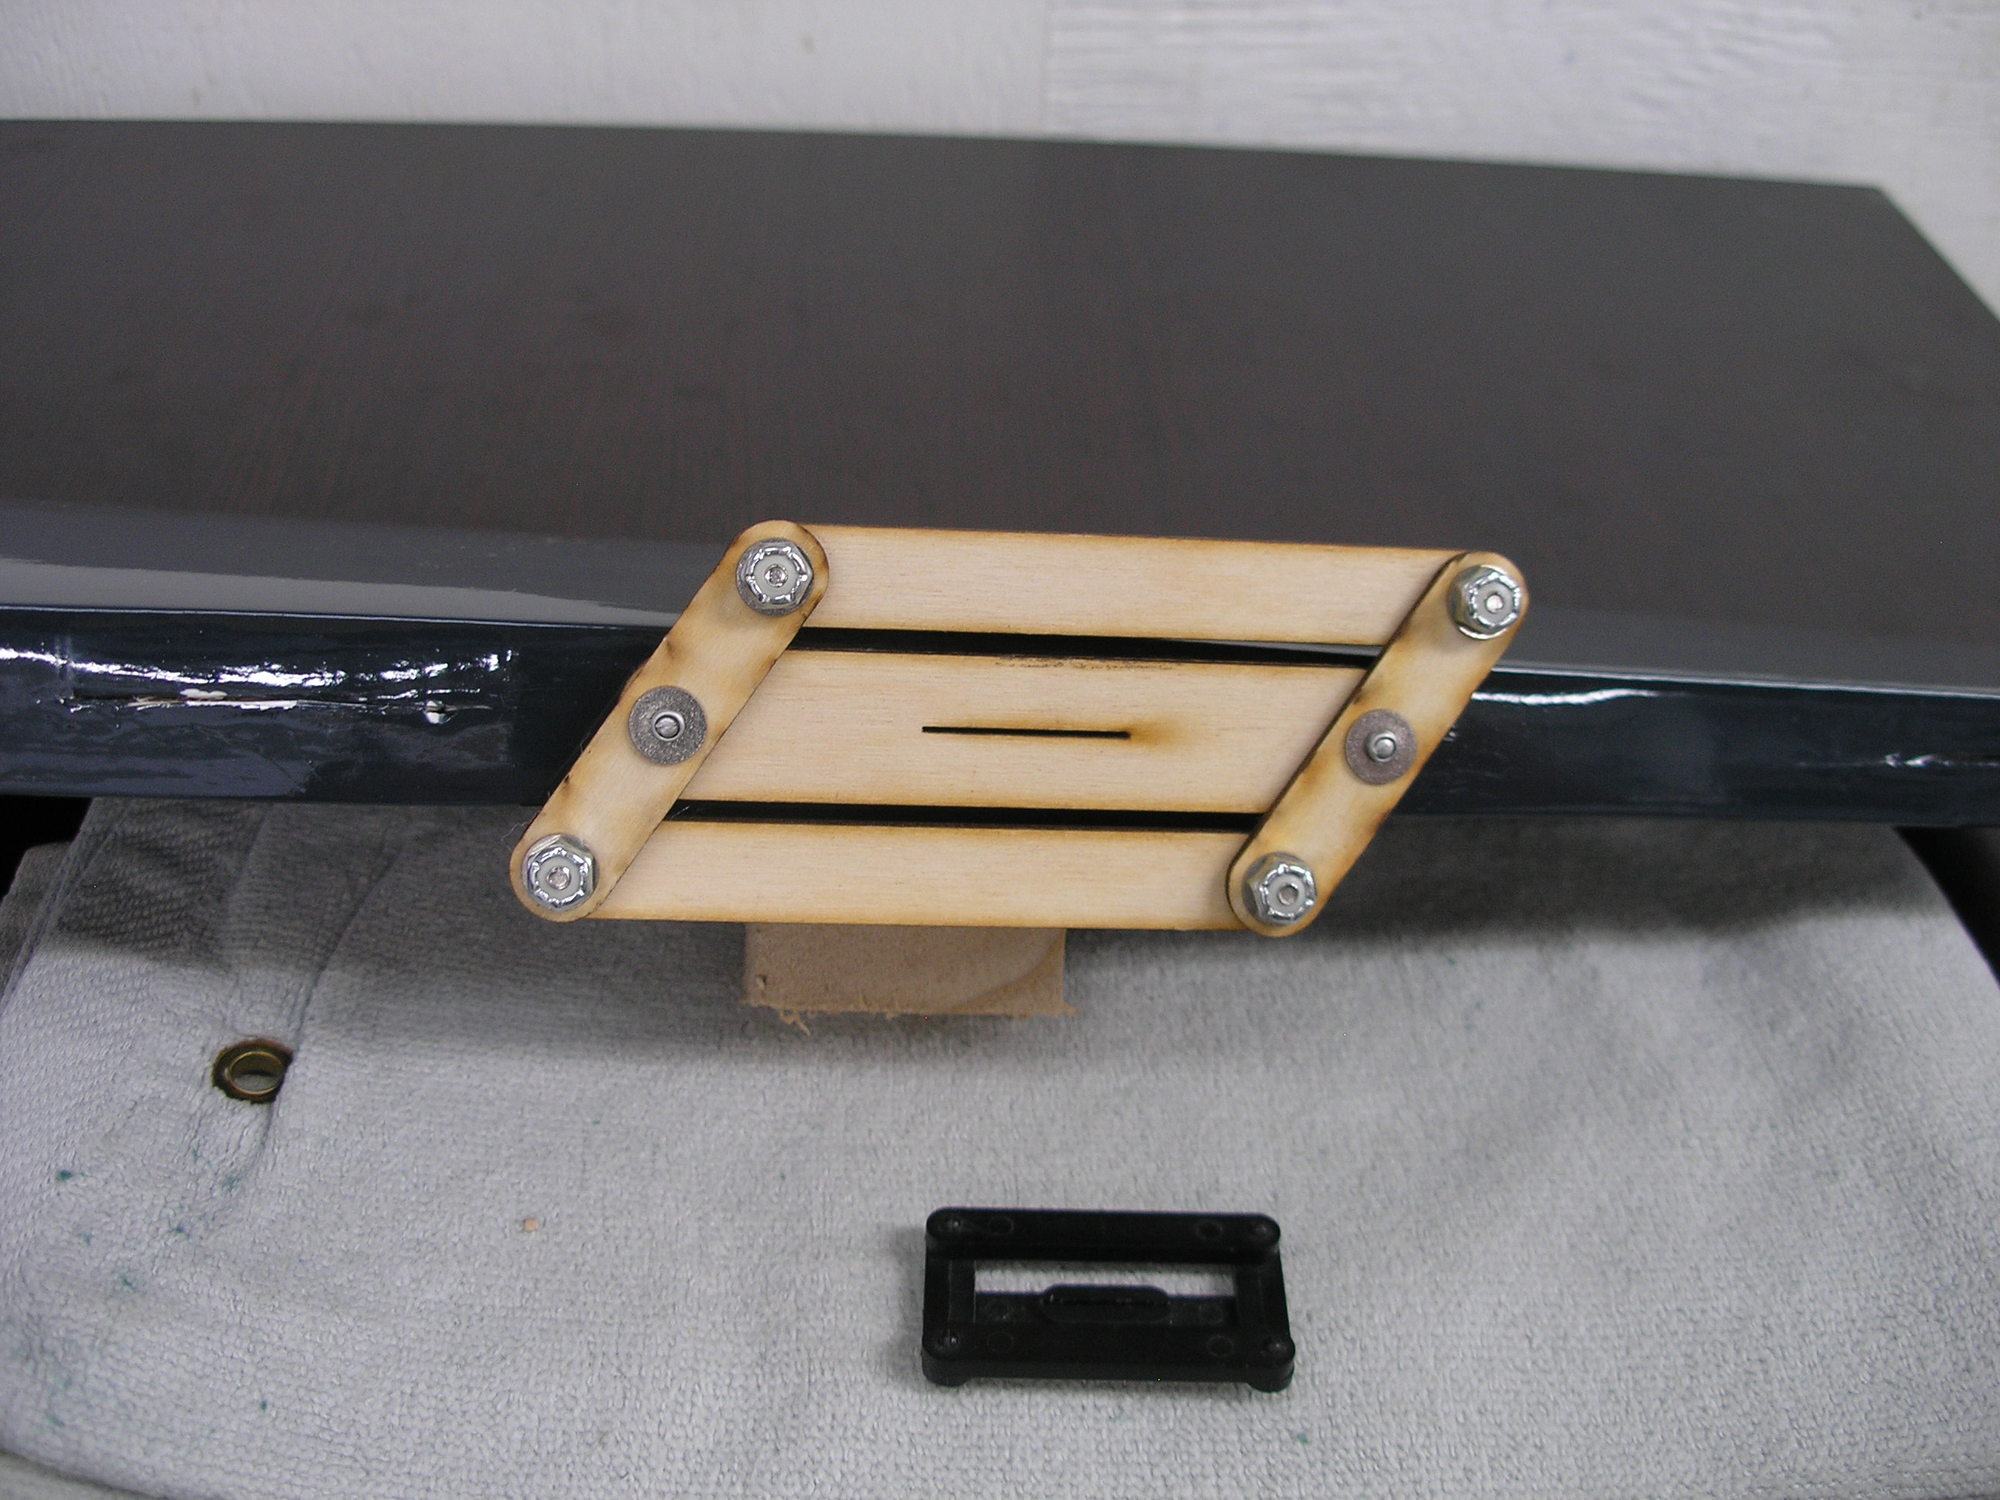
There were small gaps in mine that wouldn't have affected anything flight wise but looked ugly. That is one reason I wanted a mechanical bond. The screws allowed me to pull the pods in tight and eliminate most if not all of the gaps and ensure that the epoxy bond was good and tight. I didn't show it in the pictures but there are backing plates on all of the lightning hole inserts I used to mount the blind nuts. If you are interested in using that method, I would be happy to share some of those special parts or any of the parts I created. Hate to spend all that time designing them just to be used once.
07-10-2018, 11:58 AM
#54
Thank you very much. I would be interested in the parts for bolting the Nacelles on. My email is [email protected]. Just let me know how much you want for the parts.
07-10-2018, 03:53 PM
#55
Thread Starter
Thank you very much. I would be interested in the parts for bolting the Nacelles on. My email is [email protected]. Just let me know how much you want for the parts.
07-30-2018, 03:58 PM
#57
Thread Starter
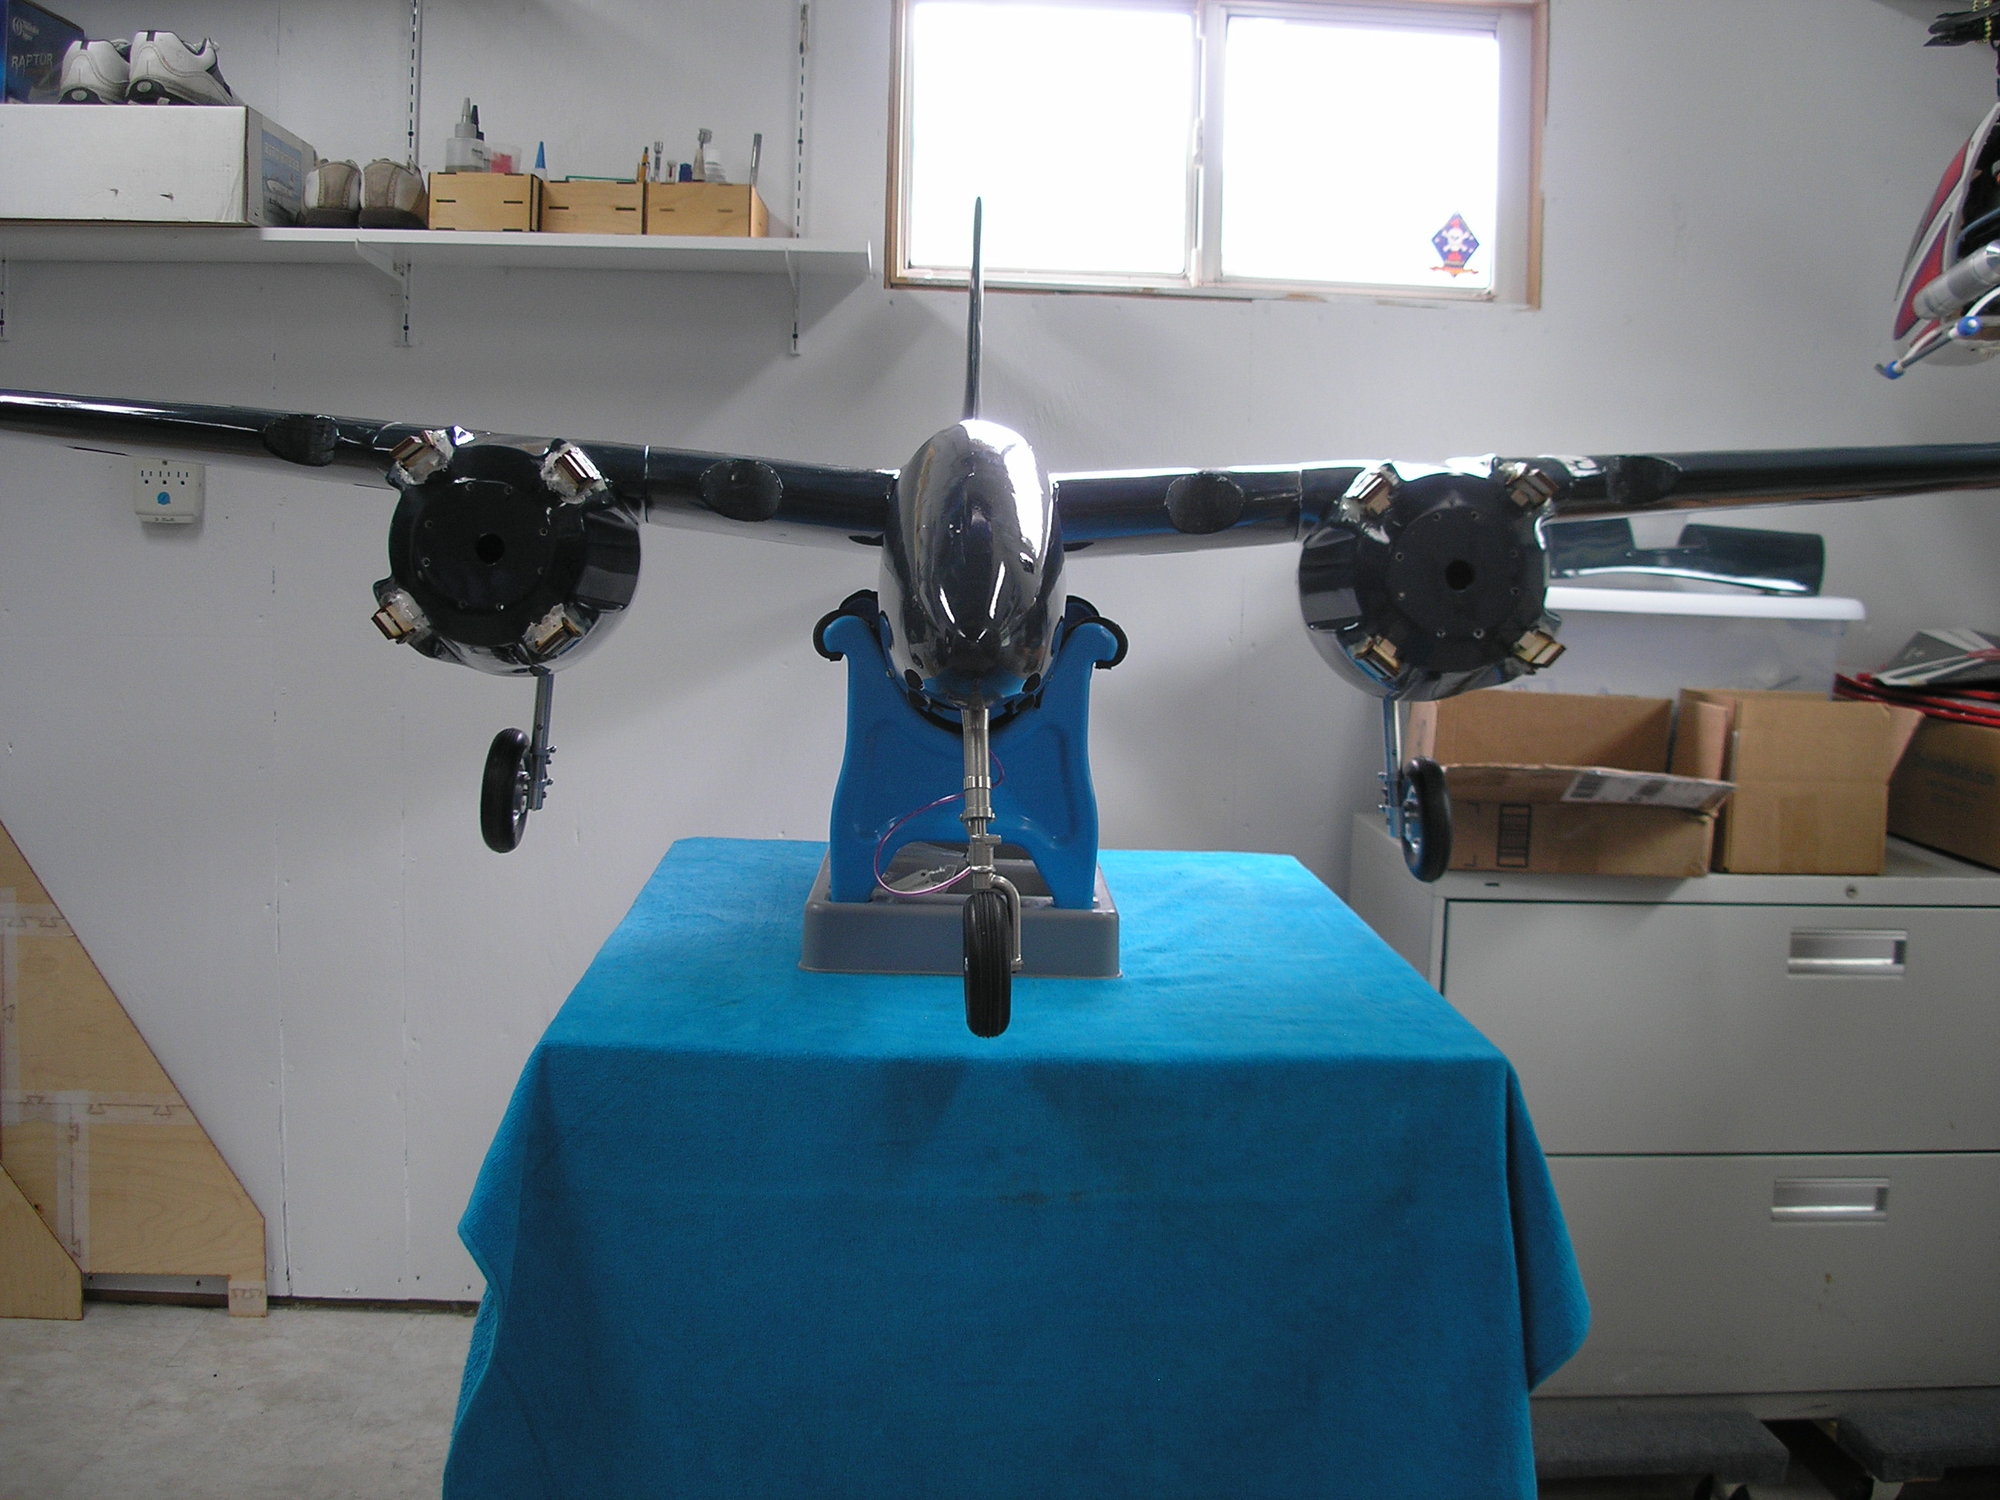
New struts on the jet so i am back on the TC build. Got a few things accomplished. The mounting blocks for the back of the wing were already glued in place but the front mounts were not. After drilling for the mounting bolts (1/4") I laser cut mounting plates and installed blind nuts. I bolted the wing on with extra long bolts and brushed on epoxy to the mounts and the fiberglass saddle. Then i snugged the bolts and let it set. After that i brushed more epoxy and reinforced the joint with triangle stock. It isn't pretty but it is plenty strong.

07-30-2018, 04:03 PM
#58
Thread Starter
Got the landing gear set up. Again, i laser cut spacers to drop the gear far enough for the wheels to clear the top of the nacelles. They were hitting the top of the nacelles when retracted. It took 5/8" worth of spacers to make the wheels clear.
 07-30-2018, 04:23 PM
#60
Thread Starter
I have been building long enough to know that there are always set backs and issues that you just don't catch in the building process. It was my intention to keep the wing center section mounted and simply remove the wingtips for transport. It seemed like a good idea at the time. What i never realized is that after installing the retracts i could not get my hands deep enough into the nacelles to install/remove the forward mounting screws. I decided to leave the wingtips mounted and remove the wing assembly for transport. I intend to use the Futaba S.Bus setup so there will be a minimum of wires to connect. I will try to set up the main retracts within the wing assembly if possible to eliminate the air hose connection. I did drill holes in the front and rear mounting blocks to utilize alignment dowels so the wings will align properly when installed at the field. It was impossible to drill the wing mounting holes accurately enough to simply bolt them on and have them align properly. One thing i have noticed is that this thing is heavy. I did a preliminary balance check with just the Eflite 160 motors installed and it appears to be very nose heavy. I'm not sure i can place enough servos and accessories in the back to compensate. We will see.
Put it on the scale with only motors and landing gear mounted. She's at about 22 pounds already. I'm guessing she will be at 30 pounds after electronics and batteries. The manual lists the flying weight at 23.2 pounds. At some point i will remove the gear and motors to finish things up. I will weigh it again dry and see how how heavy it was from the factory. Should have done that already i guess.
Put it on the scale with only motors and landing gear mounted. She's at about 22 pounds already. I'm guessing she will be at 30 pounds after electronics and batteries. The manual lists the flying weight at 23.2 pounds. At some point i will remove the gear and motors to finish things up. I will weigh it again dry and see how how heavy it was from the factory. Should have done that already i guess.
Last edited by ftjets; 07-31-2018 at 02:06 AM. Reason: Add new information
08-18-2018, 09:33 PM
#61
My Feedback: (13)
Hi Guys,
I managed to get one of the last kits from VQ Warbirds. I also picked up Sierra retracts, wheels and brakes. I have yet t start the build, but plan on using twin cylinder 30cc gas engines... I was looking at the 19cc three cylinder radials, but I doubt they will have enough power for the model. Any inputs would be nice...
Soft Landings Always,
Bobby of Maui
08-20-2018, 11:40 AM
#63
My Feedback: (13)
Hi Guys,
I managed to get one of the last kits from VQ Warbirds. I also picked up Sierra retracts, wheels and brakes. I have yet t start the build, but plan on using twin cylinder 30cc gas engines... I was looking at the 19cc three cylinder radials, but I doubt they will have enough power for the model. Any inputs would be nice...
Soft Landings Always,
Bobby of Maui
I managed to get one of the last kits from VQ Warbirds. I also picked up Sierra retracts, wheels and brakes. I have yet t start the build, but plan on using twin cylinder 30cc gas engines... I was looking at the 19cc three cylinder radials, but I doubt they will have enough power for the model. Any inputs would be nice...
Soft Landings Always,
Bobby of Maui
08-21-2018, 02:09 AM
#64
Thread Starter
I have been held up a little due to that pesky work thing but have made some progress. I am working on attaching the control surfaces. I wanted to use the large Dubro pinned hinges with removable cotter pins but the gap is way too wide. I don't like using CA hinges on larger planes but I figured I would just add extra hinges. Getting them centered was a trick and some of the factory hinge cuts were not on center so I had to do a little fabricating. My standard hinge line cutter was not large enough so I made my own. It worked quite well.

09-25-2018, 01:10 PM
#65
Join Date: Jul 2014
Posts: 4
Likes: 0
Received 0 Likes
on
0 Posts
Just picked up an unstarted ESM TigerCat with the Century Jet electric retracts. Got it from a fellow club memebr that, at 86 years young, decided he would never get around to building it. It will be electric powered. I have a BUSA Taube 90 going on the bench next, but will follow this thread in prep for the ESM build.
Plans are to go CF on the wing tube with the wing center section and nacells permanently assembled and the outer wing panels removable. I have noticed the challenges that you've already tackled with that and will give some thought to other ways to accomplish it.
I just finished a 1/3 scale Fokker D-VIII (Flying Razor) powered by a 100cc electric in a 12S 10000mah configuration. Had to do a lot of engineering on that project as well.
09-25-2018, 02:49 PM
#66
Thread Starter
Welcome to the club twowing. I have been held up with the Futaba issue but was finally able to order a receiver this week. I hope to get back on it when the receiver and Futaba servos arrive on Thursday.
10-15-2018, 10:55 AM
#67


Join Date: Mar 2014
Location: Madrid, Spain.
Posts: 5
Likes: 0
Received 0 Likes
on
0 Posts
Hello everyone from Madrid, Spain. I recently bought this F7F model from ESM and I have been reading your thread with interest, it clarifies doubts about the assembly of the model. I would like to ask you a question about the front landing gear. Does the front-end actuator rotate exactly ninety degrees or rotate more than ninety degrees? I am going to buy the electric actuators and I have to be clear about this point.
Apparently by the actuator seat are ninety but I would appreciate clarifying this point.
It would also be interesting to know if you know any store where you can buy the struts replicas of the original, in Big Planes Netherlands, where I bought the plane, do not have them in stock ... Have you ever mounted an alternative landing gear to the original one?
Also, if you are so kind, tell me the diameter of front and rear wheels that you have used.
Thank you for your safe response and received a greeting from Spain.
Last edited by ACCURA; 10-15-2018 at 11:12 AM.
10-19-2018, 11:41 PM
#68
Thread Starter
Hello Accura
I purchased the Sierra air operated gear recommended by VQ. The nose gear side plates are marked 105 deg. I hope that helps.
The main gear wheels are 4.5 inches and the nose gear wheel is 3.5 inches on my Sierra gear set.
I purchased the Sierra air operated gear recommended by VQ. The nose gear side plates are marked 105 deg. I hope that helps.
The main gear wheels are 4.5 inches and the nose gear wheel is 3.5 inches on my Sierra gear set.
Last edited by ftjets; 10-19-2018 at 11:44 PM.
10-22-2018, 05:43 AM
#69
Join Date: Mar 2014
Location: Madrid, Spain.
Posts: 5
Likes: 0
Received 0 Likes
on
0 Posts
Hello everyone, if someone unfortunately had the bad luck to crash his F7F I would be willing to buy the struts of the plane. Please, if you know someone who could sell them I would be grateful. The postage to Spain run of my account of course. regards

 11-05-2018, 07:10 AM
#73
Join Date: Mar 2014
Location: Madrid, Spain.
Posts: 5
Likes: 0
Received 0 Likes
on
0 Posts
It's not a good idea, the length of the tygon is too long and forces the carburetor to do too much work sucking gasoline. I would not do it, in fact I go to place the deposits in mine stuck to the engine frame. This is only my opinion of course.
11-05-2018, 07:21 AM
#75
Join Date: Dec 2011
Location: , AZ
Posts: 27
Likes: 0
Received 0 Likes
on
0 Posts
Moving the tanks down just Interfere with the retracts more. Due to wheel clearance I had no choice but to shim the retract down 3/4" now I'm wondering if I need to also shim nose gear.