


GROUP BUILD - Top Flite Giant Scale F4U Corsair
 12-07-2016, 04:31 PM
I used a pull pull cable system for the steering controls. When extended, just the right amount of tension, when retracted allows the rudder servo to move the rudder without the tail wheel moving, and was able to use only one servo for both. Note though this is on the 60 size, not the GS one.
 12-07-2016, 07:37 PM

My Feedback: (6)
tho I did not put doors on my tail wheel I did use cable pull/pull and in about 100 flights have never had a problem with the retract or coming down.
Maybe I have just been lucky
cheers Bob T
Maybe I have just been lucky
cheers Bob T
12-07-2016, 07:54 PM

Anyone with photos of their steering setup using an Earl Aune or DaddySam tailwheel? I want to use ball links on the tailwheel end, just not sure they'll have enough give as the angle of the tiller arm moves when the gear goes up. I would just install them and see for myself, but don't have any yet so while I wait to order them or see if the LHS has any, figured I'd ask. Couldn't find anything in the thread already.
You can adjust the length of the links to set the timing of the doors and how tightly they close.
This system works perfectly and my buddy copied it to his big P-51 too.
12-07-2016, 08:27 PM
Nice idea, I think I can use a modified version on the B-25. The doors on that are closed all the time and only open during a cycling. I can make a bar that attached to the servo and then ball links to the doors.
12-08-2016, 07:08 AM

I was actually talking about the steering for the tailwheel and not the doors, but this is all going to be hugely helpful when it comes time for me to do the doors too!
I do see in Chris' picture he just used a pull-pull cable looped through the steering arm. I think that's probably easiest. I was hoping to put a threaded end on one end or the other for easier line adjustments, and there's currently no room to do it at the servo because of the former behind the servo tray, but I think I can make room by turning the servo around.
I do see in Chris' picture he just used a pull-pull cable looped through the steering arm. I think that's probably easiest. I was hoping to put a threaded end on one end or the other for easier line adjustments, and there's currently no room to do it at the servo because of the former behind the servo tray, but I think I can make room by turning the servo around.
12-08-2016, 08:30 AM
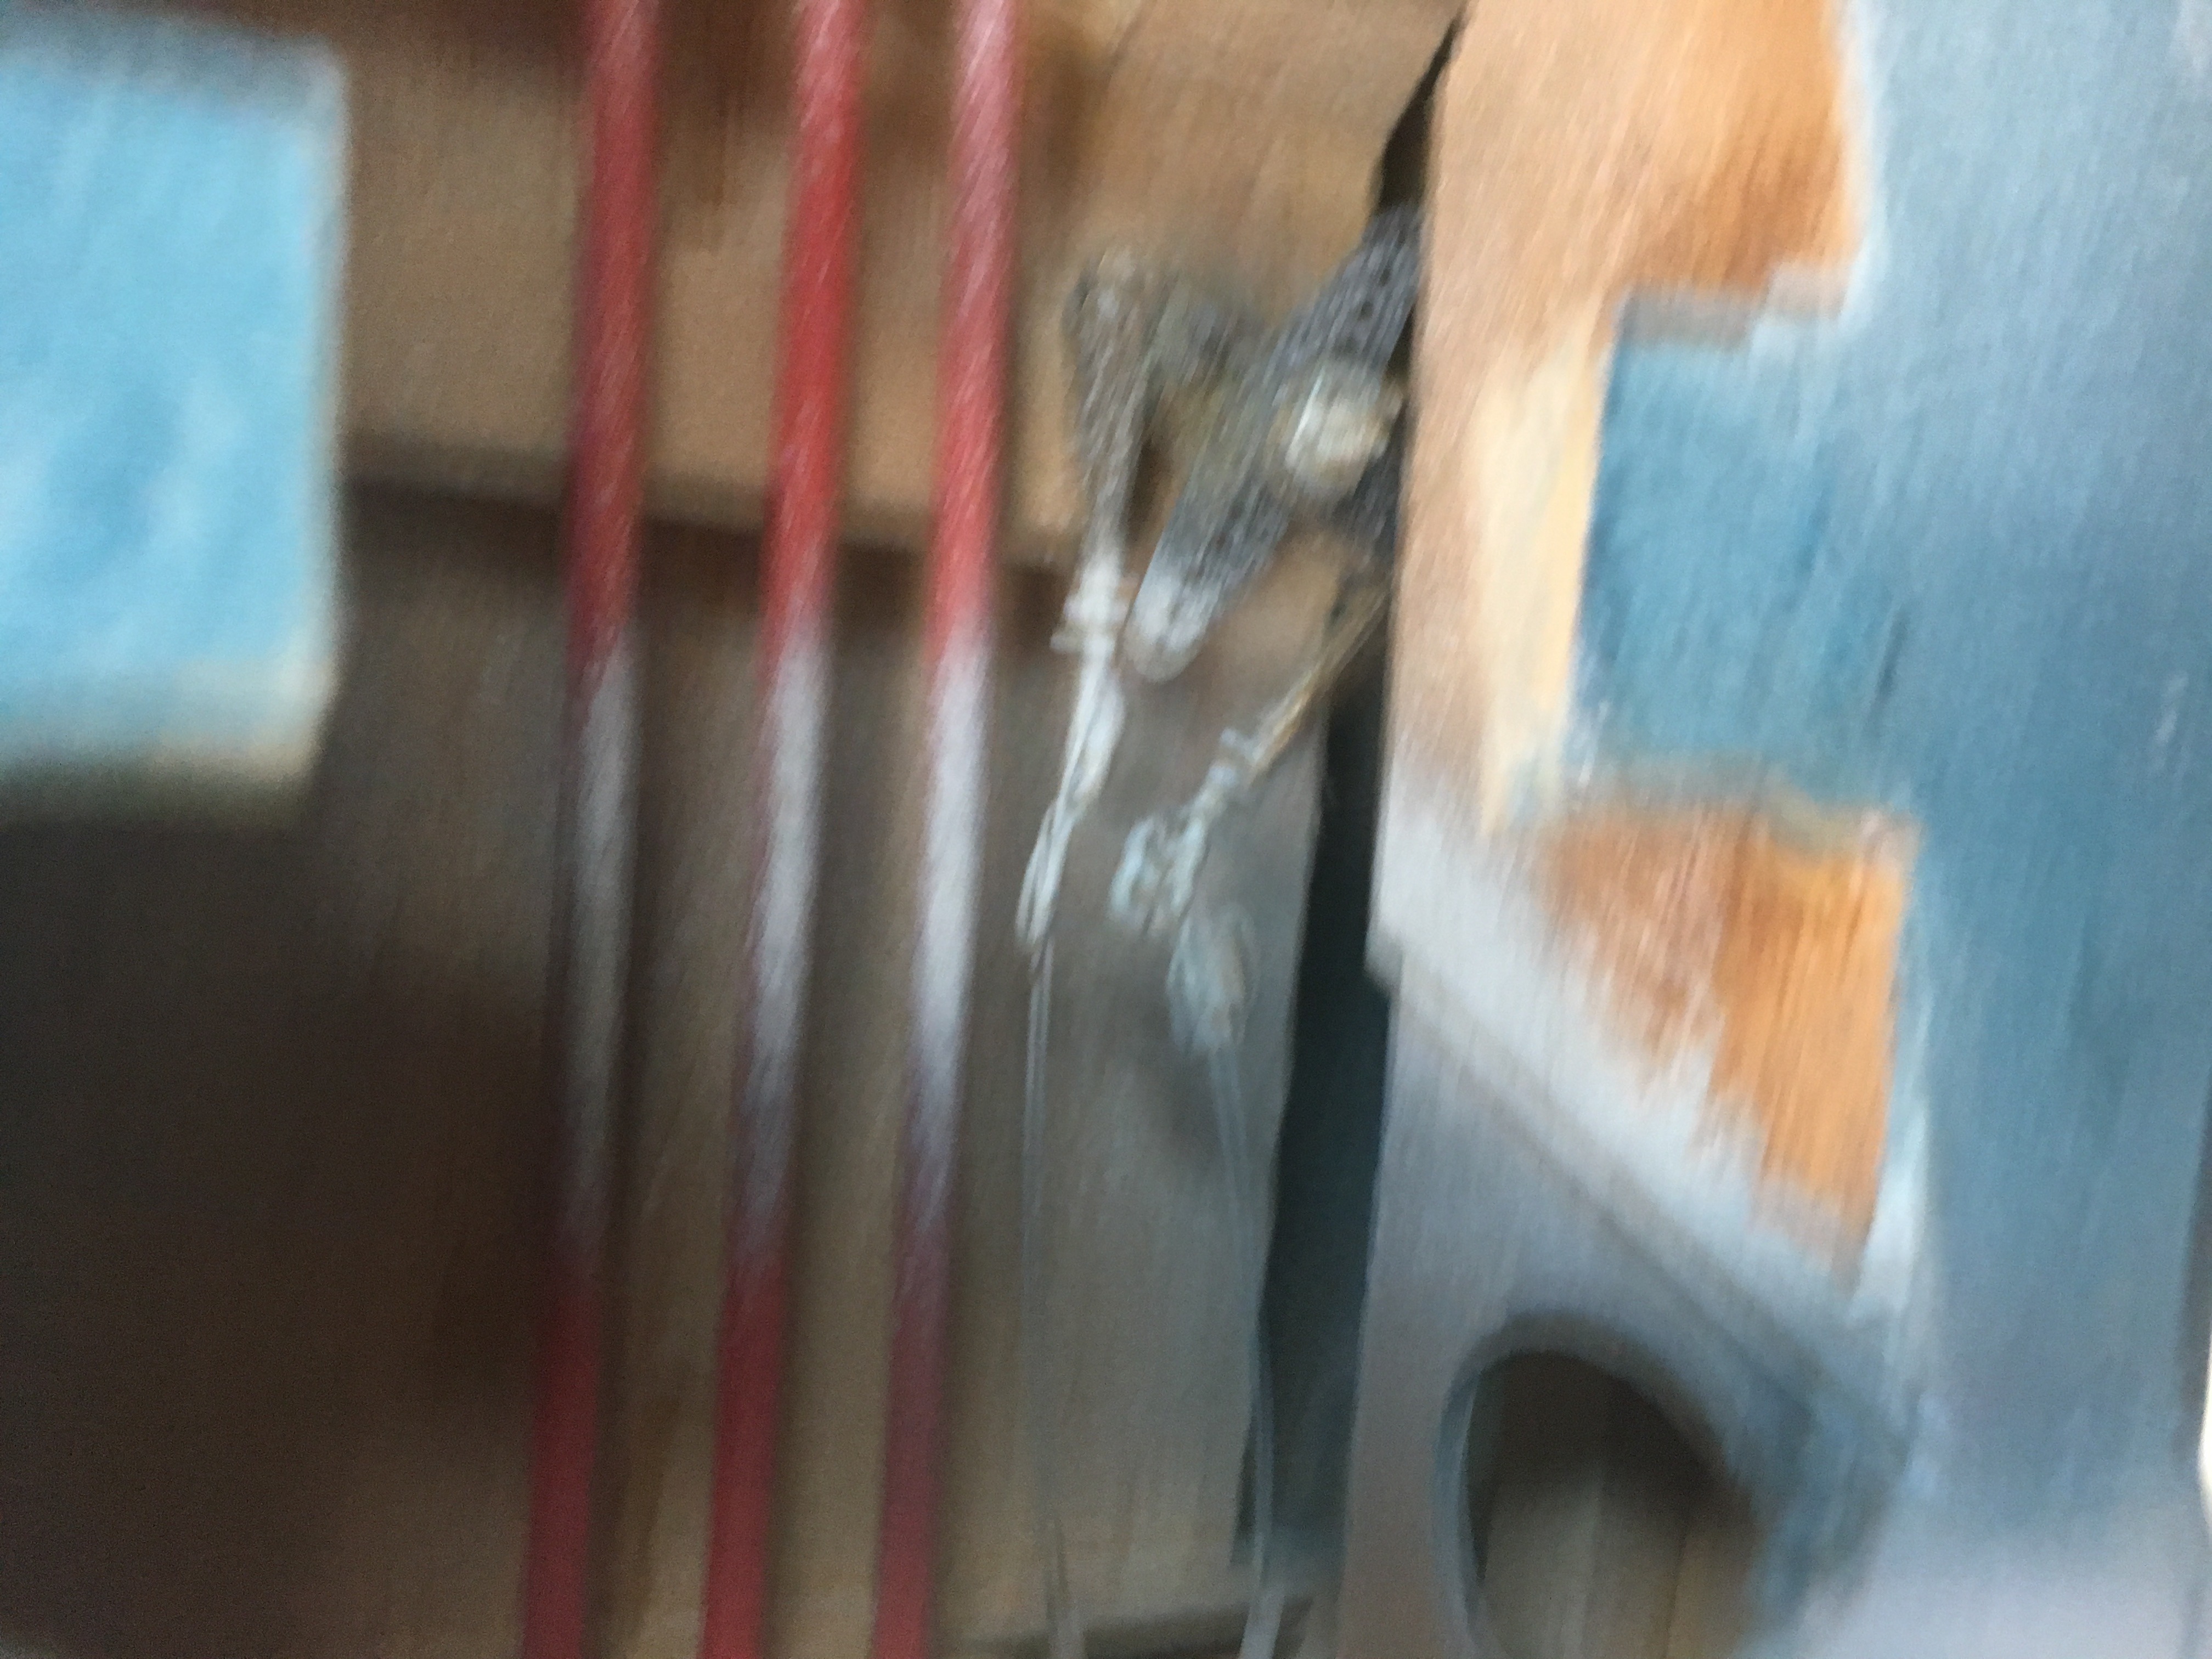
Maybe these can give you a starting point. This is in my 60 size Corsair. What I did was take a standard servo arm and anchored it to the inside, then run cables from it to the tail gear steering arms, crossing them inside to match the rudder direction. I then used a ball link to connect that arm to the rudder servo on the same side as the rudder link, one hole in from the outside where the rudder connects. Since I used the servos in another build, they were only used for setup, I dont have pics of the completed link setup. Sorry about the first one being blurred, didn't notice until it was already uploaded, but you can see how the cables are slack, allowing the arm to move freely, then when the gear is down they tighten up allowing the wheel to move. I need to get back to this plane some day. The paint on it came out really nice, but a bit too glossy, and not 100% covered, some areas are mottled, so I am going to wet sand it and apply a coat of automotive clear flat instead. I still have to finish painting the colors on the bottom of the wing too, then I can finish the assembly.


12-08-2016, 09:08 AM
That's great, thanks. Pretty nifty about anchoring a servo arm and then driving it with a separate link instead of running the cables back to the servo itself. I was planning to use a separate steering and rudder servo, but that might work too. It's so hard to read this thread at work and not be able to walk over and look at my plane on the bench while I have my head full of ideas. 
Last edited by Auburn02; 12-08-2016 at 09:17 AM.
12-08-2016, 09:14 AM
I know what you mean. Doing the same with my B-25, got a lot of ideas in my head, then when I get down there,I lose them all as I work on it since I am not yet to the point in the build to where I can do what I had in my head. argh.
12-08-2016, 01:06 PM
I was actually talking about the steering for the tailwheel and not the doors, but this is all going to be hugely helpful when it comes time for me to do the doors too!
I do see in Chris' picture he just used a pull-pull cable looped through the steering arm. I think that's probably easiest. I was hoping to put a threaded end on one end or the other for easier line adjustments, and there's currently no room to do it at the servo because of the former behind the servo tray, but I think I can make room by turning the servo around.
I do see in Chris' picture he just used a pull-pull cable looped through the steering arm. I think that's probably easiest. I was hoping to put a threaded end on one end or the other for easier line adjustments, and there's currently no room to do it at the servo because of the former behind the servo tray, but I think I can make room by turning the servo around.
12-08-2016, 01:10 PM
One other thing you guys can look into is Conditional Mixing. If your radio has the ability then you can set the tail wheel steering servo to turn off when the retract cycle is engaged. When the retracts are extended the servo works again. This helps save power and any chance of strain or fouling of the control wires should any of that be an issue.
I do this on the YA P-38 for the nose gear because of the wires.
I do this on the YA P-38 for the nose gear because of the wires.
12-08-2016, 02:00 PM
One other thing you guys can look into is Conditional Mixing. If your radio has the ability then you can set the tail wheel steering servo to turn off when the retract cycle is engaged. When the retracts are extended the servo works again. This helps save power and any chance of strain or fouling of the control wires should any of that be an issue.
I do this on the YA P-38 for the nose gear because of the wires.
I do this on the YA P-38 for the nose gear because of the wires.
Not to stray this topic, but any pics or link to your P-38? Have you flown it?
Last edited by Auburn02; 12-08-2016 at 10:07 PM.
12-09-2016, 06:50 AM
Very nice Chris.
Almost hinging time. Just have the middle flap for the left wing to build. Still undecided on how I'll hinge them and then how I'll drive them between either the internal linkage or external like the ailerons. I'll probably move on to shaping wingtips as soon as I finish building the last flap and save the hinging nightmare for later.

Almost hinging time. Just have the middle flap for the left wing to build. Still undecided on how I'll hinge them and then how I'll drive them between either the internal linkage or external like the ailerons. I'll probably move on to shaping wingtips as soon as I finish building the last flap and save the hinging nightmare for later.
12-09-2016, 07:26 AM
Senior Member
My Feedback: (10)
Join Date: Oct 2003
Location: Mohnton,
PA
Posts: 450
Likes: 0
Received 0 Likes
on
0 Posts
Glue those flaps in place and forget about making them operate. It will save about a year of pulling your hair out 
I used some scap balsa and made a mock up of the wing trailing edge and flaps leading edge and used that to make different test holes for flap operation. (actually I made several mock up til I got it right).
From your pics it looks like you do nice work.. You'll get it right.
I used some scap balsa and made a mock up of the wing trailing edge and flaps leading edge and used that to make different test holes for flap operation. (actually I made several mock up til I got it right).
From your pics it looks like you do nice work.. You'll get it right.
12-09-2016, 01:44 PM

My Feedback: (3)
Join Date: Jul 2002
Location: Willimantic, CT
Posts: 1,180
Likes: 0
Received 0 Likes
on
0 Posts
To All,
I"ll say it again, if those Robarts hinges are not lined perfectly they will bind and will not work (they didn't for me) and I tried them twice you know filling up those holes with balsa dowels & epoxy to me it was very frustrating and not worth the aggravation,thats why I went with the Dubro heavy duty large scale hinges, installed them where the Robarts would go and they work flawlessly. (JUST MY 2 CENTS WORTH)
I"ll say it again, if those Robarts hinges are not lined perfectly they will bind and will not work (they didn't for me) and I tried them twice you know filling up those holes with balsa dowels & epoxy to me it was very frustrating and not worth the aggravation,thats why I went with the Dubro heavy duty large scale hinges, installed them where the Robarts would go and they work flawlessly. (JUST MY 2 CENTS WORTH)
12-09-2016, 02:05 PM
I'm still debating ordering those Tamjets hinges too, but I probably should have taken that into account when I put in the hinge blocks if I'm going to use them. And quite honestly, my wing was built and sheeted most of the way before I got it, so I'm only assuming the first builder put the hinge blocks in the correct locations...
http://www.tamjets.com/OSCnew/produc...roducts_id=122
http://www.tamjets.com/OSCnew/produc...roducts_id=122
12-09-2016, 03:17 PM
Senior Member
My Feedback: (10)
Join Date: Oct 2003
Location: Mohnton,
PA
Posts: 450
Likes: 0
Received 0 Likes
on
0 Posts
To All,
I"ll say it again, if those Robarts hinges are not lined perfectly they will bind and will not work (they didn't for me) and I tried them twice you know filling up those holes with balsa dowels & epoxy to me it was very frustrating and not worth the aggravation,thats why I went with the Dubro heavy duty large scale hinges, installed them where the Robarts would go and they work flawlessly. (JUST MY 2 CENTS WORTH)
I"ll say it again, if those Robarts hinges are not lined perfectly they will bind and will not work (they didn't for me) and I tried them twice you know filling up those holes with balsa dowels & epoxy to me it was very frustrating and not worth the aggravation,thats why I went with the Dubro heavy duty large scale hinges, installed them where the Robarts would go and they work flawlessly. (JUST MY 2 CENTS WORTH)
Can you show a pic of those hinges in your flaps? Maybe I'm missing something but I don't see how a flat hinge would make it easier on that center section of flaps.
Thanks
12-09-2016, 06:08 PM
My Feedback: (2)
FYI Robart makes a jig for it's hinge points. It really helps center the hinge point on the Trailing Edge.
http://www3.towerhobbies.com/cgi-bin...FcWKswod6wYEPQ
http://www3.towerhobbies.com/cgi-bin...FcWKswod6wYEPQ
12-09-2016, 07:16 PM
This was covered I think on the last page. The wing tip on the Corsair isn't centered, but offset a bit, so that centering guide doesn't help. The best method I found is to draw a line from tip to center, and you will find it isn't centered all the way, but angled, so I drill the holes down the line, and use a dowel that has been tapered and sharpened to a point, and use that to mark where to drill the wing. This prevents binding that occurs if you were to center the hinge line instead.
12-10-2016, 07:16 PM
My Feedback: (7)
Join Date: Dec 2008
Location: Owatonna,
MN
Posts: 226
Likes: 0
Received 0 Likes
on
0 Posts
I'm a going to be a slow poke on progress for a while due to other obligations in the next few months but a simple thing is done. Control surfaces have been shaped and hinged. Ailerons have been already done.
Z

Z
12-10-2016, 07:49 PM
My Feedback: (2)
acdii,
the jig centers the hinge between the top and bottom surface. If you have a Gull wing for example.. Each part of the Gull will have its own trailing edge. The jig just centers each section as necessary. The wing top too has its own center. Should work there as well ..
the jig centers the hinge between the top and bottom surface. If you have a Gull wing for example.. Each part of the Gull will have its own trailing edge. The jig just centers each section as necessary. The wing top too has its own center. Should work there as well ..
12-10-2016, 08:42 PM
The reason it doesn't work for the Corsair aileron is the middle hinge is not centered on the trailing edge, but is offset. If you put a straight edge on the outer hinges you will see the middle one sits higher. If you center all 3 then the aileron binds. I think on the prior page this was discussed with another member who ran into this as well, and I too suggested the Robarts guide, then remembered, wont work for the Corsair aileron.