


top flite spitfire build
 05-16-2007, 03:35 PM
#1
Senior Member
Thread Starter

Join Date: Dec 2006
Location: santiago, CHILE
Posts: 107
Likes: 0
Received 0 Likes
on
0 Posts
hi everyone.
im glad to share mi first kit proyect, a top flite spitfire mkix. i would like to say that im a real fan of this plane and also that i have a very little experience on wood work (just a cessna of guillows thats all, ..oh yes! and all those repairs in my old 40` trainner ) so any comments, ideas, helps, critics, etc are more than wellcome!
im planing to go with a .90 2 stroke engine with a 4 blade prop (i think the super tigre would be ok but i would be glad to hear any other ideas). i will also use flaps and retracts (the robarts suggested by the instructions).
well here is the process so far:
on the first picture is the stab and the fin already finished (no pictures of the building, sorry!). there was only one problem with a tip of the stab and i had to made it again (as a result of my inexperience, thats for sure!). to late i read here that is better to save weight in the tail[ ], i hope these will not cause any futher problems.
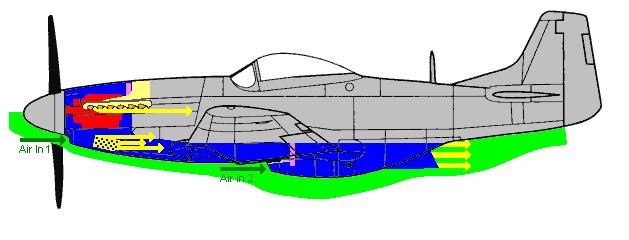
on the second picture is my actual process, the wing ready to be covered with the skins (anyone nows why you dont have to glue the inner trailing edge??), you will notice a small aluminium tube on the rib 4 near the center section of the wing (picture 3), thats for a air cooling system for the engine that takes the air from the radiators (on the bottom) to the engine through the center of the wing, and exhausting from the exhaust stacks on the cowl.
well thats all for now, i hope i could post some pictures of the evolving soon. cheers!!
PD. sorry about my english, but im from chile (south america) and is difficult for me writting it
im glad to share mi first kit proyect, a top flite spitfire mkix. i would like to say that im a real fan of this plane and also that i have a very little experience on wood work (just a cessna of guillows thats all, ..oh yes! and all those repairs in my old 40` trainner
) so any comments, ideas, helps, critics, etc are more than wellcome!im planing to go with a .90 2 stroke engine with a 4 blade prop (i think the super tigre would be ok but i would be glad to hear any other ideas). i will also use flaps and retracts (the robarts suggested by the instructions).
well here is the process so far:
on the first picture is the stab and the fin already finished (no pictures of the building, sorry!). there was only one problem with a tip of the stab and i had to made it again (as a result of my inexperience, thats for sure!). to late i read here that is better to save weight in the tail[
], i hope these will not cause any futher problems.on the second picture is my actual process, the wing ready to be covered with the skins (anyone nows why you dont have to glue the inner trailing edge??), you will notice a small aluminium tube on the rib 4 near the center section of the wing (picture 3), thats for a air cooling system for the engine that takes the air from the radiators (on the bottom) to the engine through the center of the wing, and exhausting from the exhaust stacks on the cowl.
well thats all for now, i hope i could post some pictures of the evolving soon. cheers!!
PD. sorry about my english, but im from chile (south america) and is difficult for me writting it
 05-16-2007, 04:23 PM
#2
Senior Member
Interresting cooling idea. Doubt you will pass enough air for the engine to cool properly. I would give up on the 4 bladed flying prop idea as well, and make a nice 4 bladed static prop and use a two blade for flying purposes. One thing you will learn in this hobby is some things work but most of these types of idea's have been tried before, and just don't work. Build the plane according to the directions and have fun flying it.
05-16-2007, 04:26 PM
#3

Hi cvial,
Be sure to look through the great build thread by tubig. I learned a lot from his build.
http://www.rcuniverse.com/forum/TF_S...1403165/tm.htm
You will find a wealth of information there.
As for flying with a 4 blade prop, there are really only two choices at this scale, the RCV SP series engines or electric. I have the 90SP in my TF Spitfire, and am getting ready for an electric Top Flite P-51B build. Cooling and power are the challenges with the 90SP, and cost is the big challenge with electric.
For cooling on my Spit, I took a novel approach. The only air inlet in the cowl I have is the space between the spinner and the front of the cowl, and a small hole I made to allow clearance for the throttle arm. I exhaust the hot air out the bottom of the cowl using a small ducted fan and baffling inside the cowl to keep the air flow across the cylinder. This is working pretty good. My next mod will be to add a thermalcouple controller for the ducted fan.
I've had a lot of delays in getting my Spit airborne, but have to pick up the pace as my club is hosting the Scale Masters qualifiers this August. On my maiden attempt, my control throws were way too great and I aborted right at take off. I ended up landing hard and breaking the gear rails. I've finished repairs and need to refinish the paint job. I am also changing over to the Spektrum radio and want to get some flight time in on a modified 4 * I'm building before flying the Spit on it. I have some photos in my gallery of various stages of my build. I also have a short clip of a ground test of the spit running with a 15.5" 4 blade here: http://www.rcuniverse.com/forum/TF_S...1403165/tm.htm
Good luck, and I look forward to seeing your progress.
Scott
05-18-2007, 04:45 PM
#4
Senior Member
Thread Starter
Join Date: Dec 2006
Location: santiago, CHILE
Posts: 107
Likes: 0
Received 0 Likes
on
0 Posts
Hi there.
Thanks for your answers, they are really helpfull!
As for the cooling idea I was thinking on using three cooling fans of 30*30*6 mm in the places that shows the diagrams and the picture to keep the air flowing, this idea is really a bet so I hope the results are as I expected. About the prop, you really clear me a doubt with that, I was not really sure that the supertigre could run with a 4 blade, so I will be running with a 2 blade and save the 4 for static display (I was seeing the RCV but unfortunately they dont sell it here and with the shiping costs and taxes it gets very expensive[:@])
Ive been watching tubig built, great source of information there!! thanks a lot!, I saw your TF spit buildng too Scot, men she`s really a beauty, you have much to be proud of!. Too bad to hear about that accident I hope there is nothing serious.
Well I go now to work on that wing, happy flying!!
05-23-2007, 04:29 PM
#6

My knowledge of compressible fluid flow is not the best, but
I don't think that you will get very good airflow through those
small hoses, even with fans to help.
The problem is that you will have a huge pressure build-up
inside the tubes, so that the fans would have to be quite
powerful to force a large enough quantity of the air through
them. If you want to see for yourself, take a section of that
tubing that is about 2 feet long, bend it like you show in your
images, and then try blowing through it. You will notice that
a lot of pressure is necessary to force air through.
Please don't mistake my advice for discouragement. I intend
to try something similar on my TF P-51.
Try to find a system that works and that is reliable. Make sure
that you test it. I can tell you from experience: nothing is worse
than an unreliable engine. You spend more time on the ground,
either fixing damage from the last dead stick landing, or tuning
the engine.
05-23-2007, 08:28 PM
#7
My Feedback: (13)
I woulld be very carefull about adding any weight to this plane it will build heavy and you will be surprised how much nose weight you will need,I certainly was when I ended up adding 19oz of lead to the nose for balance total weight 11lbs every thing is as close to the nose as I could make it including the battery in the engine compartment.
saramos's idea for a cooling fan looks interesting for sure,all I did was make a opening for the head to stick out for clearance and a exit hole in the bottom of the cowl,as well as opening the exhaust stack ends.
I am also running a OS91fs not a 2st,
another thing is running a 4 blade prop there is alot of info on this you should read the cowl is small and heat is a major issue.
05-24-2007, 08:32 AM
#8
Junior Member
Join Date: Mar 2007
Location: London,
ON, CANADA
Posts: 15
Likes: 0
Received 0 Likes
on
0 Posts
What retracts are you using? if you are using robarts you can buy the smaller air tank(or two) and mount them in the wings...thats what i did on my spit i managed to keep it down to 9 1/2 pounds mostly because I had to add less nose weight with the retract air tanks(i used two small ones) in the wings and not in the fuse..I'm running a YS110 engine in mine and it spins a 3 blade prop well...
05-25-2007, 06:21 PM
#9
Senior Member
Thread Starter
Join Date: Dec 2006
Location: santiago, CHILE
Posts: 107
Likes: 0
Received 0 Likes
on
0 Posts
HI Iam using robarts too but I am not really sure about adding more weight to the wing, but is a good idea for loosing some weight on the tail.
In the cooling system I am trying to exit more air than the the air getting in to create some kind of vacuum space to keep the air flowing so it can get in the cowl easily, at least that the idea. Of course I will test it first and if it doesnt work I will be going with some holes on the bottom of the cowl. Do you have some pictures of what you are doing on the p-51 IL2windhawk?, I dont understand very well the diagram.
thanks, cristian
06-25-2007, 03:34 PM
#10
Senior Member
Thread Starter
Join Date: Dec 2006
Location: santiago, CHILE
Posts: 107
Likes: 0
Received 0 Likes
on
0 Posts
Ok, sorry about the delays but these last weeks I have a lot of studies "business" to take care for and almoust nothing to build a single stick in the plane[:'(].
Not very much, I am ready to fit the second retract after finishing the bottom skin. I am also using robart cover struts for now and planning to use robostrusts in the future, although they look great and very scale.
I was also thinking and decided to give up with the tube cooling system, it was getting really heavy and there was no warranties that it would work well. Instead of that I decided to do one of the two schemes below, these planes have a larger intake in the cowl and I can take the air directly from there without adding more wheight and is just after the prop so it will keep the air flowing.
Thats all so far, I hope I could post more soon.
06-25-2007, 05:18 PM
#11
I don't think that'll provide enough cooling. The opening on the carb intake scoop is only 3/8" x 1 3/16". This would provide less than 1/2 sq in opening, and you will still need to exhaust the air and have to add some radical baffling to get the airflow over the cylinder.
Scott
Scott
06-25-2007, 05:45 PM
#12

My Feedback: (6)
I agree, you are going to need a lot of air movement and there is just no easy place to hide it on a Spit this size without getting very complicated, adding weight, or cutting some big holes especially if you want to keep the AUW down to a minimum. I am quickly approaching the point where I make the air scoop and vents so we will see how it works out. I am planning to cut the backside of the air scroop open and take advantage of the low pressure point there along with other vents around the scoop and another on the front of the cowl. There is a round circle with a letter painted on the front of the cowl of the Spit I am modeling so I am going to use that as the intake and oversize it a little to cheat. The muffler will vent out the back of the scoop as well. I am enjoying my build and I have a thread over on RCSB.
06-25-2007, 05:51 PM
#13
My Feedback: (6)
Another think to consider is to cut out the exhaust and fabricate something more scale with pipes that are open. You could open up some more exhaust area there and in the gaps between the exhaust and cowl although that alone would still not be enough.
06-25-2007, 06:03 PM
#14
My Feedback: (13)
I ended up opening the exhaust pipe ends for venting,I just drilled a couple of holes and used a round file to finish the holes to vent some of the hot air out.
depending on your engine your going to need a hole at the front of the cowl for the cylinder head to clear the cowl as well as provide a entry point for cooling air or your going to be running hot.
depending on your engine your going to need a hole at the front of the cowl for the cylinder head to clear the cowl as well as provide a entry point for cooling air or your going to be running hot.
06-25-2007, 06:46 PM
#15
My Feedback: (6)
I agree with that too. I measured a Saito 82 and it still required a hole for the head to clear. I forgot to mention that.
ORIGINAL: bigtim
I ended up opening the exhaust pipe ends for venting,I just drilled a couple of holes and used a round file to finish the holes to vent some of the hot air out.
depending on your engine your going to need a hole at the front of the cowl for the cylinder head to clear the cowl as well as provide a entry point for cooling air or your going to be running hot.
06-25-2007, 08:44 PM
#16
Senior Member
Thread Starter
Join Date: Dec 2006
Location: santiago, CHILE
Posts: 107
Likes: 0
Received 0 Likes
on
0 Posts
Thanks for all your advices, I will try to make as much intake holes as I can without affect the scale apereance of the model, I was thinking about the carb intake, the left exaust pipes (the right ones are for the outtake), and the gap between the spinner and the cowl for now, I will try other spaces as I build her up. I was thinking about using some fans, specially for the outtake to create low preasure to keep the air flowing, I´ve heard that the outtake has to be twice the intake.
I am looking forward to see your results rustypep, congratulations on a great job.
I am looking forward to see your results rustypep, congratulations on a great job.
06-25-2007, 11:28 PM
#17
Here's a couple of photos of my solution. I have one more modification. Right now, I use a knob on my TX to control the fan on my 8 channel radio. I no longer trust my radio and have purchased a DX7. Now, to control the fan, I picked up a ThermaCowl from Oregon Scale Aviation. It will thermally drive the ECS that I am using for the ducted fan. I still had to make the carb scoop removable. The scoop is used for display, and removed for flight.
Scott
Scott
07-04-2007, 03:51 AM
#18
Junior Member
Join Date: Oct 2005
Location: , PA
Posts: 9
Likes: 0
Received 0 Likes
on
0 Posts
Hi do you recommend this model to a beginner that have not built a r/c plane but built a box, bridge and a CO2 dragster also how are the flying charteristics
07-20-2007, 03:32 PM
#19
Senior Member
Thread Starter
Join Date: Dec 2006
Location: santiago, CHILE
Posts: 107
Likes: 0
Received 0 Likes
on
0 Posts
I dont know if this model would be the best choise for a first plane. I recomend to start with a arf trainer to get use to building and flying rc planes, thats what I did, then you could move to a warbird or whatever you chose. Although I don´t think this model is so dificult to built, of course that depends on how much details you would like to add, but is a good first KIT model.
On flying characteristics I really dont know but I have read that is very smooth and maneubrable but without the self recovery of trainers.
I hope this helps. cheers
On flying characteristics I really dont know but I have read that is very smooth and maneubrable but without the self recovery of trainers.
I hope this helps. cheers
07-22-2007, 02:58 PM
#20
Senior Member
Thread Starter
Join Date: Dec 2006
Location: santiago, CHILE
Posts: 107
Likes: 0
Received 0 Likes
on
0 Posts
Ok I have been out for the last week, but here is so far.
I finished the aleiron servo hatchs and added the presoure head at the bottom wing, I get detailed pictures and plans from the "modelmania 5, supermarine spitfire IX-XVI" book, Its a really good choise and it has a lot of detailed pictures of everything. I scaled the plan on autocad so I can get 1/7 plans of all that details.
I dont know if I would leave the preasure head for flying, I think I would try first without it to see how she behaves on landing aproaches and then decide it.
Now I have just started with the weel wells using 1/32 balsa, I have to trim the ribs to acomodate it, I hope that the well give the strength necesary, I also plan to add the weel well fairings to increase the resistanse.
well thats all so far .
10-12-2007, 09:44 PM
#21
Senior Member
Thread Starter
Join Date: Dec 2006
Location: santiago, CHILE
Posts: 107
Likes: 0
Received 0 Likes
on
0 Posts
Hi everyone, last building report:
I had expend the last weeks finishing the landing gear system (including weel wells and landing gear doors) and sanding the bottom of the wing.
for the landing gear doors I am using 1/32 ply, works just fine for me but I have to add a little more in the edges because of the angle of the wing that leaves a gap between the surface of the wing and the door. not very complicate and it looks very fine.
I am planing to add the paint coat for the inside parts of the wing tomorrow, i will airbrush with zinc chromate enamel and then add a coat of flat clear lustrekote for the fuelproofing, i am also now working on the flaps and the radiatos, so I hope I will be working on the upper skin by the end of the weekend.
Here are some shots of the work so far, I will get the whole proyect to a betterworkimg table soon so my family can finally play some ping-pong without bothering me.
See you all soon (I hope with some better shots)!
I had expend the last weeks finishing the landing gear system (including weel wells and landing gear doors) and sanding the bottom of the wing.
for the landing gear doors I am using 1/32 ply, works just fine for me but I have to add a little more in the edges because of the angle of the wing that leaves a gap between the surface of the wing and the door. not very complicate and it looks very fine.
I am planing to add the paint coat for the inside parts of the wing tomorrow, i will airbrush with zinc chromate enamel and then add a coat of flat clear lustrekote for the fuelproofing, i am also now working on the flaps and the radiatos, so I hope I will be working on the upper skin by the end of the weekend.
Here are some shots of the work so far, I will get the whole proyect to a betterworkimg table soon so my family can finally play some ping-pong without bothering me
.See you all soon (I hope with some better shots)!
12-24-2007, 04:41 PM
#23
Senior Member
Thread Starter
Join Date: Dec 2006
Location: santiago, CHILE
Posts: 107
Likes: 0
Received 0 Likes
on
0 Posts
hi there finally I`ve finished my exams period so i can focus in the spit build at least for the next month.
well in the meantime I finally finished the wing sheeting and the inside coat with humbrol green zinc chromate with a coat of clear lustrecote. I also added a pair of magnets at the bottom of the wing (you can see them in the first 2 pictures), thats for static display 250 lbs bombs (I thought about building some system to drop them from the air, but because of weight and simplicity I decided to build them just for display)
yesterday I started the building on the flaps and glue the top ones, not big problems so far, just following instructions.
well I hope to write the next weekend with more news.
MERRY CHRISTMAS FOR EVERYONE!!!
05-24-2008, 12:05 PM
#24
Senior Member
Thread Starter
Join Date: Dec 2006
Location: santiago, CHILE
Posts: 107
Likes: 0
Received 0 Likes
on
0 Posts
hello everyone, you would have to excuse me but I couldnt post before for different several reasons, but here I am again .
first of all I am glad to said that I finally finish the wing (it looks like that I take seriously that part that says "take your time to build..")
I build up the flaps just as the instructions said but for the ailerons I added a 1/32 skin to cover the ribs (thanks to tubig for that idea!), you can see in the first picture the 1/32 gap in the ribs for the skin. the other pictures shows the final wing (I plan to make a hach to cover the holes of the retracts, but for now I just wanted to start the fuse!)
I passed the last week thinking about the cockpit and decided to build my own instead of using top-flite, I already made some plans to see what modifications I will have to make (I plan to use the tips described on the tutorials of rcscalebuilder.com great info there for scaling builds)
. first of all I am glad to said that I finally finish the wing (it looks like that I take seriously that part that says "take your time to build.."
)I build up the flaps just as the instructions said but for the ailerons I added a 1/32 skin to cover the ribs (thanks to tubig for that idea!), you can see in the first picture the 1/32 gap in the ribs for the skin. the other pictures shows the final wing (I plan to make a hach to cover the holes of the retracts, but for now I just wanted to start the fuse!)
I passed the last week thinking about the cockpit and decided to build my own instead of using top-flite, I already made some plans to see what modifications I will have to make (I plan to use the tips described on the tutorials of rcscalebuilder.com great info there for scaling builds)
05-24-2008, 12:23 PM
#25
Senior Member
Thread Starter
Join Date: Dec 2006
Location: santiago, CHILE
Posts: 107
Likes: 0
Received 0 Likes
on
0 Posts
Yesterday I started the fuse and paid special atention on the F4, I`ve read that it has some problems specially with the old kit. I had some dificulties with it because the plan shows that the fuse skin doesnt cover the cockpit rails, so the F4 has a gap for the skin in reference to the cockpit floor, but the other formers doesnt. Also it confuse me the fact that some skin nedd to be added in the cocpit before the instrument pannel for the cannopy. I think I will end buiding the skin like the old model covering the cockpit rails and adding some filler to the F4 to fill the gap. I dont know if somewone has the same problem?
cvial
cvial