


KMP / YT FW-190 Build Thread
 09-05-2012, 04:14 PM
#2651
Senior Member

Join Date: Aug 2004
Location: GraftonNew South Wales, AUSTRALIA
Posts: 1,289
Likes: 0
Received 0 Likes
on
0 Posts
Hi Volkert
Have built a couple of these (and have another in box waiting for assembly). Mine have flown OK with the motor mounted on the firewall with no side or down thrust. Think most have mounted this way.
As far as aligning I ignored the marks mounted the fuse vertical (fixed it to the back of a chair and shuffled the motor and mount around until aligned with the cowl. I then carefully removed the cowl and marked up
Terry
 09-06-2012, 04:50 AM
#2652

Join Date: Feb 2006
Location: camden, SC
Posts: 1,133
Likes: 0
Received 0 Likes
on
0 Posts
Volkert I have the Corsair and the P-51. And I mounted mine to the firewall. Both fly great. I have the 190 on the way. Gonna put a dle 35 in it. And plan to mount it the same.
09-07-2012, 07:16 AM
#2653

My Feedback: (77)
Join Date: Dec 2001
Location: Rineyville,
KY
Posts: 471
Likes: 0
Received 0 Likes
on
0 Posts
I mounted my PTR 36 in a similar fashion. Put the fuselage vertical. Set the motor without the spinner on the firewall.
If your cowl is tight, put wax paper between the cowl and fuselage. Then place your spinner backplate on the crank and adjust the motor. If you slip it off carefully, not disturbing the motor, then you can mark the motor mounts positions.
billrad
If your cowl is tight, put wax paper between the cowl and fuselage. Then place your spinner backplate on the crank and adjust the motor. If you slip it off carefully, not disturbing the motor, then you can mark the motor mounts positions.
billrad
 10-03-2012, 11:42 AM
#2656
Join Date: Oct 2003
Location: Eindhoven, NETHERLANDS
Posts: 969
Likes: 0
Received 0 Likes
on
0 Posts
It is about complete! I cycled the ESM electric gears a couple of times and guess what: it failed! Looks like the gears stripped.
When I ordered them reviews were OK. Now I read about other unhappy campers. So, what is best? Go back to air and get a set of Sierra's? Any other offering of electric retracts? Hope ESM will deliver their V3 version?
Volkert
When I ordered them reviews were OK. Now I read about other unhappy campers. So, what is best? Go back to air and get a set of Sierra's? Any other offering of electric retracts? Hope ESM will deliver their V3 version?
Volkert
10-03-2012, 01:06 PM
#2657
Senior Member

Join Date: Dec 2007
Location: BLENHEIM Malbourough, NEW ZEALAND
Posts: 276
Likes: 0
Received 0 Likes
on
0 Posts
Go Sierra's and relax but run the wheels that come with the kit put them on a lathe and round the sides slighty with sand paper and they look great i watched the ESM ones on a test personaly i thought they where junk . Have seen four of there sets fail to date
10-03-2012, 04:47 PM
#2659
My Feedback: (1)

Join Date: Oct 2008
Location: Camas, WA
Posts: 312
Likes: 0
Received 0 Likes
on
0 Posts
Volkert,
I had my ESM gear modified by Down and Locked http://www.downandlocked.com/. I've been very happy. Reliable and they have great customer service.
Jason
I had my ESM gear modified by Down and Locked http://www.downandlocked.com/. I've been very happy. Reliable and they have great customer service.
Jason
10-03-2012, 10:21 PM
#2660
Join Date: Oct 2003
Location: Eindhoven, NETHERLANDS
Posts: 969
Likes: 0
Received 0 Likes
on
0 Posts
ORIGINAL: Starmer
Volkert,
I had my ESM gear modified by Down and Locked http://www.downandlocked.com/. I've been very happy. Reliable and they have great customer service.
Jason
Volkert,
I had my ESM gear modified by Down and Locked http://www.downandlocked.com/. I've been very happy. Reliable and they have great customer service.
Jason
Volkert
10-07-2012, 12:59 PM
#2661
Member
Join Date: Mar 2005
Location: Salisbury, UNITED KINGDOM
Posts: 55
Likes: 0
Received 0 Likes
on
0 Posts
Hi All,
I haven't contributed in a while because my electric 190 has been in retirement for just over a year. Revisited the plane and have had a half dozen flights this month, and finally got a decent movie, shot by my great mate and cameraman Bob.
She flies just as well as I remember, so here is the link to the movie. I hope you enjoy it.
Al
http://www.youtube.com/watch?v=KkLyzHtRkcE
10-07-2012, 06:08 PM
#2662
My Feedback: (1)
Join Date: Oct 2008
Location: Camas, WA
Posts: 312
Likes: 0
Received 0 Likes
on
0 Posts
Al,
Nice video! It really is an art to get everything right. Al, I must admit you were my inspiration for converting mine to electric. I used your same set up with 8S. I was considering switching to 10 cells. I have enough power for scale flight but I'm swinging a 22X10 prop to get enough watts since my plane is so heavy at 19 pounds. Pretty high Amps at 65 with bursts to 80.
I had a fun day at the field yesterday.Its still very touchy on the elevator though. I have 15mm of throw. Manualcalls for 25mm.I tried expo too, then backed off to none. Plane balanced at 135mm, manual says 140mm. I thinkI will try 130mm and see how it likes it. Where are you balanced? Perhaps I'm stilla touch tail heavy still
 . Plane looks very nice in the air and flies pretty rock solid once you get everything trimed and set. Pictures below.
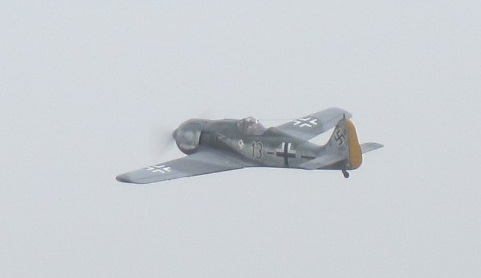
And another some more
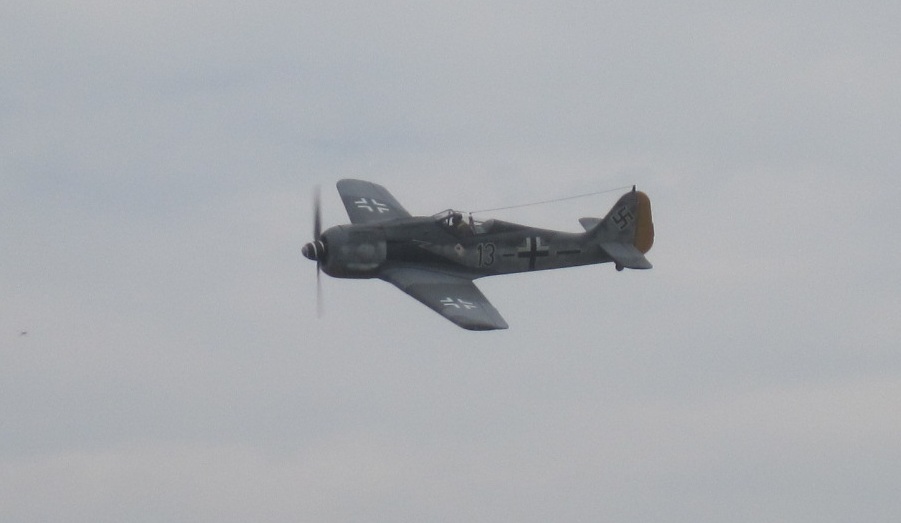
I have the gear doors pulled off from previous flights. Wet and muddy field with the monsoon season here in Thailand. I've had a few little mishaps but nothing I can't repair.

The one nice thing I like about bashing these ARFs is that you can do a color scheme that no one has. I haven't seen anyone do the "Pips" Priller bird in a large scale. A real head turner.
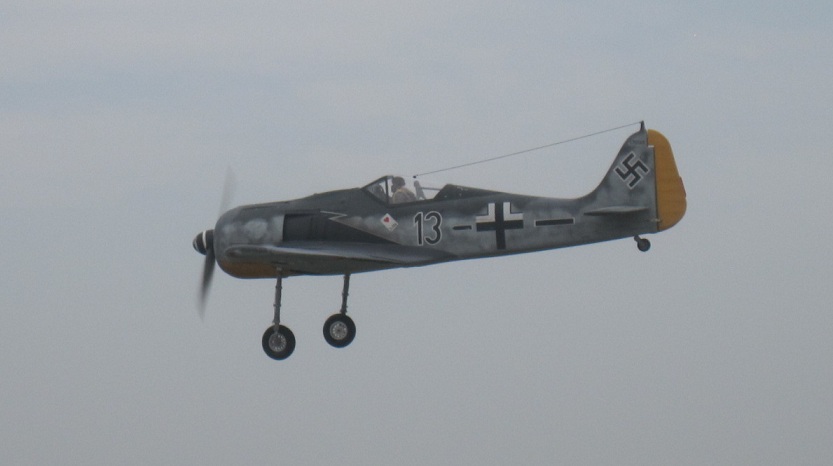
One more thing. Feedback for anyone building this plane or any other ESM for that matter. I tore or damaged the gear plate/ribs of this plane 3 times.
 OK, Ok, my landings or in two cases ..aborted Take offs into soft muddy grass were not pretty but muddy grass tore them loose.
  The balsa for the leading edge (forward part of the landing gear bay) is real spongy and soft. The ply actually separated and pulled loose twice. I glued the leading edge back with CA to harden it and then CA'd and reinforced everything (ribs, plate etc) with milled glass Epoxy and some FG. No more problems. The greater surface area with the epoxy fillets around the joints did the trick. I'd definitely reinforce and beef up this area if I build another ESM plane.
For Flaps I've tried 15 degrees and none for Take Off. None really required. For landing I use 58-60 degrees. No real pitch change and it slows the plane down fine.
Cheers,
Jason
10-07-2012, 09:28 PM
#2663
Join Date: Oct 2003
Location: Eindhoven, NETHERLANDS
Posts: 969
Likes: 0
Received 0 Likes
on
0 Posts
Jaspn, don't forget: flying electric means no fuel! I'll be hauling around a pound of fuel at take off. So moving to 130mm for CG might really help you. Maybe some other electrics can chime in.
Great pictures!
Volkert
Great pictures!
Volkert
10-08-2012, 09:50 AM
#2664
Member
Join Date: Mar 2005
Location: Salisbury, UNITED KINGDOM
Posts: 55
Likes: 0
Received 0 Likes
on
0 Posts
Hi Jason,
Great photos and an equally impressive colour scheme[8D].
The CG on mine is at 140mm. I too have found that the elevator is sensitive with the flaps and wheels down, but I guess that I have got used to it. Having said that, you can see on the movie that I had a couple of "bites" at the landing!!
I have 3 other FW190As, the FMS 1400mm one, the ST Model 1200mm one and the FMS 800mm one. The first two have retractable wheels and flaps and they are also pitch sensitive during the landing.
I'm sure that moving the CG forward to 130mm will make it less sensitive.
Hope this helps,
Al
10-08-2012, 10:55 AM
#2665
Join Date: Oct 2003
Location: Eindhoven, NETHERLANDS
Posts: 969
Likes: 0
Received 0 Likes
on
0 Posts
Jason,looked at the pictures again and looks like you did a great job on the pilot figure / cockpit. Could you show a detail picture + story on what you did?
Volkert
Volkert
10-08-2012, 12:59 PM
#2666
Senior Member
Join Date: Aug 2004
Location: GraftonNew South Wales, AUSTRALIA
Posts: 1,289
Likes: 0
Received 0 Likes
on
0 Posts
You electric flyers should not forget that every electron you carry adds 9.10938188 X 10(-31) to the mass of the plane
Think of what that does to the CG when they start moving from the battery to the motor!
Terry
Think of what that does to the CG when they start moving from the battery to the motor!
Terry
 10-08-2012, 03:43 PM
#2668
ORIGINAL: Redback
You electric flyers should not forget that every electron you carry adds 9.10938188 X 10(-31) to the mass of the plane
Think of what that does to the CG when they start moving from the battery to the motor!
Terry
You electric flyers should not forget that every electron you carry adds 9.10938188 X 10(-31) to the mass of the plane
Think of what that does to the CG when they start moving from the battery to the motor!
Terry
10-08-2012, 05:43 PM
#2669
My Feedback: (1)
Join Date: Oct 2008
Location: Camas, WA
Posts: 312
Likes: 0
Received 0 Likes
on
0 Posts
Kahlog,
True, True. I here ya!....But I think they are using some ironic gas usage humor...[X(]
Volkert,
Thanks for the compliment. I'll post some of my cockpit details below from my Build Thread over on RCSB. If you want more you can go to RCSB and check out the whole Bash build. You can Register (free) to view, but if you want to post more than 5 times then you will need to subscibe for $20. Well worth it IMHO.
My RCSB thread: http://www.rcscalebuilder.com/forum/forum_posts.asp?TID=17536&PN=1&TPN=1
Quote:
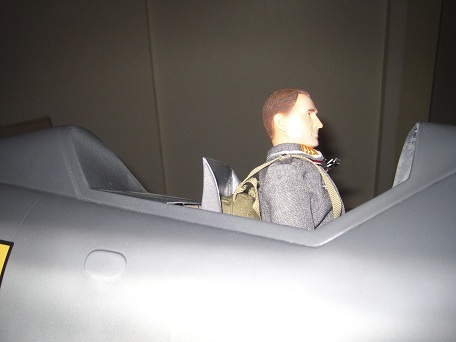
I'm using a DBalsa cockpit kit and I'll need to determine how it will fit with the servo tray located in the fuse. This first part will go quick since I've been building on it for a little while. First was cutting a hole for the cockpit kit. A dremmel cutoff wheel was indispensible for this. I then had to figure out the placement for the cockpit deck. I had to get it as low as I could without interferring with the servo tray. I decided in a little higher than scale location for ease of installation without removing too much. After some trial and error it fit OK. I threw a 1/6 scale Dragon pilot to check for depth. Pic below. I later trimmed the back of the seat down to look more scale and installed the rest of the kit. Quite a few things were not very scale with the kit, but it was a starting place to add touches. It's no INZPAN kit but it works for an ARF and adds quite a bit. I wish INZPAN made a 1/6th scale kit. (I now know that I Fly Tallies.com offers cockpit parts for a great looking cockpit.
http://www.iflytailies.com/store/instruments/1-6-scale-warbirds/.)
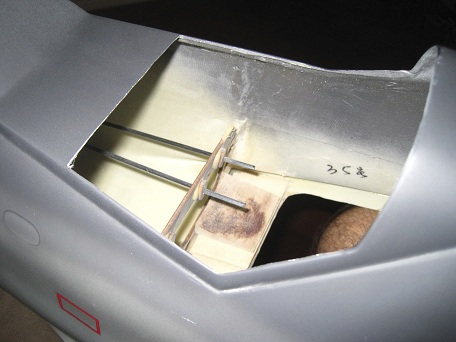
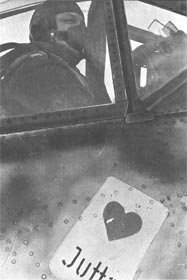
Here's the pilot test fit. The height looks about right. I later removed some stuffing from his chute so he would sit better in the seat. Here's a picture of the man himself "Pips" Priller. Remember, I cut the seat back down in later. It was too high. It's not the most scale cockpit in the world, but for a Bash in an ARF I was fairly happy with the outcome.
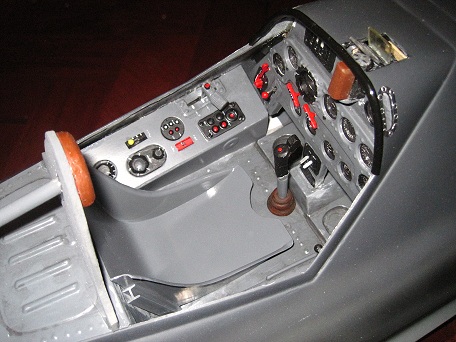
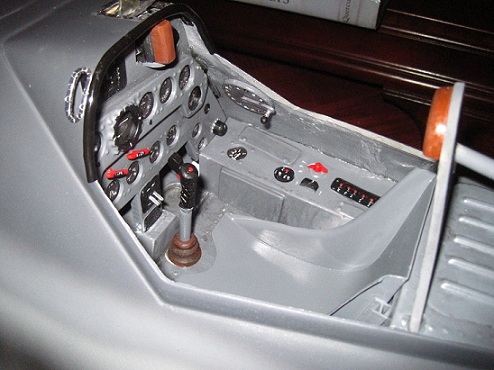
Here's the rest of the cockpit put together. I cut hand holds out and sunk the REVI sight into the dash. The kit directions had it mounted to the front so it stuck out, but I think the embeded position looks more scale.
Cheers,
Jason
True, True. I here ya!....But I think they are using some ironic gas usage humor...[X(]
Volkert,
Thanks for the compliment. I'll post some of my cockpit details below from my Build Thread over on RCSB. If you want more you can go to RCSB and check out the whole Bash build. You can Register (free) to view, but if you want to post more than 5 times then you will need to subscibe for $20. Well worth it IMHO.
My RCSB thread: http://www.rcscalebuilder.com/forum/forum_posts.asp?TID=17536&PN=1&TPN=1
Quote:
I'm using a DBalsa cockpit kit and I'll need to determine how it will fit with the servo tray located in the fuse. This first part will go quick since I've been building on it for a little while. First was cutting a hole for the cockpit kit. A dremmel cutoff wheel was indispensible for this. I then had to figure out the placement for the cockpit deck. I had to get it as low as I could without interferring with the servo tray. I decided in a little higher than scale location for ease of installation without removing too much. After some trial and error it fit OK. I threw a 1/6 scale Dragon pilot to check for depth. Pic below. I later trimmed the back of the seat down to look more scale and installed the rest of the kit. Quite a few things were not very scale with the kit, but it was a starting place to add touches. It's no INZPAN kit but it works for an ARF and adds quite a bit. I wish INZPAN made a 1/6th scale kit. (I now know that I Fly Tallies.com offers cockpit parts for a great looking cockpit.
http://www.iflytailies.com/store/instruments/1-6-scale-warbirds/.)
Here's the pilot test fit. The height looks about right. I later removed some stuffing from his chute so he would sit better in the seat. Here's a picture of the man himself "Pips" Priller. Remember, I cut the seat back down in later. It was too high. It's not the most scale cockpit in the world, but for a Bash in an ARF I was fairly happy with the outcome.
Here's the rest of the cockpit put together. I cut hand holds out and sunk the REVI sight into the dash. The kit directions had it mounted to the front so it stuck out, but I think the embeded position looks more scale.
Cheers,
Jason
10-16-2012, 10:43 AM
#2670
Senior Member
My Feedback: (12)

Join Date: Feb 2008
Location: Mesa,
AZ
Posts: 389
Likes: 0
Received 0 Likes
on
0 Posts
Hey all, sorry to jump in and ask a likely redundant question but I've searched through a lot of the 107 pages and at this point am throwing in the towel! I have an older gas engine I really want to use ( a Weber Bully 35 some that a few RCU guys helped me get running ). It is a strong runner, but a bit heavier then the newer breed of gassers. My original plan was to use it on the ESM Val, had one on order, then it went back order with no word on when they might be in stock. So now I am looking at other round-cowl war birds that need nose weight and am kind of down to choosing between the 190 or the F8F Bearcat. Reading through the posts, I see that the earlier version with the molded wings was heavier and needed more ballast up front. The newer built up wing version is lighter, but I didn't see how much less nose weight was needed. When putting the Bully on the scale, it comes to just about 4 lbs. ready to run (muffler, ignition unit, spinner, prop - basically pulled from the test stand and put on the scale). It seems the bearcat has a shorter nose and needs A LOT of added wt. but the 190 looks to have a longer snout, any one know or have an opinion whether the bully would work in the 190? Or at least have a motor/added weight combo I could research?
Thanks!
J
Thanks!
J
10-16-2012, 11:58 AM
#2671
The 190 does NOT have a longer snout then the bearcat. Not by a long shot. The 190A is a very short front end. A 4 pound motor would work well up front on the 190. I put in a saito 180 and everything related to it in front of the cowl.....ie...throttle servo, onboard glow, and even the RX battery and STILL added at least 12 oz or more of dead weight lead.
10-16-2012, 01:06 PM
#2672
Join Date: Oct 2003
Location: Eindhoven, NETHERLANDS
Posts: 969
Likes: 0
Received 0 Likes
on
0 Posts
I mounted a Laser 200v @1220 grams but will still need a lot of lead to get to the right balance so you should be fine with that motor.
Volkert
Volkert
10-16-2012, 03:04 PM
#2673
Senior Member
My Feedback: (12)
Join Date: Feb 2008
Location: Mesa,
AZ
Posts: 389
Likes: 0
Received 0 Likes
on
0 Posts
ORIGINAL: kahloq
The 190 does NOT have a longer snout then the bearcat. Not by a long shot. The 190A is a very short front end. A 4 pound motor would work well up front on the 190. I put in a saito 180 and everything related to it in front of the cowl.....ie...throttle servo, onboard glow, and even the RX battery and STILL added at least 12 oz or more of dead weight lead.
The 190 does NOT have a longer snout then the bearcat. Not by a long shot. The 190A is a very short front end. A 4 pound motor would work well up front on the 190. I put in a saito 180 and everything related to it in front of the cowl.....ie...throttle servo, onboard glow, and even the RX battery and STILL added at least 12 oz or more of dead weight lead.
Guess I spent too much time looking at the stumpy (almost caricature) profile of the bearcat, that and subconsciously calling up images of the Dora I just remembered the sleeker looking 190 (in any of its models) as having a longer nose. The bearcat is 5" shorter, but you would think that would make it less tail heavy, but from what I read that's not the case. Anyway, back to the subject,,,
Volkert, how did the laser fit in the cowl? The bully is side carb and exhaust, just wondering what kind of clearance I would have.
Thanks,
J
10-16-2012, 03:28 PM
#2674
Mine is the built up wing. The actual wing itself doesnt really change the CG muchwhether its composite or built up. The composite just is heavier....though there is maybe like a 5-10mm difference in CG. Ive got mine balanced at 133mm if I recall
10-16-2012, 04:41 PM
#2675
Senior Member
My Feedback: (12)
Join Date: Feb 2008
Location: Mesa,
AZ
Posts: 389
Likes: 0
Received 0 Likes
on
0 Posts
ORIGINAL: kahloq
Mine is the built up wing. The actual wing itself doesnt really change the CG muchwhether its composite or built up. The composite just is heavier....though there is maybe like a 5-10mm difference in CG. Ive got mine balanced at 133mm if I recall
Mine is the built up wing. The actual wing itself doesnt really change the CG muchwhether its composite or built up. The composite just is heavier....though there is maybe like a 5-10mm difference in CG. Ive got mine balanced at 133mm if I recall