


TBM 93" Zero ARF Build
 12-18-2012, 12:34 PM
#751

My Feedback: (49)
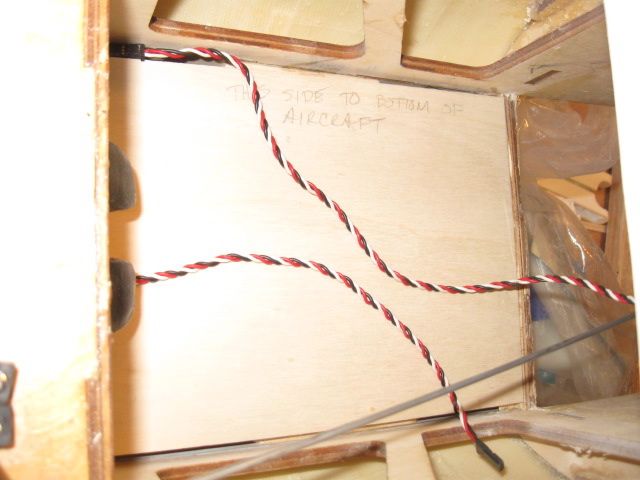
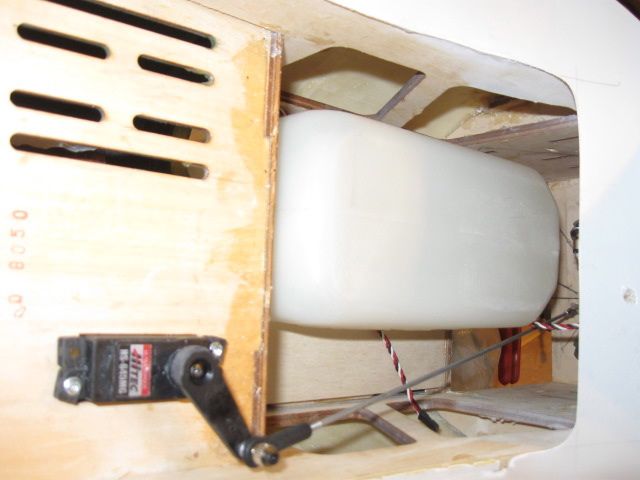
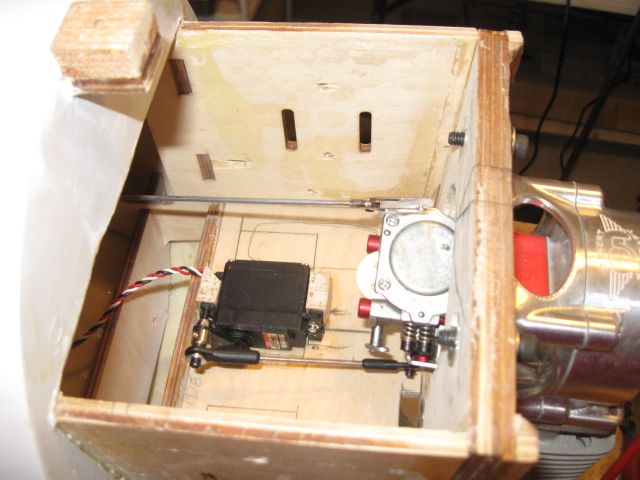
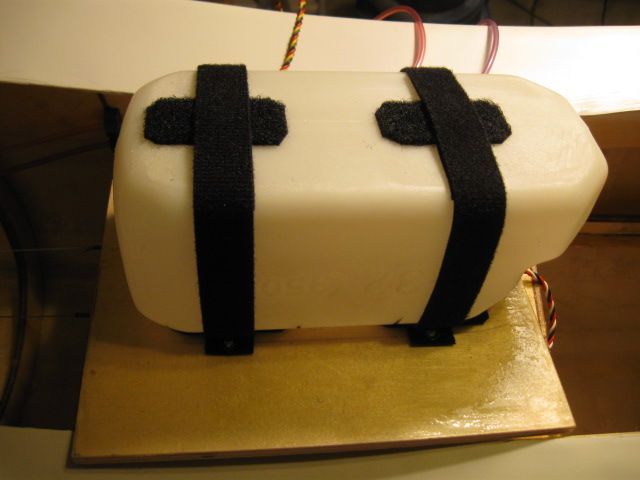
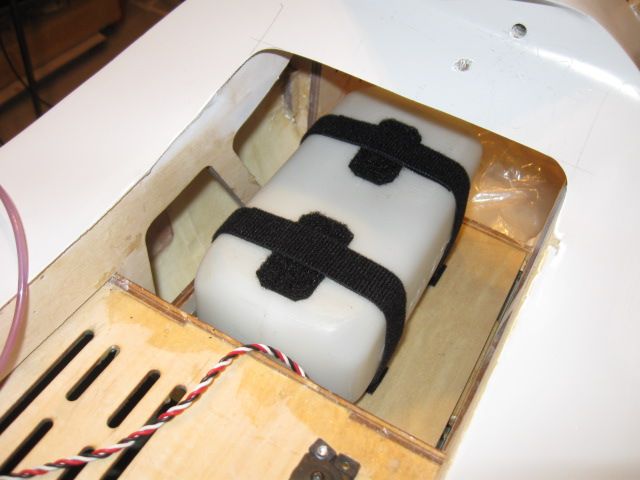
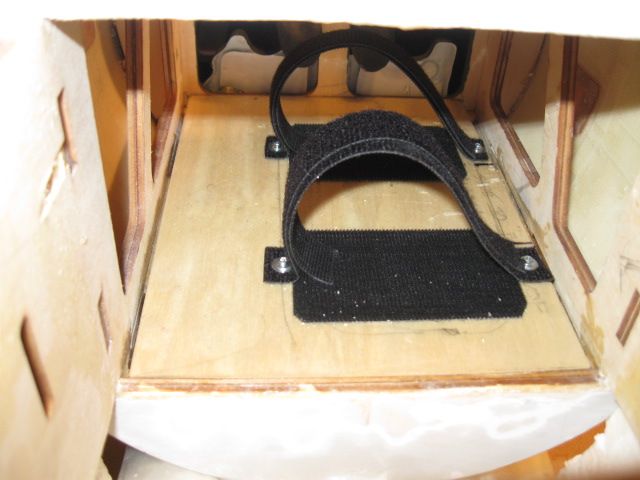
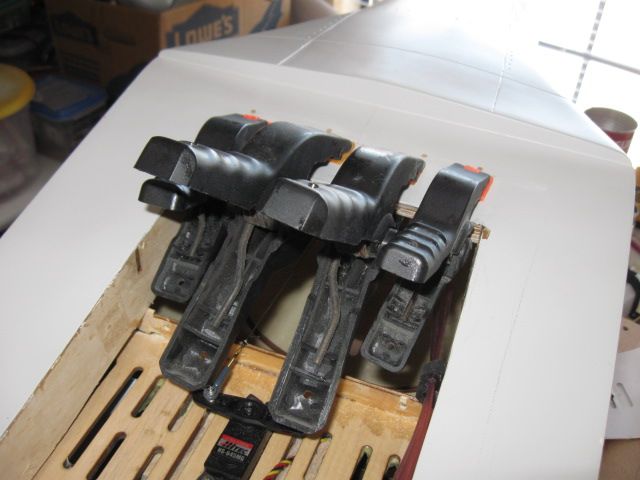
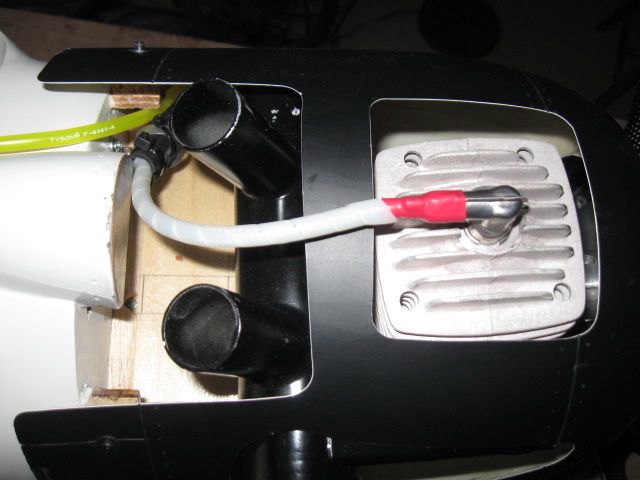
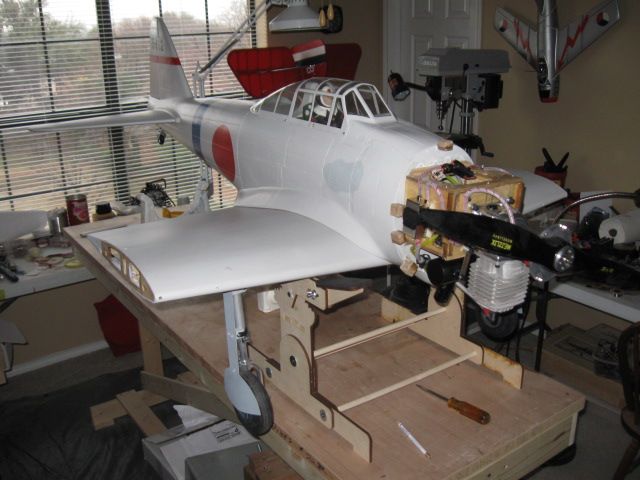
The more I get in to this one the further I tear the old stuff out. The perforated "floor" ahead of the cockpit area was coming apart and had no integrity so I ripped it out. I used some 1/4" ply which will hold the gas tank in with velcro sticky and belts. I also hooked the DA-85 choke to a servo under the cockpit linked with a 4-40 rod. Wow, the throttle and choke work ate up about 2 days. Lots of trial and error fitment. I can now go ahead and start epoxying the engine box back together. I am tempted to find some Hysol two part glue for the engine box as the DA-85 is said to put out lots of vibes. Loctite is supposed to have some so maybe some local stores will have that.

 12-23-2012, 11:17 AM
#754
My Feedback: (49)
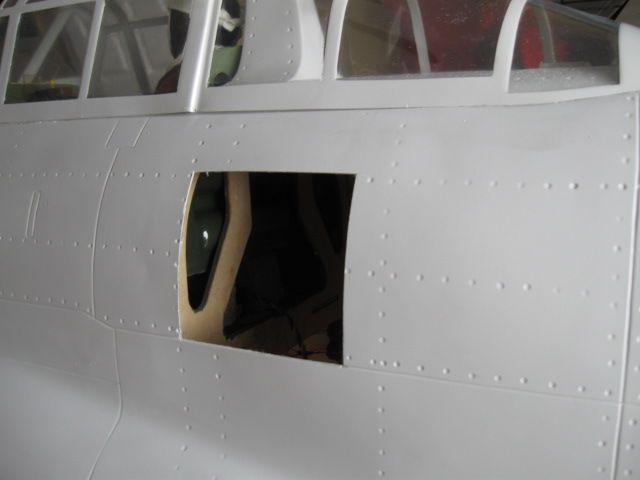
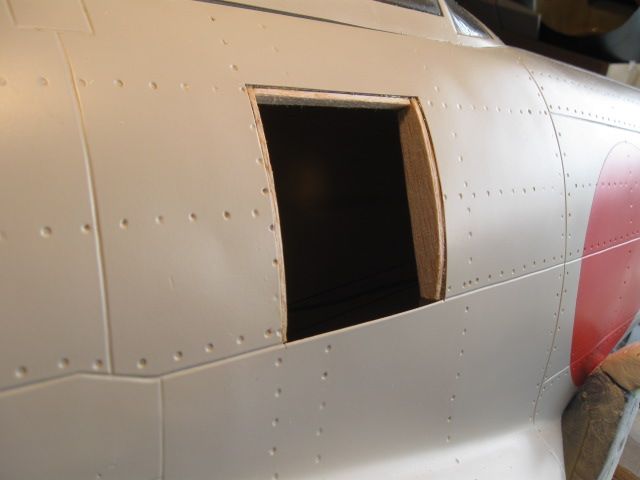
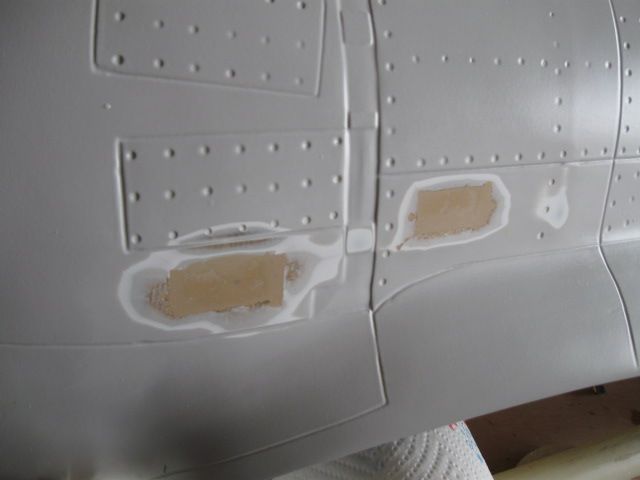
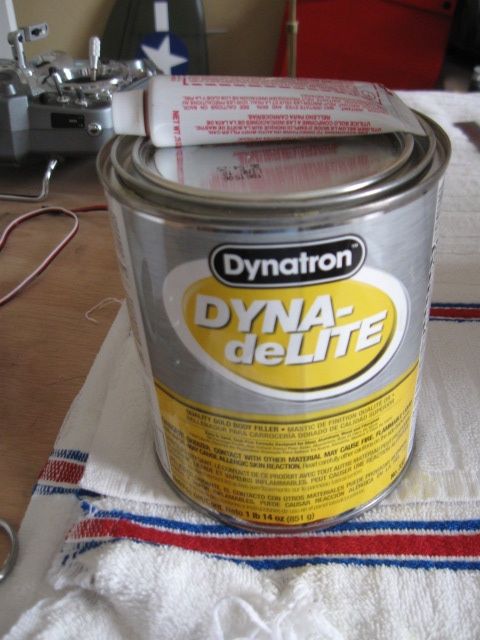
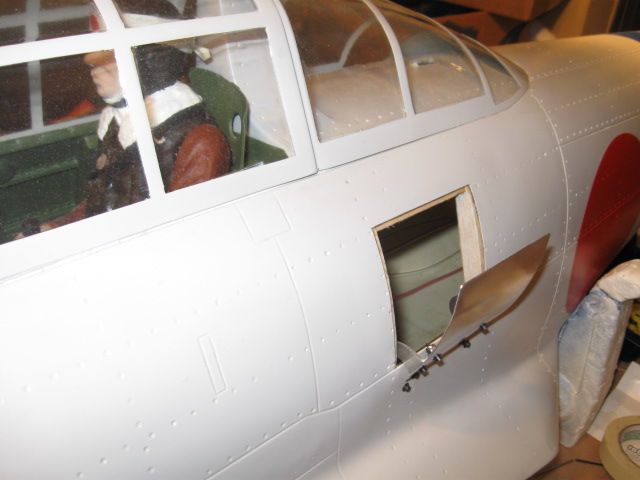
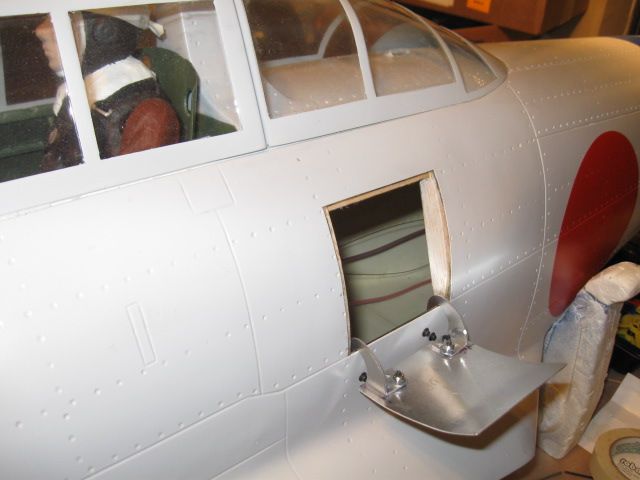
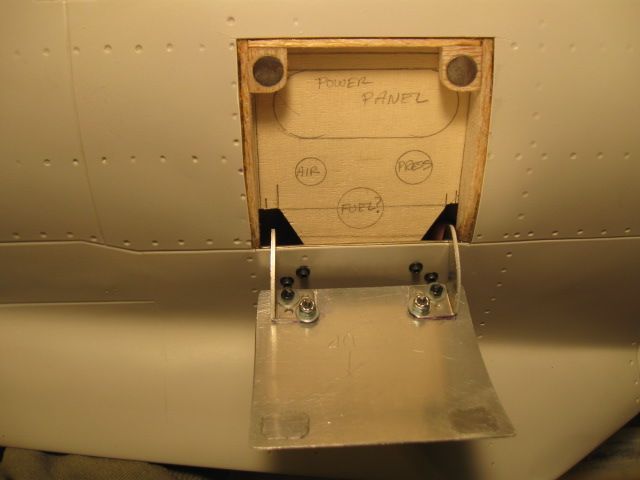
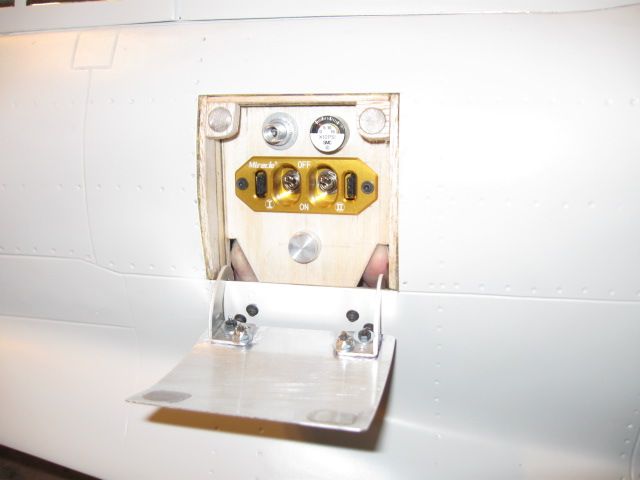
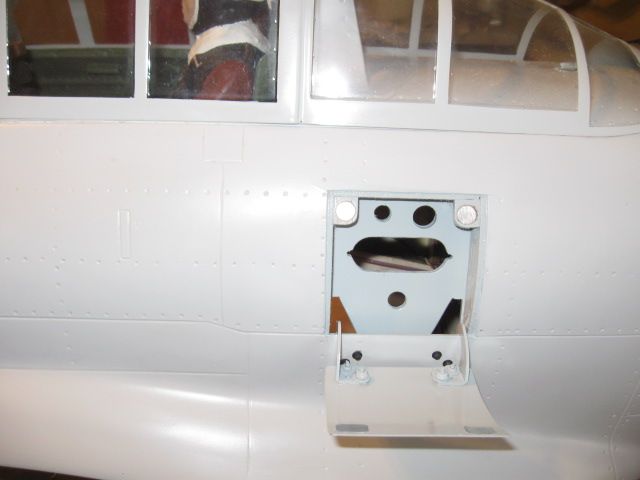
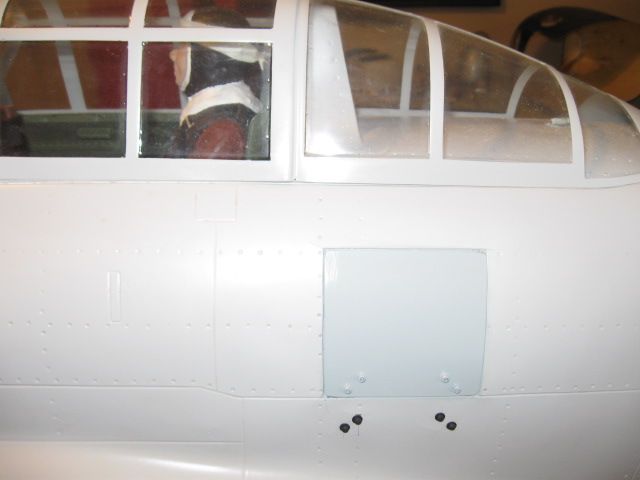
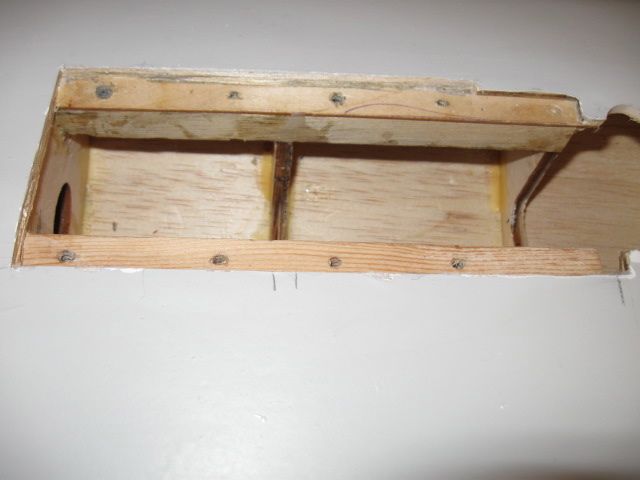
Decided to make an access panel for the various things that the plane needs. Behind the cowl made sense, but too crowded. Behind the cockpit area was the best place. Laid out the panel and did some cuttin'. Faced it out with some balsa stock. Plywood panel will hold the parts. Need some bomb bay door hinges for the hatch. The old switch holes were filled and putty'd with some lite bondo. Works well. Gonna use a Miracle dual switch power panel without the gas filler hole. Not sure if the gas dot will be on the panel or up closer to the tank. Be nice to go ahead and get it concealed under the hatch. It will work back there, no problem.
 12-24-2012, 05:52 PM
#757
My Feedback: (49)
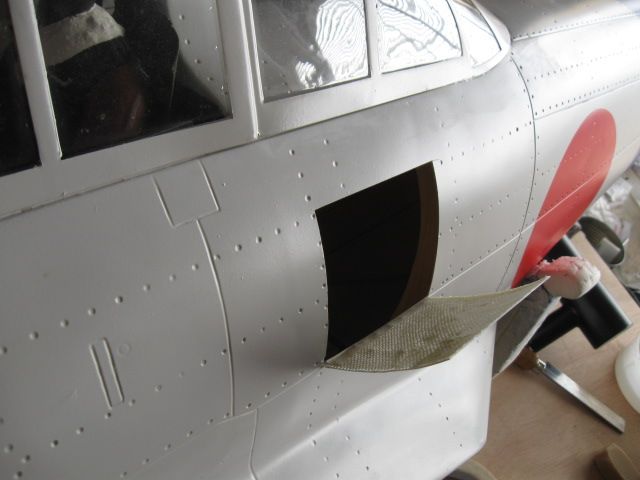
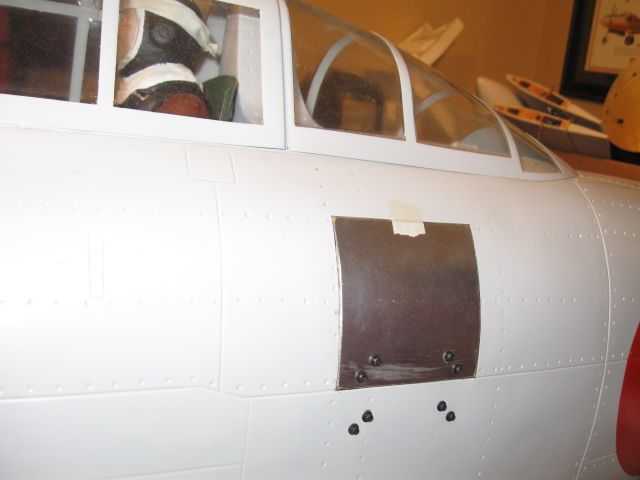
Couldn't leave ya hangin'. Completed the door with some rare earth magnets. Main thing is it holds tight. Look closely and you can see the little squares on the door. Those are cut from Altoid mint cans epoxied on the aluminum. Seems to work. I'll have to alter the layout of the switches and such, but no biggie.
12-25-2012, 09:59 PM
#758
My Feedback: (49)
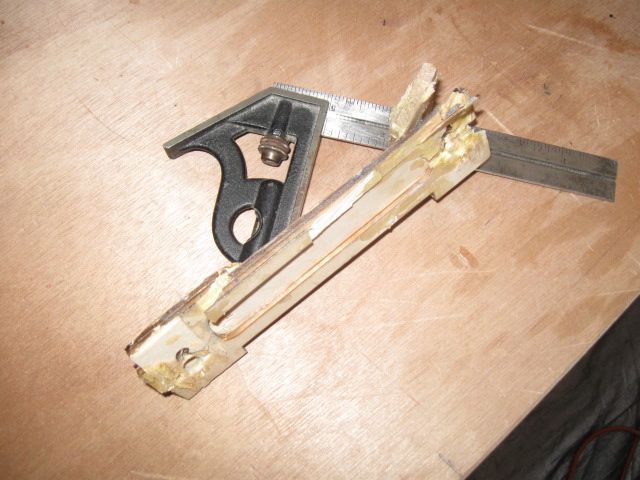
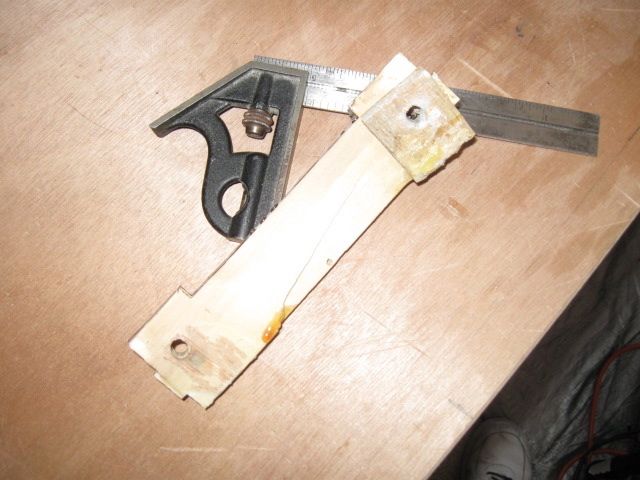
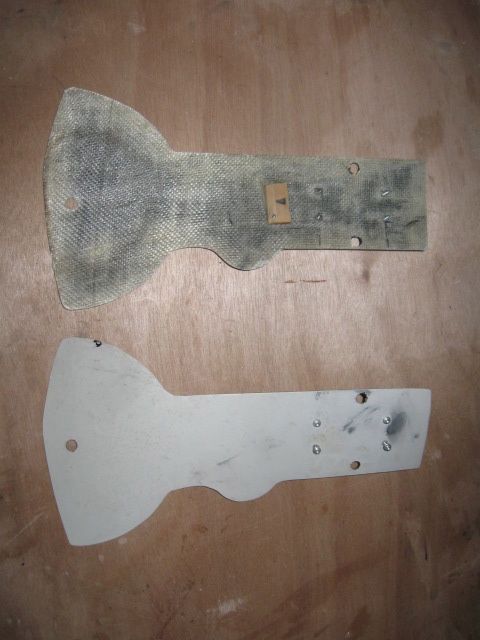
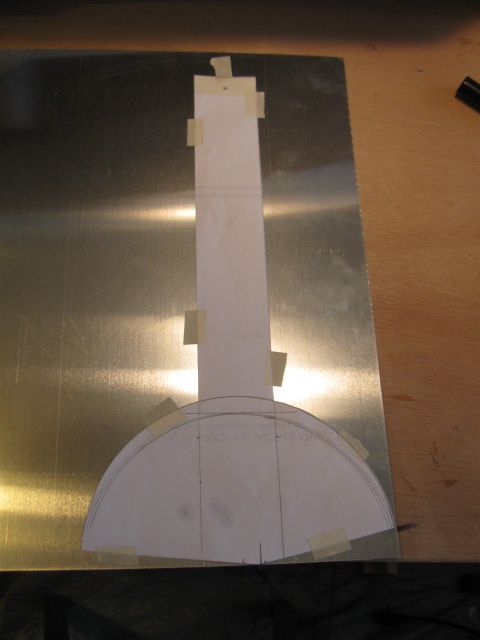
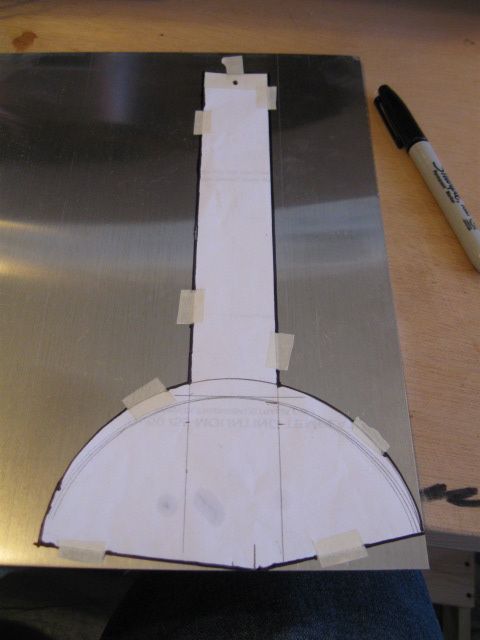
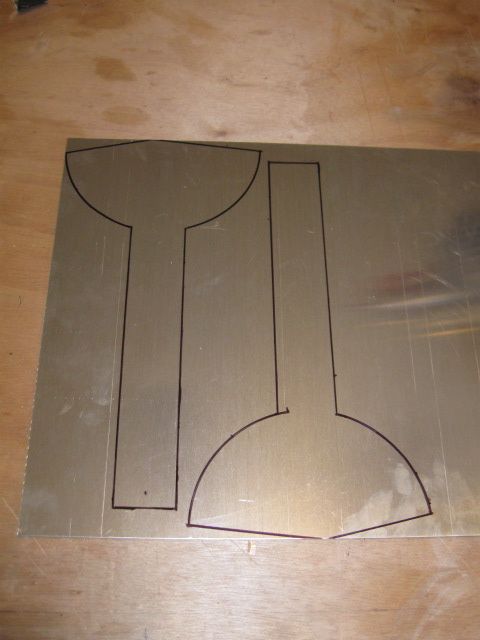
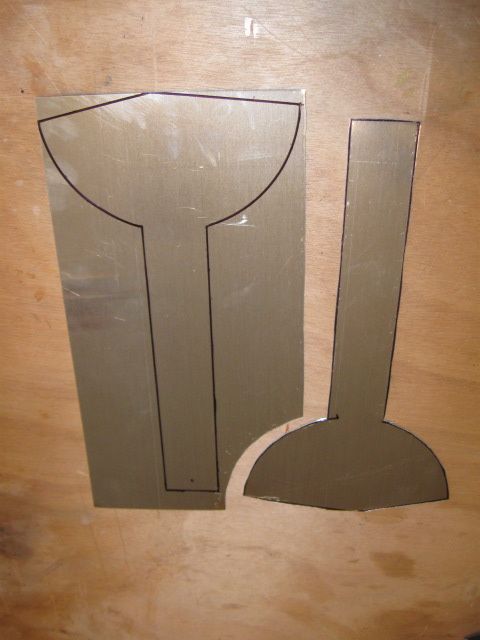
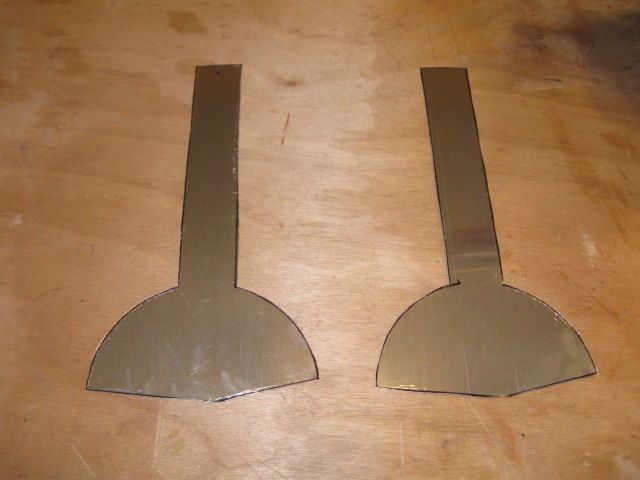
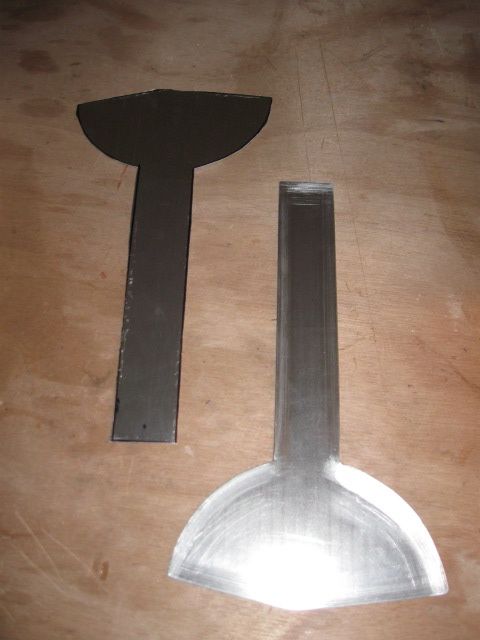
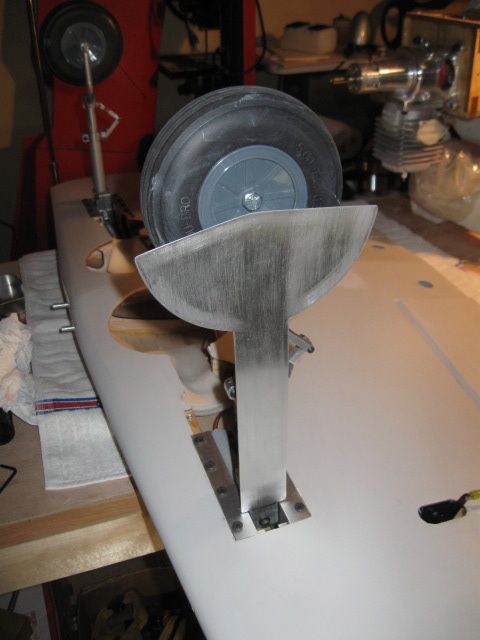
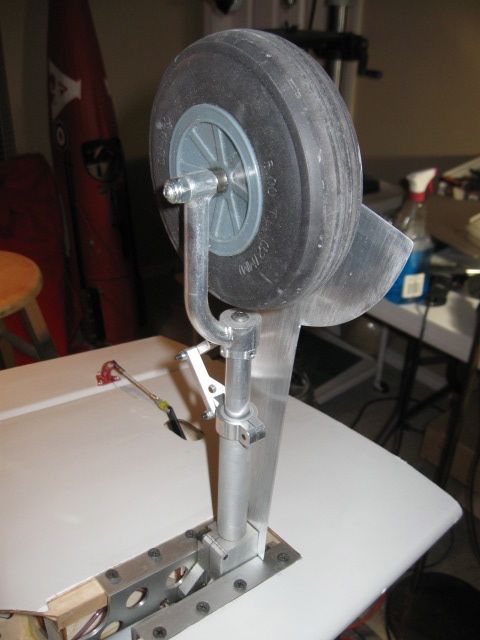
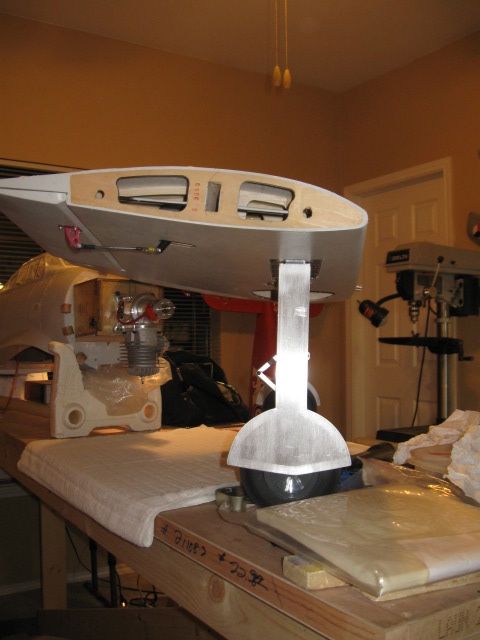
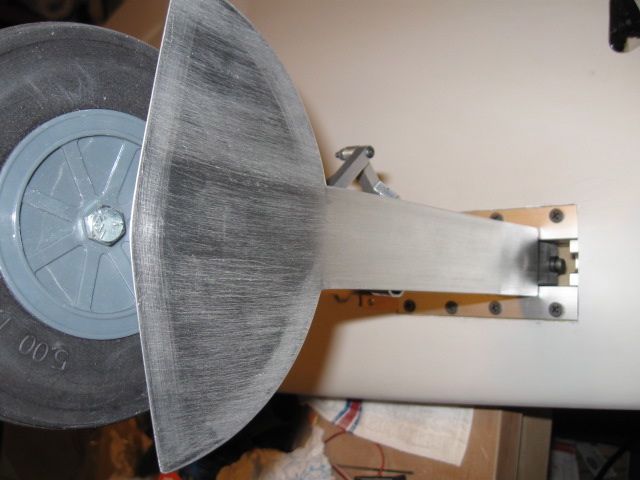
For some reason, as good as the TBM Zero is, they really missed the gear doors. Don't look anything near scale. I suppose they were trying to cover all the retract plates with the doors and that was where they lost it. I am not going to try to cover the plates as they won't be seen inflight and the doors will look pretty close to scale on the ground. And the previous owner really messed them up anyway. So, will make some new ones out of .025 aluminum sheet. I started with a paper pattern of what I thought would look good. Transferred that to the aluminum and cut them out. Next will backup the aluminum with some 1/8" lite ply and fix them to the struts with some hardwood brackets. The contour cut hardwood parts will be attached to the struts with a wire tie and some CA. Wood screws will hold the door to the hardwood parts along with some epoxy. To keep the doors under control at speed, I usually curve the circular lower part a bit to lay against the wing. These will be stand off scale, but a world better than the TBM parts. Will look better with some primer and paint. The full scale doors were a bit lower down on the wheels, but having flown with shock absorbing struts, I know that they will bottom out from time to time and crush the doors. So, I made them a bit more off the ground.


12-26-2012, 04:43 PM
#759

LBJ,
Nice work! Especially the gear doors. I did not install them as they did not come even close to fitting. Later this winter when I am going through mine will consider adding them based on your work.
Have you worked on mounting the canopy yet? Waiting to see how you do that. As you know there is a bunch of stuff you need to do to make this a reliable well built warbird. Once you get it all done you will have a great flying plane!
Musta put 50+ flights on mine this past season. All systems worked great and had a blast flying this plane.
Regards,
John B.
12-26-2012, 05:43 PM
#760
My Feedback: (49)
Hi John, thanks and glad you like the work. Unfortunately, the canopy has been installed by a turkey (first owner) who GLUED it on. So, that's a matter of history. If it breaks, I will have to try out a Ziroli canopy as a replacement, as I checked the measurements and they are very close.
The previous owner did a half way good job on the cockpit, which is about all that wasn't messed up. However, I cannot get in there to vacuum all the various debris I created in doing the needed work. I plan on taking it over to a friend's garage with his compressor and shop van and blowing it out from the top while holding the vac under the cockpit. Might work.
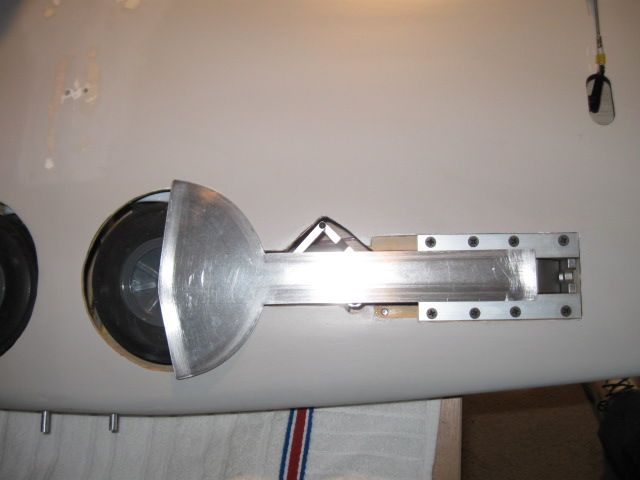
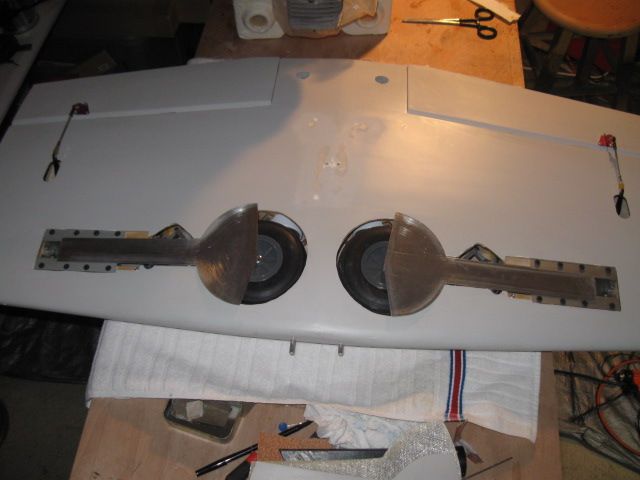
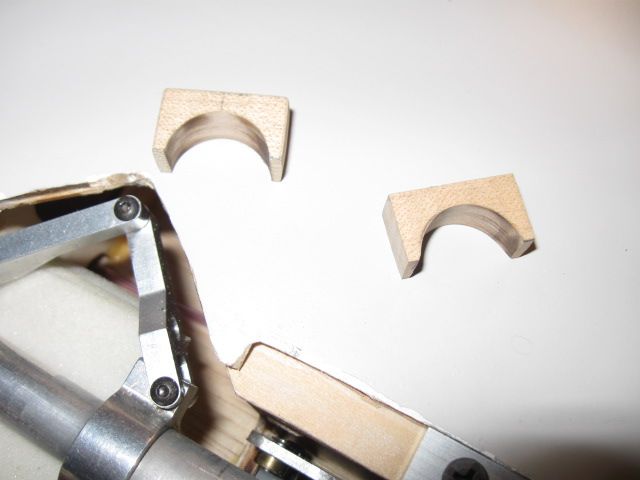
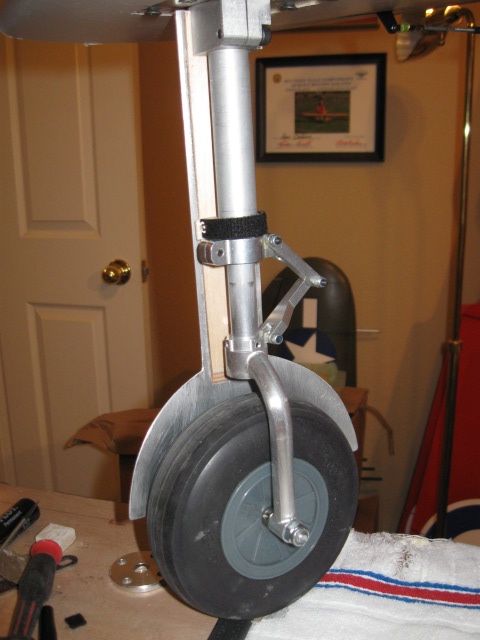
I am posting a few more pics here as I am just about done with the gear doors. I changed to velcro strips to hold the doors to the struts as the hardwood parts were a bit small to drill for the wire ties. I broke the other side hardwood while drilling it for the sheet metal screws, so I'll have to remake one of them and maybe both out of some thicker, wider, hardwood. It's not a production line here, so stuff happens. I did make the doors curved at the bottoms to hold them against the wing while going 100 mph! haha. Hope it goes at least 80.
You are right in that LOTS of things need to be brought up to snuff on the Zero. I am sorry I didn't pull the trigger several years ago when TBM still had them NIB.
We have some crazy Hot/Cold/Warm/Freezing weather down here in TX during January, so, might get a chance to get her flown before Feb hits.

The previous owner did a half way good job on the cockpit, which is about all that wasn't messed up. However, I cannot get in there to vacuum all the various debris I created in doing the needed work. I plan on taking it over to a friend's garage with his compressor and shop van and blowing it out from the top while holding the vac under the cockpit. Might work.
I am posting a few more pics here as I am just about done with the gear doors. I changed to velcro strips to hold the doors to the struts as the hardwood parts were a bit small to drill for the wire ties. I broke the other side hardwood while drilling it for the sheet metal screws, so I'll have to remake one of them and maybe both out of some thicker, wider, hardwood. It's not a production line here, so stuff happens. I did make the doors curved at the bottoms to hold them against the wing while going 100 mph! haha. Hope it goes at least 80.
You are right in that LOTS of things need to be brought up to snuff on the Zero. I am sorry I didn't pull the trigger several years ago when TBM still had them NIB.
We have some crazy Hot/Cold/Warm/Freezing weather down here in TX during January, so, might get a chance to get her flown before Feb hits.
12-28-2012, 06:50 AM
#761
My Feedback: (49)
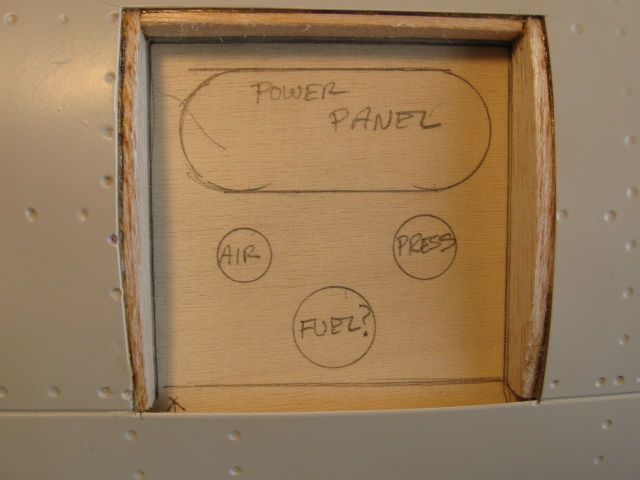
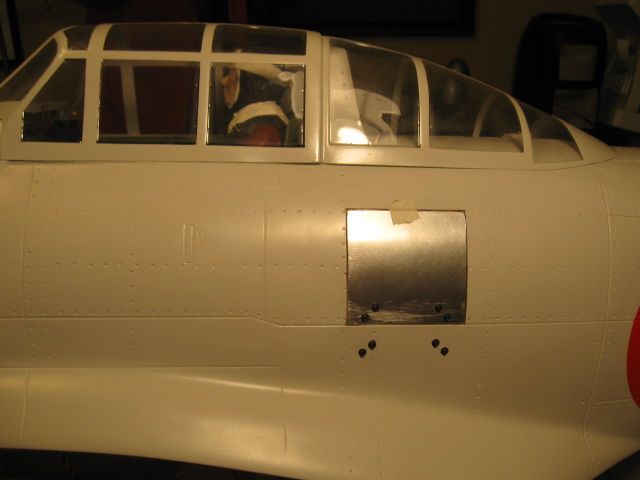
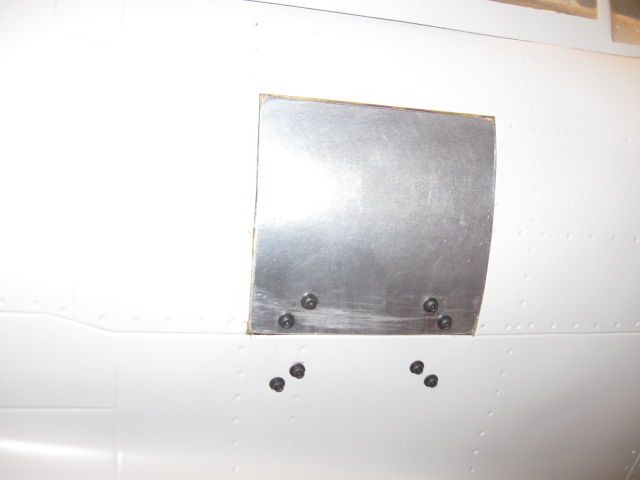
Got the panel parts in and installed. Should work out fine. Fuel dot is on the bottom. Other than gluing panel to door frame and some paint, that's about it.
Got some fu-fu can paint work done. Close enough for now. Also painted over some patches I made to the old power switches. The guy had the front end littered with 'em.
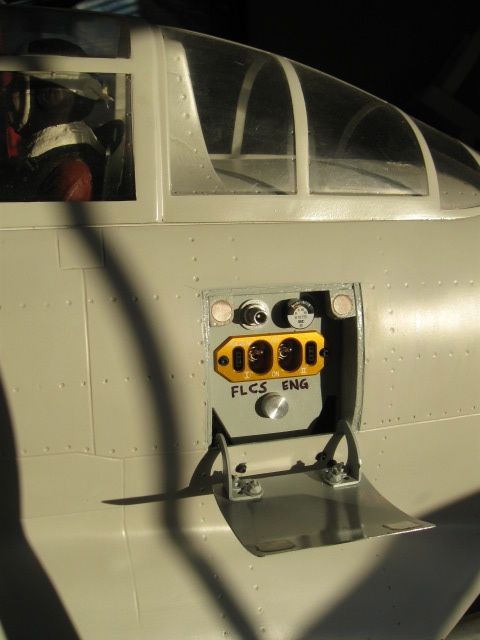
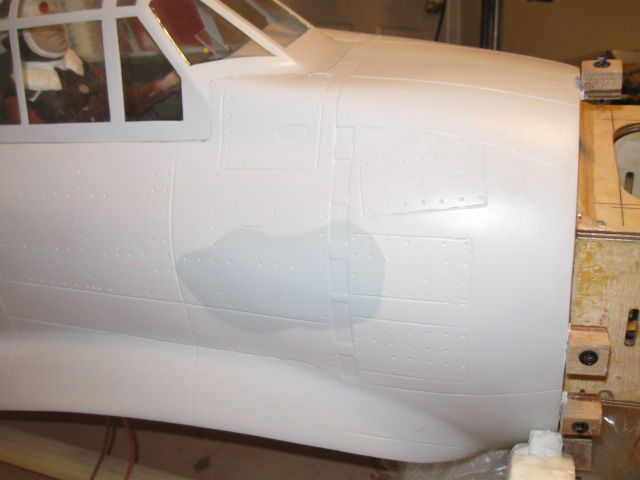
Got some fu-fu can paint work done. Close enough for now. Also painted over some patches I made to the old power switches. The guy had the front end littered with 'em.
12-29-2012, 06:26 AM
#762
My Feedback: (49)
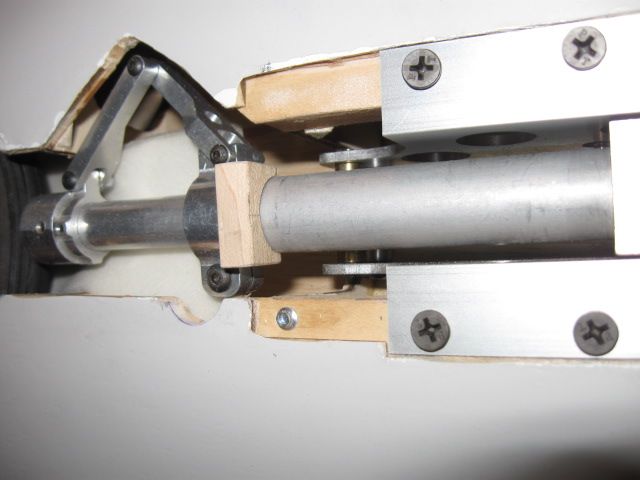
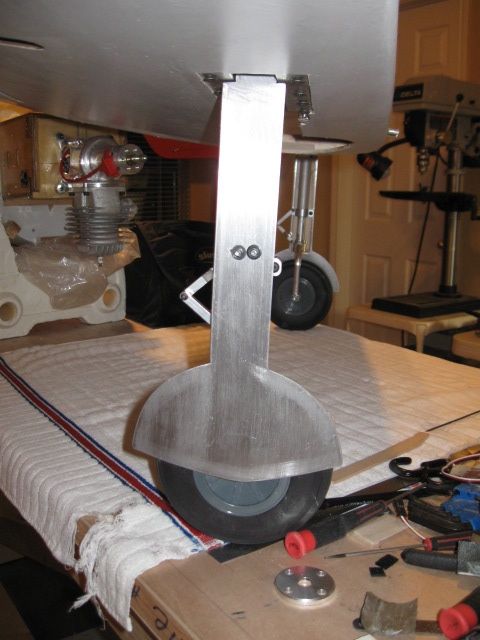
Going in reverse doesn't seem to end. Now the retract mounting blocks have come apart on their own with just operating the gear on the workbench. Wow, I am really hoping this thing stays together inflight. Whatever glue they used at the factory is just worthless. Had to reglue the hardwood mounting beams with epoxy, and add some vertical plywood supports with lots of epoxy. Talk about eating up time. Each piece has to be custom fit which has taken several hours. While I'm at it, I will have to plug all the holes with dowels and epoxy and redrill as the "turkey" drilled the holes cockeyed. One thing less to worry about later as weak mounted retracts will fail at the first "less than perfect" touchdown. These would have failed on takeoff, most likely! ha.
Forward side before supports added.
Aft side after supports and tri-stock added.

Gear in place for test fit. Yep, they still fit.
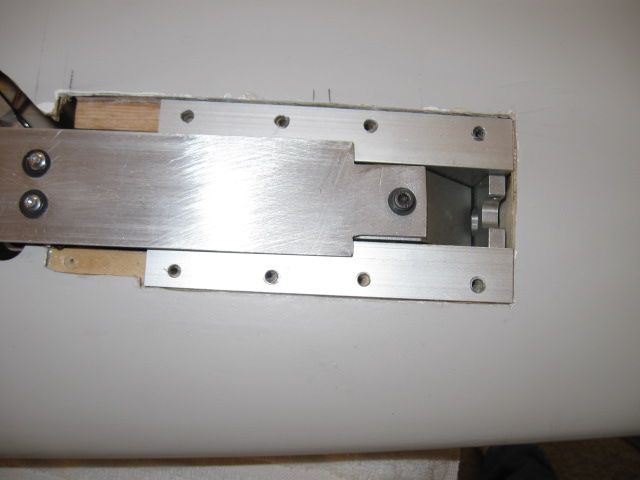
Forward side before supports added.
Aft side after supports and tri-stock added.
Gear in place for test fit. Yep, they still fit.
01-01-2013, 07:28 PM
#763
My Feedback: (49)
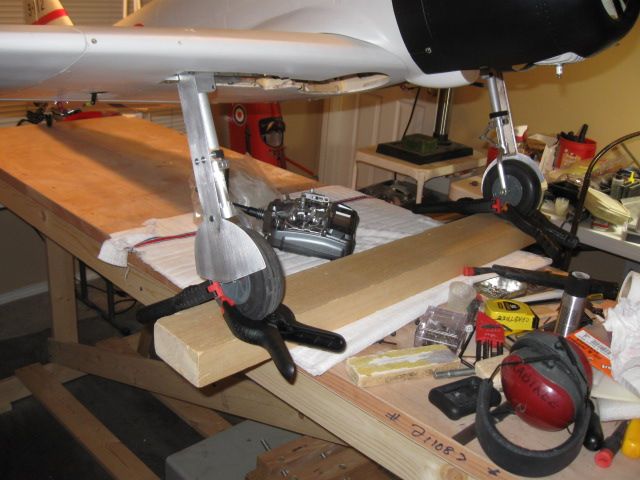
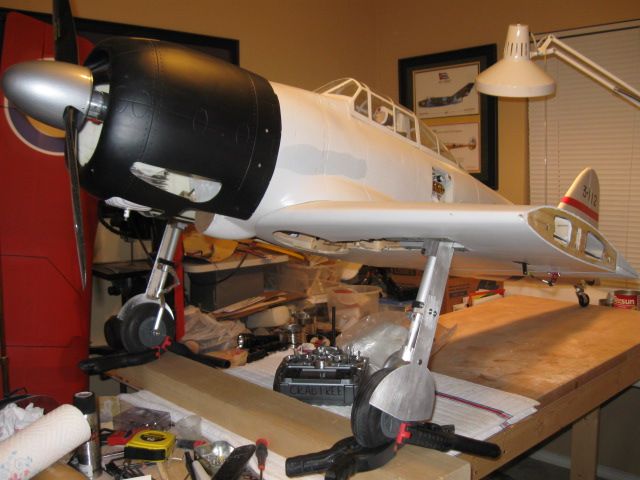
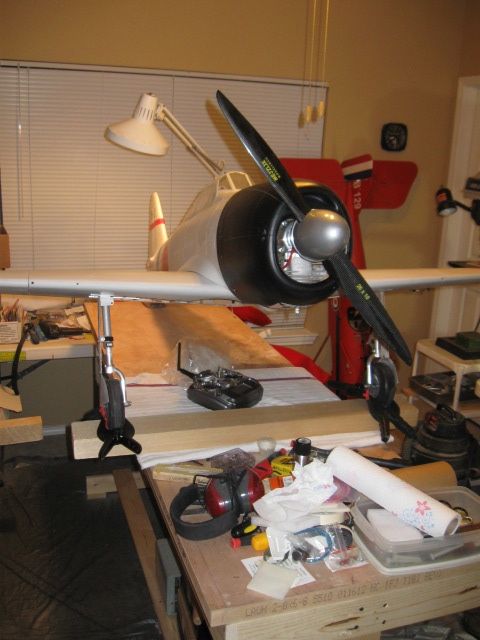
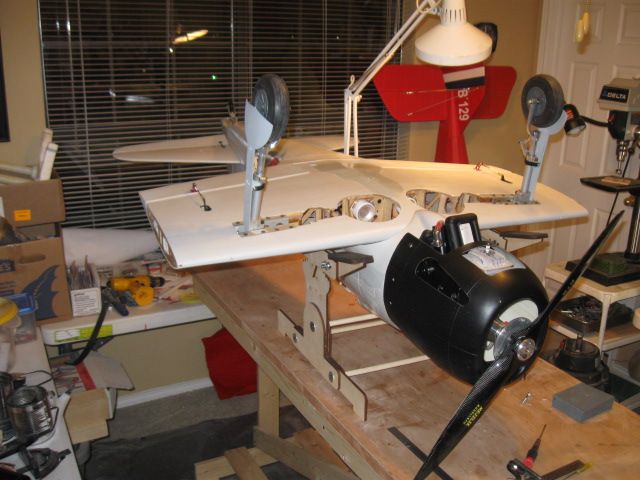
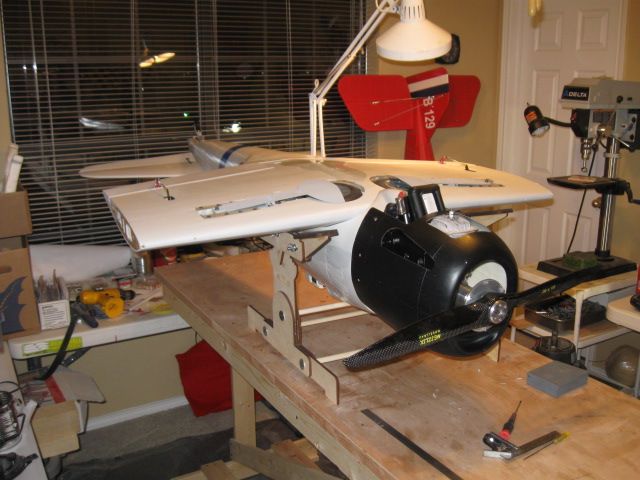
Been working 8 hours a day on her. Decided to put the wing on the fuselage and see what I have. The retracts work like gangbusters. I'll be getting her together in a week or two after I get a few parts. CG measurement is almost at hand, as soon as I get a VIC RC CG stand. Just a few pics to show progress. Looks pretty much like yours, I would guess.


01-01-2013, 07:42 PM
#764
LBJ,
Looking good!
Did you fiberglass the inside of the cowl? When I built mine it was cracking while working on to so I glassed the entire inside with 3 ounce fiberglass. Also the cowl mounts all can use some thin CA to secure them. Yeah the gear mounts do need beefing up. Good news is this ship is easy to land lightly. Keep up the good work. You are giving me and the others who have these ships some great ideas.
John B.
01-01-2013, 09:18 PM
#765
My Feedback: (49)
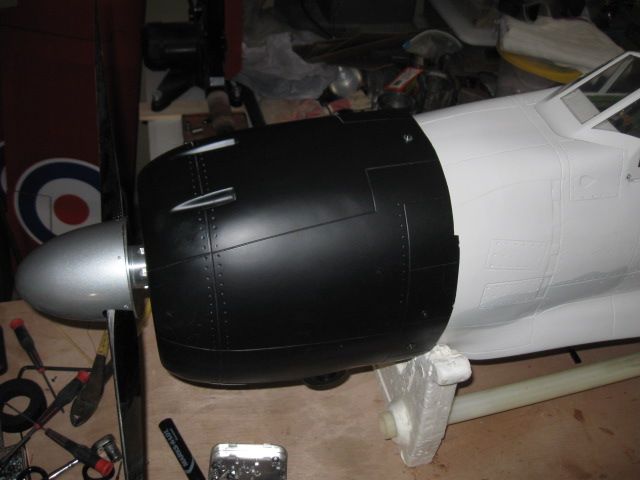
Thanks, John. I have done some reinforcement in the cowl with some carbon fiber around the cutouts, but have yet to glass the insides. I plan on doing this, just saving that for last. The cowl is pretty flimsy, for sure. I wonder if Fiberglass Specialties has a glass cowl for this? Their glass work is always good.
I took one of the cowl mounts off and found out they are fairly foolproof. They are "T" shaped and cannot actually come out of the firewall. I figured they were just straight pieces of plywood with hardwood blocks and were shabbily installed. But after working for quite a few minutes, I saw how they were installed. So, I reglued that one and left the rest alone. One thing I did was to change out the metric cowl bolts and t-nuts with 6-32 t-nuts. Loosing one of those metric bolts out at the field would be a real problem. Everyone has 6-32 stuff in their field box! ha.
Glad the postings are useful.
LBJ
01-05-2013, 10:23 AM
#766
My Feedback: (49)
I managed to carefully pry the canopy off without tearing up. Hot glue came off here and glad that's what the turkey used in a good way for once. I have ordered a Ziroli Zero canopy to see if it will work, in the mean time. Not sure how long this one will last as it is pretty brittle material. Most guys are making canopies out of PETG these days, which is what they make coke and water bottles out of - very flexible and forgiving to work with. The pilot had lost his right arm somehow and I got that put back in place. Vacuumed the inside of the cockpit and she cleaned up pretty nicely. I went back with small sheet metal screws for canopy attachment.
I took the radio mast and glued a rare earth magnet to the bottom and made a trough out of balsa to stand it in for ground coolness. I don't think it would stay in during a flight. But it looks better with it in place for static.
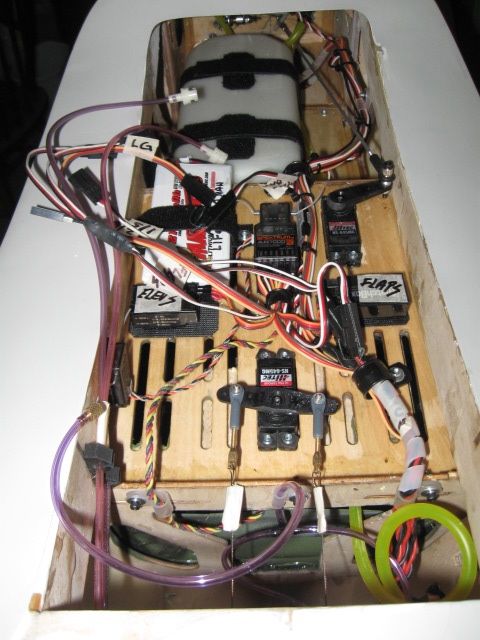
I am just about thru with wiring the model, but still have to add the horizontal tails and run the servo wires up front to the Match Box. I left the tail surfaces off because I am constantly flipping the Zero over on her back and over again to do needed things. The tails are somewhat of a hassle doing all that and glad I could remove them. Next up is CG checking. Hope all goes easy on that. I'll also do a weigh-in. Looking forward to running her up, at least, and if the weather is really nice will give her a flight.


I took the radio mast and glued a rare earth magnet to the bottom and made a trough out of balsa to stand it in for ground coolness. I don't think it would stay in during a flight. But it looks better with it in place for static.
I am just about thru with wiring the model, but still have to add the horizontal tails and run the servo wires up front to the Match Box. I left the tail surfaces off because I am constantly flipping the Zero over on her back and over again to do needed things. The tails are somewhat of a hassle doing all that and glad I could remove them. Next up is CG checking. Hope all goes easy on that. I'll also do a weigh-in. Looking forward to running her up, at least, and if the weather is really nice will give her a flight.
01-05-2013, 11:57 AM
#767
My Feedback: (16)
Join Date: May 2002
Location: Cincinnati,
OH
Posts: 486
Likes: 0
Received 0 Likes
on
0 Posts
Did you get your VIC RC CG stand yet? I need a balancer like that. The zero is too big for my great planes cg balancer. The $80 price is kinda tuff but if the quality/value is there I would consider buying one. Actually I would not mind building one from 1/4" ply. Please let me know how it works out LBJ. And maybe some pics..
tp
tp
 01-06-2013, 08:53 AM
#769
My Feedback: (49)
I borrowed a booklet for the Ultra RC Zero which was the forerunner of the TBM Zero, as I have been told. That booklet shows control throws in degrees, not inches. So, they suggest 30 degrees for the elevators HIGH rates and 20 degrees LOW rates. That's the one I am most interested in as that's the one you tend to over control, especially on the first few flights. Of course, I use +30 to +40 percent expo (Spektrum Radio) on the Elevators and Ailerons. Anyone have actual throws in inches?
Booklet shows CG as 4.5" AFT of LE at center. I have read some discussions here about CG placement. That's a bit nose heavy. About 5.0" is 25 percent MAC, which is a good starting point. I would say somewhere between 5 to 6 inches aft of LE would work.
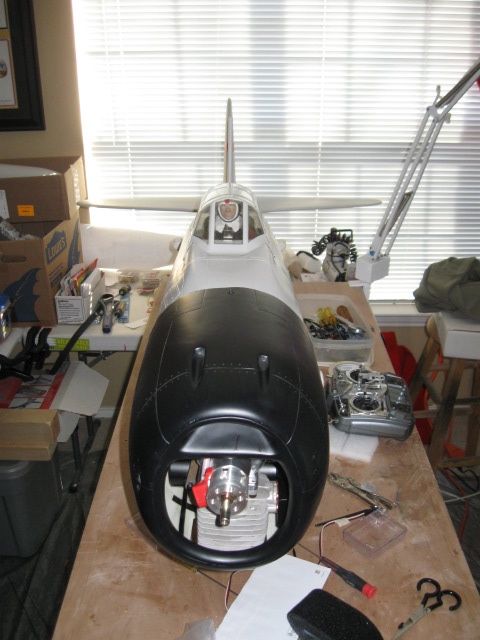
Got the horizontal tails on this morning. All hooked up and works well. Looks like an aircraft now.
Need to glass the inside of the cowl for good measure in case I nose over during takeoff on the first flight. Starting to run out of things to do here. That's good news!
Booklet shows CG as 4.5" AFT of LE at center. I have read some discussions here about CG placement. That's a bit nose heavy. About 5.0" is 25 percent MAC, which is a good starting point. I would say somewhere between 5 to 6 inches aft of LE would work.
Got the horizontal tails on this morning. All hooked up and works well. Looks like an aircraft now.
Need to glass the inside of the cowl for good measure in case I nose over during takeoff on the first flight. Starting to run out of things to do here. That's good news!
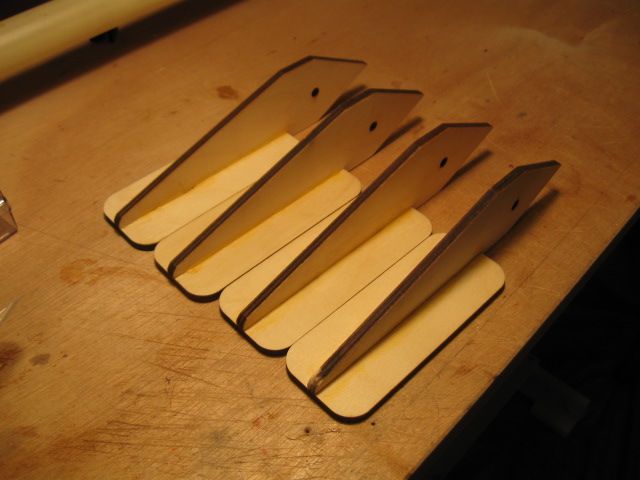
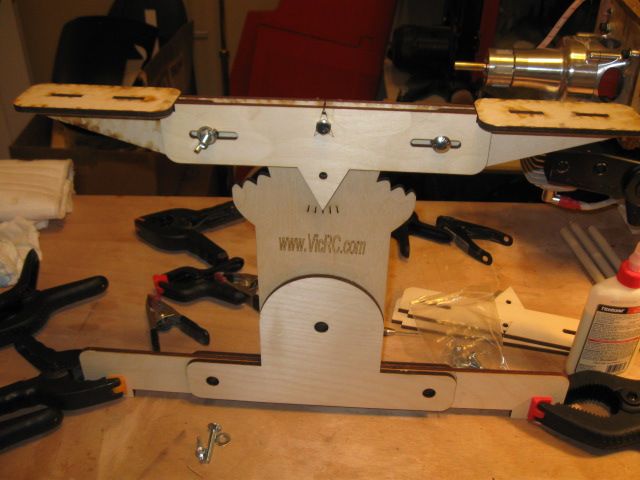
01-08-2013, 09:42 AM
#770
My Feedback: (49)
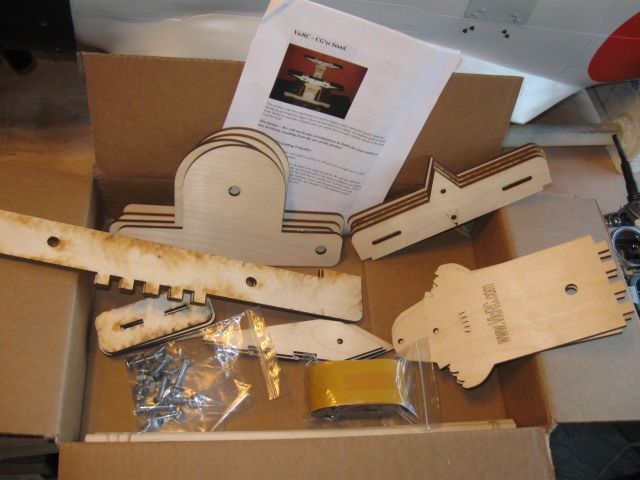
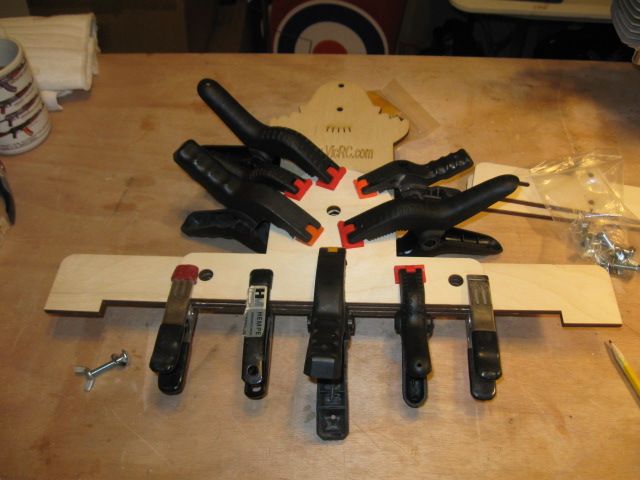
Got the parts assembled. Might need some help getting the Zero on the jig. I used the extra bolthole on the jig to pin the platform in place so I can load her on there and not tip. This bolthole also makes a platform for working on the wing or whatever other use you need.

01-08-2013, 11:03 AM
#771
My Feedback: (16)
Join Date: May 2002
Location: Cincinnati,
OH
Posts: 486
Likes: 0
Received 0 Likes
on
0 Posts
Thanks LBJ for the pictures of the stand/balancer. I had my cg way too far back on this zero's maiden and it was a heck of a ride. Ever since I have been a real stickler for getting it (cg) right the first time.. I am going to build or buy one of these.
In an earlier post, I posted some pics of the center section that had the gear ripped out by the previous owner. It looked to me that there was really no spar in the wing so I added 2 carbon rods. Also I made the ribs holding the gear mounts out of 1/4" ply. These ribs were then tied into the carbon spar rods.
tp
01-08-2013, 11:15 AM
#772
My Feedback: (49)
Tom, It would be easy enough to build a stand. However, I really like the quality of the plywood used in the kit. You could get some better-grade (than usual wall or roof sheeting) thin plywood at the local Lowe's or Home Depot and do a good job with that. Aircraft grade plywood like in the kit is VERY expensive.
If the dollar wasn't in such poor shape, it wouldn't cost this much to buy one of Vic's stands. Looks like a well planned project and should work well for CG determination.
The only thing not really locked down are the dowels. I will drill the ends of each one and add a drywall screw and a washer so they cannot come off the jig under a load.
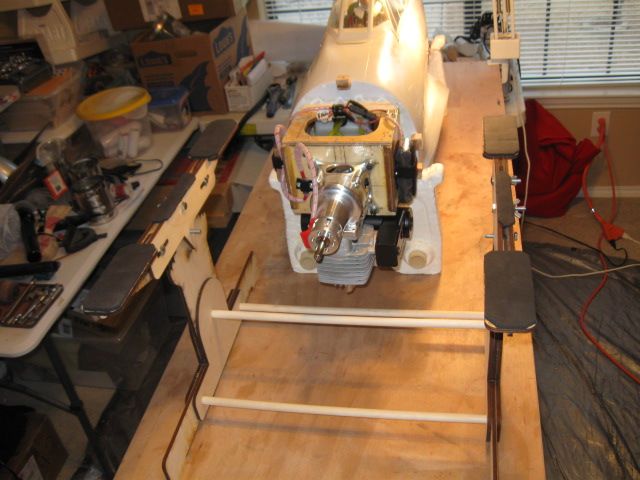
Got her loaded on the stand. Rough estimate is 4 lb lead ballast needed. I'll have to pull the canopy off to flip her over and check CG from that way. Stand is in LOCKED position, not actual CG depicted here. Gotta go to the Dive shop for more weights.
Got her flipped over. Looks like 5 lb lead right now. The Zero is CG'ing at 5.25 inches aft of LE, which computes to 25 percent MAC. I left the wing tips off for now as I don't see those changing the CG. I'll have to do the inverted flight CG test to see how she falls. I have a good test pilot at the field who'll do that maneuver for me. She's in the ball park for CG though as 25 percent MAC is always a safe starting point.
If the dollar wasn't in such poor shape, it wouldn't cost this much to buy one of Vic's stands. Looks like a well planned project and should work well for CG determination.
The only thing not really locked down are the dowels. I will drill the ends of each one and add a drywall screw and a washer so they cannot come off the jig under a load.
Got her loaded on the stand. Rough estimate is 4 lb lead ballast needed. I'll have to pull the canopy off to flip her over and check CG from that way. Stand is in LOCKED position, not actual CG depicted here. Gotta go to the Dive shop for more weights.
Got her flipped over. Looks like 5 lb lead right now. The Zero is CG'ing at 5.25 inches aft of LE, which computes to 25 percent MAC. I left the wing tips off for now as I don't see those changing the CG. I'll have to do the inverted flight CG test to see how she falls. I have a good test pilot at the field who'll do that maneuver for me. She's in the ball park for CG though as 25 percent MAC is always a safe starting point.
01-08-2013, 07:10 PM
#773
LBJ,
If you go to page 27 of this thread and about halfway down you will see the throws and CG for my zero. 5.5 inches is way too far back. Of course this depends on where you are measuring from. Try balancing with the wing tips on. Mine is 4.5" back from the outer leading edge of the center wing panel. Unless you have added weight to the tail it should not take 5 LBS unless your motor is way lighter than a G62.
Regards,
John B.
01-08-2013, 07:59 PM
#774
My Feedback: (49)
John, I'm measuring the total wing chord (20.5") from the VERY center of the wing, with it off the fuselage. 5" was my rough measurement of desired CG (25%). So, that same 5" aft of LE line run straight across the wing is only about 3.5" behind the LE, at the edge of the main section. Or, 1" forward of your mark. The spar at the edge of the panel is 6" aft of the LE, measured at the far outside edge of the panel. so, based on your calculations, I am a bit nose heavy, it appears. Frankly, I was a bit amazed at the amount of weight needed. I added the tips and it only moved the CG back 1/8". I will go look at your notes on page 27. Thanks, LBJ
In looking things over, I feel your CG is about 30% MAC, or about 6" aft of LE from the very center of the wing, which is certainly an acceptable CG. Nothing dangerous there at all. I will have to setup again and see what I need to remove from the lead weights to get that setting. Not sure if a full pound of lead removed will be the answer or not. But even so, I will be at 31 lbs all up. 31 pounds weight on a plane this large is no problem, only thing that worries me is "Do I have the CG correct?" Too far aft CG and I'm toast on takeoff and too far forward CG and I cannot flare enough on landing. I bet she will fly like I have her now, but since you and others have flown with a CG of about 30% MAC, then I will try that too.
In looking things over, I feel your CG is about 30% MAC, or about 6" aft of LE from the very center of the wing, which is certainly an acceptable CG. Nothing dangerous there at all. I will have to setup again and see what I need to remove from the lead weights to get that setting. Not sure if a full pound of lead removed will be the answer or not. But even so, I will be at 31 lbs all up. 31 pounds weight on a plane this large is no problem, only thing that worries me is "Do I have the CG correct?" Too far aft CG and I'm toast on takeoff and too far forward CG and I cannot flare enough on landing. I bet she will fly like I have her now, but since you and others have flown with a CG of about 30% MAC, then I will try that too.
01-10-2013, 08:13 AM
#775
My Feedback: (49)
John, I moved the CG back to the 4.5" mark aft of the outboard LE of the main wing section. I was able to take out 1 pound of lead. Since I have it set up, I can try 3 pounds plus a few smaller denomination lead bars to see how much I can drop it down. I doubt I can get it down to just 3 pounds ballast, but will if possible. But like I say, not worried about the weight, just that the CG is correct. It will fly fine at 31 pounds. Other than some gusty winds, the weather is supposed to be clear and sunny for the weekend. Might at least get out and run the engine.
On Vic's CG Stand, from a dead-level position, fuselage upright, she drops nose-down nicely. That tells me I can drop some weight off, maybe a few ounces. Vic said that's how he does it with the stand. He said he doesn't flip it over wing-up like I show in the pics. He's made quite a few large models and flown them with success, so I am sure he knows his stuff. He also recommend to use the CG you guys have flown with success. So, I consider the CG hurdle to be jumped and will proceed to get her ready to run-up and fly. Thanks for the tips.
Small update. I forgot to CG with the wing tips installed. Went back and did that. Looks like even 4 pounds isn't enough. The aileron servos and linkage are behind the CG, so have to take that into account. Had to add 6 oz more of small lead bars. Well, that's what it takes! I cannot argue with the "scales." So, 4 lb 6 oz is what she will have on first flight. I can only account for the increased lead ballast by assuming the DA-85 with electronic ignition is lighter than the G-62 with magneto. And, I also am assuming the G-62 has magneto ignition.