


Byron Mustang
 03-25-2009, 09:40 PM
#1

Thread Starter
My Feedback: (3)
Join Date: Dec 2007
Location: New York ,
NY
Posts: 252
Likes: 0
Received 0 Likes
on
0 Posts
I know it might be a little late, and Im well aware that Im working over my head..
A little history..Im a pretty accomplished plastic model builder and always wanted to do an RC warbird..I had the chance to get a Byron Mustang..Just the fuselage, wing and not much else..Ive done alot of research and my father has built RC airplanes for many years so I do have some guidance, but not as much as I need..
Ive finished the wing as well as the other flight control surfaces..I do plan on doing some riveting, and flight metal for the fuselage, paint for the wing..
The engine I bought online and the reduction drive has been beefed up, with some mods that were recommended back in the day..Its only a 35, and I thought about going to B&B for at least a 42..
Ive made alot of progress thus far, and have taken some logical steps in mounting the airelons out board, and have done alot of reading on this board about whats good and bad to do with the Byron Mustang..
 03-25-2009, 09:55 PM
#3
Thread Starter
My Feedback: (3)
Join Date: Dec 2007
Location: New York ,
NY
Posts: 252
Likes: 0
Received 0 Likes
on
0 Posts
At this point, before I go any further, I just wanted to get some feedback on the servo mounting and installation of the air slide that Ive done thus far..
This particular part of the servo mounting in the fuselage intimidates me the most, and id appreciate some critical feed back..
Ive not done this before, and Im only partially sure of what Ive done here..Fill and sand stuff is easy..This part of the operation makes me nervous..
In my own opinion I think I could have been a little neater with the 30 min epoxy, however Im satisfied with the layout, and how it works, and how its bonded..
If theres a better or cleaner way, and I know its kinda late at this point Id be open for it before I go any further..
Thanks again..
03-26-2009, 10:49 AM
#4

My Feedback: (43)
The servo mounts look ok as long as that is light ply and not balsa. It is hard to tell from the pic, but it looks like ply. As far as the epoxy over polyester fuse, it will stick as long as you roughed the fuse up with some coarse paper, cleaned it with solvent and I like to heat the epoxy as I put it on so it flows into the open cloth that you exposed during sanding. Did you also use some bits of cloth to attach the trays? If not, I would go back and some. For a future reference, you can use Hysol industrial epoxy to attach and it sticks great to polyester.
03-26-2009, 11:41 AM
#5
Senior Member

Join Date: Jun 2007
Location: Cape Coral,
FL
Posts: 320
Likes: 0
Received 0 Likes
on
0 Posts
Nise job on the cockpit looks great . For attaching anything to the glass fuse try the hysol you can get it at TBM [link=http://www.troybuiltmodels.com/ns/acce/adhesives/]hysol link[/link]. If you buy the hysol get a gun and extra tips.Keep up the great work.
03-26-2009, 09:22 PM
#6
Thread Starter
My Feedback: (3)
Join Date: Dec 2007
Location: New York ,
NY
Posts: 252
Likes: 0
Received 0 Likes
on
0 Posts
Thanks guys..
Yes I did sand and clean before adding the trays..I used 2ton 30min Epoxy..and did get it in all the crevices with a brush..
I also epoxied around the areas of the tray and mount connections to sort of stiffen up the fuselage..
I tried pulling them off, and I would break the wood before they detached from the body..
Thanks again, and Ill check out the Hysol..
03-26-2009, 09:34 PM
#7
Snake,
I should think you did get it in all the crevises. Yikes, with two tons of epoxy you could cover a few planes. He he he! Just kidding. Great job and keep it up!
Scott
I should think you did get it in all the crevises. Yikes, with two tons of epoxy you could cover a few planes. He he he! Just kidding. Great job and keep it up!
Scott
03-27-2009, 01:01 PM
#8
Thread Starter
My Feedback: (3)
Join Date: Dec 2007
Location: New York ,
NY
Posts: 252
Likes: 0
Received 0 Likes
on
0 Posts
Thanks,
The video on YouTube of your Mustang was what pushed me over the edge to try and get a Byron..I love the look they have in the air, and that Video is a great example of one..
I plan on buying a Quadra 42 from B&B, and I want to try and put a Keleo Exhaust in it..
The video on YouTube of your Mustang was what pushed me over the edge to try and get a Byron..I love the look they have in the air, and that Video is a great example of one..
I plan on buying a Quadra 42 from B&B, and I want to try and put a Keleo Exhaust in it..
03-27-2009, 02:59 PM
#9
Snake,
I'm glad the video did that for you. I love the plane as well. The reduction drive is a lot of maintenence but worth it. It's not an everyday flyer for me but it went to the Warbird gatherings with me. Mine had a Mustang 50cc in it and was a solid performer until I burnt the head. I replaced the head with a Fuji 50 head, piston and rings and she was right back at it. I traded it about a year ago to Donzie up in Carolina and i'm not sure if he's flown it yet. I loved it and miss it and I hope you have as much fun with it as I did.
Happy Landings,
Scott
03-28-2009, 09:46 PM
#10
Thread Starter
My Feedback: (3)
Join Date: Dec 2007
Location: New York ,
NY
Posts: 252
Likes: 0
Received 0 Likes
on
0 Posts
I installed the actuating valve for the air slide, and did some wire management up to the back of the cockpit..
I installed the push pull steering but I really didnt like it so I took it out..I guess "clumsy" would be the word that Id use to decribe how I felt about it..I havent ever installed one before and that was my first impression of it..plus Id be worried about the wires getting bound on something..
If I went with a single servo for steering, how do you accomodate for the slack required in the forward movement in the retract?
Do you guys have any photos of that type of servo steering installed that I could use as a reference? Im not to sure on how to go about this?
Thanks..
04-01-2009, 09:55 PM
#11
Thread Starter
My Feedback: (3)
Join Date: Dec 2007
Location: New York ,
NY
Posts: 252
Likes: 0
Received 0 Likes
on
0 Posts
Working on the radiator outlet..I was also considering adding the oil cooler inlet/outlet that goes in front of this, not sure though..It would be awesome if it came in a pre moulded kit..
I plan on putting the air fill, on off switch and all guages at the front/taller section of the side wall area just below the rudder servo..
I need to get some mini piano hinges for the door, and I am also going to make a removable panel that will run "straigt across" to hide all the servos and keep turbulent air out..
04-08-2009, 09:53 PM
#12
Thread Starter
My Feedback: (3)
Join Date: Dec 2007
Location: New York ,
NY
Posts: 252
Likes: 0
Received 0 Likes
on
0 Posts
Access cover for rear servos/air slide etc...
Im considering putting the air guage, on off switch, air fill etc..where the radiator is supposed to be..Im going to have the radiator door on a piano hinge..
Not sure yet, but I think thats the way Ill go..
Im considering putting the air guage, on off switch, air fill etc..where the radiator is supposed to be..Im going to have the radiator door on a piano hinge..
Not sure yet, but I think thats the way Ill go..
04-08-2009, 10:35 PM
#13
Snake,
Looks good buddy. Nice work.........clean like a doctors operating room. I vote for a nice hatch for all that stuff. It would be hard to read the guage and use the other stuff under the plane in the radiator area. Maybe I am not understanding something. It is late and I haven't had my meds yet. Mom told me not to drink and post!?!?!? Great work, keep it up!
Scott
04-09-2009, 11:15 AM
#15

That looks like base wood to me.
Your doing a first class job here old chap... way above the average hack you see here.
Keep on going, get specific help where you need it and just do your thing everywhere else... such a the cockpit.
Splendid job.
Your doing a first class job here old chap... way above the average hack you see here.
Keep on going, get specific help where you need it and just do your thing everywhere else... such a the cockpit.
Splendid job.
04-10-2009, 12:37 PM
#16
Thread Starter
My Feedback: (3)
Join Date: Dec 2007
Location: New York ,
NY
Posts: 252
Likes: 0
Received 0 Likes
on
0 Posts
Thats right, its Basswood..It looks like balsa, and it comes out lighter in the pictures then it is in reality..Its plenty strong...
Thats cool Scott I take my medication at night before bed as well...
Let me do some thinking then..perhaps I can make the two hatches forward of the windscreen for this kind of stuff..
Thanks again for the compliments and advice..
Thats cool Scott I take my medication at night before bed as well...
Let me do some thinking then..perhaps I can make the two hatches forward of the windscreen for this kind of stuff..
Thanks again for the compliments and advice..
04-11-2009, 02:40 PM
#17
Thread Starter
My Feedback: (3)
Join Date: Dec 2007
Location: New York ,
NY
Posts: 252
Likes: 0
Received 0 Likes
on
0 Posts
I did the radiator today...Ill probably just paint it all black when the time comes or some sort of aluminium and dirty it up..
Im waiting on some piano hinges to do the rear scoop..I think Im going to use velcro to hold the radiator screen in as that will have to come out as well to get total access..
Im waiting on some piano hinges to do the rear scoop..I think Im going to use velcro to hold the radiator screen in as that will have to come out as well to get total access..
04-14-2009, 09:31 PM
#20
Thread Starter
My Feedback: (3)
Join Date: Dec 2007
Location: New York ,
NY
Posts: 252
Likes: 0
Received 0 Likes
on
0 Posts
The beginnings of the tail wheel doors..
I have a few good P51 reference books (the best being Production Line to Front Line) plus a 1/48th Tamyia kit, and I really cant find all that much on what the inside of the doors look like..
I kind of just did a generic inner gear door look..If somebodys got a better look at the inside of one, I certainly would be up for a redo, as Im not all that set on keeping them like this..
Im going to clean them up and detail with some riveting otherwise.
04-20-2009, 09:01 PM
#21
Thread Starter
My Feedback: (3)
Join Date: Dec 2007
Location: New York ,
NY
Posts: 252
Likes: 0
Received 0 Likes
on
0 Posts
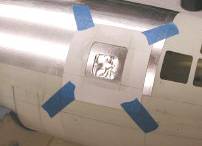
I was just experimenting with some foil tape for access covers..Im using the silver HVAC tape..
It seems to smear and is easily pushed out of shape..Do you guys have anytips for this?
Im guessing there is something better I can use..
It seems to smear and is easily pushed out of shape..Do you guys have anytips for this?
Im guessing there is something better I can use..
04-21-2009, 08:31 AM
#23
Thread Starter
My Feedback: (3)
Join Date: Dec 2007
Location: New York ,
NY
Posts: 252
Likes: 0
Received 0 Likes
on
0 Posts
Looks outstanding..
I planned on using FM on the body and paint on the wing.
If I can simulate access coves with the FM even better..
Thanks..
I planned on using FM on the body and paint on the wing.
If I can simulate access coves with the FM even better..
Thanks..
05-02-2009, 09:03 AM
#24

ORIGINAL: SnakeBT6 I was just experimenting with some foil tape for access covers..Im using the silver HVAC tape.. [&o]It seems to smear and is easily pushed out of shape..Do you guys have anytips for this? Im guessing there is something better I can use..
You are experiencing one of the issues in using construction grade HVAC tape. What may look like, feel like, and smell like one thing is not necessarily the same as something else. In this specific case there is too much of an inappropriate adhesive. This is one of the differentials Barry and everyone else recognized immediately when they began applying panels and faux hatches with FM.
It would be my guess 100% of those using FM attempted to use HVAC and construction grade foils prior to successfully applying FM. Removal of the aluminum foil you used can be achieved with a hot air blower like that used to shrink plastic coverings. After the foil comes loose, be absolutely sure to remove all residual adhesive from the surface with Goo Gone then wipe off Goo Gone with alcohol or you will have a residual "spot" or in this case a rectangular surface issue from then on... : )
When applying a faux panel or access hatch it can be helpful to form it off the airframe. Below are images from the application and finishing directions on our web site of George Maiorana creating faux panels on the surface of his Tu-4 after its surface was covered.
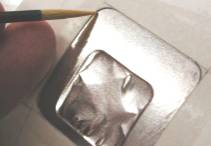
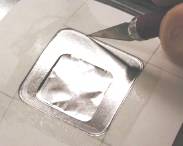
A card stock template is taped to the surface and the panel shape cut-out perimeter is followed with a "fresh" #11 blade. You will find it helpful to transfer a faux hatch to a low tac carrier sheet/tape attached to its uncoated side to permit accurate positioning on model surface when ready to apply it. This will permit intricate faux panel shapes to be applied without deforming.
Hope this suggestion was helpful.
05-13-2009, 01:51 PM
#25
Senior Member
Join Date: Oct 2008
Location: Fishers, IN
Posts: 169
Likes: 0
Received 0 Likes
on
0 Posts
Flitemetal is great, but there are other options.
Paul Letourneau built a great C-46 and the bare metal finish is rendered with McMaster Carr foil tape.
I am covering my 262" B-36D with Tape depot .0012 mil tape. I have tested on bare 1/64 ply to see how it will work, and it looked good, will look better on glass. It is only adding 5.4 pounds to my 23,800 square inches.
On open access hatches I cut a piece of g-10 fiberglass panel to the size of the hatch and then cover it with the foil tape leaving about 1/8" around the outside. Works perfect.
Thanks, DAG
http://www.thetapedepot.com/cart/com...mart/Itemid,1/