


ESM 50cc Corsair
 04-06-2014, 06:45 AM
#2151

My Feedback: (49)
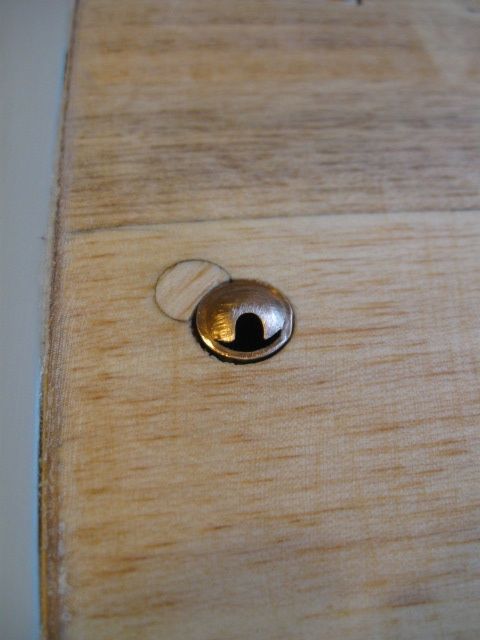
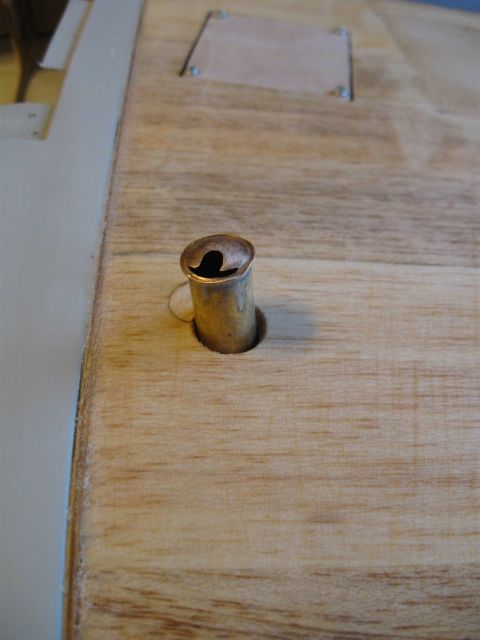
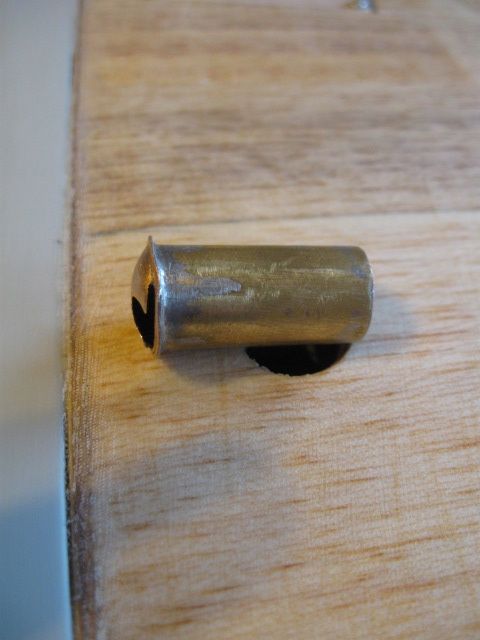
While I was on the H9 60CC build thread, I saw that Fred C had installed some whistles on his wing to try to duplicate the "whistling death" sound of the Corsair superchargers. He bought his from a shop in England, and not really cheap either. I decided I could make one out of brass tubing. I haven't tested it inflight yet, but seems to make a shrill whistle. There's even a place in the underside wing to install them, it's where the outer panel is bolted in. Looking forward to trying this one out. Not sure of all the physics involved here concerning what makes the tones higher or lower, but that takes some experimenting. I did discover that just the slit parallel to the top wasn't enough - the air needs room to escape too, which is the roundish cut 90 degrees to the first one. That made it whistle. Now, at what speeds will this work? Should be interesting to test it out.
Here's the link to the commercial whistles.
http://www.warbirdreplicas.co.uk/Air-Whistle/33.htm
Here's the link to the commercial whistles.
http://www.warbirdreplicas.co.uk/Air-Whistle/33.htm
 04-06-2014, 09:34 AM
#2152

Those whistles looks like a great idea! But will the sound be generated inside the wing now?
Here is a picture of how it turned out with a 0.01 inch fiber-glass sheet on top of the inner part of the center section.
I hope it will prevent the buckling of the skin;

I buy 0.01 inch sheets from here;
http://www.acpsales.com/Solid-Fiberglass-Sheets.html
According to the guys at RCSB ; For a plane already buildt in balsa, one can use 0.007 inch glued to the balsa instead of glassing.
The advantage is no sanding afterwards. Ready to paint!.
Something to consider for the Top Flite Monokote ARF's.
Here is a picture of how it turned out with a 0.01 inch fiber-glass sheet on top of the inner part of the center section.
I hope it will prevent the buckling of the skin;
I buy 0.01 inch sheets from here;
http://www.acpsales.com/Solid-Fiberglass-Sheets.html
According to the guys at RCSB ; For a plane already buildt in balsa, one can use 0.007 inch glued to the balsa instead of glassing.
The advantage is no sanding afterwards. Ready to paint!.
Something to consider for the Top Flite Monokote ARF's.
Last edited by kwik; 04-06-2014 at 09:39 AM.
04-06-2014, 12:24 PM
#2154
My Feedback: (49)
Kwik, nice looking wing mod. Cannot tell it has been worked. Gear doors look good too.
How many wings have folded due to buckling? I have the smaller ESM Corsair, and the sun has warped the center section a bit, but she still holds together.
The whistle sound comes back out the top of the whistle. The bottom of the whistle is sealed with a brass cover too.
How many wings have folded due to buckling? I have the smaller ESM Corsair, and the sun has warped the center section a bit, but she still holds together.
The whistle sound comes back out the top of the whistle. The bottom of the whistle is sealed with a brass cover too.
Last edited by LBJ; 04-06-2014 at 12:32 PM.
 04-07-2014, 06:10 PM
#2158

I installed the Hangar 9 tail wheel and pull pull. Works and fits fine. I am having trouble with the linkage. I'm using a fiberglass pushrod attached to a servo near the gas tank area. I'm trying to keep the weight out of the rear. Getting the right angle to smoothly operate the up and down is a challenge. I talked with Down and Lock and they might try an electric conversion. More to follow.
I hope KWIK is more clever than me.
jim
I hope KWIK is more clever than me.
jim
04-07-2014, 09:37 PM
#2159
I installed the Hangar 9 tail wheel and pull pull. Works and fits fine. I am having trouble with the linkage. I'm using a fiberglass pushrod attached to a servo near the gas tank area. I'm trying to keep the weight out of the rear. Getting the right angle to smoothly operate the up and down is a challenge. I talked with Down and Lock and they might try an electric conversion. More to follow.
I hope KWIK is more clever than me.
jim
I hope KWIK is more clever than me.
jim

Allways wanted a more Corsair lookalike tailwheel.
04-07-2014, 09:47 PM
#2160
Those whistles looks like a great idea! But will the sound be generated inside the wing now?
Here is a picture of how it turned out with a 0.01 inch fiber-glass sheet on top of the inner part of the center section.
I hope it will prevent the buckling of the skin;
I buy 0.01 inch sheets from here;
http://www.acpsales.com/Solid-Fiberglass-Sheets.html
According to the guys at RCSB ; For a plane already buildt in balsa, one can use 0.007 inch glued to the balsa instead of glassing.
The advantage is no sanding afterwards. Ready to paint!.
Something to consider for the Top Flite Monokote ARF's.
My center section was so rippled, Troybuilt agreed to get me a new one. Unfortunately, I've been waiting several months.
 04-07-2014, 10:24 PM
#2161
I sanded the wing with AND the fiberglass sheets with 240 paper first. Incredible important for the glue to stick.
I used finishing resin as glue, but perhaps contact cement would have been better.
But if you align it wrong with contact cement.......
Next I put tape on the wing along where the edges of the sheets would be. To catch the glue that will come outside the area of the sheets.
One sheet from aft of wing and forward to the main spar. Another from main spar and around the leading edge including radiator inlets.
Put on the aft first.
Smeared a LOT of glue on the wing. The tapes catched running glue outside the area.
Had tape fixing the aft , around the flaps( Taped the flapses too fist, to avoid getting glue on them.
Next put tape on the front of the sheet, stretching it forwards as hard as possible, pushing out the glue under the sheet.
Let the two aft sheets dry. Removing the edge tapes before the glue is completely dry, otherwise they will be hard to remove.....
Next day the front sheets.Same procedure.
Only a couple of evenings work. Next sanding the upper side of the sheets, so that paint will stick.
04-08-2014, 06:26 AM
#2162
I sanded the wing with AND the fiberglass sheets with 240 paper first. Incredible important for the glue to stick.
I used finishing resin as glue, but perhaps contact cement would have been better.
But if you align it wrong with contact cement.......
Next I put tape on the wing along where the edges of the sheets would be. To catch the glue that will come outside the area of the sheets.
One sheet from aft of wing and forward to the main spar. Another from main spar and around the leading edge including radiator inlets.
Put on the aft first.
Smeared a LOT of glue on the wing. The tapes catched running glue outside the area.
Had tape fixing the aft , around the flaps( Taped the flapses too fist, to avoid getting glue on them.
Next put tape on the front of the sheet, stretching it forwards as hard as possible, pushing out the glue under the sheet.
Let the two aft sheets dry. Removing the edge tapes before the glue is completely dry, otherwise they will be hard to remove.....
Next day the front sheets.Same procedure.
Only a couple of evenings work. Next sanding the upper side of the sheets, so that paint will stick.
I used finishing resin as glue, but perhaps contact cement would have been better.
But if you align it wrong with contact cement.......
Next I put tape on the wing along where the edges of the sheets would be. To catch the glue that will come outside the area of the sheets.
One sheet from aft of wing and forward to the main spar. Another from main spar and around the leading edge including radiator inlets.
Put on the aft first.
Smeared a LOT of glue on the wing. The tapes catched running glue outside the area.
Had tape fixing the aft , around the flaps( Taped the flapses too fist, to avoid getting glue on them.
Next put tape on the front of the sheet, stretching it forwards as hard as possible, pushing out the glue under the sheet.
Let the two aft sheets dry. Removing the edge tapes before the glue is completely dry, otherwise they will be hard to remove.....
Next day the front sheets.Same procedure.
Only a couple of evenings work. Next sanding the upper side of the sheets, so that paint will stick.
04-08-2014, 08:44 AM
#2163
0.01 inch fiber-glass sheet is quite thin. It was no problems around the leading edge.
You tape it using many log tape strips in the aft (Which in this case will be close to main spar; Where the panel lines are?) and then stretch it over the leading edge using long tape strips there as well.
It worked very nicely.
You tape it using many log tape strips in the aft (Which in this case will be close to main spar; Where the panel lines are?) and then stretch it over the leading edge using long tape strips there as well.
It worked very nicely.
04-08-2014, 09:51 PM
#2164
I installed the Hangar 9 tail wheel and pull pull. Works and fits fine. I am having trouble with the linkage. I'm using a fiberglass pushrod attached to a servo near the gas tank area. I'm trying to keep the weight out of the rear. Getting the right angle to smoothly operate the up and down is a challenge. I talked with Down and Lock and they might try an electric conversion. More to follow.
I hope KWIK is more clever than me.
jim
I hope KWIK is more clever than me.
jim
04-09-2014, 05:36 PM
#2165
Why not run a carbon fiber rod back to the tail wheel attached to a HD 1501MG servo for $13? Same as electric without all that motor/gear box weight in the tail. That is what I did in my 74" and I'm installing now in my 85" Corsair. Just a suggestion.
04-09-2014, 06:07 PM
#2166

I stopped by the Horizon booth at Toledo and spoke with with the designer of H9 Corsair & tail wheel . He had designed it so the Robart jack could be located under the cockpit and drive a pushrods for the unit.
FYI- the unit was designed so you could easily add a functional tail hook!
Scott
FYI- the unit was designed so you could easily add a functional tail hook!
Scott
04-10-2014, 06:53 PM
#2167
I thought the same and used a Dave Brown Fiber glass rod. My problem was the full Tysplane cockpit kit I built into the plane hung very low. I had to rearrange the servos by moving them closer to the wing saddle and also move the pull pull rods. Anyway, (for me) it changed the geometry to the tail wheel. Servo buzzed like crazy...I hate buzzing servos. Soooo...I sent my Hangar 9 Retract to Mitch at D&L for conversion. It should work nicely with my Robart electric Corsair gear. He seemed very familiar with the H9 retract. I hope it works.
On a side note, this kit has been very poorly made. Wings are different sizes, hinge holes are misaligned, horizontal stab tube misaligned, fiber glass wing section is very thin and rippled, rudder is warped...it has not been a fun build. I'm waiting on replacement parts and have been for months. Rant over.
jim
04-10-2014, 07:10 PM
#2168
My Feedback: (49)
On a side note, this kit has been very poorly made. Wings are different sizes, hinge holes are misaligned, horizontal stab tube misaligned, fiber glass wing section is very thin and rippled, rudder is warped...it has not been a fun build. I'm waiting on replacement parts and have been for months. Rant over.
jim
04-11-2014, 11:44 AM
#2169
Has anyone noticed that the stars and bars on the top left wing is much smaller than the one on the bottom right wing? Not that it matters cause I'm going to repaint the plane.
04-11-2014, 11:51 AM
#2170
The only way to avoid it, is to not buy ARF's, and build your own plane......
04-11-2014, 12:02 PM
#2171
 04-11-2014, 04:47 PM
#2173
I was just whining a bit about the poor quality. In retrospect, I would not be good at framing, sheeting, glassing, priming, painting. I only ask that if the builder in China makes 5 of these a day...could he pay a little more attention to mine.

jim
04-12-2014, 02:19 PM
#2175
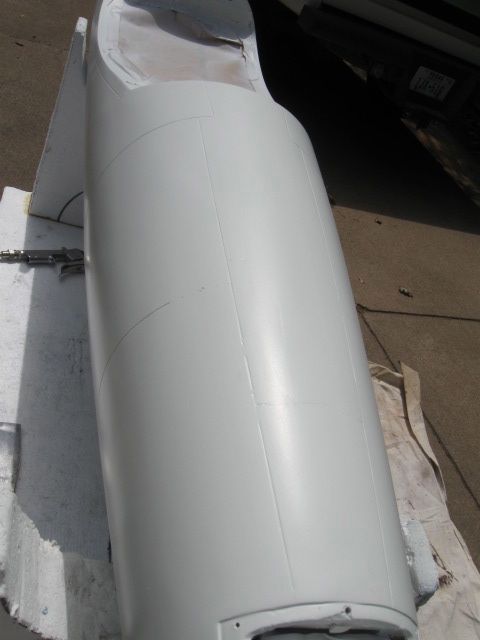
My Feedback: (49)
Got some Insignia White down today. This is the bottom color of the F4U. Took some adjusting on my Old Devilbiss Spray gun as well as thinning the paint, but it worked pretty well.
It's a bit hard to tell the difference between the white primer and the latex paint.
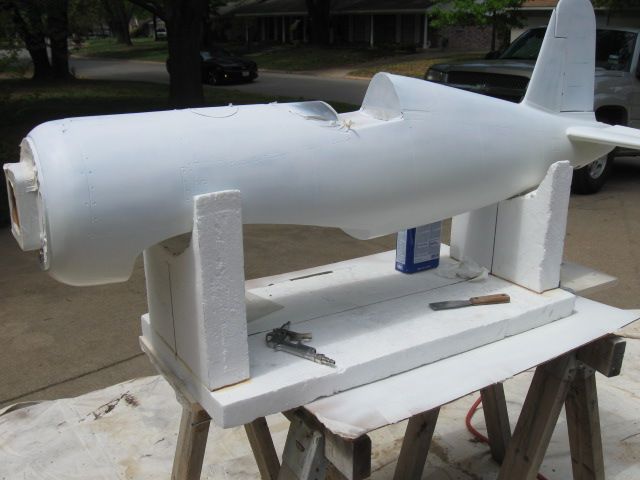
The bottom half of the cowl is painted to match the fuselage.
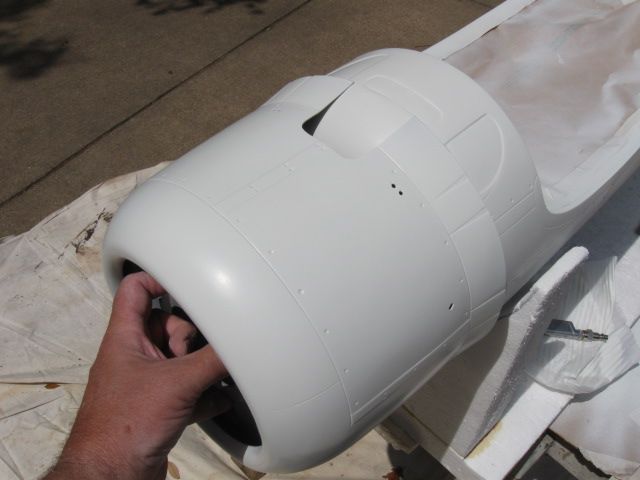
The elevator is Insignia White and the horizontal is white primer.

You can see the satin sheen on the white. Actually turned out well.
It's a bit hard to tell the difference between the white primer and the latex paint.
The bottom half of the cowl is painted to match the fuselage.
The elevator is Insignia White and the horizontal is white primer.
You can see the satin sheen on the white. Actually turned out well.