


ESM 50cc Corsair
 07-26-2014, 05:44 PM
#2376


Plane looks awesome in the air...love the paint scheme.

 07-29-2014, 12:49 PM
#2380

My Feedback: (49)
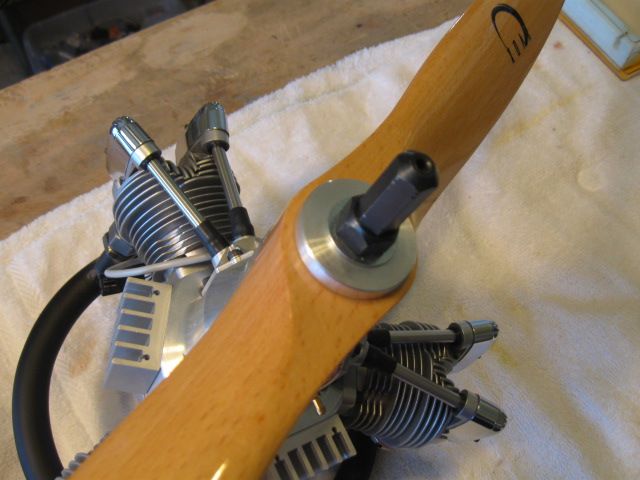
mkriley, not sure about the fit, but at only 4.0 HP. may be a bit anemic. Even a DLE-55 (5.5 HP) would be more powerful, by comparison. The cowl will accept a diameter just under 10" diameter. The Saito FG-84 is 9.85" and it fits, but not any room to spare.
I looked this info up on older OS Max specs since it is not apparently a current engine.
I looked this info up on older OS Max specs since it is not apparently a current engine.
07-31-2014, 02:52 PM
#2383
Join Date: Oct 2011
Location: , AUSTRALIA
Posts: 177
Likes: 0
Received 0 Likes
on
0 Posts
Hey LBJ, what CG did you use? was it 135mm back from leading edge at the root?
Gonna do a preliminary balance today to decice on servo location.
BTW I have no instructions as this was a "preloved" a/c. I am actually undoing the previous owners work and doing it properly this time.
grrrr
Cheers
Matt
Gonna do a preliminary balance today to decice on servo location.
BTW I have no instructions as this was a "preloved" a/c. I am actually undoing the previous owners work and doing it properly this time.
grrrr
Cheers
Matt
07-31-2014, 03:35 PM
#2384
My Feedback: (49)
Matt, that would work. Mine was right at 28 percent MAC which is 5.0" from the center LE of the wing. 135mm is 5.3". I feel anything from 4.5" to 5.5" would work. That's about 25 to 30 percent MAC which is a safe CG for first flight in any model I am aware of.
I spent at least a hundred hours rebuilding a "nice" TBM Zero (their first version 10 years ago) I bought off RCU from a guy in Houston. Haha. He ended up giving me back $300 to cover the many repairs and parts I had to buy, as he got taken in the deal too.
I spent at least a hundred hours rebuilding a "nice" TBM Zero (their first version 10 years ago) I bought off RCU from a guy in Houston. Haha. He ended up giving me back $300 to cover the many repairs and parts I had to buy, as he got taken in the deal too.
07-31-2014, 04:37 PM
#2385
Join Date: Oct 2011
Location: , AUSTRALIA
Posts: 177
Likes: 0
Received 0 Likes
on
0 Posts
Cheers mate, is that the centreline of the wing? or at the fuse/ wing joint?
'll shoot for a nice midrange, see what we get.
Currently testing the gear for leaks, all looks good so far. It's robart tho, so I expect itll work nice. Never really had a problem with Robart at all. Just be systematic in set up and it pays off later for sure.
Yeah, I asked the fella for some money back, cuz he provided me with the ESM elec gear, but no controller, ie completely useless. I told him I send em back and he can give me 150 bucks. We agreed, haven't heard from him! So I guess I got a nice set of f*^(ng paper weights. I really don't like frauds man.
Cheers
Matt
 07-31-2014, 07:18 PM
#2387
My Feedback: (49)
Center of the wing where the two dowels plug into the fuselage. Measure 5" (or whatever your number is going to be) aft of the LE then draw a line 90 deg to that line across the wing, light pencil, then out to the wing tips and you have your balance points. I use a Vic RC balancer as the plane is a bit heavy to try the fingertip method at the wing tips.
08-02-2014, 03:23 AM
#2390
My Feedback: (49)
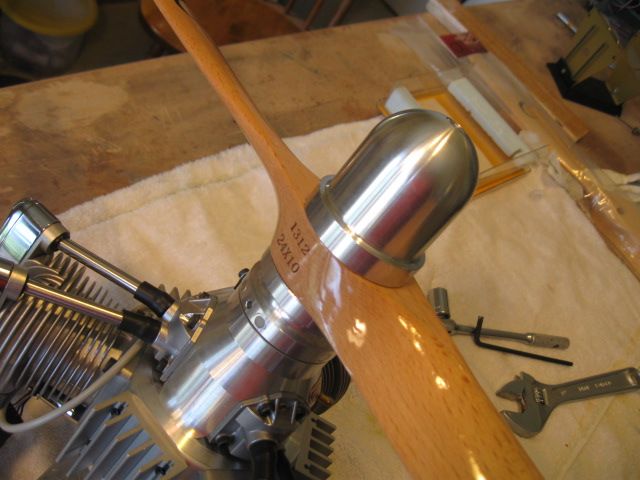
Matt, Let me find the papers for the order so I can tell you exactly what I used. They are downstairs, I think. I also used a Dave Brown adapter since the engine shaft isn't internally threaded.
OK, have the receipt.
You need a TruTurn -
1-3/4" STYLE A PROP HUB
Part TTH-1750A
$24.95 USD
Also, from Chief Aircraft or Dave Brown
10mm x 1.25 Prop Adapter - Long (This is the shortest one that comes in 10mm threads).
Part DAV 9112
$5.95 USD
Then, you use whatever bolt that fits the prop adapter to hold the prop hub on. I think it's like a 10-32 which should be no problem to find and cut to length. I had to drill the TruTurn backplate out to 10mm to fit the threaded shaft when it arrived. Just use a standard metric prop reamer in a drill press to keep it perfectly round and centered. Also, be sure to tighten down the nut securely before installing the prop adapter, as there are not any additional thru bolts holding the prop from coming loose. Also, make sure the prop adapter is on pretty dang tight as well. I used a Dave Brown adapter because it's a bit stronger than TruTurn, but that's just me. It may be easier for you to just make one order from TruTurn and use their version.
Don't forget to adjust your valves to 0.0015" (GO) - 0.0020" (NO GO) gap on all 6 valves. Oil the moving parts on the rocker arm area with one of those micro-needle oilers like train guys use. Check the gap on the plugs to 0.024". Should start right up.
Any more questions, let me know.
Last edited by LBJ; 08-02-2014 at 04:17 AM.
08-07-2014, 05:53 PM
#2391
My Feedback: (170)
Join Date: Sep 2010
Location: lubbock,
TX
Posts: 47
Likes: 0
Received 0 Likes
on
0 Posts
08-16-2014, 02:32 AM
#2395
Join Date: Oct 2011
Location: , AUSTRALIA
Posts: 177
Likes: 0
Received 0 Likes
on
0 Posts
These flaps aremaking me thirsty!
The geometry of the flaps, I'm finding very difficult to get any holding power on the out board flaps. No matter what I do, there is play in the system. Using 9 kg Hitec digitals, the servo is not moving. the pushrods are tight, no play, or bend. It's the confounded hinging system. Some one else built this plane, I'm undoing his sh&*^*&y work.
Any advice/ solutions ect appreciated.
It's driving me to the drink, ....enjoying my red wine tonight ; )
Matt
08-16-2014, 03:34 AM
#2396
My Feedback: (49)
Matt, the main thing is to get them (all) to deploy to the same degree of deflection, one to the other. "Play" is a bit hard to define, but once they are down, do they hold their position? When you drop them, the air pressure is going to be pushing on them and if they resist that pressure and hold position, then that's what's important. Does that make sense?
For what it's worth, I used some LHS digital metal gear servos with 200 oz of torque for the flaps. They seem to work fine.
For what it's worth, I used some LHS digital metal gear servos with 200 oz of torque for the flaps. They seem to work fine.
Last edited by LBJ; 08-16-2014 at 03:39 AM.
08-16-2014, 10:10 AM
#2397

I use Hitec 645 MG's, and they work fine. I do have one servo on the outermost flap (The one on the outer wing-panel), and one servo on the innermost flap.
So, that is 4 servos. All controlled from a Futaba MSA-10 (Similar to Hitecs Matchbox).
So, that is 4 servos. All controlled from a Futaba MSA-10 (Similar to Hitecs Matchbox).
08-16-2014, 09:06 PM
#2398
Join Date: Oct 2011
Location: , AUSTRALIA
Posts: 177
Likes: 0
Received 0 Likes
on
0 Posts
The play I speak of, yes the outter flaps will blowback at full throw and half throw. I'm sure it's not the servo, it's got plenty of grunt for just the one surface, and the servo is not moving, it's in the geometry.The inboard servos have their own servos, they are holding.
Can you guys please post a pic, of the hinge arrangement, I'm sure the original builder has done it wrong. I have no instructions. I will cut the hinges off and put in new ones, properly. Just sh&*&t I wish I didn't have to do.
Suffice to say this plane will not leave the ground until all systems are 110%.
The Hitec digitals I'm using have about the same power as the good ole 645's. I couldn't get any 645 here atm, otherwise my entire plane would have them.
Matt
08-17-2014, 12:21 AM
#2399
Here is the hinges on my flaps. I have everything inside the wing;


The black thing you see coming out of the wing, is a ball link at the end of the pushrod, 3 mm.
There are two hinges on the flap with a 3 mm hole in them.
A 3 mm bolt goes through, which is tightened, so there is no play there. The movement is solely a rotary movement around the brass thing in the ball link.
I have the same setup on both the outer, and the inner flaps.
Last edited by kwik; 08-17-2014 at 09:36 AM.
08-17-2014, 04:26 AM
#2400
My Feedback: (49)
Matt, after that small amount of "play" do the flaps become solid? In other words, they can only move to the rear inflight, so, they move a bit then stop. Correct? Flaps are not going to be used at full power and full speed, so, not likely to flutter. As long as they stay put when down, that's what you want. My setup is about the same as Kwik's. Maybe you could post a pic of your setup? I am assuming yours is as per the instruction booklet? If the control horns are 90 degrees to the flaps like an aileron, then that's going to possibly cause a problem and you should redo them like Kwik shows in his photos.