


ESM 50cc Corsair
 05-04-2017, 08:52 AM
#2626
Junior Member
Join Date: Feb 2017
Posts: 6
Likes: 0
Received 0 Likes
on
0 Posts
Al , I dont have this ESM , I have the 75" smaller one. I also have the FMS 1700 Corsair. This larger esm can easily be flown as an electric and at my club many have been converted. The ESM corsair tend to be tail heavy so epower helps with the battery weight as far forward as possible.
My next question based on your post ( not knowing more ) is that the FMS 1700 corsair is similar to flying a kite and the esm corsair is a heavy warbird with more skill and stick time needed for success. So if you have not flown a heavy warbird, you can not compare the FMS 1700 corsair to the ESM corsair. They will have a dramatically different feel especially on take off
My next question based on your post ( not knowing more ) is that the FMS 1700 corsair is similar to flying a kite and the esm corsair is a heavy warbird with more skill and stick time needed for success. So if you have not flown a heavy warbird, you can not compare the FMS 1700 corsair to the ESM corsair. They will have a dramatically different feel especially on take off
Would using the Saito FG-60R3 help with weight to the front?
Thanks again.
Last edited by 0311 AL USMC; 05-04-2017 at 08:55 AM.
 05-07-2017, 09:55 AM
#2627
Junior Member
Join Date: Feb 2017
Posts: 6
Likes: 0
Received 0 Likes
on
0 Posts
Alrighty.... Decided to go electric conversion and will be building a Giant Sweet N' Low stick to use as a low wing trainer.... once I get the hang of that.... I will buy the ESM and transfer the electronics over. Thanks for the advice LDM.
05-11-2017, 10:17 AM
#2628

Join Date: Dec 2015
Location: San Juan Island,Washington
Posts: 90
Likes: 0
Received 2 Likes
on
2 Posts
You might want to check out the hobby squawk forum titled downwindleg/aros EMS 50cc Corsair. I was about 2/3 done with the plane and didn't have the time to finish it after years of working on it so I'm selling it to my good friend Aros who has started this thread on the completion and flight of Marines Dream Corsair. there are already pictures posted of the progress so far and it WILL BE ELECTRIC .
Question for some of you ol' timers and new guys.... Is this like the turbine thread where if your end game is to go gas then start with a gas model? Right now I am flying an easy stik and a Giant stik.... both built and moded by me but they are electric. Was thinking of getting the FMS 1700mm F4U to start with before going ahead and getting this EMS MARINES Dream. Any thoughts or suggestions. Nearest field is 1.5 hours so.... I can't always make it down to mingle with the flyers down there. I am also self taught. Thanks.
09-28-2017, 08:05 AM
#2630
Hey fellas I am the lucky one downwind leg sold his ESM Corsair to. I've been wanting a giant scale Corsair for years. He already put a ton of work into the build with excellent components so I just need to finish it up. I am humbled and in awe of many of your manufacturing/tooling/mod skills displayed in this thread! Unfortunately I don't have those skills or tools so here's what I am looking for. I had someone put together, paint and weather the full depth cockpit kit and it turned out fantastic so I want to be able to display it proudly and as you all know the stock canopy is flimsy which means I am looking for a perfect fit/same size canopy that is more robust. It will be a rolling canopy. Any information is greatly appreciated!
Here's a couple pics of the cockpit (almost complete) and the custom coolers I had someone model and print out on a 3D printer.
Here's a couple pics of the cockpit (almost complete) and the custom coolers I had someone model and print out on a 3D printer.
09-28-2017, 08:13 AM
#2631

My Feedback: (77)

Join Date: Apr 2002
Location: Bryan, TX
Posts: 3,157
Likes: 0
Received 0 Likes
on
0 Posts
Corsair and details look great !!!
Here is the link for the made in USA upgrade 50cc Corsair canopy:
https://vqwarbirds.com/product/tys-p...orsair-canopy/
Here is the link for the made in USA upgrade 50cc Corsair canopy:
https://vqwarbirds.com/product/tys-p...orsair-canopy/
12-02-2017, 04:25 PM
#2636
Hi Fred, nice work! I will be adding the full depth cockpit myself and am looking for any advice/info on alternative push/pull servo mounting so the full depth kit fits...Thanks for any info!
12-03-2017, 09:05 AM
#2637

Join Date: Jan 2016
Location: Normandy
Posts: 24
Likes: 0
Received 0 Likes
on
0 Posts
Hi Aros,
I have made a new servo plate and two spacers to lower the servos from 50mm, and glued it to the shell with expended PU glue.
You can see on the picture that the spacers are not equal. In fact, the the original servos mount was not glued right...
Spacer in the middle measures 50mm.

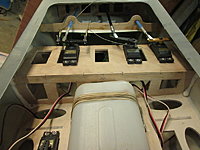
I have made a new servo plate and two spacers to lower the servos from 50mm, and glued it to the shell with expended PU glue.
You can see on the picture that the spacers are not equal. In fact, the the original servos mount was not glued right...
Spacer in the middle measures 50mm.
Last edited by fred.; 12-03-2017 at 12:41 PM.
12-16-2017, 02:21 PM
#2639
Thanks Fred! I will be sure to pass that info and pics along to my builder buddy.
My full depth cockpit and Pappy pilot have been painted up thanks to the talents of some great artists. (I just bought an airbrush system so I have many many moons to go before I could even attempt their skill level)...The darn thing is going to be near museum scale so how in the heck am I going to have the cojones to maiden!
My full depth cockpit and Pappy pilot have been painted up thanks to the talents of some great artists. (I just bought an airbrush system so I have many many moons to go before I could even attempt their skill level)...The darn thing is going to be near museum scale so how in the heck am I going to have the cojones to maiden!
 01-02-2018, 09:11 PM
#2642
Join Date: Aug 2017
Posts: 1
Likes: 0
Received 0 Likes
on
0 Posts
Happy 2018
i just bought one of these at a swap meet. Previous owner gave up on it after installing retracts and installing the flaps. It has a set of century jet Retracts that lock up. Does anyone have experience with these Retracts? I have purchased an EME 70 for it and love how it fits in the cowl. I also got rid of the pull pull elevator when one of the wires snapped lol. After reading 106 pages I have the understanding that this plane flies awesome but, as I am finding out, it is a pain in the butt to build. I am wondering if I need to cut open the center section of the wing. From the flap and retract holes I can see it looks like a lot of glue is on all of the ribs.
i just bought one of these at a swap meet. Previous owner gave up on it after installing retracts and installing the flaps. It has a set of century jet Retracts that lock up. Does anyone have experience with these Retracts? I have purchased an EME 70 for it and love how it fits in the cowl. I also got rid of the pull pull elevator when one of the wires snapped lol. After reading 106 pages I have the understanding that this plane flies awesome but, as I am finding out, it is a pain in the butt to build. I am wondering if I need to cut open the center section of the wing. From the flap and retract holes I can see it looks like a lot of glue is on all of the ribs.
01-03-2018, 04:14 PM
#2643
Join Date: Apr 2007
Location: Qld, AUSTRALIA
Posts: 309
Likes: 0
Received 0 Likes
on
0 Posts
hi, the EME 70 will be fantastic, very smooth, I normally flick start mine, 23 x 10 Mejzlik 2 blade, I did the mods in the center section on mine, then I talked to a flyer that had broken his wing, but I saw him flying a War Bird with 3D throws, really tight turns, I try to fly mine close to smooth scale, so that decision is yours. re the Century Jet Retracts, I have a set in a 72" Spitfire, I dont like them, I would NEVER buy another set, but you might not have any problems with the rotating version, I have the ESM air retracts in my Corsair, they need a bit of work to start with, but are excellent, mine came in at just over 15kg, about 34lbs, not a problem. I dont like the Pull, Pull elevator system, have not used it on any of my ESM Kits, (8 diff models) some fantastic info in this forum, I read it all before I built mine as well. I really like flying mine.
Oldtimer
Oldtimer
Last edited by oldtimer4759; 01-03-2018 at 05:52 PM.
01-08-2018, 03:30 PM
#2644
Still a little work on the instrument panel :
Attachment 2247483
Attachment 2247484
Attachment 2247485
Attachment 2247486
Attachment 2247483
Attachment 2247484
Attachment 2247485
Attachment 2247486
02-04-2018, 02:03 PM
#2647
Question for any of you that went with an electric setup...Trying to figure out what some folks did to power their hungry servos and electric retracts? Any information is greatly appreciated!
 02-24-2018, 03:06 PM
#2650
Well this bear is trying to build in the Winter! LOL
I bought the upgraded canopy from VQ Warbirds...Is this what most people went with as the upgrade to the stock canopy? Seems as flimsy as the stock one (was thinking it was going to be a bit thicker/stronger) and there's a slight texture to it so the windows won't be clear see-thru. Is there a better alternative out there (a bit thicker and very clear)?
I bought the upgraded canopy from VQ Warbirds...Is this what most people went with as the upgrade to the stock canopy? Seems as flimsy as the stock one (was thinking it was going to be a bit thicker/stronger) and there's a slight texture to it so the windows won't be clear see-thru. Is there a better alternative out there (a bit thicker and very clear)?
Last edited by Aros; 02-24-2018 at 03:10 PM.