


Warbird Racer Trinity-build
 03-16-2012, 07:29 AM
#451

The race scheduled for April 1st is the Big Kahuna Memorial. You can find information under the events section at www.sacramento-rc-flyers.org
 06-18-2012, 07:09 PM
#452

Thread Starter

I'm back! For some reason, I'd been unable to access the RCU site for about 2 1/2 months, but finally the bug has been worked out. I completed all the finish work on my tribute to "Galloping Ghost" quite some time ago, but was unable to post the pictures until now. Here they are:
06-18-2012, 07:18 PM
#454
Thread Starter
I then decided to make gear doors. Here they are mounted.
The center picture shows the starboard side. I decided to name the plane simply, "The Ghost," as a tribute to "The Galloping Ghost" So, "The Ghost" is stated on the starboard side, with the "The Galloping Ghost" stated in full on the port side.
The center picture shows the starboard side. I decided to name the plane simply, "The Ghost," as a tribute to "The Galloping Ghost" So, "The Ghost" is stated on the starboard side, with the "The Galloping Ghost" stated in full on the port side.

 06-18-2012, 07:31 PM
#458
Thread Starter
I still haven't flown her yet. I still have to glue the canopy, install my receiver, and set-up the programming on my radio. Of course it has been sitting in the workshop waiting just to do those simple tasks for over 2 months now. (I've been incredibly busy, lately!) She'll fly in 2 - 3 weeks.
06-18-2012, 07:35 PM
#459
Thread Starter
I doubt she'll go to Anderson. I finished repairing and recovering my "Red Baron" P-51, and started repainting today. I plan to bring that P-51, beings it has already flown, as well as a Hanger 9 60-sized Corsair ARF (if I can get that done in time), too. So far, I've only glued the wing sections and fiberglass reinforced each joint.
I found that when I did a touch-up on Galloping Ghost, that the color changing paint does not cover quite the same way. So while the effect of this paint is really striking, it means that repairs and retouching are out of the question, as the color will be slightly "off". In other words, the touched-up area may look blue while the rest of the fuse will appear purple or red from the same angle. I thing it will look worse to try to retouch it than to leave it with any damage. This means, I'm not about to rush anything with this one!
I found that when I did a touch-up on Galloping Ghost, that the color changing paint does not cover quite the same way. So while the effect of this paint is really striking, it means that repairs and retouching are out of the question, as the color will be slightly "off". In other words, the touched-up area may look blue while the rest of the fuse will appear purple or red from the same angle. I thing it will look worse to try to retouch it than to leave it with any damage. This means, I'm not about to rush anything with this one!
03-30-2013, 11:10 PM
#461
Thread Starter
ORIGINAL: Iron Dog
ORIGINAL: pjakew
Hey Ollie, you got an IPad or IPhone?
Hey Ollie, you got an IPad or IPhone?
I have an ancient IPhone 3G.
I had quite a bit of difficulty finding an engine that would run properly. I resulted to canibalizing parts from two separate crash-damaged YS 110S engines to make one working engine and got her installed and bench run late afternoon Friday. Installed the radio gear permanently and balanced her into the wee hours Friday night.
03-30-2013, 11:32 PM
#462
Thread Starter
So Saturday afternoon it was time to take her out to the field. After all this time and work, and being so rusty with flying warbird racers after taking off the latter half of last season, I was extremely nervous. Luckily for me,TommyGun was out and was a huge help. He offered to take her up and initially trim her out for me.
One airborne, all she needed was two clicks left aileron and 1 click of left rudder.
One airborne, all she needed was two clicks left aileron and 1 click of left rudder.
03-31-2013, 12:33 AM
#463
Thread Starter
All was well until the landing gear wouldn't retract. I cycled those things easily 25+ times on the ground with no problem, but now . . . problem. I attempted to cycle them repeatedly, but they were stuck partially retracted. Tom decided to slow her down and suddenly the engine quit. He did a beautiful job getting her just to the edge of the runway. Of course the gear collapsed as soon as the weight of the plane settled on them as they touched the ground, so it ended up being a belly slide across the runway. One of the gear doors broke, the mains were bent, and we wore through the covering on the left bottom wingtip, and a couple other abrasions, but Tom saved the plane. (Thanks Tom!)
When I tried to bend the landing gear leg back, one of them snapped at the coil. (In my experience, these Hobbico continually do!) I didn't bring any spare LG wires with me, and would have needed to weld the axles on anyway, so I thought I was done for the day. But I found a set of spare gear legs and axles pre-welded that was a back-up for my old 1/10th scale P-47 prototype that I raced until last year. (Like I said, they continually snap. I had to have a backup.) Of course they were too short for the 1/8th scale P-51. Mark (the photographer that took these pictures for me "Thanks Mark!") and Tom suggested that I put them on and just not retract the gear. I decided I needed to fly her, so that's why all the pictures have these short gear hanging down. Once that issue was resolved, we began to look at the engine. Tom stated that "The Ghost" flew great; but, that it seemed to him that the engine wasn't transitioning well in the mid-range. The problem was that the regulator was set too lean. After some re-adjustments to the low- & high-speed needles, and wome minor adjustments to low throttle end-point adjustments on the radio. I took her off for her second flight.
I was immediately comfortable. She did not seem to have any bad habits. She flew hands-off without Tom or I having to add any elevator trim, but I prefer to have a slight sink in altitude when I fly. So, she was smooth and predictable for me, once I added 3 or 4 clicks of down elevator trim to suit my flying style. Initially, I flew at 1/2 throttle but steadily added power each lap around and was soon at full throttle.
03-31-2013, 01:28 AM
#464
Thread Starter
I decided it was time to slow her down and determine her slow speed and landing characteristics. Again, everthing went relatively well . . . I did botch the initial landing attempt, and went around. I lined her up better the second time to decided to commit and hit the throttle cut. Only with the change in the end-point adjustment, I forgot to reprogram the throttle cut to compensate. Being out of practice, I had my forefinger holding the throttle cut, and couldn't apply rudder, so I ran off into the grass. Otherwise, the landing was good, and aside from minor repairs to landing gear, she's in one piece.
I'll probably have to wait until next Saturday to properly put her on the course and time her. If my luck holds out, she'll compete at next Sunday's "2nd Big Kahuna Memorial Warbird Race." (Looking at the top of this page, I see I'm only a year late! )
)
Part Two of the Trinity is complete! If you're still interested, stay tuned, and I'll finish the P-47 in June.
Also, Brian (dasquirrelisme), TommyGun did shoot some video of "The Ghost's" second flight. You wanted me to post some video. I'll do that as soon as I can get to it.
I'll probably have to wait until next Saturday to properly put her on the course and time her. If my luck holds out, she'll compete at next Sunday's "2nd Big Kahuna Memorial Warbird Race." (Looking at the top of this page, I see I'm only a year late!
)Part Two of the Trinity is complete! If you're still interested, stay tuned, and I'll finish the P-47 in June.
Also, Brian (dasquirrelisme), TommyGun did shoot some video of "The Ghost's" second flight. You wanted me to post some video. I'll do that as soon as I can get to it.
04-01-2013, 10:58 AM
#465

Glad to be of assistance ID.
Of the various planes you have allowed me to fly, this one was the best handling of the lot.
As I mentioned, for my preferences the elevator was a bit softer than I like, but I was flying your plane mode 2 instead of my preferred mode 1. It's probably a subjective thing.
But I think I would have made that deadstick with no problem at all had I been using mode 1.
Well done and keep at it.
And thanks for letting me fly the Ghost.
02-08-2015, 06:04 PM
#466
Thread Starter
About the time I stopped working on this thread, I was overloaded with work, trying to put together my first VALLEY OF SPEED warbird race, find and purchase a new house, and sell my old one. Now that all that happened, I finally feel fairly settled in my new house; and it is raining pretty heavy here this weekend so I can't do any yard work (A-h-h-h darn!), it would appear that it must be time to start building warbirds again! So, let's revisit this thread and see if I can finally get it all wrapped-up by summer.


The last plane I had to finish in the "Trinity-build" series of my composite designs was my 1/10th scale P-47. I gave the cowl I had originally made for it to Sullivan, so he could quickly complete his last "Panama Red" P-47 that my father-in-law had built him. I then needed a cowl for my "Peg O'My Heart" P-47 in time for last year's "Ash Fast" Redding race, after its original was damaged. When I pulled the replacement cowl for "Peg O'My Heart", the mold surface had deteriorated from age and use, and the cowl was barely usable. It was clear that I would need to make a new mold from my original plug, before I could finish up my last P-47.
While more work, and yet one more thing to slow me down, at least it gives me an opportunity to show several that have asked me how I make a mold from a plug that process, too. So here it goes . . .
(Oops, now the wife is calling me for dinner, so here it goes . . . after dinner and "The Walking Dead, anyway. Stay tuned.)
Last edited by Iron Dog; 02-08-2015 at 06:09 PM.
02-08-2015, 09:34 PM
#467
Thread Starter
The mold making process began Thursday. I waxed my plug 3 times using Rexco. Each time, let it dry to a haze and wiped with a soft cloth; then buffed with another soft, clean cloth.
Then, I sprayed with a mist coat of Polyvinyl Alcohol (PVA), and let that dry. (I used Rexco's Partall Film #10.) Then applied a couple thin flow-coats. The wax and the PVA form a parting barrier between the plug and the epoxy used in the lay-up of the mold. I did this before the weather system moved in to avoid issues with excessive humidity beings the PVA is water soluble. I am self-taught, so I don't know for a fact that humidity causes problems, but had an issue in the past, that the only thing I could figure was different than my previous attempts was a high humidity level, so didn't want to take any chances. Perhaps Shawn, or someone who does this sort of thing professionally would be willing to chime-in, and tell us if high humidity causes problems with PVA's effectiveness. Due to the weather system moving in, I took this down to my basement "composite room" and let this dry overnight.
Then, I sprayed with a mist coat of Polyvinyl Alcohol (PVA), and let that dry. (I used Rexco's Partall Film #10.) Then applied a couple thin flow-coats. The wax and the PVA form a parting barrier between the plug and the epoxy used in the lay-up of the mold. I did this before the weather system moved in to avoid issues with excessive humidity beings the PVA is water soluble. I am self-taught, so I don't know for a fact that humidity causes problems, but had an issue in the past, that the only thing I could figure was different than my previous attempts was a high humidity level, so didn't want to take any chances. Perhaps Shawn, or someone who does this sort of thing professionally would be willing to chime-in, and tell us if high humidity causes problems with PVA's effectiveness. Due to the weather system moving in, I took this down to my basement "composite room" and let this dry overnight.
02-08-2015, 10:12 PM
#468
Thread Starter
Friday night, before I went to bed, I mixed up a couple ounces of West System's #105 epoxy and mixed it with the #206 Hardener - using the West System pumps, it is one pump each. I actually prefer the #209 Extra Slow, but had a problem with dried resin clogging my pump and didn't have time to mess with it, so went with the Slow, instead. (Yes, it has been way too long since I have done any of this!)
I don't know if I already mentioned this years ago when I started this thread, but in addition to less working time with each batch, I found that parts made using the Fast-cure hardener actually got soft in the summer sun; so for me the slower, the better.
Anyway, I mixed about a half a teaspoon of #423 Graphite Powder into my batch of epoxy to make a black tooling layer. When later laying up a part in this mold, this black layer will make easy to see any air pockets and/or areas where the fiberglass cloth is not completely wetted-out. It also performs the same handy task for me as I lay down successive layers of cloth in the process of building this mold. The mix was just a little too thin and "drippy", so I needed just a touch of a thickening agent. All I had was micro balloons, so that is what I used. Cabosil or another agent may have been better for this purpose, but again I am not a professional so don't know all the parameters of each and every product. When mixing, stir gently to avoid mixing in extra air bubbles.
I then used a small brush to very gently "paint" on this initial layer over the PVA. Anything from a small flux brush to a 1" brush will work fine for this purpose. Just be very careful not to scratch or otherwise damage the thin layer of PVA. Try to smooth out as many of the small air bubbles as possible. Below is a picture of the plug the next morning, after I woke up. At this point, it was partially cured to the point of barely being still tacky. I was able to set it on a towel for the picture with all the materials I detail using, without the tooling-layer transferring to the towel. But want to emphasize that I kept the plug elevated with a block underneath it while it partially cured overnight.
Last edited by Iron Dog; 02-09-2015 at 09:45 AM.
02-08-2015, 10:46 PM
#469
Thread Starter
My second layer was another batch (as previously), but with chopped fiberglass mixed into the epoxy and graphite powder, instead of microballoons. I use the scrap FG cloth of previous layups and cut it with scissors in a small container.

Last edited by Iron Dog; 02-09-2015 at 09:48 AM. Reason: Picture did not properly upload
02-08-2015, 11:01 PM
#471
Thread Starter
I paint this "slurry" onto the plug with a flux brush. The idea of using the chopped fibers is to have a thickness of fibers in random orientation, so the weave of consecutive cloth layers shows-through less obviously.

02-08-2015, 11:10 PM
#472
Thread Starter
Keep working it to smooth it down evenly around the surface of the plug. The smoother you can apply it, the easier time you will have getting your cloth layers to lay down. I let this partially harden for a few hours, then I begin with my actual layers of cloth.
02-08-2015, 11:16 PM
#473
Thread Starter
Being on a teacher's budget, I couldn't splurge for the 1/2 oz. and 1 oz. cloth, but found a reasonable deal on some .7 oz. and 1.4 oz. cloth, so used them for my initial layers, instead.
This is the first layer of .7 oz. going around the outside of the plug, over the chopped fiber layer. Note how any air gaps or cloth that is not satisfactorily wetted-out shows up as fairly obvious light patches.
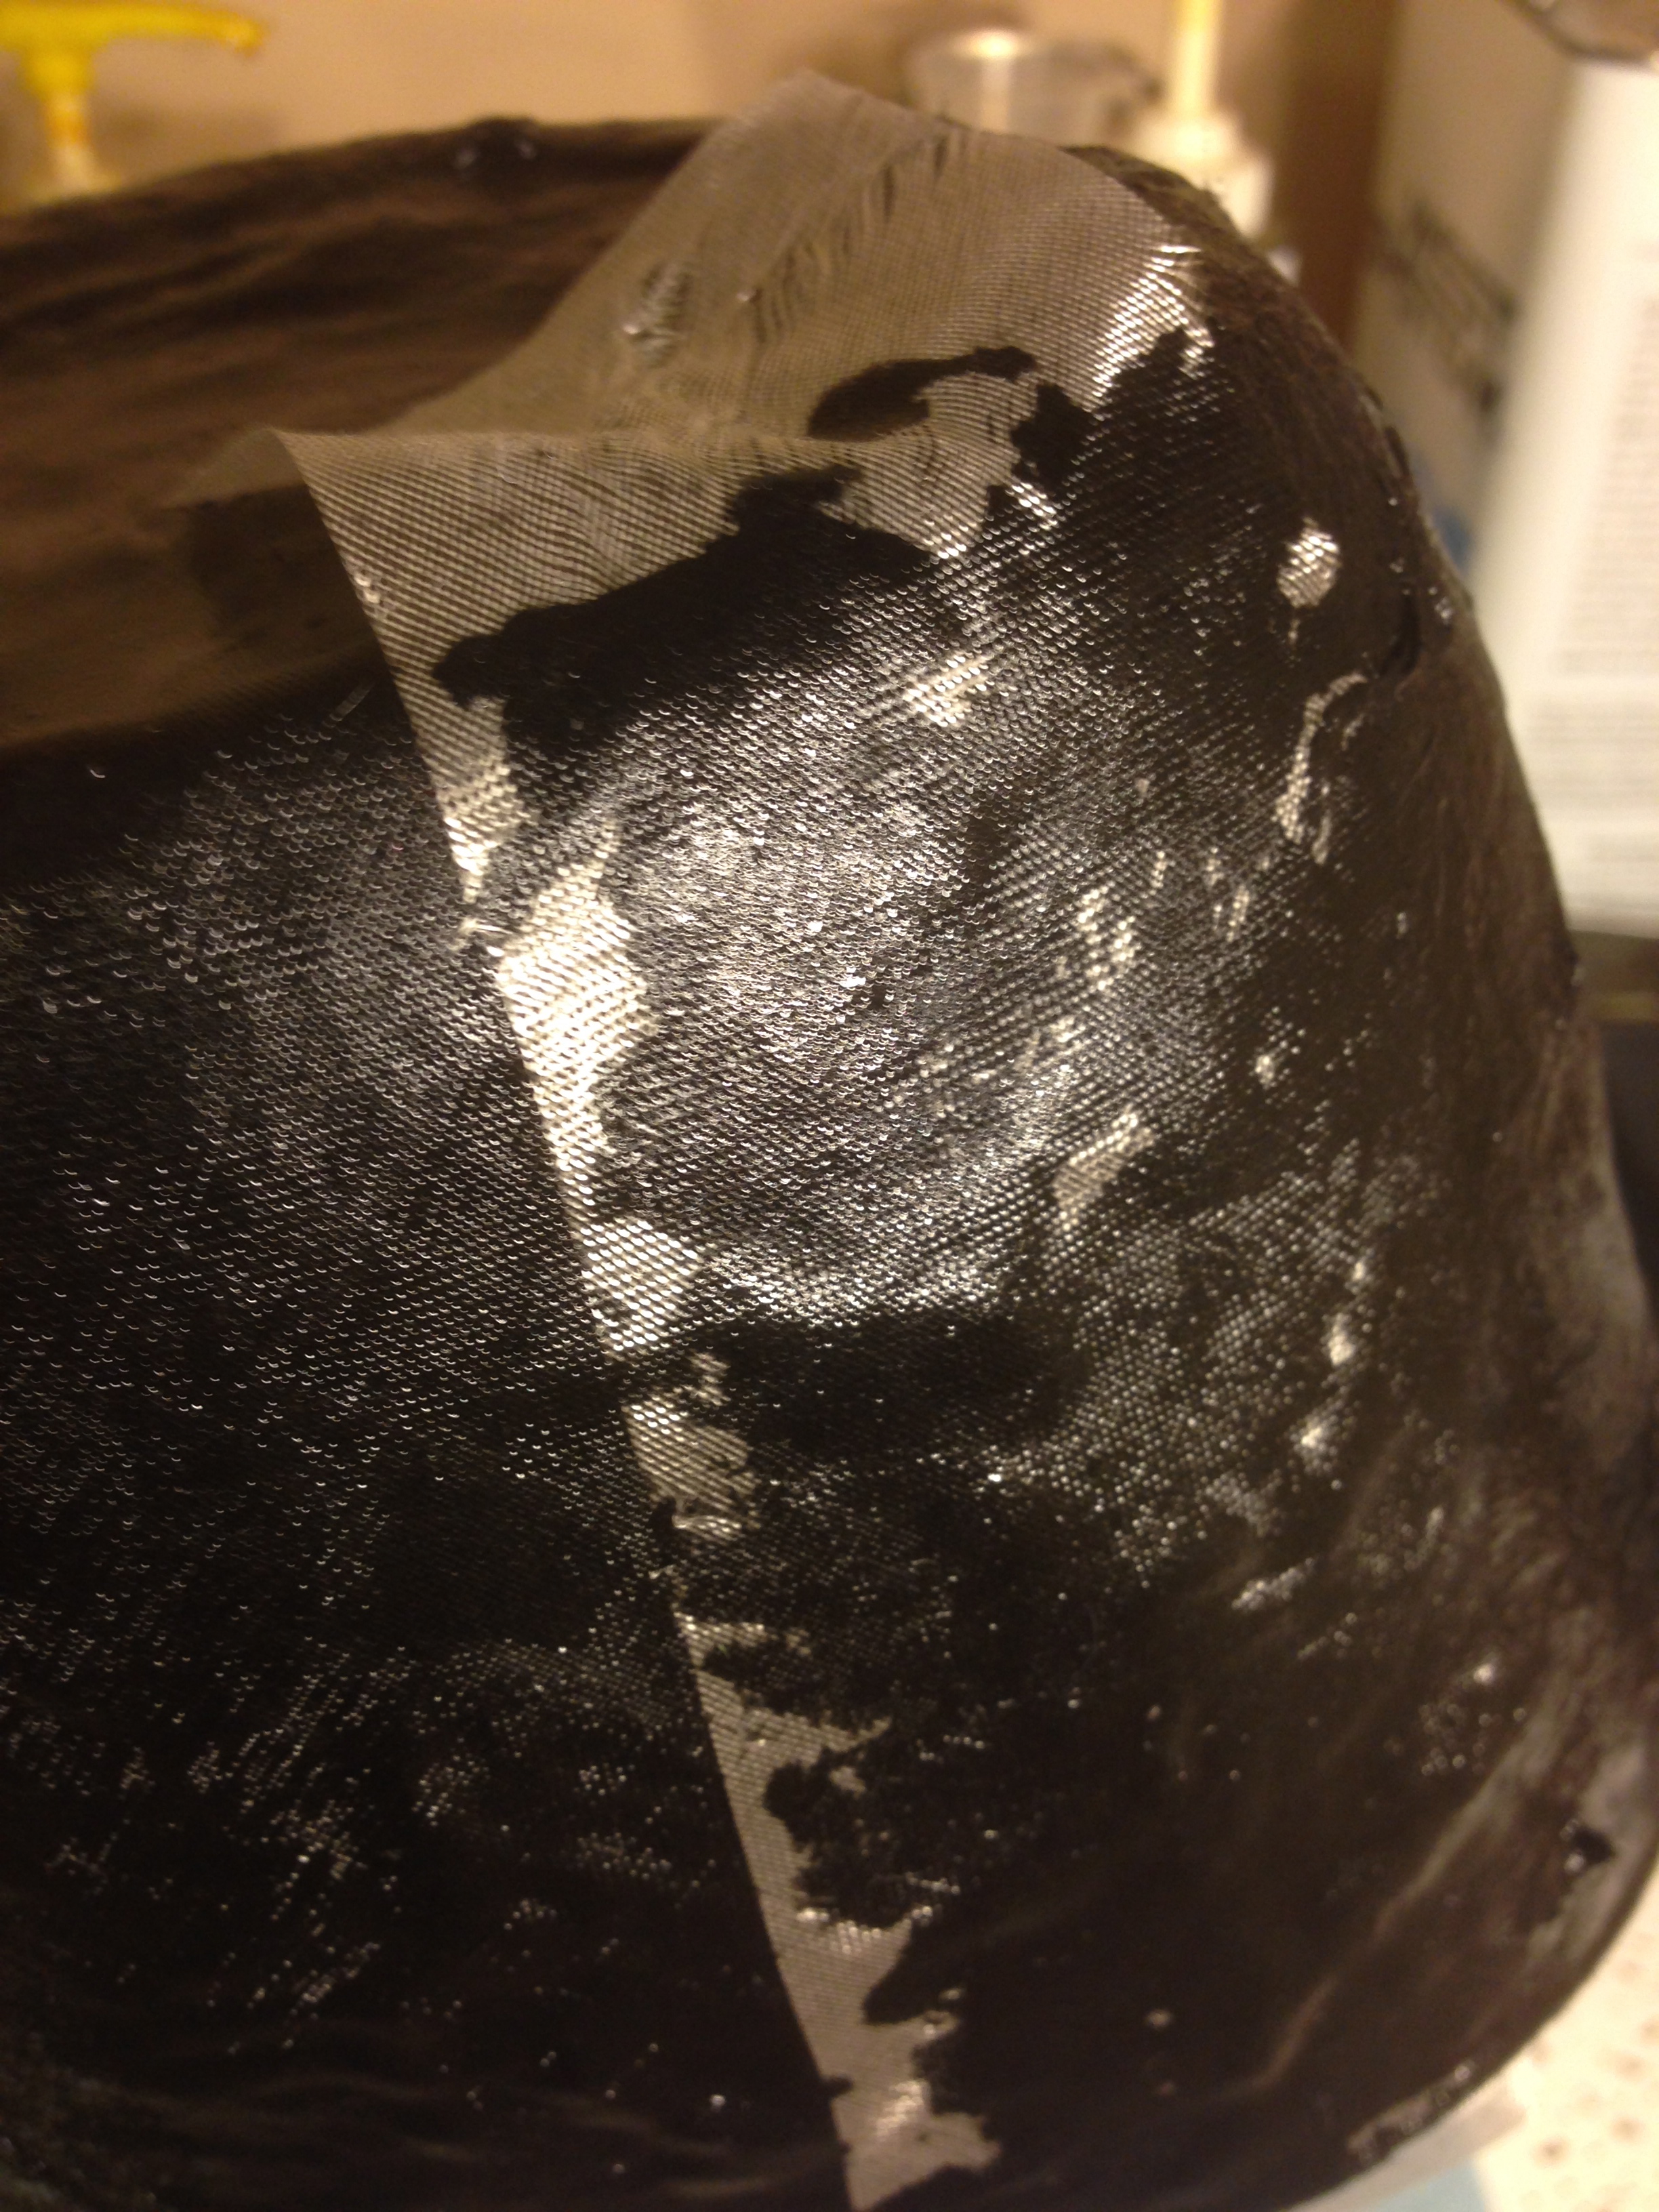
This is the first layer of .7 oz. going around the outside of the plug, over the chopped fiber layer. Note how any air gaps or cloth that is not satisfactorily wetted-out shows up as fairly obvious light patches.
Last edited by Iron Dog; 02-08-2015 at 11:30 PM.
02-08-2015, 11:24 PM
#475
Thread Starter
After letting the .7 oz layer tack up for a few hours so the cloth won't move around on me, I then apply the tight-weave 1.4 oz. cloth layer, just before going to bed. Note the relief cuts to help the cloth conform to the complex curves of the cowl surface.

Last edited by Iron Dog; 02-08-2015 at 11:34 PM.