


first venture into scratch building for R/C question
 05-18-2011, 02:23 PM
#1
Junior Member
Thread Starter
Join Date: May 2011
Location: southington, CT
Posts: 5
Likes: 0
Received 0 Likes
on
0 Posts
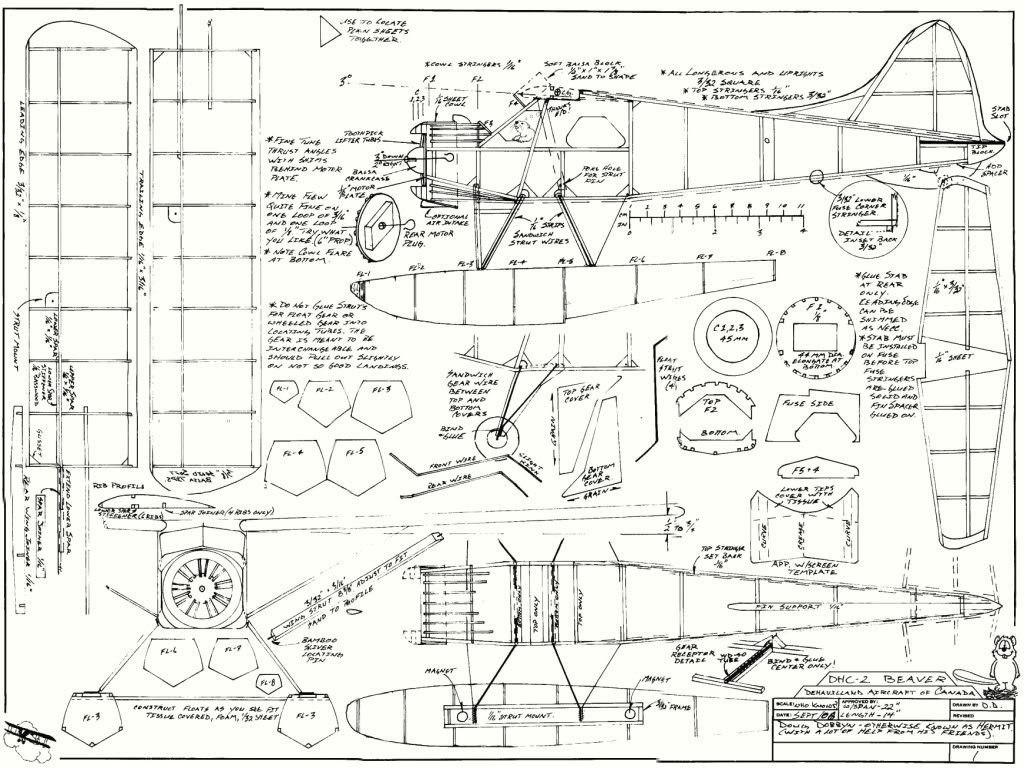
hello all, i have been building kit balsa models on and off for more than 10 yrs but have never scratch built an R/C... in fact i am new to the whole RC flight thing. i am currently learning to fly with a hobbyzone mini super cub and going well but my real passion is building. i have decided on building a dhc-2 beaver and acquired some plans from another site.
My question stems from the plans themselves, the plans i have are for a 22" wingspan plane, but i have doubled the plans to a 44" wingspan. The question is in regards to the wood for the plans, should i just double the size of the wood listed on the plans? example: if listed as 1/16 square stock, should i then use 1/8 in square instead? or should the wood size used not be scaled the same as the size of the plans?
not sure what im going to use to power her yet, i like electric but wouldnt mind gas/nitro powered either. controls are going to be full tail and ailerons. My building skills are pretty good, and modifications dont scare me at all
Plans can be posted if that will help.
Any other help/suggestions are welcome.

 05-18-2011, 02:34 PM
#3
Junior Member
Thread Starter
Join Date: May 2011
Location: southington, CT
Posts: 5
Likes: 0
Received 0 Likes
on
0 Posts
thanks limeybob! that must be the fastest answer ive ever gotten on a webforum. That leaves me with another question though, due to the size of the model that will leave me with non standard sizes for wood, should i round up the the next closest size wood in this case? example: if the plan calls for 1/8" square stock the scaled up size would then be 9/50" or do you think that this would cause the plan to become too heavy? if i can figure it out would it be better to scale the plans to match the common wood sizes better?
edit: added pic of the plans(not scaled)
edit: added pic of the plans(not scaled)
05-18-2011, 03:46 PM
#4
Keep as close to the 1.44 scale as you can. 1/8 =3/16 for instance.
The original design is light weight, so really you need to increase the number of ribs and formers, also the landing gear will probably need beefing up.
I would look at some plans that are of a similar size to what you want to build and get some ideas from them
hope this helps
Bob
The original design is light weight, so really you need to increase the number of ribs and formers, also the landing gear will probably need beefing up.
I would look at some plans that are of a similar size to what you want to build and get some ideas from them
hope this helps
Bob
05-18-2011, 04:57 PM
#5

For your first swaray into scratch building,, I would invest if a set of plans that more match your target size closer, not to mention going from Free flight to RC, you're going to have to redraw and re engineer so much it's hardly worth it.
05-18-2011, 08:02 PM
#6

Join Date: Aug 2005
Location: Mississauga,
ON, CANADA
Posts: 4,196
Likes: 0
Received 1 Like
on
1 Post
IF i were you, i would be looking for set of plans that is close or exact size of a plane you would want to build. Can i suggest in getting Unionville Hobbies Beaver plans for 40sz model and make that ur first scale scratch built model, this way you will not be fiddling with what size of wood to use and they are already designed for RC model. It's bit bigger at 72" WS but beautiful flying model. In past i had few of those UVille Beavers and they were good to me.
05-18-2011, 08:14 PM
#7


Join Date: Oct 2002
Location: Chilliwack, BC, CANADA
Posts: 12,425
Likes: 0
Received 22 Likes
on
19 Posts
What you posted is obviously a small rubber model plan. If you were building this plan up to be a 44 inch rubber model then you would need to double the size of MOST of the wood. But unless you're looking at a rubber powered model or a very lightly built electric powered model then your airframe is going to come out very light but unfortunetly very weak for most applications.
A few other things come to mind as well.
Likely you'll need to increase the number of wing ribs. And most certainly you'll need to properly design the wing spars. Off the top of my head I'd say you need to double the number of wing ribs. The wing spars will need attention as well. For a lightly built electric model you'll want to use something like 1/4x1/8 very hard balsa with a top and bottom cap that are joined by webbing. It would not be a bad idea either to make the struts actually functional and load bearing. For some extra giggles make the flaps operational along with the ailerons. That will mean figuring out where to install the rear full depth "spar" that will also be the wing panel's trailing edge for the flaps and ailerons to attach to. Likely this should be 1/8 thick by whatever depth. Where you install hinges double it up on the front side with a small patch to increase the glueing area.
The fuselage longerons will require more support in the form of more uprights. Off the top of my head I'd say about 50% more. In addition I'd suggest that even for a lightly built electric RC model that you should go with 3/16 sq main longerons for the fuselage made from hard balsa. The uprights being 1/8x3/16 medium balsa. And the stringered areas behind the "engine cowling" could be replaced with 1/16 soft sheet wetted and bent into place, allowed to dry while held down with guaze or similar then glued into place.
The landing gear will require major re-design. You'll want to mount the wire legs to some plywood but then glue the plywood and brace it so the LG loads are extended out into a lot of the structure by using diagonals and gussets to extend the loads out into more of the model around the cabin area.
The tails will require the "usual" modifications to make them suitable for hinging.
This is NOT a plan that is in any way suitable for glow power unless your idea of a good time is a Cox .049 on the nose. The structure, even with the mods mentioned, is just way too weak for any .15's to .25's that the wing span would suggest. The ONLY thing the plans would be good for if you want to overpower it to that extent would be for the overall outlines. The structural details would be useless. The same even goes for the use of a hotter electric motor. Put too much power into this model and it would likely go into flutter issues and fly apart in the air even with the mods suggested.
This is a design that even with the modifications suggested could and should be built down to around 17 to 20 oz ready to fly. And with any care at all the 17 oz side of the range is very doable. With that much weight look for an electric pack that provides about 50 watts. Or perhaps 70 watts if your goal is to fly it off the floats. With land gear and 50 watts of power it'll fly very much like the full size Beaver in terms of climbing under power. That is the angle of climb will be roughly 35 to 40 degrees nose up at a reasonable speed.
05-19-2011, 08:29 AM
#8
Junior Member
Thread Starter
Join Date: May 2011
Location: southington, CT
Posts: 5
Likes: 0
Received 0 Likes
on
0 Posts
So i probably should have put some more thought into my first scratch build...i'm gonna shelf the beaver plans for the moment and am currently looking at AMA plan services for something appropriate, maybe a piper cub....
05-19-2011, 09:35 AM
#9
Join Date: Oct 2002
Location: Chilliwack, BC, CANADA
Posts: 12,425
Likes: 0
Received 22 Likes
on
19 Posts
Well, I don't know if you need to go THAT far. Unless you were looking to actually go with stronger power options.
THis sort of issue is the same thing you'll run into any time you want to scale up or down a set of plans. In this case it's complicated by the fact that you chose a small and lightly built rubber model as your source. But a lot of the same issues would still be there if you chose a smaller glow power design and wanted to double the size. Generally a model can be scaled up or down up to 25% and still use the same plans with very little changes. But once you try to stretch it beyond about 25% then changes such as indicated in this thread become mandatory to the success of the project.
In your case it's doubly complicated by having to "beef up" the rubber power rated structure to accomadate RC and electrics. If it were a case of you wanting to make a big rubber powered Beaver then merely doubling the number of ribs and using wood that was directly scaled up would have been fine. So 1/8 very hard for the fuselage main longerons and wing spars and using about 1.5 to 2 times as meany fuselage uprights would do the job. Well, that and likely beefing up the landing gear mounting area a little so that it spread out the LG loads to more of the model's structure. But as soon as you look at adding RC and electric power you add significant weight. You also add in the fact that there's now an elevator that is able to make the model pull G's and load up the wing spar(s) far more than a rubber powered free flight model would ever do. And that means the wing needs to be re-designed right off the bat.
05-19-2011, 08:10 PM
#10
Junior Member
Thread Starter
Join Date: May 2011
Location: southington, CT
Posts: 5
Likes: 0
Received 0 Likes
on
0 Posts
I think im going to give this a shot after some more research, have to finish off a smaller scale piper super cub over the weekend. gonna order the wood for this after browsing the wood available at my local hobbyshop if they dont have whats needed.
05-19-2011, 08:25 PM
#11
Join Date: Oct 2002
Location: Chilliwack, BC, CANADA
Posts: 12,425
Likes: 0
Received 22 Likes
on
19 Posts
If you're interested in usng the plans you have and going for a light build for light to moderate wind conditions (as in up to around 6 ro 7 mph) I'd be willing to work with you through this thread to work out the details of the upsizing and conversion to RC. With the plans you have it's very definetly doable while still being able to use MOST of the plans you have.
The first step once you are ready is to get the plans printed out to the 44 inch span. Then "we'll" do some measurements and get started on the changes needed while still aiming at a light final flying weight.
The upside is that such a model will be ideal for carrying one of the new generation of memory stick video cameras if you are so inclined.
05-20-2011, 11:04 AM
#12
Junior Member
Thread Starter
Join Date: May 2011
Location: southington, CT
Posts: 5
Likes: 0
Received 0 Likes
on
0 Posts
Wow Bmatthews, thats awsome, thanks so much for offering to work with me on this. i assembled a set of plans last night by breaking the image up and printing on normal paper, then carefully assembled after trimming the borders. my local staples can also print blueprints up to 36x48 which is about 2 inches bigger than the plans so i have submitted an order for the plans to be printed properly. the bad news now is that i drew the short straw on a 12 hour overtime shift tommorow, so im gonna try to squeeze in finishing my piper by sunday night but may run out of time. i can start getting any measurements needed any time now though.
EDIT: Plans from staples were done way ahead of time! pickwed them up last night, now stuck at work for 11 more hours
EDIT: Plans from staples were done way ahead of time! pickwed them up last night, now stuck at work for 11 more hours
