Community
Search
Notices
Scratch Building, Aircraft Design, 3D/CAD If you are starting/building a project from scratch or want to discuss design, CAD or even share 3D design images this is the place. Q&A's.

Hot Hots Plans Build Thread

Thread Tools
 
Search this Thread
 
Old 08-18-2013, 05:57 AM
  #76  
WILDCRASHWILLY
Senior Member
Thread Starter
 
WILDCRASHWILLY's Avatar
 
Join Date: Oct 2003
Location: Western KY
Posts: 981
Likes: 0
Received 1 Like on 1 Post
Default

Well guys,

I know this build has been hit and miss as far as me being consistent but, I worked on it some more last night and took pictures. I left my camera over in the shop however, I hope to build on it some more this afternoon also. I'll attempt to post the pictures tonight. Still have a little learning curve on this NEW RCU but, I'm starting to understand it better.
Old 08-18-2013, 07:45 PM
  #77  
WILDCRASHWILLY
Senior Member
Thread Starter
 
WILDCRASHWILLY's Avatar
 
Join Date: Oct 2003
Location: Western KY
Posts: 981
Likes: 0
Received 1 Like on 1 Post
Default

I have some pictures to post tonight. Not sure how this works on the new RCU but I'll give it a try.
This group of pictures is wher I glued the rear upper spine including the rear upper fuse sides.

Attached Thumbnails Click image for larger version

Name:	Hots121.JPG
Views:	531
Size:	233.6 KB
ID:	1910004   Click image for larger version

Name:	Hots118.JPG
Views:	533
Size:	236.0 KB
ID:	1910005   Click image for larger version

Name:	Hots119.JPG
Views:	523
Size:	236.9 KB
ID:	1910006   Click image for larger version

Name:	Hots120.JPG
Views:	518
Size:	231.1 KB
ID:	1910007  

Last edited by WILDCRASHWILLY; 08-18-2013 at 08:00 PM. Reason: spelling
Old 08-18-2013, 07:53 PM
  #78  
WILDCRASHWILLY
Senior Member
Thread Starter
 
WILDCRASHWILLY's Avatar
 
Join Date: Oct 2003
Location: Western KY
Posts: 981
Likes: 0
Received 1 Like on 1 Post
Default

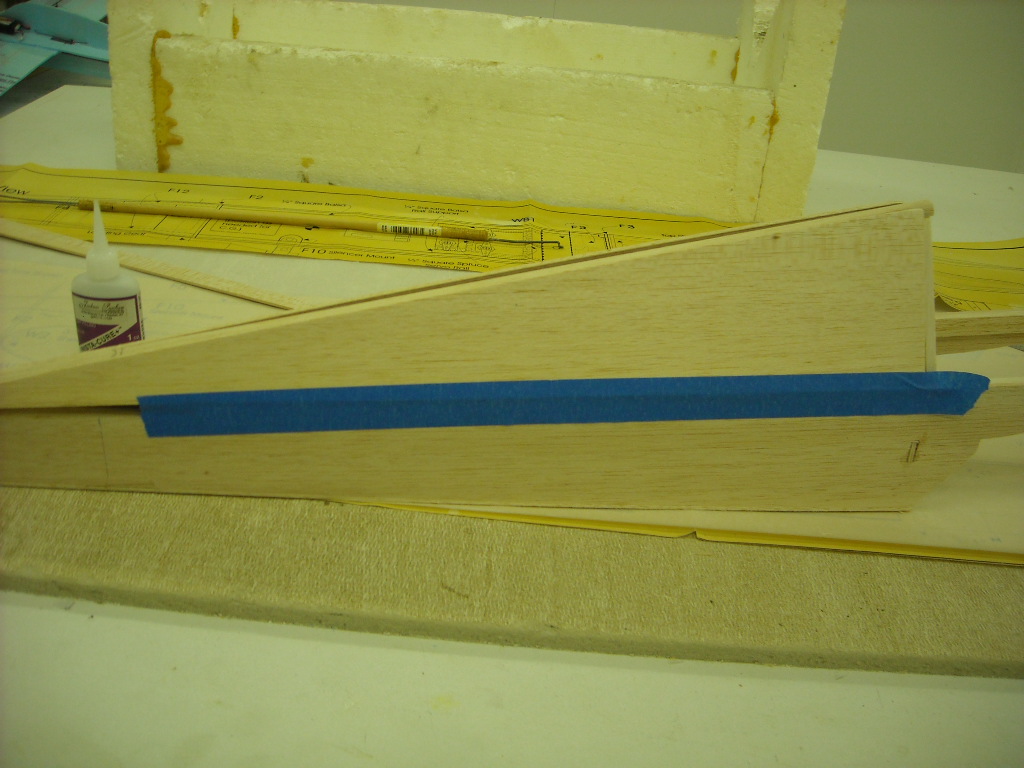
These three show where I removed the tape and did a little rough shaping with the micro plane and some additional trimming around the tail. On a side note, most of the stuff on the new RCU is okay with me however, loading these pictures was a pain in the butt. You can only insert one at a time. You have to go back to the little Icon, "which on mine is fourth from the right on the reply box", each time you want to add a pic. Works okay but is very cumbersome. If you guys know a better way, please let me know.

Attached Thumbnails Click image for larger version

Name:	Hots122.JPG
Views:	515
Size:	229.2 KB
ID:	1910011   Click image for larger version

Name:	Hots123.JPG
Views:	514
Size:	230.4 KB
ID:	1910017   Click image for larger version

Name:	Hots124.JPG
Views:	497
Size:	228.1 KB
ID:	1910018  

Last edited by WILDCRASHWILLY; 08-18-2013 at 08:01 PM. Reason: fixing a typo
Old 08-18-2013, 08:15 PM
  #79  
WILDCRASHWILLY
Senior Member
Thread Starter
 
WILDCRASHWILLY's Avatar
 
Join Date: Oct 2003
Location: Western KY
Posts: 981
Likes: 0
Received 1 Like on 1 Post
Default

I was looking back at my previous posts and noticed I left a picture out that I mentioned back in post number 74. It is where I sanded a taper on the tail portion of the fuse and epoxied the fuse sides together at the tail.

Attached Thumbnails Click image for larger version

Name:	Hots117.JPG
Views:	546
Size:	234.0 KB
ID:	1910021  
Old 09-07-2014, 05:19 PM
  #80  
lomcevoc
My Feedback: (36)
 
Join Date: Oct 2004
Location: sidney, OH
Posts: 136
Received 1 Like on 1 Post
Default

Bill

Any updates on this build?

Lom
Old 09-09-2014, 07:42 PM
  #81  
WILDCRASHWILLY
Senior Member
Thread Starter
 
WILDCRASHWILLY's Avatar
 
Join Date: Oct 2003
Location: Western KY
Posts: 981
Likes: 0
Received 1 Like on 1 Post
Default

Lom and my other RCU friends. First please accept my apologies for being so hit and miss on this build. I have gotten side tracked on several other projects both rc and non-rc due to no fault of anyone other than myself. I have been working heavily on the Hots the last two weeks and hope it flies this weekend provided i get the engine broken in.

Last edited by WILDCRASHWILLY; 09-09-2014 at 07:54 PM.
Old 09-09-2014, 07:50 PM
  #82  
WILDCRASHWILLY
Senior Member
Thread Starter
 
WILDCRASHWILLY's Avatar
 
Join Date: Oct 2003
Location: Western KY
Posts: 981
Likes: 0
Received 1 Like on 1 Post
Default

Having a little trouble posting for some reason hence the back to back post. Anyway,,, back on topic. Although i haven't had a chance to post them, i have taken plenty of pictures and will take my portion of this thread to the completion of the build. If i get a chance I'll try to post some of the pics tomorrow night if i can get them on my computer and sorted to the proper flow of the work performed. I finished the cowl this weekend and removed it from the mold last night. Then trimmed it to fit. I took detailed pics of that process as well.
Old 09-10-2014, 04:44 PM
  #83  
fritzke
My Feedback: (1)
 
Join Date: Jan 2002
Location: Crystal, MN
Posts: 1,294
Likes: 0
Received 0 Likes on 0 Posts
Default

Some Plans!

The Original Hots
http://www.outerzone.co.uk/plan_details.asp?ID=4581
Electric Hots (.075-.10 size)
http://www.outerzone.co.uk/plan_details.asp?ID=4086
Hots II
http://www.outerzone.co.uk/plan_details.asp?ID=4095
Dave
Old 09-10-2014, 08:26 PM
  #84  
WILDCRASHWILLY
Senior Member
Thread Starter
 
WILDCRASHWILLY's Avatar
 
Join Date: Oct 2003
Location: Western KY
Posts: 981
Likes: 0
Received 1 Like on 1 Post
Default

These pictures show where I installed the panels on the top of the fuse at midway and also on the front section. Although I didn't show it ,I used a razor plane and coarse sand paper to rough it in after I removed the painter's tape I used to secure it while the adhesive cured.
Attached Thumbnails Click image for larger version

Name:	H101.JPG
Views:	486
Size:	233.4 KB
ID:	2030990   Click image for larger version

Name:	H102.JPG
Views:	481
Size:	232.5 KB
ID:	2030991   Click image for larger version

Name:	H103.JPG
Views:	486
Size:	235.6 KB
ID:	2030992   Click image for larger version

Name:	H105.JPG
Views:	476
Size:	233.5 KB
ID:	2030993   Click image for larger version

Name:	H107.JPG
Views:	477
Size:	230.8 KB
ID:	2030994  
Old 09-10-2014, 08:30 PM
  #85  
WILDCRASHWILLY
Senior Member
Thread Starter
 
WILDCRASHWILLY's Avatar
 
Join Date: Oct 2003
Location: Western KY
Posts: 981
Likes: 0
Received 1 Like on 1 Post
Default

Lower section of the front of the fuse. The last picture shows where the LG would eventually be mounted. This is a mod from the plans.
Attached Thumbnails Click image for larger version

Name:	H111.JPG
Views:	487
Size:	222.6 KB
ID:	2030995   Click image for larger version

Name:	H112.JPG
Views:	491
Size:	234.5 KB
ID:	2030996   Click image for larger version

Name:	H116.JPG
Views:	491
Size:	227.1 KB
ID:	2030997  
Old 09-10-2014, 08:45 PM
  #86  
WILDCRASHWILLY
Senior Member
Thread Starter
 
WILDCRASHWILLY's Avatar
 
Join Date: Oct 2003
Location: Western KY
Posts: 981
Likes: 0
Received 1 Like on 1 Post
Default

Worked on wing fit. Actually, I have this post and the last post a little out of sequence as you can see from these pics, I haven't installed the lower part of the front of the fuse at this time.
Attached Thumbnails Click image for larger version

Name:	H108.JPG
Views:	497
Size:	230.8 KB
ID:	2030999   Click image for larger version

Name:	H109.JPG
Views:	527
Size:	234.3 KB
ID:	2031000   Click image for larger version

Name:	H110.JPG
Views:	491
Size:	235.2 KB
ID:	2031001  

Last edited by WILDCRASHWILLY; 09-10-2014 at 08:50 PM.
Old 09-10-2014, 08:57 PM
  #87  
WILDCRASHWILLY
Senior Member
Thread Starter
 
WILDCRASHWILLY's Avatar
 
Join Date: Oct 2003
Location: Western KY
Posts: 981
Likes: 0
Received 1 Like on 1 Post
Default

These pictures show where the wing mount was installed; drilled and tapped for quarter inch bolts. Altered from plan here as it shows only one bolt. I always use two except for the smallest of models.
Attached Thumbnails Click image for larger version

Name:	H113.JPG
Views:	486
Size:	230.6 KB
ID:	2031005   Click image for larger version

Name:	H114.JPG
Views:	453
Size:	233.2 KB
ID:	2031006   Click image for larger version

Name:	H115.JPG
Views:	455
Size:	232.3 KB
ID:	2031007   Click image for larger version

Name:	H117.JPG
Views:	458
Size:	228.1 KB
ID:	2031008  
Old 09-10-2014, 09:01 PM
  #88  
WILDCRASHWILLY
Senior Member
Thread Starter
 
WILDCRASHWILLY's Avatar
 
Join Date: Oct 2003
Location: Western KY
Posts: 981
Likes: 0
Received 1 Like on 1 Post
Default

More pictures of the wing as it fits the fuse and the horizontal stab on the tail. I deviated from the plans here as I used counter balance tabs where the plans show none. Actually they are on the elevator but, I show the mod to the stab to make room for them. I feel it helps reduce the strain on servos however some may argue that point. There are several points of view on these and I'm sure all have good merit. Just a personal preference I happen to like.
Attached Thumbnails Click image for larger version

Name:	H118.JPG
Views:	473
Size:	232.8 KB
ID:	2031009   Click image for larger version

Name:	H119.JPG
Views:	456
Size:	229.3 KB
ID:	2031010   Click image for larger version

Name:	H120.JPG
Views:	465
Size:	231.2 KB
ID:	2031011   Click image for larger version

Name:	H121.JPG
Views:	474
Size:	229.9 KB
ID:	2031012  
Old 09-10-2014, 09:05 PM
  #89  
WILDCRASHWILLY
Senior Member
Thread Starter
 
WILDCRASHWILLY's Avatar
 
Join Date: Oct 2003
Location: Western KY
Posts: 981
Likes: 0
Received 1 Like on 1 Post
Default

These pictures show building wing pan for the bottom of the wing which gives the fuse continuity.
Attached Thumbnails Click image for larger version

Name:	H122.JPG
Views:	506
Size:	235.4 KB
ID:	2031058   Click image for larger version

Name:	H123.JPG
Views:	512
Size:	233.5 KB
ID:	2031059   Click image for larger version

Name:	H124.JPG
Views:	502
Size:	229.3 KB
ID:	2031060   Click image for larger version

Name:	H125.JPG
Views:	508
Size:	229.3 KB
ID:	2031061  

Last edited by WILDCRASHWILLY; 09-10-2014 at 10:32 PM. Reason: tried to reattach pics
Old 09-10-2014, 09:08 PM
  #90  
WILDCRASHWILLY
Senior Member
Thread Starter
 
WILDCRASHWILLY's Avatar
 
Join Date: Oct 2003
Location: Western KY
Posts: 981
Likes: 0
Received 1 Like on 1 Post
Default

Did a little rough sanding of the fuse here and also show where the LG will mount. I normally use aluminum however, this is my buddy's plane and he likes the composite gear which is absolutely okay. Another one of those personal preference things.
Attached Thumbnails Click image for larger version

Name:	H126.JPG
Views:	522
Size:	228.9 KB
ID:	2031063   Click image for larger version

Name:	H127.JPG
Views:	512
Size:	230.9 KB
ID:	2031065  

Last edited by WILDCRASHWILLY; 09-10-2014 at 10:34 PM. Reason: due to an attachment issue had to reattach pics
Old 09-10-2014, 09:13 PM
  #91  
WILDCRASHWILLY
Senior Member
Thread Starter
 
WILDCRASHWILLY's Avatar
 
Join Date: Oct 2003
Location: Western KY
Posts: 981
Likes: 0
Received 1 Like on 1 Post
Default

Started covering. I'm using checkered on the bottom and yellow on top. It will have a green leading edge and green gears on the wing and tail feathers. You can see the templates I made with card stock. Wow ! I spent all afternoon one day cutting teeth in the templates, then the covering I used.
Attached Thumbnails Click image for larger version

Name:	H128.JPG
Views:	471
Size:	232.5 KB
ID:	2031073   Click image for larger version

Name:	H129.JPG
Views:	528
Size:	233.0 KB
ID:	2031074   Click image for larger version

Name:	H130.JPG
Views:	510
Size:	225.8 KB
ID:	2031075   Click image for larger version

Name:	H131.JPG
Views:	460
Size:	233.5 KB
ID:	2031076  

Last edited by WILDCRASHWILLY; 09-10-2014 at 10:36 PM. Reason: had to reattach pics
Old 09-10-2014, 09:16 PM
  #92  
WILDCRASHWILLY
Senior Member
Thread Starter
 
WILDCRASHWILLY's Avatar
 
Join Date: Oct 2003
Location: Western KY
Posts: 981
Likes: 0
Received 1 Like on 1 Post
Default

Wing complete with white ailerons. All covering is Ultracoat.
Attached Thumbnails Click image for larger version

Name:	H132.JPG
Views:	502
Size:	229.3 KB
ID:	2031077  

Last edited by WILDCRASHWILLY; 09-10-2014 at 10:37 PM. Reason: reattachment of photo
Old 09-10-2014, 09:18 PM
  #93  
WILDCRASHWILLY
Senior Member
Thread Starter
 
WILDCRASHWILLY's Avatar
 
Join Date: Oct 2003
Location: Western KY
Posts: 981
Likes: 0
Received 1 Like on 1 Post
Default

Black covering on the bottom of the fuse.
Attached Thumbnails Click image for larger version

Name:	H133.JPG
Views:	469
Size:	228.7 KB
ID:	2031079  

Last edited by WILDCRASHWILLY; 09-10-2014 at 10:39 PM. Reason: reattach photo
Old 09-10-2014, 09:20 PM
  #94  
WILDCRASHWILLY
Senior Member
Thread Starter
 
WILDCRASHWILLY's Avatar
 
Join Date: Oct 2003
Location: Western KY
Posts: 981
Likes: 0
Received 1 Like on 1 Post
Default

A picture of the servo bay with throttle, rudder, and elevator servo installed.
Attached Thumbnails Click image for larger version

Name:	H134.JPG
Views:	508
Size:	232.0 KB
ID:	2031080  

Last edited by WILDCRASHWILLY; 09-10-2014 at 10:39 PM. Reason: same
Old 09-10-2014, 09:29 PM
  #95  
WILDCRASHWILLY
Senior Member
Thread Starter
 
WILDCRASHWILLY's Avatar
 
Join Date: Oct 2003
Location: Western KY
Posts: 981
Likes: 0
Received 1 Like on 1 Post
Default

Starting on the cowl. Get some of your significant other's stockings. Better to ask her for an old pair. They get quite testy if you pick out a new pair... If you don't have a significant other,,,, well all I can say is the lady at the department store is going to go blink,,, blink,,, when you tell her it's to fix a plane. I used finishing resin, (in this case Z Poxy but other brands will work just fine.) The glass cloth consist of three layers of 2 oz and 1 layer of 3/4 oz. the 3/4 oz is the outside layer to make the cowl a little easier to finish in my mind but not absolutely necessary. you may find you need 4 or 5 layers of the 2 oz but 3 has worked for me and that is what is on this one. On occasion I've used 4 layers.
Attached Thumbnails Click image for larger version

Name:	H135.JPG
Views:	448
Size:	231.1 KB
ID:	2031081   Click image for larger version

Name:	H136.JPG
Views:	496
Size:	231.5 KB
ID:	2031082  

Last edited by WILDCRASHWILLY; 09-10-2014 at 10:41 PM. Reason: same
Old 09-10-2014, 09:31 PM
  #96  
WILDCRASHWILLY
Senior Member
Thread Starter
 
WILDCRASHWILLY's Avatar
 
Join Date: Oct 2003
Location: Western KY
Posts: 981
Likes: 0
Received 1 Like on 1 Post
Default

I made the plug out of florist foam. Then wrapped it tightly with plastic wrap. I used Seran wrap, (not sure I spelled that correctly).
Attached Thumbnails Click image for larger version

Name:	H137.JPG
Views:	500
Size:	230.8 KB
ID:	2031083   Click image for larger version

Name:	H138.JPG
Views:	493
Size:	234.0 KB
ID:	2031084  

Last edited by WILDCRASHWILLY; 09-10-2014 at 10:42 PM.
Old 09-10-2014, 09:39 PM
  #97  
WILDCRASHWILLY
Senior Member
Thread Starter
 
WILDCRASHWILLY's Avatar
 
Join Date: Oct 2003
Location: Western KY
Posts: 981
Likes: 0
Received 1 Like on 1 Post
Default

Stretch the panty hose over the plastic tightly. Leave no wrinkles. Trim it off, tie it off at the base then stretch a 2nd cover of the material over the assembly. I tie it off on the top and bottom of my plug with 4 inch zip ties but you can use string or bread sack ties. I then taped plastic over my little stand I made out of 5/8 dowel glued in a board. It will protect my table from resin dripping or spillage. The bottom of my plug has a piece 3/4 inch pvc pipe glued in the bottom so that I can just set it on my stand and rotate as needed. You may have noticed I have installed 16 gage steel on my table top. that's one of the projects I have started working on other than the planes. I'm going to start building with magnets as talked about on airfieldmodels.com. I'm really impressed with his procedure.
Attached Thumbnails Click image for larger version

Name:	H139.JPG
Views:	509
Size:	229.6 KB
ID:	2031085   Click image for larger version

Name:	H140.JPG
Views:	512
Size:	228.5 KB
ID:	2031086   Click image for larger version

Name:	H141.JPG
Views:	494
Size:	225.8 KB
ID:	2031087  

Last edited by WILDCRASHWILLY; 09-10-2014 at 10:43 PM.
Old 09-10-2014, 09:53 PM
  #98  
WILDCRASHWILLY
Senior Member
Thread Starter
 
WILDCRASHWILLY's Avatar
 
Join Date: Oct 2003
Location: Western KY
Posts: 981
Likes: 0
Received 1 Like on 1 Post
Default

I made a paper template of the cowl side and end cone and used it to cut the glass. Again, I used 3 layers on the cowl body and the end cap followed by the 3/4 oz final layer. I cut the fiberglass with a fiskars cutter I got from a sewing supply store my wife visits. I think you can get them at Hobby Lobby also.
Attached Thumbnails Click image for larger version

Name:	H142.JPG
Views:	498
Size:	228.7 KB
ID:	2031035  
Old 09-10-2014, 09:58 PM
  #99  
WILDCRASHWILLY
Senior Member
Thread Starter
 
WILDCRASHWILLY's Avatar
 
Join Date: Oct 2003
Location: Western KY
Posts: 981
Likes: 0
Received 1 Like on 1 Post
Default

Started with 2oz piece on the nose of the cowl. enough hangs over the side that when the sides are laid on it ties it all together.
Attached Thumbnails Click image for larger version

Name:	H143.JPG
Views:	501
Size:	228.6 KB
ID:	2031036   Click image for larger version

Name:	H144.JPG
Views:	442
Size:	229.4 KB
ID:	2031037   Click image for larger version

Name:	H145.JPG
Views:	436
Size:	232.1 KB
ID:	2031038   Click image for larger version

Name:	H146.JPG
Views:	488
Size:	232.0 KB
ID:	2031039  
Old 09-10-2014, 10:01 PM
  #100  
WILDCRASHWILLY
Senior Member
Thread Starter
 
WILDCRASHWILLY's Avatar
 
Join Date: Oct 2003
Location: Western KY
Posts: 981
Likes: 0
Received 1 Like on 1 Post
Default

Now working on the sides. I didn't show it but completely brush in the resin for saturation before the next layer. Also, scrap it with playing cards to get excess off before laying the next layer.
Attached Thumbnails Click image for larger version

Name:	H143.JPG
Views:	445
Size:	228.6 KB
ID:	2031040   Click image for larger version

Name:	H144.JPG
Views:	434
Size:	229.4 KB
ID:	2031041   Click image for larger version

Name:	H145.JPG
Views:	439
Size:	232.1 KB
ID:	2031042   Click image for larger version

Name:	H146.JPG
Views:	438
Size:	232.0 KB
ID:	2031043  


Contact Us - Archive - Advertising - Cookie Policy - Privacy Statement - Terms of Service -

Copyright © 2024 MH Sub I, LLC dba Internet Brands. All rights reserved. Use of this site indicates your consent to the Terms of Use.