


Pilatus PC9 1/3 scale

 07-19-2010, 01:18 PM
#52

Join Date: Mar 2005
Location: Coral Springs, FL
Posts: 52
Likes: 0
Received 0 Likes
on
0 Posts
I always like the Pilatus and longtime ago I was looking for plans that I can use in order to make a PC-7, could you tell me how to get the plans that you used?
Thanks
Thanks
07-19-2010, 01:30 PM
#54
Join Date: Mar 2005
Location: Coral Springs, FL
Posts: 52
Likes: 0
Received 0 Likes
on
0 Posts
I don't know what was wrong but I haven't that, if you still have it could you please forward it again?, my eMail is [email protected]
Thanks
Thanks
07-25-2010, 02:20 AM
#57

Thread Starter

Join Date: Aug 2009
Location: Paris, FRANCE
Posts: 143
Likes: 0
Received 0 Likes
on
0 Posts
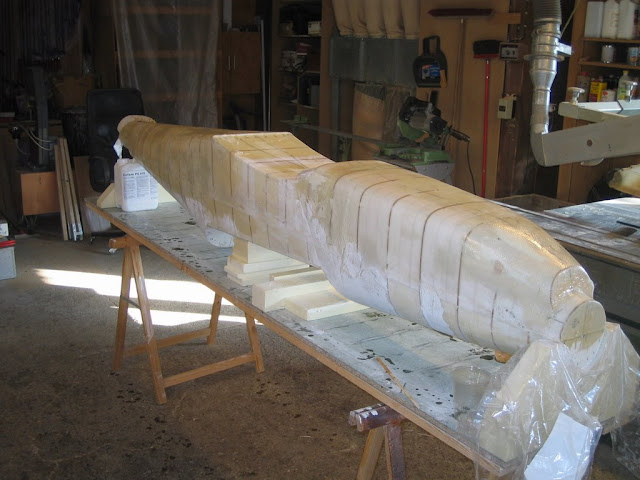
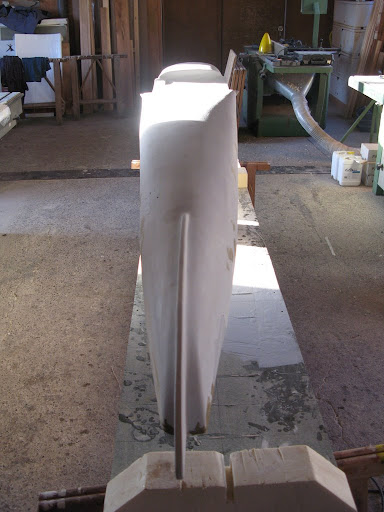
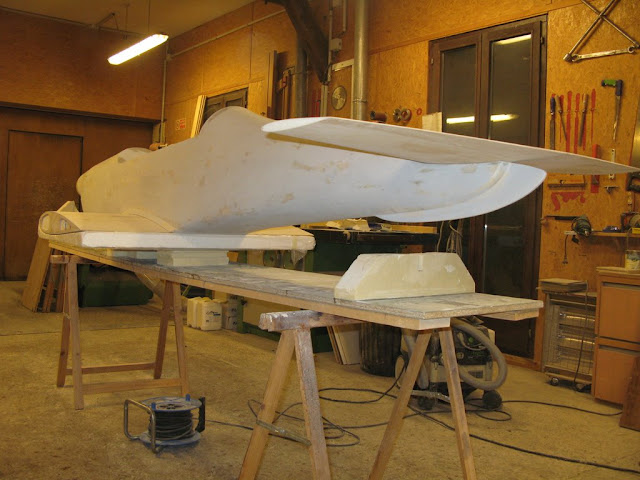
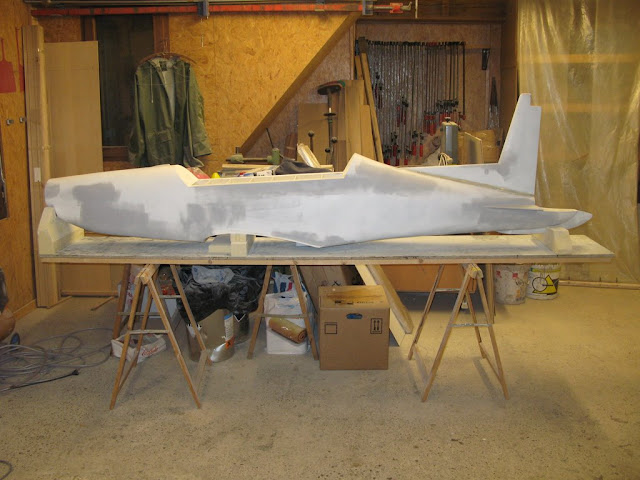
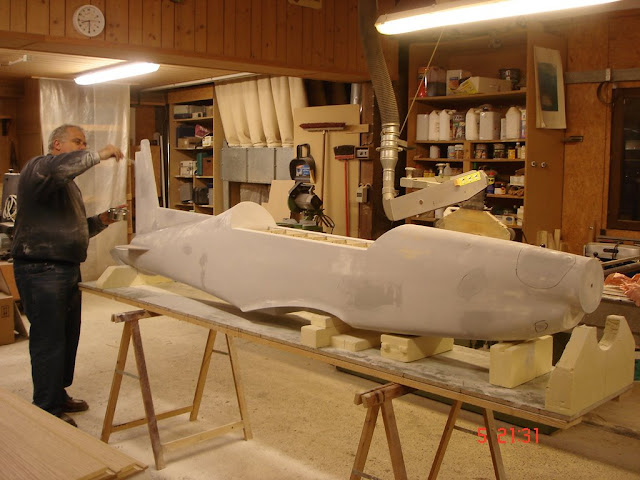
After bundle up with Jean-Claude, the finishing workbegan and we are very far from the end ...

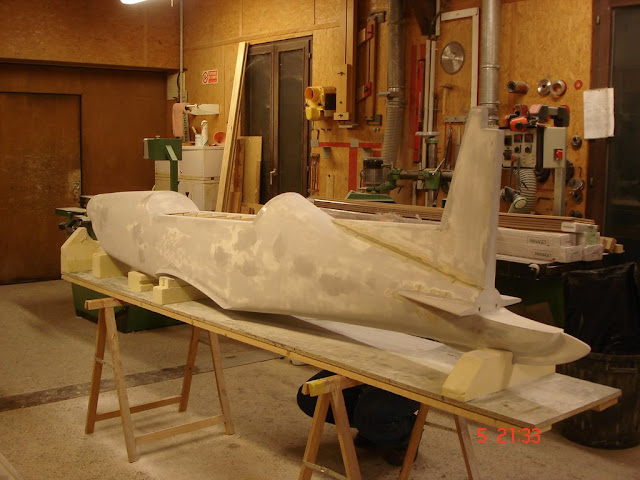
The same thing on the back.
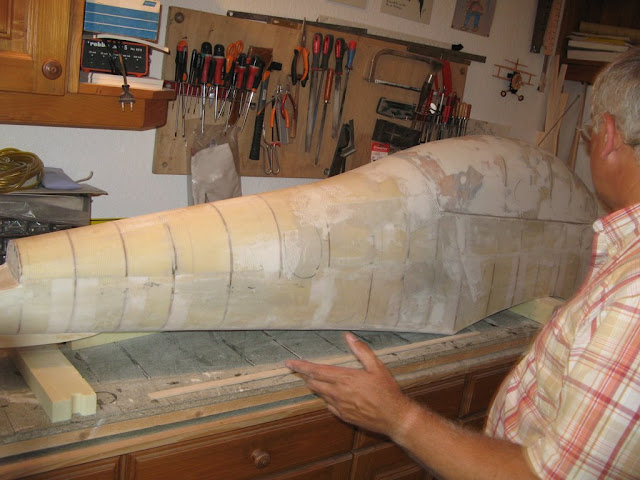
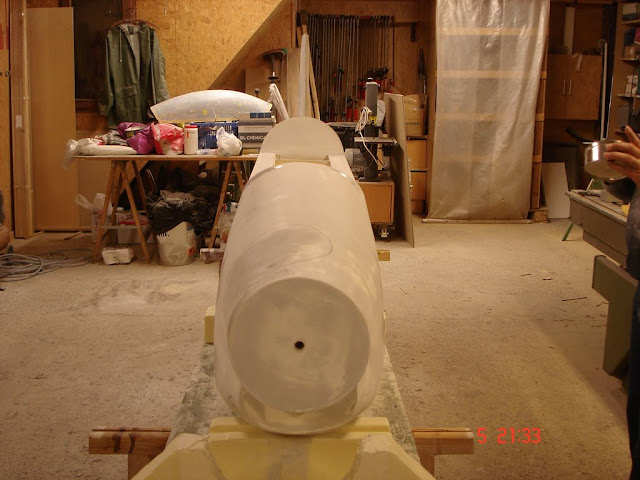
On this picture we can see the volume of the beast ... (I mean the plane) ...

In this place we really are short of space for taking photos.

Note on the back the stab fixation is realised for some testing.
The same thing on the back.
On this picture we can see the volume of the beast ... (I mean the plane) ...
In this place we really are short of space for taking photos.
Note on the back the stab fixation is realised for some testing.
During my holidays he worked really well, now it will be my turn, I get the cockpit to the finish.
To my putty, my sand paper and go, I hope to do as well as he did.

08-03-2010, 02:51 PM
#58
Thread Starter
Join Date: Aug 2009
Location: Paris, FRANCE
Posts: 143
Likes: 0
Received 0 Likes
on
0 Posts
First work on the bubble the paint to bring out all the defects.
Here is the result:

At first glance, there are not many faults ... It will go slowly with the putty.

Sanding after applying putty on the bubble.
Work very messy best done outdoors or else watch out for the fights.
At first glance, there are not many faults ... It will go slowly with the putty.
Sanding after applying putty on the bubble.
Work very messy best done outdoors or else watch out for the fights.
08-13-2010, 03:25 PM
#59
Thread Starter
Join Date: Aug 2009
Location: Paris, FRANCE
Posts: 143
Likes: 0
Received 0 Likes
on
0 Posts
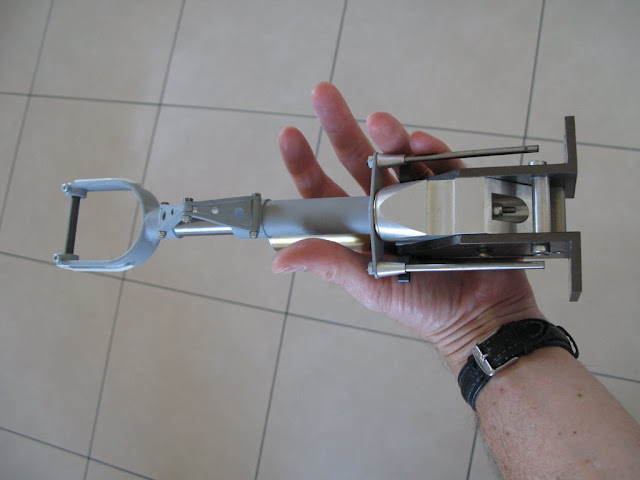
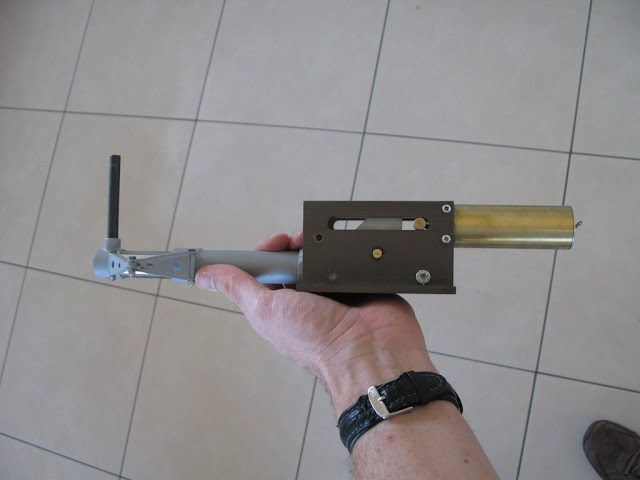
Today is the receipt of retracts .... superb.
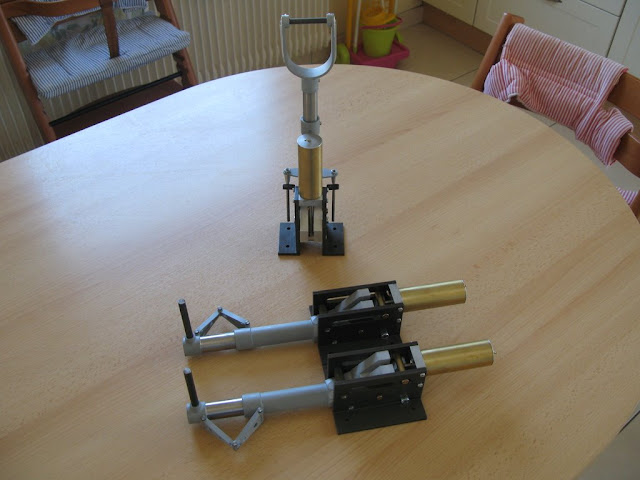
It's strong, even very strong.
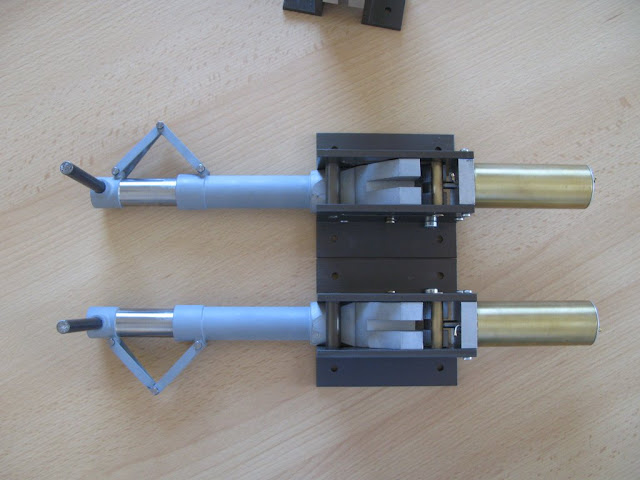
The front retract:
It's strong, even very strong.
The front retract:
Look at the size of the sections ... impressive.
As Christian said, if we do not fall off a cliff, it should do.
Side view gear retracted:
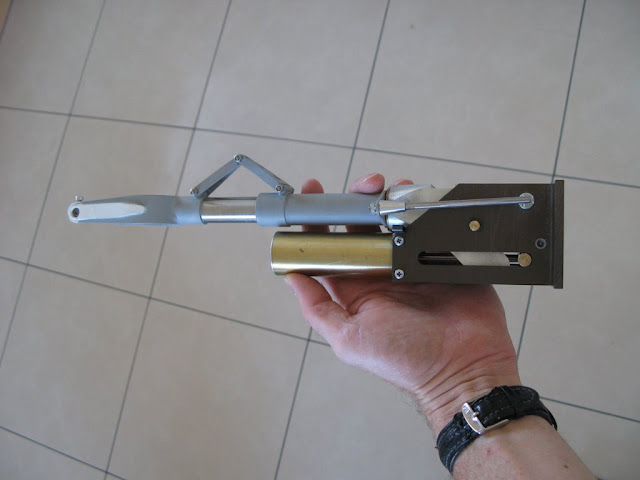
Here the main gear aside, very impressive and more the retract is very short, this provides more strength.
Here the main gear aside, very impressive and more the retract is very short, this provides more strength.
08-21-2010, 12:51 PM
#60
Thread Starter
Join Date: Aug 2009
Location: Paris, FRANCE
Posts: 143
Likes: 0
Received 0 Likes
on
0 Posts
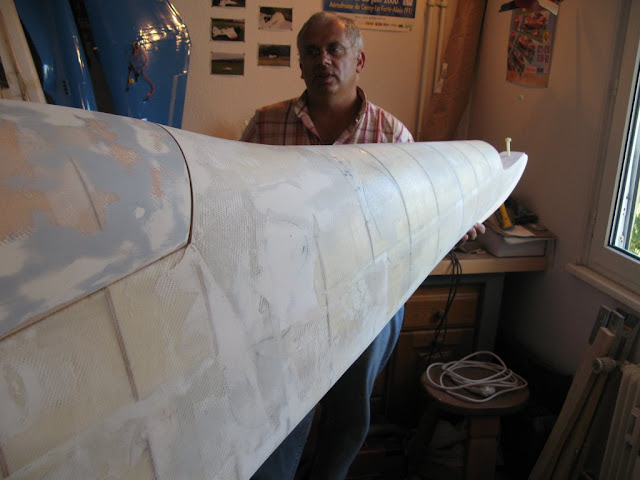
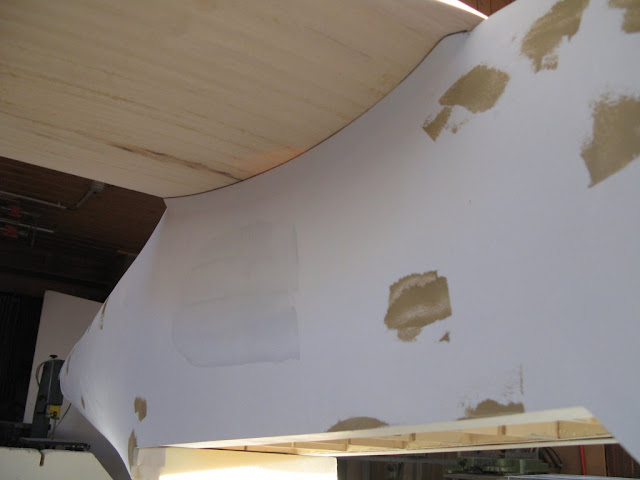
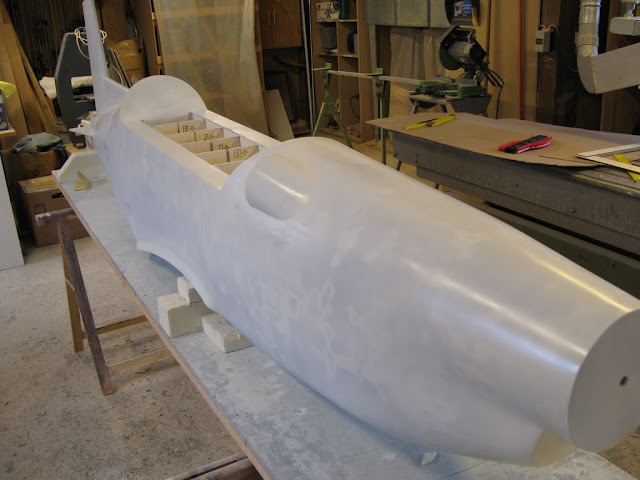
Change of scene, we are now working in a larger space to turn around is much simpler and you can just make a mess, the risk is that some that works the rest of the week can tell it to you...
It begins with a third layer of fiber on the fuselage.

Another view of the fuselagein the backwards we can see the mold of the cockpit.

It begins with a third layer of fiber on the fuselage.
Another view of the fuselagein the backwards we can see the mold of the cockpit.
08-28-2010, 05:28 AM
#63
Thread Starter
Join Date: Aug 2009
Location: Paris, FRANCE
Posts: 143
Likes: 0
Received 0 Likes
on
0 Posts
Today it's epoxy and fiberglass on the top of the aircraft.

The second layer of twill is epoxied.

Christian is closing the container of hardener. And where is the epoxy container? it is behind the nose of the aircraft.

It is better, not a crimp in the twill. It changes the first lower layer.

Mireille and Henry came to see the result, we didn't have too many notes ... so we continue ...
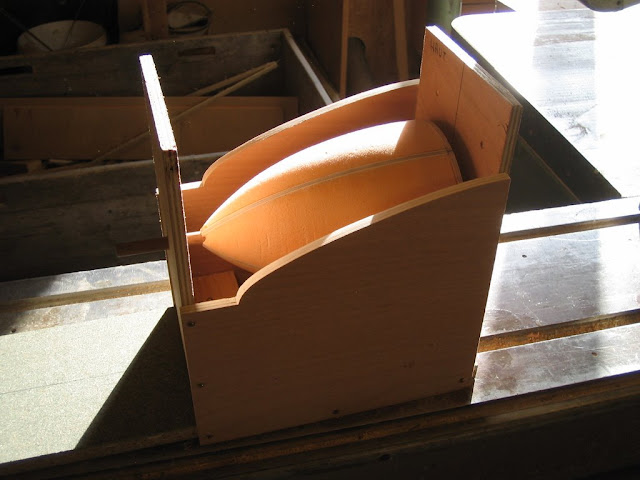
At this moment we made the box cone too. Who will give us cones to measure.
The second layer of twill is epoxied.
Christian is closing the container of hardener. And where is the epoxy container? it is behind the nose of the aircraft.
It is better, not a crimp in the twill. It changes the first lower layer.
Mireille and Henry came to see the result, we didn't have too many notes ... so we continue ...
At this moment we made the box cone too. Who will give us cones to measure.
09-04-2010, 02:20 PM
#64
Thread Starter
Join Date: Aug 2009
Location: Paris, FRANCE
Posts: 143
Likes: 0
Received 0 Likes
on
0 Posts

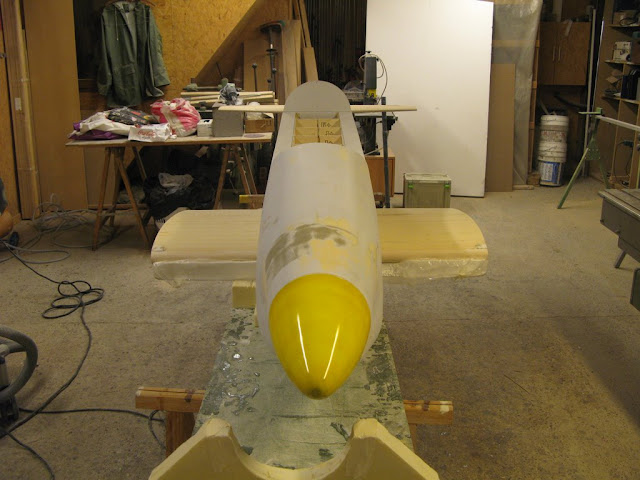
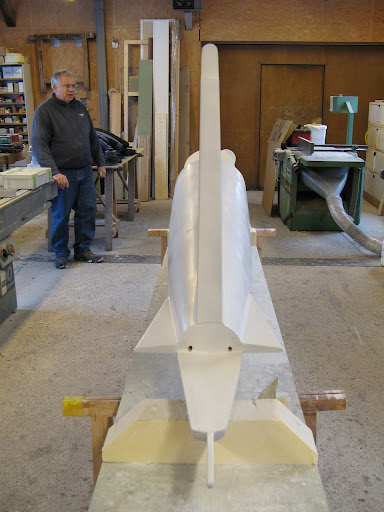
The cone once sanded a beautiful shape that adapts well to the fuselage.

A slight extra thickness will be easily adjustable.

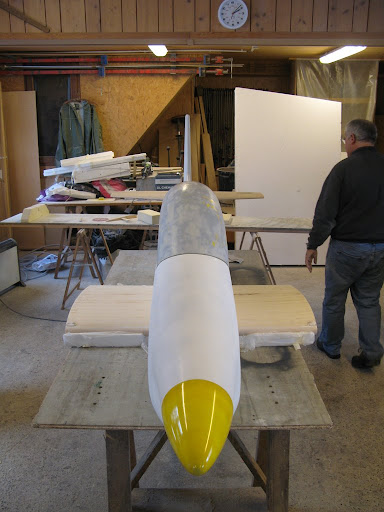
Seen from the front no doubt the shape is harmonious with the lines of the fuselage.

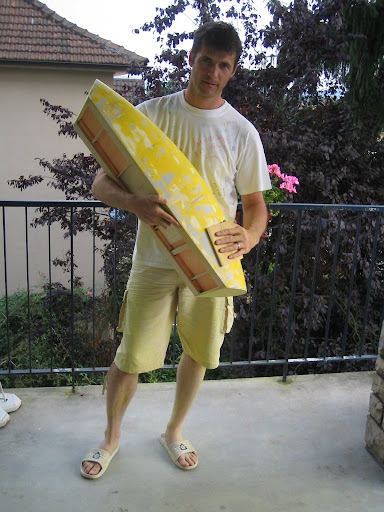
Big day's work, the cutting of all central sections, but also a left wing to verify the method used for the root rib. Everything is OK we can do the other in series. Christian takes the body to give an idea of the size of the entire wing 3.40m

View of the junction of the wings, it looks good, it worked well, we like the result very well.
09-09-2010, 02:13 AM
#65
Join Date: Sep 2005
Location: Canberra , Australian Capital Territory, AUSTRALIA
Posts: 257
Likes: 0
Received 0 Likes
on
0 Posts
Hi guys,
I'm absolutely loving reading this build - fantastic job!!! I had the pleasure of flying a PC9-A for two hours some years ago and have three in my R/C hangar. My latest is a 120 size Seagull kit with a 28CC gasser swinging a 15.5 x 12 x 4blade and she is such a pleasure to fly. I'm really looking forward to seeing the finished product you have here - congratulations!!!!
I'm absolutely loving reading this build - fantastic job!!! I had the pleasure of flying a PC9-A for two hours some years ago and have three in my R/C hangar. My latest is a 120 size Seagull kit with a 28CC gasser swinging a 15.5 x 12 x 4blade and she is such a pleasure to fly. I'm really looking forward to seeing the finished product you have here - congratulations!!!!
09-12-2010, 02:14 AM
#66
Thread Starter
Join Date: Aug 2009
Location: Paris, FRANCE
Posts: 143
Likes: 0
Received 0 Likes
on
0 Posts
Thanx mate,

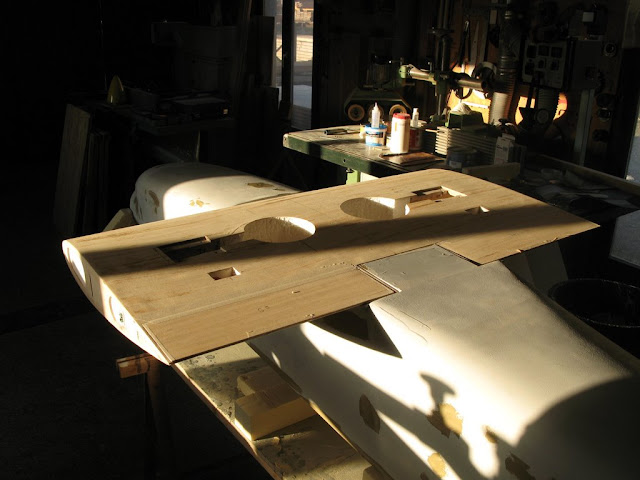
Then, the central wing of Christian, as you can see it has much more advance than me....

I am somehow a bit late ... anyway, I have to work a bit and then it will come ....
Today I do not have much to offer.
First my central wing, to show you where will be implanted the parts.Then, the central wing of Christian, as you can see it has much more advance than me....
I am somehow a bit late ... anyway, I have to work a bit and then it will come ....
09-18-2010, 03:14 PM
#67
Thread Starter
Join Date: Aug 2009
Location: Paris, FRANCE
Posts: 143
Likes: 0
Received 0 Likes
on
0 Posts
Following construction

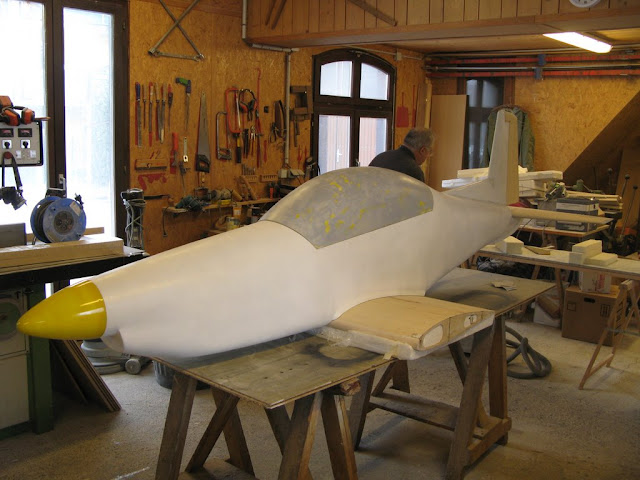
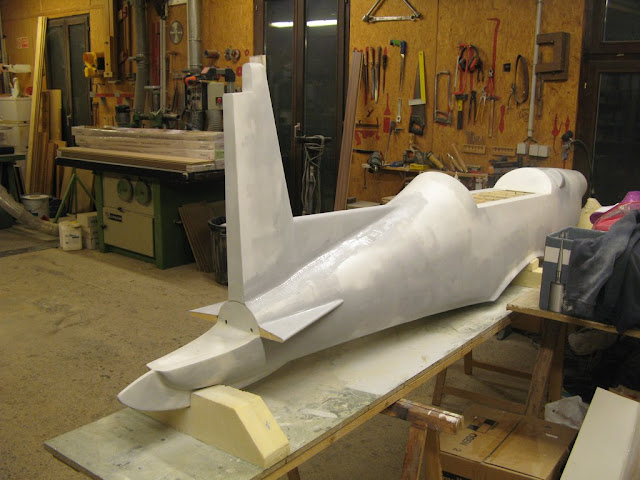
The fuselage with the cone and the stab. Christian has started puttying the fuselage.


From this side it looks a bit like a dolphin.

Little test at the base of the wing. You can see the angle of the seat of the cockpit which was rebuilt to make it straight.
Ditto on the other side.

Realization of my central wing sheaths on the shape of the keys (everything must be referenced).
The fuselage with the cone and the stab. Christian has started puttying the fuselage.
From this side it looks a bit like a dolphin.
Little test at the base of the wing. You can see the angle of the seat of the cockpit which was rebuilt to make it straight.
Ditto on the other side.
Realization of my central wing sheaths on the shape of the keys (everything must be referenced).
10-02-2010, 03:52 AM
#68
Thread Starter
Join Date: Aug 2009
Location: Paris, FRANCE
Posts: 143
Likes: 0
Received 0 Likes
on
0 Posts
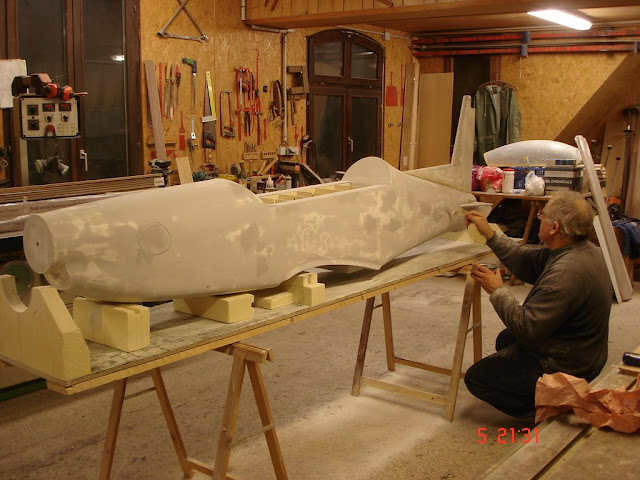
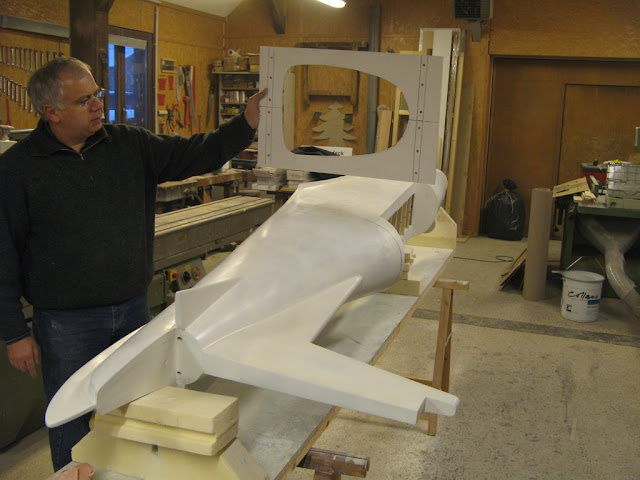
We continue in the finishes of the master
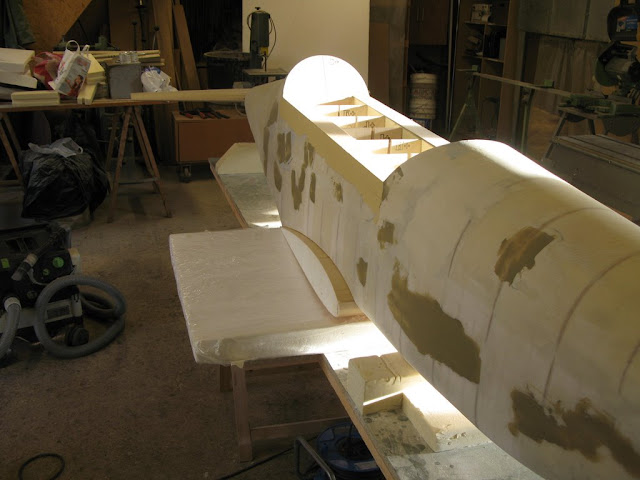
The important work of Christian. The fuselage is smooth, we see the box that will support the airbrake, which will also serve to center the wing.

Another element has been achieved: the establishment of the right angle of the front couple.
Rear view.

The day's work will be to sand it all to make it as smooth as baby's ass ...

Christian's central wing, note that the cut has joined the fuselage.

The wing position starts to look like something.
Another view of the wing, we can see here the "box" that will support the airbrake and center the wing in its final position.

Other work of Christian achieving the wing fairings, a little work on the advice of Henri will make them more beautyfull. Note that the wing is very applicable to the fuselage.
Ditto on the other side, the wing also applies very well on this side which is good.

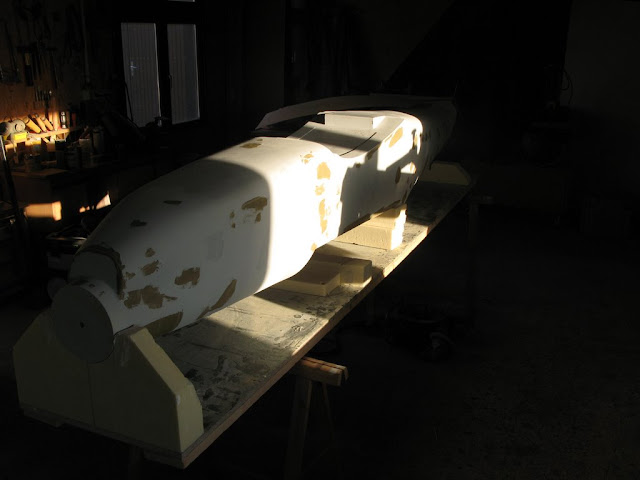
Here's the result after a few hours of sanding.

The fuselage is lying on its wing, the cone is in place as well as the stab.

Rear view. Christian at the back after you have sanded it all well whitened, I must be the same.

The surface is very smooth. It's a good sign. We even did a test coat of paint in some places to see the result: great.

The important work of Christian. The fuselage is smooth, we see the box that will support the airbrake, which will also serve to center the wing.
Another element has been achieved: the establishment of the right angle of the front couple.
Rear view.
The day's work will be to sand it all to make it as smooth as baby's ass ...
Christian's central wing, note that the cut has joined the fuselage.
The wing position starts to look like something.
Another view of the wing, we can see here the "box" that will support the airbrake and center the wing in its final position.
Other work of Christian achieving the wing fairings, a little work on the advice of Henri will make them more beautyfull. Note that the wing is very applicable to the fuselage.
Ditto on the other side, the wing also applies very well on this side which is good.
Here's the result after a few hours of sanding.
The fuselage is lying on its wing, the cone is in place as well as the stab.
Rear view. Christian at the back after you have sanded it all well whitened, I must be the same.
The surface is very smooth. It's a good sign. We even did a test coat of paint in some places to see the result: great.
The front and rear of the fairing on the left have changed the result is much nicer, well done Henri.
We will do the same on the other side.
It really looks like a dolphin rear?

The lateral surface suggests a flight taut on rails.


Viewed from above we can see the fineness of the plane on this view.
It really looks like a dolphin rear?
The lateral surface suggests a flight taut on rails.
Viewed from above we can see the fineness of the plane on this view.
10-09-2010, 04:39 AM
#69
Thread Starter
Join Date: Aug 2009
Location: Paris, FRANCE
Posts: 143
Likes: 0
Received 0 Likes
on
0 Posts
After a major effort by Christian and his son Jean (thank to them) is the result. I brought the cockpit to ask some technical questions
I took advantage to put it on the master.
The day work will be the realization of the joint drift and fixing "fine" on the stab and general inspection of the surface.

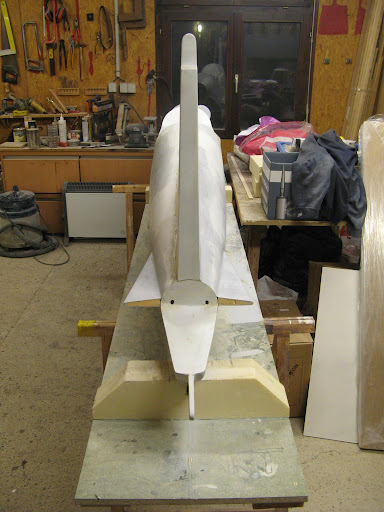
Front view.

Henry in the process of adjusting the right lobe of the aircraft through a glass cloth taped in place.

The angle of the rudder is done, and the fins are glued in place with the same incidence as the stab.

The other side.

Here below you see a green dot it is actually a pin that was set to prevent the fin to going down while drying.
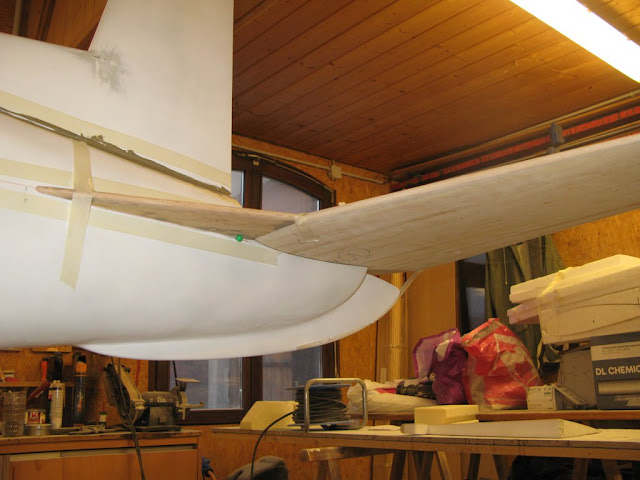
The tape above and below will make the connections between the part and the fuselage.
10-21-2010, 08:48 AM
#71
Member
Join Date: Jan 2010
Location: Velddrif, , SOUTH AFRICA
Posts: 38
Likes: 0
Received 0 Likes
on
0 Posts
Very nice work, guys!! I am impressed by the size of this scale model!
Is there a possibility to get the plans?
Enjoy building and keep us posted.
Jacques
Is there a possibility to get the plans?
Enjoy building and keep us posted.
Jacques
10-23-2010, 04:21 PM
#72
Thread Starter
Join Date: Aug 2009
Location: Paris, FRANCE
Posts: 143
Likes: 0
Received 0 Likes
on
0 Posts

Day's work, sanding filling, re-sanding, implementation of the hump, then filling, etc..
The hump does not look good, we'll do another one.
After sanding putty, we remake the left corner of the rudder that had obviously not cured after a reaction between the sealant and other products. Then we spent the polyester primer we are saving you the smell unbearable!!!
The fins of the stab are also puttyed.
We can see the fins of the stab and the hump at the front.
10-31-2010, 11:46 AM
#73
Thread Starter
Join Date: Aug 2009
Location: Paris, FRANCE
Posts: 143
Likes: 0
Received 0 Likes
on
0 Posts
Always finishes on the master ... and yes you have to be patient for a good result.
Christian, While spraying primer on an area.

The fuselage after a hard work of Christian and Jean-Claude at the primer and sanding.
Christian applying primer on the rudder.
The older hump has gone.
The seal has caused us many problems. Round and Mireille have been re-dressed.
Christian, While spraying primer on an area.
The fuselage after a hard work of Christian and Jean-Claude at the primer and sanding.
Christian applying primer on the rudder.
The older hump has gone.
The seal has caused us many problems. Round and Mireille have been re-dressed.
11-13-2010, 02:52 PM
#74
Thread Starter
Join Date: Aug 2009
Location: Paris, FRANCE
Posts: 143
Likes: 0
Received 0 Likes
on
0 Posts

Enormous work of Christian, Henri, Mireille and Jean-Claude came to lend hand. Today's menu : sanding, filling, removal of the old bump implementation of the new achievement of the leaves of the rudder Grrrrrr !!!!! Finally it is good.
New Bump from Henri. Much more realistic and pretty well done.

Another view of the bump


the rudder leave is done. Now it's all good.

My day's work, sanding the underside of the fuselage with 400 sand paper with water. Then coat of paint.

Another day's work preparing the first former to achieve the mold we see the route on the fuselage.
Phew, former is achieved, it is Christian who holds it. It was not easy to achieve but it's good now, the next step will be the realization of vertical cuts.
