Go Back  RCU Forums > RC Airplanes > RC Jets
Reload this Page >

My SM F-14 Tomcat

Notices
RC Jets Discuss RC jets in this forum plus rc turbines and ducted fan power systems

My SM F-14 Tomcat

Old 07-14-2014, 03:18 AM
  #1  
WimB
Thread Starter
My Feedback: (1)
 
WimB's Avatar
 
Join Date: Dec 2008
Location: Wichelen , BELGIUM
Posts: 441
Likes: 0
Received 1 Like on 1 Post
Default My SM F-14 Tomcat

Hey guys........

Well, finally after a long wait, last week my Skymaster F-14 Tomcat was delivered to me! It came in two large boxes, well packaged and protected, and it made the journey undamaged, phew!!!

here are some first impressions:


I already started some work on it, but it will take me some time to get all the stuff I still need to get....

Some info: she will be powered by two overhauled and updated Graupner Booster 130+'s, now putting out 15kg thrust each.Servo's will be mostly JR 8911, I just need to look into the slat servo's. electrical power will come from a Powerbox Royal SRS. control by my Graupner MC32 and 2 pcs Graupner GR32 receivers. Electronic valves on all air systems (except canopy, the Original valve included does a nice job at sequencing the canopy locks)

Wim
Attached Thumbnails Click image for larger version

Name:	DSC_0002 (Medium).JPG
Views:	1479
Size:	142.1 KB
ID:	2013939   Click image for larger version

Name:	DSC_0007 (Medium).JPG
Views:	1520
Size:	162.0 KB
ID:	2013940   Click image for larger version

Name:	DSC_0009 (Medium).JPG
Views:	1506
Size:	150.1 KB
ID:	2013941   Click image for larger version

Name:	DSC_0011 (Medium).JPG
Views:	1664
Size:	145.0 KB
ID:	2013942   Click image for larger version

Name:	DSC_0013 (Medium).JPG
Views:	1652
Size:	185.0 KB
ID:	2013943   Click image for larger version

Name:	DSC_0015 (Medium).JPG
Views:	1454
Size:	199.0 KB
ID:	2013944   Click image for larger version

Name:	DSC_0016 (Medium).JPG
Views:	1414
Size:	139.2 KB
ID:	2013945   Click image for larger version

Name:	DSC_0018 (Medium).JPG
Views:	1285
Size:	149.9 KB
ID:	2013946  

Click image for larger version

Name:	DSC_0019 (Medium).JPG
Views:	1322
Size:	202.9 KB
ID:	2013947   Click image for larger version

Name:	DSC_0021 (Medium).JPG
Views:	1312
Size:	179.8 KB
ID:	2013948   Click image for larger version

Name:	DSC_0023 (Medium).JPG
Views:	1252
Size:	199.8 KB
ID:	2013949  
Old 07-14-2014, 03:32 AM
  #2  
muzzgail
Senior Member
 
muzzgail's Avatar
 
Join Date: Jul 2008
Location: Perth, AUSTRALIA
Posts: 331
Likes: 0
Received 0 Likes on 0 Posts
Default

Looks great Wim.
Old 07-14-2014, 10:04 AM
  #3  
DrScoles
My Feedback: (18)
 
DrScoles's Avatar
 
Join Date: Sep 2002
Location: Sammamish, WA,
Posts: 2,394
Received 9 Likes on 9 Posts
Default

awesome! Thats the scheme I chose, minus the nose art…. the magical "12 weeks" hasn't arrived yet, but not holding my breath, no time to work on it anyway.
Old 07-14-2014, 10:20 AM
  #4  
muzzgail
Senior Member
 
muzzgail's Avatar
 
Join Date: Jul 2008
Location: Perth, AUSTRALIA
Posts: 331
Likes: 0
Received 0 Likes on 0 Posts
Default

Maybe our aircraft are in here somewhere

Attached Thumbnails Click image for larger version

Name:	10529427_10204018325399524_196536780_n.jpg
Views:	1278
Size:	69.8 KB
ID:	2014107  
Old 07-14-2014, 11:35 AM
  #5  
WimB
Thread Starter
My Feedback: (1)
 
WimB's Avatar
 
Join Date: Dec 2008
Location: Wichelen , BELGIUM
Posts: 441
Likes: 0
Received 1 Like on 1 Post
Default

Originally Posted by DrScoles
awesome! Thats the scheme I chose, minus the nose art…. the magical "12 weeks" hasn't arrived yet, but not holding my breath, no time to work on it anyway.
don't hold your breath, mine took over 20 weeks.......... but it has been worth the wait !!

Wim
Old 07-15-2014, 08:45 AM
  #6  
invertmast
My Feedback: (23)
 
invertmast's Avatar
 
Join Date: Dec 2003
Location: Capon Bridge, WV
Posts: 8,198
Received 225 Likes on 116 Posts
Default

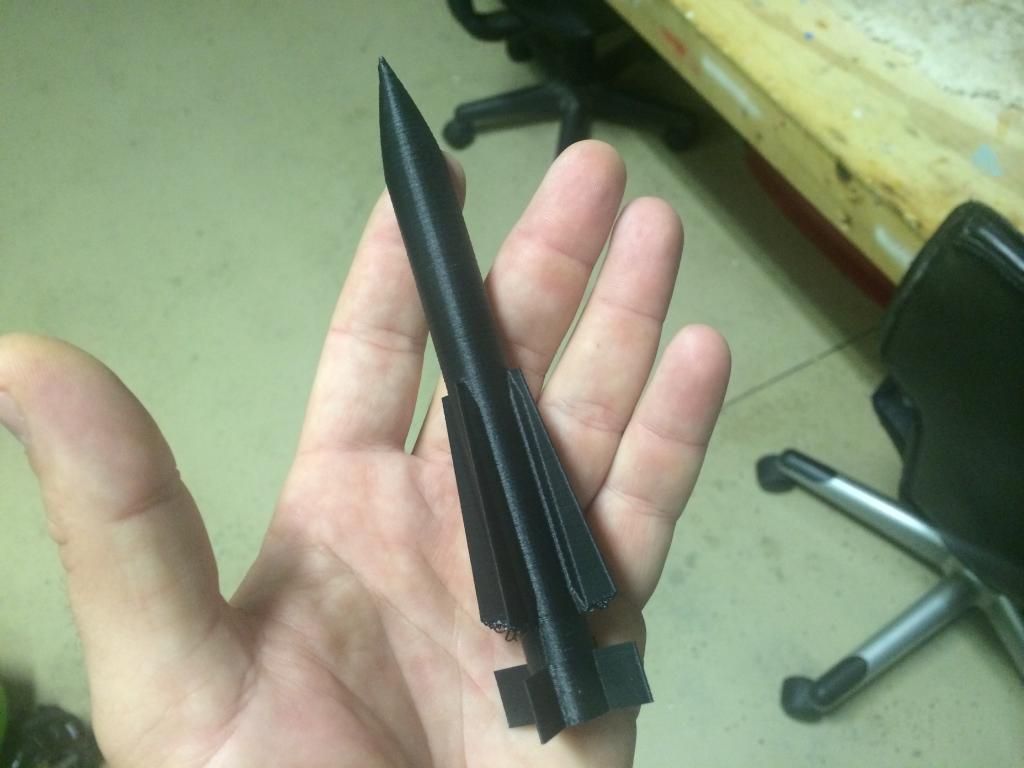
Looks nice Wim. Im starting to get the armament stuff for my F14 printed out, so if you guys would like some Phoenix, sparrow or Sidewinder missle's let me know. Here is a small version of my Phoenix that was done last night as a test. Ill have the full size printed out today hopefully.

Old 07-15-2014, 08:53 AM
  #7  
muzzgail
Senior Member
 
muzzgail's Avatar
 
Join Date: Jul 2008
Location: Perth, AUSTRALIA
Posts: 331
Likes: 0
Received 0 Likes on 0 Posts
Smile

John informed me tonight that mine is about to leave the factory. Even sent me some photos. Right on schedule, good job Skymaster.

Attached Thumbnails Click image for larger version

Name:	DSC02068.JPG
Views:	1186
Size:	646.4 KB
ID:	2014515   Click image for larger version

Name:	DSC02069.JPG
Views:	1093
Size:	635.8 KB
ID:	2014516   Click image for larger version

Name:	DSC02070.JPG
Views:	1048
Size:	629.9 KB
ID:	2014517   Click image for larger version

Name:	DSC02071.JPG
Views:	1087
Size:	628.4 KB
ID:	2014518  
Old 07-15-2014, 09:11 AM
  #8  
SJN
 
Join Date: Sep 2002
Location: Copenhagen, DENMARK
Posts: 6,325
Likes: 0
Received 6 Likes on 6 Posts
Default

Ultimate RC jet ever....congrats :-)
Old 07-15-2014, 11:10 AM
  #9  
WimB
Thread Starter
My Feedback: (1)
 
WimB's Avatar
 
Join Date: Dec 2008
Location: Wichelen , BELGIUM
Posts: 441
Likes: 0
Received 1 Like on 1 Post
Default

Muzz, she sure looks great as well, congrats!!!

Wim
Old 07-15-2014, 11:20 AM
  #10  
ravill
My Feedback: (11)
 
ravill's Avatar
 
Join Date: Jan 2003
Location: Granite Bay, Ca
Posts: 5,704
Received 90 Likes on 72 Posts
Default

Yup, friggin awesome.
Old 07-15-2014, 11:22 AM
  #11  
WimB
Thread Starter
My Feedback: (1)
 
WimB's Avatar
 
Join Date: Dec 2008
Location: Wichelen , BELGIUM
Posts: 441
Likes: 0
Received 1 Like on 1 Post
Default

Thomas,

I would be interested in a set of antenna's, probes and other dirty stuff to hang off it in 1:7.5 scale.......I got the ordnance from SM, and it is pretty decent........

Wim

Wim
Old 07-15-2014, 11:40 AM
  #12  
invertmast
My Feedback: (23)
 
invertmast's Avatar
 
Join Date: Dec 2003
Location: Capon Bridge, WV
Posts: 8,198
Received 225 Likes on 116 Posts
Default

Originally Posted by WimB
Thomas,

I would be interested in a set of antenna's, probes and other dirty stuff to hang off it in 1:7.5 scale.......I got the ordnance from SM, and it is pretty decent........

Wim

Wim
Wim,
Antenna's and probes i have drawn up already, i just need to get the nylon to print the molds... Ill order some and get that going and be in touch

thomas
Old 07-15-2014, 11:43 AM
  #13  
WimB
Thread Starter
My Feedback: (1)
 
WimB's Avatar
 
Join Date: Dec 2008
Location: Wichelen , BELGIUM
Posts: 441
Likes: 0
Received 1 Like on 1 Post
Default

Thomas,

that would be great!

Wim
Old 07-15-2014, 01:44 PM
  #14  
smaze17
My Feedback: (60)
 
Join Date: Dec 2001
Location: Mooresville, NC
Posts: 1,480
Likes: 0
Received 0 Likes on 0 Posts
Default

Looks beautiful Wim!
Old 07-15-2014, 01:45 PM
  #15  
smaze17
My Feedback: (60)
 
Join Date: Dec 2001
Location: Mooresville, NC
Posts: 1,480
Likes: 0
Received 0 Likes on 0 Posts
Default

Originally Posted by muzzgail
Maybe our aircraft are in here somewhere

Is that Dubs 104??
Old 07-15-2014, 03:09 PM
  #16  
VF84sluggo
My Feedback: (55)
 
VF84sluggo's Avatar
 
Join Date: Nov 2007
Location: Gulf Breeze, FL
Posts: 2,367
Likes: 0
Received 1 Like on 1 Post
Default

Very nice, indeed!! Hope the build goes smoothly, looking forward to following it.

Sluggo
Old 07-15-2014, 04:36 PM
  #17  
muzzgail
Senior Member
 
muzzgail's Avatar
 
Join Date: Jul 2008
Location: Perth, AUSTRALIA
Posts: 331
Likes: 0
Received 0 Likes on 0 Posts
Default

Thanks all. Looking forward to shooting a few camera shots of the build, as it comes along.
Old 07-18-2014, 06:14 AM
  #18  
WimB
Thread Starter
My Feedback: (1)
 
WimB's Avatar
 
Join Date: Dec 2008
Location: Wichelen , BELGIUM
Posts: 441
Likes: 0
Received 1 Like on 1 Post
Default

well guys, already made some progress in the build, here are some pictures....

first thins I've done is take out the tanks, to modify them to the new fittings ("A10 style"). in order to remove the main tanks, the whole wing swing mechanism needs to come out. I also took out the gear while I was at it.


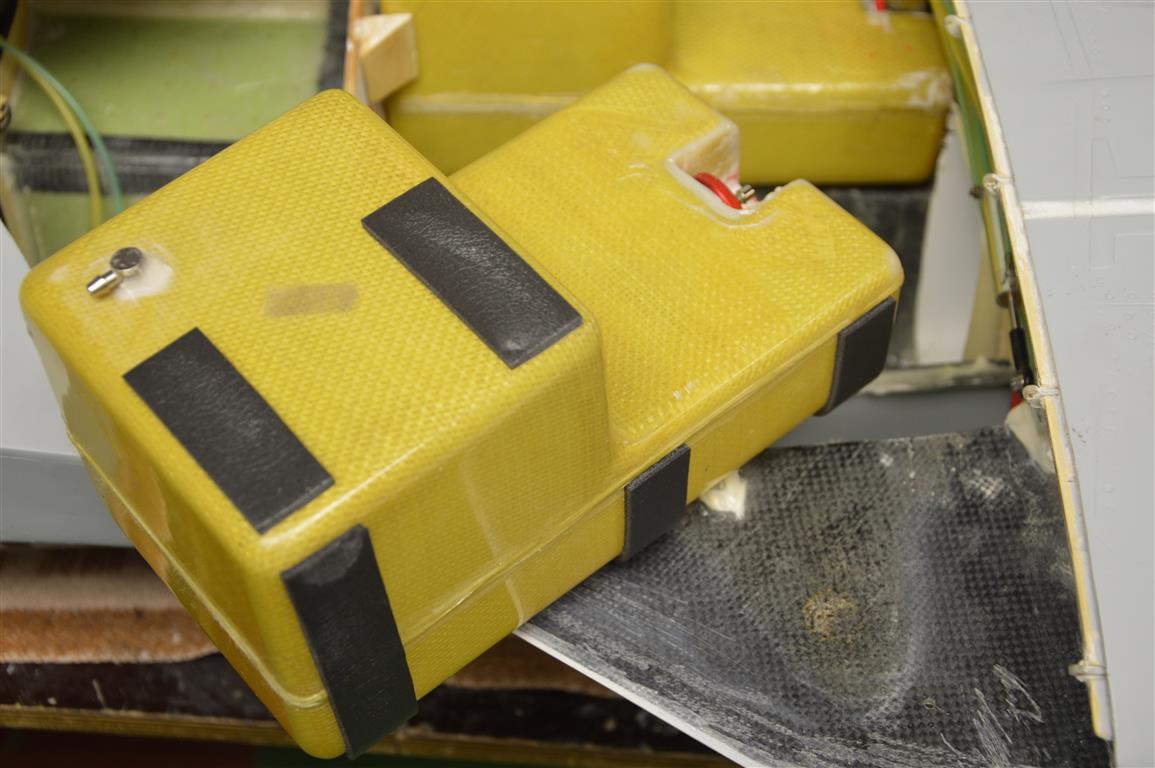
The pictures tell the story: I replaced the Original "rubber" stoppers, and glued on the alu rings with screw-in type cap. added advantage is that I can connect the 6mm festo hose directly to these.
Attached Thumbnails Click image for larger version

Name:	DSC_0027 (Medium).JPG
Views:	1020
Size:	170.5 KB
ID:	2015143   Click image for larger version

Name:	DSC_0028 (Medium).JPG
Views:	1038
Size:	157.0 KB
ID:	2015144   Click image for larger version

Name:	DSC_0029 (Medium).JPG
Views:	1072
Size:	156.1 KB
ID:	2015145   Click image for larger version

Name:	DSC_0030 (Medium).JPG
Views:	453
Size:	112.1 KB
ID:	2015146   Click image for larger version

Name:	DSC_0031 (Medium).JPG
Views:	469
Size:	111.9 KB
ID:	2015147   Click image for larger version

Name:	DSC_0033 (Medium).JPG
Views:	1013
Size:	137.9 KB
ID:	2015148   Click image for larger version

Name:	DSC_0034 (Medium).JPG
Views:	1089
Size:	136.4 KB
ID:	2015149   Click image for larger version

Name:	DSC_0035 (Medium).JPG
Views:	1000
Size:	126.0 KB
ID:	2015150  

Click image for larger version

Name:	DSC_0036 (Medium).JPG
Views:	998
Size:	140.2 KB
ID:	2015151  
Old 07-18-2014, 06:21 AM
  #19  
WimB
Thread Starter
My Feedback: (1)
 
WimB's Avatar
 
Join Date: Dec 2008
Location: Wichelen , BELGIUM
Posts: 441
Likes: 0
Received 1 Like on 1 Post
Default

don't know how those pics of the rudders got in, but i got those horns installed as well. was a bit of a messy job, didn't find much wood under the skins, so I had to open up the base to properly attach the horns.


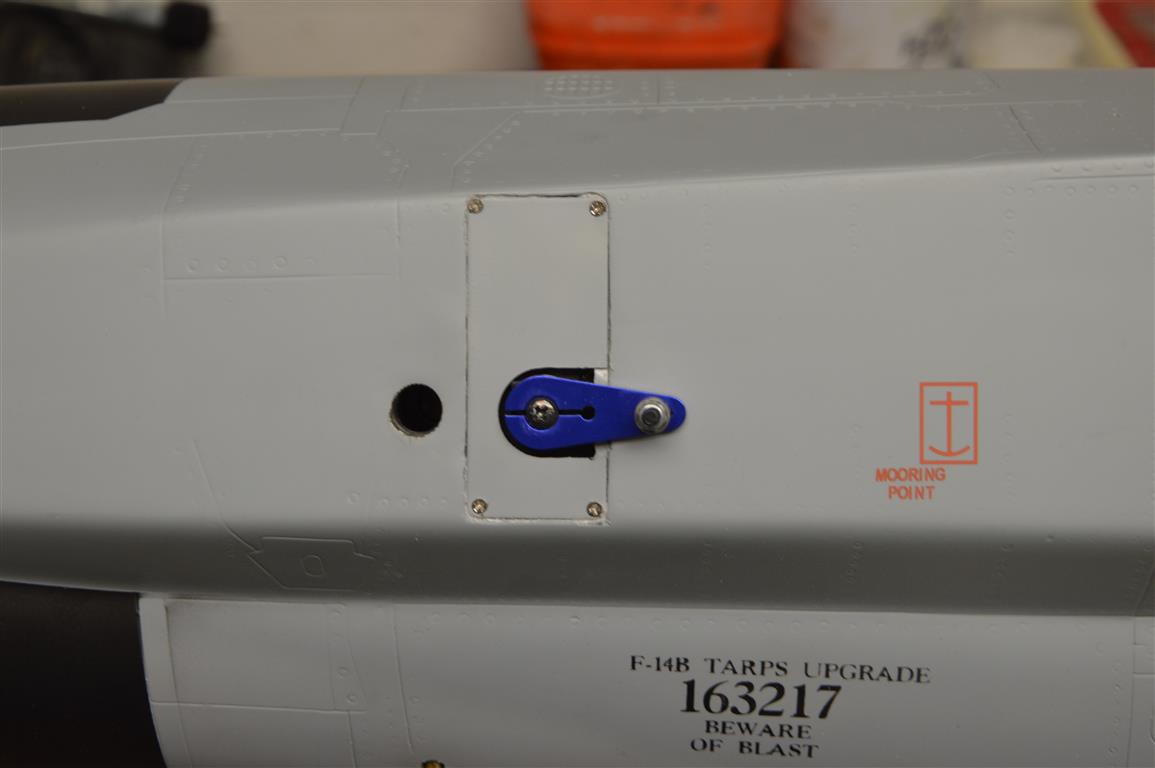
I installed the elevator servos as well. I had to shim the servo's a bit, since the depth is so critical. I did countersink the screw some more to get me some more 'play' between the fuse and the elevator. This setup does give a nice, slop free response on the elevons. the ball-barings on the arm ride in a hard anodised alu bushing.
Attached Thumbnails Click image for larger version

Name:	DSC_0037 (Medium).JPG
Views:	988
Size:	89.7 KB
ID:	2015159   Click image for larger version

Name:	DSC_0038 (Medium).JPG
Views:	975
Size:	91.8 KB
ID:	2015160   Click image for larger version

Name:	DSC_0039 (Medium).JPG
Views:	963
Size:	94.4 KB
ID:	2015161   Click image for larger version

Name:	DSC_0040 (Medium).JPG
Views:	1026
Size:	88.0 KB
ID:	2015162  
Old 07-18-2014, 06:24 AM
  #20  
WimB
Thread Starter
My Feedback: (1)
 
WimB's Avatar
 
Join Date: Dec 2008
Location: Wichelen , BELGIUM
Posts: 441
Likes: 0
Received 1 Like on 1 Post
Default

on to the gear: I'm replacing all the airlines and T-fittinge with Festo hardware. I just don't want airleaks on this bird......on the main gear, I rerouted the lines for the locking cylinder and the brakes, to be less apparent..

Attached Thumbnails Click image for larger version

Name:	DSC_0050 (Medium).JPG
Views:	1079
Size:	165.5 KB
ID:	2015164   Click image for larger version

Name:	DSC_0051 (Medium).JPG
Views:	1044
Size:	137.3 KB
ID:	2015165   Click image for larger version

Name:	DSC_0052 (Medium).JPG
Views:	1046
Size:	174.1 KB
ID:	2015166  
Old 07-18-2014, 06:28 AM
  #21  
WimB
Thread Starter
My Feedback: (1)
 
WimB's Avatar
 
Join Date: Dec 2008
Location: Wichelen , BELGIUM
Posts: 441
Likes: 0
Received 1 Like on 1 Post
Default

Since I'm working on the back, i got along with the installation of the turbines as well....there's not much room to work there, and it's impossible to check the distance between the turbine and the pipe, sa a sort of 'jig' has to be made to keep proper alignment. I've put the turbines at 2.5cm from the entry of the pipe.

Attached Thumbnails Click image for larger version

Name:	DSC_0026 (Medium).JPG
Views:	1009
Size:	134.6 KB
ID:	2015167   Click image for larger version

Name:	DSC_0043 (Medium).JPG
Views:	977
Size:	108.8 KB
ID:	2015168   Click image for larger version

Name:	DSC_0044 (Medium).JPG
Views:	999
Size:	115.5 KB
ID:	2015169   Click image for larger version

Name:	DSC_0046 (Medium).JPG
Views:	1021
Size:	136.6 KB
ID:	2015170   Click image for larger version

Name:	DSC_0047 (Medium).JPG
Views:	949
Size:	118.5 KB
ID:	2015171   Click image for larger version

Name:	DSC_0059 (Medium).JPG
Views:	997
Size:	115.4 KB
ID:	2015172  
Old 07-18-2014, 06:31 AM
  #22  
WimB
Thread Starter
My Feedback: (1)
 
WimB's Avatar
 
Join Date: Dec 2008
Location: Wichelen , BELGIUM
Posts: 441
Likes: 0
Received 1 Like on 1 Post
Default

and I also made the plates which will hold the valves and the Ecu's...these are installed behind the main tanks, next to the turbines.

Attached Thumbnails Click image for larger version

Name:	DSC_0067 (Medium).JPG
Views:	1030
Size:	151.3 KB
ID:	2015177   Click image for larger version

Name:	DSC_0068 (Medium).JPG
Views:	982
Size:	126.6 KB
ID:	2015178   Click image for larger version

Name:	DSC_0069 (Medium).JPG
Views:	1017
Size:	143.6 KB
ID:	2015179   Click image for larger version

Name:	DSC_0070 (Medium).JPG
Views:	958
Size:	123.7 KB
ID:	2015180  
Old 07-18-2014, 06:56 AM
  #23  
muzzgail
Senior Member
 
muzzgail's Avatar
 
Join Date: Jul 2008
Location: Perth, AUSTRALIA
Posts: 331
Likes: 0
Received 0 Likes on 0 Posts
Default

Well done on the photos Wim. Loved the layout of the ECU boards. Cool
Old 07-18-2014, 07:36 AM
  #24  
Jack Diaz
My Feedback: (1)
 
Join Date: Nov 2003
Location: Caracas, VENEZUELA
Posts: 551
Likes: 0
Received 0 Likes on 0 Posts
Default

Looking good Wim !

I wonder if it can be ordered with the tank aluminum fittings already installed at the factory.
Old 07-18-2014, 08:18 AM
  #25  
FenderBean
 
FenderBean's Avatar
 
Join Date: Feb 2006
Location: Huntsville AL
Posts: 7,140
Likes: 0
Received 79 Likes on 52 Posts
Default

Man, after looking at the gear there is no way possible to convert the gear to electric. Oh well SM is know a for their gear so maybe it will hold up to, but will deff be one of those things you have to keep a close eye. Nice look gear for sure, it looks like a fun project.
Has anyone tried there standard tanks or do they only offer kevlar tanks?

Thread Tools
Search this Thread

Contact Us - Archive - Advertising - Cookie Policy - Privacy Statement - Terms of Service -

Copyright © 2024 MH Sub I, LLC dba Internet Brands. All rights reserved. Use of this site indicates your consent to the Terms of Use.