


setting up a workshop!! Need ideas!!!
 03-24-2017, 05:58 AM
#1
Hi guys,
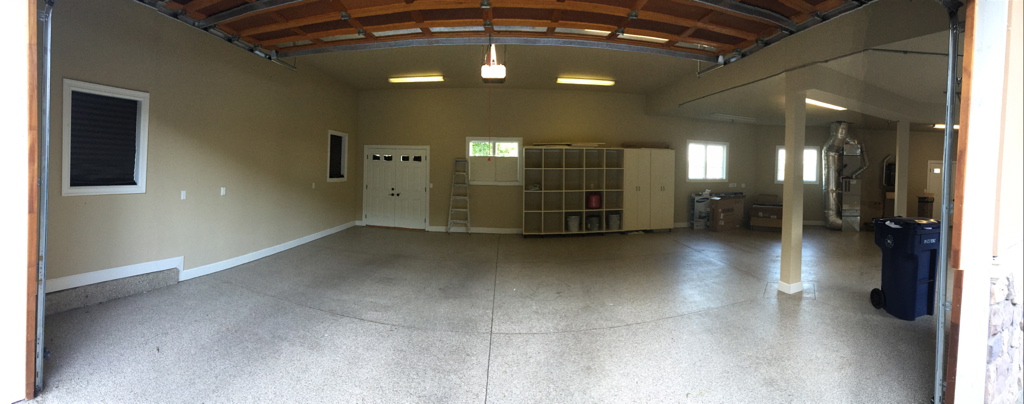
I am in the process of setting up a new workshop about 60 square meters in L shape and need some good ideas for storage of jets, Giant planes, a few foamies and accessories...
Will also have to design power outputs to be able to have optional AC/DC voltage access from different points of the workshop. Same goes for Lighting!!!
on the other hand ideas/photos for a practical workbench are also welcomed.
Thanks in advance
Regards,
 03-24-2017, 11:07 AM
#2

I have a 28x28' shop dedicated to building stuff. metal mill, metal lathe, mig welder, all the woodworking stuff on dedicated suction, 3D printer, delta air filter... it is my favorite part of our new home :-) I made a few of the tables. The EAA has a easy plan online to build it. I made them larger than they suggested. Here are some pics. I'll post more in a few... Biggest thing to me is lighting. Make sure you have adequate lighting. Changing or adding bulbs is worth it!
03-24-2017, 11:22 AM
#3


Join Date: Jan 2005
Location: CaloundraQueensland , AUSTRALIA
Posts: 493
Likes: 0
Received 2 Likes
on
2 Posts
I don't have big workshop it's double car garage biggest thing was storage and more lighting the better also just aircon put in there what defence it has made to building oh and pay TV so I enjoy watching the V8 supercars
Damo
Damo
 03-24-2017, 11:56 AM
#5

My Feedback: (4)
The biggest thing to plan for is to make sure you have room to grow. My workshop was a room in my home, then I moved into the garage (2 car) then I got my trailer which took half my space and so on......This has been a progression over the past 15 years, but I have been out of space for the last 4 years and have a 37% plane sitting in my family room and an unhappy wife. I am looking at building a dedicated shop for myself and this time will not go under 400sq ft.
 03-24-2017, 12:42 PM
#6
I made metal racks to hold planes. I screwed up and ordered 3" tubing, you could hang a motorcycle off these racks... 1" is fine. But it was free standing, so I wanted it stronger. The one against the wall is 1"
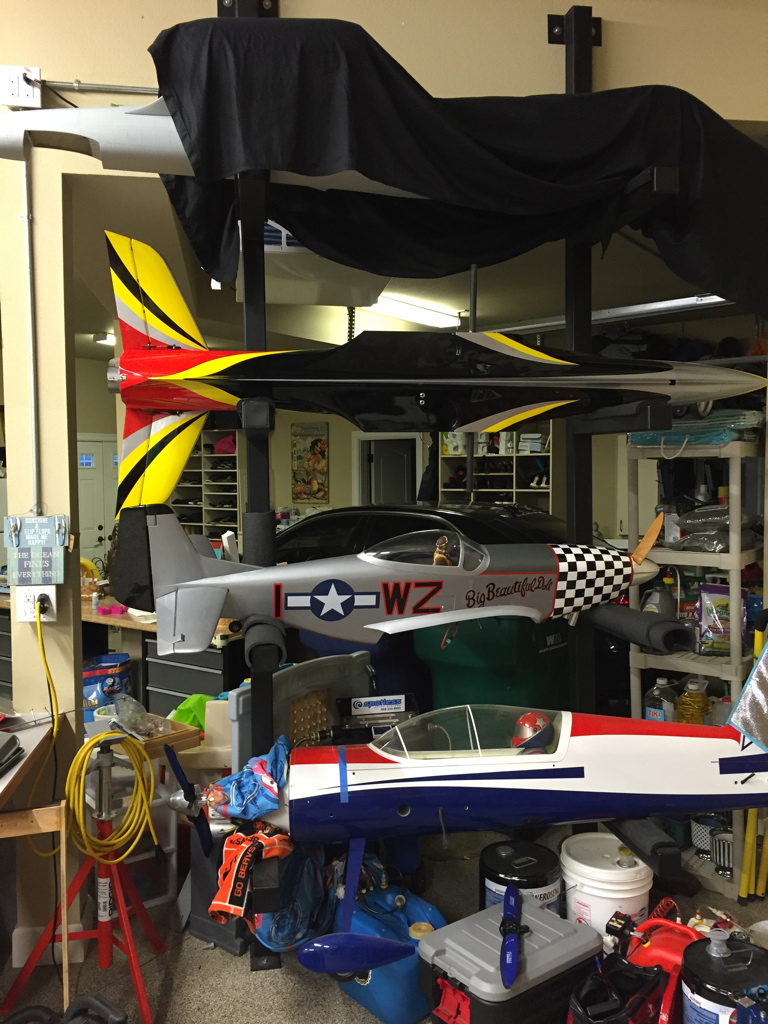
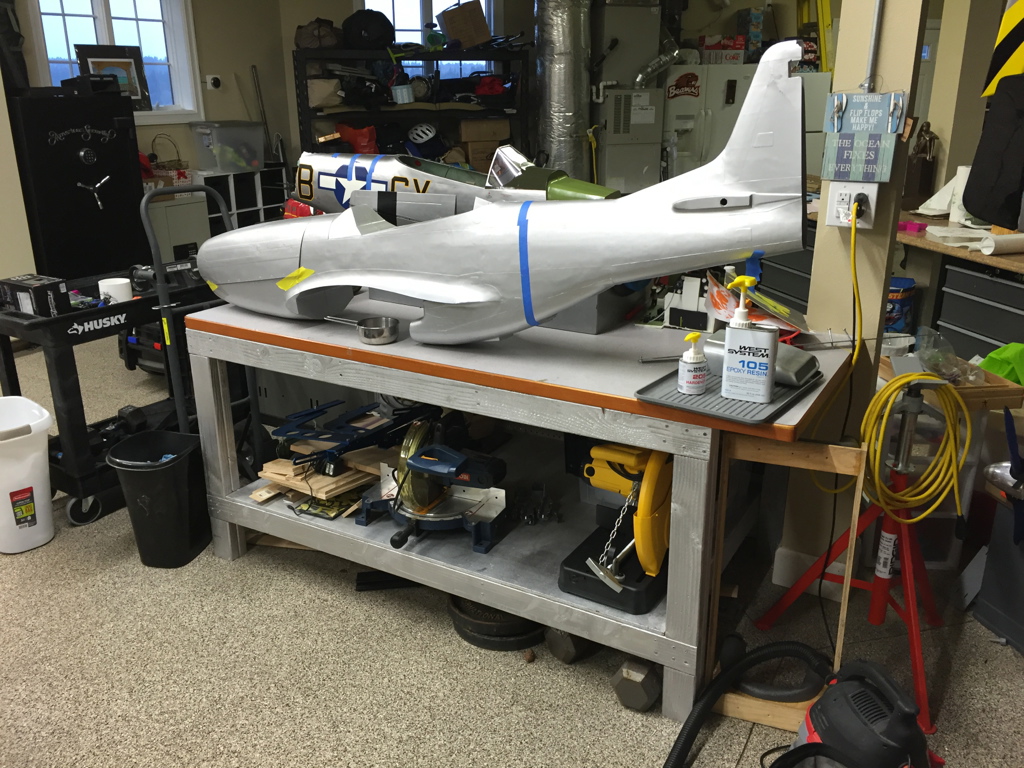
I think having free tables with storage underneath is key. You can buy, but making is much cheaper and not that hard. I did the formica countertop on this one, won't be doing that again! Pain in the ass.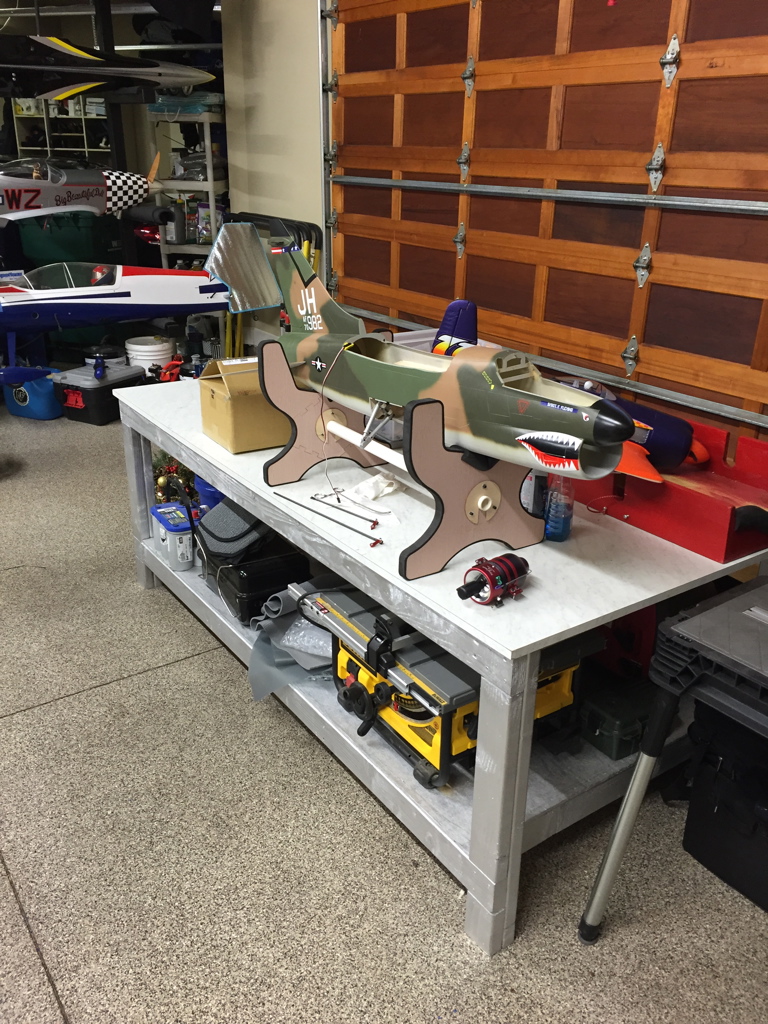
I think having free tables with storage underneath is key. You can buy, but making is much cheaper and not that hard. I did the formica countertop on this one, won't be doing that again! Pain in the ass.
03-24-2017, 01:00 PM
#7

Check these out ... great for building workbenches quick and straight ... just need the wood ..
https://www.amazon.com/Hopkins-90164...kins+workbench
https://www.amazon.com/Hopkins-90164...kins+workbench
Last edited by AEROSHELDON; 03-24-2017 at 04:10 PM.
03-24-2017, 02:37 PM
#8
Join Date: Jan 2005
Location: CaloundraQueensland , AUSTRALIA
Posts: 493
Likes: 0
Received 2 Likes
on
2 Posts
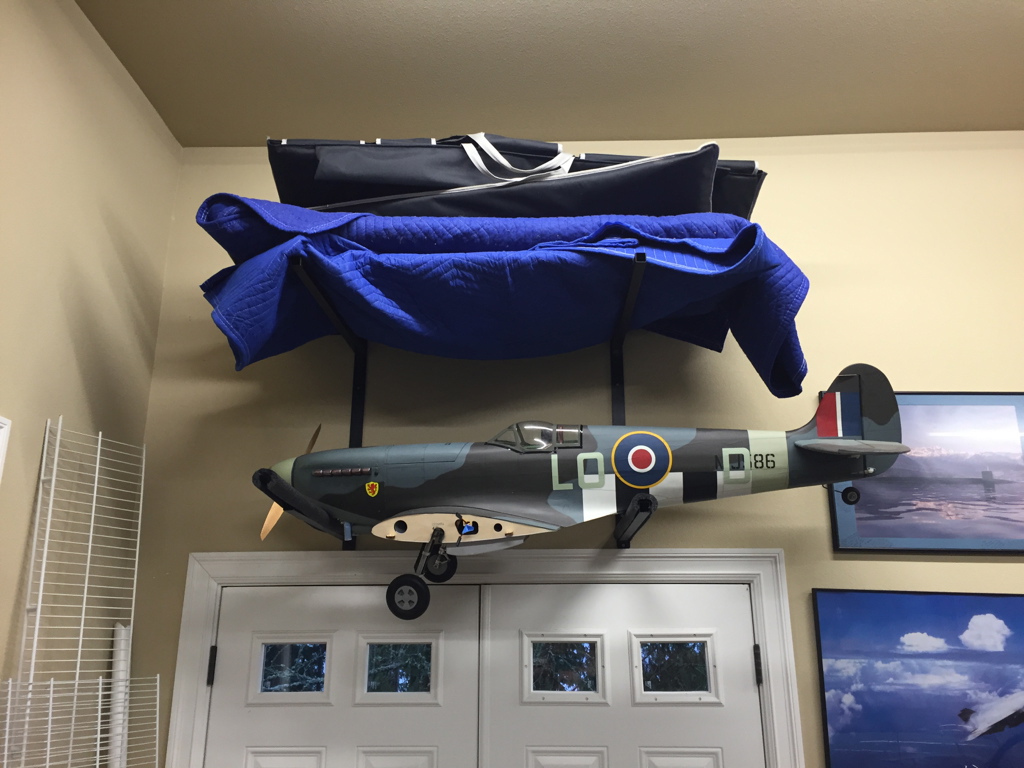
If you need space use the walls gets the planes off the floor and if don't need workbenches painters stands work the best for building.... I got one workbench and 3 painters stands
Damo
Damo
03-24-2017, 04:24 PM
#11
Join Date: Mar 2009
Location: willow springs , IL
Posts: 1,212
Likes: 0
Received 25 Likes
on
14 Posts
5000 K on the lighting like a suspect interrogation room.. Have a work table that is a pier off the wall or in the center of the floor. Being able to get to both sides of the airplane at the same time is very nice. A band saw is a must. I remember building from plans in the early days with only a Dremel saw. I dreaded aircraft ply cuts. The cheapie band saw from Menards was like heaven.
03-24-2017, 05:51 PM
#12

Join Date: Jun 2006
Location: Gold Coast, Queensland, AUSTRALIA
Posts: 1,469
Received 26 Likes
on
24 Posts
Extra 300,
I agree 100% about having enough lights, plus add electrical points every 2 meters along the walls. Even where you might be storing. It makes charging very easy when you can do that with the model in it's storage space. A few other 'must have' I won't compromise on:
- Get the floor finished in a light coloured, smooth, but non-slip surface.
- Dedicate a section for storage. You don't want to mix working area and storage area if at all possible.
- Put all your bench tools along a wall with tool/parts shelves below and tool hanging above it against the wall.
- If possible get a worktop that you can sit at along the wall somewhere.
- Dedicate the maximum open space in the center of your working area so that you can use movable workbenches and or model stands there. This will become the most used space in your workshop as it is for building, assembly and preflight checking. If you have a roof/ceiling height that changes in your workshop - I suggest you position this area under the highest spot. Height is very important as you never have to worry about picking up and manoeuvring your models inside the workshop. (Especially as they are getting bigger all the time). Make sure you have very good access in and out of this area. In my workshop I have a 3m garage door on two sides of it. This also improves ventilation and you can even test run your models very close to your workshop.
A note on storage. There are many options and no doubt everyone uses the method that works best for them in their situation. For me - after trying many different options; I make a PVC pipe storage/carry/transport stand for every one of my jet models. This allows me to store them in shelves like a 'morgue' and put everything belonging to that model with it. I can charge them in there, then slide them out and transfer them into my model van for transport or onto a workbench or model stand.
Like everything customised - a successful result is directly related to the planning and preparation you put into it. List everything you have, then write down how you would like to handle it, then see where your space will give you what you need.
Good luck and enjoy,
Jan
Last edited by Springbok Flyer; 03-24-2017 at 07:03 PM.
03-24-2017, 07:41 PM
#14
Join Date: Jun 2006
Location: Gold Coast, Queensland, AUSTRALIA
Posts: 1,469
Received 26 Likes
on
24 Posts
I make the PVC stand as soon as I can join the fuselage....

....as it becomes the way of moving my model around...

Eventually the model get held to the stand with reusable velcro wrap (loop side against the model)....

...and then the stands get secured when I transport the model.

They work well, because you pick up and handle the stand, not the model. They slide very easily because all the edges are round....and are light, smooth and strong.
Cheers,
Jan
03-24-2017, 08:09 PM
#15

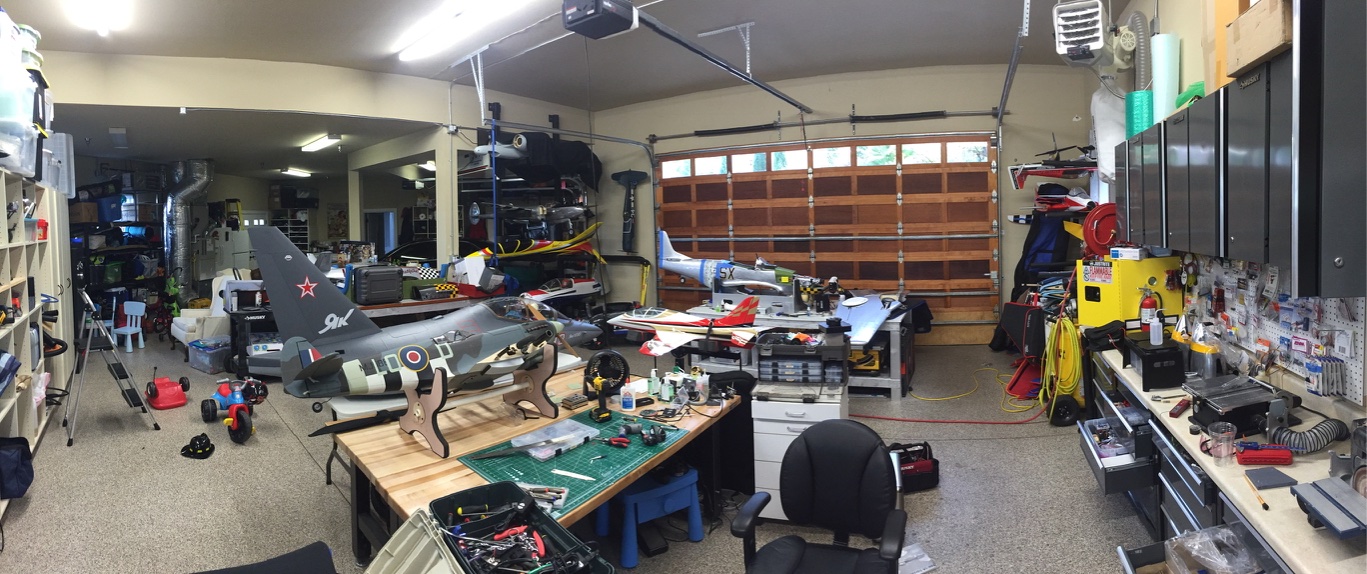
I have a 30x40 shop, the more floor space you can keep open the better,,I built a large double sided rack on casters, I keep 8 giant scales on it, and can easily roll it around. Dont forget the ceiling, I have 5 planes hanging from my shop ceiling 50cc up to 120cc. The key is to get them out of the way when not working on em. The LED lighting trays are the way to go, the bright white, and you can use all the light you can get. Also if you got a Hotrod, watch out cause they eat up room too.
If your like me, and are gonna be in there ALOT,,,some of the best money you can spend is climate control. I can keep warm in the winter,,but summer,,,Im in there bakin like a spiral cut Ham..
If your like me, and are gonna be in there ALOT,,,some of the best money you can spend is climate control. I can keep warm in the winter,,but summer,,,Im in there bakin like a spiral cut Ham..
Last edited by raron455; 03-24-2017 at 08:12 PM.
03-24-2017, 08:47 PM
#16
My Feedback: (4)
There is something else that I wanted to mention. In my shop (garage) i mounted a small television and I have an apple tv attached to it. Its there so I can mainly have background noise, but its also great to watch instructional videos, play music,just to watch something funny on television when I am waiting on glue to dry or just to take a break for a few minutes. I also have to second Ronnie's recommendation on great climate control. I am in Florida and in the winters it is beautiful in my shop, but in summer I have my own personal sauna and mosquito feeding room all in one. A fan helps but when its 98 degrees and 98 percent humidity outside at 8pm it only circulates hot air.
Patrick
Patrick
03-25-2017, 06:38 AM
#18
Like someone mentioned above, if you put in an epoxy floor, make sure its light colored! My floor has too much black speckling and parts disappear. I don't even look for them anymore.
Amazon sells these little paint booths that have a suction and filter. With two together, you can paint pretty much everything but an actual plane.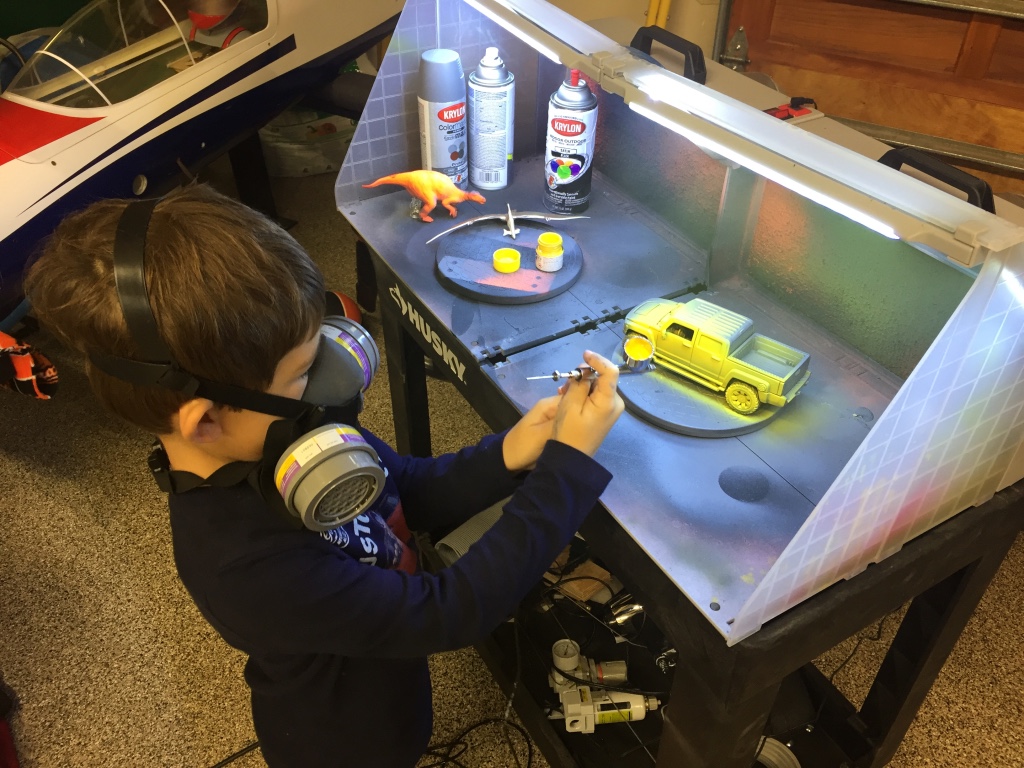
Amazon sells these little paint booths that have a suction and filter. With two together, you can paint pretty much everything but an actual plane.
03-25-2017, 06:44 AM
#19
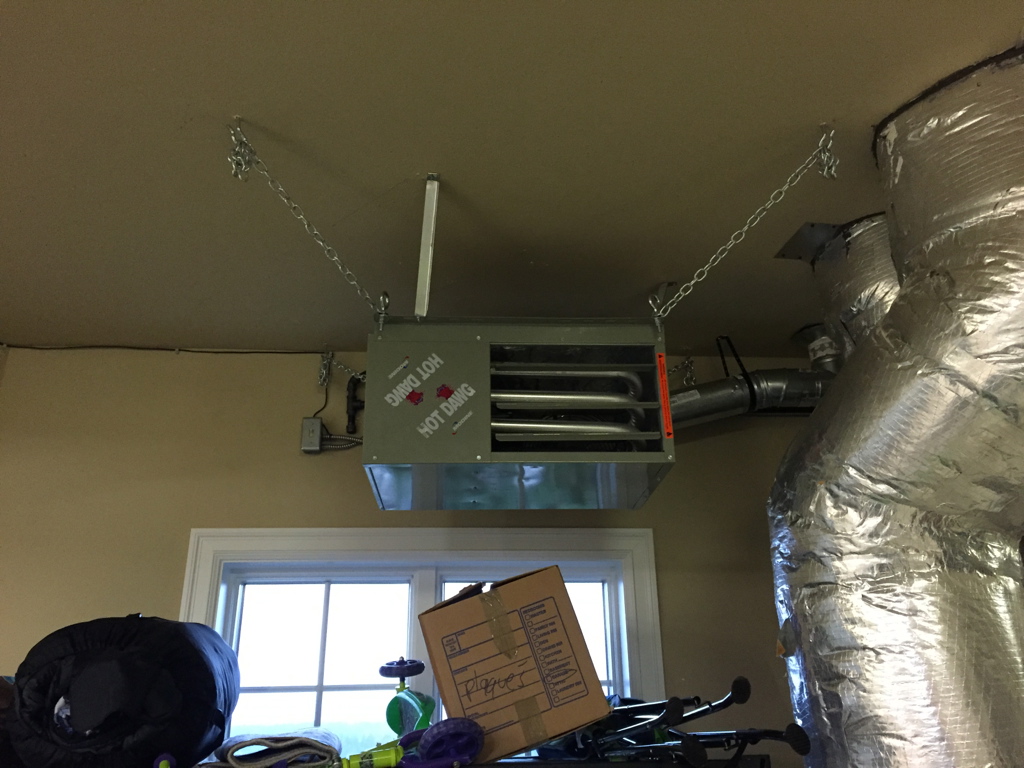
Ronnie mentioned "climate control" We spend thousands on these toys and deprive ourselves of a nice place to work on them,(for those in a cold climate.) It doesn't get really cold here in Seattle, but I'm not hanging out in the shop when its 40 degrees! I have a 45k BTU furnace in the shop, I can get the place cooking in a few minutes. They cost around $600. If you aren't wound up about having it installed to code, you can DIY. I did the last one at my house and it worked for twelve years without any problems. I had to pay to get this one installed, it was $1600. I have real stucco on the wall outside of where the vent goes and its about a 25' drop. No experience with stucco and I'm too old to get on a ladder that tall! Highly recommend a Hot Dawg! I never let the garage go below 50 degree in the winter. Probably wasting money, but I just like the idea of my toys not having such a large temperature swing.
03-25-2017, 02:34 PM
#20
Join Date: Jun 2006
Location: Gold Coast, Queensland, AUSTRALIA
Posts: 1,469
Received 26 Likes
on
24 Posts
- Don't glue anything together until you have dry assembled.
- Start with the two sections on which the wing seat and major weight will sit. Insert a round wooden dowel inside this section making sure it goes well into the elbows at each end. This will stop the PVC piping from sagging. I use 22mm tubing with a 19mm dowel.
- The sponge is a kids pool noodle with a hole. Slip it over the tubing as required.
Cheers,
Jan
03-25-2017, 04:22 PM
#21

I made metal racks to hold planes. I screwed up and ordered 3" tubing, you could hang a motorcycle off these racks... 1" is fine. But it was free standing, so I wanted it stronger. The one against the wall is 1"
I think having free tables with storage underneath is key. You can buy, but making is much cheaper and not that hard. I did the formica countertop on this one, won't be doing that again! Pain in the ass.
I think having free tables with storage underneath is key. You can buy, but making is much cheaper and not that hard. I did the formica countertop on this one, won't be doing that again! Pain in the ass.
03-25-2017, 04:25 PM
#22
A few tips when making the stands:
- Don't glue anything together until you have dry assembled.
- Start with the two sections on which the wing seat and major weight will sit. Insert a round wooden dowel inside this section making sure it goes well into the elbows at each end. This will stop the PVC piping from sagging. I use 22mm tubing with a 19mm dowel.
- The sponge is a kids pool noodle with a hole. Slip it over the tubing as required.
Cheers,
Jan
03-27-2017, 05:11 AM
#24

This is from 15 years ago, but the layout is still working well. Since this update, I've improved the ventilation / exhaust system in the paint room, and added a mill and lathe, but all the above remarks about a large central work area, separate plane storage, and tons of lighting are all good stuff.
I really thought the paint room was a crazy luxury, but I've used it a ton. Painting sure, but for anything messy, such as heavy sanding, powder coating, jigsawing fiberglass molds, etc.
http://www.mmrca.org/lance/shop.htm
After realizing the paint room didn't have enough air movement, I put in this hazardous material fan (enclosed unit, so no sparks, incase you've got paints or solvents that might go boom...... It's awsome, as now I can pull in the climate controlled air from the rest of the house. Fan turns over all the air in the room, in less than a minute. I've got a cage that goes over it, with a paper filter too.

Lance
Edit: One thing not shown in the paint room photo, is that I eventually put 2 rows of florescent lighting ringing the sides of the paint room, at around 4 and 6 feet high, like they have in professional paint booths. Overhead lighting doesn't work well for painting, but from the side helps you see how well you've got it wet out.
I really thought the paint room was a crazy luxury, but I've used it a ton. Painting sure, but for anything messy, such as heavy sanding, powder coating, jigsawing fiberglass molds, etc.
http://www.mmrca.org/lance/shop.htm
After realizing the paint room didn't have enough air movement, I put in this hazardous material fan (enclosed unit, so no sparks, incase you've got paints or solvents that might go boom...... It's awsome, as now I can pull in the climate controlled air from the rest of the house. Fan turns over all the air in the room, in less than a minute. I've got a cage that goes over it, with a paper filter too.
Lance
Edit: One thing not shown in the paint room photo, is that I eventually put 2 rows of florescent lighting ringing the sides of the paint room, at around 4 and 6 feet high, like they have in professional paint booths. Overhead lighting doesn't work well for painting, but from the side helps you see how well you've got it wet out.
Last edited by Lance Campbell; 03-27-2017 at 05:30 AM.
03-27-2017, 03:01 PM
#25

Join Date: Sep 2007
Location: Beeton, Ontario, CANADA
Posts: 1,337
Likes: 0
Received 5 Likes
on
4 Posts
Just a 1.5 garage for me. Just want to mention I do a lot of painting and sanding in the area so I invested in a heater that draws and expels air/gasses to and from outside. No worries of an explosion now. 

