


2C Garage to Ultimate R/C Shop Renovation
 07-21-2007, 11:56 PM
#1
Senior Member
Thread Starter
My Feedback: (1)

Join Date: Jun 2005
Location: Antelope Valley,
CA
Posts: 825
Likes: 0
Received 0 Likes
on
0 Posts
Two Car Garage to Ultimate R/C Shop Renovation-Intro
Summary
This thread will catalog the progress of my garage to ultimate R/C shop transformation. I've been wanting to do this for a long time, but being in the military meant that I would never be in any one place for any length of time. Now I'm out and just bought a brand new 1700sq. ft house with a 20ft x 19ft garage, so it's time to get busy. The shop will be used solely for R/C as I plan to run my business from there.
I expect the renovation to take 6-8 months, mainly working on the weekends due to family and work [:@]. The renovations will include (Figure 1):
1. 15000 BTU thru-the-wall A/C system
2. 250V/55A Sub Panel
3. Insulated walls, ceiling, and garage door panels
4. Multiple table surfaces and magnetic building board
5. 20-30 additional wall mounted outlets every 24in
6. Retractable 13A extension cord mounted to the center of the ceiling
7. CNC lathe/mill with 36" x 24" x 8" cutting area for making fiberglass molds and aluminum parts
8. 100% solids epoxy floor coating with color flecks and non-slip coating
9. Twin 40W florescent lights and 4 recessed lights on two separate switches
10. Track lighting along walls for close-up work
11. Sink & mini-refrigerator

Figure 1. CAD rendition of final garage layout
The renovation will be completed in 9 phases
Phase 1: Demolition & Attic Access Ladder Installation
Phase 2: Sub Box Installation
Phase 3: A/C "Header"
Phase 4: Electrical outlets and lighting
Phase 5: Install A/C
Phase 6: Coat the floor
Phase 7: Build Cabinets and Tables
Phase 8: Install Sink and Mini-Refrigerator
Phase 9: Finish CNC lathe/mill
Summary
This thread will catalog the progress of my garage to ultimate R/C shop transformation. I've been wanting to do this for a long time, but being in the military meant that I would never be in any one place for any length of time. Now I'm out and just bought a brand new 1700sq. ft house with a 20ft x 19ft garage, so it's time to get busy. The shop will be used solely for R/C as I plan to run my business from there.
I expect the renovation to take 6-8 months, mainly working on the weekends due to family and work [:@]. The renovations will include (Figure 1):
1. 15000 BTU thru-the-wall A/C system
2. 250V/55A Sub Panel
3. Insulated walls, ceiling, and garage door panels
4. Multiple table surfaces and magnetic building board
5. 20-30 additional wall mounted outlets every 24in
6. Retractable 13A extension cord mounted to the center of the ceiling
7. CNC lathe/mill with 36" x 24" x 8" cutting area for making fiberglass molds and aluminum parts
8. 100% solids epoxy floor coating with color flecks and non-slip coating
9. Twin 40W florescent lights and 4 recessed lights on two separate switches
10. Track lighting along walls for close-up work
11. Sink & mini-refrigerator
Figure 1. CAD rendition of final garage layout
The renovation will be completed in 9 phases
Phase 1: Demolition & Attic Access Ladder Installation
Phase 2: Sub Box Installation
Phase 3: A/C "Header"
Phase 4: Electrical outlets and lighting
Phase 5: Install A/C
Phase 6: Coat the floor
Phase 7: Build Cabinets and Tables
Phase 8: Install Sink and Mini-Refrigerator
Phase 9: Finish CNC lathe/mill
 07-22-2007, 12:53 AM
#2
Senior Member
Thread Starter
My Feedback: (1)
Join Date: Jun 2005
Location: Antelope Valley,
CA
Posts: 825
Likes: 0
Received 0 Likes
on
0 Posts
Phases 1-3: Demolition, Attic Access Ladder, Sub-Panel, and A/C Header Install
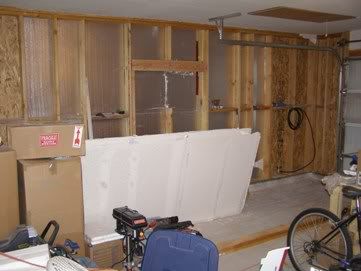
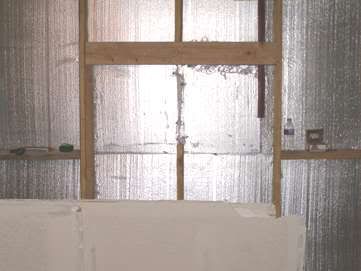
In southern Arizona A/C is a must, so having good insulation is also a must. Of the four garage walls that are shared with house, only two are insulated. The demolition phase included removing all the drywall from the un-insulated walls (figures 1 & 2). Care was taken not to damage them as they will be reused and patched once construction is completed.

Figures 1 & 2
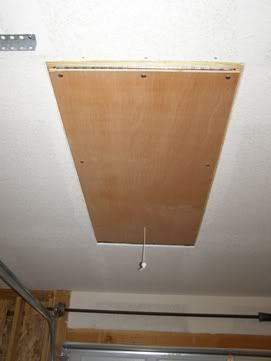
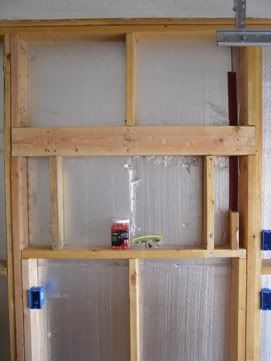
Next, was the attic access ladder install (figures 3 & 4). It is fairly simple as long as your ceiling joists are spaced 24in apart. The ladder will be beneficial because it allows easy access to the attic when the electrical system needs to be installed. Once construction is completed, 3/4" ply will be applied to the floor and the attic will be used for storage.

Figures 3 & 4
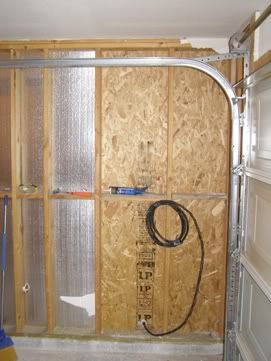
Then it was time to install the sub-panel. The contractor placed the main power panel on the opposite side of the house and only installed one outlet in the entire garage. I could of extended all of my additional outlets from that one but then I would run the risk of tripping a breaker when using more than one tool. The safest solution was to install a sub-panel and run all of my electrical from there. This involved running underground 6/3 cable in 1" PVC conduit 18in from the surface (NEC code) from the main panel across the front yard, under the driveway, and into the side of the garage. I was fortunate to do it on a day where the temp was only 110 degrees with overcast. The cable is through and all that remains is to install the sub panel (figure 5).
Figures 5 & 6
Lastly, I started building a header for the A/C unit. The wall had no window or opening for an A/C so I had to make one. I decided to install it dead center in the wall and this involved cutting a stud. Building codes require that if you remove a stud in a wall you must install a "header" set up to take the load of the missing stud. Here's where I at now (figure 6) and here's a CAD rendition of what it will look like when I'm done (figure 7).
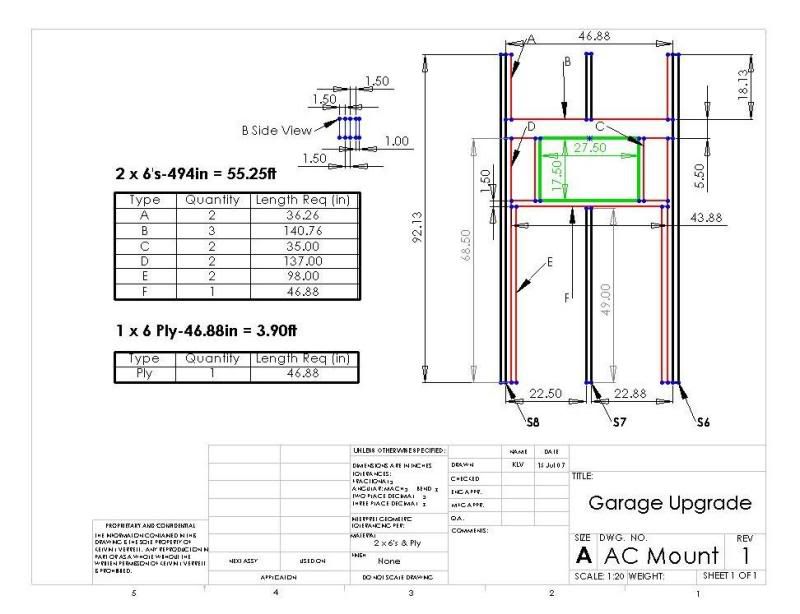
Figure 7
What's Next?
1. Finish the header
2. Run the electrical and lighting
More to come,
Mods
In southern Arizona A/C is a must, so having good insulation is also a must. Of the four garage walls that are shared with house, only two are insulated. The demolition phase included removing all the drywall from the un-insulated walls (figures 1 & 2). Care was taken not to damage them as they will be reused and patched once construction is completed.
Figures 1 & 2
Next, was the attic access ladder install (figures 3 & 4). It is fairly simple as long as your ceiling joists are spaced 24in apart. The ladder will be beneficial because it allows easy access to the attic when the electrical system needs to be installed. Once construction is completed, 3/4" ply will be applied to the floor and the attic will be used for storage.
Figures 3 & 4
Then it was time to install the sub-panel. The contractor placed the main power panel on the opposite side of the house and only installed one outlet in the entire garage. I could of extended all of my additional outlets from that one but then I would run the risk of tripping a breaker when using more than one tool. The safest solution was to install a sub-panel and run all of my electrical from there. This involved running underground 6/3 cable in 1" PVC conduit 18in from the surface (NEC code) from the main panel across the front yard, under the driveway, and into the side of the garage. I was fortunate to do it on a day where the temp was only 110 degrees with overcast. The cable is through and all that remains is to install the sub panel (figure 5).
Figures 5 & 6
Lastly, I started building a header for the A/C unit. The wall had no window or opening for an A/C so I had to make one. I decided to install it dead center in the wall and this involved cutting a stud. Building codes require that if you remove a stud in a wall you must install a "header" set up to take the load of the missing stud. Here's where I at now (figure 6) and here's a CAD rendition of what it will look like when I'm done (figure 7).
Figure 7
What's Next?
1. Finish the header
2. Run the electrical and lighting
More to come,
Mods
07-22-2007, 10:59 AM
#4
Senior Member
Thread Starter
My Feedback: (1)
Join Date: Jun 2005
Location: Antelope Valley,
CA
Posts: 825
Likes: 0
Received 0 Likes
on
0 Posts
ORIGINAL: Strykaas
Can't believe you've CADed the garage upgrade as well...
Can't believe you've CADed the garage upgrade as well...
 07-22-2007, 03:21 PM
#6

are you really surprised?
 07-23-2007, 03:12 PM
#7
Senior Member
Join Date: Feb 2003
Location: Lake County,
CA
Posts: 1,555
Likes: 0
Received 0 Likes
on
0 Posts
Your airconditioner may be a little small.
I used a 12,000 on my 10 x 20 hobby shop in El Centro.
I think the recommended was 8,000 for that size space.
You're larger and going to be more active than I was in mine.
On the other hand be careful, bigger isn't always better when it comes to A/C.
I'm jealous and good luck,
KW_Counter
I used a 12,000 on my 10 x 20 hobby shop in El Centro.
I think the recommended was 8,000 for that size space.
You're larger and going to be more active than I was in mine.
On the other hand be careful, bigger isn't always better when it comes to A/C.
I'm jealous and good luck,
KW_Counter
07-23-2007, 08:37 PM
#8
Senior Member
Thread Starter
My Feedback: (1)
Join Date: Jun 2005
Location: Antelope Valley,
CA
Posts: 825
Likes: 0
Received 0 Likes
on
0 Posts
ORIGINAL: KW_Counter
Your airconditioner may be a little small.
I used a 12,000 on my 10 x 20 hobby shop in El Centro.
I think the recommended was 8,000 for that size space.
You're larger and going to be more active than I was in mine.
On the other hand be careful, bigger isn't always better when it comes to A/C.
I'm jealous and good luck,
KW_Counter
Mods
07-23-2007, 11:58 PM
#9

I found that the garage door opener was a real pia! I removed it and plan on installing an IDrive opener. It mounts directly to the torsion rod and header above the garage door. They carry them at Lowes. It's a real space saver.
http://www.wayne-dalton.com/idrive_Torsion.asp
I did a workshop in my garage. Unfortunately, I don't have all the space, one wall is still for household storage.
Scott
http://www.wayne-dalton.com/idrive_Torsion.asp
I did a workshop in my garage. Unfortunately, I don't have all the space, one wall is still for household storage.
Scott
07-24-2007, 03:45 PM
#10
Join Date: Jan 2002
Location: Fort Walton Beach,
FL
Posts: 1,218
Likes: 0
Received 0 Likes
on
0 Posts
Mods,
That is quite an undertaking! I wish I had a workshop like that[ ].
].
Do houses in southern AZ have basements? If so, wouldn't it have been easier to run the power through the basement instead of doing the trenching and conduit work?
You may want to pick up six or seven more flourescent fixtures. Four can lights and two 4', twin tube fixtures may provide adequate light for a garage but when it comes to building and machining, the shadows and squinting will drive you nuts. I have two, twin-tubers in my basement over top of my building table (approx. 8' X 8' area) and they are not enough. For the size of your area, two rows of four or three rows of three would be perfect.
Have you thought about a window or two? Without windows providing outside light it is gonna be pitch black in there!
(I'm just trying to offer some insights & ideas )
)
Looks great so far! Keep us informed.
Good Luck,
Jeff
That is quite an undertaking! I wish I had a workshop like that[
].Do houses in southern AZ have basements? If so, wouldn't it have been easier to run the power through the basement instead of doing the trenching and conduit work?
You may want to pick up six or seven more flourescent fixtures. Four can lights and two 4', twin tube fixtures may provide adequate light for a garage but when it comes to building and machining, the shadows and squinting will drive you nuts. I have two, twin-tubers in my basement over top of my building table (approx. 8' X 8' area) and they are not enough. For the size of your area, two rows of four or three rows of three would be perfect.
Have you thought about a window or two? Without windows providing outside light it is gonna be pitch black in there!
(I'm just trying to offer some insights & ideas
)Looks great so far! Keep us informed.
Good Luck,
Jeff
07-24-2007, 04:48 PM
#11
My Feedback: (1)
Join Date: Dec 2001
Location: Waseca,
MN
Posts: 8,456
Likes: 0
Received 0 Likes
on
0 Posts
It looks like it is too late, but a few observation from doing something similar 5 years ago.
My brother and I both installed similar ladders up to our attics, they are very handy. He installed his in a corner similar to yours, and I put mine right in the midddle of the ceiling. Having it in the center makes it a bit easier putting stuff up there and taking stuff back down.
My garage is a three stall, approx 800 sq feet, and I went with a Carrier 22,000 BTU airconditioner. I think its the biggest window unit available. I am glad I went with the large unit (and my shop is in Minnesota). I would be hesitant to skimp there, especially with your heat. Last summer the air went out in the house during a hot spell, and I was glad I had the big unit in the garage, I slept quite well out there I can cool the garage quite quickly.
My brother and I both installed similar ladders up to our attics, they are very handy. He installed his in a corner similar to yours, and I put mine right in the midddle of the ceiling. Having it in the center makes it a bit easier putting stuff up there and taking stuff back down.
My garage is a three stall, approx 800 sq feet, and I went with a Carrier 22,000 BTU airconditioner. I think its the biggest window unit available. I am glad I went with the large unit (and my shop is in Minnesota). I would be hesitant to skimp there, especially with your heat. Last summer the air went out in the house during a hot spell, and I was glad I had the big unit in the garage, I slept quite well out there
I can cool the garage quite quickly.
07-24-2007, 09:53 PM
#12
I went with a modest size AC and it is inadequate. I'll need to increase it when I get the chance. I will also second the opinion that you'll want more light. The last photo I posted was still before I was done. All the walls were covered with gloss white panel boards and I have 5 4' twin bulb fixtures, it's still not as light as I'd like it. Alsof you have the room, consider an air cleaner.
Scott
Scott
07-25-2007, 12:46 AM
#14
Senior Member
Thread Starter
My Feedback: (1)
Join Date: Jun 2005
Location: Antelope Valley,
CA
Posts: 825
Likes: 0
Received 0 Likes
on
0 Posts
ORIGINAL: Jazzy
Mods,
That is quite an undertaking! I wish I had a workshop like that[].
Do houses in southern AZ have basements? If so, wouldn't it have been easier to run the power through the basement instead of doing the trenching and conduit work?
You may want to pick up six or seven more florescent fixtures. Four can lights and two 4', twin tube fixtures may provide adequate light for a garage but when it comes to building and machining, the shadows and squinting will drive you nuts. I have two, twin-tubers in my basement over top of my building table (approx. 8' X 8' area) and they are not enough. For the size of your area, two rows of four or three rows of three would be perfect.
Have you thought about a window or two? Without windows providing outside light it is going to be pitch black in there!
(I'm just trying to offer some insights & ideas)
Looks great so far! Keep us informed.
Good Luck,
Jeff
Mods,
That is quite an undertaking! I wish I had a workshop like that[
].Do houses in southern AZ have basements? If so, wouldn't it have been easier to run the power through the basement instead of doing the trenching and conduit work?
You may want to pick up six or seven more florescent fixtures. Four can lights and two 4', twin tube fixtures may provide adequate light for a garage but when it comes to building and machining, the shadows and squinting will drive you nuts. I have two, twin-tubers in my basement over top of my building table (approx. 8' X 8' area) and they are not enough. For the size of your area, two rows of four or three rows of three would be perfect.
Have you thought about a window or two? Without windows providing outside light it is going to be pitch black in there!
(I'm just trying to offer some insights & ideas
)Looks great so far! Keep us informed.
Good Luck,
Jeff
Most of the houses on the west coast don't have basements [sm=frown.gif]. The garage is what I have to work with. I could add a window but my one external wall faces east and with the kind of temps were get here, it would get hot quick! I could add more lights pretty easily. I went with the recessed lights because I wanted light where the garage door opens. Looks like I'm going with more florescent.
I went with a modest size AC and it is inadequate. I'll need to increase it when I get the chance. I will also second the opinion that you'll want more light. The last photo I posted was still before I was done. All the walls were covered with gloss white panel boards and I have 5 4' twin bulb fixtures, it's still not as light as I'd like it. Also if you have the room, consider an air cleaner.
Scott
Scott
Thanks for the suggestion about the air filter. I knew I forgot something.
I dont know if you've given any thought about a vacuum system for your sanding. Balsa dust can get really bad.
Thanks a lot guys keep the suggestions coming!
07-25-2007, 02:52 PM
#15
Senior Member
Join Date: Feb 2003
Location: Lake County,
CA
Posts: 1,555
Likes: 0
Received 0 Likes
on
0 Posts
It worked really well. Took a little time to cool off but was fine after that. I ran a 220V unit.
I didn't have any heavy machinery in that part of the shop, they were in the garage.
When I was doing the size analysis I don't think they were considering the Imperial Valley
when they said 8,000 that's why I used 12,000. Plus I had ten foot ceilings.
A couple of ceiling fans will be a big help. Mine were a couple of ugly ones that were on the patio.
You might be able to find some at a garage sale, depending on how tight your budget is.
Wife and I really hated giving up that house. We really enjoyed the valley, a good flying club
and Yuma and Palm Desert an hour away for shopping and good food.
San Diego was to cold, didn't go there to often.
Let us know how it turns out.
Good Luck,
KW_Counter
07-25-2007, 04:44 PM
#16
Senior Member
Thread Starter
My Feedback: (1)
Join Date: Jun 2005
Location: Antelope Valley,
CA
Posts: 825
Likes: 0
Received 0 Likes
on
0 Posts
ORIGINAL: KW_Counter
It worked really well. Took a little time to cool off but was fine after that. I ran a 220V unit.
I didn't have any heavy machinery in that part of the shop, they were in the garage.
When I was doing the size analysis I don't think they were considering the Imperial Valley
when they said 8,000 that's why I used 12,000. Plus I had ten foot ceilings.
A couple of ceiling fans will be a big help. Mine were a couple of ugly ones that were on the patio.
You might be able to find some at a garage sale, depending on how tight your budget is.
Wife and I really hated giving up that house. We really enjoyed the valley, a good flying club
and Yuma and Palm Desert an hour away for shopping and good food.
San Diego was to cold, didn't go there to often.
Let us know how it turns out.
Good Luck,
KW_Counter
Mods
07-27-2007, 07:39 PM
#18
My Feedback: (16)
More often than not the central A/C unit of the main house will be enough to cool and heat the garage also (if attached of course), if this is your case I would do it this way, on my last house I had 2 vents and one return, worked like a charm, the attic above the garage must be insulated also, otherwise you'd be wasting too much energy, I had the entire house done with blown in insulation. Although the initial investment might be a little more, you will always be ready to go to your shop, never hot or cold, if well insulated the energy bill will not be much at all, certainly a lot less if you had a noisy wall unit.
I would give it another thought on the paint color that you will be using on the floor, I found out the best color is one that is light and neutral, avoid specs on paint, as if when you loose some a small part (and you know you will) that goes flying off the work bench, it would be much easier to find it on a light colored and speckfree floor.
I would go with the new spring activator that mounts on top of the door, it sure beats the old style, which dumps dirt on your workspace or models when the door is activated. Honestly, the best type of door would be a regular hinged type door, as the ones that go up take up so much space of the ceiling, unless you have a nice side door which you can use too.
As suggested above, ceiling fans are a must, make sure they will not be right above your workspace, they love to bite wingtips, specially when in the building stages.
Do make plans for wall mounting brackets or whatever you think is right for you, regarding storage of fuselages, with at least two electrical outlets next to it.
Do mount everything possible on casters, good ones, mind you. I had my workbenches, saws and just about everything I could set on 2x4 frames with a plywood top. Every now and then we must clean our mess and being able to move things around and even take them out to the driveway for wood cutting, painting, etc. is a great thing, every 3 or 4 years the floor paint needs some touch up and being able to move things all to one side or the outside is a great help.
I've sold my house and have all my shop in storage, you have no idea how I miss my shop.
Good luck on your project, let us see when it's finished, it should be awesome!
07-27-2007, 09:44 PM
#19
Senior Member
Thread Starter
My Feedback: (1)
Join Date: Jun 2005
Location: Antelope Valley,
CA
Posts: 825
Likes: 0
Received 0 Likes
on
0 Posts
ORIGINAL: Walter D
More often than not the central A/C unit of the main house will be enough to cool and heat the garage also (if attached of course), if this is your case I would do it this way,
More often than not the central A/C unit of the main house will be enough to cool and heat the garage also (if attached of course), if this is your case I would do it this way,
I've sold my house and have all my shop in storage, you have no idea how I miss my shop.
Thanks,
Mods
07-27-2007, 11:08 PM
#20
Senior Member
Thread Starter
My Feedback: (1)
Join Date: Jun 2005
Location: Antelope Valley,
CA
Posts: 825
Likes: 0
Received 0 Likes
on
0 Posts
Phase 4: Electrical outlets and lighting
Summary
The header is complete and the sub-box is installed (figures 1 & 2). Now, I can start wiring the outlets. I thought to only install 8 outlets on the west wall but decided to install outlets every 24in (22 new outlets total) above and below the work benches (figure 3). I plan on having each wall on its own 20A breaker. This way there is less chance of tripping a breaker. I'm also installing separate breakers for the A/C and CPU since these will be active the most when I am in the shop.
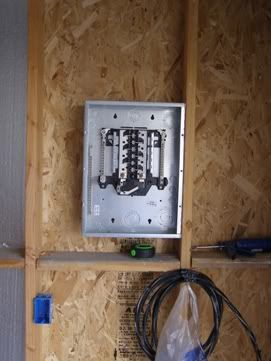
Figures 1 & 2
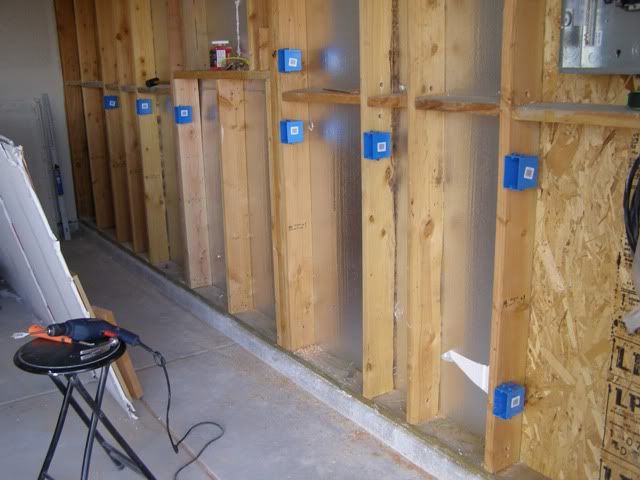
Figure 3
Construction
Mounting outlet on the finished/insulated south wall will be a bit more difficult. I am not going to remove the drywall to add outlets; I'll use cut-in boxes. I have to know exactly where they will be placed to minimize any additional spackle patching. I used CAD to sketch out my cabinets because I want the outlet to be ~2in above the counter, which will leave me 11in of pegboard space (figures 4 & 5).
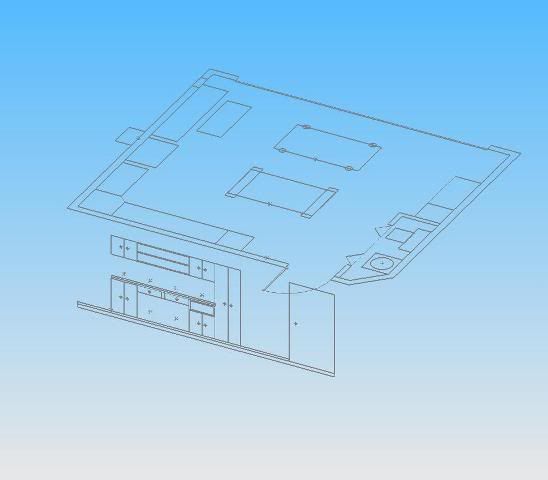
Figure 4
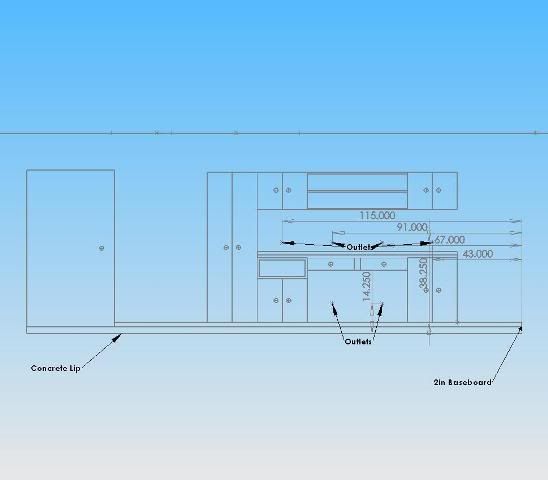
Figure 5
What’s Next?
1. Finish outlets for West Wall
2. Start South Wall
More to Come,
Mods
Summary
The header is complete and the sub-box is installed (figures 1 & 2). Now, I can start wiring the outlets. I thought to only install 8 outlets on the west wall but decided to install outlets every 24in (22 new outlets total) above and below the work benches (figure 3). I plan on having each wall on its own 20A breaker. This way there is less chance of tripping a breaker. I'm also installing separate breakers for the A/C and CPU since these will be active the most when I am in the shop.
Figures 1 & 2
Figure 3
Construction
Mounting outlet on the finished/insulated south wall will be a bit more difficult. I am not going to remove the drywall to add outlets; I'll use cut-in boxes. I have to know exactly where they will be placed to minimize any additional spackle patching. I used CAD to sketch out my cabinets because I want the outlet to be ~2in above the counter, which will leave me 11in of pegboard space (figures 4 & 5).
Figure 4
Figure 5
What’s Next?
1. Finish outlets for West Wall
2. Start South Wall
More to Come,
Mods
07-28-2007, 06:47 AM
#21

My Feedback: (27)
Join Date: Mar 2004
Location: Port Washington,
WI
Posts: 1,251
Likes: 0
Received 0 Likes
on
0 Posts
ORIGINAL: Mods-R-Me
That is a great idea, but it came a little too late. I already ordered the A/C unit [:@]. My ceiling is a bit low (8ft) for a fan, but I will definitely have some floor units in the corners.
...
Mods
ORIGINAL: Walter D
More often than not the central A/C unit of the main house will be enough to cool and heat the garage also (if attached of course), if this is your case I would do it this way,
More often than not the central A/C unit of the main house will be enough to cool and heat the garage also (if attached of course), if this is your case I would do it this way,
...
Mods
While the main unit may have the capacity to cool the garage, it's certainly not something that you want to do 24x7.
Having lived in Phoenix for 20 years, I can speak from experience that the operating cost would be astronomical.
Unless the home unit was dual zone with a dedicated thermostat in the garage, it would be almost impossible to keep the garage cool without freezing you out of the rest of the house. Otherwise, the house would be comfortable and the garage would be much warmer.
You are far better off in the long run having a separate unit for the garage that you can control the temperature and operating time separate from the main house.
07-30-2007, 02:00 PM
#22

For other members reading this adding a return air duct from
a garage is a big no no. If anyone were to ever use that
garage again it could draw gas or other fumes in to your
home.
Also a return air vent from a dusty shop will spew dust
through the rest of your home.
Here is my shop build. I conditioned it with the home AC,
but no return vents, and no leaky garage door to deal
with.
[quote]ORIGINAL: krossk
[quote]ORIGINAL: Mods-R-Me
ORIGINAL: Walter D
More often than not the central A/C unit of the main house will be enough to cool and heat the garage also (if attached of course), if this is your case I would do it this way,
More often than not the central A/C unit of the main house will be enough to cool and heat the garage also (if attached of course), if this is your case I would do it this way,
07-30-2007, 05:23 PM
#23
Senior Member
Thread Starter
My Feedback: (1)
Join Date: Jun 2005
Location: Antelope Valley,
CA
Posts: 825
Likes: 0
Received 0 Likes
on
0 Posts
Wow, I hope to have a shop like yours when I grow up! Just curious, where do you sleep?
07-30-2007, 08:47 PM
#24
Senior Member
Thread Starter
My Feedback: (1)
Join Date: Jun 2005
Location: Antelope Valley,
CA
Posts: 825
Likes: 0
Received 0 Likes
on
0 Posts
Phase 4: Electrical outlets and lighting cont...
The east wall wiring is complete. The wall now has a sub panel (figure 1) and 20 outlets (figure 2) on 3 different circuits; air conditioner, CPU, and miscellaneous outlets. I may add another 240V high amp outlet for a welder. The south and west wall will have to be wired through the ceiling along with the lights; I hung those just for fun (figure 3).
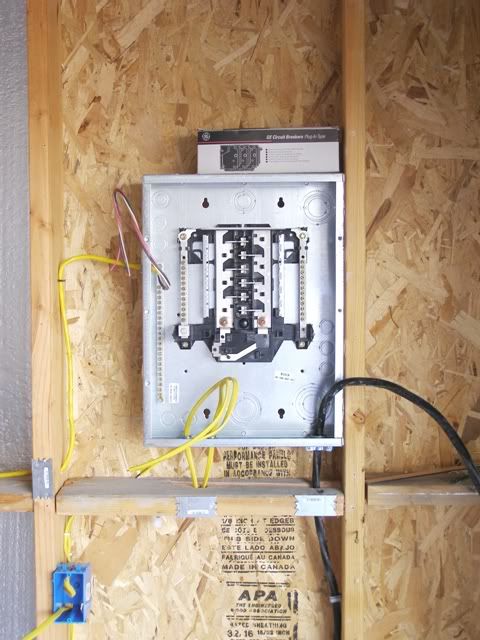
Figure 1
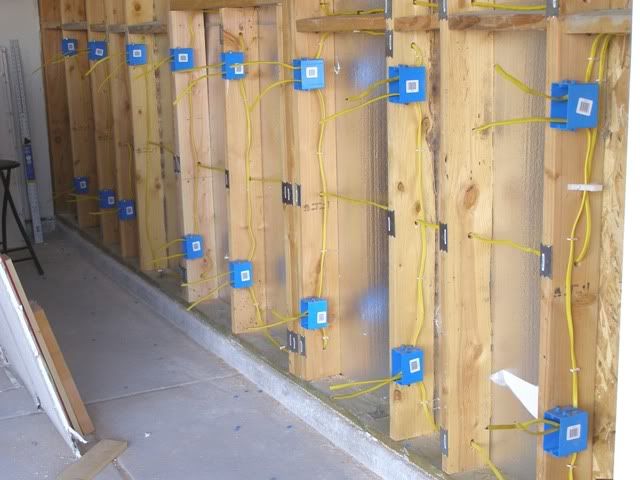
Figure 2
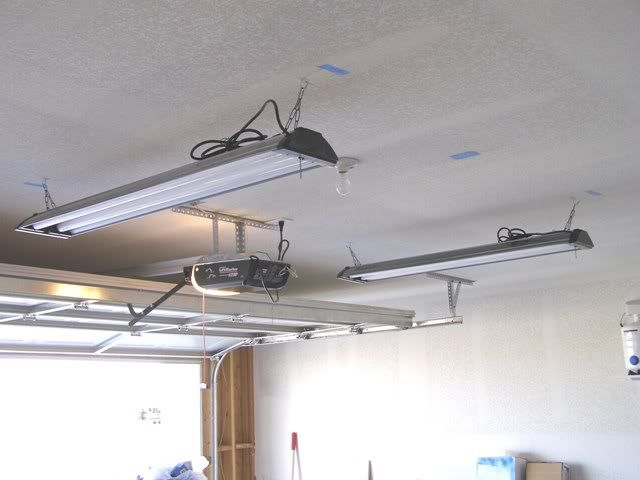
Figure 3
The east wall wiring is complete. The wall now has a sub panel (figure 1) and 20 outlets (figure 2) on 3 different circuits; air conditioner, CPU, and miscellaneous outlets. I may add another 240V high amp outlet for a welder. The south and west wall will have to be wired through the ceiling along with the lights; I hung those just for fun (figure 3).
Figure 1
Figure 2
Figure 3
07-31-2007, 03:25 PM
#25
Senior Member
Join Date: Feb 2003
Location: Lake County,
CA
Posts: 1,555
Likes: 0
Received 0 Likes
on
0 Posts
Lots of outlets is good.
I have outlets on my workbenches in the front under the overhang of the top.
A lot of cords accross the bench can be a problem.
One bench is for tools and is in the middle of the room.
Outlets front and rear. Work in the front, plug tool in in the rear.
Real safe, especially around rotary equipment.
If you use ceiling fans make sure they are above the lights.
Constant moving shadows like that have been used for torture.
They also make wall mounted fans that swivel around their axis.
Is all of youe electrical on a GFCI?
Good Luck,
KW_Counter