


Snowmobile build up start to finish
 06-14-2008, 03:45 AM
#1
Senior Member
Thread Starter
Join Date: May 2007
Location: Niagara Falls,
ON, CANADA
Posts: 134
Likes: 0
Received 0 Likes
on
0 Posts
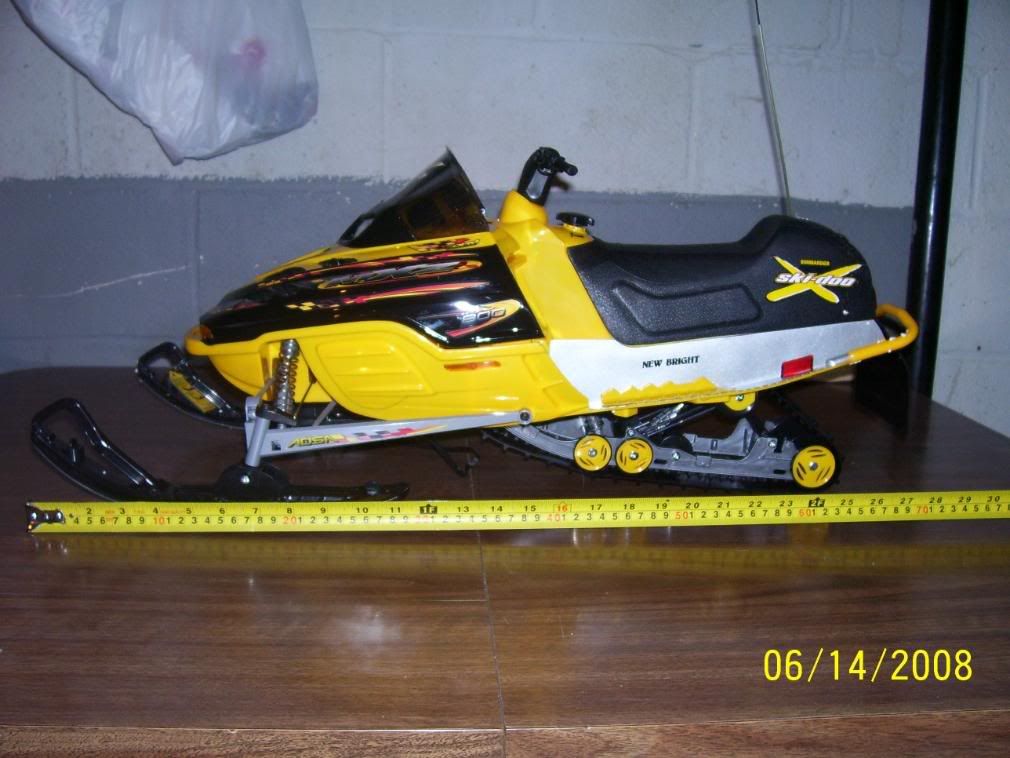
Ok I was asked by a fellow member to help out with a build so here goes nothing.
Its a Newbright snowmobile build the parts I will be using is as follows.
Motor Align 600XL 1650KV
Radio 2 channel
Batteries 4cell lipo 6600mah 20C
Servo HiTec metal gear high torque 144oz
Esc Mamba Max
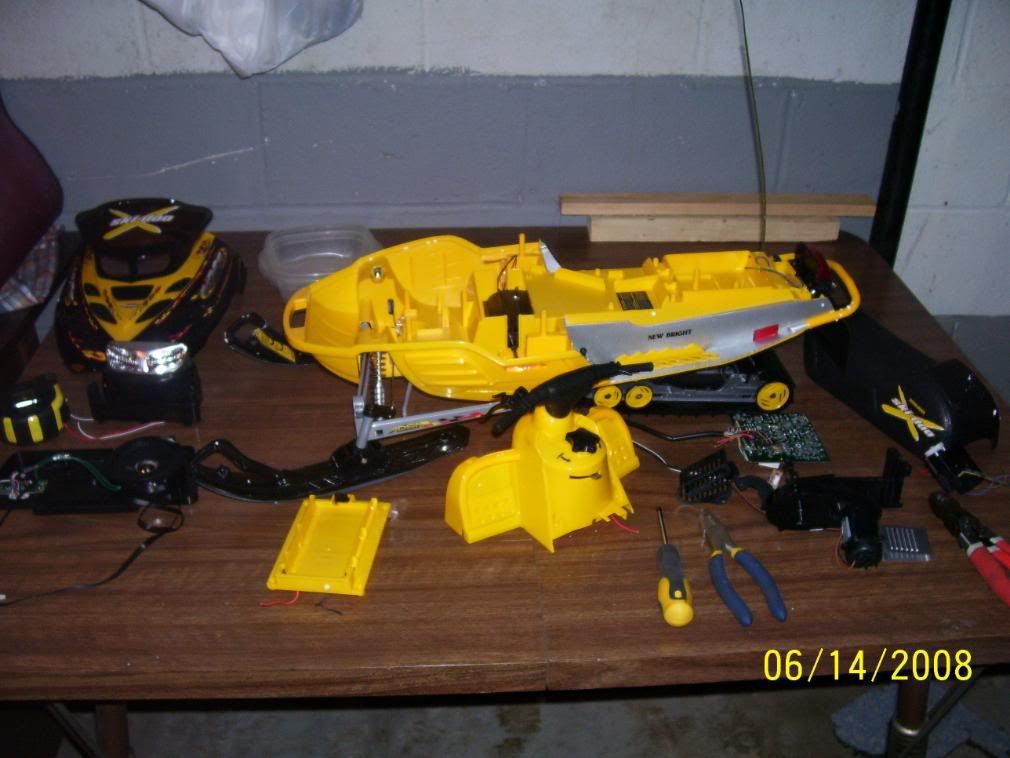
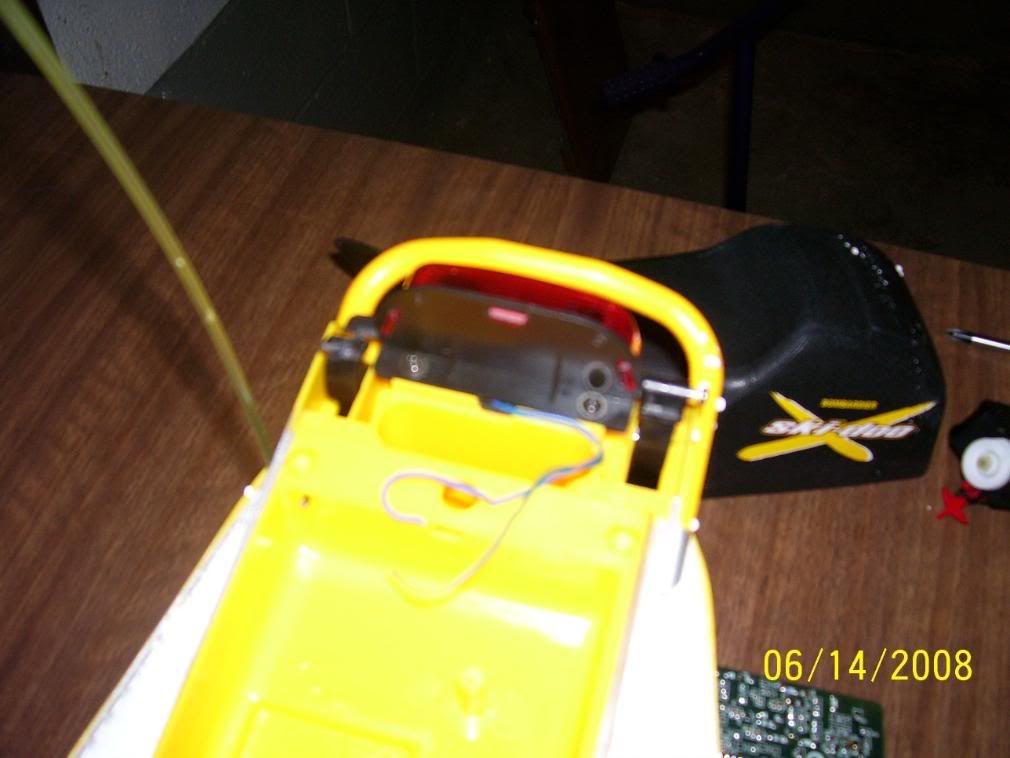
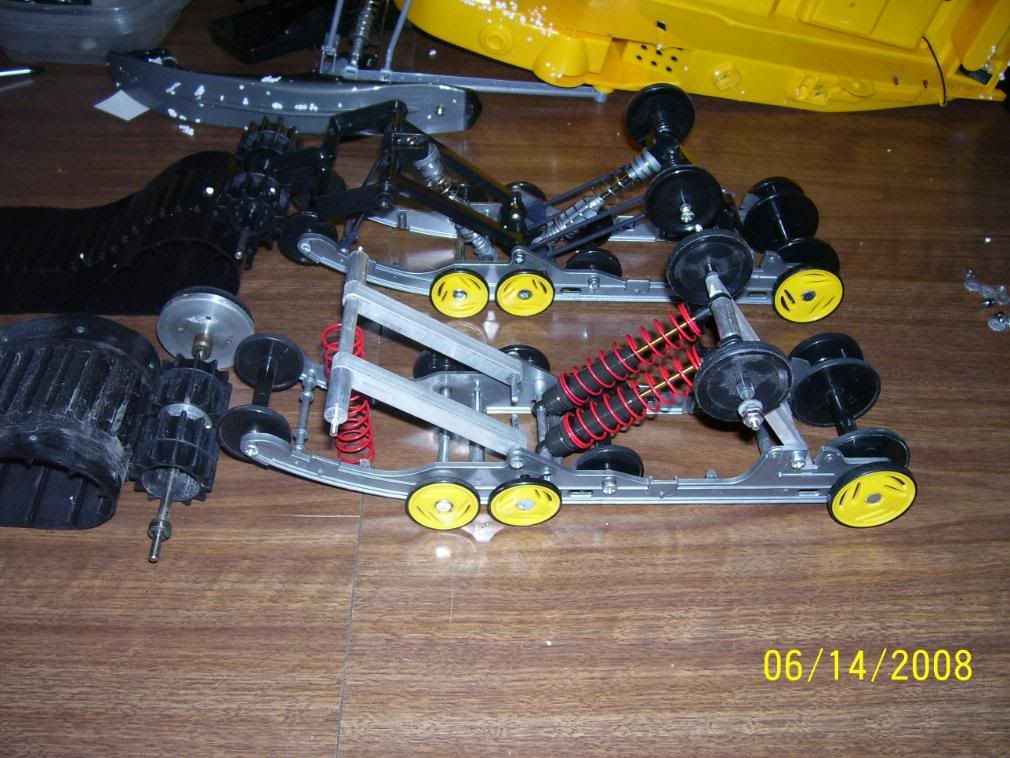
Now the first thing you need to do is RIP all the junk out to make way for the new power plant.
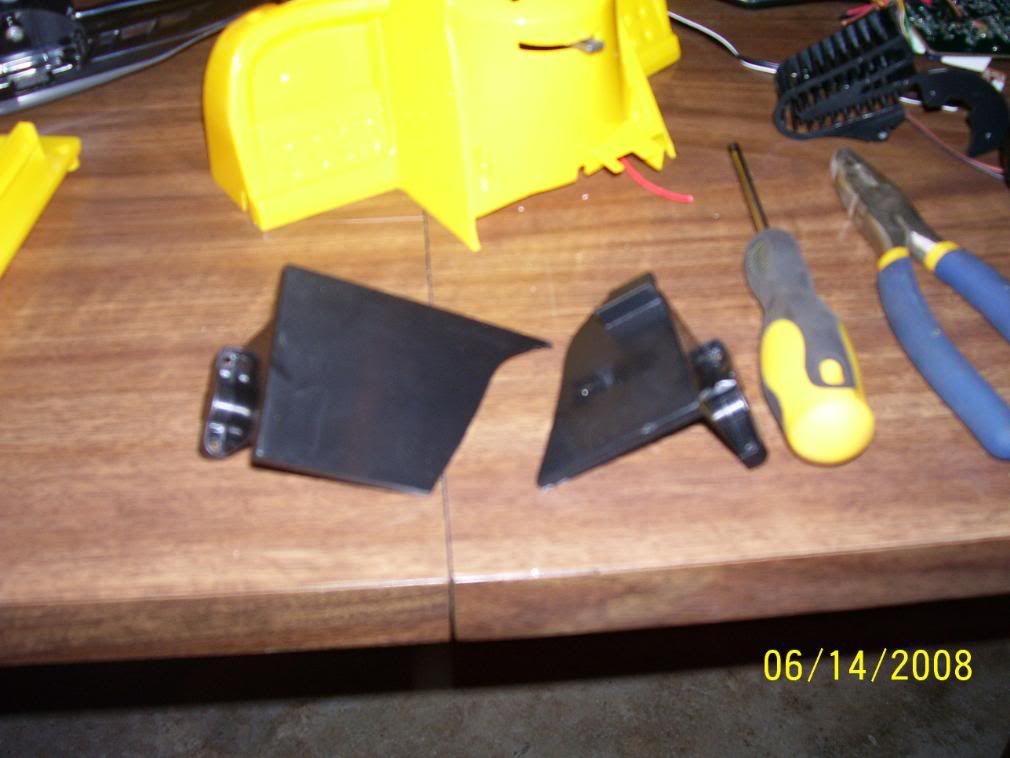
When I started pulling this baby apart I found 2 broken parts, I have yet to get one that didn't have something broken on it.
The 2 parts are the arms that hold the seat and the cover for the main drive for the track.
Lucky I have 6 of these so I got lots of spare parts.
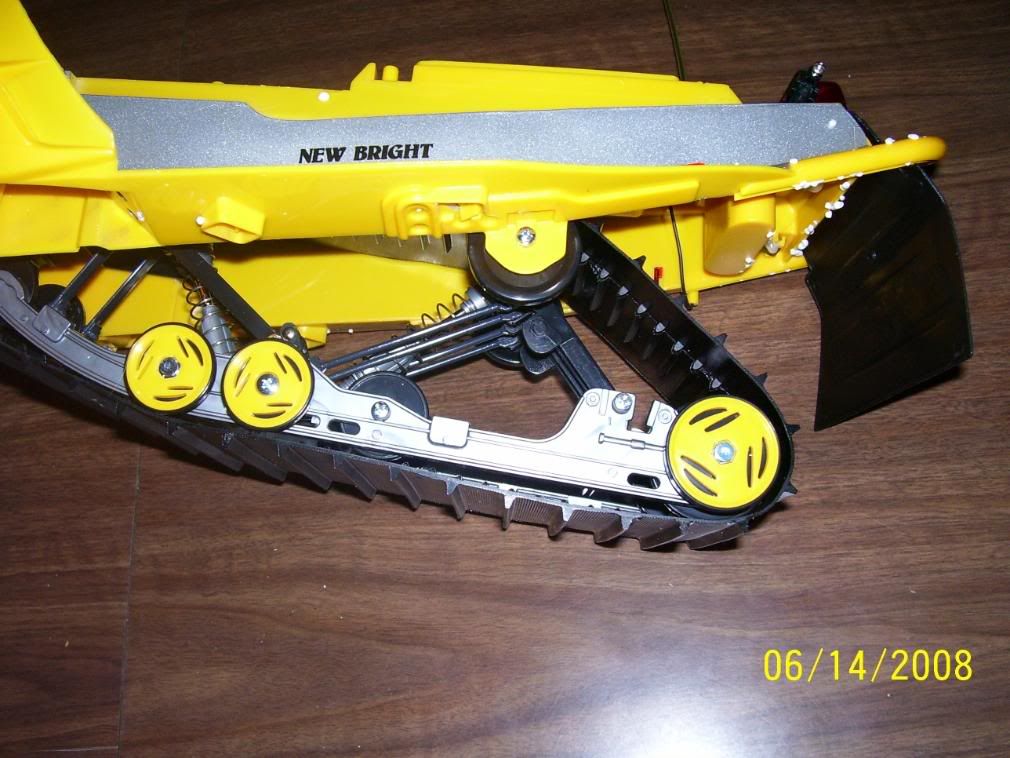
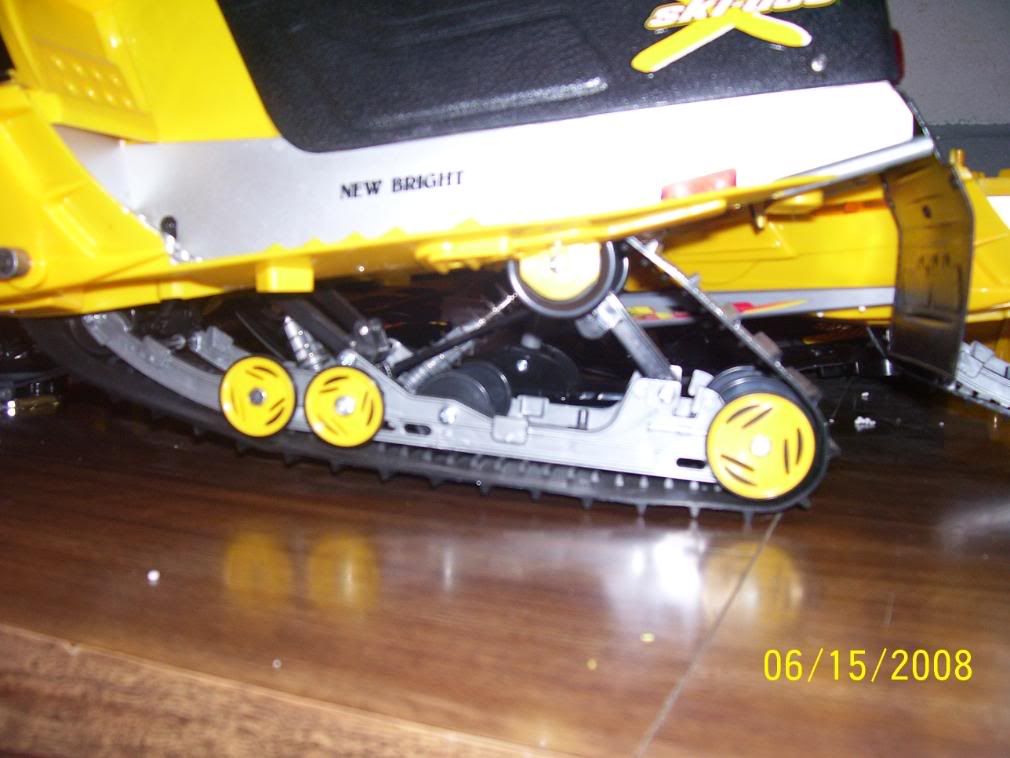
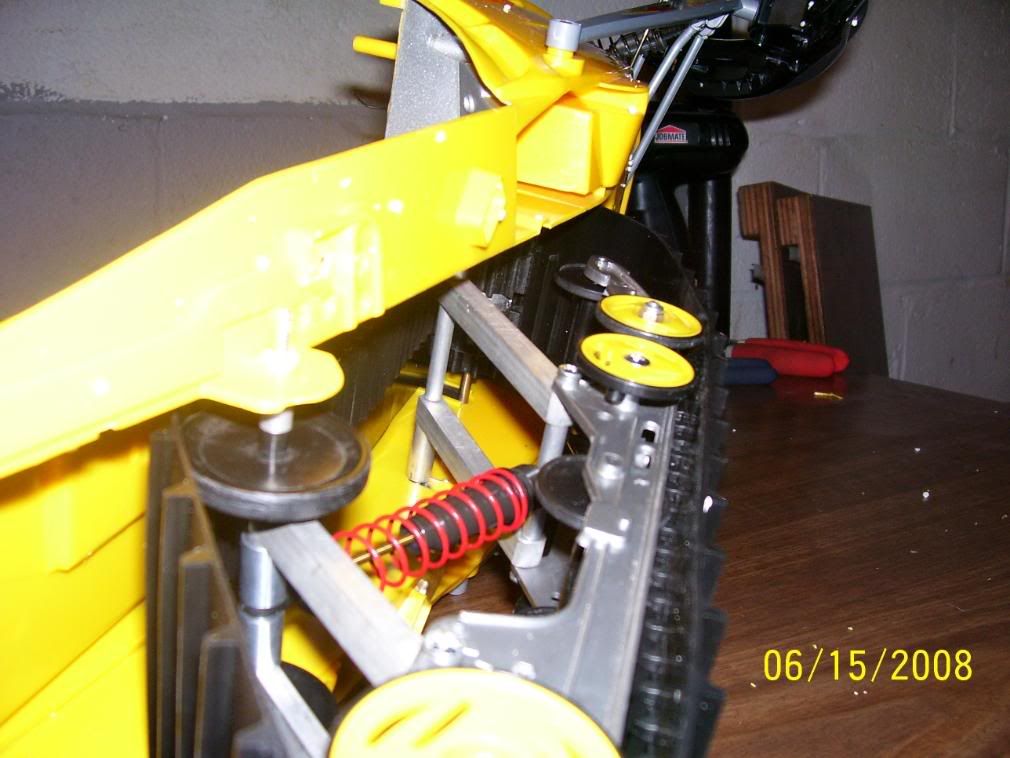
In the pics you can see the original track and how little it has for grabbing and driving the track.
Then you can see mine with the mods I have done to improve this, I have never had my track slip even at over 40mph.
I have installed bearings everywhere, made a custom 5mil shaft and adapter to hold the track-drive pulleys, also for the main drive drive pulley.
the main drive shaft I have 2 bears on one end and only one on the other side I have also installed E-clips to make sure they never go out of alignment.
All pulleys, adapters, shafts and spacers are all custom machined by me.
If any one needs any help with a mod I would be glad to lend a hand.
I will be posting pics of the build and all specs and info as I move along with this mod so check back often.

Its a Newbright snowmobile build the parts I will be using is as follows.
Motor Align 600XL 1650KV
Radio 2 channel
Batteries 4cell lipo 6600mah 20C
Servo HiTec metal gear high torque 144oz
Esc Mamba Max
Now the first thing you need to do is RIP all the junk out to make way for the new power plant.
When I started pulling this baby apart I found 2 broken parts, I have yet to get one that didn't have something broken on it.
The 2 parts are the arms that hold the seat and the cover for the main drive for the track.
Lucky I have 6 of these so I got lots of spare parts.
In the pics you can see the original track and how little it has for grabbing and driving the track.
Then you can see mine with the mods I have done to improve this, I have never had my track slip even at over 40mph.
I have installed bearings everywhere, made a custom 5mil shaft and adapter to hold the track-drive pulleys, also for the main drive drive pulley.
the main drive shaft I have 2 bears on one end and only one on the other side I have also installed E-clips to make sure they never go out of alignment.
All pulleys, adapters, shafts and spacers are all custom machined by me.
If any one needs any help with a mod I would be glad to lend a hand.
I will be posting pics of the build and all specs and info as I move along with this mod so check back often.
 06-15-2008, 03:10 AM
#2
Senior Member
Thread Starter
Join Date: May 2007
Location: Niagara Falls,
ON, CANADA
Posts: 134
Likes: 0
Received 0 Likes
on
0 Posts
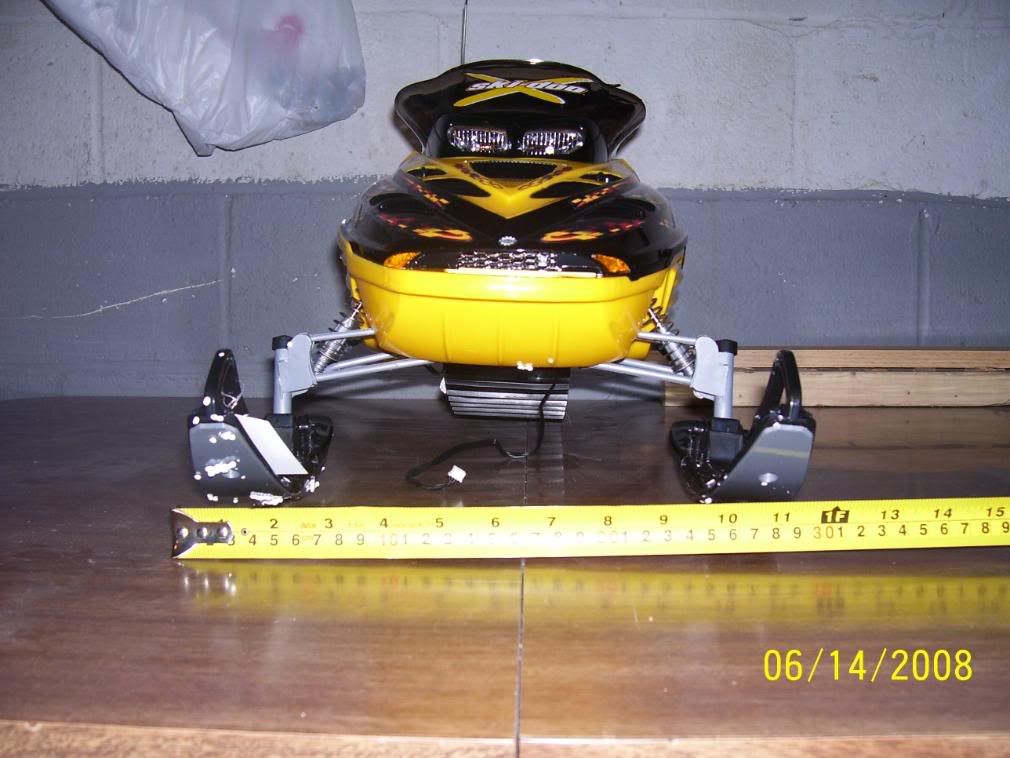
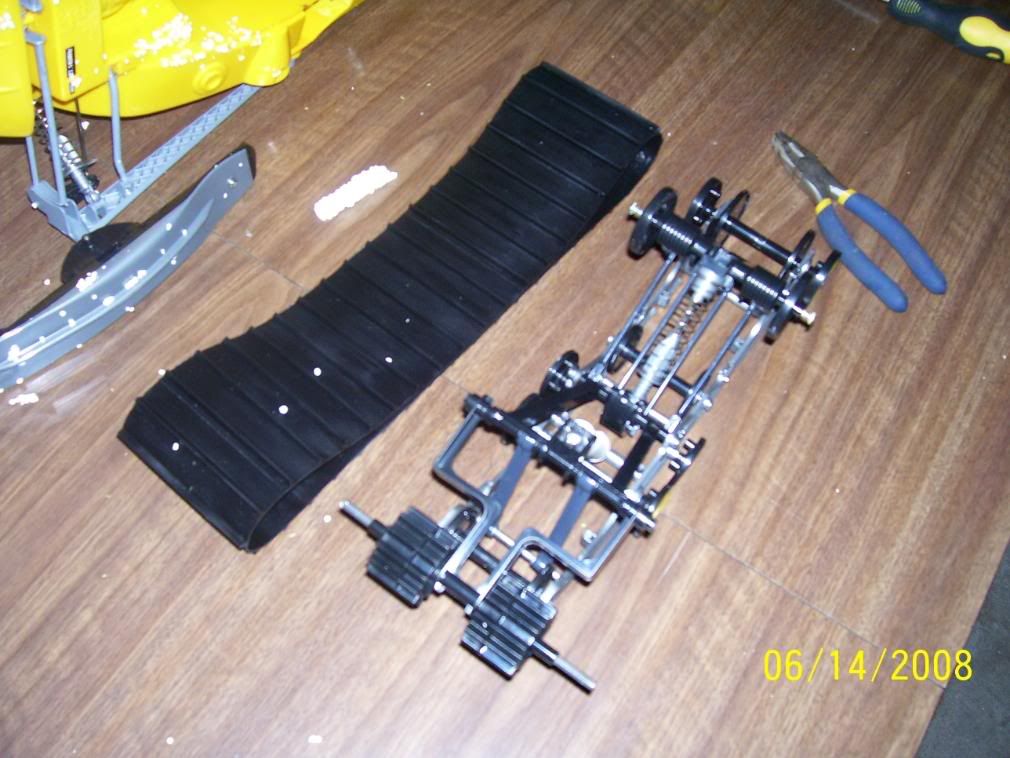
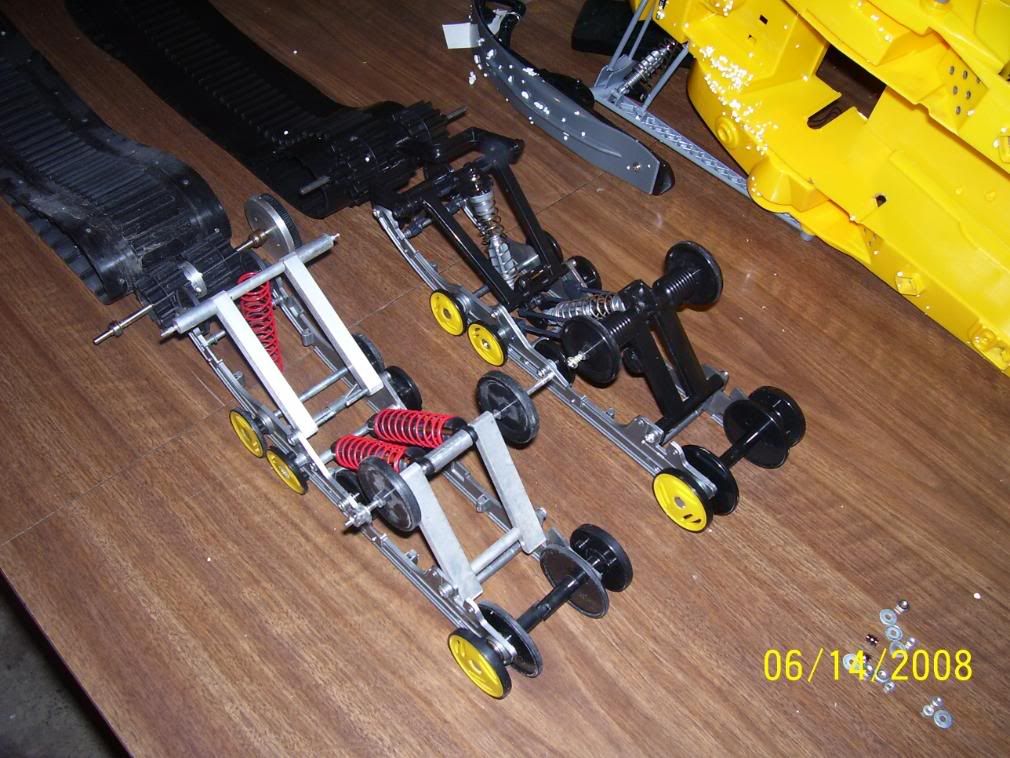
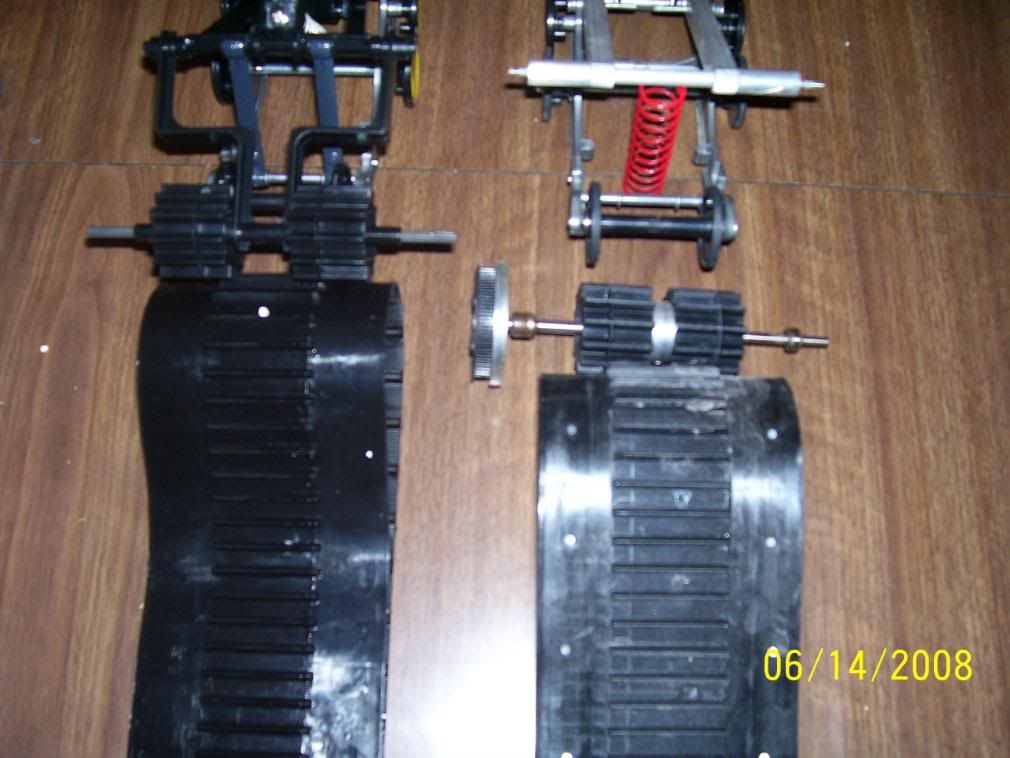
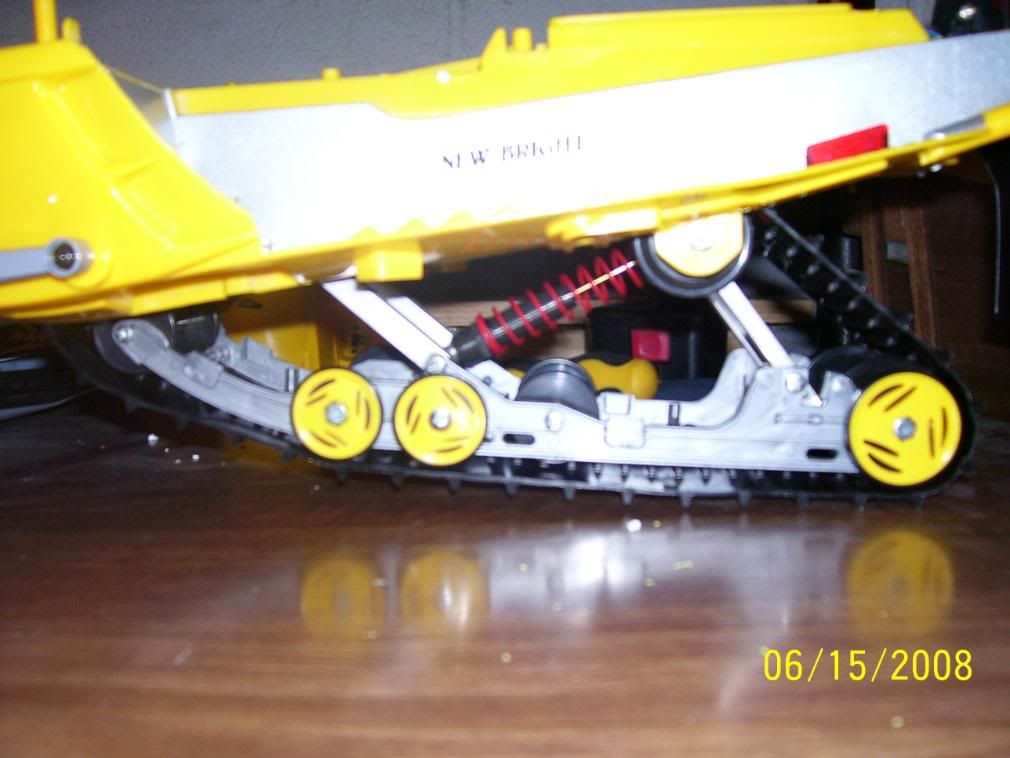
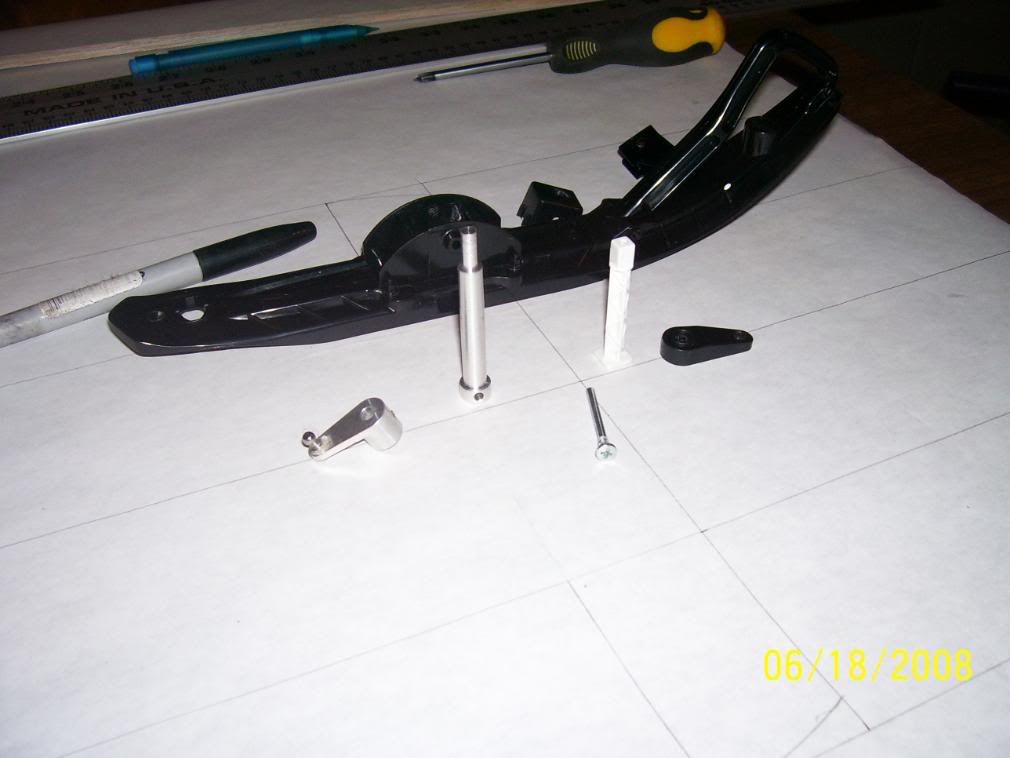
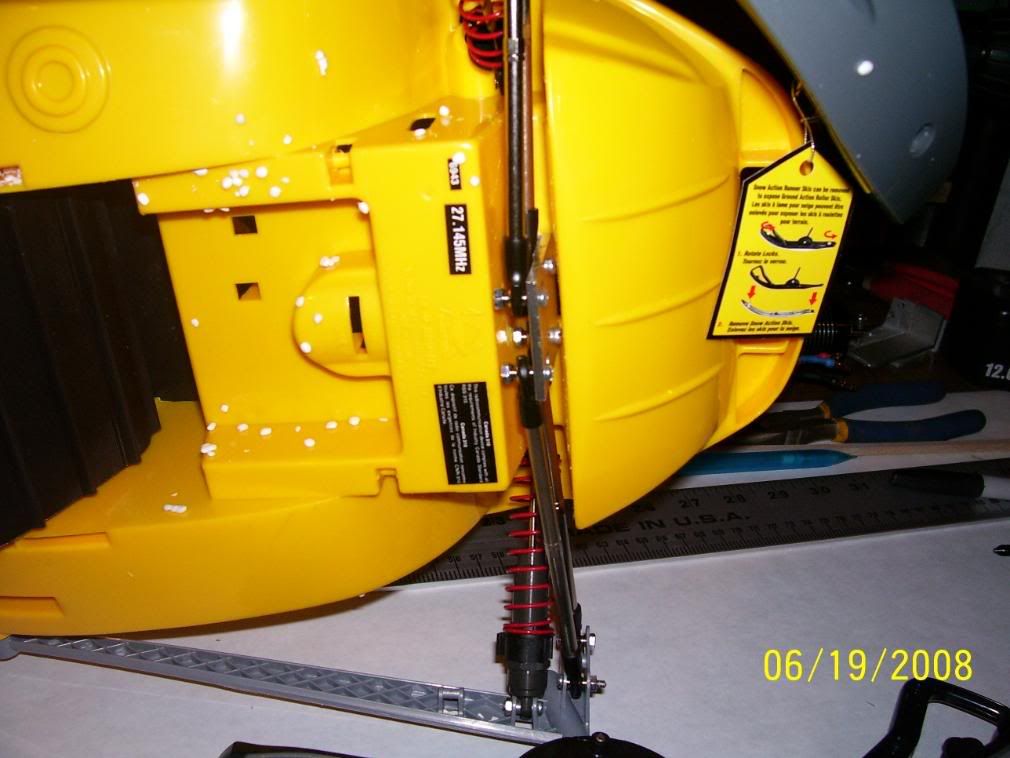
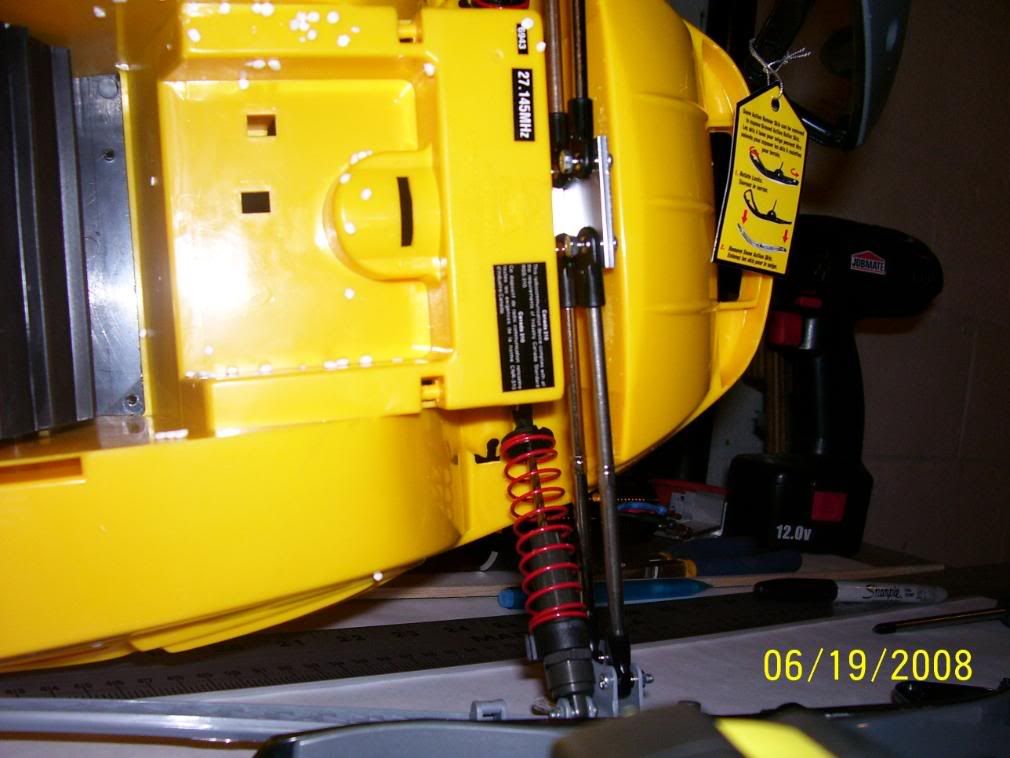
Now for the next step was to get the suspension and track drive installed.
I have used only one shock because with two its way to stiff.
As you can see in the pics the sled still sits at the same hight as stock.
Also I have moved the top guide wheels in 1/4 of an inch so the track can not slide off.
Now the main drive pulley was made so that I could slide on the belt-drive gear and it is bolted on with four 4/40 allen-head bolts
And the E-clips keep the main shaft from moving side to side.
I have also made spacers on both top and bottom to keep the shock in the middle.
Where the suspension bolts to the sled I have made shafts that go all the way through and threaded at both ends.
Check back soon for the next step.
06-19-2008, 01:24 AM
#3
Senior Member
Thread Starter
Join Date: May 2007
Location: Niagara Falls,
ON, CANADA
Posts: 134
Likes: 0
Received 0 Likes
on
0 Posts
Ok now for the next step.
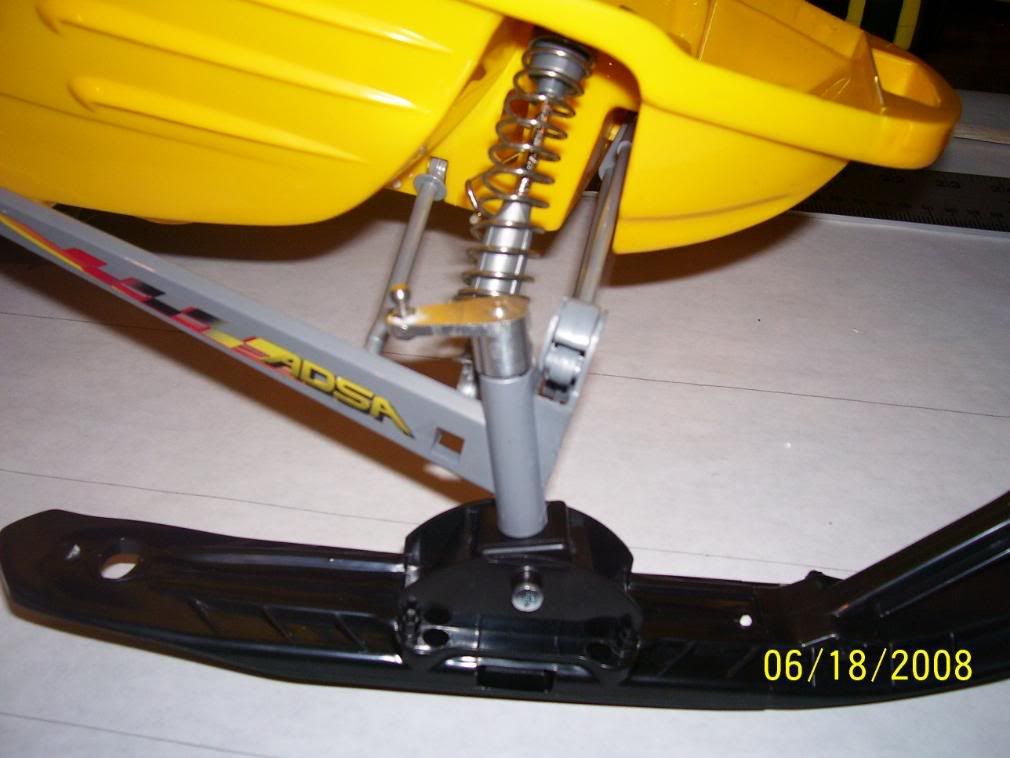
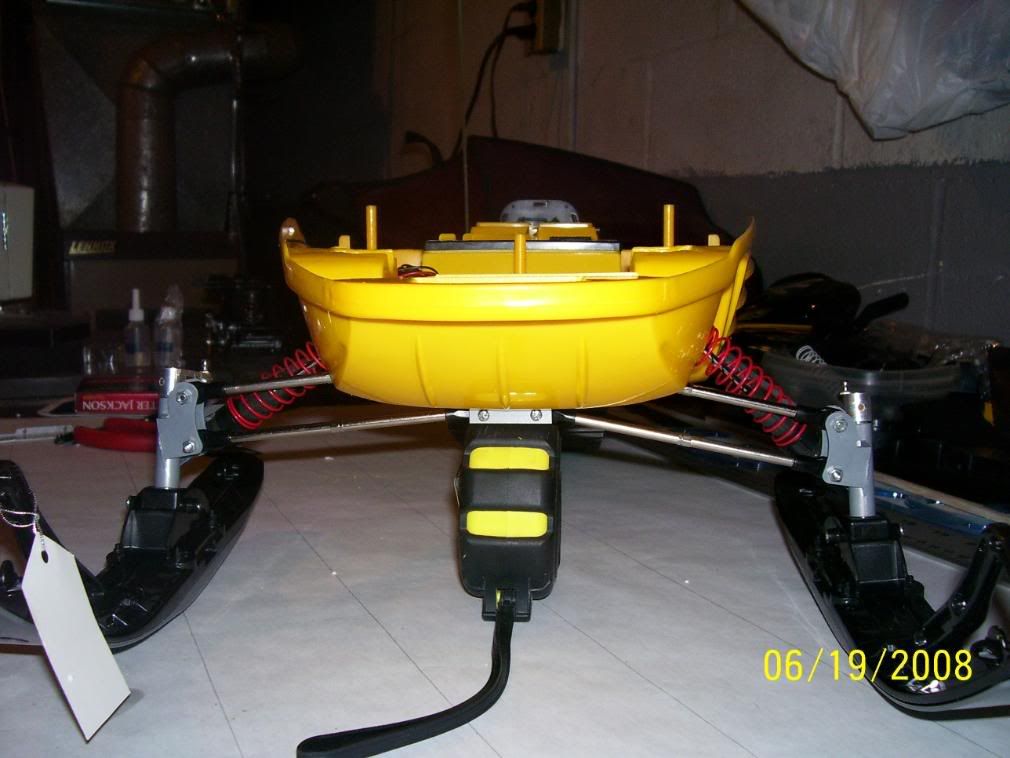
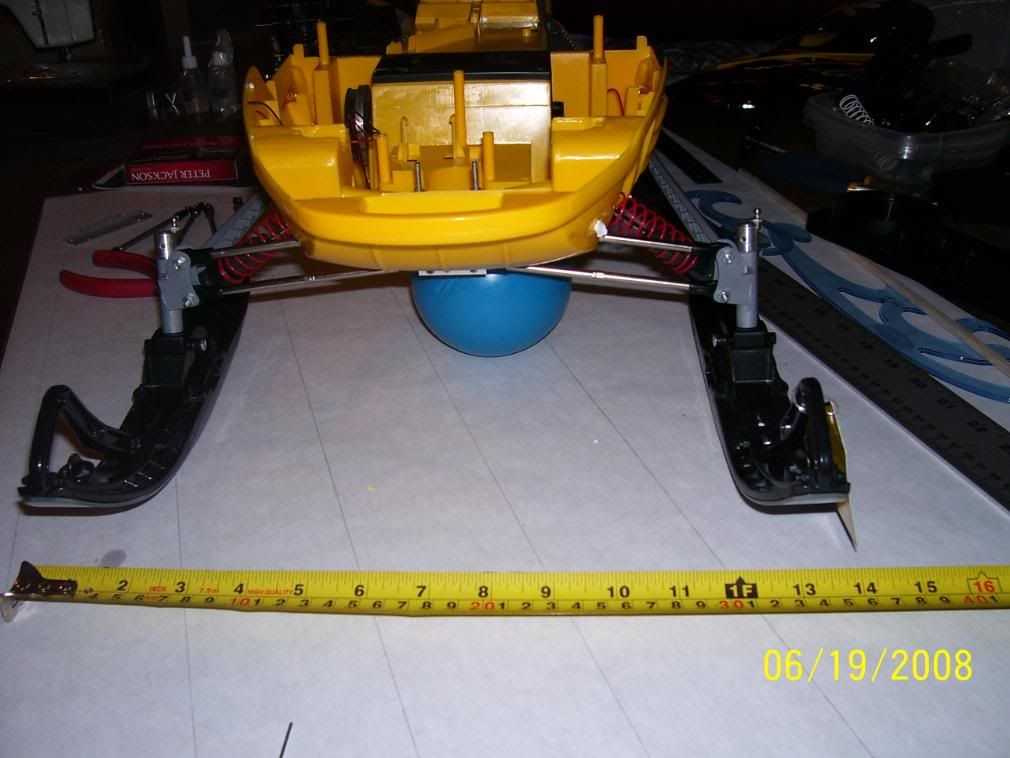
What I worked on today was the ski's and linkage for them.
I had to go to the hobby shop today and buy some turnbuckles for the linkage I use the 4 1/2 inch ones from a traxxas T-Max
Now as you can see in the pics the stance is now 14 inches instead of 12 ride hight will still be the same but now there will be more
travel.
The shocks will be mounted in the next step along with servo set-up and control arms and servo-mount.
If you have any questions please feel free to PM or ask.
I have not been writing to much as to what I have done because I have received some really bad news this past weekend.
My father in-law has past away, and I have been having trouble keeping my mind on what I am doing.
So please ask if you are unsure of any of the step and parts that have been changed or made and so on.
Now for the pics.
06-21-2008, 12:14 PM
#4
Senior Member
Thread Starter
Join Date: May 2007
Location: Niagara Falls,
ON, CANADA
Posts: 134
Likes: 0
Received 0 Likes
on
0 Posts
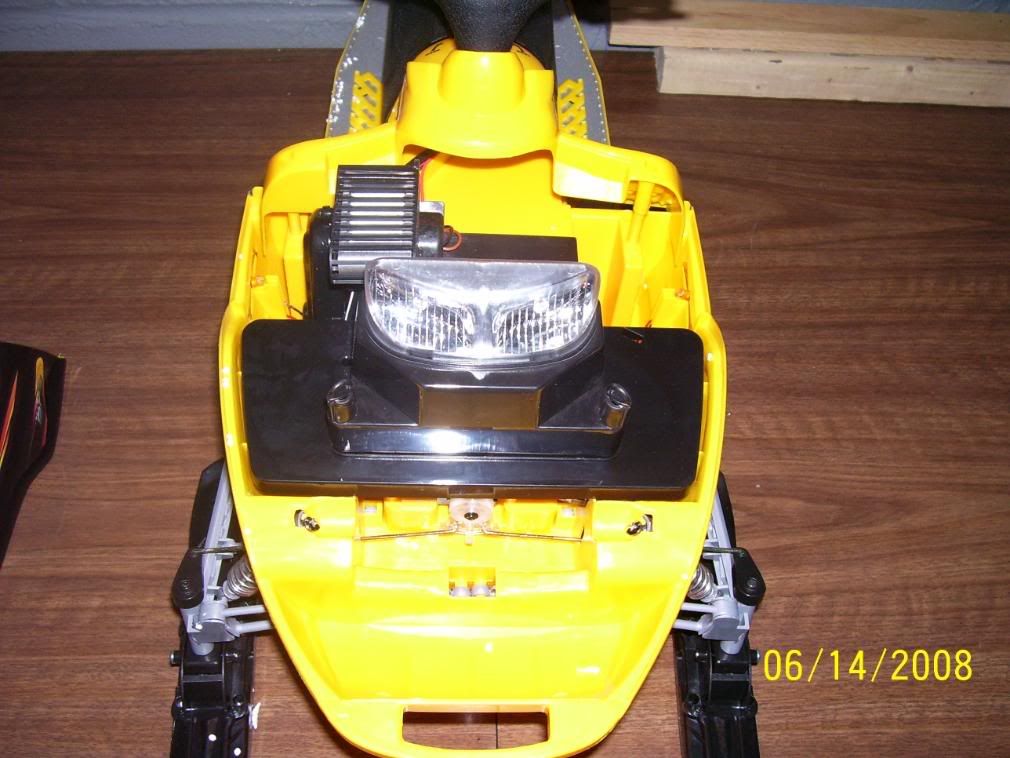
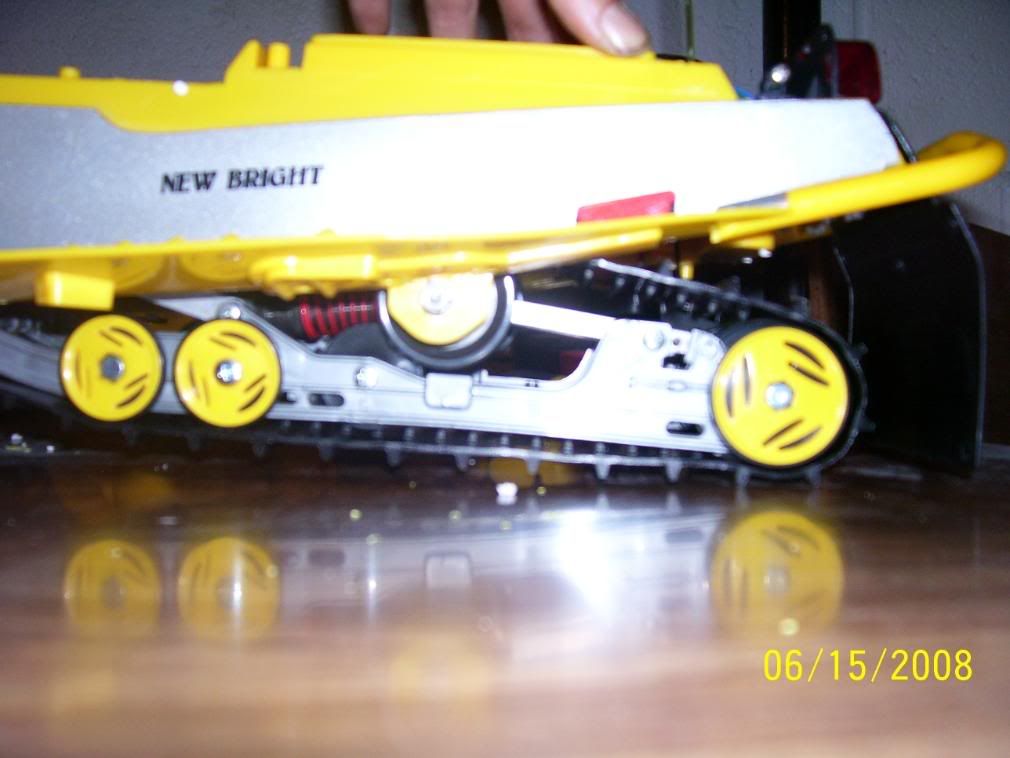
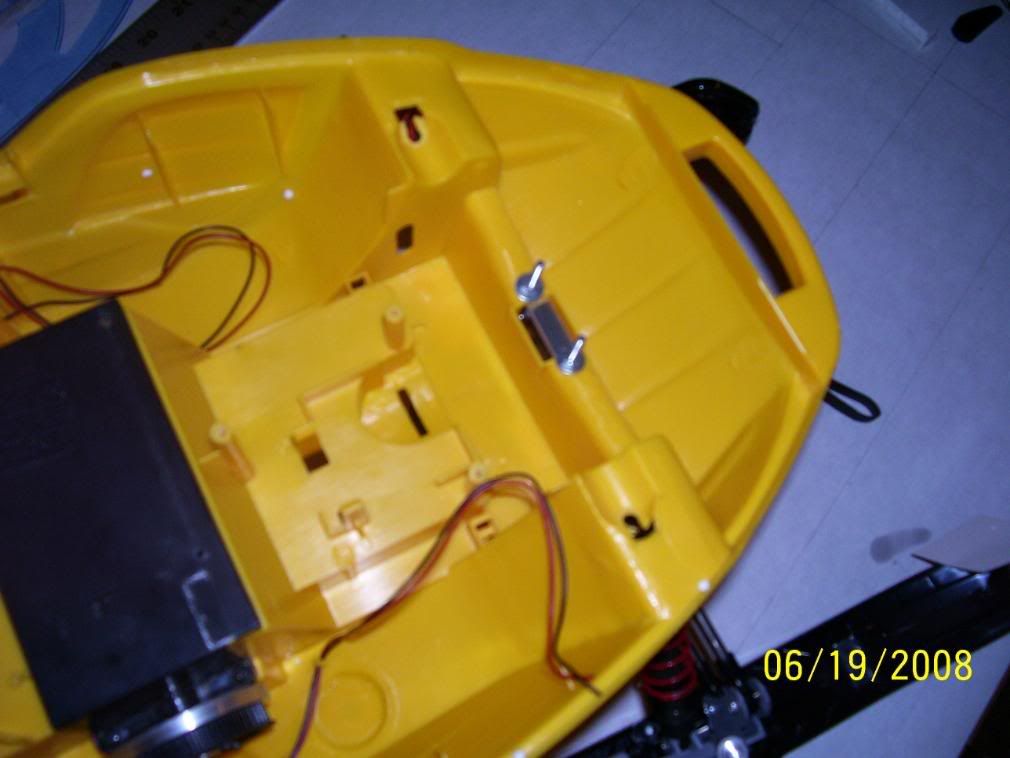
Ok well I have finaly got the servo and mount installed.
I have made a few new mods to the sled because I did some testing and broke the belt drive well just the belt broke using it on grass, on snow the track can slip so there is not so much
pull on the drive line.
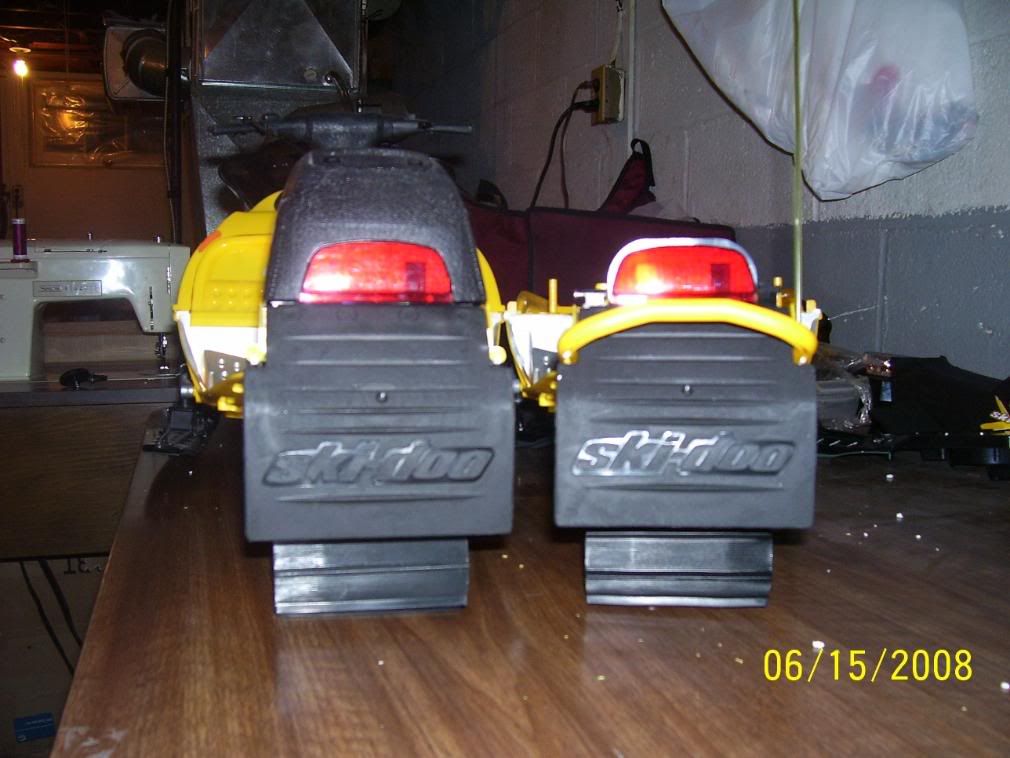
As you can see in the pics the stance is now 2 inch's wider.
I have put the servo in the front to give more room for motor placement.
I have also moved the shock down 1/4 inch to give more travel in the track.
Now as for the main drive pulley set-up you can see I have added a new bigger and wider belt and pulleys to help take all the power of this algin 600XL
Yes I have a few of these motors I just love the power they can put out.
Most people put the motor up top were it is from factory I prefer to keep it as low as I can to help keep the weight and COG low to help stop the tipping in hard cornering.
The gear ratio with this set-up is is just under 4:1
Now for some specs
motor 1650KV
Lipo 16.8 volts fully charged
so total motor RPM is 27720
With gear ratio 4:1 the track will be spinning at 6930 times a minute this is a good reason to put bearings and bracing in it.
When this is all finished I will be posting a video of the test run with the new setup.
Now I will just post a link to the pics cause this post will take for ever to load if I keep added the pics here.
http://s229.photobucket.com/albums/e...e-fibers/day5/
Thanks and enjoy.
Hurricane
I have made a few new mods to the sled because I did some testing and broke the belt drive well just the belt broke using it on grass, on snow the track can slip so there is not so much
pull on the drive line.
As you can see in the pics the stance is now 2 inch's wider.
I have put the servo in the front to give more room for motor placement.
I have also moved the shock down 1/4 inch to give more travel in the track.
Now as for the main drive pulley set-up you can see I have added a new bigger and wider belt and pulleys to help take all the power of this algin 600XL
Yes I have a few of these motors I just love the power they can put out.
Most people put the motor up top were it is from factory I prefer to keep it as low as I can to help keep the weight and COG low to help stop the tipping in hard cornering.
The gear ratio with this set-up is is just under 4:1
Now for some specs
motor 1650KV
Lipo 16.8 volts fully charged
so total motor RPM is 27720
With gear ratio 4:1 the track will be spinning at 6930 times a minute this is a good reason to put bearings and bracing in it.
When this is all finished I will be posting a video of the test run with the new setup.
Now I will just post a link to the pics cause this post will take for ever to load if I keep added the pics here.
http://s229.photobucket.com/albums/e...e-fibers/day5/
Thanks and enjoy.
Hurricane
06-21-2008, 07:20 PM
#6
Senior Member
Thread Starter
Join Date: May 2007
Location: Niagara Falls,
ON, CANADA
Posts: 134
Likes: 0
Received 0 Likes
on
0 Posts
I got them from ebay but you can order them from
McMaster-Carr
They are made for some of the CNC machine's that I work on and build.
McMaster-Carr
They are made for some of the CNC machine's that I work on and build.
06-24-2008, 02:44 AM
#7

My Feedback: (25)
Join Date: Feb 2005
Location: Fort Erie,
ON, CANADA
Posts: 15
Likes: 0
Received 0 Likes
on
0 Posts
Hello Bill cool build as I myself have seen the first one you built and drove last winter this one looks to be even better.Its the middle of summer though,shouldn't you be building your boats?Talk later,John
06-28-2008, 03:58 AM
#8
Senior Member
Thread Starter
Join Date: May 2007
Location: Niagara Falls,
ON, CANADA
Posts: 134
Likes: 0
Received 0 Likes
on
0 Posts
Ok this is just a quick little update
Well today I got it out for some testing good news and bad news.
Good news is its got WAY TO MUCH POWER.
Bad news I snaped the 5 mil shaft so now I have gone to a 1/4 inch stainless and hardend shaft
all is working really well now.
I can say this thing need the cold for the track because of the warmth its soft and not stiff the ears on the inside of the track just bend real easy.
so I was getting some track slipage now I am just making a few mods for the track to help pull it tight
to stop it from slipping.
now once it see's the cold the shock can just be moved back down as the track will tighten up from the cold.
As you can see in the new pics I have custom made a belt tightener with double flanged bearings just to keeps things stright, true and smooth running.
It is fully adjustable so as the belt works in it can be tightened up.
Seeing as Danny will be running the sled in the summer I have added a fan to the motor just to help keep things cool, also added vent holes just under the light for air flow.
The new lipo's fit perfect under the seat after you remove the old battery tray.
the lipo's are 2 2S2P 6600mah in parallel to make it 14.8 volt should get a good long amount of run time with these babies.
now the next step is some more testing and hooking up all the lights and separate battery for them.
Well anyways heres the link to some of the new pic's
http://s229.photobucket.com/albums/e...e-fibers/day8/
Keep watching I will be posting a video real soon
if any one has any questions please ask.
Be back soon
Hurricane
07-12-2008, 06:06 AM
#9
Senior Member
Thread Starter
Join Date: May 2007
Location: Niagara Falls,
ON, CANADA
Posts: 134
Likes: 0
Received 0 Likes
on
0 Posts
Ok here is another update.
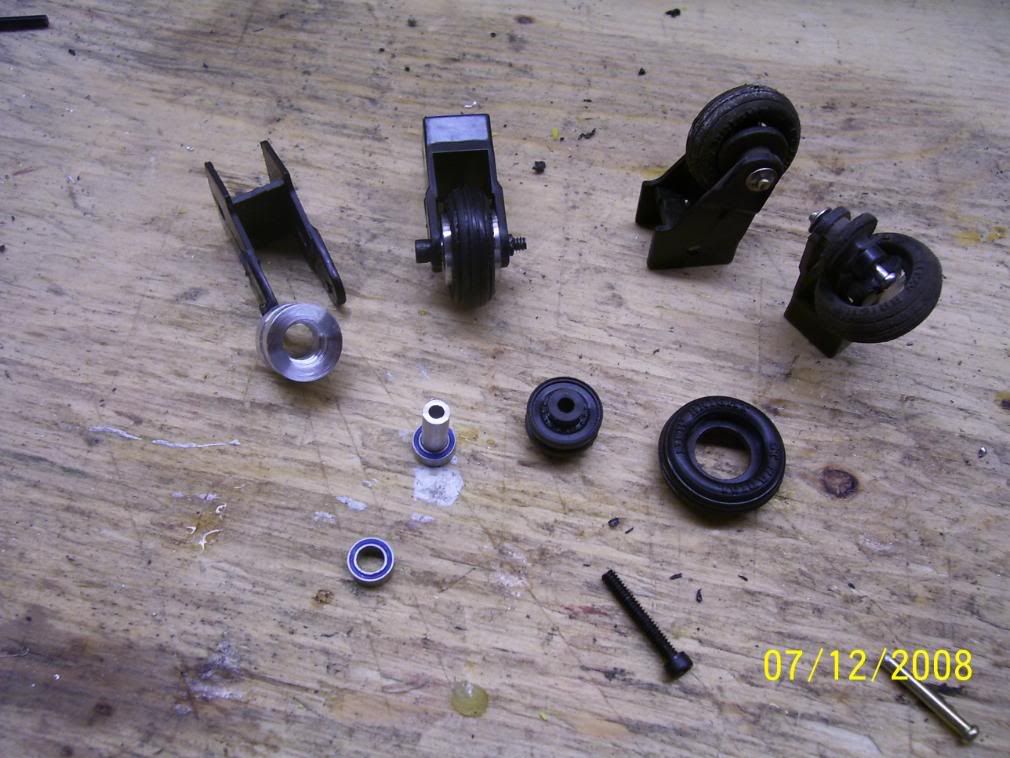
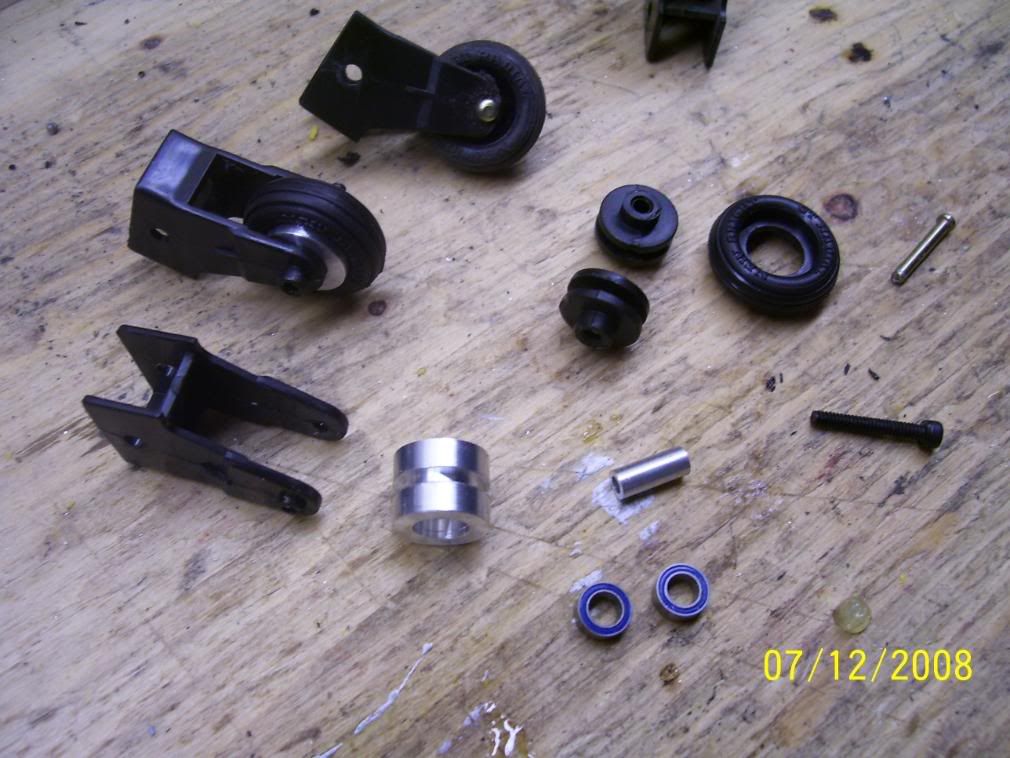
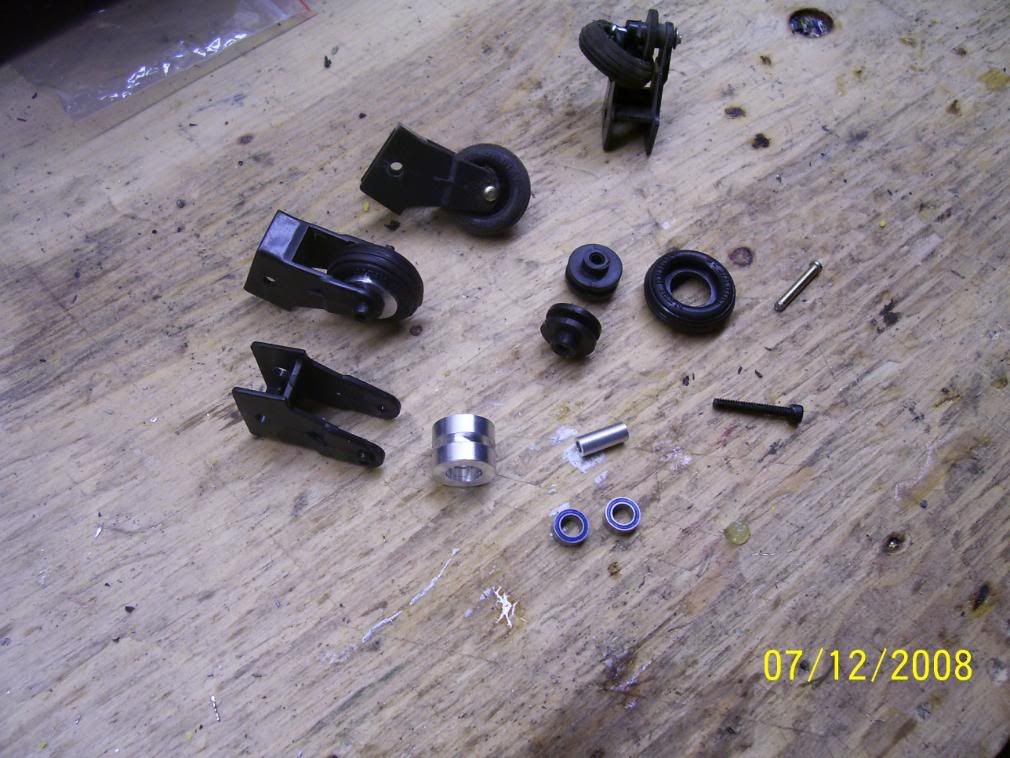
First off the wheels I had nothing but problems with them, so I decided I had to make my own.
In the pics you can see what happend to the factory ones.
This was only after about 2 minute run the hubs exploded and melted.
So what I have done is made new hubs, shafts and added bearings.
The tires are pressed on this way they will never come off the hubs.
I used a 4/40 allen head bolt into a 3/16 shaft and 2 3/16 X 5/16 bearings for each wheel also the hubs are steped inside so the bearings and shaft stay put.
Also you can see that the new wheels keep the ski's just high enough that they don't touch when its running you would never know there is wheels under the ski's.
Here are the pics of the new wheels
Now for some final pics of the sled all finished up and ready to tear it up.
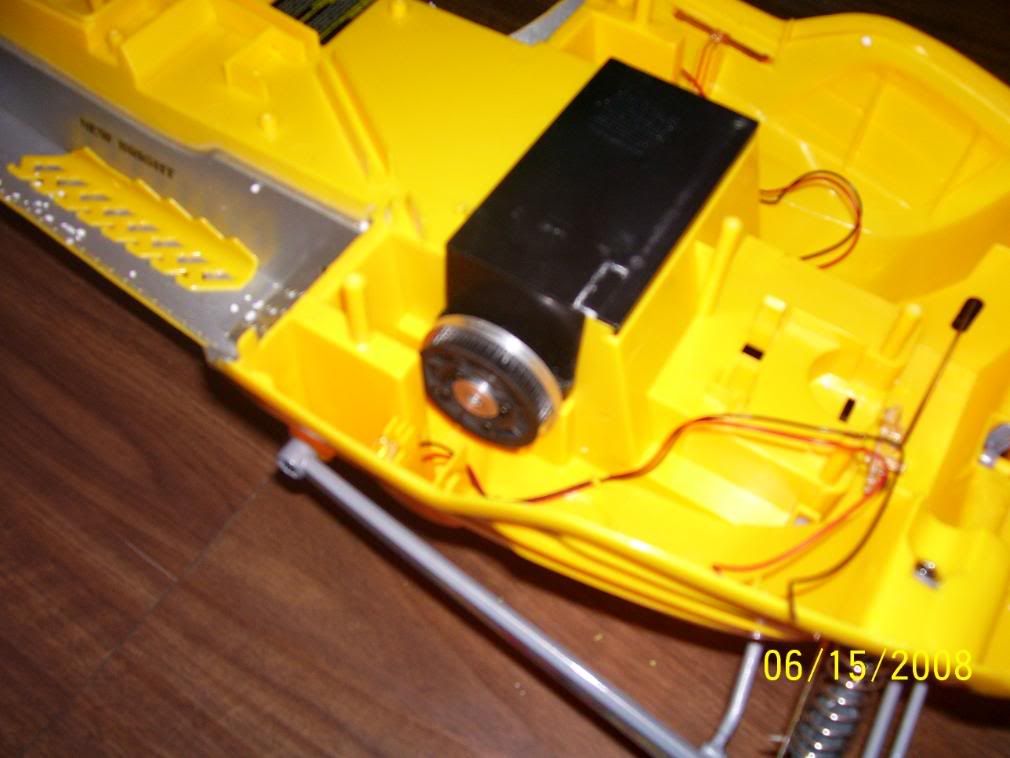
For the lights and the fan I used a receiver pack with four double A batteries
There is two switch's one is for the lights and fan thats the factory one, the other is from the mamba max witch powers motor receiver ect.
Also had to change the tail light it was blown, now these lights are really bright front and back.
Now for the breakdown and cost of all the parts I have put into it.
Breaings for the track and drive shaft 11 bearings 5mil X 11 mil cost 3.98 a pice
bearings in the belt tensioner 2 flanged 5/16 X 3/8 cost 2.98 a pice
bears in the wheels for the ski's 2 for each wheel 4 3/16 X 5/16 cost 3.98 a pice
Traxxas titanium turn buckles 4 with spherical rod ends cost 16.97 a set 2 sets
Belts and pulleys from Mcmaster Carr 1 belt 2 pulleys cost 26.00 for all
fan and cooling shield for motor from integrity cost 15.95
All the misalaniouse parts aluminum deans plugs heat shrink tubbing wire nuts and bolts set-screws ect.
Most of the misalaniouse prts I had already so that made it easyer when it came time for machining parts.
So now for total cost on my end I would guess around 160.00
Still not to bad but the good thing is this sled will last and be very durable.
Now for the pics of the finished and ready to run sled.
Check back tonight I will be posting video of the final test run before I ship it back to Danny.
http://s229.photobucket.com/albums/e...bers/finished/
If anyone has any question please feel free to drop me a line will be glad to help out
First off the wheels I had nothing but problems with them, so I decided I had to make my own.
In the pics you can see what happend to the factory ones.
This was only after about 2 minute run the hubs exploded and melted.
So what I have done is made new hubs, shafts and added bearings.
The tires are pressed on this way they will never come off the hubs.
I used a 4/40 allen head bolt into a 3/16 shaft and 2 3/16 X 5/16 bearings for each wheel also the hubs are steped inside so the bearings and shaft stay put.
Also you can see that the new wheels keep the ski's just high enough that they don't touch when its running you would never know there is wheels under the ski's.
Here are the pics of the new wheels
Now for some final pics of the sled all finished up and ready to tear it up.
For the lights and the fan I used a receiver pack with four double A batteries
There is two switch's one is for the lights and fan thats the factory one, the other is from the mamba max witch powers motor receiver ect.
Also had to change the tail light it was blown, now these lights are really bright front and back.
Now for the breakdown and cost of all the parts I have put into it.
Breaings for the track and drive shaft 11 bearings 5mil X 11 mil cost 3.98 a pice
bearings in the belt tensioner 2 flanged 5/16 X 3/8 cost 2.98 a pice
bears in the wheels for the ski's 2 for each wheel 4 3/16 X 5/16 cost 3.98 a pice
Traxxas titanium turn buckles 4 with spherical rod ends cost 16.97 a set 2 sets
Belts and pulleys from Mcmaster Carr 1 belt 2 pulleys cost 26.00 for all
fan and cooling shield for motor from integrity cost 15.95
All the misalaniouse parts aluminum deans plugs heat shrink tubbing wire nuts and bolts set-screws ect.
Most of the misalaniouse prts I had already so that made it easyer when it came time for machining parts.
So now for total cost on my end I would guess around 160.00
Still not to bad but the good thing is this sled will last and be very durable.
Now for the pics of the finished and ready to run sled.
Check back tonight I will be posting video of the final test run before I ship it back to Danny.
http://s229.photobucket.com/albums/e...bers/finished/
If anyone has any question please feel free to drop me a line will be glad to help out
07-19-2008, 08:19 PM
#10
Senior Member
Thread Starter
Join Date: May 2007
Location: Niagara Falls,
ON, CANADA
Posts: 134
Likes: 0
Received 0 Likes
on
0 Posts
Ok I have finally got some good video of the sled.
The first video was way to dark and also I was having range issues, so I have moved the esc and the receiver and also put a magnet around the esc wire to the receiver
an that solved the problem.
Now what you see in the video is only about 3/4 throttle cause the track is spinning it just finished raining so things are a little slick.
I have the timing set as low as it can go and also the throttle curve it should be turned up when the sled gets ran in the colder days when there is snow for it to run on LOL.
Not sure what else to say here but if anybody wants to know anything else about it please ask.
Well heres the link to the video so watch and enjoy.
http://www.youtube.com/watch?v=XH6RhVNYArc
Hey Danny hope you like it
Talk to ya soon
Bill H
07-22-2008, 05:25 AM
#11
Junior Member
Join Date: Apr 2007
Location: plano,
TX
Posts: 2
Likes: 0
Received 0 Likes
on
0 Posts
Hurricane I have had time to review the video and re-read all of your posts and I really can't believe the level of professionalism, dedication, and ingeniouity you have put into this project. My local hobby shop has gone crazy waiting to see the threads and video, I have been holding back until everything was finished. I think they will be pleasantly surprised. Just want to take this opportunity to thank Hurricane for all of his efforts. To think that he was willing to spend so much time on another person's sled really amazes me. Thank you again Hurricane will leave another post after receiving the sled.
09-12-2008, 10:20 PM
#12
Member
Join Date: Apr 2008
Location: Hensall, ON, CANADA
Posts: 30
Likes: 0
Received 0 Likes
on
0 Posts
I was wondering if this might work on the interactive toy Polaris fusion would work with this...I am not an expert at rc stuff but i am so sick of how slow it is!I thing i know for sure is making the steering rods longer because of the way the front suspension is.
09-12-2008, 10:52 PM
#13
Member
Join Date: Apr 2008
Location: Hensall, ON, CANADA
Posts: 30
Likes: 0
Received 0 Likes
on
0 Posts
or since the only thing broken in my sled is the controller ...if I just buy a mamba controller for it will it run better(go faster,go up hill alot better,get some air?)not to ask too many questions for ya but i am really into snowmobiles and my rc sled got wet inside last year and the controller got fries cuz now it smokes whenever its on(not a good thing i don't think!lol)...it also gives full throttle when the batterie is connected but is set to off..will this mamba max controller work and fix the problem?
09-13-2008, 02:28 AM
#14
Senior Member
Thread Starter
Join Date: May 2007
Location: Niagara Falls,
ON, CANADA
Posts: 134
Likes: 0
Received 0 Likes
on
0 Posts
In order for any of that to work you would need to change the motor esc and receiver.
thats were I would start also check and see if you can change the pinion gear on the motor and run better batteries or use lipo's
But also I think the track on your sled stretch's to much i have tried every kind and size of sled I could get my hands on and the only one I found
that works well and can handle the power is the MXZ by newbright.
If you need any help just let me know I will do what I can to point you the right way.
Thanks
Hurricane
09-14-2008, 12:51 PM
#16

NICE! Iv been thinking about how I could build a zenoah powered snowmobile but I think its beyond my abilities. But this new bright snowmobile looks do-able. Do you think the newbright is better than the art attack?
How much wider could the ski's be widened?
Thanks
How much wider could the ski's be widened?
Thanks
10-26-2008, 05:07 PM
#18
Banned
Join Date: Oct 2008
Location: sunderland,
WY, UNITED KINGDOM
Posts: 417
Likes: 0
Received 0 Likes
on
0 Posts
hi great build i also mod newbrights with great success although not snow mobiles , i have a question DID you use the newbright gears for this or did you replace them . the reason i ask is i have two 1/6 scale models the gears are 32 pitch , iam wanting to install a mild brushles system . but iam unsure if the gear box will take the power , thanks in advance and a great build .
10-26-2008, 09:48 PM
#19
Senior Member
Thread Starter
Join Date: May 2007
Location: Niagara Falls,
ON, CANADA
Posts: 134
Likes: 0
Received 0 Likes
on
0 Posts
Hello sorry I have not been on for a bit been real busy at work.
RC Snowmobiler
For the esc motor The only ones I use are mamba max for this because they can handle 100amp and a 4 cell lipo. I also will only use a 1600kv to 2700kv motor but that depends on the gearing I use.
GiantScale
The newbright is WAY better then the art attack I have both I have made the ski's as wide as 16 inch with no probs.
Skidoo4life
Here is the link for the belt I use but it also depends on what pullies you use I used a 40 and a 10 works really well and not to hard on the motors.
http://cgi.ebay.com/CNC-TIMING-BELT-...1%7C240%3A1318
notatoy
If you read all my posts you will see I never used the gears or the gearbox I made a belt drive for it.
the gears and gearbox will not give you the speed or take the power of a brushless.
the gearing they use is around 11 to 1 and if you get them to spin fast enough to get any kind of speed they just go boom trust me I know LOL.
Thanks all
an keep a look out here as I have a new drive system for the track in the works and will post pics and info when its done.
if there is anything else you would like to know just ask away I will be glad to help out in anyway I can.
Hurricane
10-27-2008, 05:10 AM
#20
Banned
Join Date: Oct 2008
Location: sunderland,
WY, UNITED KINGDOM
Posts: 417
Likes: 0
Received 0 Likes
on
0 Posts
thanks for the advice sorry i must have missed the section about the belt drive ,. iknow guys who have installed brushles systems with stock gearing in the 1/6 scale newbright trucks it seems the 32 pitch gearset is very strong as long as full bearings are installed and the diff is locked . but these trucks are very different from the snow mobile , but thanks for your opinion .
12-02-2008, 11:19 AM
#23
Senior Member
Join Date: Jan 2007
Location: On the go..
Posts: 482
Likes: 0
Received 0 Likes
on
0 Posts
ORIGINAL: hurricane-fibers
Hello sorry I have not been on for a bit been real busy at work.
RC Snowmobiler
For the esc motor The only ones I use are mamba max for this because they can handle 100amp and a 4 cell lipo. I also will only use a 1600kv to 2700kv motor but that depends on the gearing I use.
GiantScale
The newbright is WAY better then the art attack I have both I have made the ski's as wide as 16 inch with no probs.
Skidoo4life
Here is the link for the belt I use but it also depends on what pullies you use I used a 40 and a 10 works really well and not to hard on the motors.
http://cgi.ebay.com/CNC-TIMING-BELT-...1%7C240%3A1318
notatoy
If you read all my posts you will see I never used the gears or the gearbox I made a belt drive for it.
the gears and gearbox will not give you the speed or take the power of a brushless.
the gearing they use is around 11 to 1 and if you get them to spin fast enough to get any kind of speed they just go boom trust me I know LOL.
Thanks all
an keep a look out here as I have a new drive system for the track in the works and will post pics and info when its done.
if there is anything else you would like to know just ask away I will be glad to help out in anyway I can.
Hurricane
I have few questions.On the Polaris the track carrier pivots at the main drive axle so i'm not sure if i will be able to use the same idea as you did any thoughts or idea's?
I was thinking of building a new track carrier with some aluminum i have so it would pivot under the foot rest's like the new bright one.So have you got any pic's of your new drive system?
How did you attach the plastic track-drive pulley to the new drive axle you made?Any close up pics?
Here are some pics of what i am working with.
12-02-2008, 06:25 PM
#24
Member
Join Date: Apr 2008
Location: Hensall, ON, CANADA
Posts: 30
Likes: 0
Received 0 Likes
on
0 Posts
ORIGINAL: hurricane-fibers
Hello sorry I have not been on for a bit been real busy at work.
RC Snowmobiler
For the esc motor The only ones I use are mamba max for this because they can handle 100amp and a 4 cell lipo. I also will only use a 1600kv to 2700kv motor but that depends on the gearing I use.
GiantScale
The newbright is WAY better then the art attack I have both I have made the ski's as wide as 16 inch with no probs.
Skidoo4life
Here is the link for the belt I use but it also depends on what pullies you use I used a 40 and a 10 works really well and not to hard on the motors.
http://cgi.ebay.com/CNC-TIMING-BELT-...1%7C240%3A1318
notatoy
If you read all my posts you will see I never used the gears or the gearbox I made a belt drive for it.
the gears and gearbox will not give you the speed or take the power of a brushless.
the gearing they use is around 11 to 1 and if you get them to spin fast enough to get any kind of speed they just go boom trust me I know LOL.
Thanks all
an keep a look out here as I have a new drive system for the track in the works and will post pics and info when its done.
if there is anything else you would like to know just ask away I will be glad to help out in anyway I can.
Hurricane
Hello sorry I have not been on for a bit been real busy at work.
RC Snowmobiler
For the esc motor The only ones I use are mamba max for this because they can handle 100amp and a 4 cell lipo. I also will only use a 1600kv to 2700kv motor but that depends on the gearing I use.
GiantScale
The newbright is WAY better then the art attack I have both I have made the ski's as wide as 16 inch with no probs.
Skidoo4life
Here is the link for the belt I use but it also depends on what pullies you use I used a 40 and a 10 works really well and not to hard on the motors.
http://cgi.ebay.com/CNC-TIMING-BELT-...1%7C240%3A1318
notatoy
If you read all my posts you will see I never used the gears or the gearbox I made a belt drive for it.
the gears and gearbox will not give you the speed or take the power of a brushless.
the gearing they use is around 11 to 1 and if you get them to spin fast enough to get any kind of speed they just go boom trust me I know LOL.
Thanks all
an keep a look out here as I have a new drive system for the track in the works and will post pics and info when its done.
if there is anything else you would like to know just ask away I will be glad to help out in anyway I can.
Hurricane
12-03-2008, 02:45 AM
#25
Senior Member
Thread Starter
Join Date: May 2007
Location: Niagara Falls,
ON, CANADA
Posts: 134
Likes: 0
Received 0 Likes
on
0 Posts
yes you will need to use a new controller and also what batteries are you going to be using and how many cell's?