


Guillows C172 R/C conversion with Weatronic telemetry
 04-03-2015 | 06:05 PM
#1

Thread Starter
Junior Member
Joined: Sep 2014
Posts: 8
Likes: 0
Received 0 Likes
on
0 Posts
Hello RC Universe
I am relatively new to the hobby and wanted to collect some feedback on my first ever R/C project: a Guillows C172, converted for the 21st century
Initially I wanted to scratch-build a quadcopter as that is all the rage these days, but then I thought that I better start with something that is easy to get some experience: build a kit. I decided to get a Guilllows C172 balsa kit and convert it to R/C and add some bling: GPS and telemetry; I mean in the age of cheap electronics, how hard could that be?
Well, as you might have guessed.... In hindsight I had better started with that quad
Anyways, as I was struggling with pretty much every detail of the conversion (putting the balsa together was fairly straight forward, the fun came after that), I decided I'll put my "solutions" to all those problems up so that those of you who actually know what they are doing could comment on it. Hopefully your comments can help those who attempt this foolish idea after me
Stuff I struggeled with:
Yes, this list is essentially everything other than buing the kit and gluing the balsa together
So without much further storytelling, here are the pictures of my solution attempts... (bear in mind: the plane isn't covered yet, so I am not actually sure that it will fly... so your milage might vary)


Battery Placement, CG and Engine Mount
A problem that didn't occur to me untill rather late is that covered airplanes, unlike open quads, need to have a provision to get a battery in and out. Oh, and as the battery is one of the heaviest things in the plane, that might actually change the CG... But as I didn't know where that will be with all the other stuff mounted, I had to have some wiggle room in placing the battery. Solution: build a sliding tray that allows changing the battery placement.


The tray is held by nylon screws which are reachable through the air intake openings in the cowling.
Ailerons
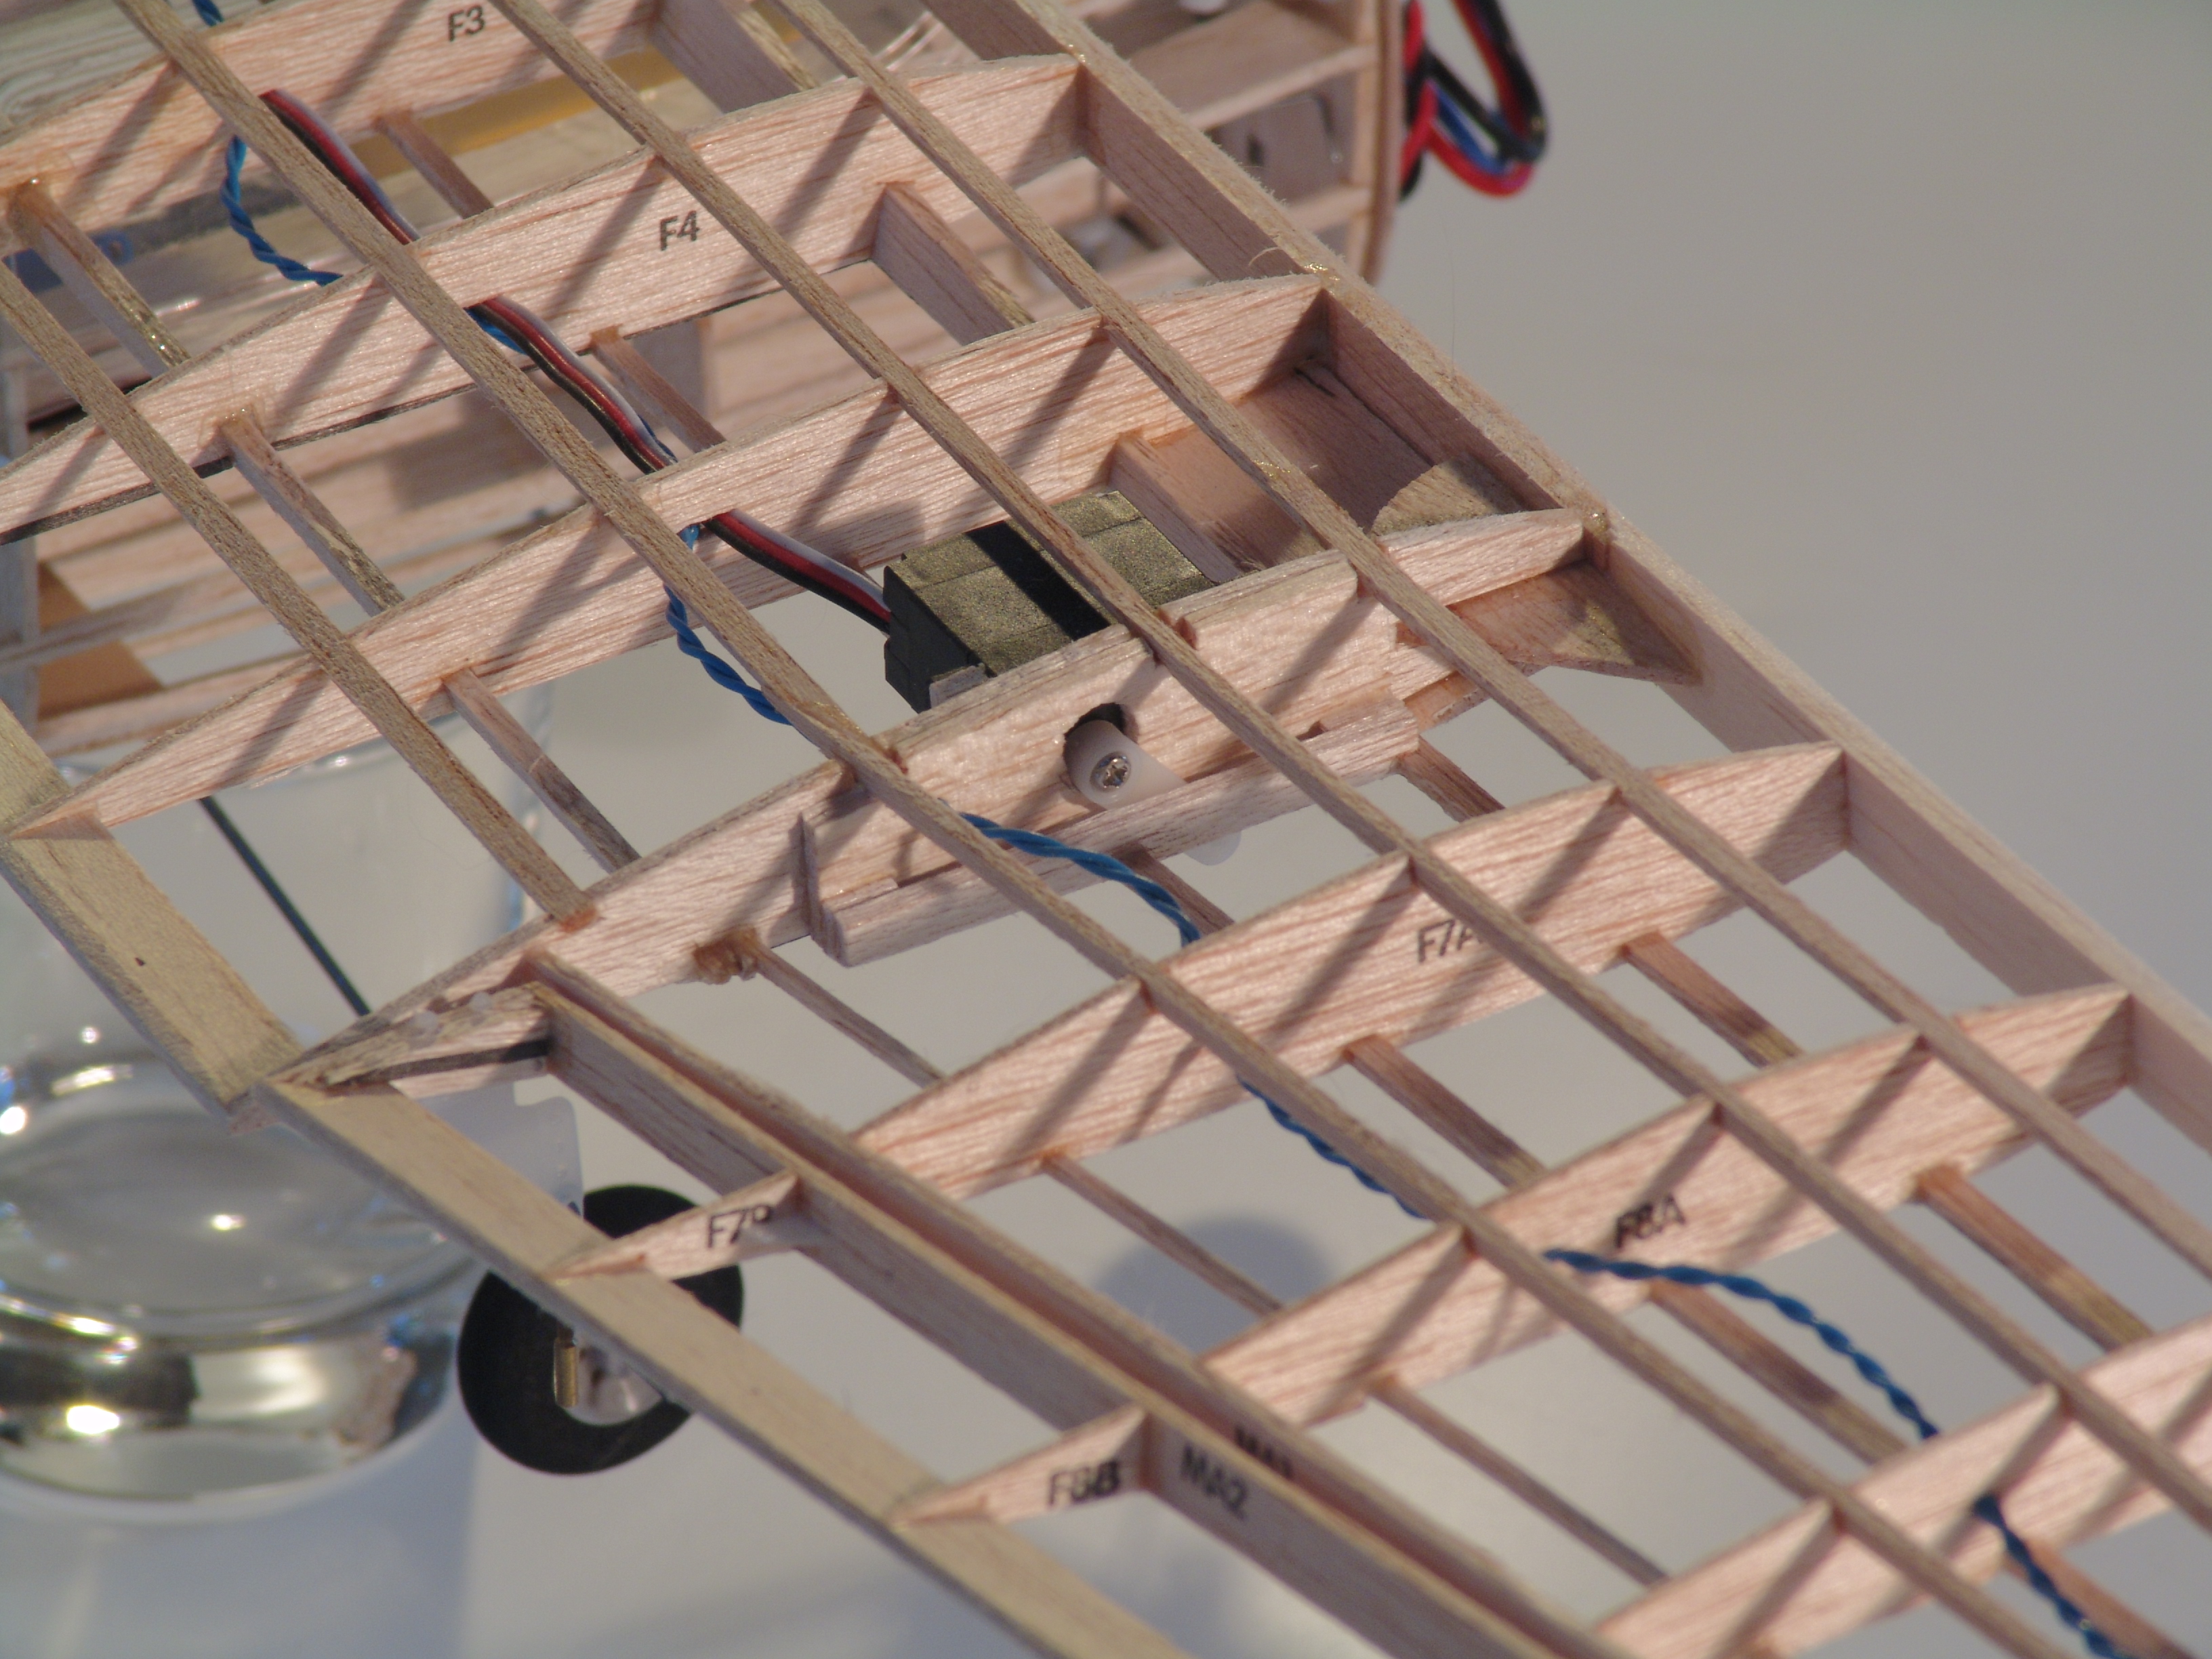
I decided to use two servos as I wasn't able to find/source that little flex cable in a tube. Also, having two servos should allow me to mix in a bias, making the ailerons flaperons.
The thing I struggeled most with was how to mount the servos so that I could still cover the rest of the wing... after all, the servo horn has to penetrate the skin somehow.


Front Wheel
With the battery and the engine on a tray, I needed to get the front wheel axle and actuator out of the way to the side; which can also be used to add some springiness


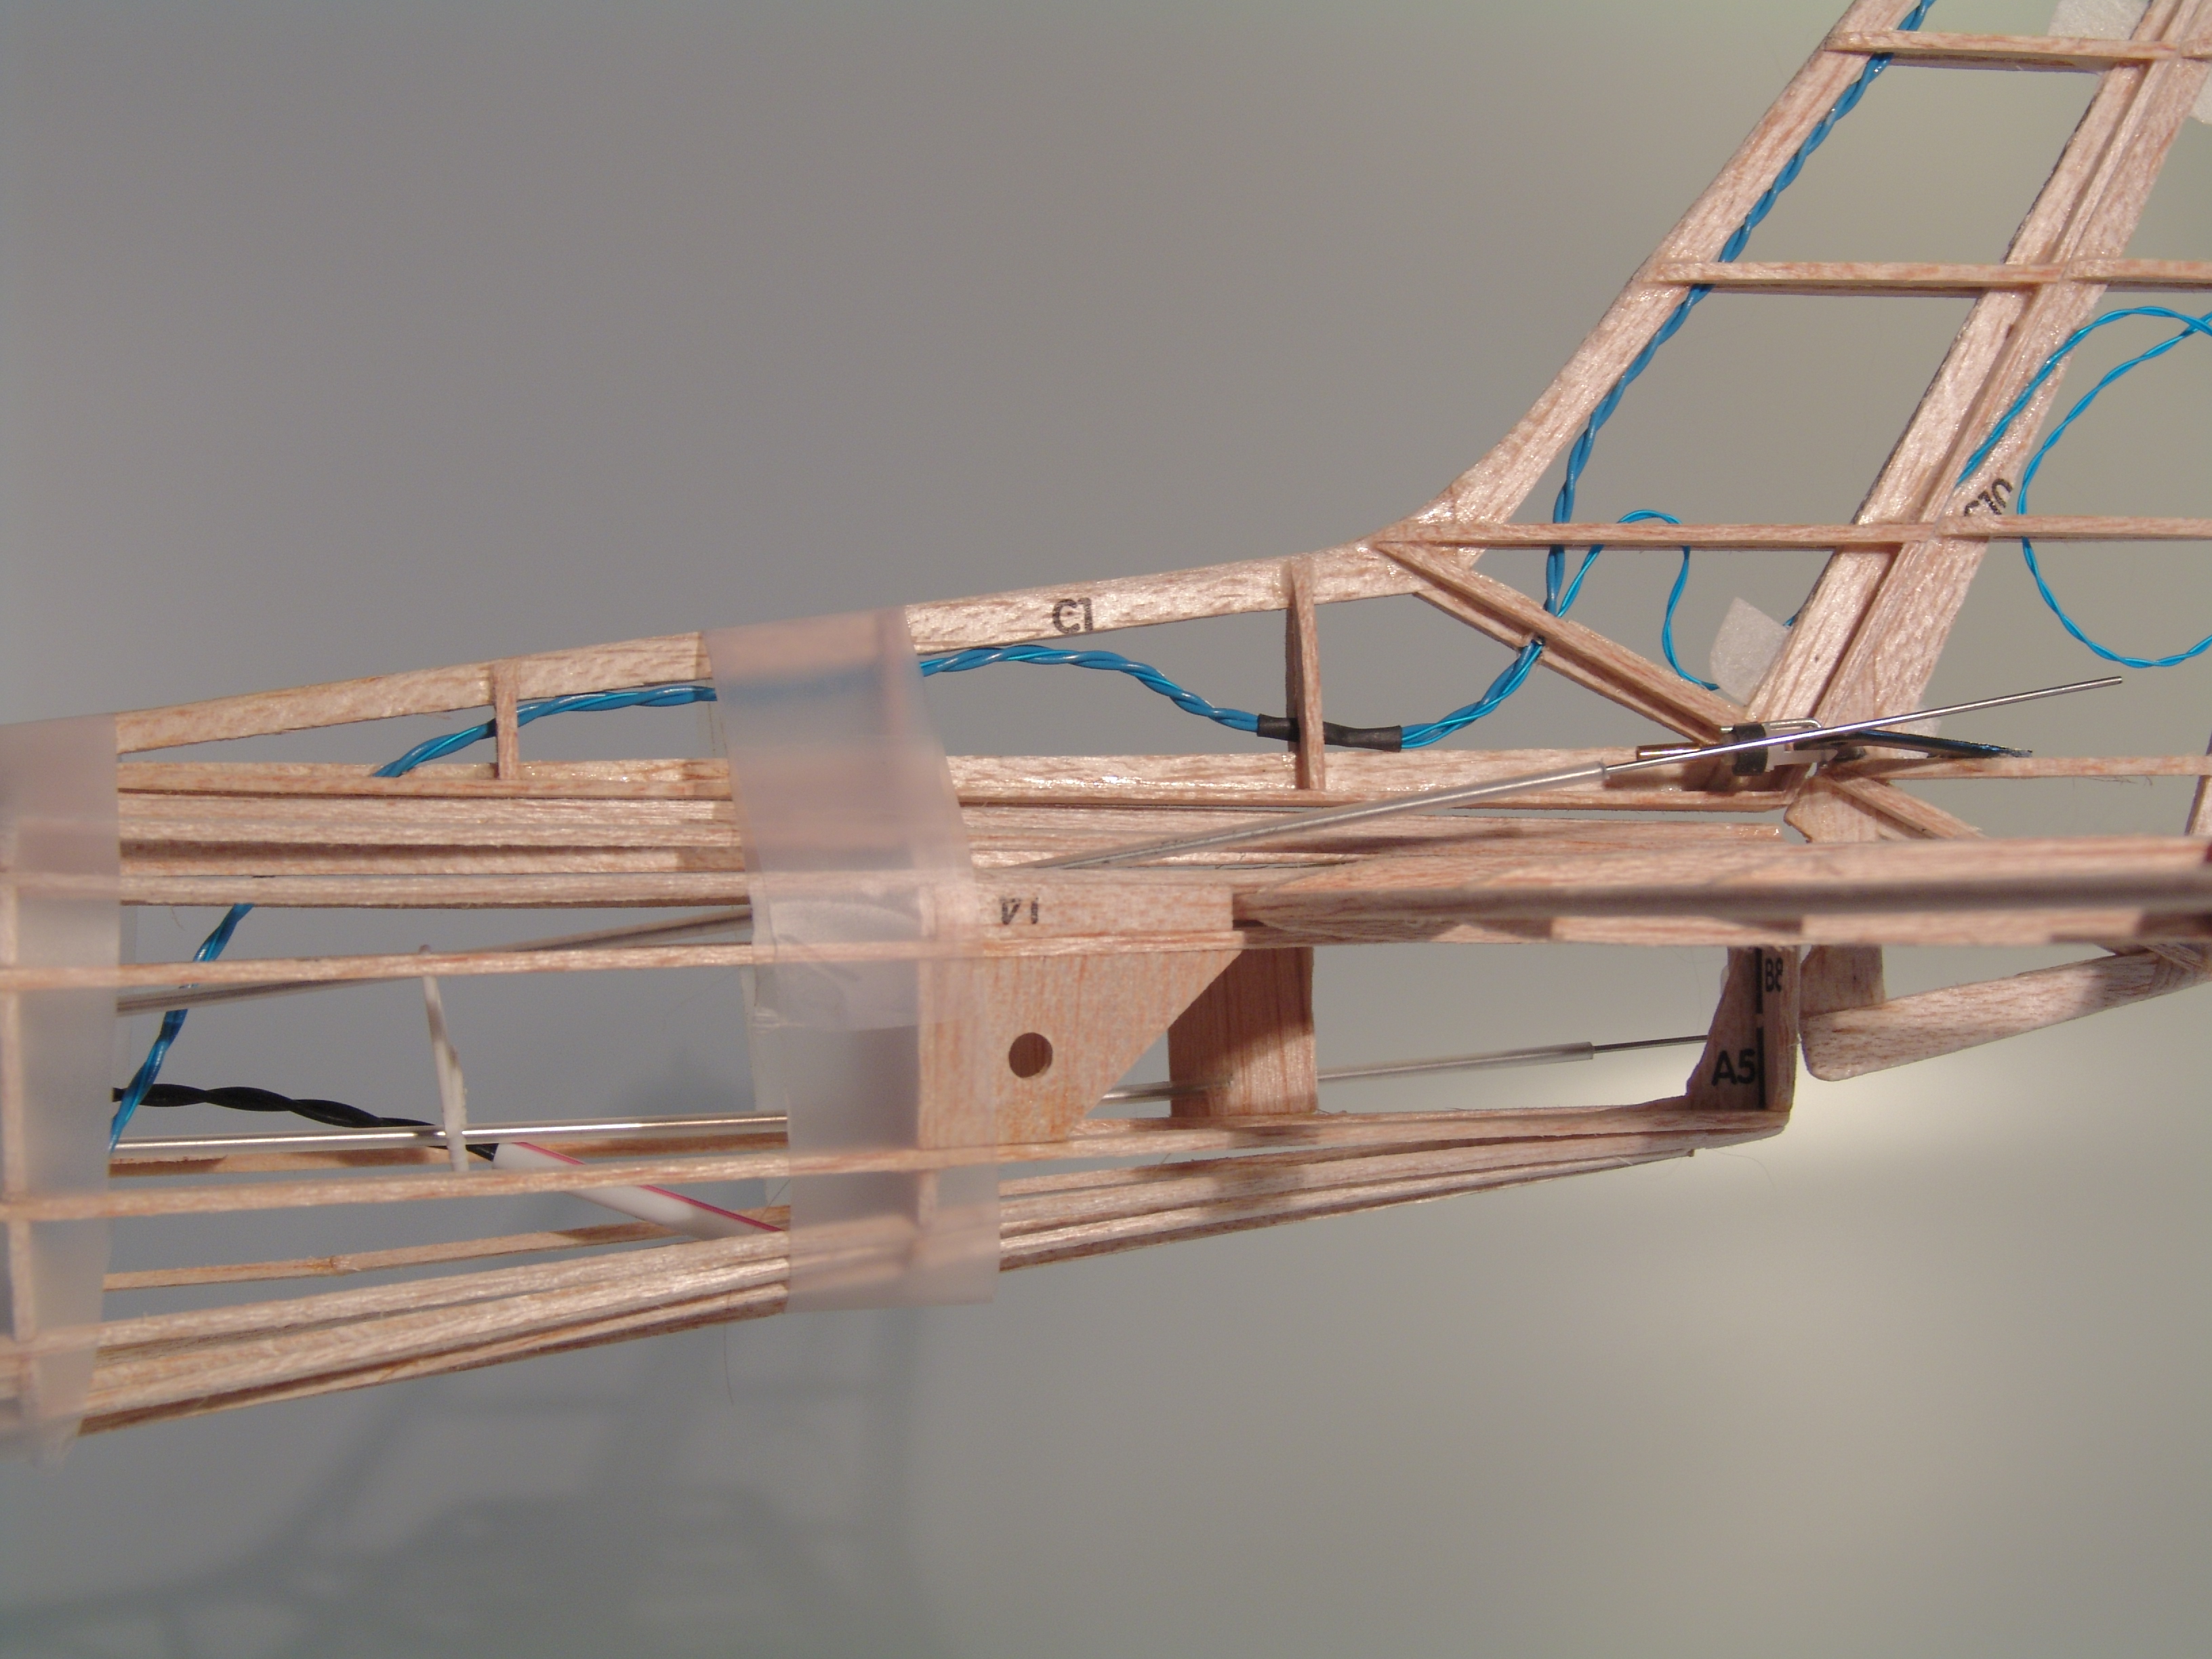
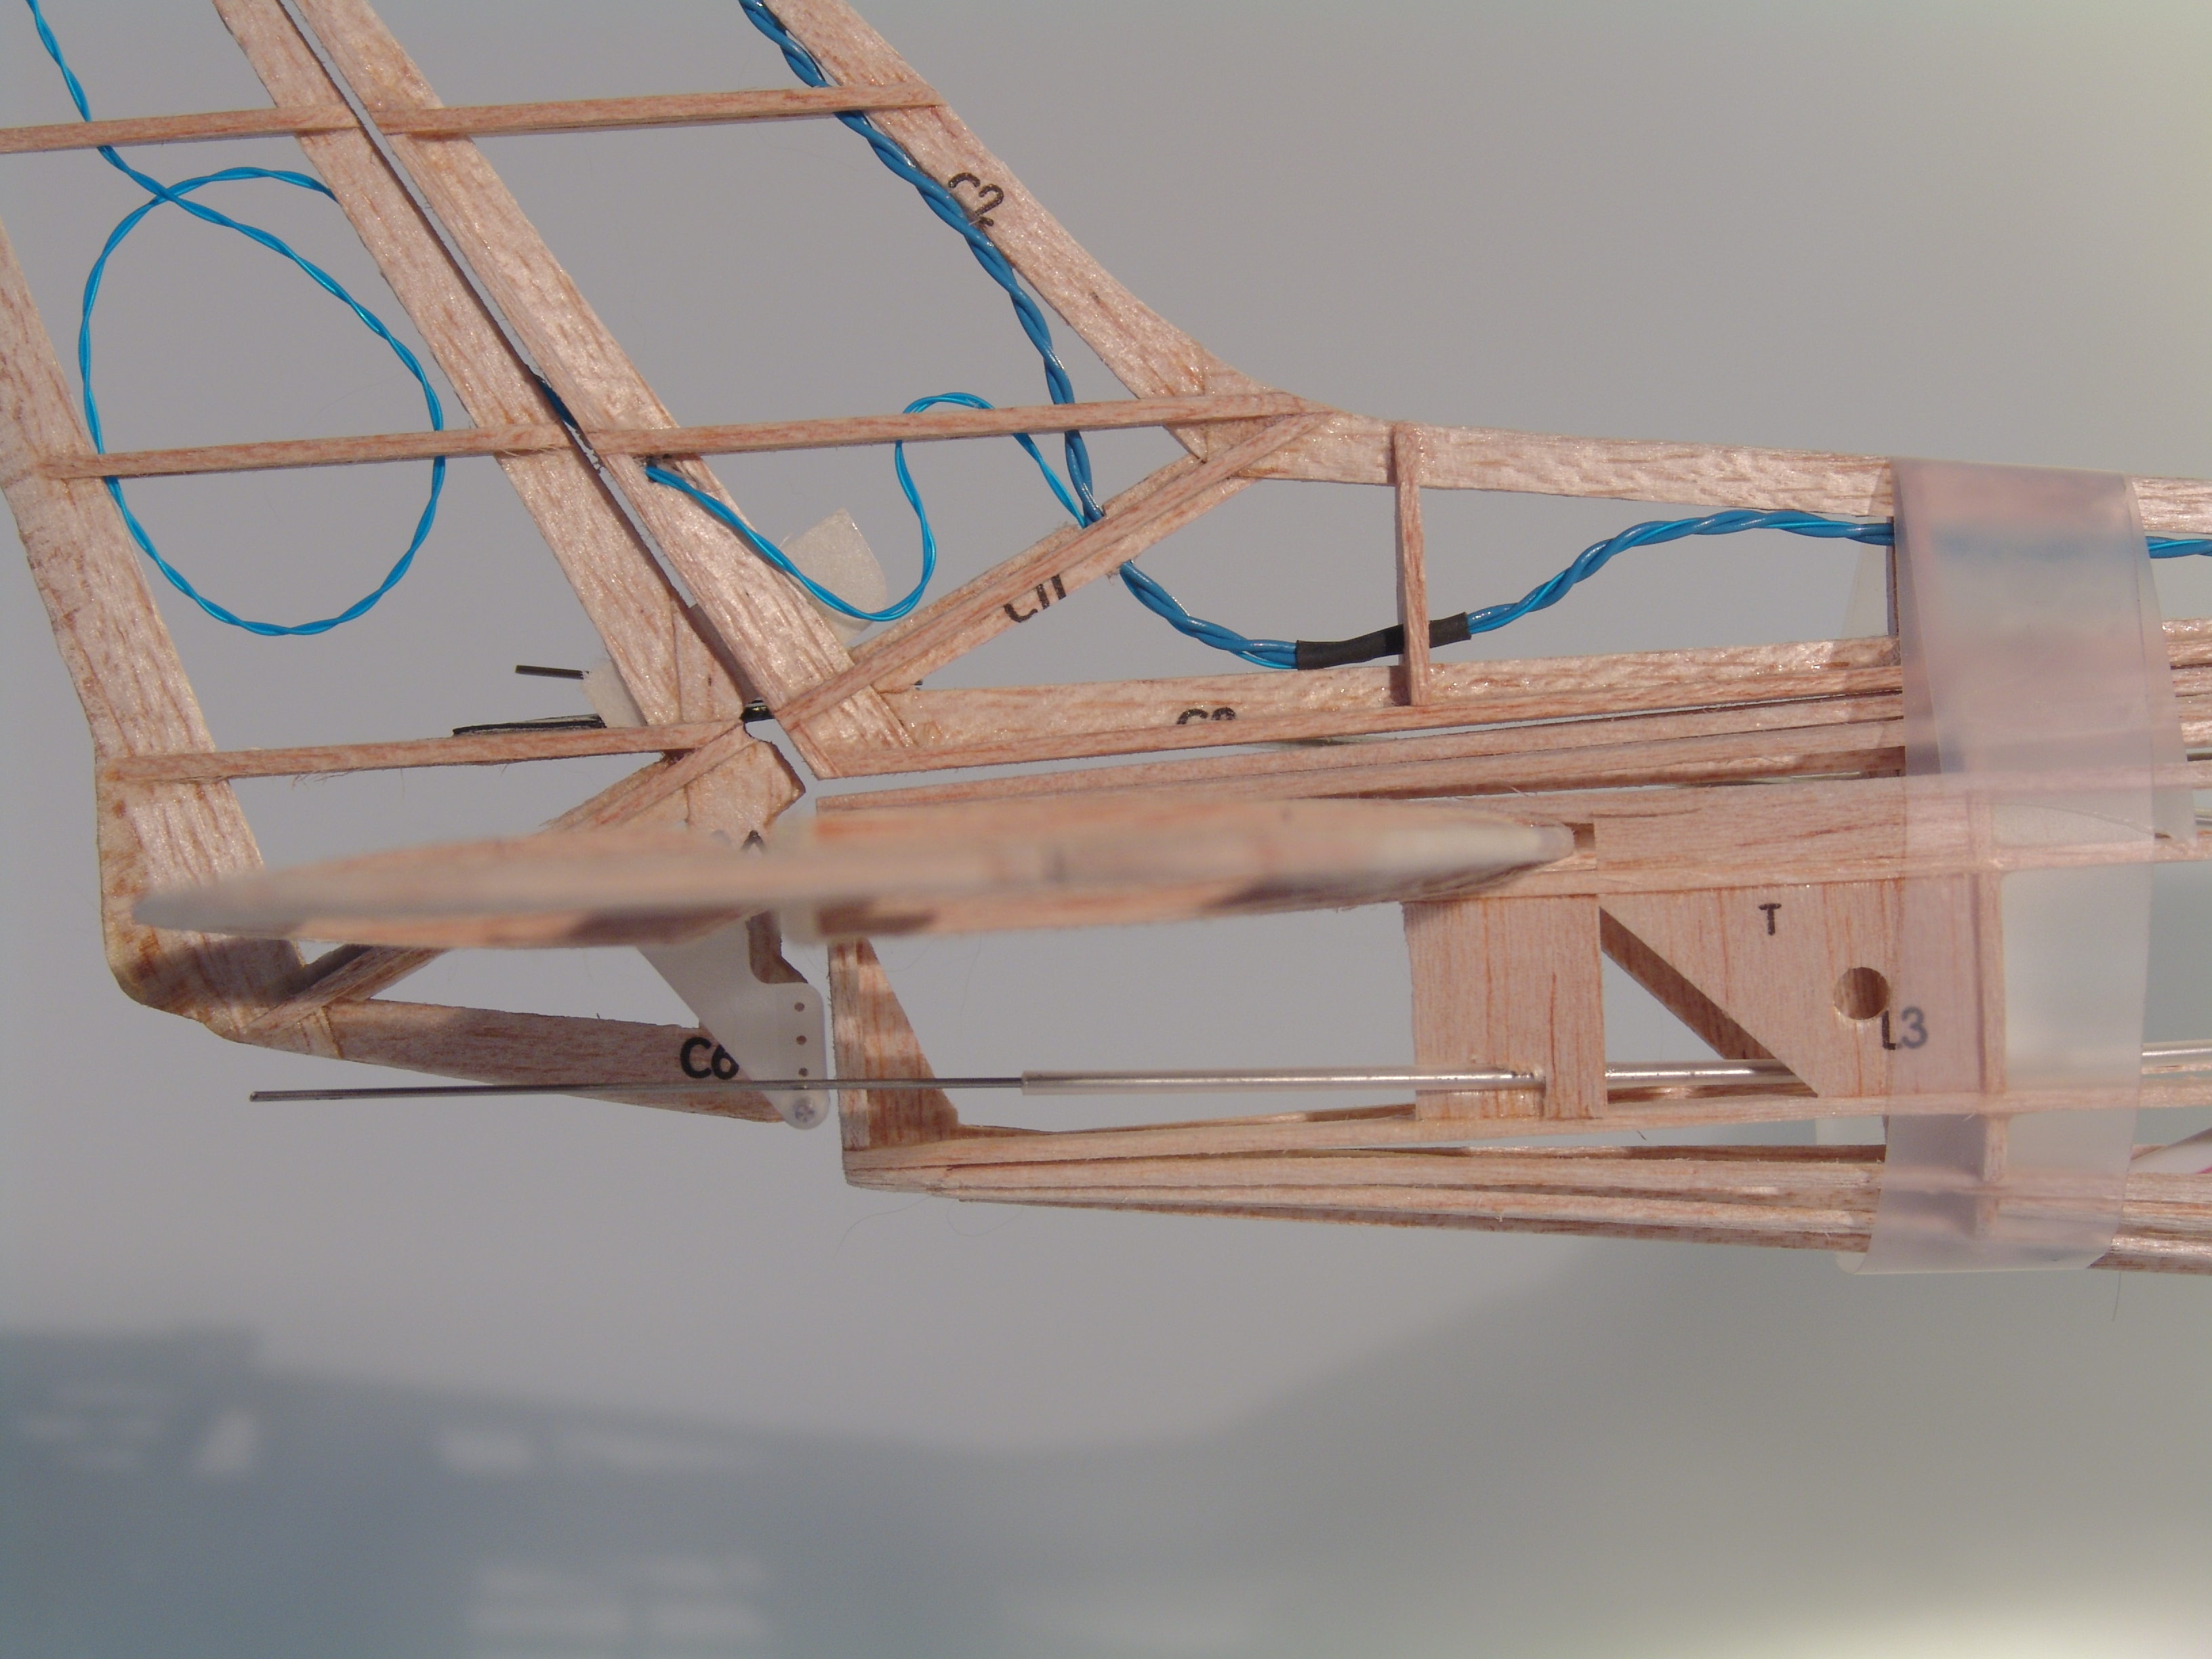
Rudder and Elevator
I wanted to keep as much mass as much forward as I could for CG reasons, which is why I ended up putting the elevator and rudder servos up front. This meant that I needed to run some wires to the back to attach to the surfaces... which was easy for the elevator, but rather tricky for the rudder as the kinematics of that darn slanted hinge ruined all my great ideas...


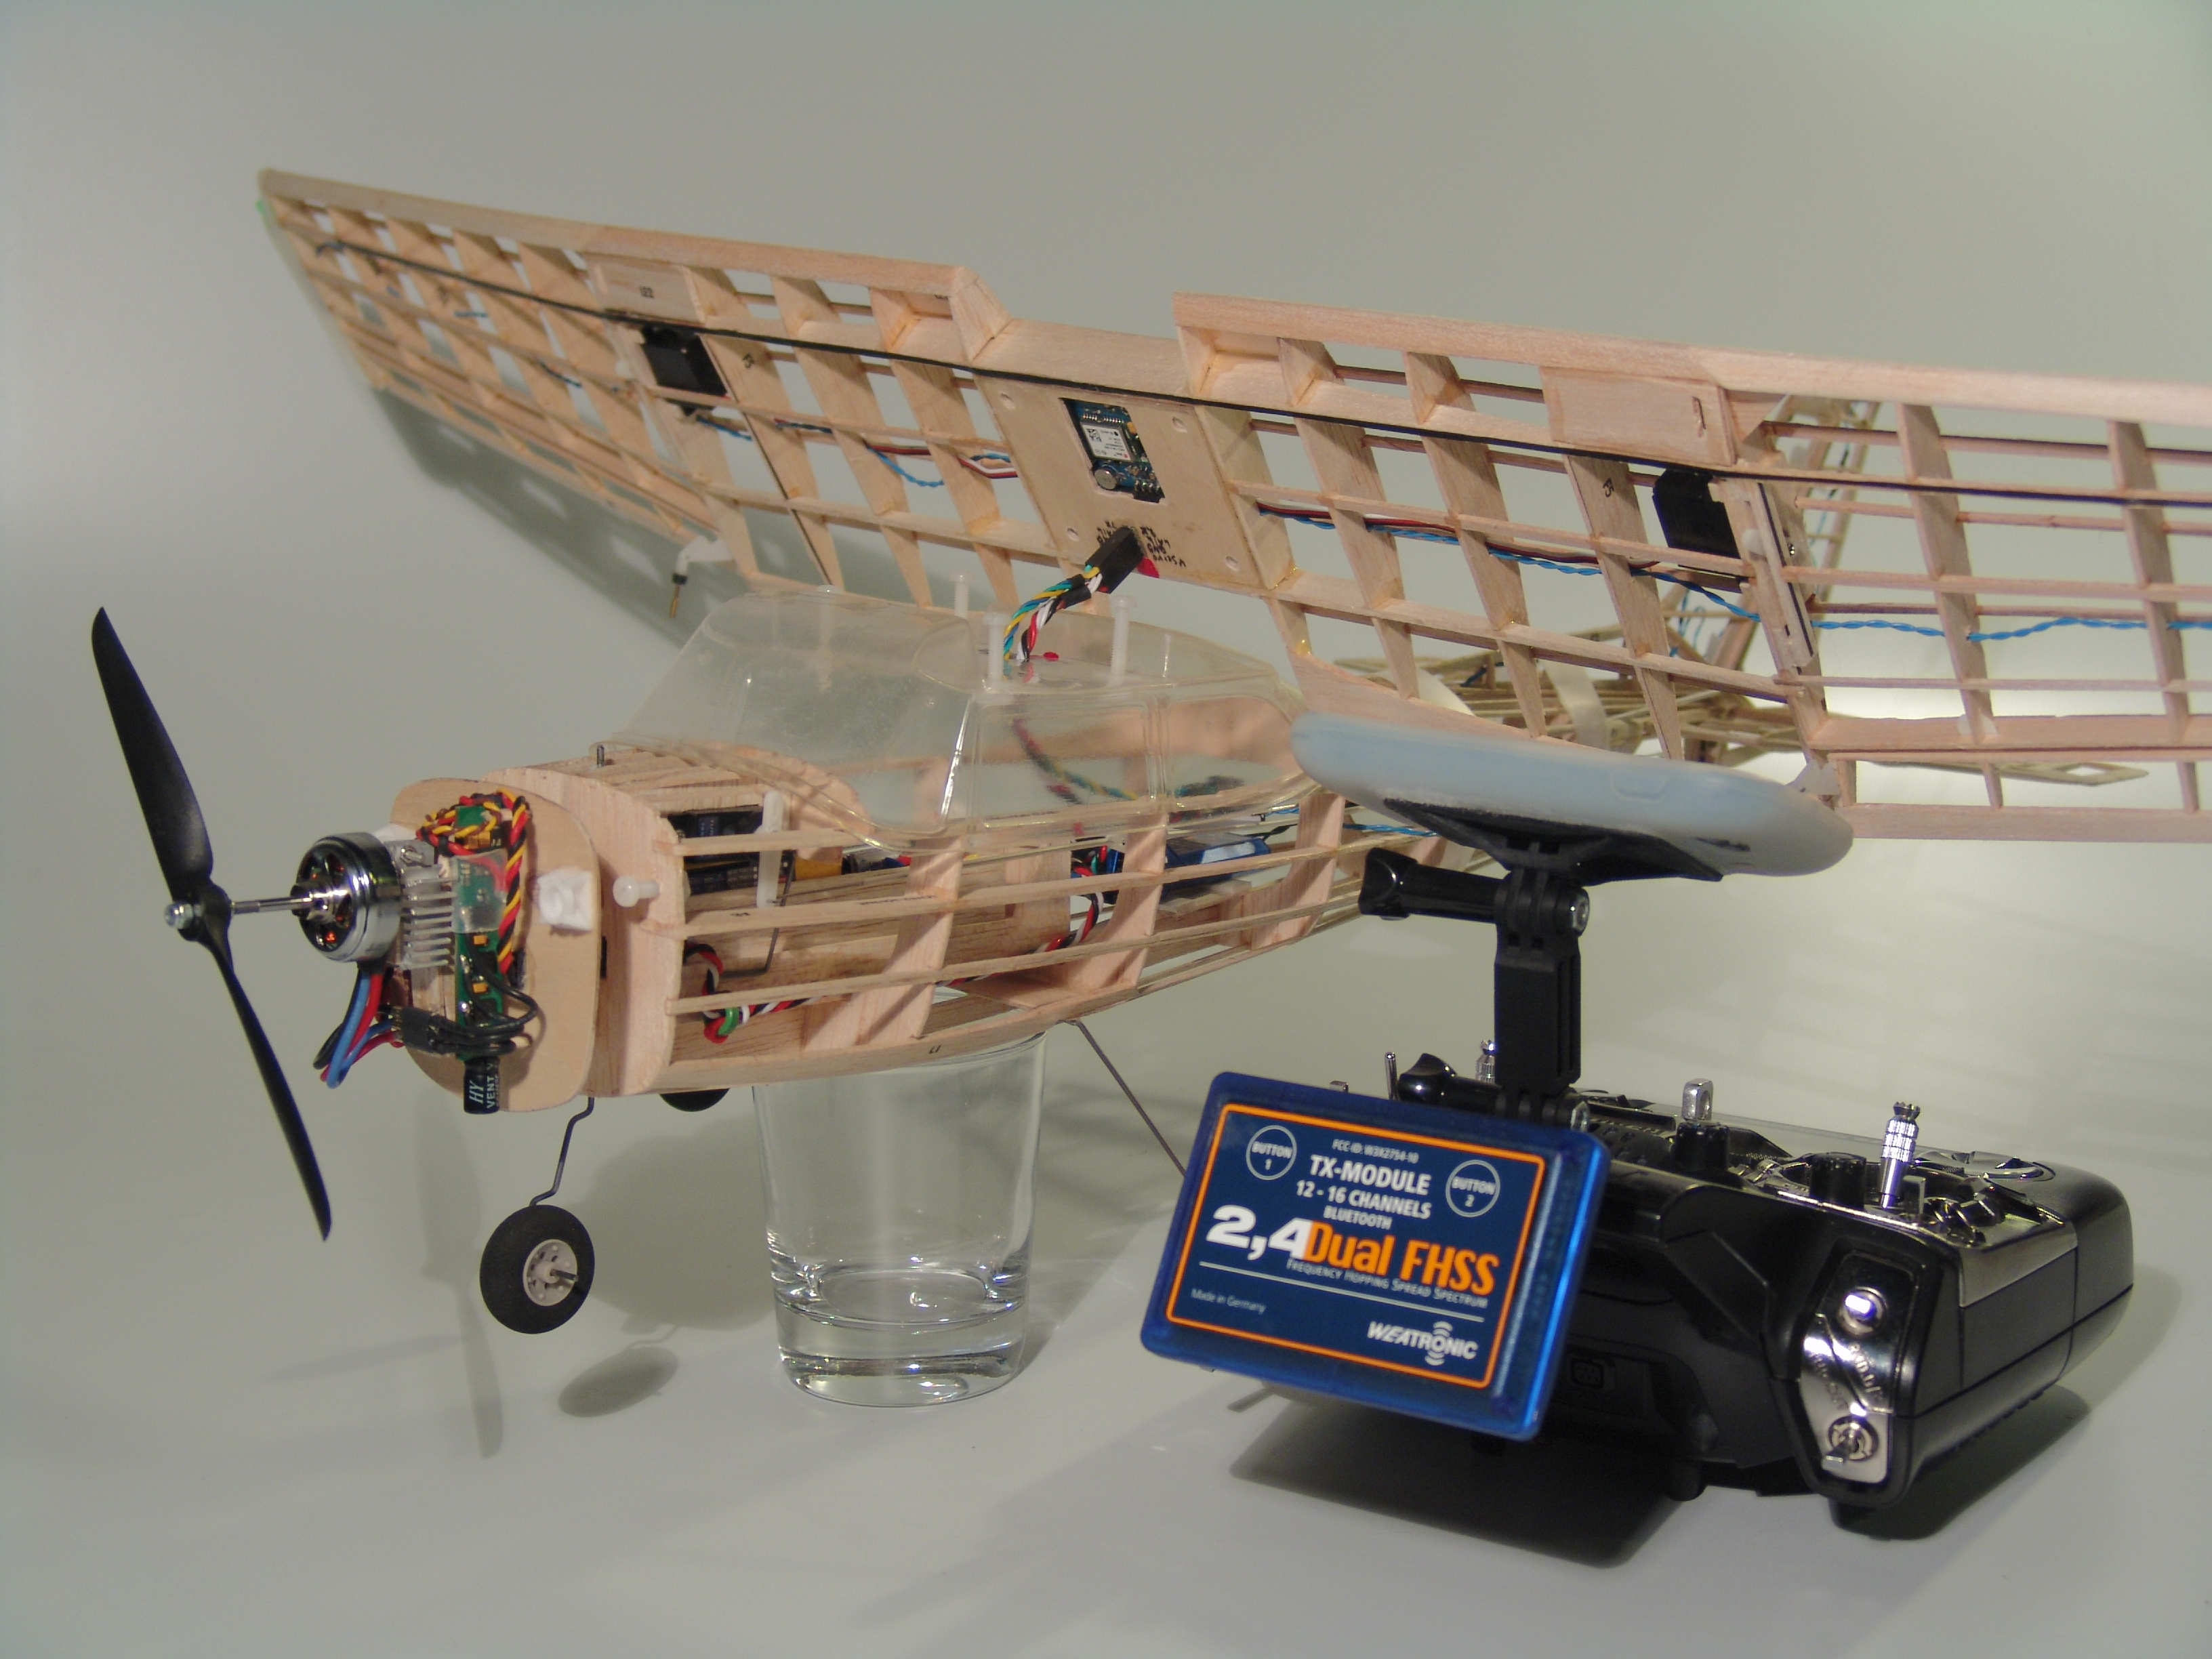
GPS
Ok, so I wanted some data and the easies I could think of was using a GPS with a high update rate as some easy math can compute a heck of a lot of aero data from that.
The idea is to have a u-blox NEO 7 in the wing and run the serial date to a little Arduino which is doing the math and pumps the results to a telemetry-capable receiver....


Avionics (Telemetry, Light controls)
As I needed an Arduinio anyways to process the raw GPS data, I might as well use that to control the lights. I use the PPM sum channel on my Weatronic Smart 8 to get all the data from my Turnigy 9XR and modulate some PWMs to get an ozzing beacon, some blinky strobe action, as well as some regulat navigation lights. The Arduino then sits atop the receiver and all should be well...


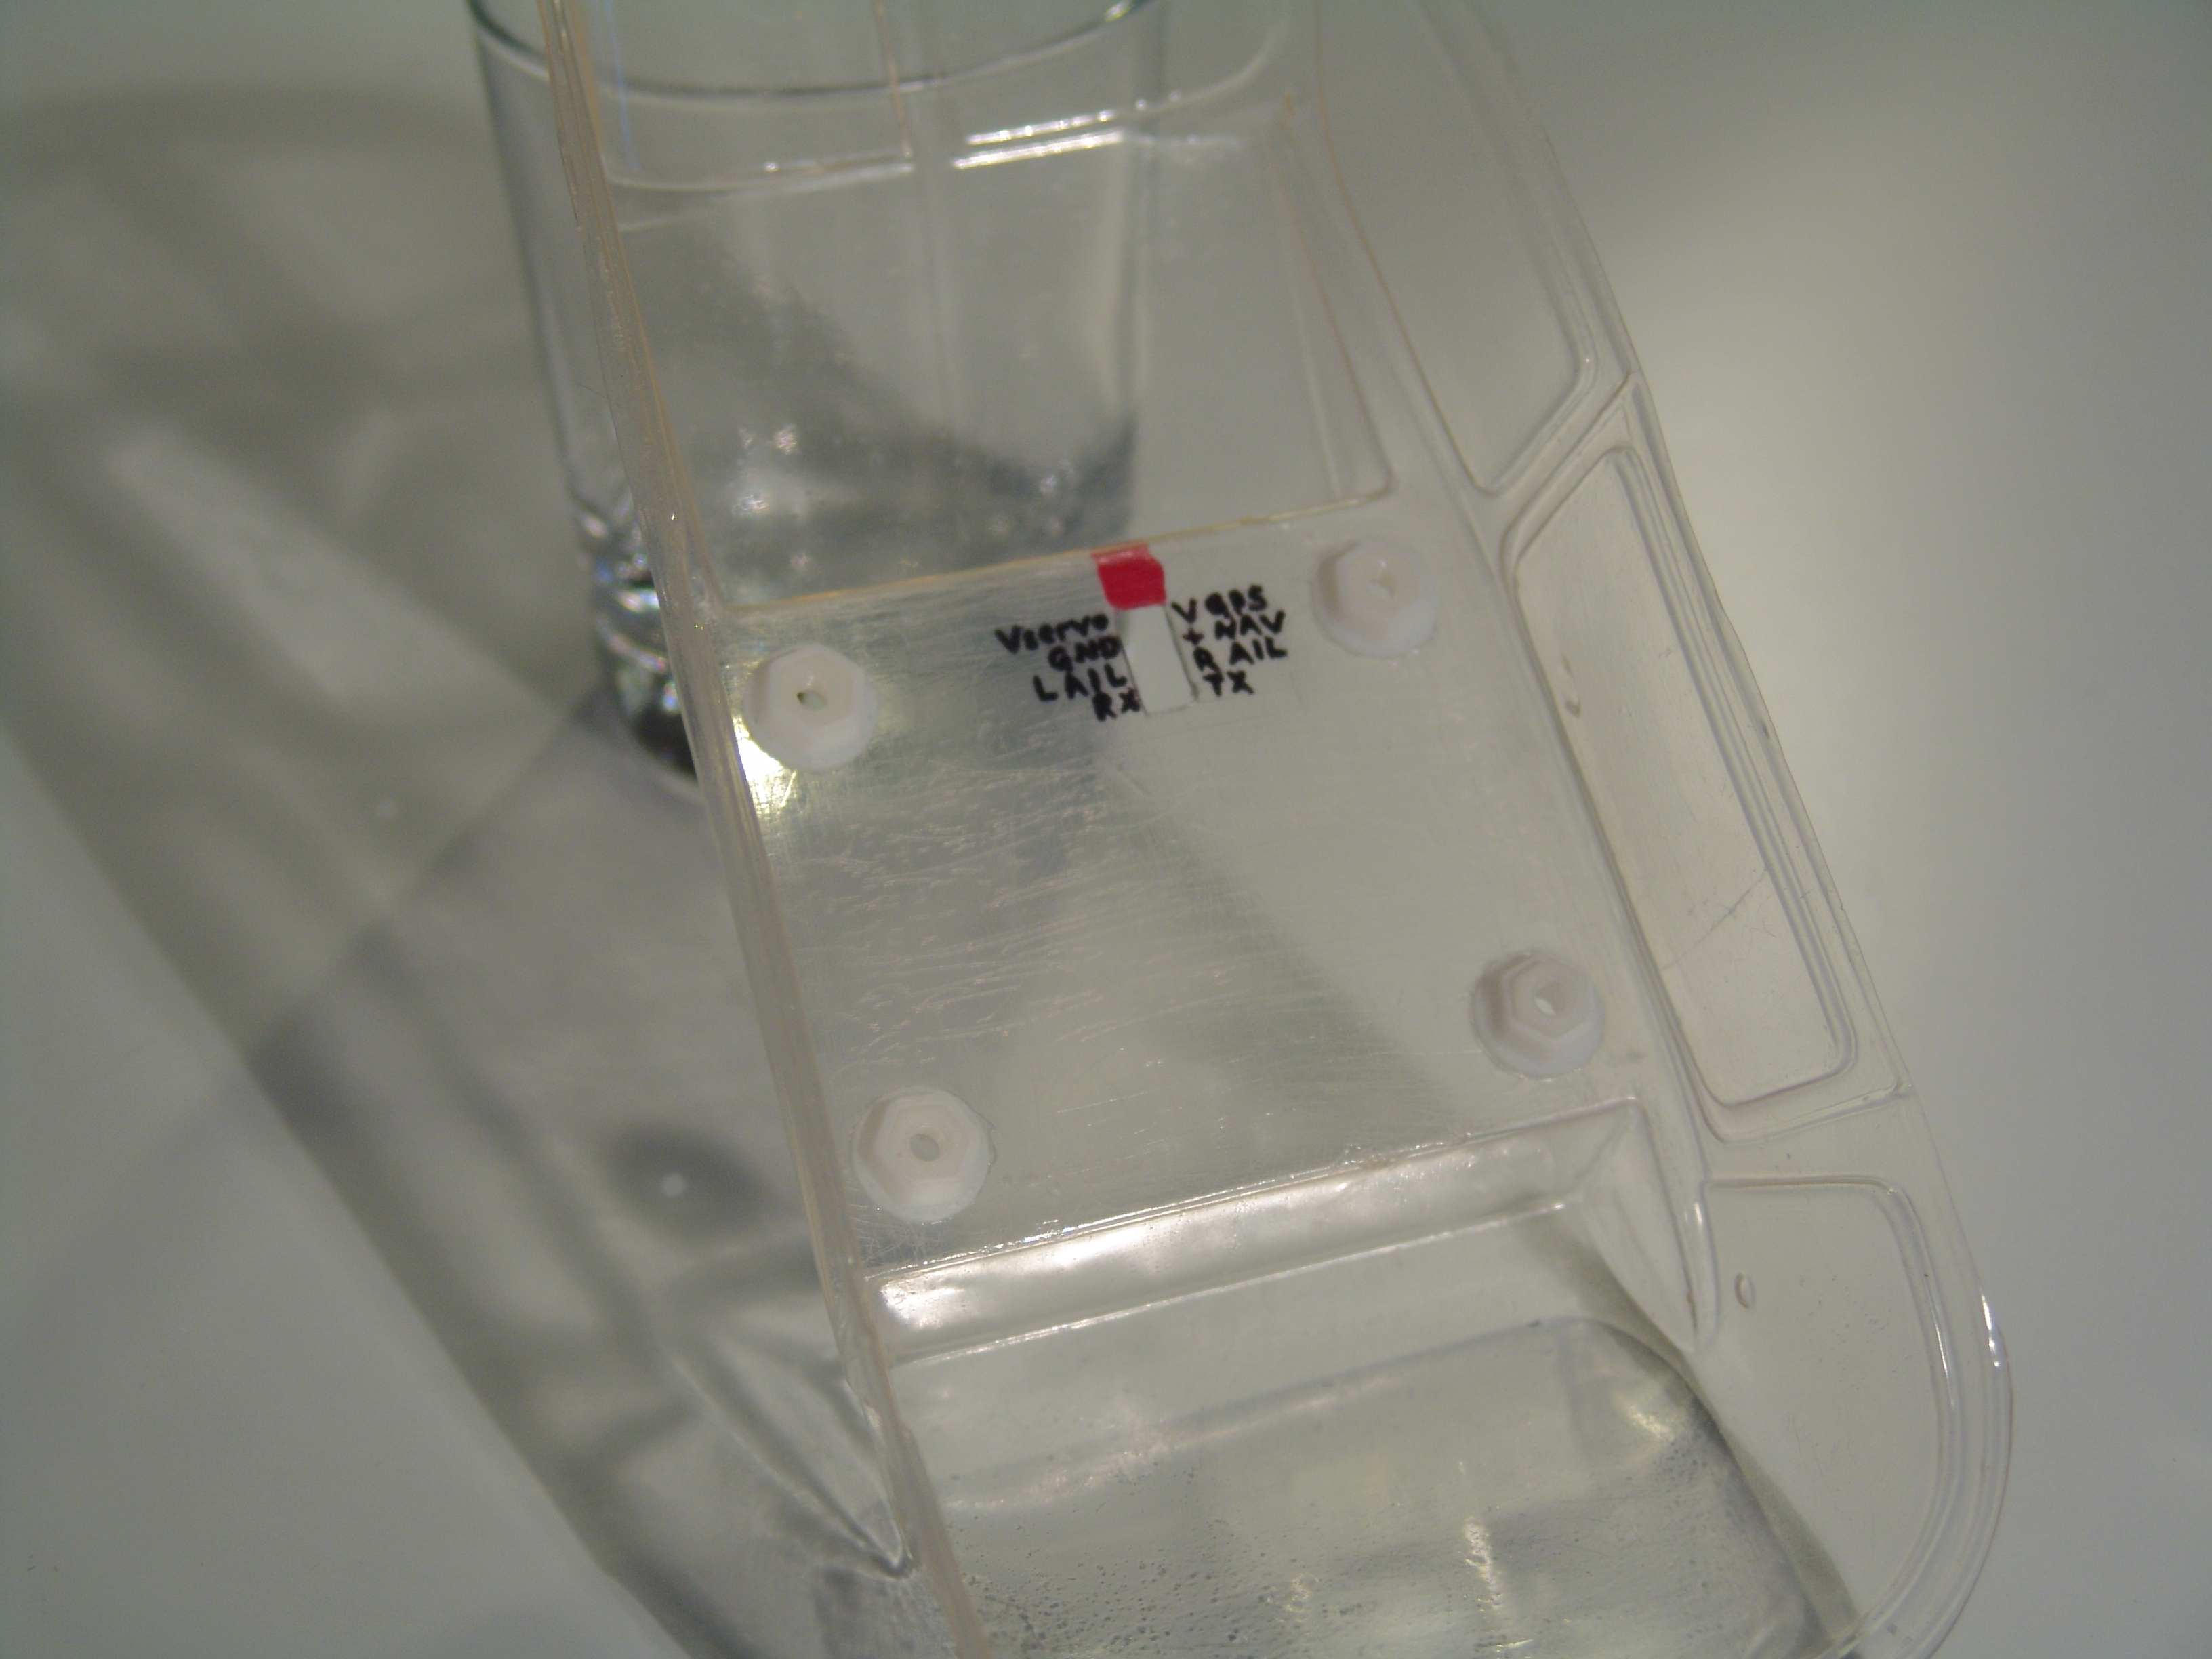
Removable Wing
I didn't realize that a build up C172 actually is too large to be easily transportable (or storable), so the wing needed to come of. As I had a whole lot of stuff in there (2 servos, GPS, nav lights), I centralized all the wires to a single 8 conductor connector that can be fed through the canopy. Four nylon screws can then be used to bold down the wing to the canopy and I 3D-printed some standoffs with a rim so that I could glue the covering material to it (I need to get to those screws somehow...)


Radio
I was contemplating a long time which radio/receiver to get as my first set. I decided on a Turnigy 9XR (running Open TX) with a R/F module from Weatronic (the DV-4). I really like the redundant channels and love the fact that I can program everything on the PC, uploading through the radio. The 9XR essentially "just" provides the gimbals and switches, and Open TX essentially does nothing put pass all the raw data directly through to the DV4 (which is where all the model dependend mixing is happening). As there wasn't one available, I create a 3D-printable mount to get the DV4 and a cell phone (to view the telemetry data) on the 9XR.
OK, that is all I had. Bring on the comments
(And please: I am new to this and I want to learn. So if you spot some stupid stuff or have a link to a better solution, PLEASE post it.)
PS: Oh, and if somebody from Weatronic is reading this: I missed the point that your telemetry protocol is still not publicly available... so yes, all that GPS stuff is dead weight. So PLEASE, opensource your API for that SCU port of yours...
I am relatively new to the hobby and wanted to collect some feedback on my first ever R/C project: a Guillows C172, converted for the 21st century
Initially I wanted to scratch-build a quadcopter as that is all the rage these days, but then I thought that I better start with something that is easy to get some experience: build a kit. I decided to get a Guilllows C172 balsa kit and convert it to R/C and add some bling: GPS and telemetry; I mean in the age of cheap electronics, how hard could that be?
Well, as you might have guessed.... In hindsight I had better started with that quad
Anyways, as I was struggling with pretty much every detail of the conversion (putting the balsa together was fairly straight forward, the fun came after that), I decided I'll put my "solutions" to all those problems up so that those of you who actually know what they are doing could comment on it. Hopefully your comments can help those who attempt this foolish idea after me
Stuff I struggeled with:
- picking a radio/receiver combo
- placing servos for the Ailerons
- making the front wheel stearable
- actuating the rudder and elevator
- getting the CG right
- getting a battery in (and out )
- adding lights
- controlling lights
- adding telemetry
Yes, this list is essentially everything other than buing the kit and gluing the balsa together
So without much further storytelling, here are the pictures of my solution attempts... (bear in mind: the plane isn't covered yet, so I am not actually sure that it will fly... so your milage might vary)
Battery Placement, CG and Engine Mount
A problem that didn't occur to me untill rather late is that covered airplanes, unlike open quads, need to have a provision to get a battery in and out. Oh, and as the battery is one of the heaviest things in the plane, that might actually change the CG... But as I didn't know where that will be with all the other stuff mounted, I had to have some wiggle room in placing the battery. Solution: build a sliding tray that allows changing the battery placement.
The tray is held by nylon screws which are reachable through the air intake openings in the cowling.
Ailerons
I decided to use two servos as I wasn't able to find/source that little flex cable in a tube. Also, having two servos should allow me to mix in a bias, making the ailerons flaperons.
The thing I struggeled most with was how to mount the servos so that I could still cover the rest of the wing... after all, the servo horn has to penetrate the skin somehow.
Front Wheel
With the battery and the engine on a tray, I needed to get the front wheel axle and actuator out of the way to the side; which can also be used to add some springiness
Rudder and Elevator
I wanted to keep as much mass as much forward as I could for CG reasons, which is why I ended up putting the elevator and rudder servos up front. This meant that I needed to run some wires to the back to attach to the surfaces... which was easy for the elevator, but rather tricky for the rudder as the kinematics of that darn slanted hinge ruined all my great ideas...
GPS
Ok, so I wanted some data and the easies I could think of was using a GPS with a high update rate as some easy math can compute a heck of a lot of aero data from that.
The idea is to have a u-blox NEO 7 in the wing and run the serial date to a little Arduino which is doing the math and pumps the results to a telemetry-capable receiver....
Avionics (Telemetry, Light controls)
As I needed an Arduinio anyways to process the raw GPS data, I might as well use that to control the lights. I use the PPM sum channel on my Weatronic Smart 8 to get all the data from my Turnigy 9XR and modulate some PWMs to get an ozzing beacon, some blinky strobe action, as well as some regulat navigation lights. The Arduino then sits atop the receiver and all should be well...
Removable Wing
I didn't realize that a build up C172 actually is too large to be easily transportable (or storable), so the wing needed to come of. As I had a whole lot of stuff in there (2 servos, GPS, nav lights), I centralized all the wires to a single 8 conductor connector that can be fed through the canopy. Four nylon screws can then be used to bold down the wing to the canopy and I 3D-printed some standoffs with a rim so that I could glue the covering material to it (I need to get to those screws somehow...)
Radio
I was contemplating a long time which radio/receiver to get as my first set. I decided on a Turnigy 9XR (running Open TX) with a R/F module from Weatronic (the DV-4). I really like the redundant channels and love the fact that I can program everything on the PC, uploading through the radio. The 9XR essentially "just" provides the gimbals and switches, and Open TX essentially does nothing put pass all the raw data directly through to the DV4 (which is where all the model dependend mixing is happening). As there wasn't one available, I create a 3D-printable mount to get the DV4 and a cell phone (to view the telemetry data) on the 9XR.
OK, that is all I had. Bring on the comments
(And please: I am new to this and I want to learn. So if you spot some stupid stuff or have a link to a better solution, PLEASE post it.)
PS: Oh, and if somebody from Weatronic is reading this: I missed the point that your telemetry protocol is still not publicly available... so yes, all that GPS stuff is dead weight. So PLEASE, opensource your API for that SCU port of yours...
 04-03-2015 | 07:57 PM
#3
My first thought is that you're going to come out too heavy. That's a small model, and you've already added a way over engineered battery compartment, lights, a GPS, and an Arduino. Consider making your first few flights without any of the extra stuff, then add pieces one at a time to see how they affect the performance.
A simple hatch would have given you battery access.
Covering is likely to throw off your current CG.
You'll have to take off the control horns to do the covering.
It's really helpful to have an access hatch to get to your wing mounted ailerons. The normal way to do it is to mount the ailerons to the hatch which then fits into a recess in the wing and is held in place with screws.
Your nosewheel is probably going to give you trouble bent forward that way. Make it vertical to reduce stress on the firewall.
And lastly, your piloting skills are probably not good enough to fly this plane. I realize that Cessnas are beginner planes in real life, but model ones are a significant step past trainer planes. I know because I trained on one and had a tough time with it. If you will work with an instructor you'll increase your chances of bringing the plane home in the same number of pieces that you left with it in from just barely above zero to maybe the 95% range. You can find instructors by contacting a club that you can find at www.modelaircraft.org.
04-03-2015 | 10:02 PM
#4


My Feedback: (1)
Its not clear if you actually expect to learn how to fly a conventional RC airplane or just expect it to operate in an autominous manner but the chances of you actually ever learning any manual flight skills with that set up as a beginner is slim indeed.
If you really want to learn skills then start with a conventional trainer and forget the useless bells and whistles.
There is one glaring problem with your ship and that is if there is ever the slightest prop strike then that long shaft is going to set up an awful vibrations that will make most of those devices useless. Simple slight prop strikes are common.
John
04-04-2015 | 06:03 AM
#6
Thread Starter
Junior Member
Joined: Sep 2014
Posts: 8
Likes: 0
Received 0 Likes
on
0 Posts
Hi jester_s1, thank you for taking the time to point out some mistakes in my design.
I have to admit that some I hadn't thought of, but same crossed my mind before. Let me write up my thougts on the very valid points you are making.
Weight is indeed a critical factor. Unfortunately the only thing I can take out at this point is the Arduino as eveything else (Lights, GPS) is more or less glued in. I wasn't certain how to add them once the cover is on. I do have two different size batteries (a 3S 700 mAh and a 3S 1000 mAh), and I was planning to attempt flight with the small one first.
I have seen hatches in some pictures in other build posts, but I couldn't find a picture (series) from which I completely understood how to (re-)build it. And I had some questions that I didn't find answers to that satisfied me: So when you build a hatch, how does one secure the battery as "down" is more or less open. (The hatches I saw seem to be more of an aerodynamic factor than a "heavy" door where a battery could rest upon. I also initially couldn't see how to get the front wheel stearable, but I guess I could have used the same bending kinematics I used for the current setup.
The CG is actually one of my biggest concerns. I have no way of telling where it will end up being, so I was hoping to use my tray so that I can reposition the battery freely in it whan all else is done.
That is true, I was hopeing to start the underside of the wings first, then do the cutout, put the horns on, and then cover the top.
So for this, does one just build a square frame to glue the cover on and which could then also be used to screw that hattch door in?
Thanks for that tip, I was trying to follow the Guillows plan in their angles. Also, the lower hinge alows for a little up/down motion to dampen out impacts, but obviously a forward/backward force on the lower kiel is not affected by that.
I fear that you are right, as I am a total novice on R/C flight. I tried "training" with RealFlight and I was planning on having a friend do the first maiden flight to check out the characteristics of the plane. I did opt for the highest dihedral the Guillows plans showed and I tried to keep the CG as close to the thrust line as possible (the battery sits fairly high in the tray) as that should reduce throttle induced pitch moments... but yes, I totally expect to have trouble learning to fly.
Thanks again for the feedback, I do appreciate it.
I have to admit that some I hadn't thought of, but same crossed my mind before. Let me write up my thougts on the very valid points you are making.
My first thought is that you're going to come out too heavy. That's a small model, and you've already added a way over engineered battery compartment, lights, a GPS, and an Arduino. Consider making your first few flights without any of the extra stuff, then add pieces one at a time to see how they affect the performance.
The CG is actually one of my biggest concerns. I have no way of telling where it will end up being, so I was hoping to use my tray so that I can reposition the battery freely in it whan all else is done.
That is true, I was hopeing to start the underside of the wings first, then do the cutout, put the horns on, and then cover the top.
And lastly, your piloting skills are probably not good enough to fly this plane. I realize that Cessnas are beginner planes in real life, but model ones are a significant step past trainer planes. I know because I trained on one and had a tough time with it. If you will work with an instructor you'll increase your chances of bringing the plane home in the same number of pieces that you left with it in from just barely above zero to maybe the 95% range. You can find instructors by contacting a club that you can find at www.modelaircraft.org.
Thanks again for the feedback, I do appreciate it.
Last edited by hcc23; 04-04-2015 at 06:05 AM.
04-04-2015 | 06:13 AM
#7
Thread Starter
Junior Member
Joined: Sep 2014
Posts: 8
Likes: 0
Received 0 Likes
on
0 Posts
Hi John,
I guess the common advise is that a C172 indeed isn't a good R/C trainer
I indeed was hoping to build up some good old "manual" R/C skills first, i.e. before I attemtp the augmented flight of quads or stabilized planes (i.e. with an Ardupilot ArduPlane setup). The Arduino in there is only intended to get me some telemetry data back. I was hoping that speed data could be helpfull to get a better awareness of stalls, etc.
That is certainly very true, especially as the plane doesn't have a lot of ground clearance. I played around with a couple of motors (one was way to small, one was way to big) before I stumbled upon this one. The problem I was facing is that I couldn't seem to find a "big enough" motor that allowed placement inside that plastic cowling. How would I better have overcome this problem?
Thanks for your feedback
I guess the common advise is that a C172 indeed isn't a good R/C trainer
Its not clear if you actually expect to learn how to fly a conventional RC airplane or just expect it to operate in an autominous manner but the chances of you actually ever learning any manual flight skills with that set up as a beginner is slim indeed.
If you really want to learn skills then start with a conventional trainer and forget the useless bells and whistles.
If you really want to learn skills then start with a conventional trainer and forget the useless bells and whistles.
Thanks for your feedback
04-04-2015 | 06:16 AM
#8
Thread Starter
Junior Member
Joined: Sep 2014
Posts: 8
Likes: 0
Received 0 Likes
on
0 Posts
Oh well, I guess building is a large part of the hobby, so not all is lost
Thanks for your comment, jetmech05. I'll post some follow up and will list all the pieces I carried home
04-04-2015 | 01:53 PM
#10
On most electric planes, you build a battery tray that you attach the battery to with velcro. You then have a velcro battery strap wrapping around the tray and battery to make sure it stays. The hatch is then just a cover to preserve the aerodynamics and appearance of the plane. On yours, the wing may need to be your hatch. Two horizontal pins can replace the screws you have at the front of the wings, making a battery change a 2 screw operation. Of course, taking out 4 screws isn't that hard either. Don't worry about the vertical CG. Thrust coupling is about where the drag is in relation to the thrust, not the vertical CG. And it's tuned with the vertical thrust angle, which you'll have to set after first test flight.
On the aileron hatches, you build a square piece to mount the servo onto, then make a frame in the wing that it will fit into. This article shows you how to do it. MAN has lots of good build articles, so spending some time browsing the site is a good idea.
http://www.modelairplanenews.com/blo...-wing-hatches/
To clarify about you nose wheel, most hard nose wheel impacts come from stalling your plane on the landing. That results in a nose down impact. If your nose gear is vertical or slightly swept back, the flexibility of the wire will absorb most of the impact. But yours is at the perfect angle to keep that from happening, instead transferring all of the energy to the wood. You'd be surprise how small a bounce will tear out the bottom of your plane if the nose gear is set up wrong.
04-06-2015 | 12:12 AM
#11

After building a nonflying version of this aircraft, I can see a few things that would be beneficial in an R/C version:
1) Replace all the die cut balsa fuse parts with lite ply of an equal thickness. Since the kit was designed for either control line .020 or rubber powered free flight , the fuse wasn't designed to handle the stress of carrying all the weight you've added.
2) Beef up the front and rear spars. Like the fuse, they weren't designed for the weight of the servos in the wings or the extra weight of the gear in the fuse. I'd be looking at lite ply or spruce for the spars
3) The main gear needs to be beefed up since a majority of the plane's weight will be resting on them and, after building mine, I learned that the supplied wire BARELY could handle the stock weight. I know you used heavier wire but I'd look at light weight formed aluminum instead


