


Freewing F-86 conversion from stock to Skyblazers
 01-19-2019, 03:39 PM
#1

Thread Starter
Join Date: Jan 2010
Location: , UNITED KINGDOM
Posts: 66
Likes: 0
Received 0 Likes
on
0 Posts
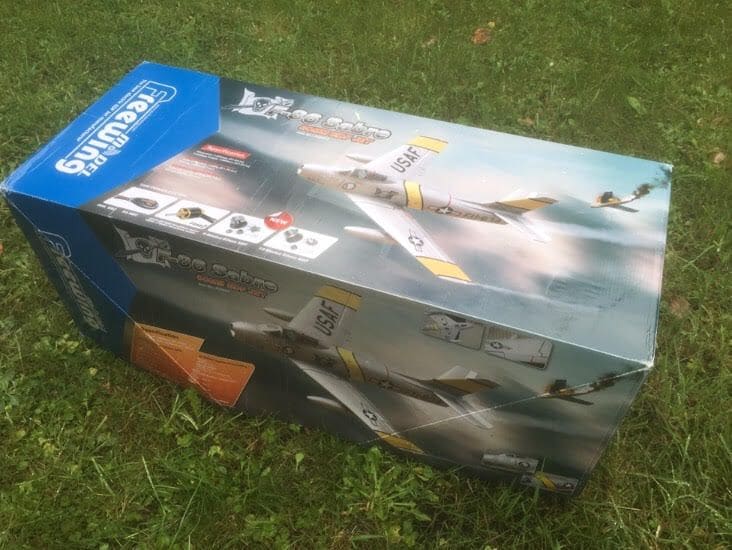
Having waiting a while I took the plunge and got myself the Freewing Sabre 90mm as I had the crazy idea of re-trimming it from the stock paint scheme and transforming it into a Skyblazers version instead. I had never attempted anything like this before but I love a challenge and could only see the end result in my head which isnt a good thing I can tell you lol. so here we go this is my guide to transforming a stock painted Freewing Sabre into a Skyblazers aerobatic scheme from the 60's. this thread is ongoing as I am still in the process of completing the project but I am half way through and will upload my progress as and when I can. As we go through the project please feel free to ask as many questions as you like and please also feel free to offer your advice and feedback on what has been created so far so that other modellers who are thinking of doing a similar project can pick up tips from this ongoing build
Last edited by autotecart; 01-19-2019 at 04:39 PM.
 01-20-2019, 04:37 AM
#2
Thread Starter
Join Date: Jan 2010
Location: , UNITED KINGDOM
Posts: 66
Likes: 0
Received 0 Likes
on
0 Posts
Having got all the parts out of the box and assessed the model in order to begin the process of preparing it for paint, I quickly realised that i needed a few essential items before I could even consider beginning the build. firstly I had to select the paint and the colours of the paint to be used and also a way of masking the different coloured panels and the best way to create all the graphics that would appear on the model itself
Being a huge fan of the Overhaulin TV progam, I have got to see how Chip Foose manages to mask his cars using the thin masking tape strips to section off parts of his renderings before spraying, So having looked around the net, I invested in a few rolls of modellers masking tape in 2, 4 and 6mm thicknesses. These tapes would be ideal for masking the various blocks of colours that would appear on the model and they also allow for a certain amount of distortion and bending to accommodate the different contours of the model itself.
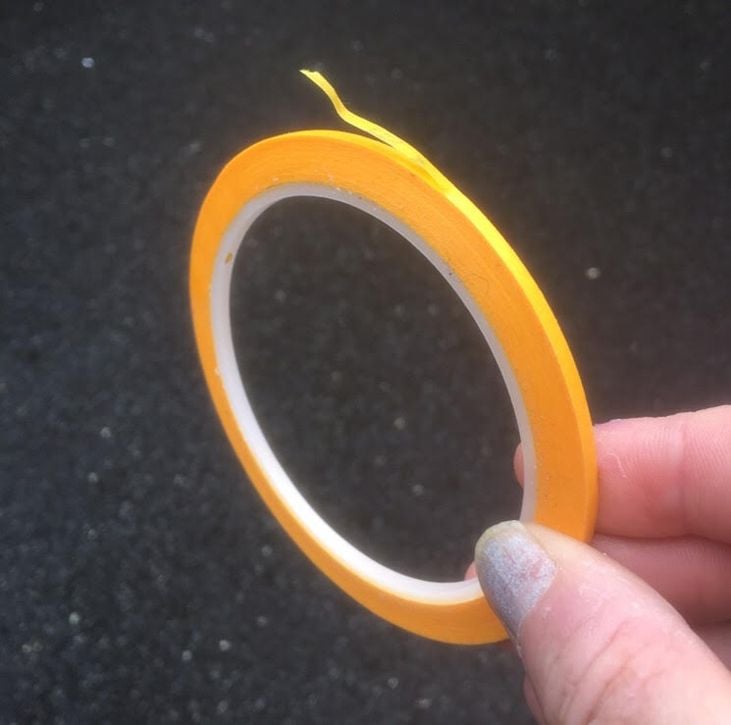
Being a huge fan of the Overhaulin TV progam, I have got to see how Chip Foose manages to mask his cars using the thin masking tape strips to section off parts of his renderings before spraying, So having looked around the net, I invested in a few rolls of modellers masking tape in 2, 4 and 6mm thicknesses. These tapes would be ideal for masking the various blocks of colours that would appear on the model and they also allow for a certain amount of distortion and bending to accommodate the different contours of the model itself.
01-20-2019, 04:38 AM
#3
Thread Starter
Join Date: Jan 2010
Location: , UNITED KINGDOM
Posts: 66
Likes: 0
Received 0 Likes
on
0 Posts
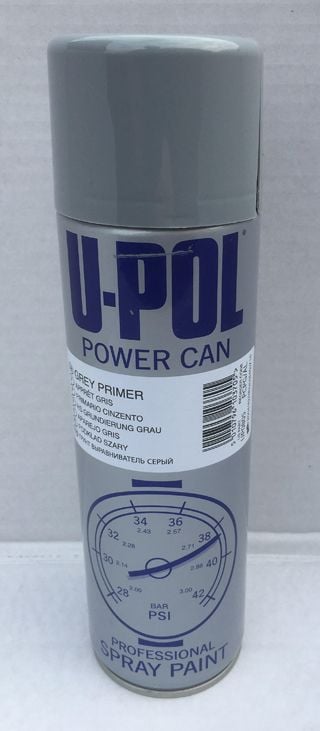
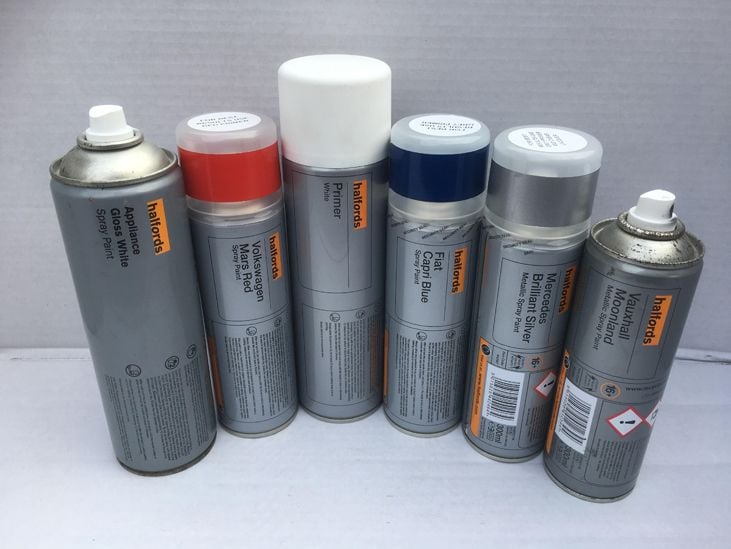
The base cote I use on anything paint related involving car cellulose paint is by a company called U-Pol and the primer itself comes in black grey or white. Its super forgiving goes on in a very even spread and dries very quickly. You have to use a mask as its pretty toxic when it comes out of the can, but its the best primer I have used for covering large surface treatments in order to gain a smooth finish in readiness for coloured paint or top coat. Its also easy to sand and I also invested in a very fine sandpaper just incase any imperfections existed from the primer or coloured top coat.
01-20-2019, 04:41 AM
#4
Thread Starter
Join Date: Jan 2010
Location: , UNITED KINGDOM
Posts: 66
Likes: 0
Received 0 Likes
on
0 Posts
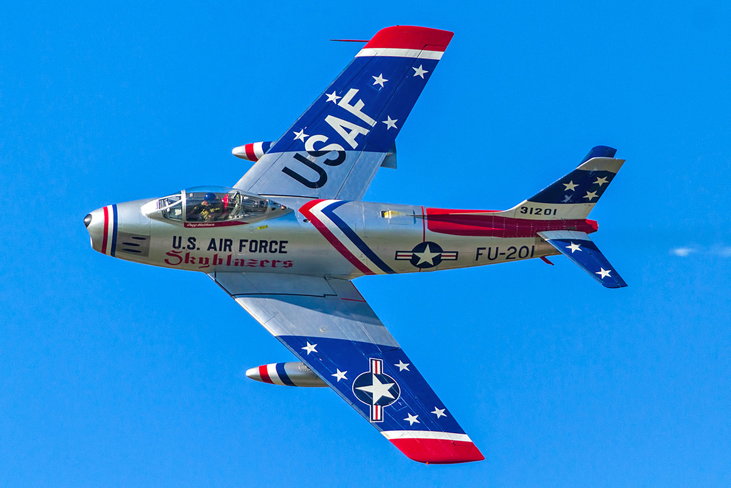
The only paint that I could theoretically use on this model was cellulose car spray paint and having taken the image of the actual plane shown above down to the local car parts store I held all the various blues and reds against the actual picture of the plane and came to decision on a red, blue, white and silver and as I had a grey in the garage for the gun pod and rear exhaust all the paint was accounted for. I made the decision to go for a gloss clear cote on this model as I wanted the paint job to sparkle in the sunshine as I had the option of going with a matt finish but on this model I felt it would not make the colours bounce off the surface like the gloss option would. But having said all the above as I had never ever attempted to spray a foam model before, my theory and logic of what I thought is the best way to do it could turn out to be the very wrong way to do it too.
01-20-2019, 04:48 AM
#5
Thread Starter
Join Date: Jan 2010
Location: , UNITED KINGDOM
Posts: 66
Likes: 0
Received 0 Likes
on
0 Posts
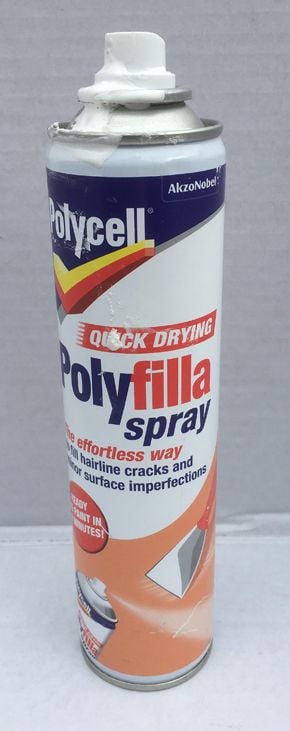
As with all foam models the surface has that honeycomb pattern to it, so the final product i invested in was Polyfiller in a spray can. Now you may be saying to yourselves what on earth would he use this for? Well here in the UK, this product is relatively new and I have used this on some internal doors at home in the past and I tell you what it really is amazing stuff. Instead of it being a paste from a tube, it sprays on like paint coming out of a can and by doing this you can spray it evenly over a surface, let it set and then lightly sand the surface until its completely smooth. i used it on the wings and parts of the fuselage where the production process wasn't quite up to scratch and when you run your hands over the treated area you cannot tell its made of foam.
01-20-2019, 04:49 AM
#6
Thread Starter
Join Date: Jan 2010
Location: , UNITED KINGDOM
Posts: 66
Likes: 0
Received 0 Likes
on
0 Posts
As a graphic artist, creating the graphics for this re-liveried paint job was not a problem and this will be accounted for later on in the thread and besides there wasn't really that much work involved in doing this as the livery itself isnt particularly complicated.
01-20-2019, 07:37 AM
#7

My Feedback: (8)
Your F-86 is an 80MM not 90MM. I flew mine stock without the wing tanks. While it flew reasonably well, I always felt it needed a bit more power. With what you are going to do to yours you will be adding weight which will not improve performance. In addition to your repainting, I am recommending that you also be looking at a "hotter" fan and motor that will boost performance.
01-21-2019, 03:04 AM
#8
Thread Starter
Join Date: Jan 2010
Location: , UNITED KINGDOM
Posts: 66
Likes: 0
Received 0 Likes
on
0 Posts
Hi Steve thanks for the post yes it is a 80 I am getting confused by the sizes as i have a 90mm A-10 in a box in the attic lol
Last edited by autotecart; 01-21-2019 at 03:08 AM.
01-21-2019, 09:47 AM
#10
My Feedback: (8)
It already has 12 blades. Don't know of any with more than that. I am not an expert on power systems for EDF but, if I were to upgrade power, here is where I would start:
https://www.effluxrc.com/
These guys can surely get you set up with a more powerful combo.
https://www.effluxrc.com/
These guys can surely get you set up with a more powerful combo.
