


Fiberglass How to: Plug to Mold to Parts


 11-27-2007, 01:44 AM
#29

Thread Starter
Join Date: Aug 2006
Location: San Diego, CA
Posts: 106
Likes: 0
Received 0 Likes
on
0 Posts
Looks Nice! Should make a great plug. Keep the pictures coming. I am going to post more on the copter project tomorrow.
11-28-2007, 12:22 PM
#30
Thread Starter
Join Date: Aug 2006
Location: San Diego, CA
Posts: 106
Likes: 0
Received 0 Likes
on
0 Posts
After the resin cures, the surface can be rough sanded to knock down any loose fibers.
Here is another installment in this project.
Once the surface of the plug has been cleaned up with coarse sandpaper, I can examine the pieces and decide where to go with this plug from this point. I began this plug imagining depressions with well defined edges where the windows should be. At this point, it seems that following this course will make this plug much more difficult to complete. This being the case, I have decided that the next phase of this plug build will see the side windows smoothed flush. Flush windows will make building the mold and pulling parts from the mold much easier.
After the rough sanding is complete, I can apply bondo to smooth out the surface of the helicopter. I only mix enough bondo that I can use in a few minutes. By mixing a little less bondo than I can comfortably work with, I am able to be much more efficient from a number of perspectives. First of all, I have time to work the bondo on the surface since I am not rushed by the thought of unused bondo curing on my mixing surface. Secondly, when I mix too much bondo, I end up just piling it on only to have to remove most of it later on because of sloppy application.
11-28-2007, 02:05 PM
#31
I agree about the complexity of indenting the windows. Been there, done that, pulled out a lot of hair over it.
I plan to do panel lines on mine. I had tried this before by scratching them into the surface. Never Again! I have heard of doing it by masking, then painting it so that the masking lines do the job. This might work for your windows too.
Rivets anyone?[X(]
I plan to do panel lines on mine. I had tried this before by scratching them into the surface. Never Again! I have heard of doing it by masking, then painting it so that the masking lines do the job. This might work for your windows too.
Rivets anyone?[X(]
12-01-2007, 10:36 PM
#32
Junior Member
Join Date: Sep 2002
Location: Crooked River Ranch,
OR
Posts: 2
Likes: 0
Received 0 Likes
on
0 Posts
Rivets anyone?[X(]
senna12625
12-05-2007, 10:40 AM
#33

Join Date: Mar 2003
Location: Houston,
TX
Posts: 487
Likes: 0
Received 0 Likes
on
0 Posts
Oh no... i have a composite bug bite and the infection has almost reached my hands! haha!
great job on the plugs guys... one question though... Ive been kicking an idea around in my head. I want to build a 1/12 scale U-2. I plan on using an electric ducted fan set up and decided to make a composite fuse. This will be my first atempt at making a large fiberglass part so Ive been reading all I can get my hands on regarding fabrication. As far as making a plug, i noticed you guys are making your plug in 2 halves... Im assuming you will be making your moulds and parts separately then. In other places Ive read about making a single mold and then using a parting board to pull moulds from each side... have any of you guys tried this??
great job on the plugs guys... one question though... Ive been kicking an idea around in my head. I want to build a 1/12 scale U-2. I plan on using an electric ducted fan set up and decided to make a composite fuse. This will be my first atempt at making a large fiberglass part so Ive been reading all I can get my hands on regarding fabrication. As far as making a plug, i noticed you guys are making your plug in 2 halves... Im assuming you will be making your moulds and parts separately then. In other places Ive read about making a single mold and then using a parting board to pull moulds from each side... have any of you guys tried this??
12-05-2007, 11:39 AM
#34
ORIGINAL: funkworks
Oh no... i have a composite bug bite and the infection has almost reached my hands! haha!
I noticed you guys are making your plug in 2 halves... Im assuming you will be making your moulds and parts separately then. In other places Ive read about making a single mold and then using a parting board to pull moulds from each side... have any of you guys tried this??
I will add pictures this weekend, but I have allignment pins in the halves of the plug. I was going to join them, and shape them. Then I was going to set the half with the alignment holes on a flat board, and layup half of the mold. Then I was going to place the half with the alignment pins on this, and lay up the other half of the mold.
The problem is that as I was planking the plug, the mating faces moved a little and do not lay perfectly flat against each other. I will probably glue them and clamp them while the glue dries. Next time I try this, I will try to make the profiles out of balsa so that they can be ''lap sanded'' flat after planking. I will also consider using flower shop foam instead of planking to reduce stress.
Notice also that I am not making separate plugs for the canopy and cowl. It is my intention to put the one piece plug in a parting board, then erect ''fences'' around the canopy and cowl. Lay up one side of the mold, remove it and ''fence'' the other side, lining up the fences with the ones on the first side. Lay up the second side, remove the fences, then lay up the canopy and cowl molds. This should ensure perfect fit of the parts.
12-05-2007, 03:03 PM
#35
Join Date: Mar 2003
Location: Houston,
TX
Posts: 487
Likes: 0
Received 0 Likes
on
0 Posts
thanks for the reply. Sorry about the problems youre having but it sounds like you got a handle on them now...
Im working on drawings for a U-2 with about an 8-9 foot span. I think I can use an electric set up with a 5" fan since I probably wont need that much power to get her in the air. Im starting to see EDF set ups with 10+lbs of thrust now. I plan on making molds for the whole plane including wings and fins. I want to mold the fuse sides and vert fin together if possible and was worried the long fuse would give me alignment problems if I tried to make the molds from separate plug halves... Im still gathering reference material so I can start on the drawings...
Im working on drawings for a U-2 with about an 8-9 foot span. I think I can use an electric set up with a 5" fan since I probably wont need that much power to get her in the air. Im starting to see EDF set ups with 10+lbs of thrust now. I plan on making molds for the whole plane including wings and fins. I want to mold the fuse sides and vert fin together if possible and was worried the long fuse would give me alignment problems if I tried to make the molds from separate plug halves... Im still gathering reference material so I can start on the drawings...
12-05-2007, 03:33 PM
#36

Join Date: Sep 2005
Location: Mesa, AZ
Posts: 1,456
Likes: 0
Received 0 Likes
on
0 Posts
Has any one ever used tooling wax sheets to get panel lines. It comes in various thicknesses and shapes with just a little practice to about any shape you wish. I have used them for depressed lettering, and to get a 12" clean edge on a deck mold for a 65" power boat to end the non-skid pattern. It is a one shot thing on the mold as the wax sometimes stays in the mold. but you could even press in rivet lines. I am thinking of doing this on my Goshawk. Make the plug 1/8" shy and overlasy the tooling wax sheet, put in rivet lines panel breaks and the like and then, carefully make a left and right mold of the paneled areas of the fuselage, turtle back and bottom panels. CST sells .007, .015, .02 and .062 thicknes.
http://www.cstsales.com/mold_making_supplies.html
http://www.cstsales.com/mold_making_supplies.html
12-11-2007, 09:17 PM
#37
Thread Starter
Join Date: Aug 2006
Location: San Diego, CA
Posts: 106
Likes: 0
Received 0 Likes
on
0 Posts
At this stage of the build, the project gets a little tedious. Sand, prime and fill – sand, prime and fill. This process is repeated over and over until the surface is smooth and the two halves join in the center.
Spending time at this stage pays off in the end. Remember that every flaw that you are too lazy to work out of the plug at this point will have to be worked out on every piece you ever make with the final mold. In other words, you can fix a flaw once here, or you can fix it on every piece you ever make, maybe 100 times. Do yourself a favor – Fix It Now!
It is at this time of a plug build that I like to apply a nice thick coat of heavy fill automotive primer from my air gun. This primer will fill all of the remaining imperfections and it can be fine sanded, polished and prepared for the actual molding of the plug.
At this point, I believe that I am done with the helicopter plug. Now is the last time to stare at it and make sure it is right before molding. As you can see in the picture, the two halves of the plug are clamped together so that I can check the alignment. I have already painstakingly aligned the two halves but now I am reaching the point of no return. I spend a good bit of time looking at the alignment of the two halves and at the plug itself.
12-12-2007, 02:55 AM
#39

Join Date: Jan 2005
Location: Vlodrop, The Netherlands
Posts: 383
Likes: 0
Received 1 Like
on
1 Post
Nice work on that plug Doc!
I'm looking forward to your tutorial, I'm waiting for your parting procedure description as I need to improve it myself!
Thank you for sharing!
I'm looking forward to your tutorial, I'm waiting for your parting procedure description as I need to improve it myself!
Thank you for sharing!
01-09-2008, 11:25 AM
#40
Thread Starter
Join Date: Aug 2006
Location: San Diego, CA
Posts: 106
Likes: 0
Received 0 Likes
on
0 Posts
Sorry I have been absent from this tutorial. I found out that my pop has cancer - from smoking - been dealing with that.
Moving on to the tutorial...
I spend a good bit of time looking at the alignment of the two halves and at the plug itself to make sure that it meets my expectations. I notice obvious departures from my reference model and need to decide if I can live with the variations. Remember what I said about my expectations of model building at the beginning of this manual – I like my projects to look like what they are supposed to look like but I don’t expect them to be completely scale. Keeping that concept in mind, I can easily identify this as a Huey UH-1 so I am good with what I have in this plug.
Preparing the plug is the next stage of this build. I begin by mounting the two halves of the plug to a piece of inch thick MDF board. I attach the plugs by using screws from the back side of the MDF. Some people glue or epoxy their plugs to the parting plane. I prefer to use screws because I can remove the plug from the MDF after the mold is finished with out destroying it.
Once I have the plugs securely attached to the parting plane, I need to go around the base of the plugs looking for gaps between the board and the plugs. Any gaps are filled with clay. This is just a matter of forcing the clay into the gaps in order to prevent resin from getting under the plug. When the gaps are filled and all excess clay is removed, I can apply mold release wax to the plugs and the MDF parting plane. I like both McGuire’s and Part-All mold release waxes. It is important to apply at least five coats to the plugs in order to ensure adequate coverage. The plugs should be polished to a shiny smooth finish.
01-19-2008, 08:53 PM
#41

My Feedback: (46)

Join Date: Jul 2002
Location: Marionville, MO
Posts: 1,017
Likes: 0
Received 0 Likes
on
0 Posts
Got a question, ive got a glass cowl i want to duplicate, can i make a mold of it without destroying the original cowl? and would i want to paint the cowl up nice and smooth or just put my wax and mold release strait on the bare glass of the cowl to be duplicated? would the original cowl be ruined for future painting? if i did paint the cowl to make a mold off of, would i have to worry about the paint comming off when releasing the mold?
Thanks for looking at my questions
Thanks for looking at my questions
01-20-2008, 02:39 AM
#42
Thread Starter
Join Date: Aug 2006
Location: San Diego, CA
Posts: 106
Likes: 0
Received 0 Likes
on
0 Posts
Hi there,
You should be able to pull a mold directly from the unpainted cowl. Just make sure to wax it good and get a few coats of PVA on it. It should be fine. You can paint the cowl first but it may get ruined during the de-mold. You can definitly paint it after molding. You have to be sure to remove all the wax before painting. Good luck with that.
You should be able to pull a mold directly from the unpainted cowl. Just make sure to wax it good and get a few coats of PVA on it. It should be fine. You can paint the cowl first but it may get ruined during the de-mold. You can definitly paint it after molding. You have to be sure to remove all the wax before painting. Good luck with that.
01-20-2008, 03:18 AM
#43
Join Date: Jan 2005
Location: Vlodrop, The Netherlands
Posts: 383
Likes: 0
Received 1 Like
on
1 Post
ORIGINAL: Constrictor
[...] and would i want to paint the cowl up nice and smooth or just put my wax and mold release strait on the bare glass of the cowl to be duplicated? [...] if i did paint the cowl to make a mold off of, would i have to worry about the paint comming off when releasing the mold?
[...] and would i want to paint the cowl up nice and smooth or just put my wax and mold release strait on the bare glass of the cowl to be duplicated? [...] if i did paint the cowl to make a mold off of, would i have to worry about the paint comming off when releasing the mold?
If the paint system is properly applied (which is easy) .AND. if the release agents are properly applied (which is harder) you shouldn't worry about the paint chipping off the cowl upon demolding.
You should consider, as Doc already said, that painting the cowl you used as a plug may be more than a concern: treat it with solvent cleaning products (those especially formulated to remove release agents residues) or wet-sand it to its roots...
One last thing: it may be necessary to stiifen the cowl if you intend to use it as a plug. You could add some bulkheads inside it (those bulkheads may then be grinded off if you want to use that cowl again) or you could use 2-part foam (which you won't be able to remove any more): the choice is yours!
HTH,
01-24-2008, 01:45 PM
#45
Junior Member
Join Date: Dec 2005
Location: Ishoj, DENMARK
Posts: 3
Likes: 0
Received 0 Likes
on
0 Posts
Hi Doc,
This is a very interesting project as I am doing a glider fuselage for a 100" glider in fiberglass. See the screenshots from my CAD in the attached photos. You may also see the 3 view of the project. It's a Dave Jones glider called R-2 from the 80'ies, which I am updating with numerous improvements as I go along.
Your post is timely for me as I am just producing a mold in pink foam. This I will have to sheet with some hard stuff inside as the mold would otherwise break easily.
What could I use to harden the inner shell of the crisp, but brittle pink foam? You can see a simulated run version of my foam mold milled in CNC from a friend (orange below).
01-24-2008, 03:24 PM
#46
When making molds directly from a CAD file to CNC I understand it is usual to use aluminum. If you try to finish the inside of a female mold made of foam it will be difficult to get a good match. You would have to be especialy careful arounf the parting line that you do not round it during finishing.
01-26-2008, 12:47 PM
#47
Thread Starter
Join Date: Aug 2006
Location: San Diego, CA
Posts: 106
Likes: 0
Received 0 Likes
on
0 Posts
Hi There,
I have always teated foam as a cheap, light, easy to sand filler that I cover with resin and mat when building a plug. That being said, dreadnaut is right. If you use CAD and CNC, the only way to preserve that kind of precision and detail is to cut it out of a medium that is durable enough to be molded. That material is almost always aluminum.
I have always teated foam as a cheap, light, easy to sand filler that I cover with resin and mat when building a plug. That being said, dreadnaut is right. If you use CAD and CNC, the only way to preserve that kind of precision and detail is to cut it out of a medium that is durable enough to be molded. That material is almost always aluminum.
01-26-2008, 06:11 PM
#48
Thread Starter
Join Date: Aug 2006
Location: San Diego, CA
Posts: 106
Likes: 0
Received 0 Likes
on
0 Posts
Moving on with this turorial, PVA is now sprayed onto the plugs and the parting board. The PVA is an excellent barrier between the mold and the plug. I like to spray a coat, let it dry and then re-apply. Applying two coats of PVA can result in lost detail but that is not a concern for me with this project. An additional coat of PVA will ensure an easy release when I de-mold the plugs.
PVA is applied with my spray gun at about 60 psi and a distance of 8 to 12 inches. PVA is cheap and valuable at the same time.
For the molding process I need my air compressor and dump gun along with: tooling gelcoat, fiberglass resin and chopped mat, MEKP, rubber gloves, disposable brushes and a respirator or fume mask.
I begin by applying black tooling gelcoat with a dump gun at about 80 psi. I make sure to keep the gun close to my work because gelcoat makes a huge mess if it gets on something other than your project. I lay down a nice thick layer of gelcoat making sure to get good coverage around the base where the plug meets the board.
01-27-2008, 04:08 PM
#49
Join Date: Jan 2005
Location: Vlodrop, The Netherlands
Posts: 383
Likes: 0
Received 1 Like
on
1 Post
Yesterday I got my first halves done (wing-tip floats of my 1/12th Canadair CL-215) and I'm pretty satisfied with the results:
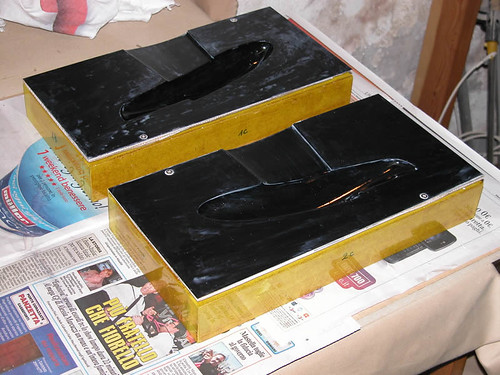
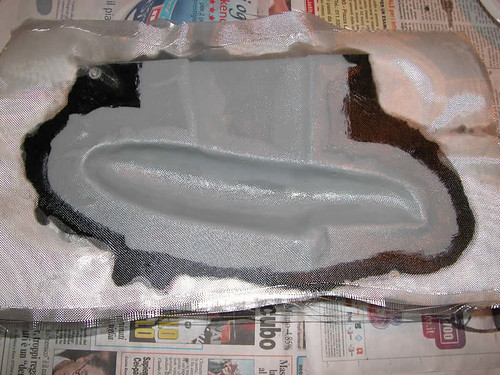

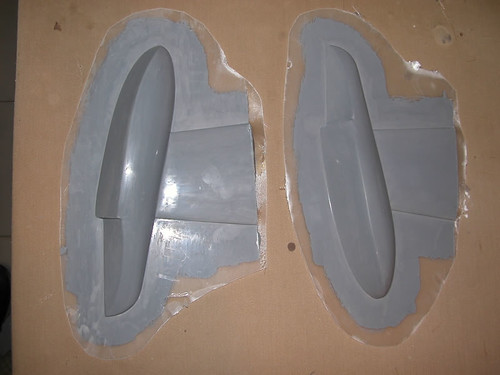
They are some little nasty parts with lots of don'ts for a mold... so I'm happy they turned out as I expected.
They are some little nasty parts with lots of don'ts for a mold... so I'm happy they turned out as I expected.
01-27-2008, 09:02 PM
#50
My Feedback: (46)
Join Date: Jul 2002
Location: Marionville, MO
Posts: 1,017
Likes: 0
Received 0 Likes
on
0 Posts
ORIGINAL: g_boxwood
Yesterday I got my first halves done (wing-tip floats of my 1/12th Canadair CL-215) and I'm pretty satisfied with the results:
They are some little nasty parts with lots of don'ts for a mold... so I'm happy they turned out as I expected.
Yesterday I got my first halves done (wing-tip floats of my 1/12th Canadair CL-215) and I'm pretty satisfied with the results:
They are some little nasty parts with lots of don'ts for a mold... so I'm happy they turned out as I expected.