


Fiberglass How to: Plug to Mold to Parts
 01-29-2008, 06:39 AM
#51


Join Date: Jan 2005
Location: Vlodrop, The Netherlands
Posts: 383
Likes: 0
Received 1 Like
on
1 Post
I'll trim them more precisely and I'll then sand 'em on a flat surface: then I'll simply join them together.
There will be enough mating surfaces around the edges as the corners are not fiberglass-thin due to a thickened mixture of resin+microballoons I applied to smooth the tight-radius corners prior to cloth layup.
There will be enough mating surfaces around the edges as the corners are not fiberglass-thin due to a thickened mixture of resin+microballoons I applied to smooth the tight-radius corners prior to cloth layup.
 01-29-2008, 09:49 AM
#52

My Feedback: (46)

Join Date: Jul 2002
Location: Marionville, MO
Posts: 1,017
Likes: 0
Received 0 Likes
on
0 Posts
You will butt joint the halves and perhaps tape the outside together then lay a narrow strip of fiberglass cloth and resin the cloth??
01-29-2008, 03:30 PM
#53
Join Date: Jan 2005
Location: Vlodrop, The Netherlands
Posts: 383
Likes: 0
Received 1 Like
on
1 Post
Butt-joining will be enough due to the large mating surfaces. I'll post pics as I join them in the next days (too busy right now).
01-31-2008, 02:34 AM
#55
Join Date: Jan 2005
Location: Vlodrop, The Netherlands
Posts: 383
Likes: 0
Received 1 Like
on
1 Post
Thank you Doc and sorry for having posted in your thread, I didn't want to hijack it, fact is I was molding like you these days!
Looking forward your molds!
Looking forward your molds!
02-08-2008, 10:01 AM
#56
Junior Member
Join Date: Feb 2005
Location: Bellevue, NE
Posts: 1
Likes: 0
Received 0 Likes
on
0 Posts
You guys are using foam. What resin do you use on which foam? I tried a one off and the foam melted, it takes a lot of filler when that happens, good thing it was a boat. Thanks
02-08-2008, 05:13 PM
#57
Join Date: May 2006
Location: Melbourne, AUSTRALIA
Posts: 231
Likes: 0
Received 0 Likes
on
0 Posts
It seems like you used polyester resin on polystyrene foam. In this case it will melt. If you still want to use polystyrene foam, then you are going to need to use epoxy resin (which is about 3 times the price, but a lot better to work with). I use polyurethane expanding foam. Its a 2 part mix and expands at a ratio of about 1:20. Its alot better to sand and cut than the polystyrene. You can apply polyester resin directly onto it, but it is expensive. For a litre, which will make about 20 litres of foam, its $35AUD. Just depends how big your plug is.
02-09-2008, 03:17 AM
#58
Join Date: Jan 2005
Location: Vlodrop, The Netherlands
Posts: 383
Likes: 0
Received 1 Like
on
1 Post
My plugs are balsa and ply with a layer of 0.75 fiberglass but I do occasionally use expanding foam as well.

I agree, use epoxy instead of poly.
I agree, use epoxy instead of poly.
02-16-2008, 04:56 AM
#59
Join Date: Jan 2005
Location: Vlodrop, The Netherlands
Posts: 383
Likes: 0
Received 1 Like
on
1 Post
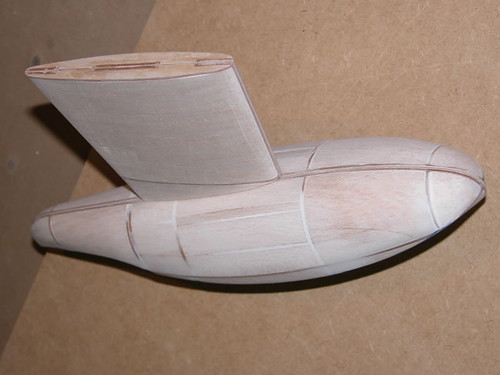
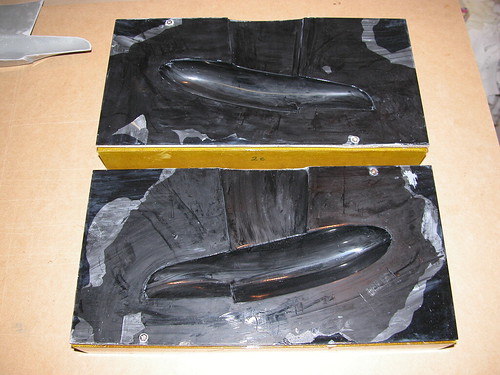
Ok, I was able to finish my first tip-float prototypes from my own molds!
I left you with the very first pair of halves roughly cut: before proceding I molded the second pair and I then trimmed all of them a little bit more precisely.
Please note that it is not really necessary to cut them perfect since the final trimming is achieved by sanding them on a flat surface:
Note that @ this stage the PVA film hasn't been peeled off yet: you can peel it off by hand and/or wash it off with tap water and a sponge.
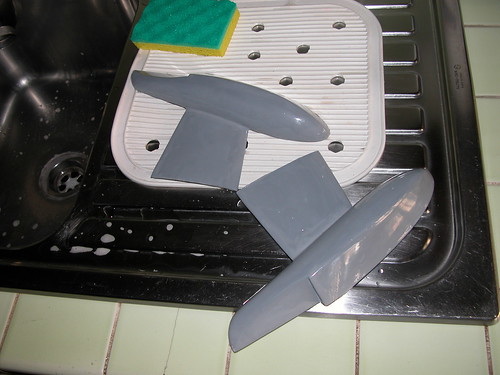
The same applies to the molds that are depicted here just after the parts have been removed:
I left you with the very first pair of halves roughly cut: before proceding I molded the second pair and I then trimmed all of them a little bit more precisely.
Please note that it is not really necessary to cut them perfect since the final trimming is achieved by sanding them on a flat surface:
Note that @ this stage the PVA film hasn't been peeled off yet: you can peel it off by hand and/or wash it off with tap water and a sponge.
The same applies to the molds that are depicted here just after the parts have been removed:
02-16-2008, 04:57 AM
#60
Join Date: Jan 2005
Location: Vlodrop, The Netherlands
Posts: 383
Likes: 0
Received 1 Like
on
1 Post
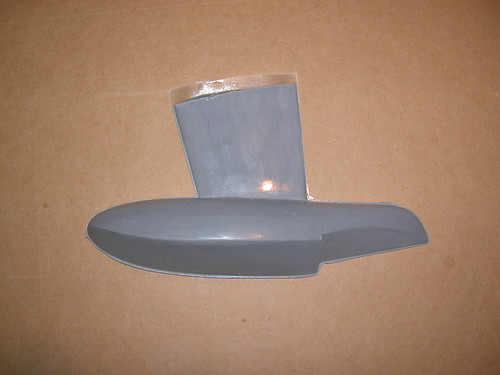
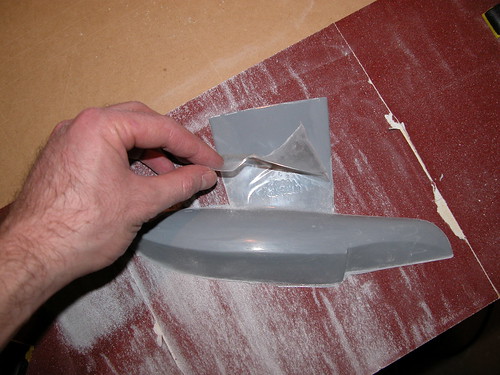
Next came the weight-check: basically I averaged a 1 oz. weight per half.
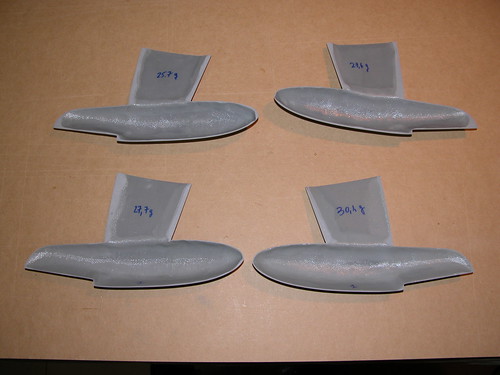
Here they are once joined together:
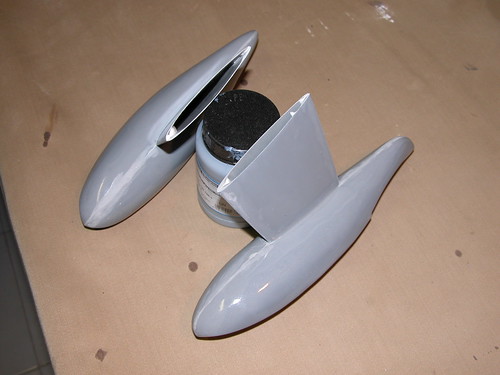

They weight a little bit more/less than 2 oz. because of the gluing mixture (epoxy + microballoons):
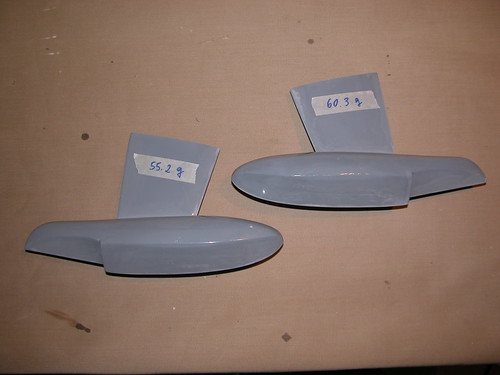
Their surface finish is highly gloss and it will need some light sanding to promote paint adhesion (400-grit).
Here they are once joined together:
They weight a little bit more/less than 2 oz. because of the gluing mixture (epoxy + microballoons):
Their surface finish is highly gloss and it will need some light sanding to promote paint adhesion (400-grit).
02-16-2008, 05:00 AM
#61
Join Date: Jan 2005
Location: Vlodrop, The Netherlands
Posts: 383
Likes: 0
Received 1 Like
on
1 Post
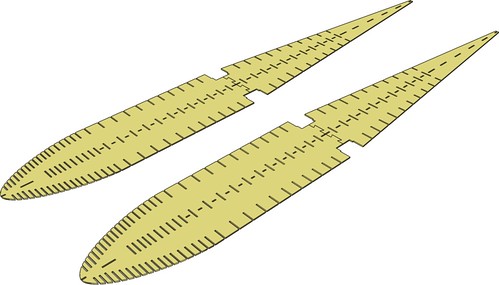
After having tried my hand at molding the tip floats I started to dream about a full fiberglass fuselage!
This is what I did yesterday in a day-long CAD session: I basically took Bernard's plans and re-drew them to lead to a plug which could be put together easily and quickly due to its interlocking construction.
The fuse plug needs to be split into a top and bottom halves (not into left and right): the top half will probably require a further longitudinal split if all the details are to be saved upon de-molding.
Here it is how I designed the parts for the plugs.
1. both the bottom and top halves share a common base:
2. vertical keel elements are then slid into the notches onto the respective base:

3. every single former is then slid into position:

4. stringers are added:
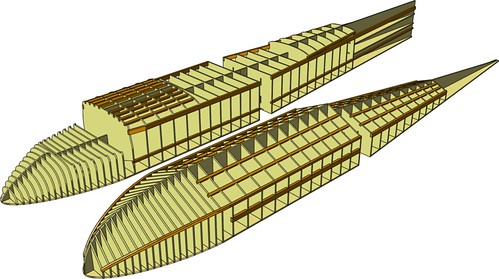
5. other elements complete the assembly:
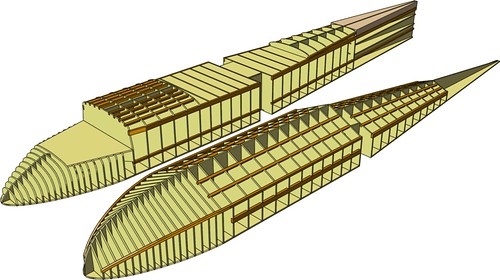
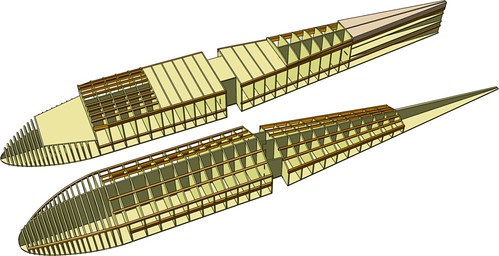
6. the remaining -empty volumes- are then filled with foam and all the plug is sheeted with 1.5 mm balsa and then glassed;
7. priming and detailing takes place;
8. they are added to their parting boards and prepared.
This is what I came up with and I'll now see if I can get it done.
This is what I did yesterday in a day-long CAD session: I basically took Bernard's plans and re-drew them to lead to a plug which could be put together easily and quickly due to its interlocking construction.
The fuse plug needs to be split into a top and bottom halves (not into left and right): the top half will probably require a further longitudinal split if all the details are to be saved upon de-molding.
Here it is how I designed the parts for the plugs.
1. both the bottom and top halves share a common base:
2. vertical keel elements are then slid into the notches onto the respective base:
3. every single former is then slid into position:
4. stringers are added:
5. other elements complete the assembly:
6. the remaining -empty volumes- are then filled with foam and all the plug is sheeted with 1.5 mm balsa and then glassed;
7. priming and detailing takes place;
8. they are added to their parting boards and prepared.
This is what I came up with and I'll now see if I can get it done.
03-24-2008, 11:21 AM
#62
Thread Starter
Join Date: Aug 2006
Location: San Diego, CA
Posts: 106
Likes: 0
Received 0 Likes
on
0 Posts
Once the plug is covered with gelcoat, I let it cure to a tack. I did this project on a nice hot San Diego day so it cured to a tack in about 45 minutes.
At this step I used a different approach than I am used to. I came into possession of a large roll of veil that I decided to use in the corners and angles of the mold. In the past I have always used a combination of cabosil and resin. I found the veil easy to work with, especially when pushing it into corners with a chip brush. With the veil in place, I proceed to build the mold with three layers of 1 ½ ounce chopped mat.
I begin applying the chopped mat by brushing a nice thick layer of catalyzed resin over the area of the plug that I am working on. Then I place a piece of mat that has been pulled off of my roll and lay it on the plug. I like to keep the pieces fairly small on a project like this, no larger than 6 inches square. Pulling the mat apart will leave many loose fibers that will help the strength of my final product once it has cured. When applying the mat, I like to overlap my pieces by about 20% and build a nice flange around the base of the plug.
I let this mold cure on the plug for almost a week before demolding. This mold popped off its parting board with little effort. Likewise, the mold separated from the plugs with ease. The process for removing the mold from the plug is simple. I use a half dozed small plastic putty knives that I insert between the mold and the parting plane. Once I have one putty knife between the mold and the parting plane, I simply insert another putty knife at the edge of the separation that occurred as a result of the first knife. This is repeated time and time again as I work my way around the perimeter of the mold. Once you get started, this is an easy process.
And there it is, just how I like it. The plug is intact and the mold is relatively free of defects.
At this point the mold is inspected for any flaws, repaired and then prepped for its first part pulls.
Making parts with this mold is very similar to making the mold itself. I begin by applying five coats of mold release wax to the inside of the mold. Once the mold is waxed, I can apply a coat of PVA. After the PVA dries, I brush in a nice healthy layer of gelcoat. Once the gelcoat cures to a tack, I begin to lay resin and mat. Since this is a fairly large item, I do two layers of 1 ½ ounce mat to provide a little strength without the part getting too heavy.
Once this fiberglass gels, I trim the excess with a sharp utility knife and let the mold cure to its full hardness. Since I will be joining the two halves of the helicopter, I don’t pull the pieces from the mold until I am ready to join them. This is because any shrinkage / warping will wreak havoc with my attempts to line up the two halves of this copter during the joining process.
Removing the parts from this mold is done just as described previously. I slip a putty knife between the mold and the part. Using several putty knives, I work the perimeter of the mold to loosen the piece. I progressively dig the putty knives deeper and deeper until my parts pop out of the mold.
Once the parts have been removed, I can clean / flatten the edges with a sanding block, align the two halves and use masking tape to hold them together and seal the seam. To finish this project I catalyze about 4 oz of resin and pour it along the inside of the seam that divides the two halves of this copter. The resin is poured into the fuselage through the opening where the exhaust port would be. I then tilt the copter forward and backward to cover the seam with resin. Once this cures, I can remove the tape and deal with filling any defects in the seam.
With this post, this project is done. I apologize for the long delays between these last few posts. Good luck with your fiberglass projects. This project ended up consuming alot more of my time than I expected. I now have two helicopter ceiling fan models with a JetRanger on the way. Turns out it is a popular item. I have sold many on eBay and quite a few to folks who see them hanging in my office. It is always nice to make a few extra bucks with your hobby
03-24-2008, 12:43 PM
#63
Senior Member

Join Date: Mar 2007
Location: Greenville, SC
Posts: 174
Likes: 0
Received 0 Likes
on
0 Posts
don't underestimate the power of compressed air from an air nozzle to help remove parts from a mold. Saves a lot of potential for damage from wedges and the like.
03-26-2008, 06:29 AM
#64

ORIGINAL: g_boxwood
After having tried my hand at molding the tip floats I started to dream about a full fiberglass fuselage!
This is what I did yesterday in a day-long CAD session: I basically took Bernard's plans and re-drew them to lead to a plug which could be put together easily and quickly due to its interlocking construction.
This is what I came up with and I'll now see if I can get it done.
Which CAD application(s) are you using?
Thanks,
-Jorden
03-26-2008, 08:45 AM
#65
Join Date: Jan 2005
Location: Vlodrop, The Netherlands
Posts: 383
Likes: 0
Received 1 Like
on
1 Post
That fuse was modeled in Rhinoceros 4.0 and rendered in Penguin (non-photorealistic renderer, sold as a plug-in for Rhino and AutoCAD).
04-20-2008, 03:13 PM
#66
My Feedback: (13)
I was wondering I keep seeing PVA used, is this the same material as the drywall primer,it looks as though its clear not white is it a special product for molding porposes.
I wanted to make a cowl using a 2 piece mold,and split it, is there a particular parting board used to split the mold,I am going to make a FW 190A8 cowl so there is a few bumps that don't permit it to be slipped out,I either need to do 2 halfs and join them, or a split mold,there are some great tips here,this has been a very informative thread I would have never thought of doing a plug using these methods without it.
I am planning on using surfboard foam to make my plug,so it will be resin compatable,my buddy is a board builder and has a ton of scrap for me to use.
04-23-2008, 02:49 PM
#67

Surf board foam is actualy polyurethane, and is sometimes called flower shop foam, and it is compatable with polyester resin.
PVA (Poly Vinyl Alcohol) has a lot of industrial uses, mold realease is one of them. (Another is that is is often added to fast food shakes, and soft serve ice cream as a foaming agent. This is why if you leave one out to melt, the volume goes down. It is how they get the air into them).
I like to apply the PVA by spraying it on with an airbrush. After you get a good coat there will be very tiny air bubbles and I take a spray bottle filled with de-natured alcohol and lightly spray over the PVA while it is still wet, until the bubbles are gone. I learned this trick years ago while working in a plant that made CRT's. The coating on the back of the screen was a powderd phosphor suspended in PVA. Bubbles were a defect, and there was an operator that watched the coating machine, spray bottle in hand. They used metanol, but de-natured works as well, and is less toxic.
04-23-2008, 08:45 PM
#68
My Feedback: (13)
I am down with the surfboard foam,as well as fiberglass construction,been surfing about 34yrs,fortunitly I went to Tap Plastics and was kindly shown all the mold release agents and the different types of waxes,since my posting, thanks though for the reply.
I actually have some family down in vista,CA.area. here's a little Indonesia from the boat.[8D]
my main concern is lining up the 2 halfs of my mold and making a 2 part form, so I can get a one piece cowl,if I have to I will copy the DocJones199 method and do 2 pieces and join them he did such a good job it doesnt look like there is any loss of quality, but I would prefer to do a single thicker cowl since the FW190 A8 is a short nosed plane and can handle the extra weight and strength up front and pass on the extra step of joining the sections.
I have a idea of using a plastic divider between the sections and drilling line up holes before I remove the form any ideas.
,fortunitly I went to Tap Plastics and was kindly shown all the mold release agents and the different types of waxes,since my posting, thanks though for the reply.I actually have some family down in vista,CA.area. here's a little Indonesia from the boat.[8D]
my main concern is lining up the 2 halfs of my mold and making a 2 part form, so I can get a one piece cowl,if I have to I will copy the DocJones199 method and do 2 pieces and join them he did such a good job it doesnt look like there is any loss of quality, but I would prefer to do a single thicker cowl since the FW190 A8 is a short nosed plane and can handle the extra weight and strength up front and pass on the extra step of joining the sections.
I have a idea of using a plastic divider between the sections and drilling line up holes before I remove the form any ideas.
