


My new flapless stunter
 01-01-2008, 04:45 PM
#1
Senior Member
Thread Starter
Join Date: Jun 2007
Location: Lake Worth, FL
Posts: 1,009
Likes: 0
Received 0 Likes
on
0 Posts
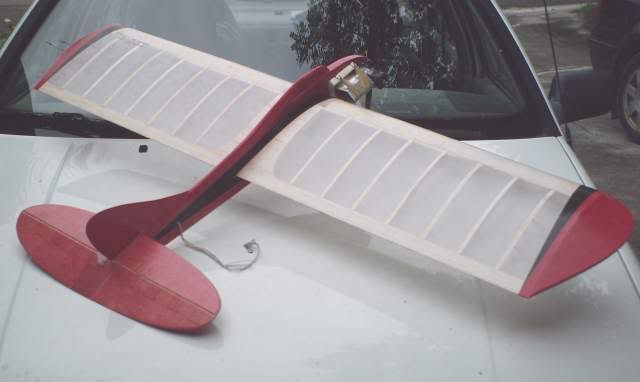
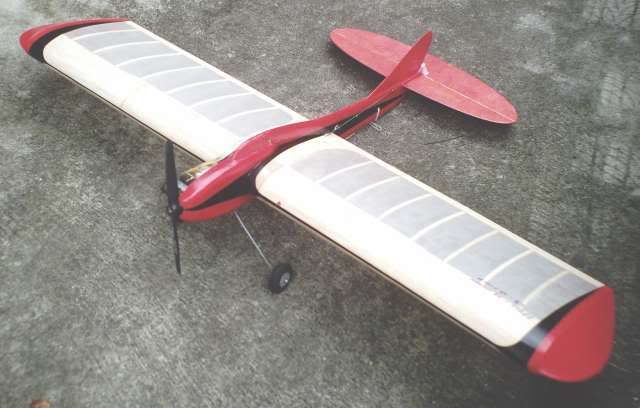
~560 square inches. Only 33oz ready to fly. I guess I borrowed heavily from Ringmaster esthetics, but the rudder looks vaguely McFarland Sharkish.
The airfoil is about 2.5" thick and almost identical to a NACA 0023. Power at the moment is a 40 or 50 year old kinda worn out Fox Stunt .29. It is slightly underpowered unless its 2-cycling. I may put a Stunt 35 in it or play with the prop some on the .29. Its got a stock MA 10x6 on it and their blades seem kinda thin.
I believe its possible to shave another 3 ounces off this design. Substitute silkspan for the silk, do tissue trims rather than paint, thin out some of the structure more (ex the rudder was made from 4 glued together pieces of 1/8" from my scrap box and silk covered). The rudder could be 1/16" and tissue covered. The main ribs (1/16" C grain) can get larger lightening holes. I went crazy beefing the bellcrank mount, etc, etc.
The sheeting is 1/32" -- the silk is structural.
The elevator was 1/8" tapered to a knife edge and tissue covered - the tissue is also structural here. The stab was a 1/16-1/32-1/16 laminated balsa with the 1/32 running cross grain to add stiffness in bending. The elevator is laminated in the center area with 1/64" ply on both sides. This scheme wound up 1 oz lighter than a built up stab/elevator I'd initially intended for it.
This thing really danced WELL during the initial couple of trimming flights. I had to adjust the leadouts back a tad and twiddle the incidence on the stab a degree or so, and it needs maybe a half ounce of tip weight - there was none initially. The tip weight I'd do tonight.
This prototype flys so well I've already started building the next one. This is flat out the best flying tightest turning plane I've ever owned. A full up loop won't stall it, it just slows a bit like a well trimmed combat plane. There's no evil wobbling or hinging through full deflection turns - everything was smooth, smooth, smooth. C/G was dandy as is. Didn't put any nose or tail weight on it.
 01-01-2008, 07:14 PM
#3
Senior Member
Thread Starter
Join Date: Jun 2007
Location: Lake Worth, FL
Posts: 1,009
Likes: 0
Received 0 Likes
on
0 Posts
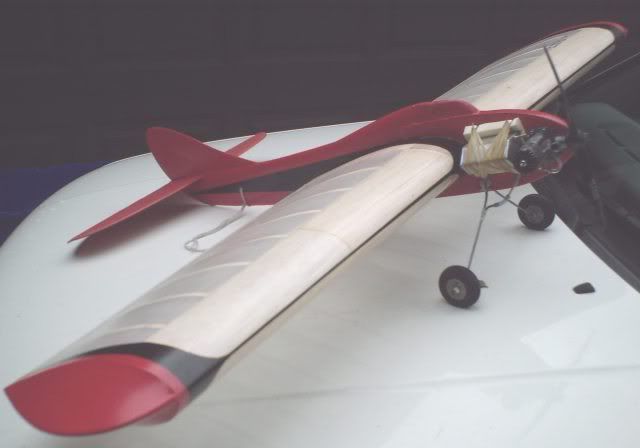
The covering and finish were done real quick and kinda slopped on. It looks nice, but its all brushed and there's lots of brush marks cuz I was using a lousy nylon bristle brush and holding back on the retarder cuz I didn't have much left on hand. I really need to buy a sprayer. My airbrush won't flow enough to do large areas effectively.
There's a couple of brushed nitrate basecoats to seal the weave, but if everything after that was shot it'd look a lot nicer. I think I'll french curve the black trim rounded corners. Right now they're just the diameter of a paint spray can bottom
The changes I know I'm going to experiment with on the next one are:[ul][*]Join the 1/32 sheeting in the center rather than out where the joint line shows (like in the 2nd pic). Then the sheet splice will serve to firm up the center section as well. Now it does nothing but join the sheets and add weight towards the extremities, which is bad.[*]Use more Ambroid or Sigment. There's probably an ounce of CA in this thing that could be eliminated by judicious Ambroid usage. I was in a big hurry to prove the concept and was slopping the CA around pretty good. I burned a full 2oz bottle putting it together.[*]Move the spar doublers onto the other side of the spar so there's more meat to glue sheeting to in the high stress area and to hide them cosmetically. Exposed on the back side of the spar they look ugly. They show up in the 1st pic going about half way out on the wing where they terminate.[*]Taper the nose doublers more to lighten the nose up.[*]1/16" tissue covered rudder.[*]All tissue trims rather than paint.[*]Inverted bellcrank[*]Use a 3" bellcrank. This only has a 2" in it now. Even so its not twitchy, but I'm on the outside hole on the horn too. [*]Eliminate the stab incidence. The prototype started with about 1.5 degrees and is not needed at all. [*]Drill out the recessed part of the maple mounts (I forgot to do that before).[*]Find some very light 1/2" for the cheek. What I had on hand was medium hard 3/8" and its was heavy.[*]Shape/Sand the rear of the fuselage more.[*]Maybe fit some shallow deflection flaps - I don't think it would need much at all. 10 degrees maybe. That would take it up to around 600+ square inches if they started at 2" and tapered to the tips. 1/8" balsa with a doped on carbon veil might keep'em light.[*]Titanium welding rod landing gear.[*]Carbon tube pushrod. This 1/16" music wire one needed 3 guides to keep it from flexing.
[/ul]
 01-03-2008, 03:28 PM
#5


ORIGINAL: cutaway
//snip//
I really need to buy a sprayer. My airbrush won't flow enough to do large areas effectively.
There's a couple of brushed nitrate basecoats to seal the weave, but if everything after that was shot it'd look a lot nicer. I think
//snip//
//snip//
I really need to buy a sprayer. My airbrush won't flow enough to do large areas effectively.
There's a couple of brushed nitrate basecoats to seal the weave, but if everything after that was shot it'd look a lot nicer. I think
//snip//
Looks great, cutaway. Should be one snazzy flier.
Reference the sprayer: Personally I am very lazy. I hate cleaning up a spray outfit. [:@] Now here is a good little item. Found at Home Depot and a number of paint stores. Relatively inexpensive and does a great job for fairly large areas.
No picture here but is is called the "Preval SPRAYER". Comes with a spray item somewhat like a spray can but much much much better. It comes with the fittings or without a paint bottle which screws on the bottom. Holds enough paint to do a coat of dope on a 700 sq. ins. wing area model. Sprayer does about a pint depending on your usage.
Cleans up with simply squirting some thinner/acetone/mek etc. through it, like turning a spray can upside down.
You might like it. Haven't bought any since last year as I did stock up at one time. The price then was $3.95 for sprayer and bottle and 3.50 sprayer alone.
Preval Sprayer
Precision Valve Corporation
P.O. Box 309
Yonkers, NY 10702 (Made in USA)
http://www.prevalspraygun.com/
Good luck with that machine.
01-04-2008, 01:13 PM
#6
Senior Member
Thread Starter
Join Date: Jun 2007
Location: Lake Worth, FL
Posts: 1,009
Likes: 0
Received 0 Likes
on
0 Posts
Put two flights on it early today in about a 10-15mph breeze.
A half ounce tip weight flattened out its attitude upright/inverted. I tried a 10/6 and 10/5 MA wood and both seemed to perform a lot better than the glass filled nylon MA 10/6 pulling it around OK on a 4-2-4 break, but just the weight difference in the props moved the C/G enough it became a touch jumpy. I think I'll try sawing down a 11 or 12/5 wood and see how that works. The fatter blade might add enough back to get the C/G back. The 10/6 wood was actually a tad too fast, and it wound up on consecutive insides even with the 10/5. My gut feeling is that something like a 10.5/4 wood cut down from a 11 or 12 might be the right answer.
I also have a suspicion that the rudder might be a tad too small. Enlarging that is on the list of trim experiments. I'll skinny it down and tissue it to keep the weight similar to what it has now.
01-04-2008, 08:05 PM
#7
Senior Member
I think your all-up weight is fine. I wouldn't put it on too much of a diet. People say the 10.5 x 4.5 APC is just the thing for a Fox 35. Have not tried one. I am presently running an APC 11 x 4 on Fox 35 on a smaller and lighter airplane than yours.
01-16-2008, 09:54 PM
#8
Senior Member
Thread Starter
Join Date: Jun 2007
Location: Lake Worth, FL
Posts: 1,009
Likes: 0
Received 0 Likes
on
0 Posts
My most recent trimming exercise included making up a set of .012/55' lines and swapping the Fox .29 for a Fox .25 (70's vintage, with the straight upright bolt on venturi). This was quite a successful combination in the air. The glass APC almost (but not quite) made up for the lighter weight of that engine.
The shorter lines helped a lot with overhead line tension, and the .25 turning a 10x4 APC pulled it with more authority than the .29 did with a 10x4. Its easily capable of the full pattern on the shorter lines -- a cloverleaf can easily be accomplished with all the turns happening within about 45 degrees of elevation.
The next version is being framed up right now with the wing being ready for the LE sheeting. The next one will have flaps. I took a look at the pressure distribution profile for a NACA 0024 when flap equipped (this is pretty close to a 0024) and saw a pretty big lump at the TE, so I beefed up the TE quite a bit to handle to added load at the rear. This flap equipped one is looking to come in around 650 square inches and I expect its weight to be similar -- just over 2lb flying weight.
He, he, he - a 650 square inch stunter pulled by a .25. Something about that idea just appeals to me ;->
07-26-2008, 03:22 PM
#9
Senior Member
Thread Starter
Join Date: Jun 2007
Location: Lake Worth, FL
Posts: 1,009
Likes: 0
Received 0 Likes
on
0 Posts
Latest tuning efforts on this beast include a new Stunt .35, 10x5 prop, and a set of 50' .015 lines. Even on the quite short 50' lines this thing has plenty of turning performance to fly the whole stunt pattern very comfortably I could probably fly the whole pattern on 45' lines and not run out of room to do it all.
07-27-2008, 10:03 AM
#10

cutaway,
In your original postings you mentioned a "worn out" Fox .29 and a (unspecified condition) Fox .25. Since you did not mention fuels, if you use a 25%-29% all castor fuel in those engines you might get some power back with a varnish shield. Synthetic removes the varnish seal.
Some guys have been known to forget this when they have been running ABC's with all or some synthetic.
BTW, that vintage Fox .25 was known to be a strong running engine. Since you seem to prefer Foxes, I'm sure you already know all of this.
George
In your original postings you mentioned a "worn out" Fox .29 and a (unspecified condition) Fox .25. Since you did not mention fuels, if you use a 25%-29% all castor fuel in those engines you might get some power back with a varnish shield. Synthetic removes the varnish seal.
Some guys
have been known to forget this when they have been running ABC's with all or some synthetic.BTW, that vintage Fox .25 was known to be a strong running engine. Since you seem to prefer Foxes, I'm sure you already know all of this.
George
11-15-2010, 02:40 AM
#11
Senior Member
Thread Starter
Join Date: Jun 2007
Location: Lake Worth, FL
Posts: 1,009
Likes: 0
Received 0 Likes
on
0 Posts
Heh, this plane went in hard today - the down leadout tore through the bellcrank when it was inverted and it went almost straight in at the bottom acute angle corner of a bow-tie maneuver. Curiously, all it did crud up the engine and bust the prop. Didn't even pop any of the silk and everything else looked OK. I'd expected this plane to explode if it ever contacted the ground hard since the structure was pretty minimal...
I even used solid leadouts on it to try and prevent the soft inferior quality Perfect bellcrank (the only thing I had on had when it was being built) from getting sawed through, but even that wasn't enough. Only had about 80 flights on it too...although the last 30 or so were with a ST G.34 and it was being flown very very hard.
I guess you need to fit eyelet bushings to those junky Perfects even if using solid leadouts...
11-15-2010, 10:04 AM
#12
Senior Member
ORIGINAL: cutaway
I guess you need to fit eyelet bushings to those junky Perfects even if using solid leadouts...
I guess you need to fit eyelet bushings to those junky Perfects even if using solid leadouts...
Yup
Somehow I'm not surprised you've got a solution to the problem. Good design, good execution, and it lasted almost 3 years.
11-15-2010, 04:45 PM
#13

My Feedback: (1)
Just curious - did that Perfect b/c also have a plastic bushing, instead of a brass one? I received a Perfect in a cottage industry kit recently. The bellcrank had a plastic bearing and was of such a soft aluminum that I bet I could have cut it with a large pair of scissors. I tossed the bellcrank because it wasn't worth the time and effort to try and fix it. To tell the truth, I wasn't aware that Perfect was still supplying bellcranks, but I believe that I recently saw them while poking around on the Tower site.
Pity that your model succumbed to a similar issue it was a nice looking ship.
Pity that your model succumbed to a similar issue it was a nice looking ship.
 11-16-2010, 01:15 PM
#15
Senior Member
Thread Starter
Join Date: Jun 2007
Location: Lake Worth, FL
Posts: 1,009
Likes: 0
Received 0 Likes
on
0 Posts
ORIGINAL: mikeainia
Just curious - did that Perfect b/c also have a plastic bushing, instead of a brass one?
Just curious - did that Perfect b/c also have a plastic bushing, instead of a brass one?
