


Wing tip repair
 01-23-2013, 11:15 AM
#1

Thread Starter
My Feedback: (10)

Join Date: Jun 2002
Location: Ladera Ranch, CA
Posts: 678
Likes: 0
Received 0 Likes
on
0 Posts
Need some guidance, please...
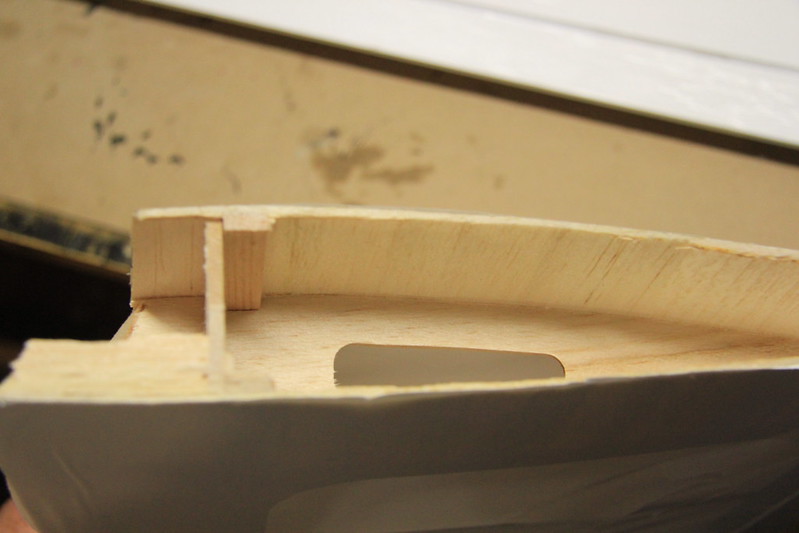
I tip stalled my BH FW 190a on Saturday and I'm very bummed... I have shattered the right wing tip to the first rib out there and need some help/pointers recreating it. One of the clubs kit builders said to cut away the shattered balsa and use the other wing to shape a new wing tip. huh?
I'm guessing that replacing the tip with a shaped block of balsa is not what he meant. In my box o' balsa I have a few sheets of thin sheeting, a leading edge stick, and some rib width sticks (all balsa).
I don't have plans for this model as it's an ARF. I know it sounds lame but previous attempts at wing repair on a different model have resulted in an massively overweight end-result (Zen 120 repair in a thread here on RCU).
I'll have pics to share tonight when I get to start working on it... I hoped maybe I could use the portions of plans for another model to use as a template ... I have a leading edge stick, I have sheeting, is there a special cut of balsa for the very end of the wing? how do i get the gracful curve from the sheeting to mimic the other wing (not the leading edge but the top and bottom surface)? I even got a recommendation to take a piece of foam, shape it, and epoxy the remaining pieces around it... since the covering on the model is printed and it's a sticker (i think), should I use black Monokote and spray paint it to match?
As a result of this latest crash I've also bent the Oleo struts and splintered the seat I bolt the wing to in the fuse.
BTW... this is the same model i rolled the landing gear out of (fixed with help from another post).
any guidance/direction is appreciated as always...
 01-23-2013, 12:28 PM
#2
Senior Member

Hey sparky,
I knocked the wingtip off my RTF trainer when I treed it last spring. Here are some pics of the repair.
Where the wingtip used to be.
I got a balsa block from my LHS. I cut two pieces to length and glued them together.
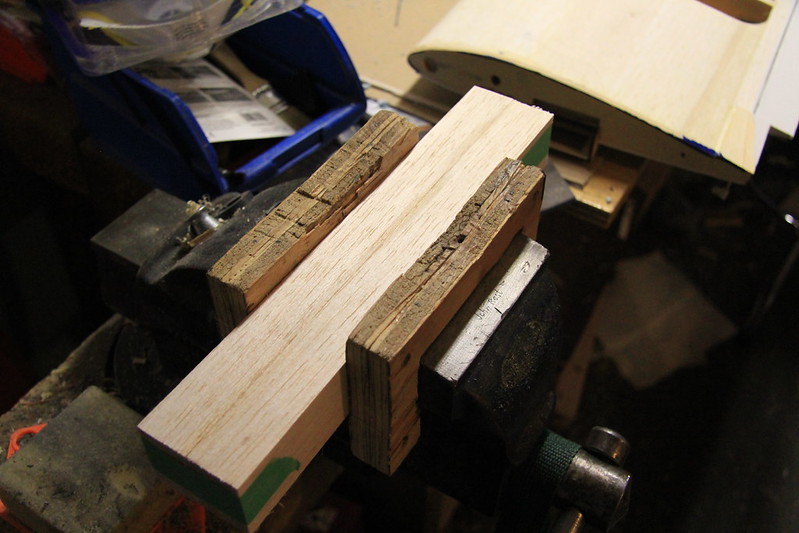
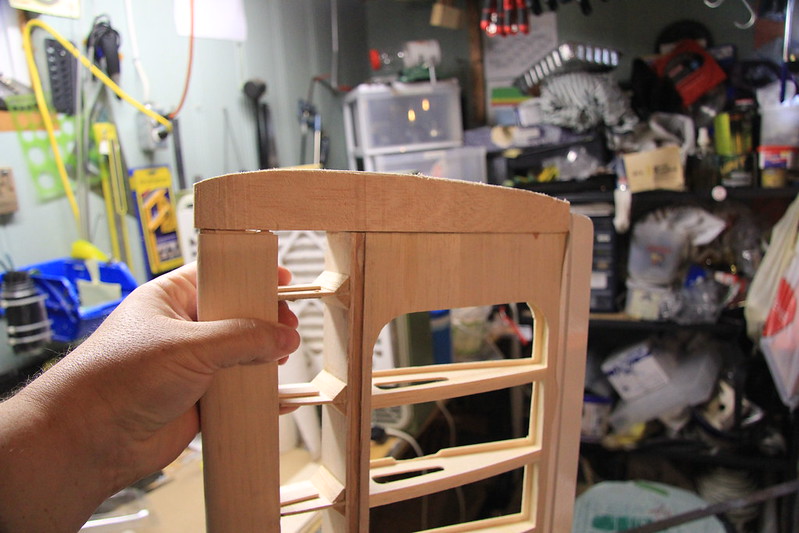
I placed the glued block next to the intact one on the other wing, always bearing in mind that I wanted a mirror image, not an exact copy. I traced a rough curve and cut it out.
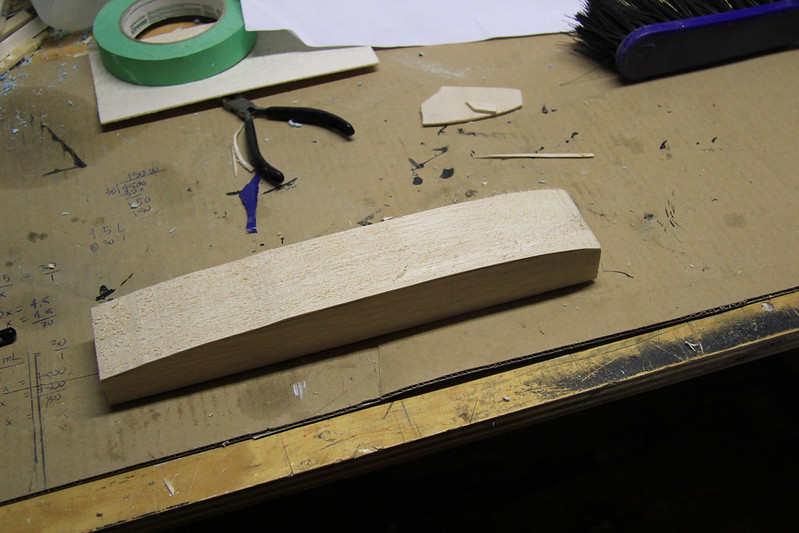
Next step was to hold the block in place on the broken wing to trace the shape onto it. Then I cut that out, leaving a VERY rough wingtip.

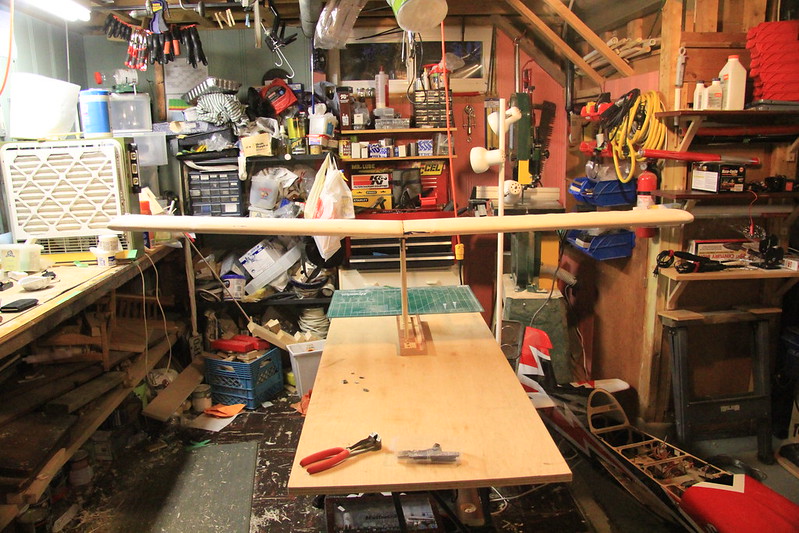
Next, I glued the wingtip onto the wing.

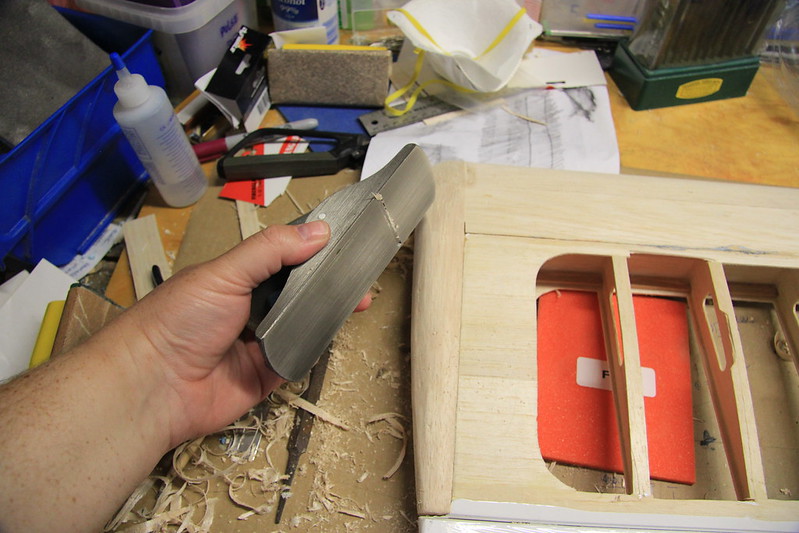
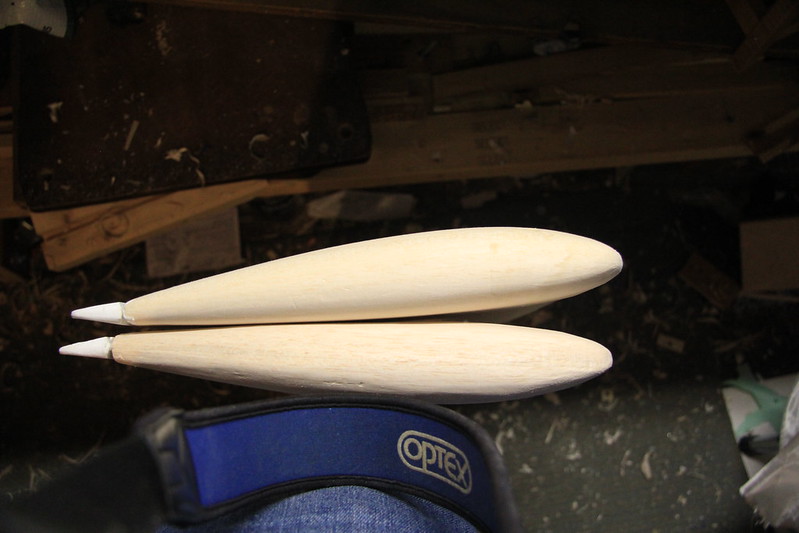
Finally, I used a block plane to shape the tip. I went slowly and compared it often with the other wingtip.
The end result:
I knocked the wingtip off my RTF trainer when I treed it last spring. Here are some pics of the repair.
Where the wingtip used to be.
I got a balsa block from my LHS. I cut two pieces to length and glued them together.
I placed the glued block next to the intact one on the other wing, always bearing in mind that I wanted a mirror image, not an exact copy. I traced a rough curve and cut it out.
Next step was to hold the block in place on the broken wing to trace the shape onto it. Then I cut that out, leaving a VERY rough wingtip.
Next, I glued the wingtip onto the wing.
Finally, I used a block plane to shape the tip. I went slowly and compared it often with the other wingtip.
The end result:
01-23-2013, 12:55 PM
#3
Thread Starter
My Feedback: (10)
Join Date: Jun 2002
Location: Ladera Ranch, CA
Posts: 678
Likes: 0
Received 0 Likes
on
0 Posts
If i understand correctly, you replaced both wingtips with solid pieces then? that would be easier for me but my wing tips aren't solid now so recreating them with solid balsa would make it too heavy, won't it?
01-23-2013, 05:33 PM
#4


Use light balsa. It will save weight and be much easier to shape. They really won't weigh much. If you stil want to cut the weight more you can hollow them out.
It is actually a rather common way to make wing tips. And adds a lot of strength at the tip.
Ken
It is actually a rather common way to make wing tips. And adds a lot of strength at the tip.
Ken
01-23-2013, 05:55 PM
#5
Senior Member
My Feedback: (14)
ORIGINAL: sparky4lawndart
If i understand correctly, you replaced both wingtips with solid pieces then? that would be easier for me but my wing tips aren't solid now so recreating them with solid balsa would make it too heavy, won't it?
If i understand correctly, you replaced both wingtips with solid pieces then? that would be easier for me but my wing tips aren't solid now so recreating them with solid balsa would make it too heavy, won't it?
Sparky......you are OVER THINKING IT!!! You don' t want a ton of extra weight, but if you have to add weight....always make it useable, and always make it equal.
Make 2 wingtips....do the best you can and go fly that hog!!!!
 01-24-2013, 10:37 AM
#6
Senior Member
ORIGINAL: sparky4lawndart
If i understand correctly, you replaced both wingtips with solid pieces then? that would be easier for me but my wing tips aren't solid now so recreating them with solid balsa would make it too heavy, won't it?
If i understand correctly, you replaced both wingtips with solid pieces then? that would be easier for me but my wing tips aren't solid now so recreating them with solid balsa would make it too heavy, won't it?
Nope, one was still intact - I just removed the covering from it so I could get a better look. Both wings needed recovering anyway. As it turned out, the port wing - the one that needed the new wingtip - ended up a little lighter than the other. I balanced the wing on its own...
... then made a pocket for the little weight I needed and epoxied it in.

If you're interested, the full set of pictures of the wing rebuild - all 311 of them - can be viewed at Hobbistar 60 - Wing repair
01-28-2013, 09:17 AM
#7

If you saved all the pieces of the ribs etc that broke then you can reassemble them with thin CA just so you can use them for a template and then start rebuilding. Pictures will help.
01-28-2013, 03:19 PM
#8
Thread Starter
My Feedback: (10)
Join Date: Jun 2002
Location: Ladera Ranch, CA
Posts: 678
Likes: 0
Received 0 Likes
on
0 Posts
hey all... thanks for all the ideas.. I actual ruined two attempts at creating a blank solid piece...
I've gone ahead and essentially filled the end with expanding foam, then collapsed all the pieces (like a puzzle) around it... the foam doesn't dry for a few minutes so i had time adjusting (smooshing) pieces... It doesn't look terrible but it'll fly...
I'll post pics when its on the flightline
I've gone ahead and essentially filled the end with expanding foam, then collapsed all the pieces (like a puzzle) around it... the foam doesn't dry for a few minutes so i had time adjusting (smooshing) pieces... It doesn't look terrible but it'll fly...
I'll post pics when its on the flightline
