


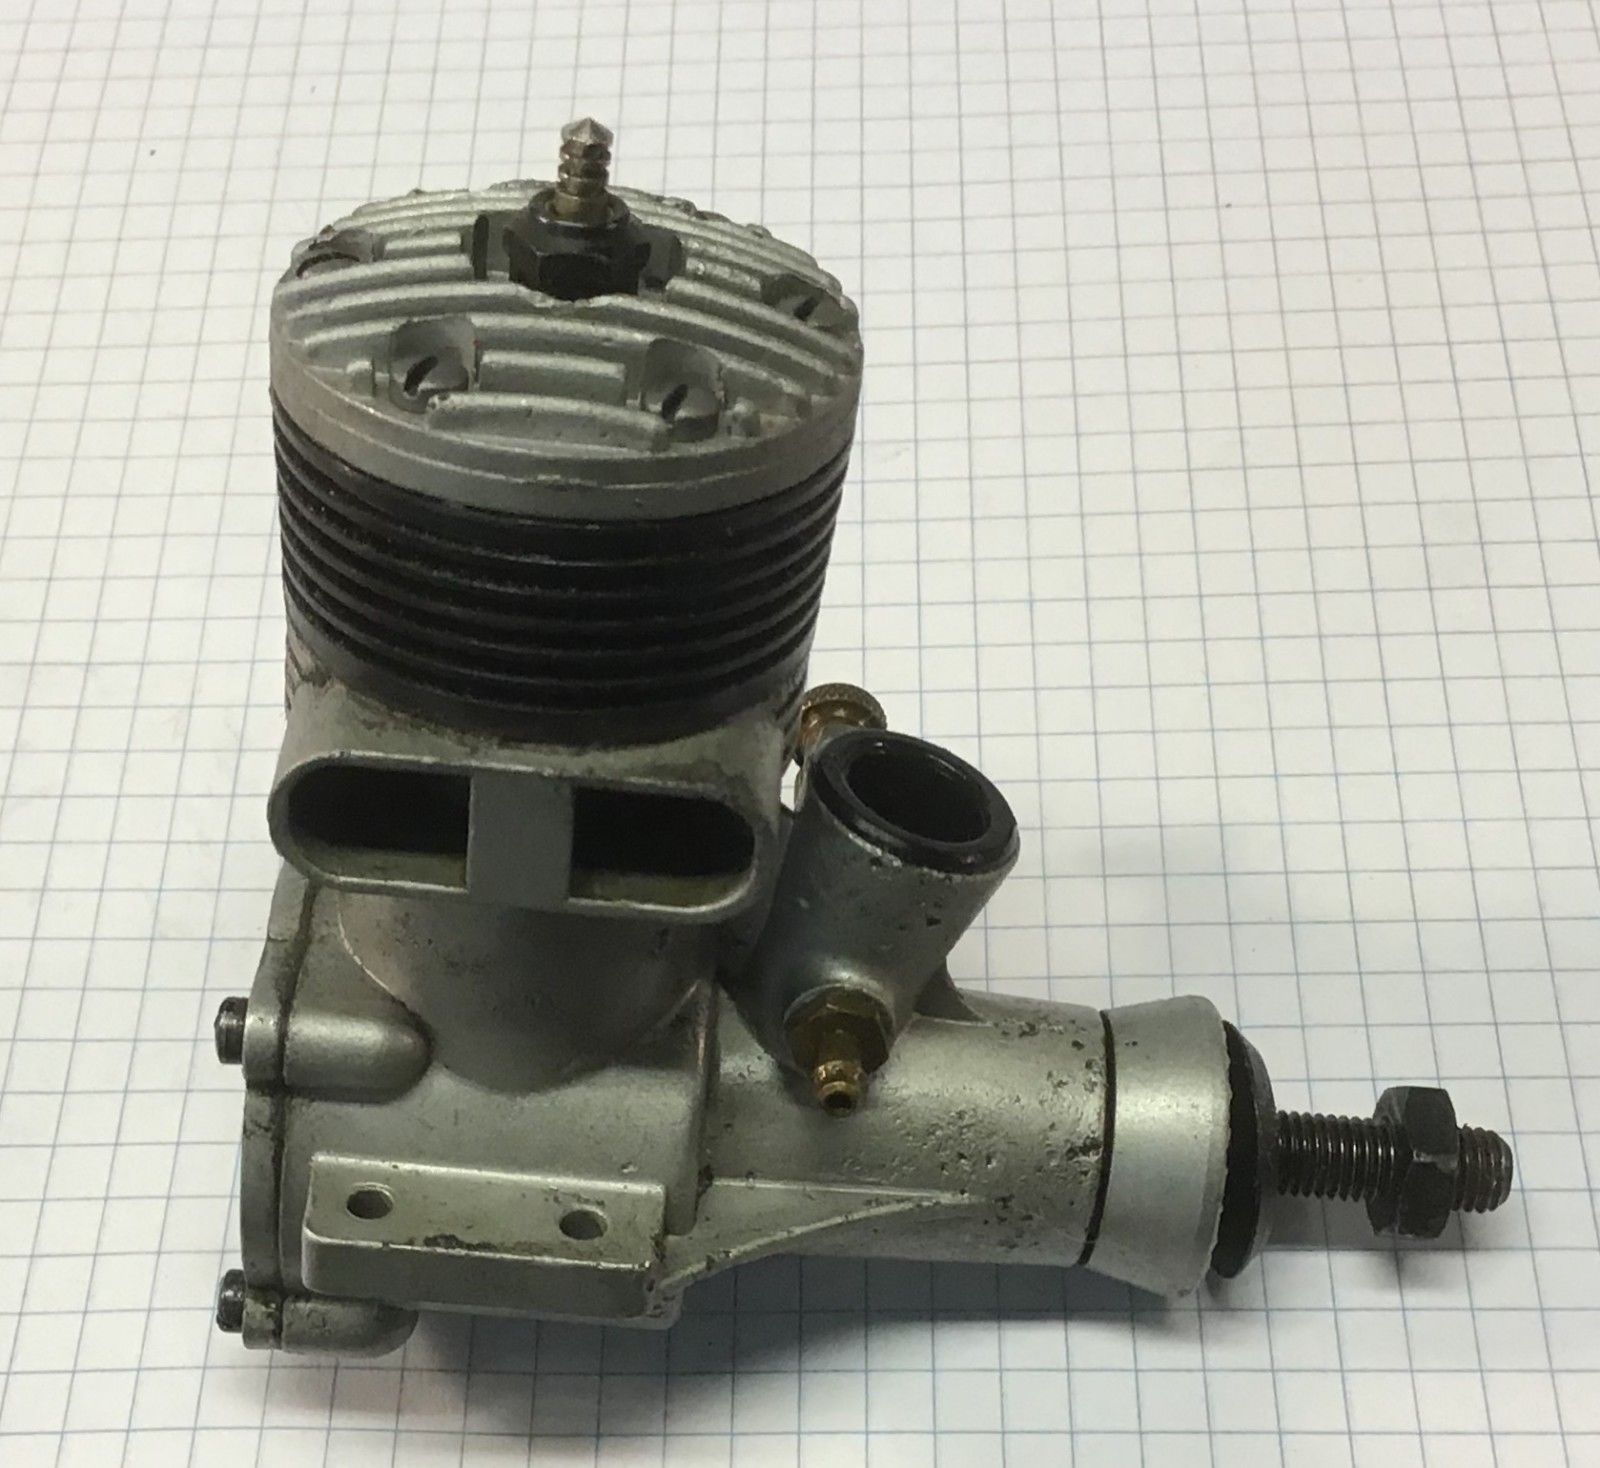
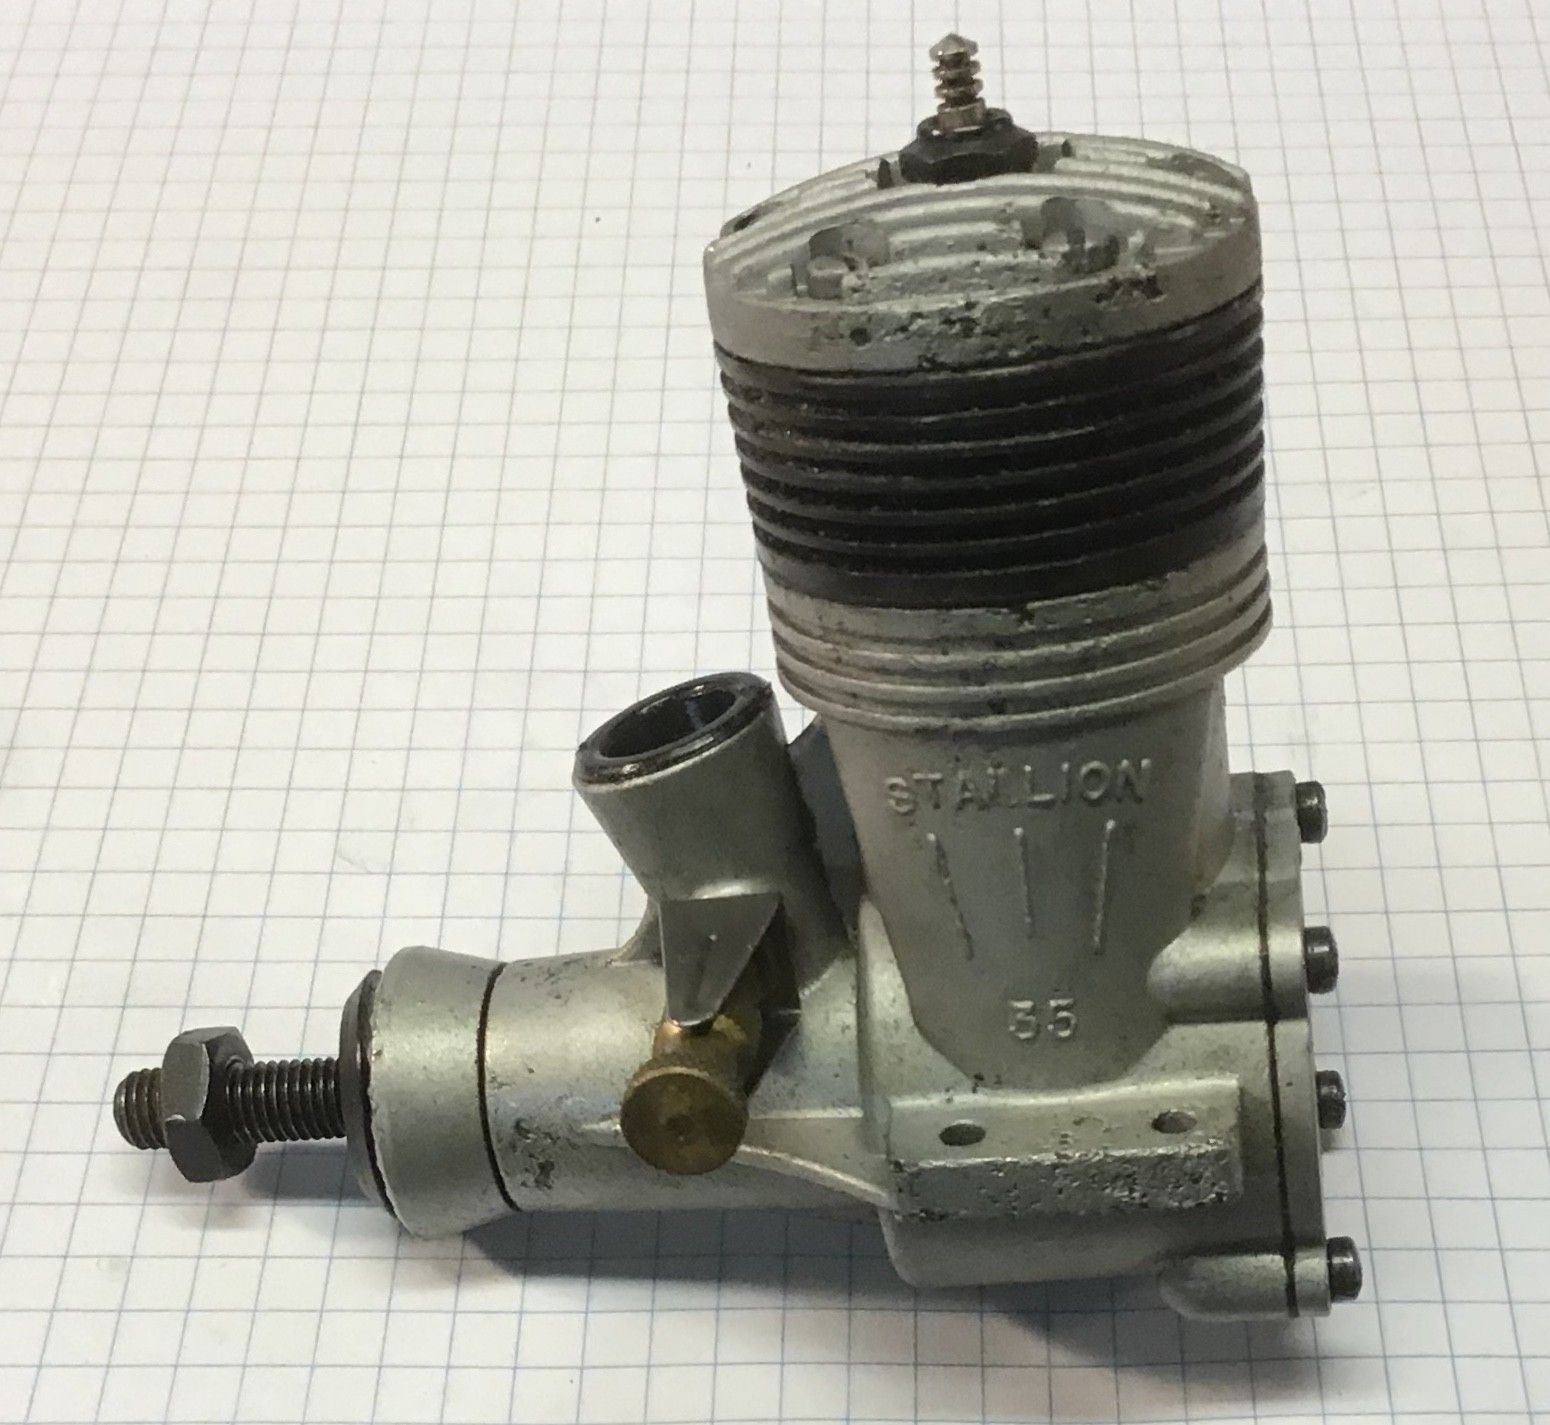
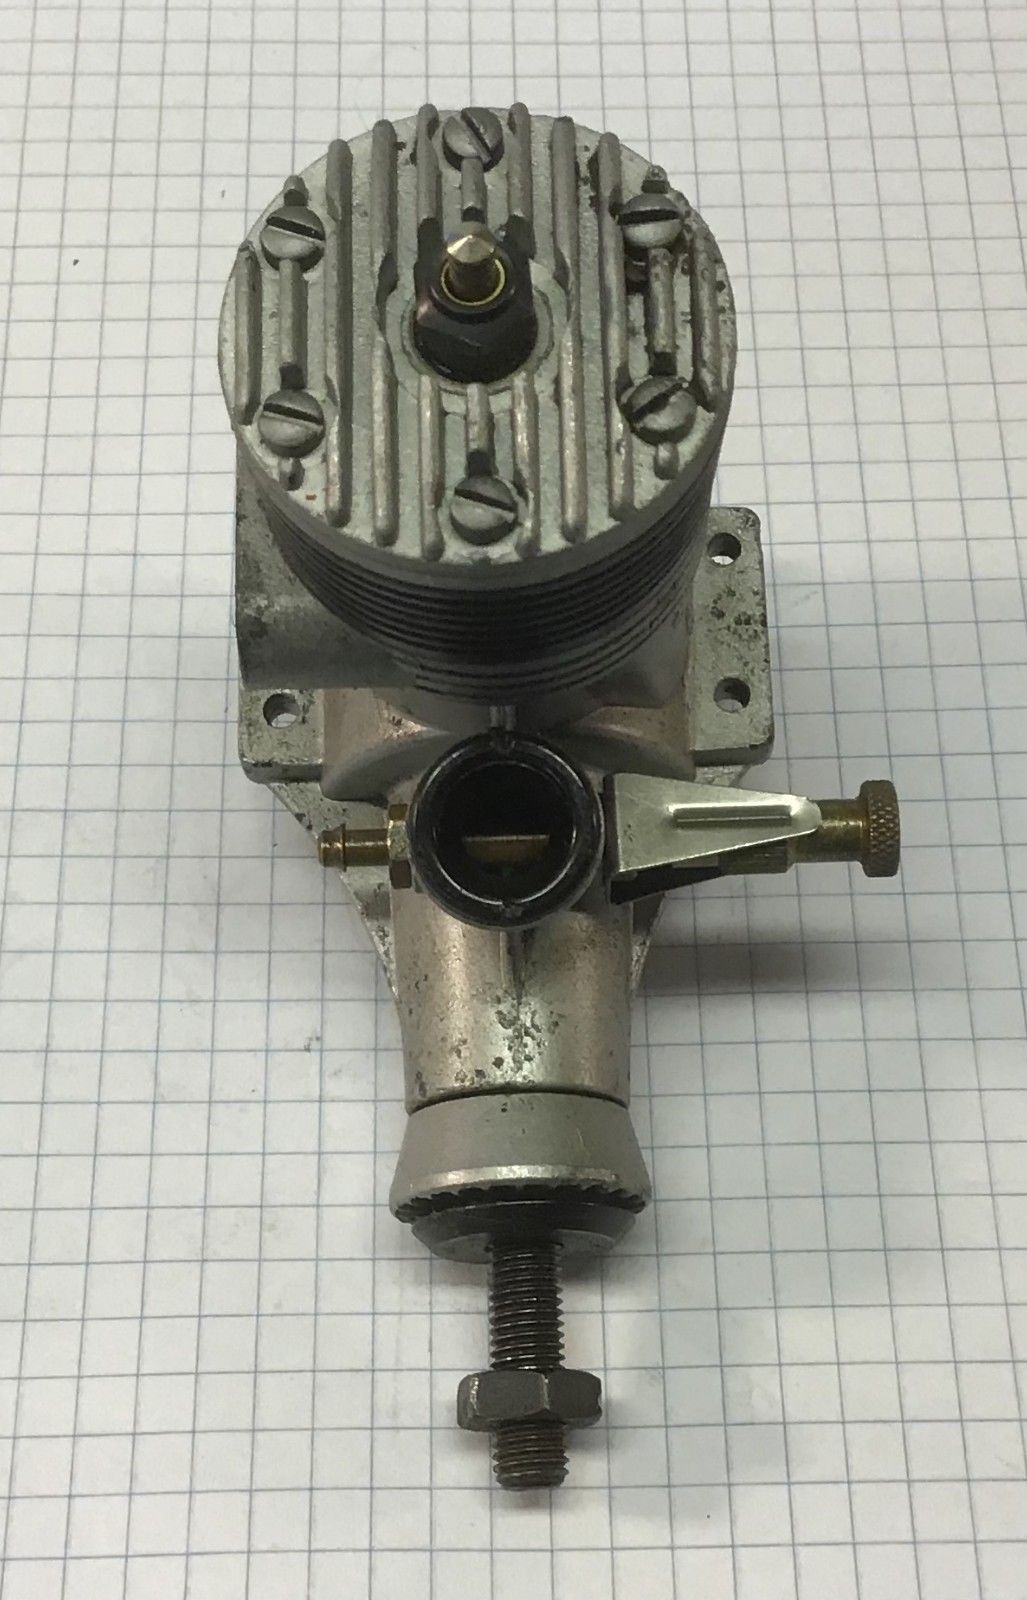
K&B Stallion 35
 08-29-2006, 01:37 PM
#26
Banned
The K&B 40 was a completely different engine from the Stallion 35. The Stallion was designed as an inexpensive sport engine for Control line fliers. It had a lapped piston and a plain bushed bearing. The K&B 40 was the first K&B engine to use a Dykes ring and had two ball bearings. It was similar to the Series 64 35 which was a racing engine. Of course it was more powerful than a Stallion 35. They weren't even in the same class. The Stallion was a much better engine than the McCoy/Testors redhead. The McCoy had a very soft cylinder and piston and wore out quickly. The K&B was a well made engine and had good longevity. Long break in period but done right, they lasted forever. Just like all the Greenhead Torpedos.
 08-30-2006, 08:56 AM
#27

ORIGINAL: Artisan
Thanks for the history lesson. I had no idea that the Stallion was that old and that it predated the .40. You guys always amaze me with the depth of your knowledge.
Thanks for the history lesson. I had no idea that the Stallion was that old and that it predated the .40. You guys always amaze me with the depth of your knowledge.
 ]
] George
08-30-2006, 09:12 AM
#28
Senior Member
My Feedback: (3)
Join Date: Nov 2002
Location: Mary Esther, Florida, FL
Posts: 20,205
Likes: 0
Received 14 Likes
on
13 Posts
George:
Don't kid yourself, i did my share of drooling.
One in particular: a brand new Morton M-5 radial in the showcase, $75 out the door. The LHS owner said if some one offered him $50 he’d take it.
Had we known then what a deal many of the engines were…
Oh well.
Bill.
Don't kid yourself, i did my share of drooling.
One in particular: a brand new Morton M-5 radial in the showcase, $75 out the door. The LHS owner said if some one offered him $50 he’d take it.
Had we known then what a deal many of the engines were…
Oh well.
Bill.
08-30-2006, 12:50 PM
#29
Banned
The K&B 40 was a completely different engine from the Stallion 35. The Stallion was designed as an inexpensive sport engine for Control line fliers. It had a lapped piston and a plain bushed bearing. The K&B 40 was the first K&B engine to use a Dykes ring and had two ball bearings. It was similar to the Series 64 35 which was a racing engine. Of course it was more powerful than a Stallion 35. They weren't even in the same class. The Stallion was a much better engine than the McCoy/Testors redhead. The McCoy had a very soft cylinder and piston and wore out quickly. The K&B was a well made engine and had good longevity. Long break in period but done right, they lasted forever. Just like all the Greenhead Torpedos.
Bill, when did you see an M-5 for 50 bucks?
Bill, when did you see an M-5 for 50 bucks?
08-30-2006, 04:49 PM
#31
Senior Member
My Feedback: (3)
Join Date: Apr 2003
Location: Hope Mills NC
Posts: 189
Likes: 0
Received 0 Likes
on
0 Posts
Bill,
Do you have any of K & B parts listings. I am somewhat of a engine collector and am always looking for parts and literature. If you have parts listings for vintage K & B .29 and .35 U/C I would like to get a copy. Do you have a prop driver for a Veco/K & B .29 U/C? If so, I would like to buy it.
I think I have the part that Ron needs for his Stallion .35. What I have is part #7822. Do you know if it will fit?
Hope to hear from you soon.
Richard
PS: Who is a good source for vintage Veco/K & B parts? I talk with Randy at Mecoa, and he has been some help.
 09-04-2018, 08:16 PM
#33

Even though this thread is a little dated, I thought it best to continue it as there is a wealth of information from long time users.
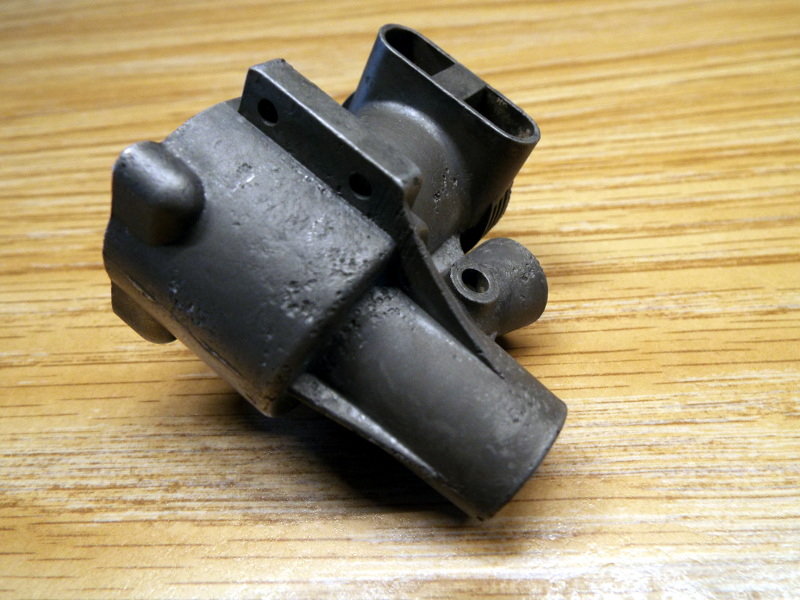
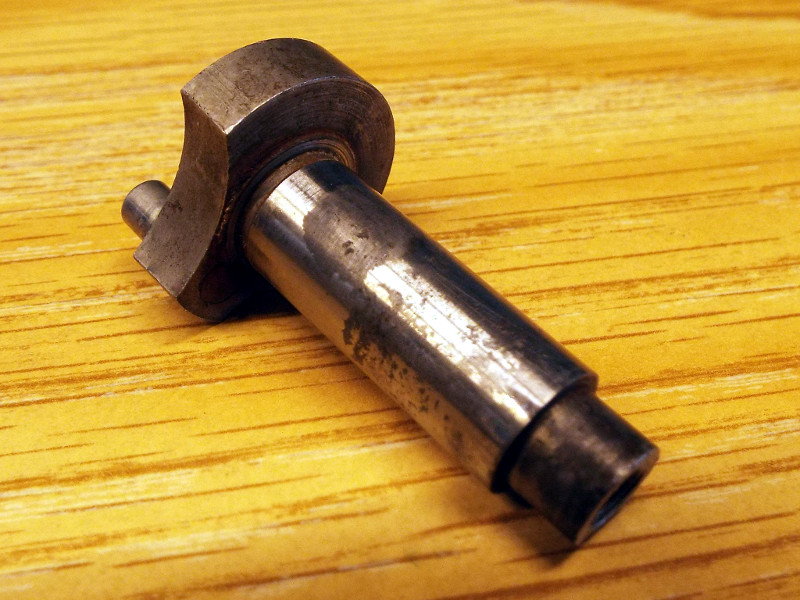
In June, I got from E-Bay what I thought was low time K&B .35 Stallion CL/FF venturi engine. The seller mentioned the engine had occlusions that were typical of the original castings some 60 years ago. A poster in another form pointed out that engine could have possibly been sand blasted recently. The irregularities in the surface appeared to be surface corrosion versus the claimed occlusions.
In June, I got from E-Bay what I thought was low time K&B .35 Stallion CL/FF venturi engine. The seller mentioned the engine had occlusions that were typical of the original castings some 60 years ago. A poster in another form pointed out that engine could have possibly been sand blasted recently. The irregularities in the surface appeared to be surface corrosion versus the claimed occlusions.
Last edited by GallopingGhostler; 09-04-2018 at 08:19 PM.
09-04-2018, 08:48 PM
#34
When I took a closer look to the engine, there was a small amount of residual aluminum dust under the cylinder fins to indicate the possibility that it had been carefully sand blasted. The surface was clean as though this had been done recently versus an engine that has had some test runs prior to storage.
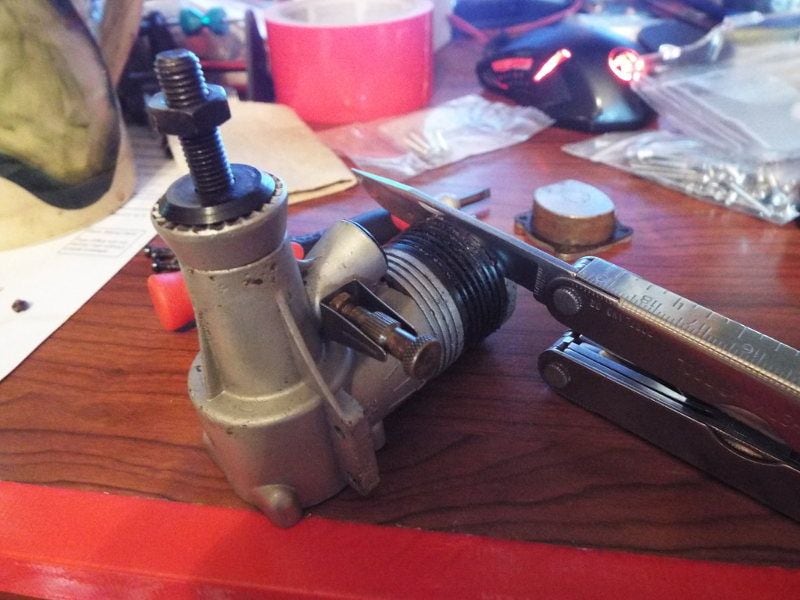
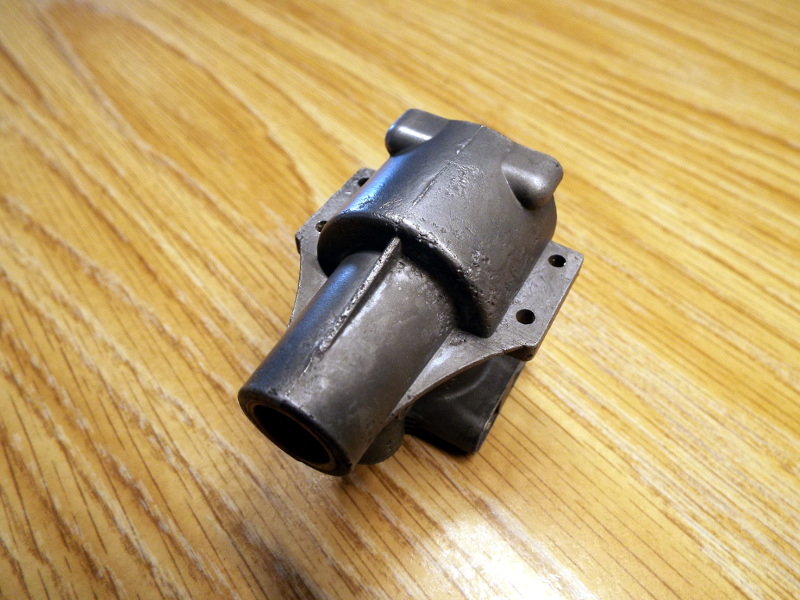
Yesterday, I started disassembling the engine. Any sand that got into the engine could only spell harm and thus needs to be washed out. I removed the back after the screws by prying with a pocket knife. There is grit inside resembling rust particles.
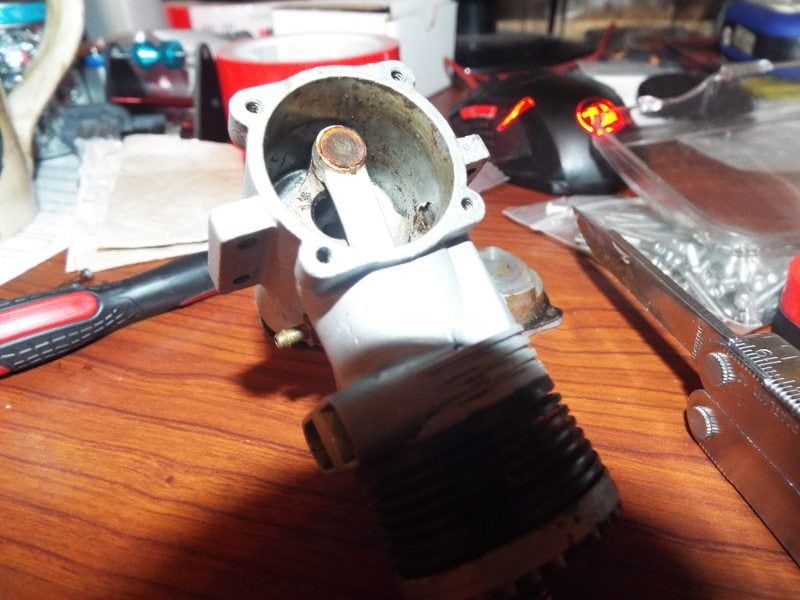
Then I removed the top screws, they did not come out easy once broke loose, like they were Locktite'd down. One 4-40x1/4 screw broke. Fortunately it was at the head, allowing me to remove the stud with a set of needle nose pliers. Removing the head required carefully wedging the edge of my Leatherman knife blade. I worked slowly, tapping on the back of the knife blade with my needle nose plier handles to work my way around the perimeter of the head, until I could remove the head.
There is rust inside the top of the cylinder liner combustion chamber, and along the edge of the aluminum head. This engine was exposed to water or to a high humidity atmosphere. The sand blasting was done to hide the fact the engine was badly corroded.
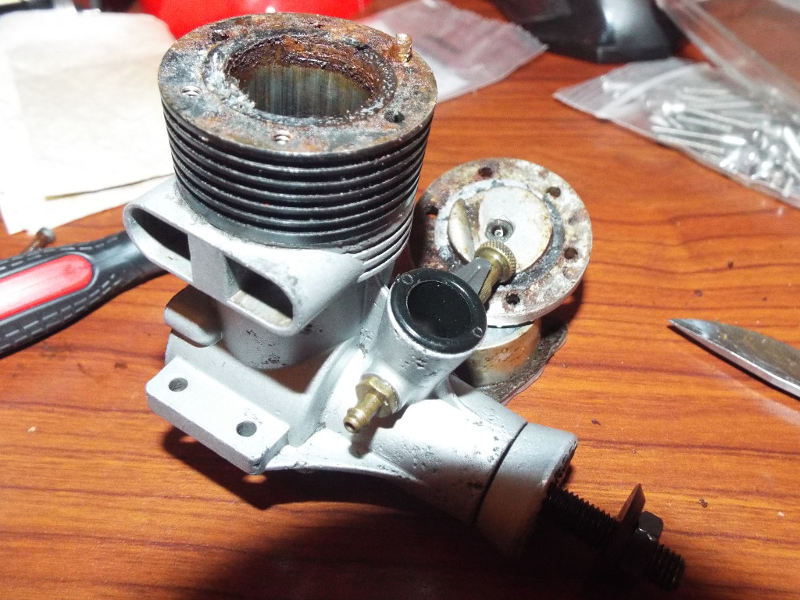
There are some discrepancies, so I don't really know where the total truth is. It is possible that the exterior was exposed to water to corrode the aluminum crankcase, but the crankcase threaded prop shaft, nut and prop washer look like new without rust, so I can't quite make heads or tails yet about the seller's occlusion story.
Since I was the only bidder (I wonder why?") ), I got the engine for a song. I think this engine is definitely salvageable and can be made into a good runner.
), I got the engine for a song. I think this engine is definitely salvageable and can be made into a good runner.  I'm going to soak in hot anti-freeze and see if I can't free the cylinder liner from the crankcase. Otherwise seems to have good compression. The crankshaft turns reasonably free without binding or looseness. I have stainless steel 4-40 socket cap screws to replace the originals. The prop nut, washer and shaft appear to be new and rust free and hardly any wrench marks. These may be new parts.
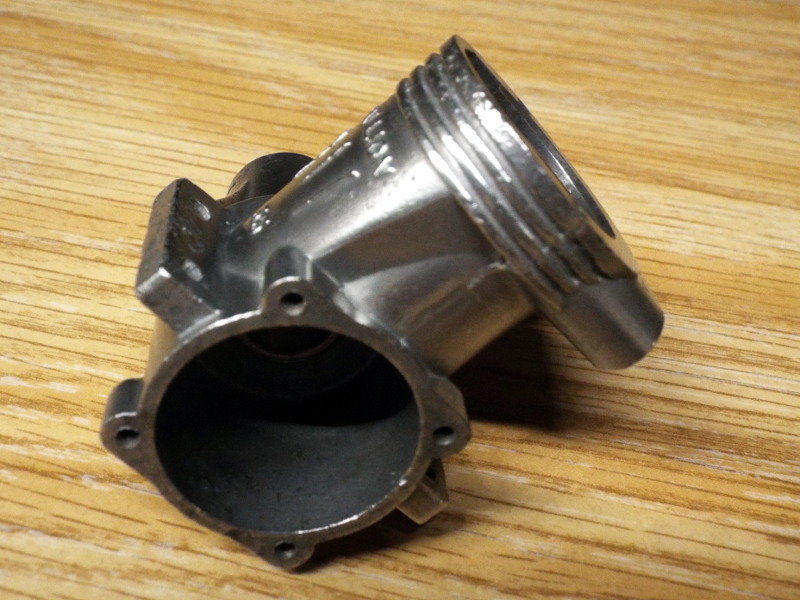
A day passes soaking the partially disassembled engine and parts in hot antifreeze. This morning I took my Leatherman knife blade and by gently tapping on the crack between aluminum crankcase and steel cylinder all along its perimeter, worked the cylinder loose. Then with gentle prying and further tapping with a putty knife, I edged the cylinder until it fell out.
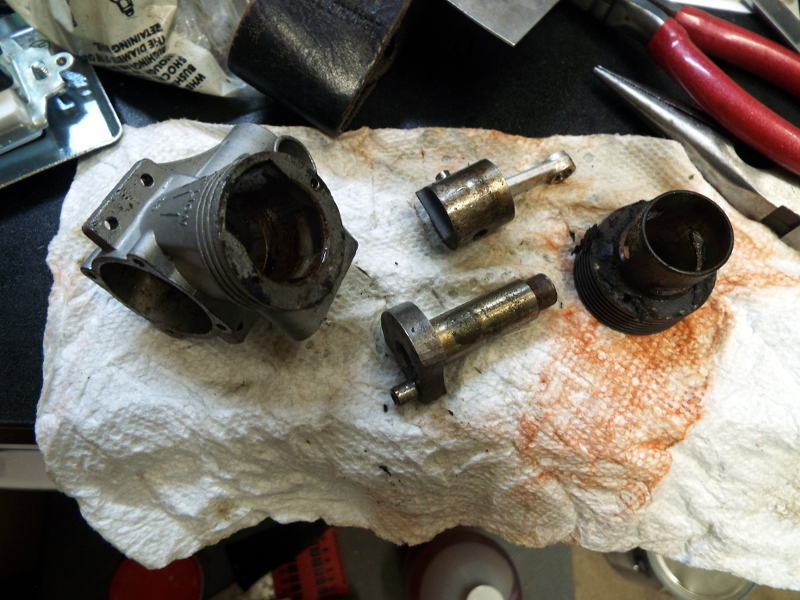
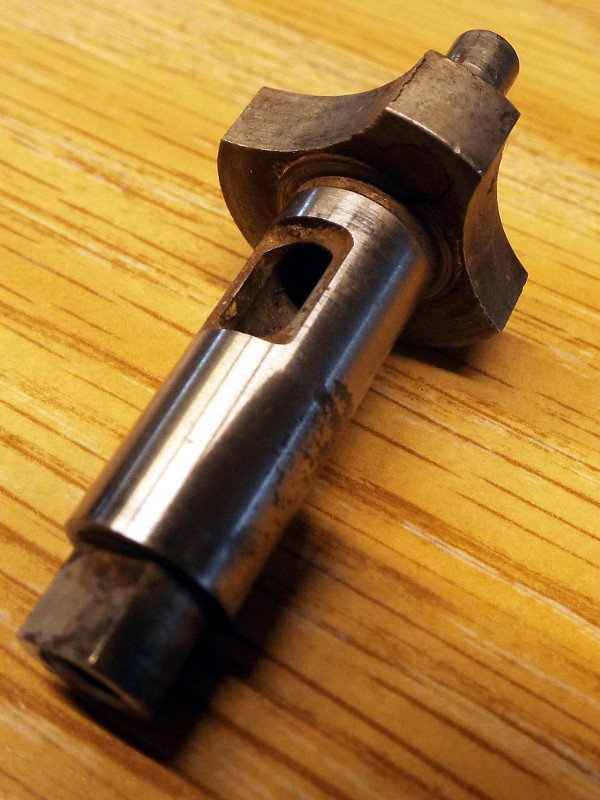
There is surface rust on the cylinder port and mating surface area. I was able to scrape most of the surface rust from the cylinder inside top that forms the combustion area at TDC. Darkening of the piston top is surface rust. There is rust on the back side of the crankshaft opposite the intake hole. Most of the rust was removed when the crank was turned.
I scraped away the gasket on the steel cylinder, both bottom and top. They appear to be the old graphite paper ones, similar to the car head gaskets of the early 1970's. Then I put the separated parts back into the antifreeze for further soaking before final clean up and polishing.
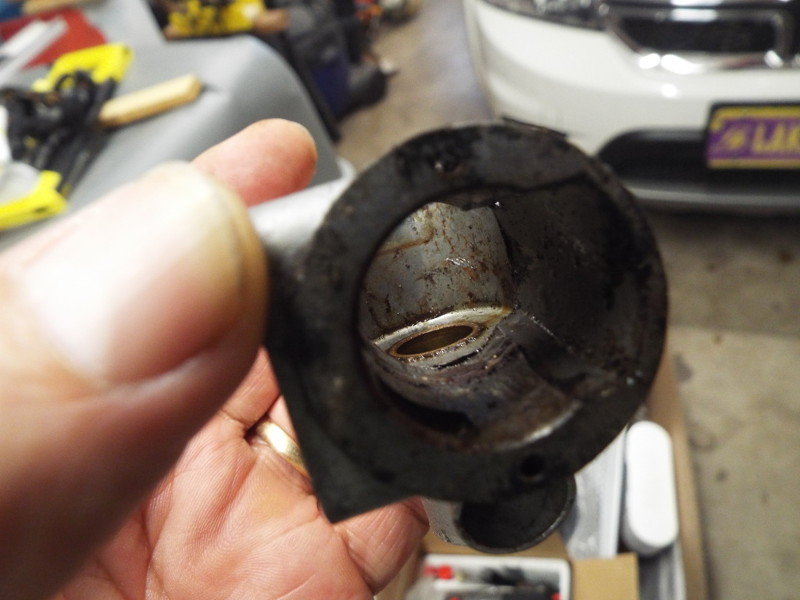
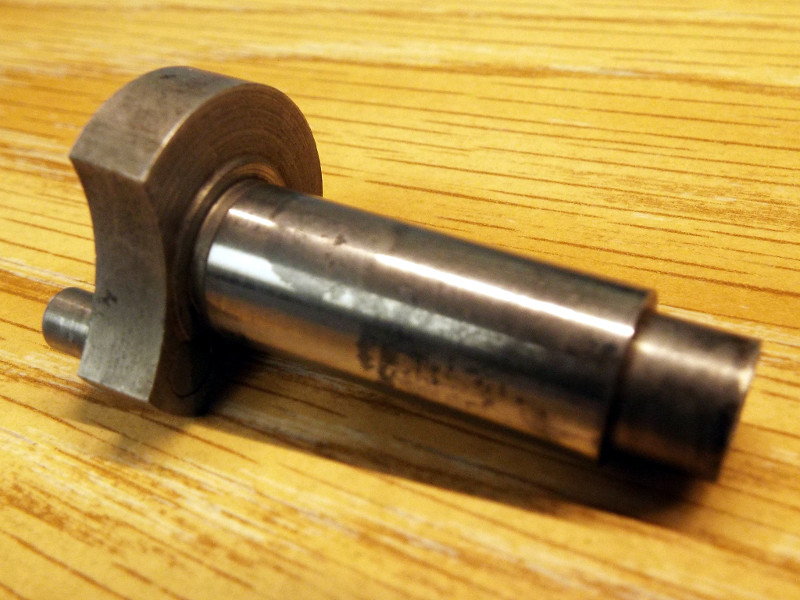
An interesting fact with this engine is that it has a steel piston pin full length without any pads. A friend and long time experienced modeler with this engine recommended that I round the pin edges and polish the ends, because the pin can can wear against the cylinder gouging it, ruining the cylinder. Parts for this earlier "economy engine" are hard to come by. Connecting rod is unbushed solid aluminum. Running this engine with a slug of healthy Castor in the fuel is a must. Crankcase has a crankshaft bronze bushing.
This appears to be a low time engine that was probably only bench run at the factory. Was it worth my $30 shipping included for the engine? At this point I think so. Rarely does one get a low time engine at this cost. Most seem well used, although they may have some life in them. It's current condition looks worse than it really is. The rust will clean up as I continue working on it.
Yesterday, I started disassembling the engine. Any sand that got into the engine could only spell harm and thus needs to be washed out. I removed the back after the screws by prying with a pocket knife. There is grit inside resembling rust particles.
Then I removed the top screws, they did not come out easy once broke loose, like they were Locktite'd down. One 4-40x1/4 screw broke. Fortunately it was at the head, allowing me to remove the stud with a set of needle nose pliers. Removing the head required carefully wedging the edge of my Leatherman knife blade. I worked slowly, tapping on the back of the knife blade with my needle nose plier handles to work my way around the perimeter of the head, until I could remove the head.
There is rust inside the top of the cylinder liner combustion chamber, and along the edge of the aluminum head. This engine was exposed to water or to a high humidity atmosphere. The sand blasting was done to hide the fact the engine was badly corroded.
There are some discrepancies, so I don't really know where the total truth is. It is possible that the exterior was exposed to water to corrode the aluminum crankcase, but the crankcase threaded prop shaft, nut and prop washer look like new without rust, so I can't quite make heads or tails yet about the seller's occlusion story.
Since I was the only bidder (I wonder why?
), I got the engine for a song. I think this engine is definitely salvageable and can be made into a good runner. I'm going to soak in hot anti-freeze and see if I can't free the cylinder liner from the crankcase. Otherwise seems to have good compression. The crankshaft turns reasonably free without binding or looseness. I have stainless steel 4-40 socket cap screws to replace the originals. The prop nut, washer and shaft appear to be new and rust free and hardly any wrench marks. These may be new parts.A day passes soaking the partially disassembled engine and parts in hot antifreeze. This morning I took my Leatherman knife blade and by gently tapping on the crack between aluminum crankcase and steel cylinder all along its perimeter, worked the cylinder loose. Then with gentle prying and further tapping with a putty knife, I edged the cylinder until it fell out.
There is surface rust on the cylinder port and mating surface area. I was able to scrape most of the surface rust from the cylinder inside top that forms the combustion area at TDC. Darkening of the piston top is surface rust. There is rust on the back side of the crankshaft opposite the intake hole. Most of the rust was removed when the crank was turned.
I scraped away the gasket on the steel cylinder, both bottom and top. They appear to be the old graphite paper ones, similar to the car head gaskets of the early 1970's. Then I put the separated parts back into the antifreeze for further soaking before final clean up and polishing.
An interesting fact with this engine is that it has a steel piston pin full length without any pads. A friend and long time experienced modeler with this engine recommended that I round the pin edges and polish the ends, because the pin can can wear against the cylinder gouging it, ruining the cylinder. Parts for this earlier "economy engine" are hard to come by. Connecting rod is unbushed solid aluminum. Running this engine with a slug of healthy Castor in the fuel is a must. Crankcase has a crankshaft bronze bushing.
This appears to be a low time engine that was probably only bench run at the factory. Was it worth my $30 shipping included for the engine? At this point I think so. Rarely does one get a low time engine at this cost. Most seem well used, although they may have some life in them. It's current condition looks worse than it really is. The rust will clean up as I continue working on it.
09-05-2018, 05:14 PM
#36
09-06-2018, 09:37 AM
#37
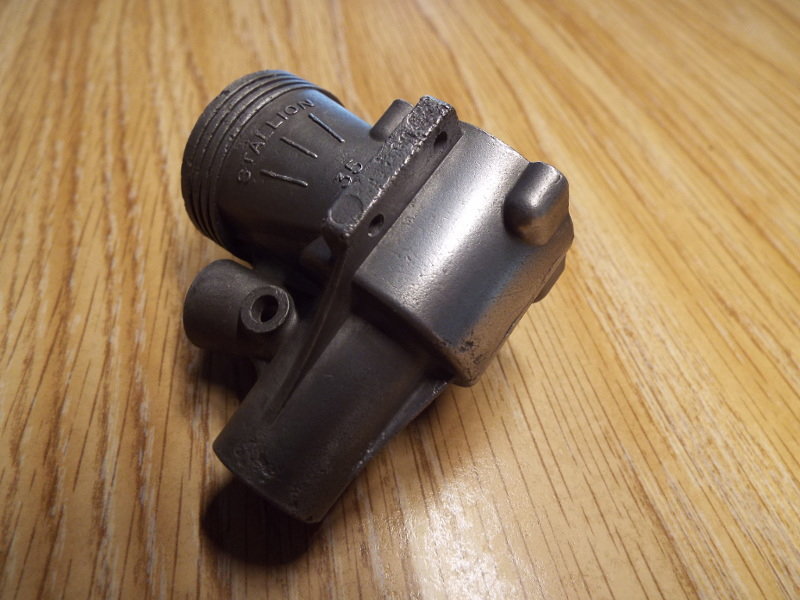
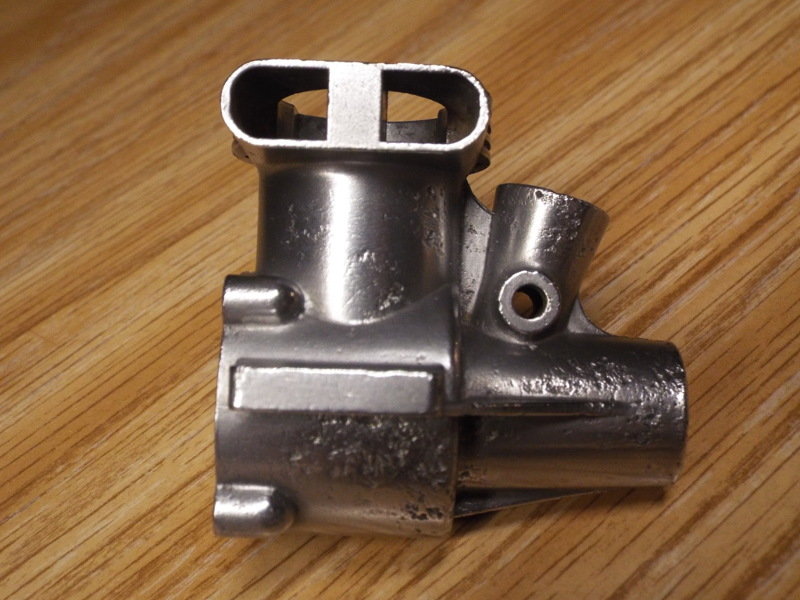
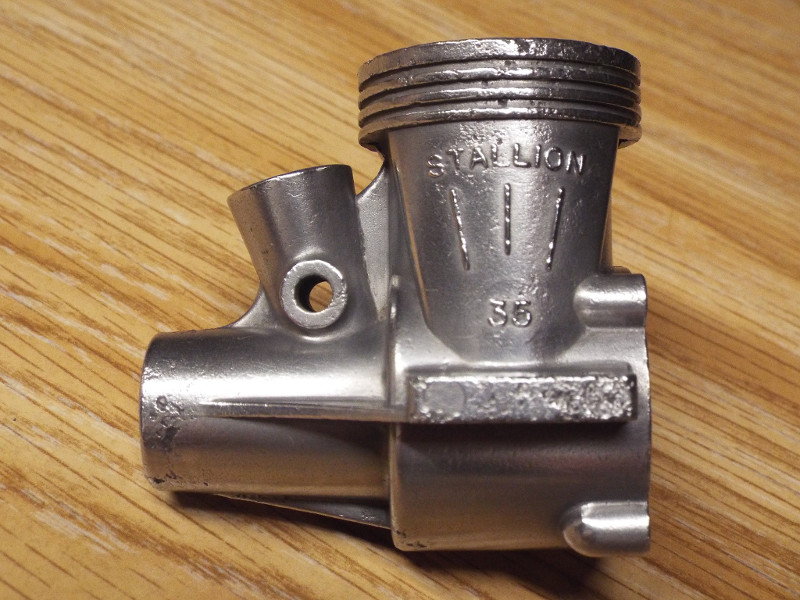
Ghostler, The Stallion is a re-badge "Green Head" Torpedo. The K&B Torpedo .35 dates from the 50's. K&B brought the engine back as the Stallion in the late 70's, or early 80's.The introduction of the Stallion engine was to offer an inexpensive plain bearing engine. There are a few slight differences between the two engines. The Stallion has a larger venturi to accommodate an RC carburetor. The FF/CL version has a plastic venturi insert. There is a web in the exhaust port for a baffle on an RC version.The script on the left side of the case says 'Stallion" instead of "Torpedo". The biggest difference is the exhaust orientation. For years most of the K&B engines exhaust were to the left. The Stallion was changed to the more common exhaust to the right. Even the Stallion box has a picture of an older Torpedo .35 (rat race version) with a left hand exhaust. .
Both tests were done by the infamous Peter Chinn. So, it is a later engine, but was in the early 1960's. This is the first time I've gotten my hands on the Stallion, so it is a good learning experience of what the earlier modelers had to work with in engine technology and construction.
09-06-2018, 11:58 AM
#38

Ghostler, Thanks for the correction. My Stallion came in a red, and black box, not the green boxes that the Torpedo's were packaged in.I noticed from pictures in this thread that later the engine was sold in the orange boxes.Even though the label stamp on the box says it is a Stallion (stock # 9041), the picture shows a rear intake, ball bearing Torpedo racing engine that was introduced in the early 60's. Also my "Care & Operating Instruction" sheet is not dated, but it does include "division of Aurora Plastics Corp." at the bottom, which should date it.Obviously the articles you referenced shows that I was off by 10 to 15 years. My bad! Thanks again.
09-08-2018, 07:15 AM
#39
No problem, Greg, thanks for the inputs on how packaged.
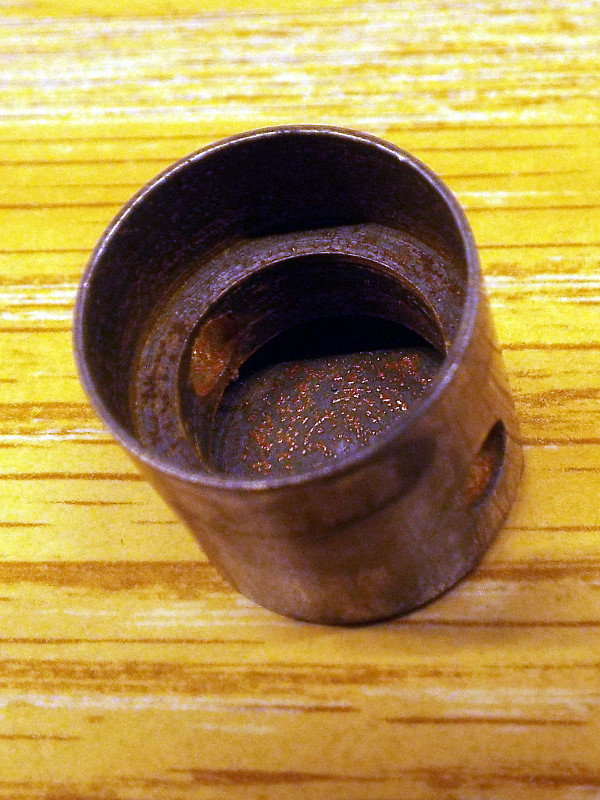
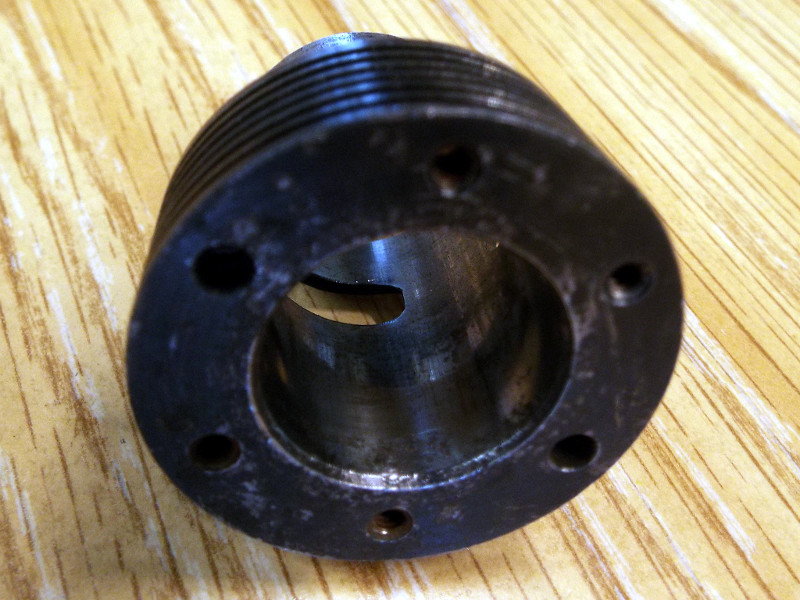
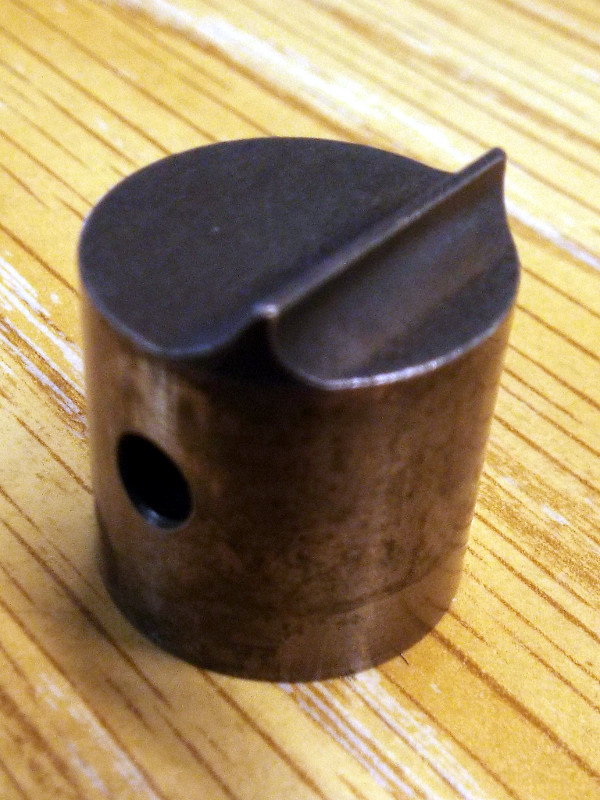
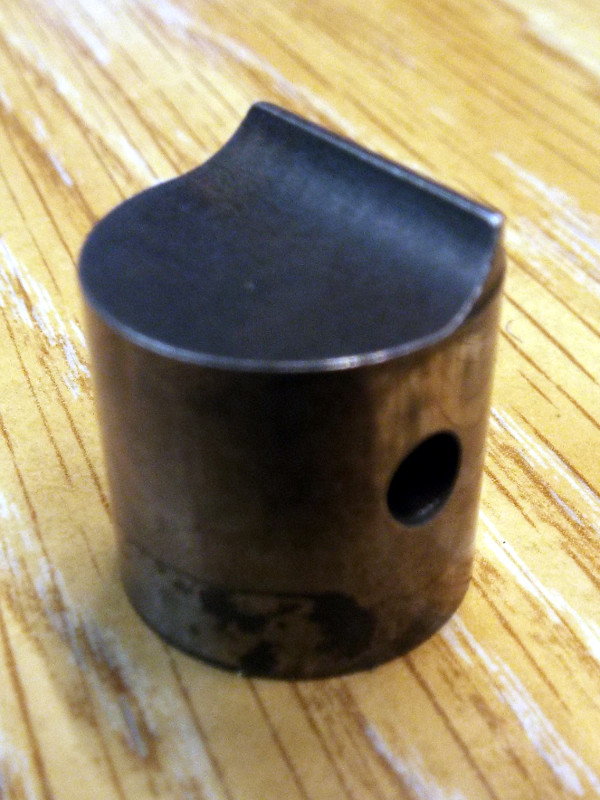
I removed the items, started scrubbing with dish soap and a green Scotchbrite pad. The outside of the cylinder that sits inside the crankcase has heavy rust, similar to the inside top where the piston at TDC sat for a long time. It is not enough to severely weaken the steel or severely pit it, but it is there. This piston shows some rust outlined where it was exposed to the exhaust port. I got most of it off with the green pad, will later use fine steel wool to remove the remainder on both the steel cylinder and iron piston.
The head gasket is well stuck to the aluminum head, wonder if the owner used some form of gasket shellac. Will need to do further work.
With it soaking and cleaning the aluminum exterior pores in the so called casting occlusions has made me see more clearly that this engine was subject to a damp environment. For all I know, it may have been a field find near an old model flying field. The head and crankcase on the intake bypass, left side of the engine have similar continuous corrosion pattern from crankcase to head. Parts are cast separately, so if there were casting occlusion imperfections they would not look uniform between pieces.
It is now more clear that at one time, it was in fact mounted to an aircraft. The diameter outline of 4-40 lock washers show on at least 2 locations, one on each side. The sand blasting must have removed enough that the other two holes look as though they were untouched.
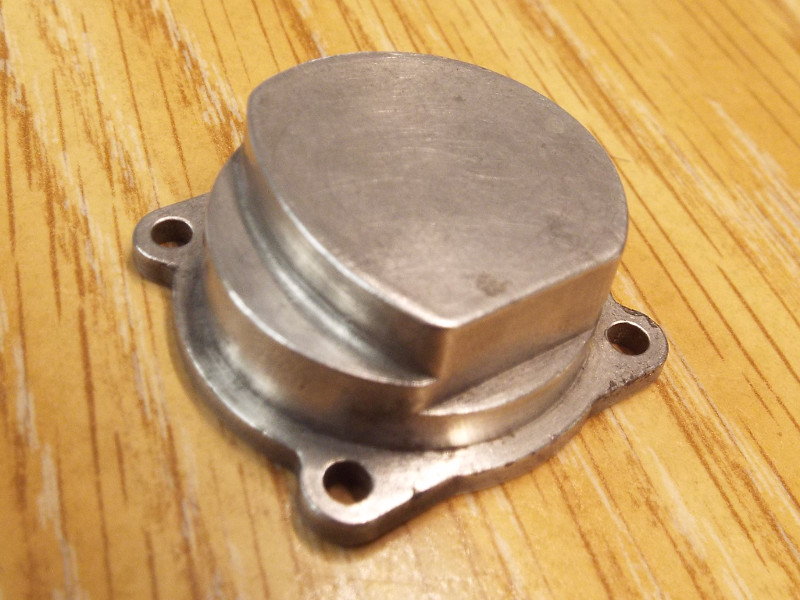
I did things a little different this time in that after initial soaking and heating, I added a small quantity of water to the antifreeze in the coffee percolator since I was running low. Now, the engine is darkened similar to a few engines with dark aluminum finish, like the Sanye AP .09, some Enyas and MDS engines. Perhaps this is why some have not had luck with the antifreeze approach. All is not lost. I did a test case of applying and rubbing with a paper towel Mothers Mag and Aluminum polish on one side of the bottom of the crankcase. The brighter aluminum is coming back, with a mild aluminum gloss it looks like a die cast factory finish. I'll be able to restore the crankcase, back and head to natural aluminum color and get rid of the odd sand blasted finish with some elbow grease.
Now on its way to recovery, this bride of Frankenstein will live again. 

I removed the items, started scrubbing with dish soap and a green Scotchbrite pad. The outside of the cylinder that sits inside the crankcase has heavy rust, similar to the inside top where the piston at TDC sat for a long time. It is not enough to severely weaken the steel or severely pit it, but it is there. This piston shows some rust outlined where it was exposed to the exhaust port. I got most of it off with the green pad, will later use fine steel wool to remove the remainder on both the steel cylinder and iron piston.
The head gasket is well stuck to the aluminum head, wonder if the owner used some form of gasket shellac. Will need to do further work.
With it soaking and cleaning the aluminum exterior pores in the so called casting occlusions has made me see more clearly that this engine was subject to a damp environment. For all I know, it may have been a field find near an old model flying field. The head and crankcase on the intake bypass, left side of the engine have similar continuous corrosion pattern from crankcase to head. Parts are cast separately, so if there were casting occlusion imperfections they would not look uniform between pieces.
It is now more clear that at one time, it was in fact mounted to an aircraft. The diameter outline of 4-40 lock washers show on at least 2 locations, one on each side. The sand blasting must have removed enough that the other two holes look as though they were untouched.
I did things a little different this time in that after initial soaking and heating, I added a small quantity of water to the antifreeze in the coffee percolator since I was running low. Now, the engine is darkened similar to a few engines with dark aluminum finish, like the Sanye AP .09, some Enyas and MDS engines. Perhaps this is why some have not had luck with the antifreeze approach. All is not lost. I did a test case of applying and rubbing with a paper towel Mothers Mag and Aluminum polish on one side of the bottom of the crankcase. The brighter aluminum is coming back, with a mild aluminum gloss it looks like a die cast factory finish. I'll be able to restore the crankcase, back and head to natural aluminum color and get rid of the odd sand blasted finish with some elbow grease.
Now on its way to recovery, this bride of Frankenstein will live again.
09-08-2018, 10:43 AM
#40
The slightly diluted antifreeze discolored the engine aluminum exterior parts a uniform darker color. In real life they look better than in the photos. After the soak, the so called occlusions, which are surface corrosion is more evident.

Here's how the surface polished with Mothers Mag and Aluminum Polish looks like. I'm almost tempted to put the crankcase back in the antifreeze and let it re-discolor.
The crankshaft shows signs of rust in various places, but this is cosmetic. It will run fine as-is.

Here's how the surface polished with Mothers Mag and Aluminum Polish looks like. I'm almost tempted to put the crankcase back in the antifreeze and let it re-discolor.
The crankshaft shows signs of rust in various places, but this is cosmetic. It will run fine as-is.
09-08-2018, 10:52 AM
#41
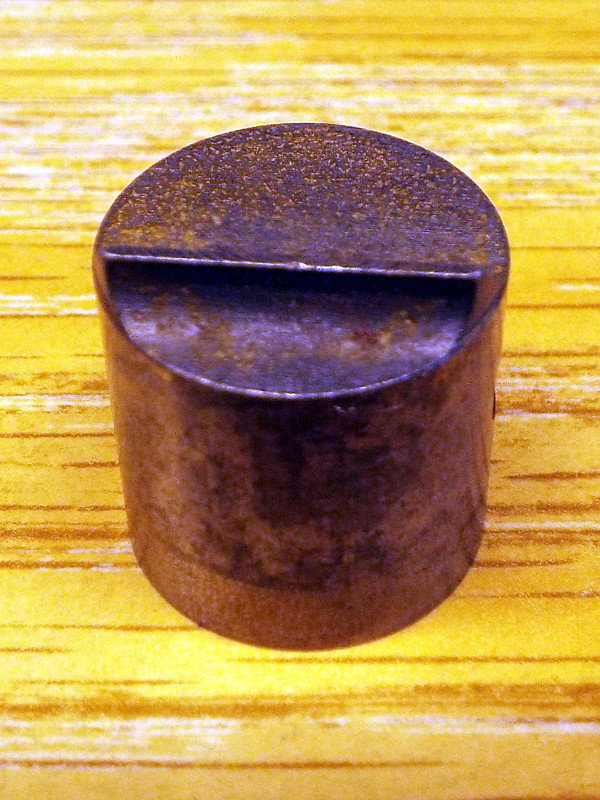
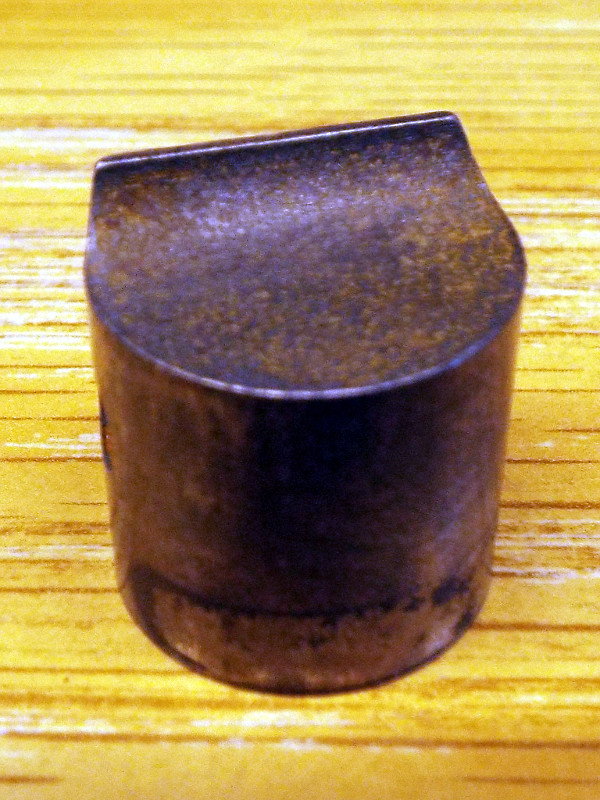
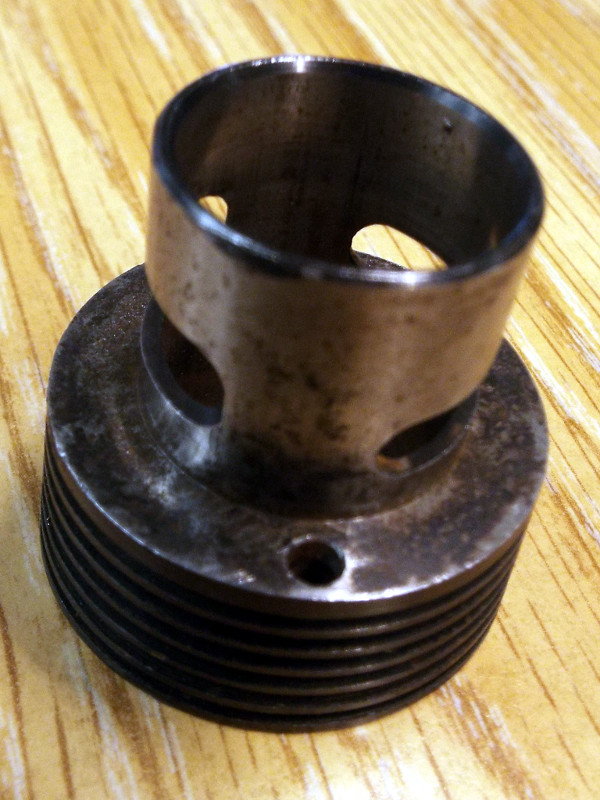
The cylinder has its share of rust, but where most rusted is not located in the piston travel area. I was able to remove the gasket fragments and some rust from the top and bottom fins using a utility knife with sharp box cutter blade. My suspicion of gasket shellac was wrong, the "glue" is simply impregnated rust and the affinity of the ancient gasket material for the machined metallic surfaces.
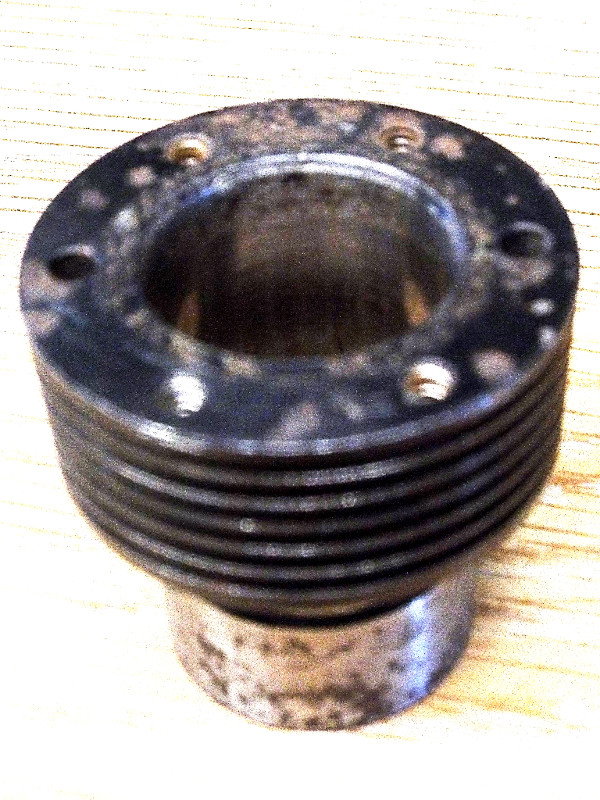


You can see from these photos where the engine piston rested at top dead center during much of its "abandoned and unloved" life. Evidence of surface rust outlines the cylinder bypass port on one side and the higher exhaust port on the other side. Both top and underside of piston has surface rust, but this is cosmetic.
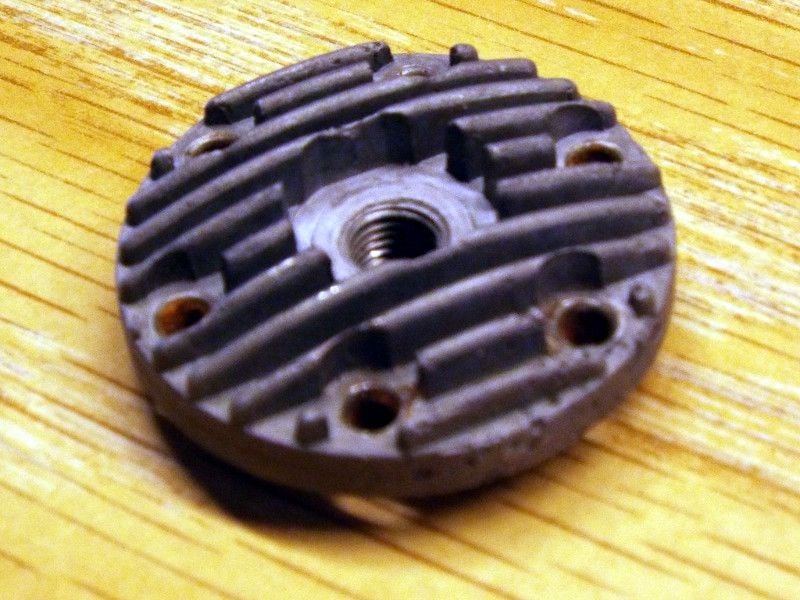
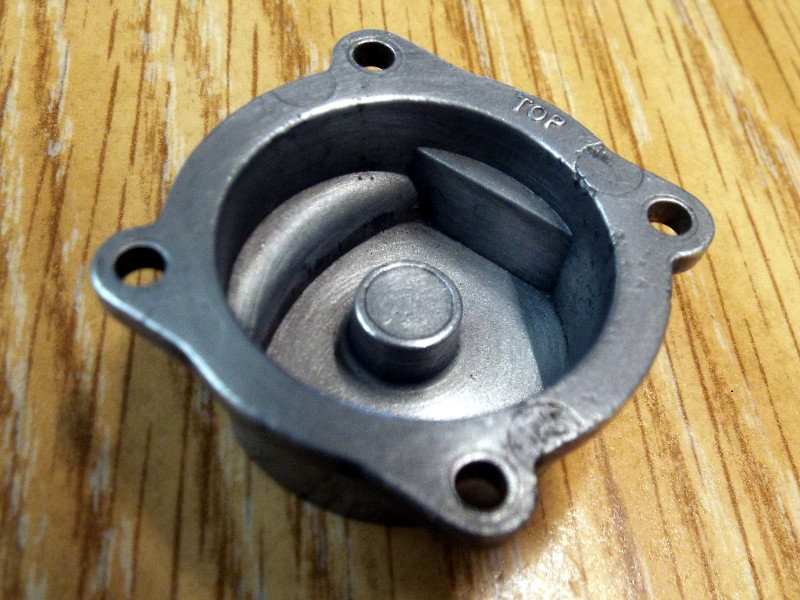
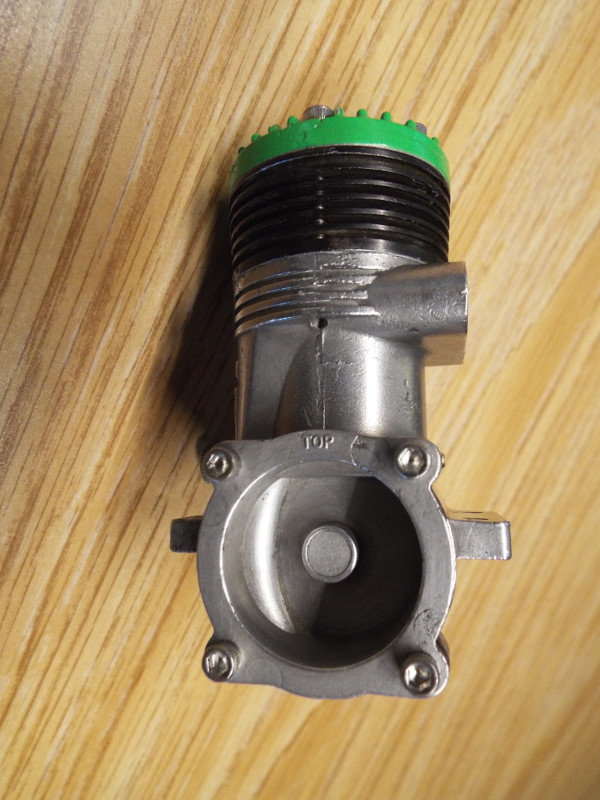
The head shows evidence of rust in the mount screw holes.
Now that I have had a chance to further forensically examine this engine, the circumstantial evidence reveals that the seller's story of occlusion imperfection occurring during the manufacturing casting process was stretching the truth a bit.

All is not lost, though. Franken-girl will live again!
You can see from these photos where the engine piston rested at top dead center during much of its "abandoned and unloved" life. Evidence of surface rust outlines the cylinder bypass port on one side and the higher exhaust port on the other side. Both top and underside of piston has surface rust, but this is cosmetic.
The head shows evidence of rust in the mount screw holes.
Now that I have had a chance to further forensically examine this engine, the circumstantial evidence reveals that the seller's story of occlusion imperfection occurring during the manufacturing casting process was stretching the truth a bit.
All is not lost, though. Franken-girl will live again!
 09-08-2018, 07:58 PM
#43
According to Peter Chinn's December 1963 Model Airplane News article, Sceptre Flight Model Engine Tests, K&B .049 Stallion , the tanked .049 was a decent performing one. It put out 0.077 HP at 16,000 RPM, optimal prop for it was the 6x3. This was on K&B Supersonic 1000 Fuel, which had 25% nitro content. This is about the same performance as the Cox .049 Golden Bee on same fuel.
Unfortunately, Leroy Cox could manufacture his .049 reed valve engines cheaper than the rest of the competition with consistent and good performance. By the early 1970's, as far as I can remember, hobby stores and stores carrying hobby items I visited had mostly Cox and a few Testors for sale, but no other small half-A's on their shelves.
09-08-2018, 08:12 PM
#44
Looks like a "swamp" find to me! I think you may be right about it having been exposed to the elements for years. Another possibility about how it was cleaned. There are "softer" methods of media blasting including walnut shells. Since the blueing on the cylinder appears undamaged, I wondered if it had been covered with tape during the cleaning process. Note that the cylinder head screws have no blueing on them, suggesting that they were media blasted, and the cylinder wasn't? One other observation is that the screw slots don't appear to show any damage. Most of the time when these engines are disassembled the screw slots show some evidence of it. My suggestion is that every time you make a post about this engine you mention who the crook was who sold it to you.
09-08-2018, 08:46 PM
#45
Looks like a "swamp" find to me! I think you may be right about it having been exposed to the elements for years. Another possibility about how it was cleaned. There are "softer" methods of media blasting including walnut shells. Since the blueing on the cylinder appears undamaged, I wondered if it had been covered with tape during the cleaning process. Note that the cylinder head screws have no blueing on them, suggesting that they were media blasted, and the cylinder wasn't?
One other observation is that the screw slots don't appear to show any damage. Most of the time when these engines are disassembled the screw slots show some evidence of it.
My suggestion is that every time you make a post about this engine you mention who the crook was who sold it to you.
I'll put this engine to good use and it ought to do a lot of good when I am done with it.
09-09-2018, 04:00 PM
#46
Today, I did further cleaning up of the engine parts using fine steel wool. This removed the sand blasted finish from the aluminum parts, imputing a fine brushed metal finish to the aluminum. I could stop here, or I could further remove the brushed look to polished with Mothers Mag & Aluminum Polish. The steel wool also removed the rust residue from the steel parts, cleaning them up considerable. Now, with the majority of the rust removed, once reassembled, oil will take care of the rest to prevent further rusting. I think you will see that the parts cleaned up quite well.


Last piston photo you'll see a steel wool "hair" strand. I will blow all engine parts with compressed air prior to assembly.
The engine may look worse for wear from the photos. Actually it isn't as bad as it looks. The photos are up close, magnifying flaws. To the naked eye the engine looks much better.
The crankcase roughness does reveal the extent of the effects of weather upon the metal finish. This engine may have sat for a while, up to 2 or 3 decades in a mid-western field. If the engine could talk, I'm wondering what free flight or simple R/C aircraft (1 or 2 channel without throttle) it might say it belonged to. In the mid 1960's multi-channel was very expensive, akin to today's costs associated with model turbine jet engine aircraft. Many who gave RC a try would settle for 1 or possibly 2 channels, escapements would be the least expensive. May be it was on a Goldberg Senior Falcon flown without throttle control?
We don't know at this point, but as you see from the photos, it was definitely not manufacturing defects but rather corrosion that played a major part in marring the exterior finish.
And, after closely looking at the piston pin, the ends are radiused and polished. Without any serial numbers, I can't tell whether this was an earlier or later Stallion. Also I learned from Peter Chinn's engine tests (see Sceptre Flight) that if one removes the plastic venturi insert, suction is still strong enough that the HP gain will be close to the engines it competed against, the Foxes and Testor McCoy Red Heads.
With the plastic venturi insert in place, it should be a fine engine for .35 CL aircraft toward the lower end of wing area, such as the Sterling Kit S-1 Ringmaster. The extra suction should prove it to be a very bullet proof engine for that aircraft.
09-09-2018, 06:25 PM
#48
So, it is very possible that perhaps my engine may be dated somewhere in the 1970's. The other Sceptre Flight article is dated 4 years later in 1968, and the Stallion there is the same model shown in 1964.
09-09-2018, 08:56 PM
#49
Here's what the engine crankcase looks like now that I have applied and rubbed in, then polished with a paper towel - Mother's Mag & Aluminum Polish. Final step was to use a clean paper towel, which then really adds the shine.
09-14-2018, 05:19 PM
#50
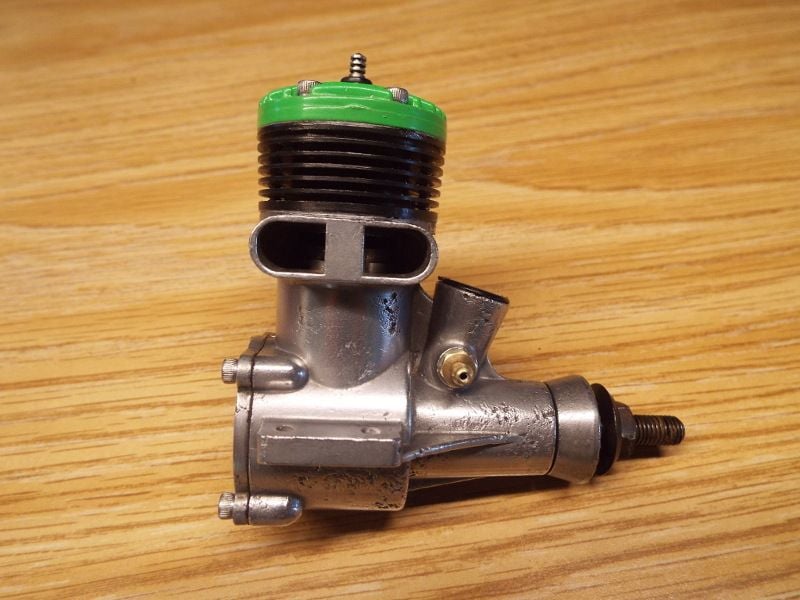
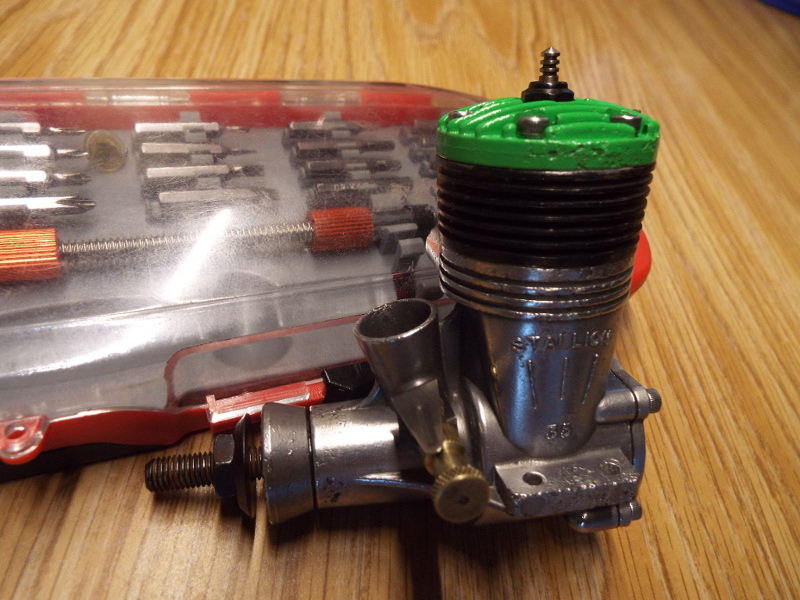
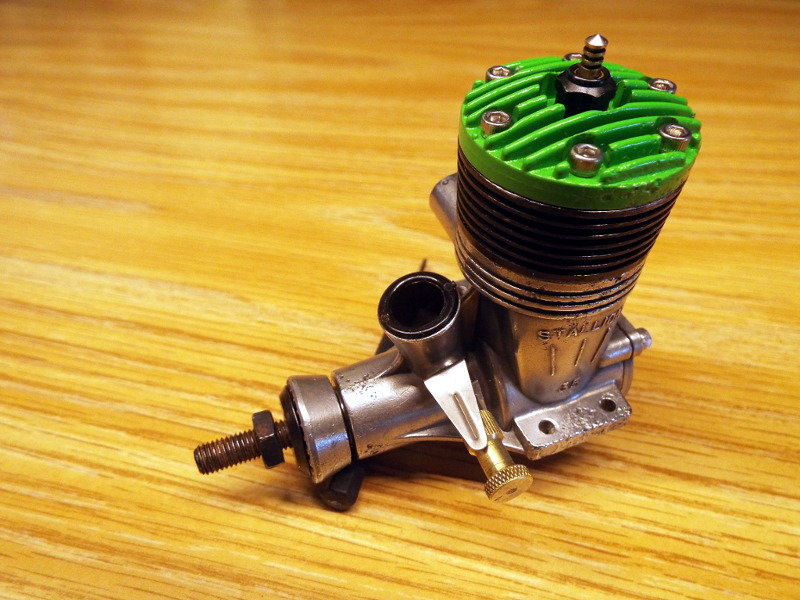
Stallion is done except for final tightening of screws and fittings. I deviated a little from the historical presence of this engine by painting the head with Duplicolor High Temperature Ceramic Engine Green paint. I know that this engine followed the green heads by at least a decade and was left in plain aluminum.
However, seeing that it suffered as an unloved child to corrode, thought that with the appearances of surface corrosion, it could use a little dressing up. This certainly beats telling people that it suffers from casting occlusion defects. "Why, didn't you know the first Stallions out of the factory were green?  This is an early one!" (Actually, one lie to cover up another one never really worked.)
To clean the head of sand blasting was too much work. A slightly roughened surface for paint sticking lent itself to me thinking, "Why not?"
To expidite, I used Permatex Ultra Grey Maximum Torque Gasket Maker to seal the cylinder and head. This holds pressure well and can stand the temperatures. It is also used on motorcycle engine cases and heads. If I find that the compression is too high, I can roll my own gaskets or seek sources later.
I think it actually came out quite well. So that the RTV gasket material could bond, I did not use any oil and assembled the engine dry. Once it cures and I torque down the screws, I can liberally oil it and such will fill the interior voids and surfaces.
Now I'm letting it sit and cure, hope to bench run in the near future.
However, seeing that it suffered as an unloved child to corrode, thought that with the appearances of surface corrosion, it could use a little dressing up. This certainly beats telling people that it suffers from casting occlusion defects.
"Why, didn't you know the first Stallions out of the factory were green? This is an early one!" (Actually, one lie to cover up another one never really worked.) To clean the head of sand blasting was too much work. A slightly roughened surface for paint sticking lent itself to me thinking, "Why not?"
To expidite, I used Permatex Ultra Grey Maximum Torque Gasket Maker to seal the cylinder and head. This holds pressure well and can stand the temperatures. It is also used on motorcycle engine cases and heads. If I find that the compression is too high, I can roll my own gaskets or seek sources later.
I think it actually came out quite well. So that the RTV gasket material could bond, I did not use any oil and assembled the engine dry. Once it cures and I torque down the screws, I can liberally oil it and such will fill the interior voids and surfaces.
Now I'm letting it sit and cure, hope to bench run in the near future.