


G-FAST build
 06-09-2012, 03:31 AM
#1

Thread Starter
My Feedback: (3)
Join Date: Feb 2010
Location: St. Augustine,
FL
Posts: 33
Likes: 0
Received 0 Likes
on
0 Posts
I saw this airplane in an AMA issue andafter reading throughthe article I thought this would be a really fun project. The planehappened to bedesigned by a well know designer. I did however notice that there was nothing out there on this plane.No pictures, comments, nothing! Not sure why, but this thinglooks really cool. I had about 1/3 of the materialson handso I decieded to start this project. Heck, I haven't found anything else out there so maybe I'm the first. My end result is hopefully going to be (in my head at least) an out of this world model. As I build, I will add to this post with pictures and you can follow along if you care.
DAY1: Made changes to the plans.The article talks about being able to transport a 90in wing. I can not, so off to designing split or "plug-in" wings. I also had a few other changes/upgrades in mind.
- [*]Relocated the aileron servo between W-2 & W-3 and recessed into wing. I also relocated the aileron wing exits.[*]Inter-locked F-1 thru F-4. F-3 was extended and F-2a was created where the spar will pass through the fuselage[*]Pull-pull rudder system[*]Dedicated elevator system (I think). I have a 1/4 scale servo not in useand might use it. 2 High TQ servo's is the other option. I'm still undecided.[*]Not that it matters what engine you use, but my choice is a Saito 180. I love Saito's Engines![*]Modified the landing gear block location. This is due to my choice of landing gear. The original design uses the the Sig Four Star 120 canopy and landing gear. I'm usinga carbon fiber composite landing gear system(#134). All of my carbon parts noted can be found at GraphTech RC. They are a great supplier of Composites.[/list]
I went through the plans and made all of my changes. The big one was the plug-inwing design. A technique that I like to usefor changes is trace paper.After I get all of the changes drawn outI then just tape it to the plans for the permanent loacation. This allows me to build off of it and not disrupt the original plan. That about sums up my changes. Until the next step!!
 06-09-2012, 03:36 AM
#2
Thread Starter
My Feedback: (3)
Join Date: Feb 2010
Location: St. Augustine,
FL
Posts: 33
Likes: 0
Received 0 Likes
on
0 Posts
DAY-2: I like to cut templates when I build. I can use them for later use if neccessary. I use 0.40 press laminate marker board for this process. It cuts nicely with sewing scissors and #11 blades. You can also shave it to create sharp inside corners. Once all of my formers, ribs and anything else I need to create is cut, I will move over to tracing them out on the wood.
06-09-2012, 04:44 AM
#3

My Feedback: (98)

Join Date: Feb 2002
Location: The Villages, Florida NJ
Posts: 4,677
Likes: 0
Received 0 Likes
on
0 Posts
You'll love the way it flies. I was lucky enough to fly the original, it has zero bad habits. I really liked the way it slows, down no dropping the wing, a very nice plane.
06-10-2012, 09:02 PM
#4
Junior Member
Join Date: Oct 2004
Location: Aurora,
OR
Posts: 4
Likes: 0
Received 0 Likes
on
0 Posts
I have a keen interest in the G-FAST and Little FAST aircraft designs. Please continue to post your build thread. Can you give more detail about the 2 piece wing modification you came up with? Did that involve raising the wing root section to mid fuse?
Thanks
Trevor
Thanks
Trevor
06-14-2012, 09:42 AM
#5
Thread Starter
My Feedback: (3)
Join Date: Feb 2010
Location: St. Augustine,
FL
Posts: 33
Likes: 0
Received 0 Likes
on
0 Posts
I'm going to leave the wing positionin place per the plans. I wanted to keep to the originaldesign look. This is why I am inter-locking the mid section of the fuselage. Meanwhile, I'm stillin the process of cutting thekit. I want to get all of my pieces cut before I begin construction. This will help keeping me 2-4 steps ahead.(I'm also making 2 wing sets)
My planis to take this era style plane and give it a modern look (graphics). I've had a graphic design inmindthat I have wanting to use.I'm hoping it's going to look very different. Iplan on continuingthe thread.
My planis to take this era style plane and give it a modern look (graphics). I've had a graphic design inmindthat I have wanting to use.I'm hoping it's going to look very different. Iplan on continuingthe thread.
07-06-2012, 02:44 PM
#6
Thread Starter
My Feedback: (3)
Join Date: Feb 2010
Location: St. Augustine,
FL
Posts: 33
Likes: 0
Received 0 Likes
on
0 Posts
Well, I'm on a small delay. I had to step away on business(trip)[&:] About all I can do is read my own thread over and over again. Stupid work, it gets in the way of the fun stuff. Once back home, it's on!!
09-05-2012, 12:27 PM
#7
Thread Starter
My Feedback: (3)
Join Date: Feb 2010
Location: St. Augustine,
FL
Posts: 33
Likes: 0
Received 0 Likes
on
0 Posts
DAY-3: HOME & BACK AT IT!!
I had to go back through my plans and parts to get a handle on where I had left off. Now that all of my parts are cut, I'm going back through to add servo rails, hatch rails, etc. throughout the kit. I'm still waiting on a corrected order for one of my components. I was not able to make all of the locations for the wing joiner tube, mainly the fuselage. Here are the latest pics of where I'm at. I set up a few of the wing ribs over the joiner tube to get a better idea of the look and layout. It also helps in the brainstorming. The fuselage is put together (w/o glueand fuse former) to check alignment and spacing. I layedthe W-2 template over to location of the wing root. It will give you and idea of where I'm heading with "plug-in wings"
I had to go back through my plans and parts to get a handle on where I had left off. Now that all of my parts are cut, I'm going back through to add servo rails, hatch rails, etc. throughout the kit. I'm still waiting on a corrected order for one of my components. I was not able to make all of the locations for the wing joiner tube, mainly the fuselage. Here are the latest pics of where I'm at. I set up a few of the wing ribs over the joiner tube to get a better idea of the look and layout. It also helps in the brainstorming. The fuselage is put together (w/o glueand fuse former) to check alignment and spacing. I layedthe W-2 template over to location of the wing root. It will give you and idea of where I'm heading with "plug-in wings"
09-21-2012, 06:25 AM
#9
Thread Starter
My Feedback: (3)
Join Date: Feb 2010
Location: St. Augustine,
FL
Posts: 33
Likes: 0
Received 0 Likes
on
0 Posts
DAY-4: Rudder & Stab assemblies
I noticed that when I was laying out my wood for the staband elevatorthat afew pieces did not match the print on the plans. Noted issues: stab aft stick calls of 3/8 x 1/2 =plan is drawn to 3/8 x 3/4, leading stick to the elevators calls for a 1/2 x 1/2 = plan drawn to 1/2 x 3/4. Because of the 1/16 stab sheeting there has to be a change in the elevator. After comparing the pictures, designer notes and the plans, I made my own variation. Not a big deal, a slight change/mod in wood and the end result is a slightly tapered elevator. It actually assisted in an added feature to my build which I will cover later in the build.
Stab & elevator
I built the stab & elev per the plans and held off on the sheeting until all of my tail parts where completed.
Vert fin & rudder
I built the rudder per the plans withthe exception of adding a little extra balsa in the area of the control horns. This was due to me using a pull-pull system for the rudder. In stead of using a solid piece of 3/8 balsa I cut two pieces of3/16 balsa and offset the grain. It will later belaminated together with carbon and epoxy.
Finishing
I laminated the stab and vert fin with carbon fiber. It's easy strength and very little added weight. I started by cutting 6 pieces of carbon tape to be placed over the leading and trailing sticks of the stab (3 top, 3 bottom) Starting with side-1 I heated the balsa with my heat gun. I then coated the balsa with a very light coat of 30min epoxy.I then layed out the carbon and pressed it into the epoxy. Finally, I set the 1/16 sheeting in place and re-heated the balsa. By heating the balsa it changes the viscosity and allows it to soak into the wood a little better (more easy strength) It's not a good idea or practice to thin epoxy with alcohol for bonding purposes. I added some weight to ensure a good bond and got ready for side-2. After 40min, I repeated the steps for side-2. I cuttwo carbon strips for the vert fin and liminated it the same way I did the stab. I set them aside and gave them some good cure time. I cleaned up the edges, matched them and put them aside until later. Now it's back to the fuselage.
09-21-2012, 08:13 AM
#10
My Feedback: (-1)
A question about the marker board. I was a printer and we used what is called CHIP BOARD a lot, it was used as the back page for tablets and pads. They used something just like it but a bit thinner on the bottom of pallets for shipping things but now use cardboard. I once in a while find a sheet or two at Sam's club and grab it up. In short it is just a thick card board. Is this the same thing you call marker board?? If so, where are you getting it and in what sizes? I use it for templates too but it's getting hard to locate.
I'm enjoying the build a lot. When I was building kits for others and building a plane from plans for myself I finally started leaving myself notes on my own build so I could recall where I left off and what my thoughts were so I could get back to the build. Today it's an old age thing but then it was just to make getting back into my build easier.
I'm enjoying the build a lot. When I was building kits for others and building a plane from plans for myself I finally started leaving myself notes on my own build so I could recall where I left off and what my thoughts were so I could get back to the build. Today it's an old age thing but then it was just to make getting back into my build easier.
09-21-2012, 09:43 AM
#11
Thread Starter
My Feedback: (3)
Join Date: Feb 2010
Location: St. Augustine,
FL
Posts: 33
Likes: 0
Received 0 Likes
on
0 Posts
Iget it at Michael's. I first found it in the marker board section. It's made by Strathmore and the series is Bristol 400. The sheets that I use for template cutting is 22" x 30" 4 ply. What I like so much about it is that it doesn't leave any fibers or ruffles at the cut edge. It shaves very easily with #11 blades as well. I believe now you can find it in the artist section at Michael's. They always seem to be moving that store around on me, darn them 
I typically buy abouta 1/2 dozen sheets at a time. As scarce as wood kits are becoming these days I make template and copies of plans for just about everything.
I typically buy abouta 1/2 dozen sheets at a time. As scarce as wood kits are becoming these days I make template and copies of plans for just about everything.
11-06-2012, 05:08 PM
#12
Thread Starter
My Feedback: (3)
Join Date: Feb 2010
Location: St. Augustine,
FL
Posts: 33
Likes: 0
Received 0 Likes
on
0 Posts
Update: I'm currently on hold until my new order of wood arrives. Lone Star Balsa has me on hold due to a botched order. After a long non-productive ordeal with them and a not so happy ending, I'm having to place another order with a different company. My wing spars have to be 48" min on length. I was going to experiment with a process that would produce a laminated carbon reinforsed spar. I'm a bit behind and most likely going to skip that now. I'm really anxious to get finished so I can start appling my covering design.
11-06-2012, 07:50 PM
#13
My Feedback: (-1)
ORIGINAL: ortmayerm
Update: I'm currently on hold until my new order of wood arrives. Lone Star Balsa has me on hold due to a botched order. After a long non-productive ordeal with them and a not so happy ending, I'm having to place another order with a different company. My wing spars have to be 48'' min on length. I was going to experiment with a process that would produce a laminated carbon reinforsed spar. I'm a bit behind and most likely going to skip that now. I'm really anxious to get finished so I can start appling my covering design.
Update: I'm currently on hold until my new order of wood arrives. Lone Star Balsa has me on hold due to a botched order. After a long non-productive ordeal with them and a not so happy ending, I'm having to place another order with a different company. My wing spars have to be 48'' min on length. I was going to experiment with a process that would produce a laminated carbon reinforsed spar. I'm a bit behind and most likely going to skip that now. I'm really anxious to get finished so I can start appling my covering design.

Who inked the plans?? Joe Demarco??
11-06-2012, 09:03 PM
#14
My Feedback: (98)
Join Date: Feb 2002
Location: The Villages, Florida NJ
Posts: 4,677
Likes: 0
Received 0 Likes
on
0 Posts
Dick normally inks his own, but he has recently started using a guy that does it digitally. My records show the pictures where taking 1-5-09, so I'd say Dick inked it.
I think I know what gave him the idea for the plane though. :^)
I think I know what gave him the idea for the plane though. :^)
03-03-2013, 07:01 PM
#15
Thread Starter
My Feedback: (3)
Join Date: Feb 2010
Location: St. Augustine,
FL
Posts: 33
Likes: 0
Received 0 Likes
on
0 Posts
I got into a slight distraction with this kit. I started finishing it while I was waiting on new wing spars for the G-FAST project. I finishing up some details and paint. We be getting back to the G-Fast project in a few days. Well, an issue loading the pictures...sorry.
11-04-2015, 05:09 PM
#17
Thread Starter
My Feedback: (3)
Join Date: Feb 2010
Location: St. Augustine,
FL
Posts: 33
Likes: 0
Received 0 Likes
on
0 Posts
.....My project continues due to the simple fact that is has been on hold
..so back to my wing. I have all of the wing ribs cut and trimmed to the basic form. I finally finished cutting the holes for the wing tube. This took a ton of time because I wanted to ensure that the tube would be straight. After this was done I cut the holes for the cardboard tube for the servo wire. I also added the cross braces for the servo. I changed this a little in relation to the plans. The plans call for a separate rib to hold the servo in place. I chose to leave this rib out and run the mounting across ribs W-8 & W-9. I mocked up a servo with cross braces to help with the placement as you can see in the attached photos.
..so back to my wing. I have all of the wing ribs cut and trimmed to the basic form. I finally finished cutting the holes for the wing tube. This took a ton of time because I wanted to ensure that the tube would be straight. After this was done I cut the holes for the cardboard tube for the servo wire. I also added the cross braces for the servo. I changed this a little in relation to the plans. The plans call for a separate rib to hold the servo in place. I chose to leave this rib out and run the mounting across ribs W-8 & W-9. I mocked up a servo with cross braces to help with the placement as you can see in the attached photos.
11-04-2015, 05:47 PM
#18
Thread Starter
My Feedback: (3)
Join Date: Feb 2010
Location: St. Augustine,
FL
Posts: 33
Likes: 0
Received 0 Likes
on
0 Posts
After a few mock build-ups with the wing(NO GLUE), I think I'm ready to start gluing the wing together. I put things together to make sure that everything will fit in place correctly. I wanted to keep the servo tucked in the wing but leave enough room for clearance in servo arm travel. I have to make cardboard tubes that will be used in the wings as well before I move forward with gluing. The one I used in the photo above was only for placement and adjustments. The servo wire tube will be a 2 piece setup joined at W-5. Also, before I glue anything I will transfer all of the mounting holes and to the other set of wings(Very important!!). Tonight will be a gluing party with a few cups of coffee. Since I'm making custom tubes for this model, I'm going to make a batch of tubes with various sizes. I personally like to use them in the fuselage if servos are going to be place in the tail. It keeps the wires together and makes things so much easier. Plus they are as light as a feather. I put some photos up showing the finished product.
I put some photos up showing the finished product.
11-05-2015, 02:54 PM
#19
Thread Starter
My Feedback: (3)
Join Date: Feb 2010
Location: St. Augustine,
FL
Posts: 33
Likes: 0
Received 0 Likes
on
0 Posts
After a late night and a lot of coffee, the tubes are complete. I made a large batch of various sizes and lengths while I was set up and at it. I put together everything one last time to ensure everything fit nicely. I did notice a little pre-set warp starting to form up with the tubes in place. I just oversized the servo tube holes a fraction to fix that. I also went through to make sure the ribs fit smoothly on the spars instead of a tight/snug fit. I am using a 3/8 hardwood dowel that will pass through W-2 & W-3 as the aft wing support. This will also plug into the fuselage as well. In the picture below I have it marked on W-2 and will set the placement on W-3 after the wing is mostly completed. I am changing the look of the sheeting which will allow me to have access to the W-3 location. Again, before I glue anything together I will make sure that I transfer the locations to the right hand wing assy. Because you typically build wings upside down on the board I naturally starting with the left wing which was used for all of the adjustments and placements. I also put up a pic showing the final servo tube product. They will come together at W-5. Next step will be to glue everything in place.
11-06-2015, 06:47 AM
#20

DAY-2: I like to cut templates when I build. I can use them for later use if neccessary. I use 0.40 press laminate marker board for this process. It cuts nicely with sewing scissors and #11 blades. You can also shave it to create sharp inside corners. Once all of my formers, ribs and anything else I need to create is cut, I will move over to tracing them out on the wood.
Going back to your second post---- what exactly is "0.40 press laminate marker board".
I could not see in the pictures well enough to know for sure what you are using.
I also tried a simple internet search and did not come up with anything conclusive.
Something that can be cut with scissors sounds great.
To transfer the pattern to wood--what are you doing, tracing around it with ink or pencil and then cut or ?????
11-06-2015, 11:10 AM
#21
Thread Starter
My Feedback: (3)
Join Date: Feb 2010
Location: St. Augustine,
FL
Posts: 33
Likes: 0
Received 0 Likes
on
0 Posts
Check out the two links below. I use the smooth board for my templates. For the initial tracing I like to use a 0.7 & 1.1mm pencil. When I trace the templates to the balsa, I'll use a 0.5 sharpie. The balsa doesn't seem to soak or draw out the ink as bad. After that, it off to cutting and shaping.
http://www.michaels.com/search?q=bristol%20400
http://www.officedepot.com/a/product...Paper-Black-8/
I've been using these items for many years now. Because kits are becoming discontinued at what seems to be a fast rate, I trace and cut templates for everything I deal with. I've been ordering extra cowels and windshilds in fear that they will be going away as well.
11-06-2015, 03:26 PM
#22
Check out the two links below.................
http://www.michaels.com/search?q=bristol%20400
http://www.officedepot.com/a/product...Paper-Black-8/
I've been using these items for many years now..............
http://www.michaels.com/search?q=bristol%20400
http://www.officedepot.com/a/product...Paper-Black-8/
I've been using these items for many years now..............
A friend of mine has the PrimeCut+ and that thing looks like a blast...
11-06-2015, 04:23 PM
#23
Thread Starter
My Feedback: (3)
Join Date: Feb 2010
Location: St. Augustine,
FL
Posts: 33
Likes: 0
Received 0 Likes
on
0 Posts
Thanks. I've put this project on the back burner too many times and really want to get if finished. I'm going to run a Saito 1.80 on this one with a performance type prop. Depending on how it handles the plane, I may put the gas conversion kit on it. Fuel burn will be the issue.(Thirsty Saito's)
)
05-22-2023, 05:22 AM
#24
Thread Starter
My Feedback: (3)
Join Date: Feb 2010
Location: St. Augustine,
FL
Posts: 33
Likes: 0
Received 0 Likes
on
0 Posts
Well, I'm back at it after all this time. Too much time has gone by and I really want to get this plane finished and in the air!!!
So, where was I.......
Since I had the wings 90% complete I jumped back to the fuselage. I spent the first day getting all of my pieces back together to see where I had left things . I worked the vertical, horizontal, and tail control surfaces first. Lots of sanding was in store. Thank goodness I had a Master Aircrew shaving razor. A must have for scratch building. Because these surfaces are built up it took a little time making sure everything was lined up correctly. Some of the thicknesses were a little off and some extra sanding and shaping were required. Once all finished I decided to add in the hinges. It was a lot easier to do off the aircraft.
So, where was I.......
Since I had the wings 90% complete I jumped back to the fuselage. I spent the first day getting all of my pieces back together to see where I had left things
. I worked the vertical, horizontal, and tail control surfaces first. Lots of sanding was in store. Thank goodness I had a Master Aircrew shaving razor. A must have for scratch building. Because these surfaces are built up it took a little time making sure everything was lined up correctly. Some of the thicknesses were a little off and some extra sanding and shaping were required. Once all finished I decided to add in the hinges. It was a lot easier to do off the aircraft.
05-22-2023, 06:16 AM
#25
Thread Starter
My Feedback: (3)
Join Date: Feb 2010
Location: St. Augustine,
FL
Posts: 33
Likes: 0
Received 0 Likes
on
0 Posts
Now that I had the til surface mostly finished, it's time to break out the epoxy. I started with the horizontal and worked the saddle to get it level. Since my building work bench was true, I was able to use that as my plane of reference. I shimmed the fuselage the best I could so i wouldn't over sand the saddle for the horizontal. Once happy with all of the dimensions I added lots of reference lines before gluing. I set the incidence on the horizontal to 0.0 degrees. I don't remember ever seeing or reading any notes on it.
After a hand full of additional measurements, I glued in the horizontal with 30min epoxy. I mentioned in a earlier post that my technique is to heat up the balsa gluing surfaces with a heat gun prior to gluing. This is purely my technique.
I rechecked all my dimensions and reference lines to ensure all was set correctly. Time to walk away for a few hours.
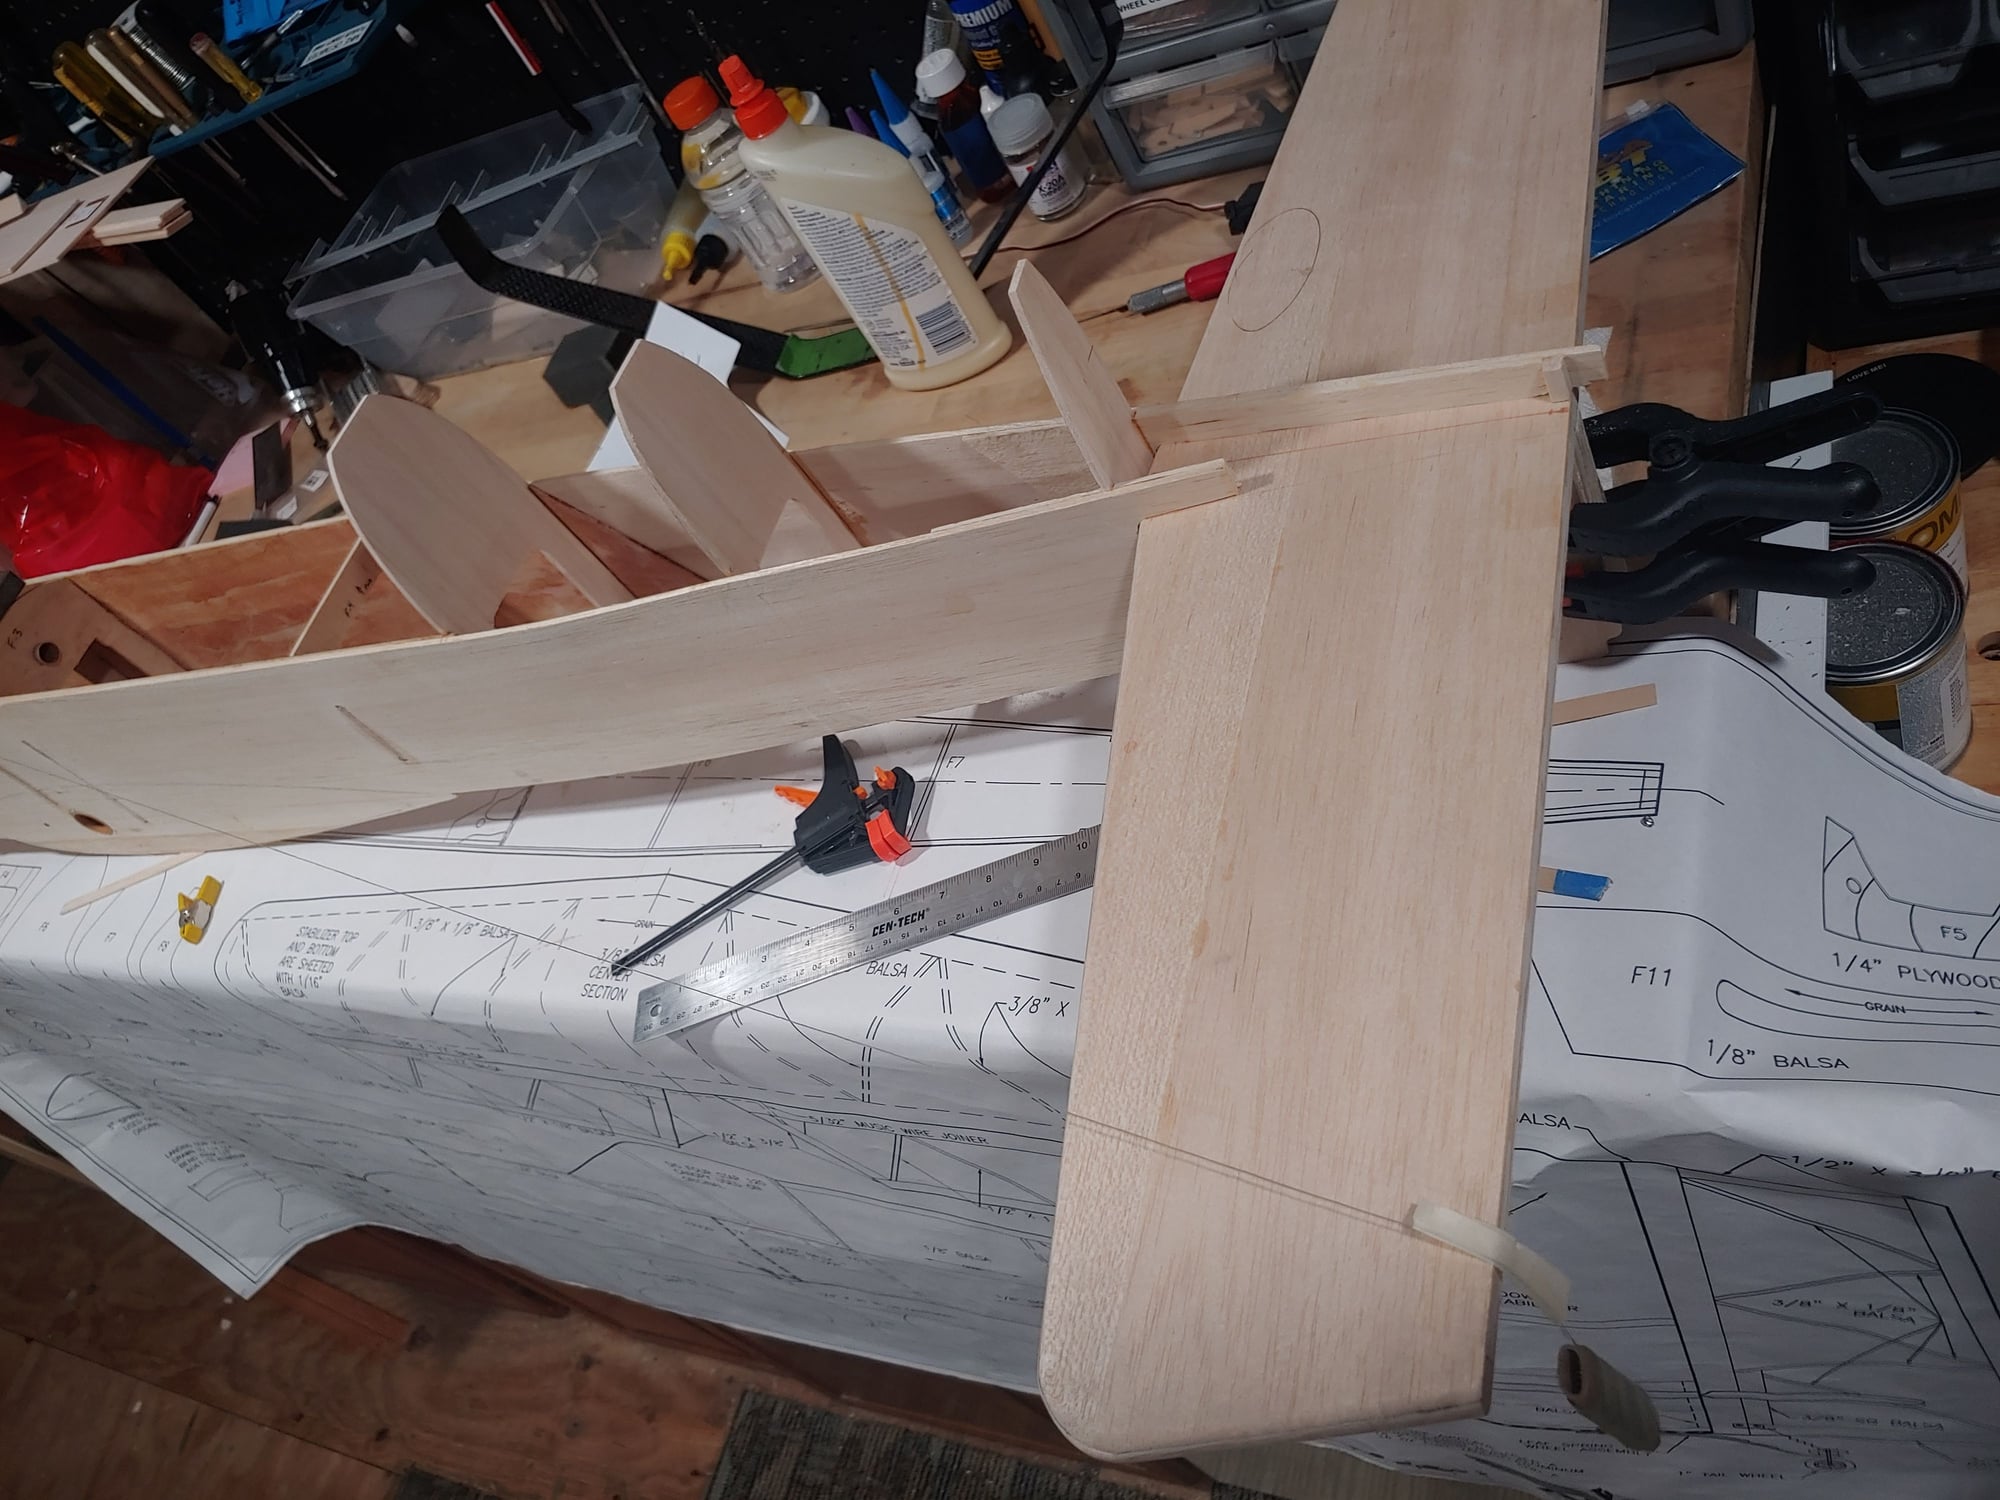
Note: I removed a small section of the fuselage skin as you can see in the photo. I did this so I could put my 90 degree square in for the rudder. I will glue it back in at a later
point.
After a hand full of additional measurements, I glued in the horizontal with 30min epoxy. I mentioned in a earlier post that my technique is to heat up the balsa gluing surfaces with a heat gun prior to gluing. This is purely my technique.
I rechecked all my dimensions and reference lines to ensure all was set correctly. Time to walk away for a few hours.
Note: I removed a small section of the fuselage skin as you can see in the photo. I did this so I could put my 90 degree square in for the rudder. I will glue it back in at a later
point.