


New Guy- Great Planes Extra 300S .40
 12-17-2014, 08:28 PM
#1
Junior Member
Thread Starter
Join Date: Dec 2014
Posts: 12
Likes: 0
Received 0 Likes
on
0 Posts
I've been out of RC for the last several years, and things have finally calmed down to the point I decided I was going to dive back in this winter with a new kit. I grabbed a copy of Phoenix sim, joined the local club, built a workbench, and ordered an Extra 300S .40 from Great Planes. Build will start tonight, I'm hoping to get enough practice with my old Hangar 9 P51 PTS on the few warm days we'll get this winter to be ready to fly the Extra in the Spring. Assuming I can get enough help on this forum to get this airframe built!!
Here's my new workshop:

Here's my new workshop:
 12-17-2014, 10:22 PM
#2
Junior Member
Thread Starter
Join Date: Dec 2014
Posts: 12
Likes: 0
Received 0 Likes
on
0 Posts
Horizontal stab is framed up and rough sanded. CA ended up sticking to the wax paper I used to cover the plans... anyone have any tips so I dont need to spend my time carefully shaving the paper off the elevator/v stab when I do those tomorrow night?

12-17-2014, 10:35 PM
#3
Banned
 .
. Many good wood glue do not run down when applied along vertical surfaces or corners.
They have enough viscosity to avoid this problem.
The wood glue is not likely to attack the wax and stick to the paper if you put too much and it runs down. The second glue coat (filleting) is applied when the surfaces are horizontal.
Oh! ... I forgot ... Welcome to your participation and ...
Have a Merry Christmas.
Zor
Last edited by Zor; 12-17-2014 at 10:50 PM.
12-18-2014, 04:17 AM
#4


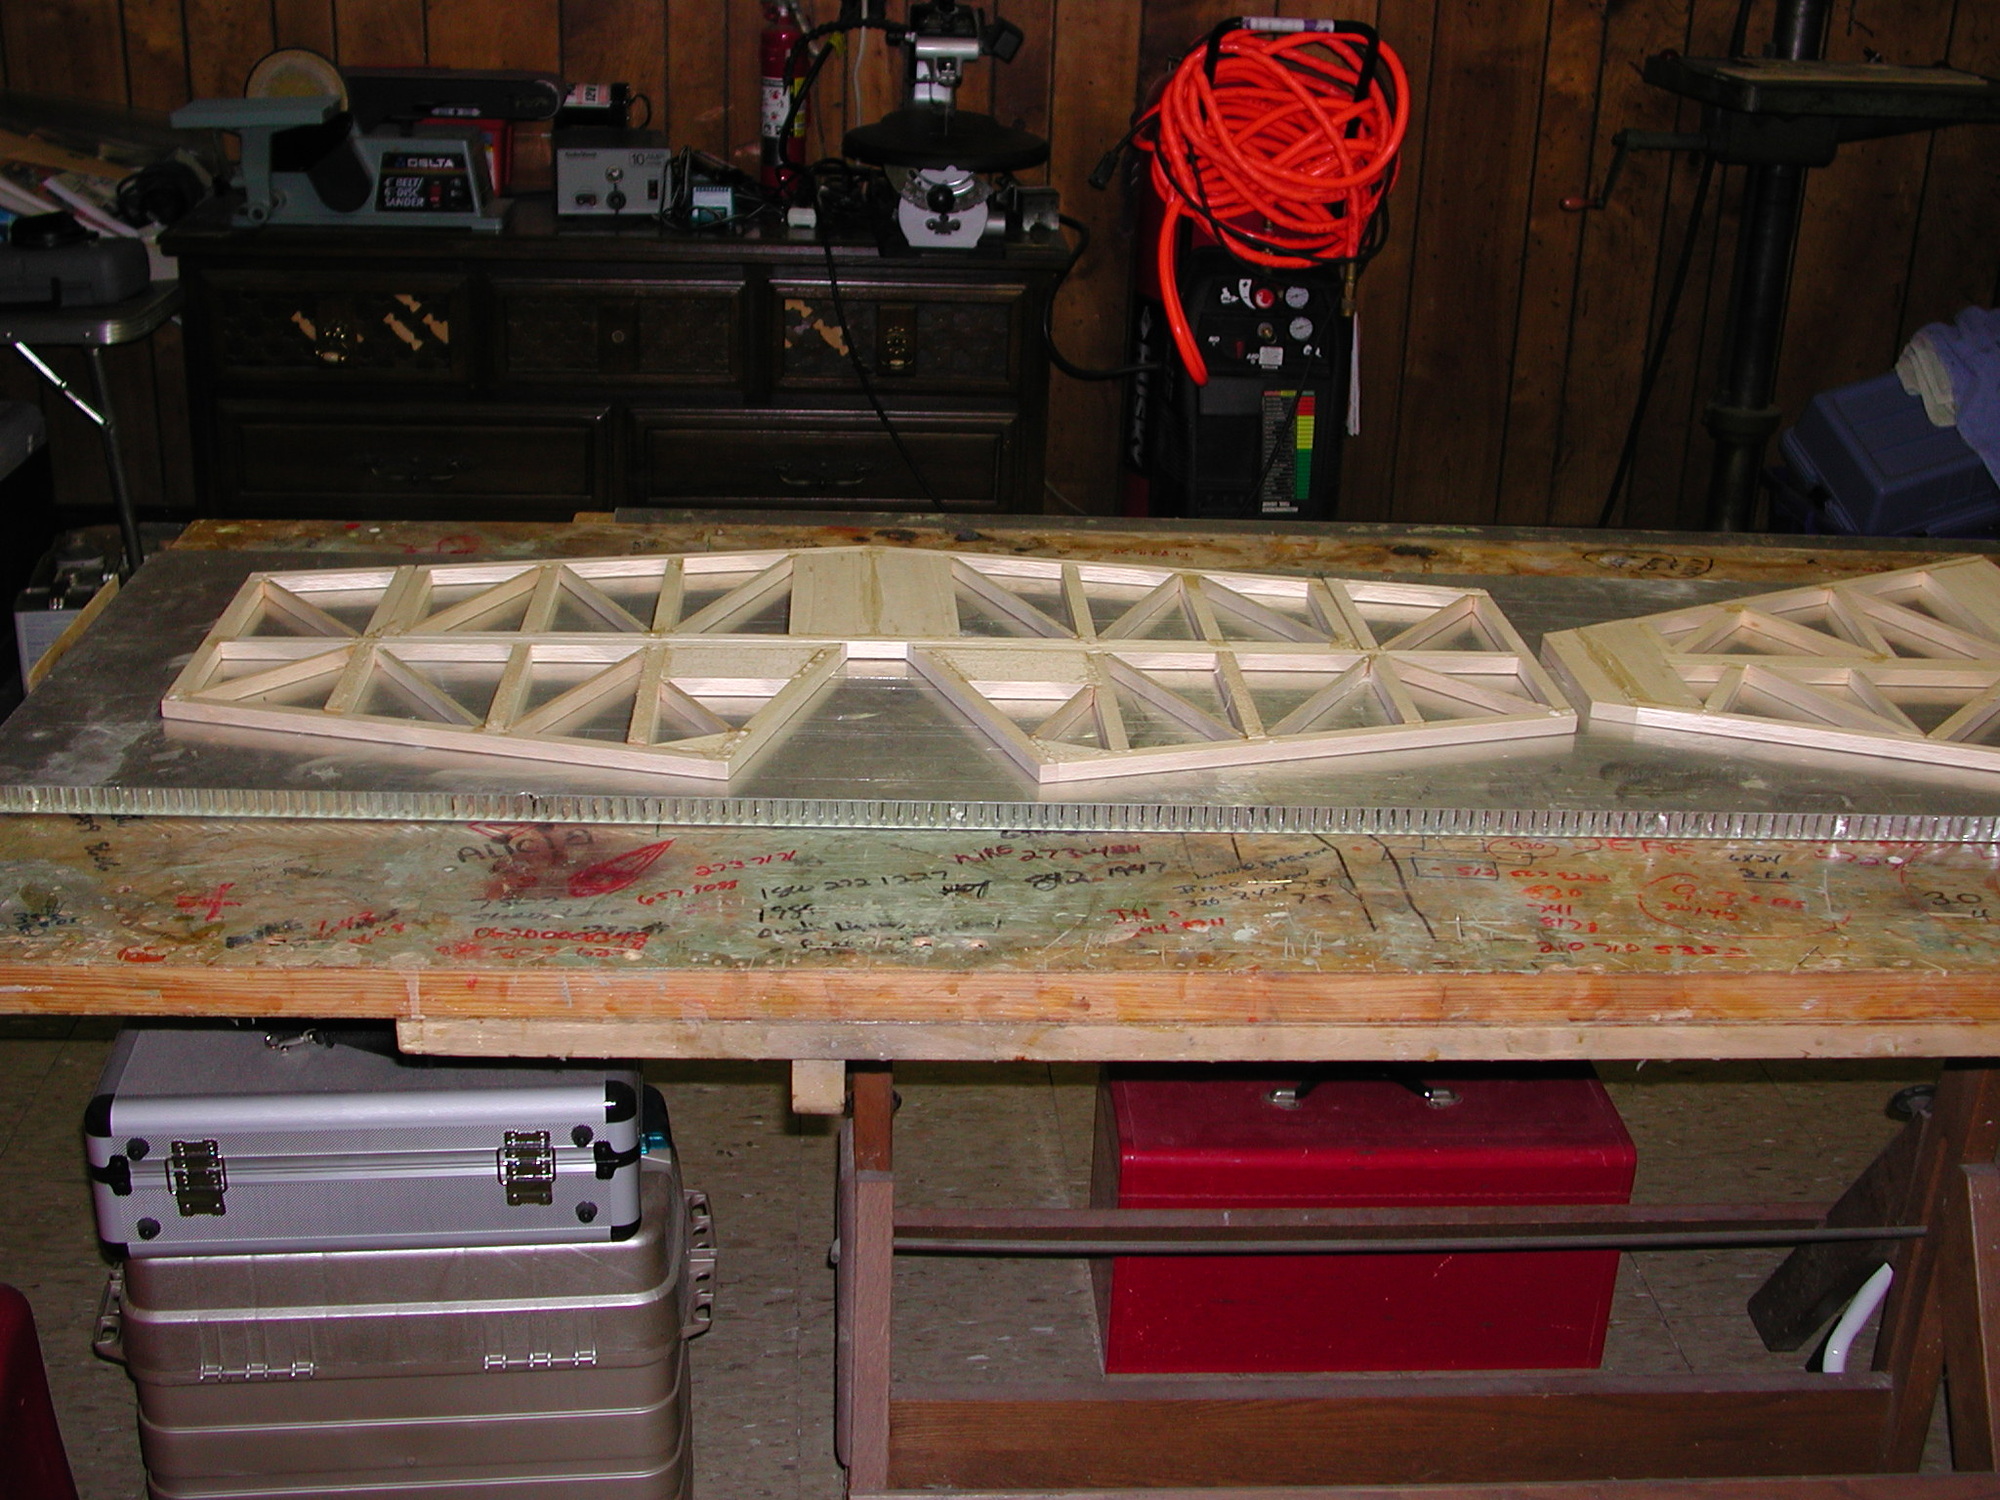
First, when using CA place Handy-Wrap over the plans, it releases from CA. Now for getting the wax paper off your stab. I purchased a 96" X 24" 3/4" thick piece aluminum honeycomb panel around 12 or 15 years ago, I have always used it as a sanding board by mounting 220 grit silicon carbide open coat full sheets of sand paper to one side with 3M 77 spray adhesive covering nearly the entire side at times, then I just move the work in 45 degree motions over it, what this means is just take your stab and move it over the sanding board instead of using a sanding block and sanding on top of your fixed stab. I have never found anything that works so true and easily. I soak my joints with thin and medium CA and never worry about how hard it is to sand the high CA glue down because with this method it removes the high spots like butter. As you can see the tail feathers glued up and sitting on the honeycomb panel ready for sanding, and after sanding. This is a 55% fuselage after sanding and gussets glued on after using the same board and method of sanding as the smaller size stuff I have also included some finish shots and one of my 52% Extra 300 SP sanded this very same way on the fuselage top, bottom, and sides.
Sanding curved surfaces like wings, turtle decks and so I just use a flexible spline board to level the high spot even with the low spots, believe it or not I mound 80 grit sand paper for this process and again a 45 degree motion is used.
Note: I stated that I soak with thin and medium CA, what I actually mean is I soak all joints with thin CA on the table, I then remove from the table top to a horizontal position and place fillets of medium CA in every joint corner, then I sand. Been doing it this way for many years.
You do not need a 96" long piece of honeycomb to accomplish this little task, just something longer than your longest item to be sanded and it must be flat and true, that's it.


Bob
Sanding curved surfaces like wings, turtle decks and so I just use a flexible spline board to level the high spot even with the low spots, believe it or not I mound 80 grit sand paper for this process and again a 45 degree motion is used.
Note: I stated that I soak with thin and medium CA, what I actually mean is I soak all joints with thin CA on the table, I then remove from the table top to a horizontal position and place fillets of medium CA in every joint corner, then I sand. Been doing it this way for many years.
You do not need a 96" long piece of honeycomb to accomplish this little task, just something longer than your longest item to be sanded and it must be flat and true, that's it.
Bob
Last edited by sensei; 12-18-2014 at 04:25 AM.
12-18-2014, 10:13 PM
#5
Junior Member
Thread Starter
Join Date: Dec 2014
Posts: 12
Likes: 0
Received 0 Likes
on
0 Posts
Thank you both for the advice, Bob those models are gorgeous! The finish on both are immaculate, I'm jealous.
I decided to stay the course with CA, I built my first kit (a new/old Carl Goldberg Falcon 56) with wood glue. After crashing and destroying the wings, I built the new wing using CA and decided then that I prefer the convenience CA provides in speed of cure, ability to tack glue, and less need to build complicated clamping systems to hold things down while the glue cures. I did not get much done tonight, I was working slow as I am pretty tired from a long shift at work and didn't want to mess anything up. I ended up building a few sanding blocks out of some MDF I had kicking around the shed. I glued some 220 and 500 grit sand paper to these blocks with spray adhesive, and by clamping these to the table, I found it much easier to deal with the rock solid CA high spots while keeping things straight than with the smaller blocks I was using before. Pic of my limited progress:

Hopefully I'll get the vertical and rudder done tomorrow after work, it's looking like the weather's going to agree with flying on Saturday for me (unless I just jinxed it...). I'm pretty excited, I haven't flown a glow model in at least 5 years.
I decided to stay the course with CA, I built my first kit (a new/old Carl Goldberg Falcon 56) with wood glue. After crashing and destroying the wings, I built the new wing using CA and decided then that I prefer the convenience CA provides in speed of cure, ability to tack glue, and less need to build complicated clamping systems to hold things down while the glue cures. I did not get much done tonight, I was working slow as I am pretty tired from a long shift at work and didn't want to mess anything up. I ended up building a few sanding blocks out of some MDF I had kicking around the shed. I glued some 220 and 500 grit sand paper to these blocks with spray adhesive, and by clamping these to the table, I found it much easier to deal with the rock solid CA high spots while keeping things straight than with the smaller blocks I was using before. Pic of my limited progress:
Hopefully I'll get the vertical and rudder done tomorrow after work, it's looking like the weather's going to agree with flying on Saturday for me (unless I just jinxed it...). I'm pretty excited, I haven't flown a glow model in at least 5 years.
12-21-2014, 10:46 AM
#7
Junior Member
Thread Starter
Join Date: Dec 2014
Posts: 12
Likes: 0
Received 0 Likes
on
0 Posts
I finished the vstab, rudder, and final shaped all the tail surfaces this morning. Im concerned about a couple of mg hinge points and am hoping someone can take a look and advise me on how they would continue.

2 out of three hinge points on one elevator look like that, Im really happy with how all the others turned out, but not sure I trust these slots... I'd hate to have to rebuild the elevator surface, but I would hate for it to bring down the model even more...
Sorry about the sanding block clouding up the image, the camera on my phone meeded something bigger than the edge of the elevator surface to focus on.
Last edited by wrhaynie; 12-21-2014 at 10:48 AM.
12-21-2014, 10:28 PM
#8
Junior Member
Thread Starter
Join Date: Dec 2014
Posts: 12
Likes: 0
Received 0 Likes
on
0 Posts
I put the tail surfaces away and started on the wing to give myself time to think of a solution for my gouged hinge slots. The gap isn't that big, and the hinge fits snug, however, I'm just not happy with it. I think what I might try is fitting the hinge into the elevator surface and then take some balsa filler diluted with water, and inject it into the gap with a syringe. Once the water evaporates, I should be able to add CA and have a good joint. Has anyone ever tried something like this before?
Fitting the parts for the left wing. I was originally trying to just use pins to hold the parts in place, but not all of the the 'jig feet' that are on the top (wing is built upside down) of the wing would accept a pin without splitting. For these ribs that came from the harder balsa, I used some bits of 2x4 left over from building my workbench that I cut to be perfectly square, then clamped the ribs to these bits and weighted them to the table with a few packs of batteries I had floating around and a bottle of ATF I used for after-run oil yesterday (weights aren't on the 2x4s in the pic obviously).

Next came attaching the leading edge. Pretty straight forward, but I snapped a pic so I figured I'd include it here.

Then came sheeting the wing. I screwed up big time here, rather than glue the sheeting to the ribs like I should have, I pressed the sheeting down to be flush with the ribs and then tacked it with thin CA. Then I went over the ENTIRE leading edge and sheet joint with CA, filled areas where my beveled joint wasn't perfect with baking soda and added CA there too. Once things had cured, I unpinned the wing from the board and was planning on adding a light line of CA to the rib/sheet joint from the top side (bottom while building), and came across a nice surprise. The sheeting wasn't flush with more than half of the ribs. DOH!!!!!
I stared at it. I grabbed a beer and left the room. I thought about it. I decided I couldn't live with the airfoil tweaked the way I had it, and started surgery. I figured if worst comes to worst, I order a wing kit and chock it up to lessons learned. Either way, I'm building this kit to start practicing precision aerobatics, and I am NOT going to be happy with it the way it was. I slowly and carefully soaked the joint between the LE and the sheeting with CA debonder, cutting with an exacto knife as I worked along. Once I had the sheet free from the leading edge, I wiped away as much acetone as I could, then opened a window to let a breeze pass over the wing and let it be for a few hours. I didn't like the idea of gluing the joints from the bottom side as I feared I would glue in a warp, and the sheeting was still glued to the spar so I attacked the reattachment the same way I did the first time, but this time more slowly and carefully. Since the wing was no longer pinned to the board, I placed weights on the wing to keep things PERFECTLY level, pressed the sheeting down flush with the rib, and applied thin CA to the leading edge joint above the rib at the tip, just enough to tack the sheeting. After allowing the CA to cure, I flipped the wing over, checked the joint, and applied thin CA along the bottom of the rib where it meets the sheeting. I did this one by one all the way back along the sheeted area of the wing, until the sheeting was secured to all the ribs. Now I had a slight gap in some areas between the leading edge and the wing sheeting where my xacto knife slipped and did a little balsa carving rather than the joint separating that was intended. I worked balsa filler into these areas until I had a thin strip working out the other side, cleaned off the excess and let it dry. Despite all the re-work, the wing is pretty straight. I can feel a slight warp as one of the 'jig feet' on the ribs doesn't quite touch the table surface, but I can only tell by 'feel', it's less than 1/32 of an inch so I don't have means to measure it and I highly doubt it will effect the flying characteristics in any way. If Zor reads this than yes, this is a perfect example of where CA is NOT the glue of choice. had I used wood glue,I would have been able to adjust the sheeting before it began to cure and avoided a SLOW, PAINFUL reworking. When I build the right wing, I will be using Titebond instead of CA

Fitting the parts for the left wing. I was originally trying to just use pins to hold the parts in place, but not all of the the 'jig feet' that are on the top (wing is built upside down) of the wing would accept a pin without splitting. For these ribs that came from the harder balsa, I used some bits of 2x4 left over from building my workbench that I cut to be perfectly square, then clamped the ribs to these bits and weighted them to the table with a few packs of batteries I had floating around and a bottle of ATF I used for after-run oil yesterday (weights aren't on the 2x4s in the pic obviously).
Next came attaching the leading edge. Pretty straight forward, but I snapped a pic so I figured I'd include it here.
Then came sheeting the wing. I screwed up big time here, rather than glue the sheeting to the ribs like I should have, I pressed the sheeting down to be flush with the ribs and then tacked it with thin CA. Then I went over the ENTIRE leading edge and sheet joint with CA, filled areas where my beveled joint wasn't perfect with baking soda and added CA there too. Once things had cured, I unpinned the wing from the board and was planning on adding a light line of CA to the rib/sheet joint from the top side (bottom while building), and came across a nice surprise. The sheeting wasn't flush with more than half of the ribs. DOH!!!!!
I stared at it. I grabbed a beer and left the room. I thought about it. I decided I couldn't live with the airfoil tweaked the way I had it, and started surgery. I figured if worst comes to worst, I order a wing kit and chock it up to lessons learned. Either way, I'm building this kit to start practicing precision aerobatics, and I am NOT going to be happy with it the way it was. I slowly and carefully soaked the joint between the LE and the sheeting with CA debonder, cutting with an exacto knife as I worked along. Once I had the sheet free from the leading edge, I wiped away as much acetone as I could, then opened a window to let a breeze pass over the wing and let it be for a few hours. I didn't like the idea of gluing the joints from the bottom side as I feared I would glue in a warp, and the sheeting was still glued to the spar so I attacked the reattachment the same way I did the first time, but this time more slowly and carefully. Since the wing was no longer pinned to the board, I placed weights on the wing to keep things PERFECTLY level, pressed the sheeting down flush with the rib, and applied thin CA to the leading edge joint above the rib at the tip, just enough to tack the sheeting. After allowing the CA to cure, I flipped the wing over, checked the joint, and applied thin CA along the bottom of the rib where it meets the sheeting. I did this one by one all the way back along the sheeted area of the wing, until the sheeting was secured to all the ribs. Now I had a slight gap in some areas between the leading edge and the wing sheeting where my xacto knife slipped and did a little balsa carving rather than the joint separating that was intended. I worked balsa filler into these areas until I had a thin strip working out the other side, cleaned off the excess and let it dry. Despite all the re-work, the wing is pretty straight. I can feel a slight warp as one of the 'jig feet' on the ribs doesn't quite touch the table surface, but I can only tell by 'feel', it's less than 1/32 of an inch so I don't have means to measure it and I highly doubt it will effect the flying characteristics in any way. If Zor reads this than yes, this is a perfect example of where CA is NOT the glue of choice. had I used wood glue,I would have been able to adjust the sheeting before it began to cure and avoided a SLOW, PAINFUL reworking. When I build the right wing, I will be using Titebond instead of CA
12-22-2014, 09:23 AM
#10
Banned
If Zor reads this than yes, this is a perfect example of where CA is NOT the glue of choice. had I used wood glue,I would have been able to adjust the sheeting before it began to cure and avoided a SLOW, PAINFUL reworking. When I build the right wing, I will be using Titebond instead of CA
Hi wrhaynie,
Your adventures in sheeting and your explanations of a regrettable initial results are most valuable advice to new builders. You deserve an A1 for that.
Also your perseverance and success is a good example of my first motto "NEVER GIVE UP".
I am following your progress with high interest.
Zor
Last edited by Zor; 12-22-2014 at 09:38 AM.
12-30-2014, 09:27 AM
#11
Junior Member
Thread Starter
Join Date: Dec 2014
Posts: 12
Likes: 0
Received 0 Likes
on
0 Posts
When I built the right wing, I used masking tape to hold the jig tabs together when I pinned them to the board. Doing it this way, I ended up not having any of the jig tabs split while pinning them down.

I used a combination of clamps and corn meal/rice with weights to hold the sheeting while the Titebond cured on the right wing. It was a pretty painful process getting the weight spread to the right areas to hold the sheeting down while the glue cured, but overall it worked okay.

After joining the two wing halves, it was time to sheet the top. I decided to try a different method this time, I applied titebond to the main and trailing edge spars and then placed the sheeting into place. Rather than deal with the complexities of getting clamps and weights to hold the balsa sheet in place, I used a small T-pin to poke holes through the sheeting to the ribs and spars underneath. Then, working from the center out to each edge, I applied thin CA into the holes I had poked while holding the sheeting down with my fingers. This held the sheeting firmly in place while the wood glue cured, but I am a little nervous as to how sanding out the blemishes this caused will turn out.

I’ve got the fueselage mocked up as well, overall parts fitment is pretty good although there are a few areas I will be cleaning up before applying glue:

I used a combination of clamps and corn meal/rice with weights to hold the sheeting while the Titebond cured on the right wing. It was a pretty painful process getting the weight spread to the right areas to hold the sheeting down while the glue cured, but overall it worked okay.
After joining the two wing halves, it was time to sheet the top. I decided to try a different method this time, I applied titebond to the main and trailing edge spars and then placed the sheeting into place. Rather than deal with the complexities of getting clamps and weights to hold the balsa sheet in place, I used a small T-pin to poke holes through the sheeting to the ribs and spars underneath. Then, working from the center out to each edge, I applied thin CA into the holes I had poked while holding the sheeting down with my fingers. This held the sheeting firmly in place while the wood glue cured, but I am a little nervous as to how sanding out the blemishes this caused will turn out.
I’ve got the fueselage mocked up as well, overall parts fitment is pretty good although there are a few areas I will be cleaning up before applying glue:
01-02-2015, 09:06 AM
#13
Junior Member
Thread Starter
Join Date: Dec 2014
Posts: 12
Likes: 0
Received 0 Likes
on
0 Posts
Power plant is in, I found an old made in Italy Super Tigre GS45 in an estate sale on Fleabay for $40 shipped. I tore her all the way down to the case to inspect the bearings and give it a thorough cleaning. Everything looked surprisingly good, bearings turn free and it still has good compression with no major scratches etc.. in the piston or sleeve. Wrist pin fits tight, con rod fits tight to crank and the con rod bushings look to be in good shape. It is missing a head gasket, and since the lowest nitro content fuel my LHS carries is 15% I've decided against trying to get her running without it. Super Tigre parts are hard to come by as of late, but I found a NIB gasket set from a guy in Canada on Ebay and have ordered that.


01-05-2015, 01:50 PM
#14
Junior Member
Thread Starter
Join Date: Dec 2014
Posts: 12
Likes: 0
Received 0 Likes
on
0 Posts
I did a little more work on the Extra over the weekend. I built framework for the aileron servo bays out of 1/4" basswood sticks epoxied to the bottom main spar and ribs three bays out from the center of the wing. Once I have the actual servos I'll be using in I'll build hatches out of 1/8th or 1/16th ply to mount the servo to that will screw down to the basswood framework. I've gusseted the corners, but I'm wondering if I should back the ribs the sticks are glued to with ply as well for additional strength.
Basic framework:

Trimming the stick running between the spars to keep a level plane running just below the bottom of the ribs:

Adding gussets:

I also beefed up the landing gear support plate with some ply running diagonally from the fuse side to the bottom of the LG plate:

Basic framework:
Trimming the stick running between the spars to keep a level plane running just below the bottom of the ribs:
Adding gussets:
I also beefed up the landing gear support plate with some ply running diagonally from the fuse side to the bottom of the LG plate:
 01-09-2015, 11:00 AM
#16
Junior Member
Thread Starter
Join Date: Dec 2014
Posts: 12
Likes: 0
Received 0 Likes
on
0 Posts
When I started to build the ailerons I discovered a slight warp in the trailing edge of the wing, at the tip I was 1/16th of an inch off-line from the wing root. I dampened the TE and sheeting in an alcohol/water solution and placed a plywood shim under the wing root while weighing down the tip. After an overnight sit.the warp was reduced to ~1/32", I think I'm going to increase the shim size and attempt to straighten one more time.
In other news, servos are in. 4 Tactic TSX47 digital MG servos for the control surfaces and one TSX35 standard servo for the throttle. I haven't ever heard of Tactic, but they appear to be of high quality and were much cheaper than other options with the same specs.

In other news, servos are in. 4 Tactic TSX47 digital MG servos for the control surfaces and one TSX35 standard servo for the throttle. I haven't ever heard of Tactic, but they appear to be of high quality and were much cheaper than other options with the same specs.
