


1/4 Sig J3 Cub Build
 02-18-2017, 07:50 AM
#26

Bie'...now you're starting to get a picture/understanding behind the concept of overpowering. It isn't just about having extra power on tap (who doesn't want that?) it's about propping, to get the best front the airframe... and the engine. What's best/optimal for the former might not be the best for the latter and vise verse. Sure you can add more prop, but that creates ground clearance problems. You and add more pitch but then you get idle creep. You can say... sod it and just limit the engine to it's lower RPM operating range... but then you're not operating in it's best power band etc etc. Finding that airframe/engine sweet spot is the Holy Grail... both for the producers... and us pilots.
I mentioned earlier that a buddy of mind had a 1/4cub with an old Zenoah G21 as it was a perfect match. Somebody else mentioned the same but this time with a G26 (just a modern version of the same engine)... he reported the same. What we mean is that idle means slowing down... almost breaking. Mid throttle is a good solid cruise. Power up and a rock solid climb, punch it and there's plenty of power for some vertical. Holy Grail thing.
The G 21-26 is a cracking engine BTW... with or without electronic ignition (i've never flown on with) so if you see one at a swap meet or similar for a good price, pick it up. Simple, economic and with the right prop and muffler...real quiet. Nice.
Last edited by David Bathe; 02-18-2017 at 07:55 AM.
 02-18-2017, 04:41 PM
#27

Thread Starter
Join Date: Feb 2017
Location: Philippines
Posts: 65
Likes: 0
Received 0 Likes
on
0 Posts
Hi David. Slowly realizing my mistake. I always thought, the bigger the better. Turned out not on plane engines. Sadly, I will have to stick with my 35cc until I get to buy a smaller one probably..... next year!
However, If you're familiar with the TOP FLIGHT PROP CHART (I'm sure you are), you'll notice the 18x6 prop I have falls well within the allowed prop for a 35cc engine. Actually, nothing was mentioned by DLE that 18x10 is the minimum prop size. Just a recommendation. Could it be that I am just worrying too much and that 18x6 will still work fine with the 35cc?
Any remedy other than changing prop size to prevent over RPM?
With my setup,
1. 18x6 prop might cause the engine to over rpm.
2. 18x10 prop (recommended size) is not ideal for this plane as it will cause too much speed.
3. 20x6 prop might cause ground clearance problem. However, I Saw some 1/4 cubs of different manufacturers have 20xN props on them. I suppose it will be the same for the sig?
Are these conclusions correct? Other than changig the engine, can you suggest a remedy?
Thank you.
Bitoy
02-19-2017, 03:31 AM
#28
Don't worry, just build away. Fit the engine you have and experiment with the props... could be a 20x6-- or 8 or an 18 something... you'll find out and remember to build in some right trust, say 3 deg. Apart from that, Just go and enjoy yourself. It is, in the end... all about having fun. Who cares if it's absolutely correct, as long as you're having an absolute blast. If the mind is totally absorbed with something other than bills, children, mortgages, work problems etc... then it's 110% correct IMO.
02-19-2017, 05:46 AM
#29

I use an 18X6 on my 26cc Zenoah. My 38cc Zenoah uses an 18X10. I would worry about over-reving your engine if you install the 18X6.
I'm building a 1/4 Cub. I haven't checked, but by looking at the fuselage, standing on it's landing gear, I'm guessing that you may have ground clearance for a 20X6
Mine will be powered by the 26cc Zenoah.
I'm building a 1/4 Cub. I haven't checked, but by looking at the fuselage, standing on it's landing gear, I'm guessing that you may have ground clearance for a 20X6
Mine will be powered by the 26cc Zenoah.
02-19-2017, 08:02 AM
#30


Join Date: Jan 2004
Location: lake in the Hills,
IL
Posts: 977
Likes: 0
Received 14 Likes
on
14 Posts
It is not too powerful for your plane.
Yes you should be able to hover with a slow punch out with that engine.
Yes an 18 x 6 is not enough load and could over rev the 35cc. I would forget what is scale and go with what works the best, I would guess 20 x 6.
IMHO
Yes you should be able to hover with a slow punch out with that engine.
Yes an 18 x 6 is not enough load and could over rev the 35cc. I would forget what is scale and go with what works the best, I would guess 20 x 6.
IMHO
02-19-2017, 08:18 AM
#31
Join Date: Jan 2004
Location: lake in the Hills,
IL
Posts: 977
Likes: 0
Received 14 Likes
on
14 Posts
Hi David. Slowly realizing my mistake. I always thought, the bigger the better. Turned out not on plane engines. Sadly, I will have to stick with my 35cc until I get to buy a smaller one probably..... next year!
However, If you're familiar with the TOP FLIGHT PROP CHART (I'm sure you are), you'll notice the 18x6 prop I have falls well within the allowed prop for a 35cc engine. Actually, nothing was mentioned by DLE that 18x10 is the minimum prop size. Just a recommendation. Could it be that I am just worrying too much and that 18x6 will still work fine with the 35cc?
Any remedy other than changing prop size to prevent over RPM?
With my setup,
1. 18x6 prop might cause the engine to over rpm.
2. 18x10 prop (recommended size) is not ideal for this plane as it will cause too much speed.
3. 20x6 prop might cause ground clearance problem. However, I Saw some 1/4 cubs of different manufacturers have 20xN props on them. I suppose it will be the same for the sig?
Are these conclusions correct? Other than changig the engine, can you suggest a remedy?
Thank you.
Bitoy
However, If you're familiar with the TOP FLIGHT PROP CHART (I'm sure you are), you'll notice the 18x6 prop I have falls well within the allowed prop for a 35cc engine. Actually, nothing was mentioned by DLE that 18x10 is the minimum prop size. Just a recommendation. Could it be that I am just worrying too much and that 18x6 will still work fine with the 35cc?
Any remedy other than changing prop size to prevent over RPM?
With my setup,
1. 18x6 prop might cause the engine to over rpm.
2. 18x10 prop (recommended size) is not ideal for this plane as it will cause too much speed.
3. 20x6 prop might cause ground clearance problem. However, I Saw some 1/4 cubs of different manufacturers have 20xN props on them. I suppose it will be the same for the sig?
Are these conclusions correct? Other than changig the engine, can you suggest a remedy?
Thank you.
Bitoy
1 Yes.
2 Question not framed well. Planes are "drag limited" , no prop engine combo will change the drag limitations of the upper speeds as much as I worry about how the lower speed (landing approach at idle) will be.
With that said, no to an 18 x 10.
3 Yes the same and I think with your wheel choice you will not have any issues with a 20 x 6.
02-19-2017, 11:14 AM
#32
Thread Starter
Join Date: Feb 2017
Location: Philippines
Posts: 65
Likes: 0
Received 0 Likes
on
0 Posts
That's the term I was looking for! Over rev. Not over rpm.
While we're at it.. and while waiting for the 2 more weeks to start with my build...
OVER RPM. WHEN DOES IT ACTUALLY HAPPEN?
a. When AT ANY POINT the engine makes more than 8500 rpm (which is the max rpm stated by the manufacturer), or
b. When the actual rpm exceeds the rpm which the engine should make at a given power, say for example,
100% throttle = 8500+
75% = 6375+
50% = 4250+
And so on.
What I mean under b. is that even if the engine is only making a 6500 rpm, the engine is considered to be already over revving considering that only 75% throttle is being applied.
I'm thinking the answer is a. But which is the right one?
Sorry for asking lots of questions. I just find it more educational than watching vids and reading articles which after a long reading, does not give me the answer to my question.
Thanks for sticking around! 2 more weeks.
02-20-2017, 08:15 AM
#33
Nothing critical will happen to the engine, it can rev much higher than specified.... except it won't be operating in it's optimal performance spectrum.
There's a place (an RPM zone) where an engine delivers it's maximum torque. That place will be much lower down the RPM band than the max HP for example and much much lower than where the engine could rev to.
It's the max torque zone you're looking for, the place the engine delivers the most brut force at the lowest RPM. The best bang for you buck in other words.
Outside that zone you're not cashing in on what the engine has to offer. One normally props to that optimal zone, then changes the diameter and pitch to suit the flying style you want to achieve with that particular aircraft.
For example, lets say an engines sweet spot is 9000 RPM. The manufacture recommends that you'll get that spot with a 12x8 prop as a starting point. You can keep that spot with a 10x10 (which will give you a higher speed) or a 14x4 that will give a slower speed but a greater pulling power. That's not exactly true... but it's good enough for an example.
All you achieve by operating the motor above and beyond that sweet-spot is reduced torque, efficiency, economy and increase prop noise.
As the other guys have confirmed, You'll be good with a 20".
02-21-2017, 08:45 AM
#34
Join Date: Dec 2001
Location: Upplands Vasby, SWEDEN
Posts: 7,816
Likes: 0
Received 3 Likes
on
3 Posts
Hi!
Cannot understand why on earth you choose such large and heavy engine for the CUB?
The result will only be a plane that flies badly.
A 1/4 cale CUB will fly best with a .90-1,20 four stroke and 15x4-15x6 (.90) 16x6 (1.20) prop.
Cannot understand why on earth you choose such large and heavy engine for the CUB?
The result will only be a plane that flies badly.
A 1/4 cale CUB will fly best with a .90-1,20 four stroke and 15x4-15x6 (.90) 16x6 (1.20) prop.
02-22-2017, 02:11 AM
#35
Thread Starter
Join Date: Feb 2017
Location: Philippines
Posts: 65
Likes: 0
Received 0 Likes
on
0 Posts
Hi jaka, being a newbie builder, I relied heavily on the planes I saw in other threads and in youtube. I saw others using 40cc and 35cc engines though some only use 20cc engine. Back then I thought it wont be a problem overpowering a plane. Having already bought this 35cc, I'll stick with the 20x6 prop which some of our friends here suggested.
Care to discuss how bad it is going to fly?
Thank you jaka.
Bitoy
Care to discuss how bad it is going to fly?
Thank you jaka.
Bitoy
02-22-2017, 09:09 AM
#36
Join Date: Dec 2001
Location: Upplands Vasby, SWEDEN
Posts: 7,816
Likes: 0
Received 3 Likes
on
3 Posts
Hi!
Sorry!
But putting such a large and heavy engine is not going to do the CUB justice!
The CUB is made to fly on it's wing ,not on brutal power.
What that means it's going to be a "floater" if powered right ( a .90 -1.20 four stroke) with nice scale slow flying characteristics and being easily landed and handled in every situation. With a too large engine that you have chosen it will be the opposite.
02-22-2017, 12:10 PM
#37
Thread Starter
Join Date: Feb 2017
Location: Philippines
Posts: 65
Likes: 0
Received 0 Likes
on
0 Posts
I agree! this is after doing more research about my plane. I'm actually looking for other planes which this engine is suitable for, and buy a smaller engine. I'm afraid though this is not going to happen anytime soon as I still have to again save for it. Can't we just set up this 35cc to perform like a 20cc?
Now I have a gut feel, I'm now asking stupid questions. haha!
Thanks jaka
Now I have a gut feel, I'm now asking stupid questions. haha!
Thanks jaka
 03-20-2017, 11:50 AM
#39
Junior Member
Join Date: Jun 2014
Posts: 1
Likes: 0
Received 0 Likes
on
0 Posts
I built the Sig 1/4 Cub with the DLE-35RA 2 years ago. One thing to keep in mind, the firewall will need to be set back in the fuse about 3/4" for the cowl to fit right (scale). I didn't and my Cub is a little long nosed.
As far as the power goes, I throttle back and it flies scale. If I go full throttle, is goes unlimited vertical. I like having the extra power if needed.
As far as the power goes, I throttle back and it flies scale. If I go full throttle, is goes unlimited vertical. I like having the extra power if needed.
11-11-2017, 06:34 AM
#40
Thread Starter
Join Date: Feb 2017
Location: Philippines
Posts: 65
Likes: 0
Received 0 Likes
on
0 Posts
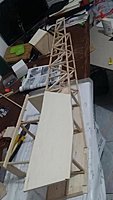
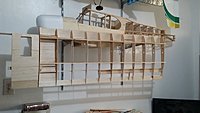
My friends, after several months late from the time I promised, I have finally started with building the cub. Had to take it real slow being afraid to make a mistake. Luckly I had a little practice with my demoiselle build which, as expected, contained a lot of mistakes. I could say the cub build is the opposite and going well. Here are just some of the pictures I took. Will post the earlier photos as soon as I get to transfer the files from my gopro. Some of the phone pics:
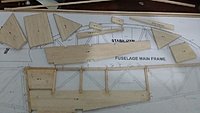
1. Started with this. For a beginner, I found it hard to shape / cut the pieces exactly according to plan. Spent much time sanding these pieces. Mixing-applying-mixing-applying epoxy also became tiresome for me considering the small parts that need to be epoxied one at a time. A friend advised me to use CA for the entire build but I still decided to strictly follow and use whatever is prescribed in the manual.
Also, is it ok if there are some gaps between some of the woods joined? just .5mm gap.[img]
 [/img]
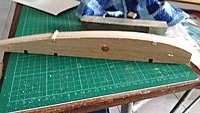
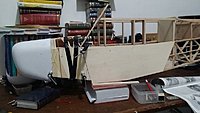
Installed the nose ------. While installing this, I actually had some doubts if this is going to hold up once the engine is up and running. Or I just don't trust balsa and epoxy that much?
showed this pic to one of the members in our club and had it mistaken by him as a heli.
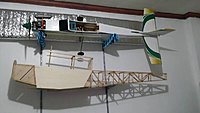
covering the nose with balsa sheet. I think I did some dirty job here. Didn't initially have an idea how to hold it in this shape until the glue dries. Lesson learned: CA has its place. I should have used it here. I have to say the finished product turned out nice though.

Had a glimpse of what it would look like with the cowl, engine and prop. Testpilot was right. I should have set the firewall a little off by 3/4". I was afraid to make some mods though as this is just my 2nd build.
[img]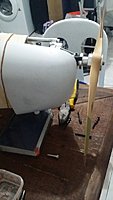 [/img]
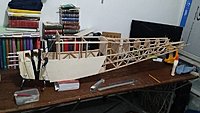
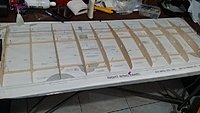
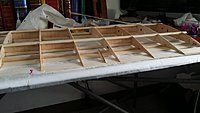
now with the wings

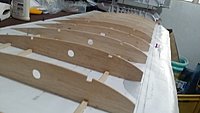
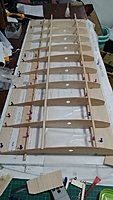


the right wing is pretty much done now. WIll post other pics soon.
As you might notice, I haven't started with the stabs, elev and rudder yet. The number of pieces I need to sand for these parts is just too overwhelming for me. Will finish both wings then go back to that.
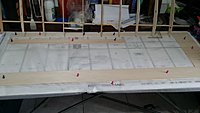
Sorry for the messy work table. Would love to hear more advice from you guys.
Thanks for viewing.
Bitoy
1. Started with this. For a beginner, I found it hard to shape / cut the pieces exactly according to plan. Spent much time sanding these pieces. Mixing-applying-mixing-applying epoxy also became tiresome for me considering the small parts that need to be epoxied one at a time. A friend advised me to use CA for the entire build but I still decided to strictly follow and use whatever is prescribed in the manual.
Also, is it ok if there are some gaps between some of the woods joined? just .5mm gap.[img]
Installed the nose ------. While installing this, I actually had some doubts if this is going to hold up once the engine is up and running. Or I just don't trust balsa and epoxy that much?
showed this pic to one of the members in our club and had it mistaken by him as a heli.
covering the nose with balsa sheet. I think I did some dirty job here. Didn't initially have an idea how to hold it in this shape until the glue dries. Lesson learned: CA has its place. I should have used it here. I have to say the finished product turned out nice though.
Had a glimpse of what it would look like with the cowl, engine and prop. Testpilot was right. I should have set the firewall a little off by 3/4". I was afraid to make some mods though as this is just my 2nd build.
[img]
now with the wings
the right wing is pretty much done now. WIll post other pics soon.
As you might notice, I haven't started with the stabs, elev and rudder yet. The number of pieces I need to sand for these parts is just too overwhelming for me. Will finish both wings then go back to that.
Sorry for the messy work table. Would love to hear more advice from you guys.
Thanks for viewing.
Bitoy
11-11-2017, 06:34 AM
#41
Thread Starter
Join Date: Feb 2017
Location: Philippines
Posts: 65
Likes: 0
Received 0 Likes
on
0 Posts
My friends, after several months late from the time I promised, I have finally started with building the cub. Had to take it real slow being afraid to make a mistake. Luckly I had a little practice with my demoiselle build which, as expected, contained a lot of mistakes. I could say the cub build is the opposite and going well. Here are just some of the pictures I took. Will post the earlier photos as soon as I get to transfer the files from my gopro. Some of the phone pics:
1. Started with this. For a beginner, I found it hard to shape / cut the pieces exactly according to plan. Spent much time sanding these pieces. Mixing-applying-mixing-applying epoxy also became tiresome for me considering the small parts that need to be epoxied one at a time. A friend advised me to use CA for the entire build but I still decided to strictly follow and use whatever is prescribed in the manual.
Also, is it ok if there are some gaps between some of the woods joined? just .5mm gap.[img]
 [/img]

Installed the nose ------. While installing this, I actually had some doubts if this is going to hold up once the engine is up and running. Or I just don't trust balsa and epoxy that much?
showed this pic to one of the members in our club and had it mistaken by him as a heli.

covering the nose with balsa sheet. I think I did some dirty job here. Didn't initially have an idea how to hold it in this shape until the glue dries. Lesson learned: CA has its place. I should have used it here. I have to say the finished product turned out nice though.

Had a glimpse of what it would look like with the cowl, engine and prop. Testpilot was right. I should have set the firewall a little off by 3/4". I was afraid to make some mods though as this is just my 2nd build.
[img] [/img]
now with the wings


the right wing is pretty much done now. WIll post other pics soon.
As you might notice, I haven't started with the stabs, elev and rudder yet. The number of pieces I need to sand for these parts is just too overwhelming for me. Will finish both wings then go back to that.
Sorry for the messy work table. Would love to hear more advice from you guys.
Thanks for viewing.
Bitoy
1. Started with this. For a beginner, I found it hard to shape / cut the pieces exactly according to plan. Spent much time sanding these pieces. Mixing-applying-mixing-applying epoxy also became tiresome for me considering the small parts that need to be epoxied one at a time. A friend advised me to use CA for the entire build but I still decided to strictly follow and use whatever is prescribed in the manual.
Also, is it ok if there are some gaps between some of the woods joined? just .5mm gap.[img]
Installed the nose ------. While installing this, I actually had some doubts if this is going to hold up once the engine is up and running. Or I just don't trust balsa and epoxy that much?
showed this pic to one of the members in our club and had it mistaken by him as a heli.
covering the nose with balsa sheet. I think I did some dirty job here. Didn't initially have an idea how to hold it in this shape until the glue dries. Lesson learned: CA has its place. I should have used it here. I have to say the finished product turned out nice though.
Had a glimpse of what it would look like with the cowl, engine and prop. Testpilot was right. I should have set the firewall a little off by 3/4". I was afraid to make some mods though as this is just my 2nd build.
[img]
now with the wings
the right wing is pretty much done now. WIll post other pics soon.
As you might notice, I haven't started with the stabs, elev and rudder yet. The number of pieces I need to sand for these parts is just too overwhelming for me. Will finish both wings then go back to that.
Sorry for the messy work table. Would love to hear more advice from you guys.
Thanks for viewing.
Bitoy
11-11-2017, 08:25 AM
#43

Hi Beibitol, I just picked up on your thread. It's great to see another flier join the ranks of the builders. Every one should have a little stick time with a Cub. I would say that you are doing fine. The first couple of builds have a learning curve as you begin to understand the techniques. If you haven't done so already, pop down to the lumber yard or the auto supply store and grab a couple of inexpensive sanding blocks and a range of sandpaper. 80 grit will help to quickly shape the part to the rough dimension and than finish with 120 to get a nice fit against the wood that is being glued to. The tighter the fit the stronger the joint, if you are concerned about gaps add a little scrap wood to make up the difference. Trim it to fit and glue it in. You can also add small gussets to strengthen joints without adding too much weight. It is time consuming but one nice advantage of sanding to shape is that you can sand a little, test fit the part and sand a little more. By doing this you can have a perfect fitting part with a strong, tight fitting joint. The nose may came out a little long, just reposition your cowl and go with it. With the exception of those who hang out with the hard core scale modelers most people have never seen an exact scale model. Even in the full scale world so many cubs (and their clones) have been modified to the point that you could probably find an example with a longer than usual nose. This may have already been addressed but you have mentioned glues on several occasions. My two cents worth is use epoxy for strength and vibration resistance, such as firewalls and spar joiners. Thin CA is quick setting and works well for joints that fit tightly. Medium and slow CA are slower setting and can fill small gaps. Glues such as Tightbond are slower setting and good for things that may need to be repositioned before the glue sets. When it is all assembled you will find that it is more rigid and stronger than you expected. A lot of the strength comes from the fact that no one joint carries all of the load.
11-11-2017, 08:58 AM
#44
My Feedback: (31)
Join Date: Jan 2002
Location: The Woodlands,
TX
Posts: 187
Likes: 0
Received 0 Likes
on
0 Posts
coming along nicely. lot of cutting, sanding and shaping will all be worth it in the end. The Sig kits are great combo of kit building and some scratch building. IMO, valuable experience for anyone in the hobby.
keep up the good work
keep up the good work
11-14-2017, 09:18 AM
#45
Thread Starter
Join Date: Feb 2017
Location: Philippines
Posts: 65
Likes: 0
Received 0 Likes
on
0 Posts
thank you RagwingFan and mgnostic. those are some good advice mgnostic! Ive been religiously following exactly the build instructions. perhaps its about time to improvise whenever necessary.
I suppose you guys are familiar with the gorilla glue which foams and expands to more than 3x the volume of what you applied. would that be instead a better option for joints that have gaps? in case you have that not so snug fitting pieces?
I suppose you guys are familiar with the gorilla glue which foams and expands to more than 3x the volume of what you applied. would that be instead a better option for joints that have gaps? in case you have that not so snug fitting pieces?
11-15-2017, 09:02 AM
#46
Gorilla Wood glue is good stuff but I would stay away from the stuff that foams up. Better by far to fill the gaps with a sliver of wood. The reason is that the foamed up glue isn't particularly strong. When the glue foams it can actually push parts away from each other unless the joint is well clamped. The foam also tends to make a difficult to clean up mess. One way of dealing with a gap is to cut a small piece of wood that fits the void. A tight fit is better. Place the trimmed piece of wood into the gap and then put of few drops of thin CA glue onto the seams. One of the great things about thin CA is that it will wick into the seam. This allows you to get all the parts where you want them and then glue to item together instead of trying to handle a small piece of wood that is coated in glue. A little bit of thin CA goes a long way.
The Foaming Gorilla glue is pretty good stuff when used in the correct circumstances. I have even used it to repair a crack in the wood siding on my house. I am just saying that it is not the best thing to use to fill a gap in a glue joint. It may not be the case with their larger models but Sig used to include hints and tips for model construction with their instructions.
The Foaming Gorilla glue is pretty good stuff when used in the correct circumstances. I have even used it to repair a crack in the wood siding on my house. I am just saying that it is not the best thing to use to fill a gap in a glue joint. It may not be the case with their larger models but Sig used to include hints and tips for model construction with their instructions.
11-23-2017, 08:11 PM
#47
Thread Starter
Join Date: Feb 2017
Location: Philippines
Posts: 65
Likes: 0
Received 0 Likes
on
0 Posts
happy thanksgiving to all!!
well, I have done little since my last post. one problem I see is it seems I'm having a very little twisted wing which upon research is called, a warped wing?
looks something like this. will it be corrected after all the metal wing anchors or braces are attached? or i need to do some major surgery here?
https://m.youtube.com/watch?v=eqImaDF7wNg
11-24-2017, 12:08 AM
#48
happy thanksgiving to all!!
well, I have done little since my last post. one problem I see is it seems I'm having a very little twisted wing which upon research is called, a warped wing?
looks something like this. will it be corrected after all the metal wing anchors or braces are attached? or i need to do some major surgery here?
https://m.youtube.com/watch?v=eqImaDF7wNg
well, I have done little since my last post. one problem I see is it seems I'm having a very little twisted wing which upon research is called, a warped wing?
looks something like this. will it be corrected after all the metal wing anchors or braces are attached? or i need to do some major surgery here?
https://m.youtube.com/watch?v=eqImaDF7wNg
Bei'... the good news it's a nice warp, meaning it's the trailing edge that's raised. That condition has a technical term; Wash-Out. Raise the trailing edge of the left-hand wing and you'll have a very stable aircraft with limited tip stalling tendencies. People actually build in exactly what you've got for that reason.
If you want to remove it, start with removing the top sheeting, if no good, the bottom. You'll get it away.
You can also twist it out when stretching the covering film.... but it'll come back.
You could similary use the wing braces to push/pull it out.
I'd remove the sheeting.
11-24-2017, 09:07 AM
#49
Beibitoi, it your wing is warped as much as the one shown in the video it is a bit too much to try to fix by adjusting the covering. I agree with Mr Bathe that peeling the top sheeting is probably the best bet. When you reinstall the sheeting you should make certain that the wing is sitting firmly on a flat surface. I have had warps creep in from building on a surface that wasn't truly flat. I often use small weights that are enough to hold the wing flat but not so big as to crush any of the structure. A box of pins will be your friend here. You will probably need a new piece of wood for the upper sheeting. Make sure it is a good fit where it meets the leading edge of the wing. You will probably need to sand the tops of at least some of the ribs due to bits of remaining glue. They shouldn't need a lot, just enough for the new sheeting to make a good contact for the new glue joint. Once you have trimmed your sheeting for a good fit use a slower drying glue that will allow you to get a bead of glue across the top of each of the ribs and along the leading edge. Put the sheeting in place starting with the leading edge.. Pin it in place starting with the front or leading edge of the sheet work your way back to the rear of the sheet. Do your best to bend the sheet evenly across the span of the wing. If the sheeting is too stiff and doesn't want to bend without cracking you can use a damp cloth to add water to the upper surface of the sheet to help it to relax a little bit. The important parts here are to have the bottom of the wing sitting flat against the building table and a good glue joint along the tops of the ribs. The curve that the ribs give to the sheeting is important. The spars, ribs and the sheeting give the front of the wing a shape that is known as a D-tube. This shape gives the wing torsional rigidity. Once you have all the parts where you want them let the glue set for at least 8 hours. I hope I'm giving the best level of detail, I just want to help you avoid issues that I have experienced over the years.
11-25-2017, 01:47 AM
#50
Thread Starter
Join Date: Feb 2017
Location: Philippines
Posts: 65
Likes: 0
Received 0 Likes
on
0 Posts
thanks dave and mgnostic.
unfortunately, upon rechecking the warp, it is a lot worse than what I've shown. not only that, the warp is on the trailing edge near the center piece. with that, i suppose Im about to make a major surgery here. which of these sheets should I remove?
ive read somewhere about spraying the entire wing with water and pinning it to a flat surface. does that work?
good thing i wont have to replace the wing entirely.

