


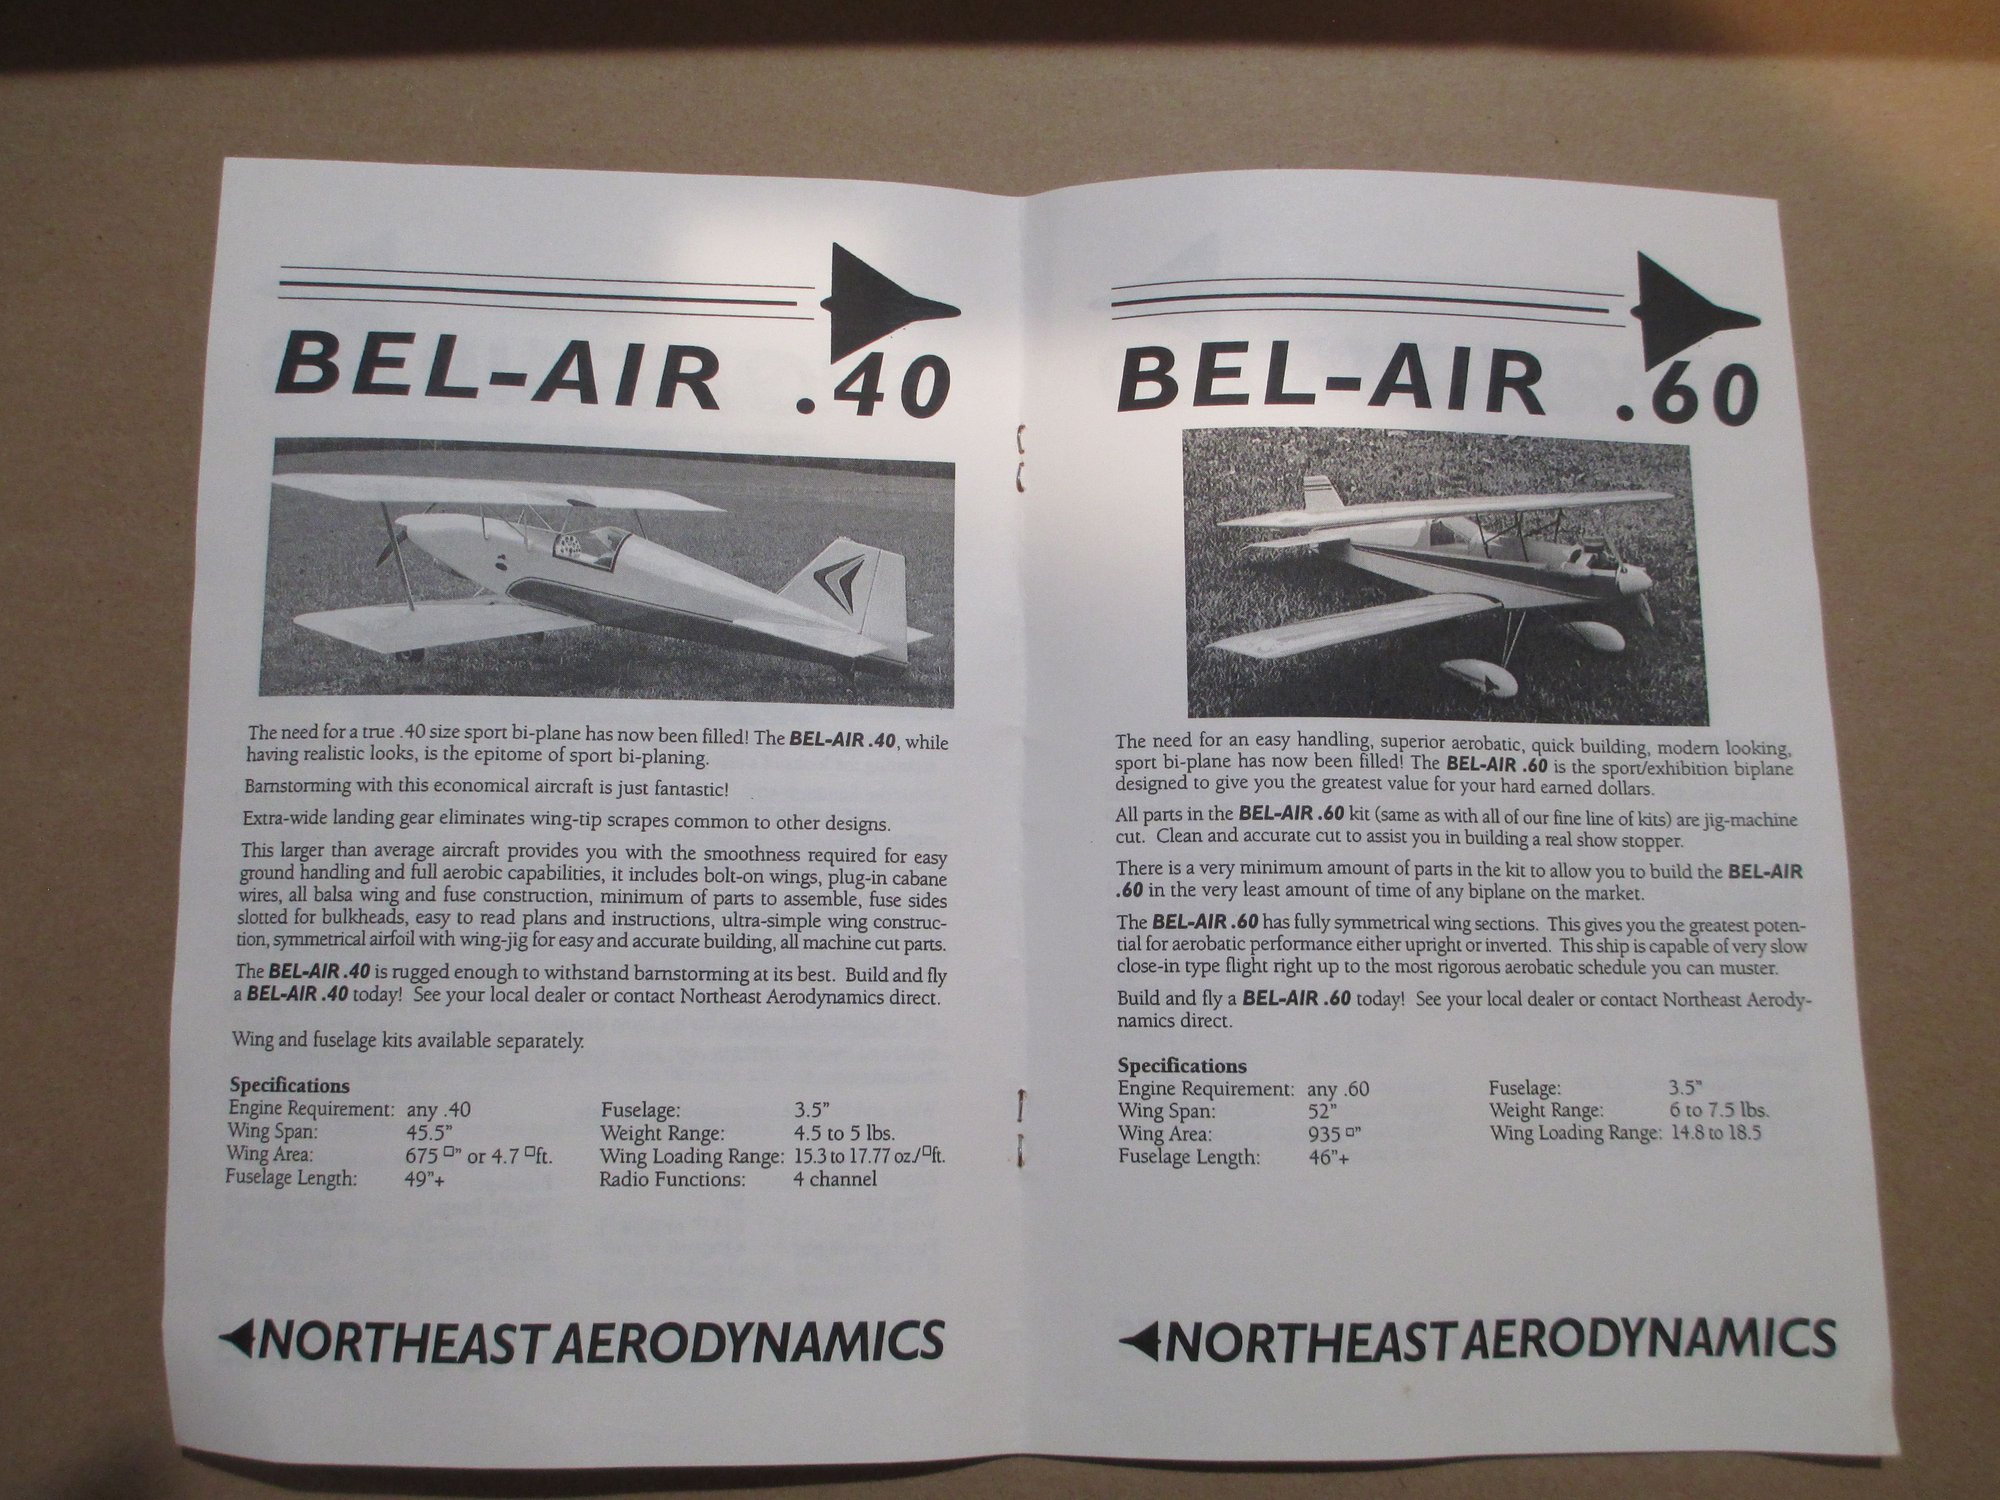
Northeast Aerodynamics Sport-Air Build

 08-07-2018, 08:27 AM
#52

Thread Starter

I've said before that you can have too many clamps or different types of clamps for that matter.

This is how I set and hold ribs into position while the glue sets. A while ago I made these (and more) wood blocks from scraps. They are 2" x 4" in size. I have blocks in various thicknesses as well. They can be made in just a few minutes and since they are made from scraps they're free!

When using two wood blocks and one clamp I can rest assured that the rib is at a perfect 90 degrees from my build table.
Welcome back Mike! I'm glad that my threads can help you be a better builder... I learn so much from others, all we can do is pass it on to others. I'm appreciative of you and others taking the time to post on this thread.
Well since I'm building the right wing panel at the moment, there is no real need for me to post the same types of pics only in the opposite direction. So I thought that I might use this time to help show some of the things that I didn't go over.
Last edited by VincentJ; 08-07-2018 at 09:19 AM.
08-07-2018, 08:57 AM
#53

Using the clamps and wood blocks is something that wouldn't have occurred to me.
Thanks for sharing the idea.
Since I'm a CA user, I use a small building square, or a 90 degree triangle..
Thanks for sharing the idea.
Since I'm a CA user, I use a small building square, or a 90 degree triangle..
08-08-2018, 05:48 AM
#54
My Feedback: (2)
Hi Vj, Wow that is great idea on making a very straight wing. I will try this on my next project which I have so many now Ha. I had a Guillows balsa building board that went missing some where in my last move. so I had one that was in pieces and my friend cut it flush for me and we used biscuits and glude it back together and now I have good building board. but I also got a 20" by 60" long piece of plywood and I attached some drywall for building bigger wings.I have a little tool cabinet on wheels and I set this on that for my building projects
thank you
Michael
thank you
Michael
08-09-2018, 12:31 AM
#55
Thread Starter

You can never have enough of these when your building!

Don't overlook "other" non-traditional items found around your house for your clamping needs. I use these type of spring clips all the time.
Though I would show you some of my clamps that I keep right next to my build table...
08-09-2018, 04:02 AM
#56
Join Date: Jun 2002
Location: Flat Rock, IN
Posts: 150
Likes: 0
Received 0 Likes
on
0 Posts

Everything seems to be here...
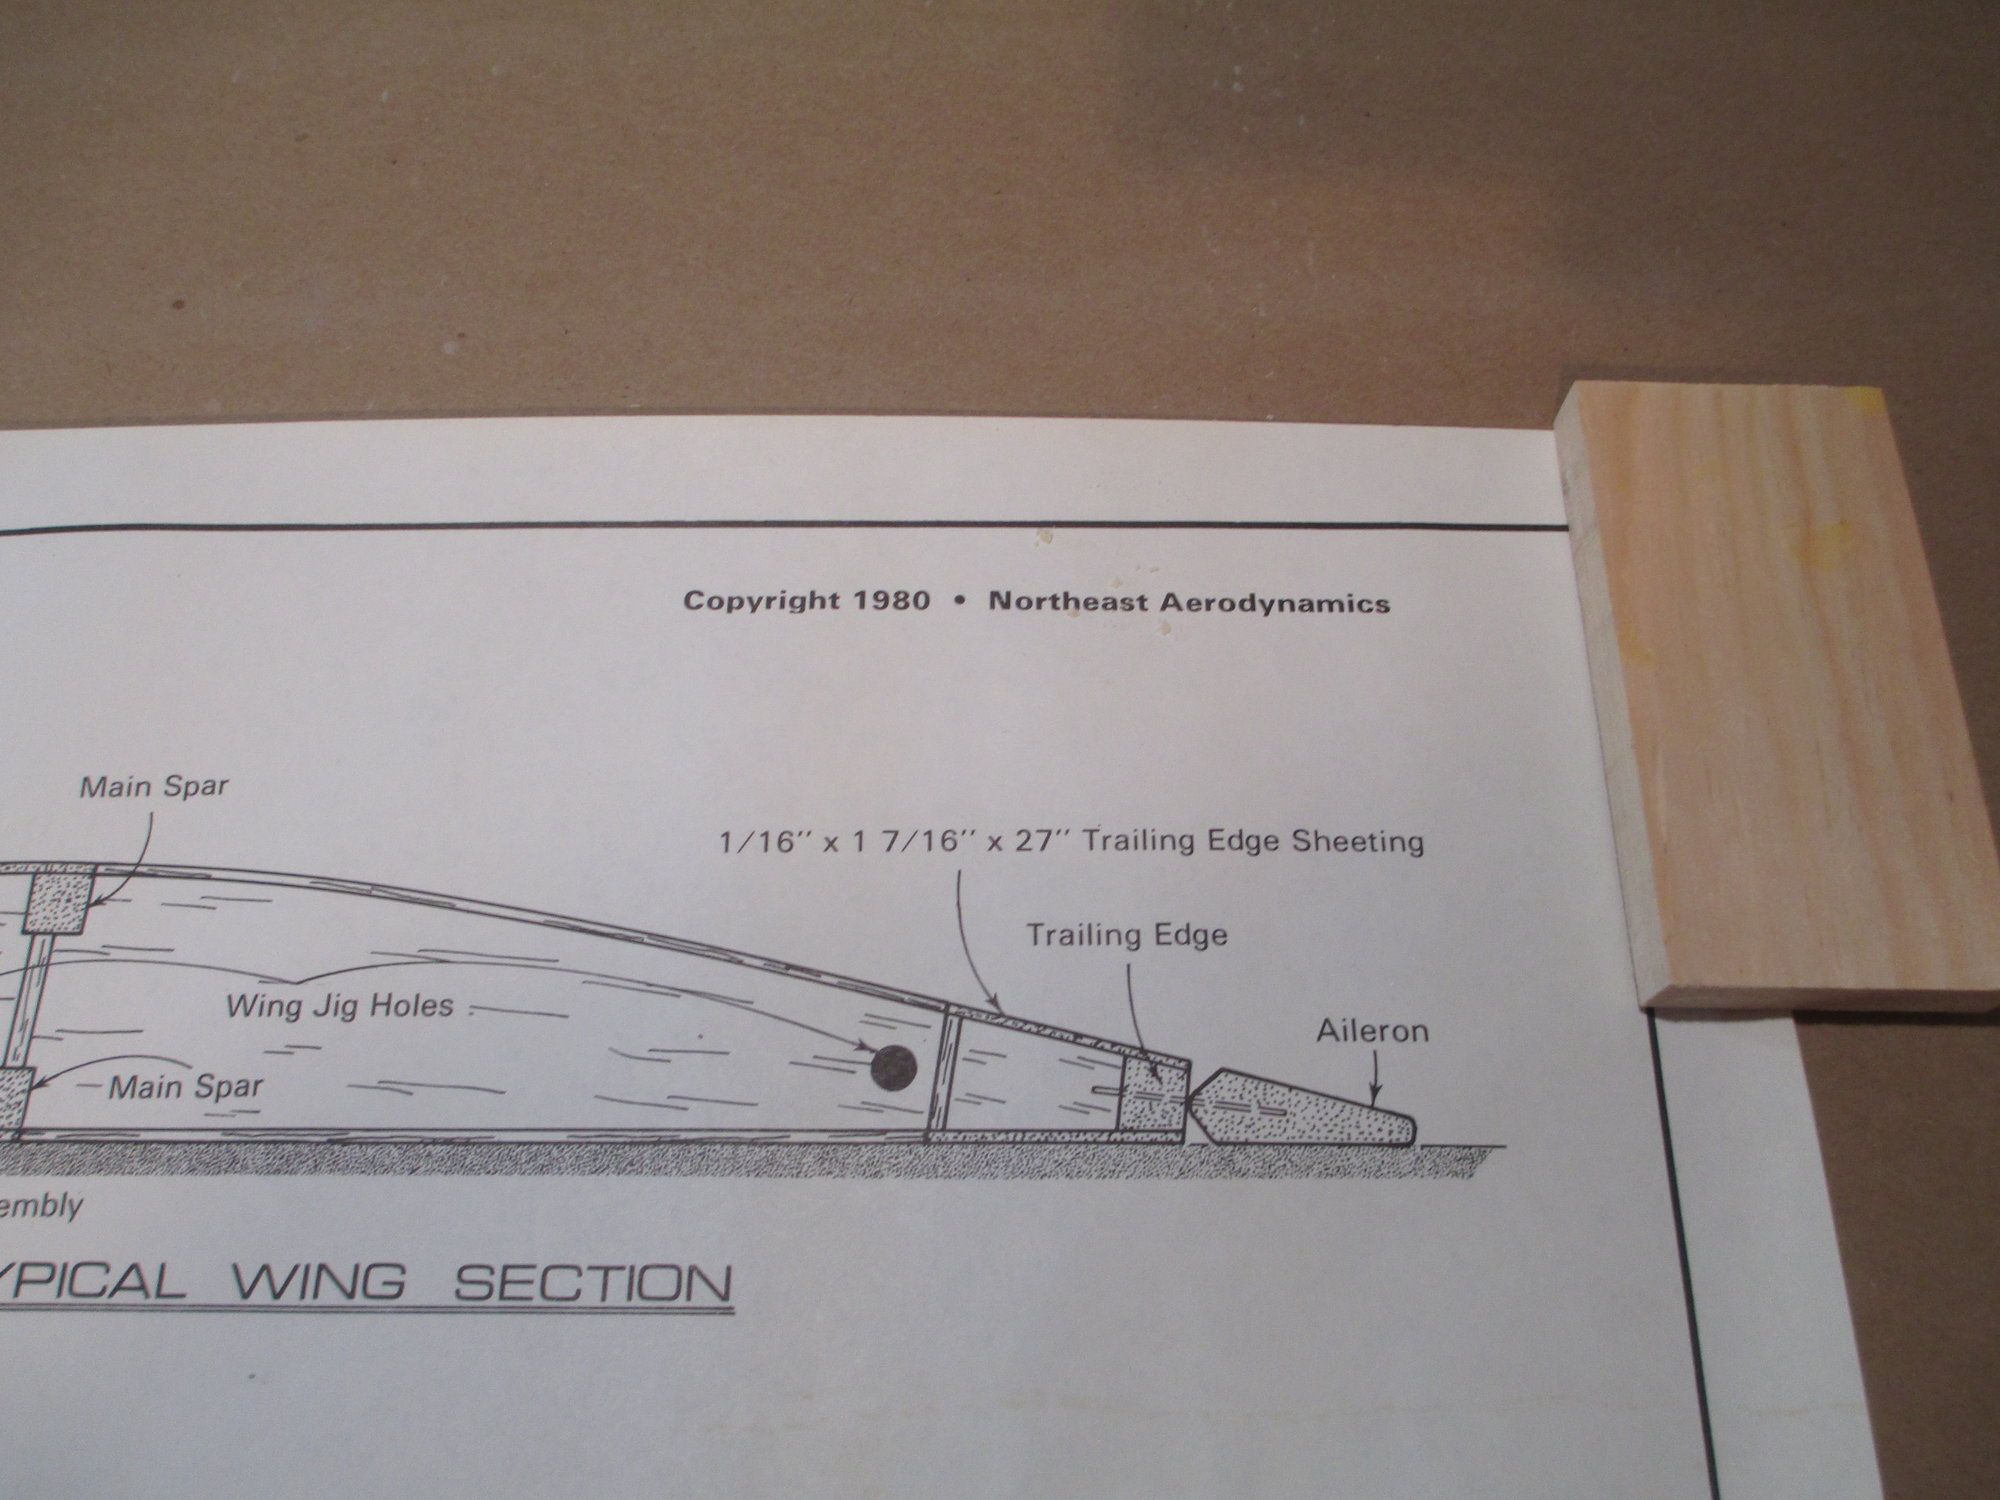
Note the 1980 copyright.

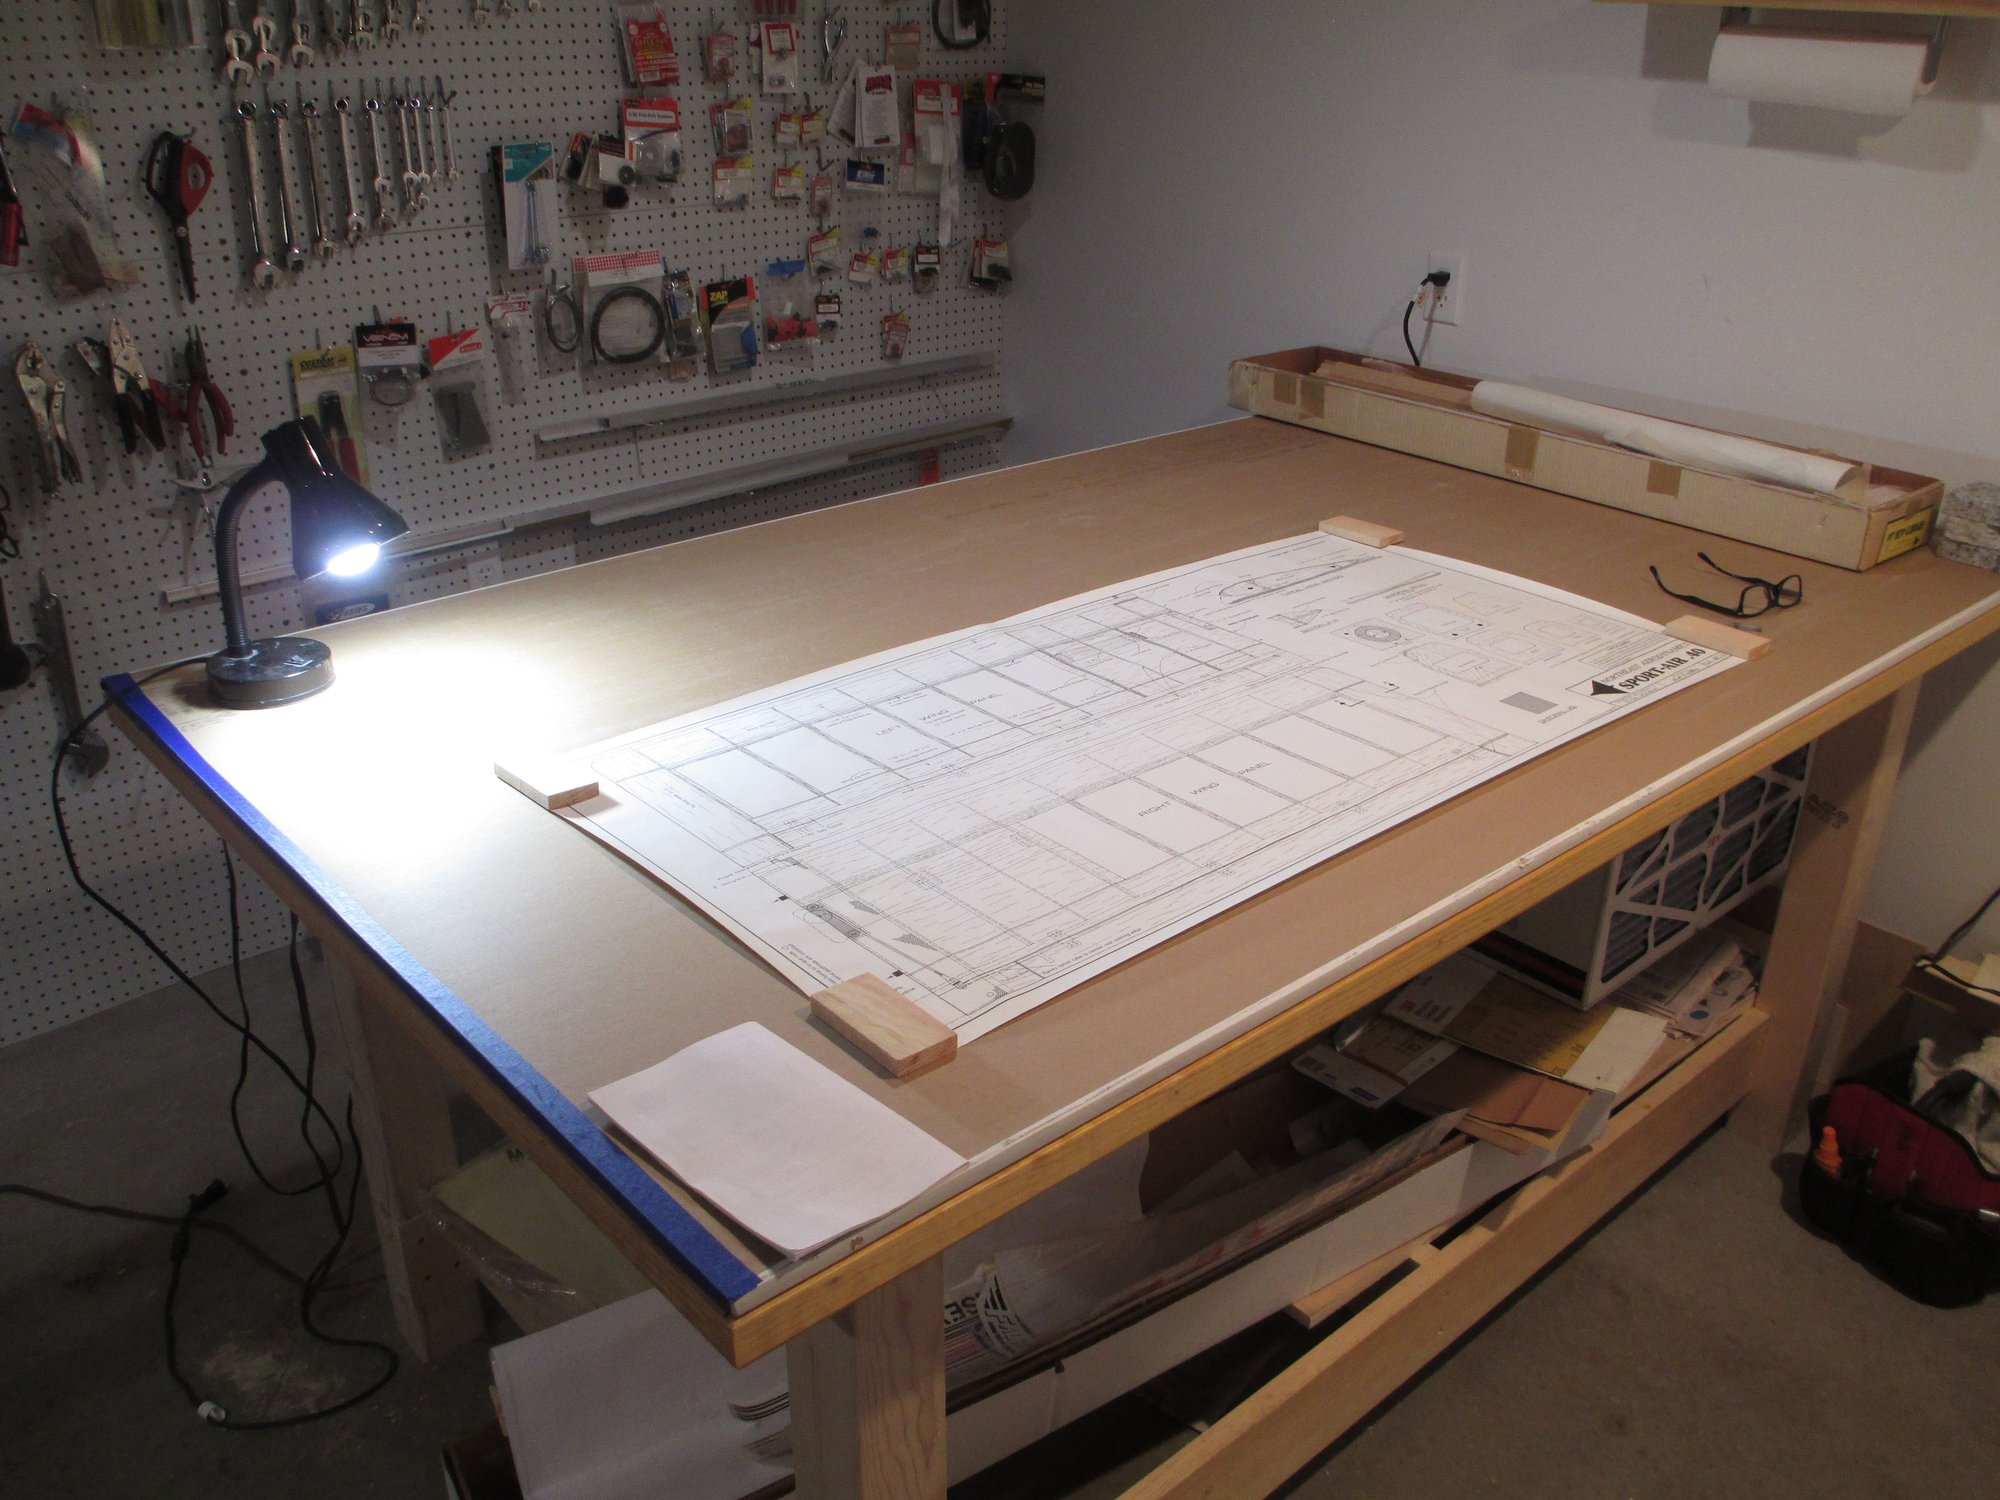
I cleaned off my build table and flipped over the 5/8" sheet rock to give me a new surface to build off of.
Plans lay nice and flat!!!
Welcome sbd-3, now we have a party! I'm afraid to ask what sbd means...
 Your memory serves you correct, see Photos 1 & 2.
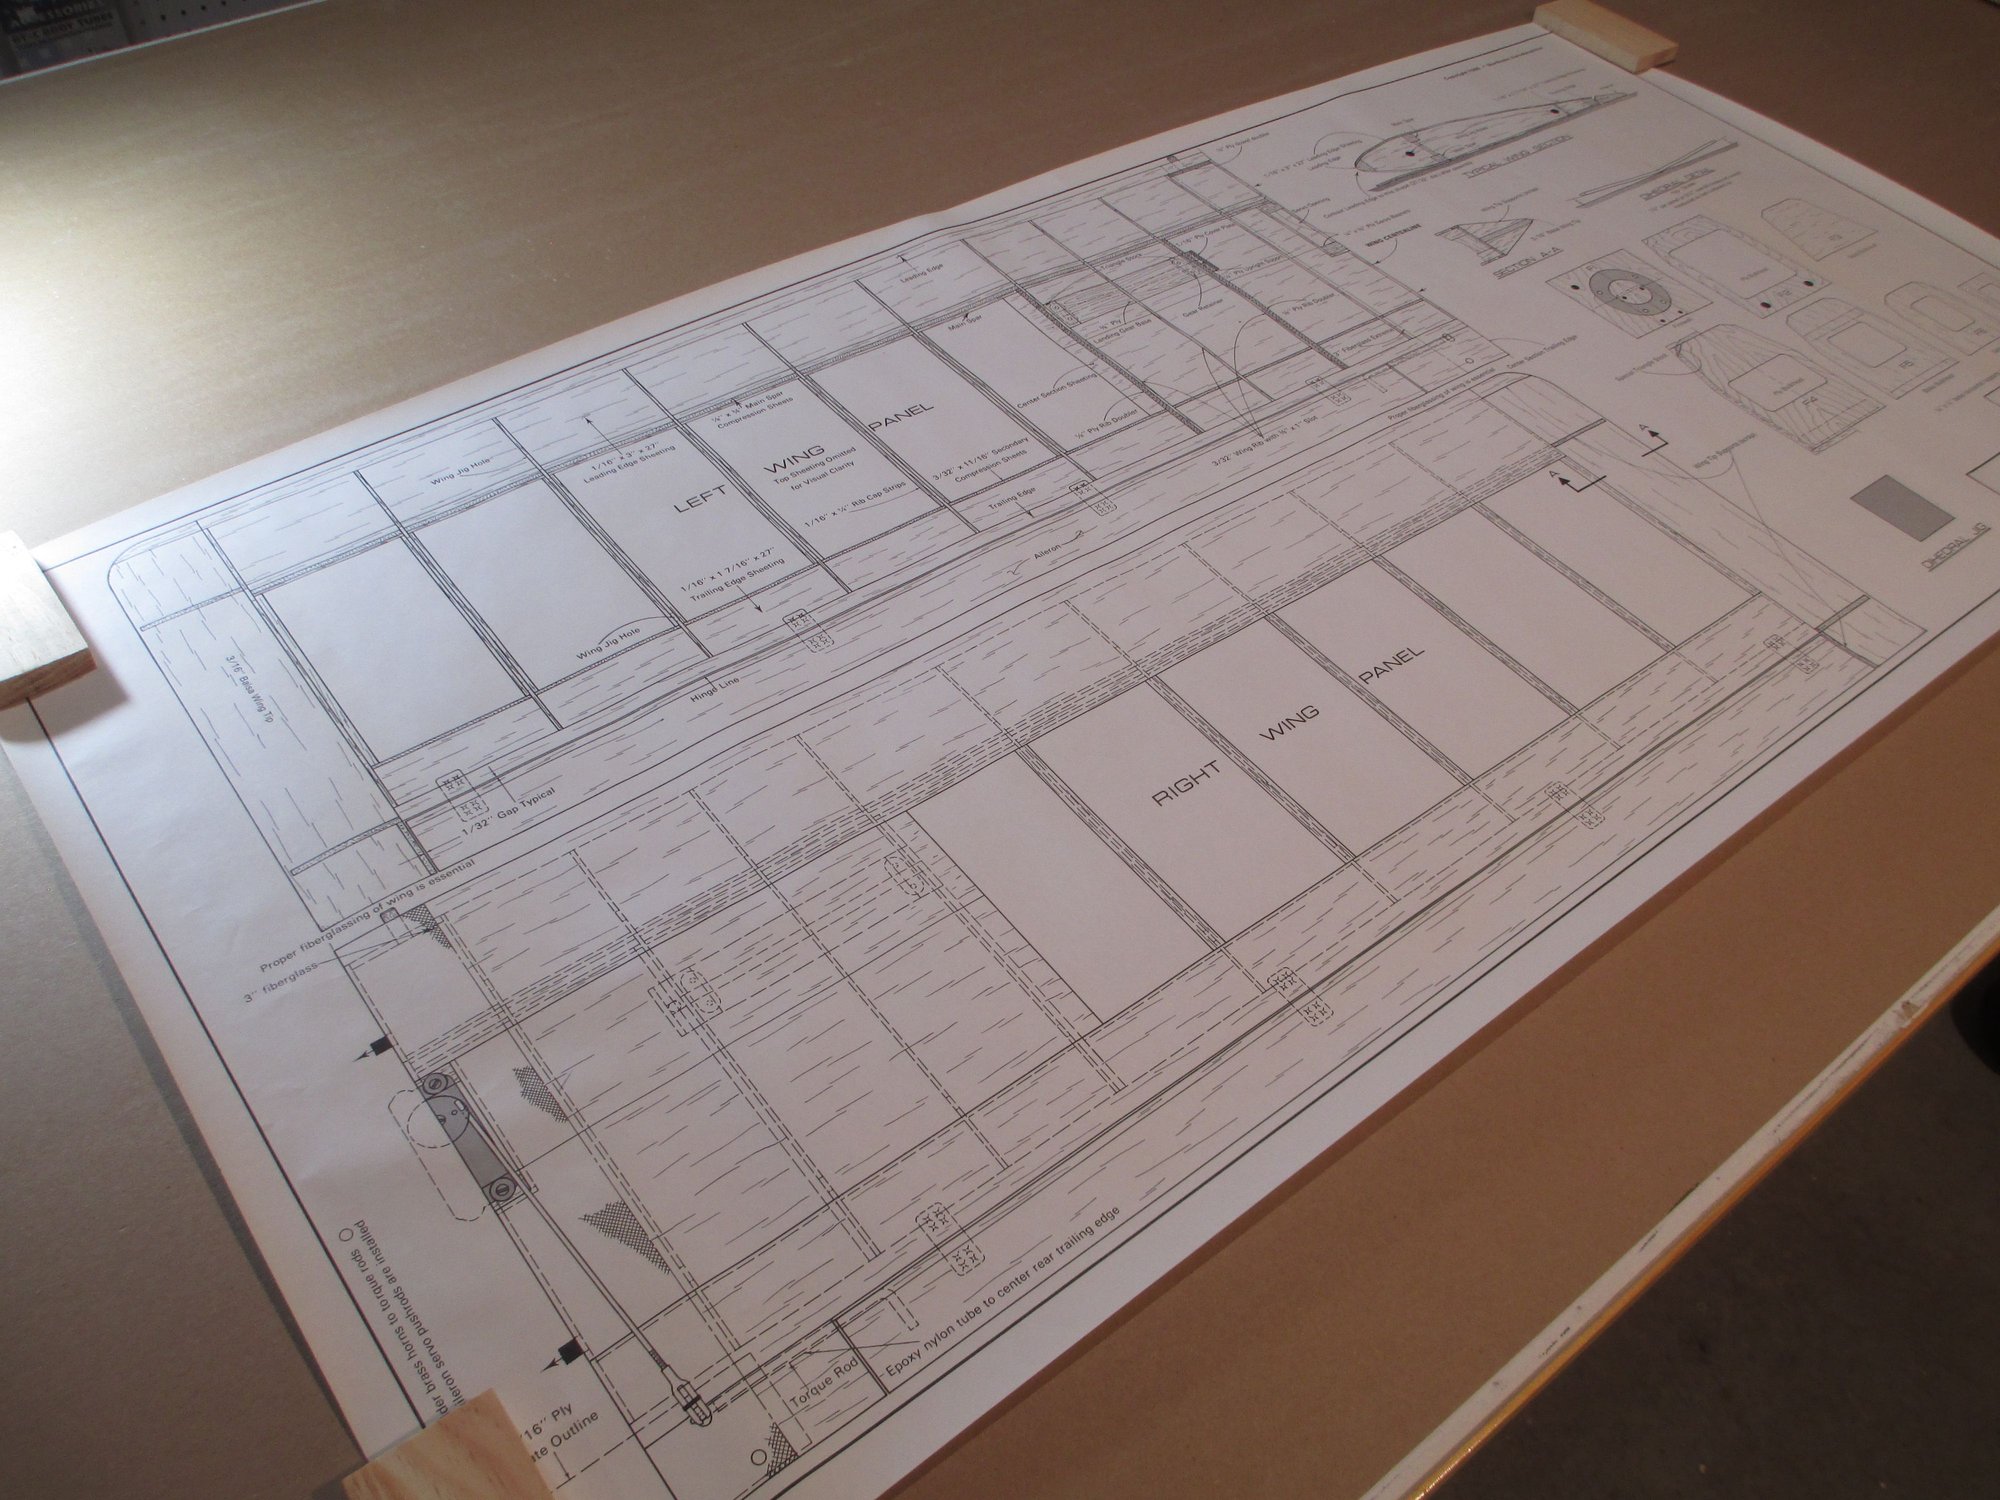
This kit hasn't seen the light of day for quite some time. Upon opening the box I liked what I saw, especially the rolled plans!!! I've always hated to work over folded plans, no matter how much I attempted to straighten them out.
08-09-2018, 02:34 PM
#57
Thread Starter

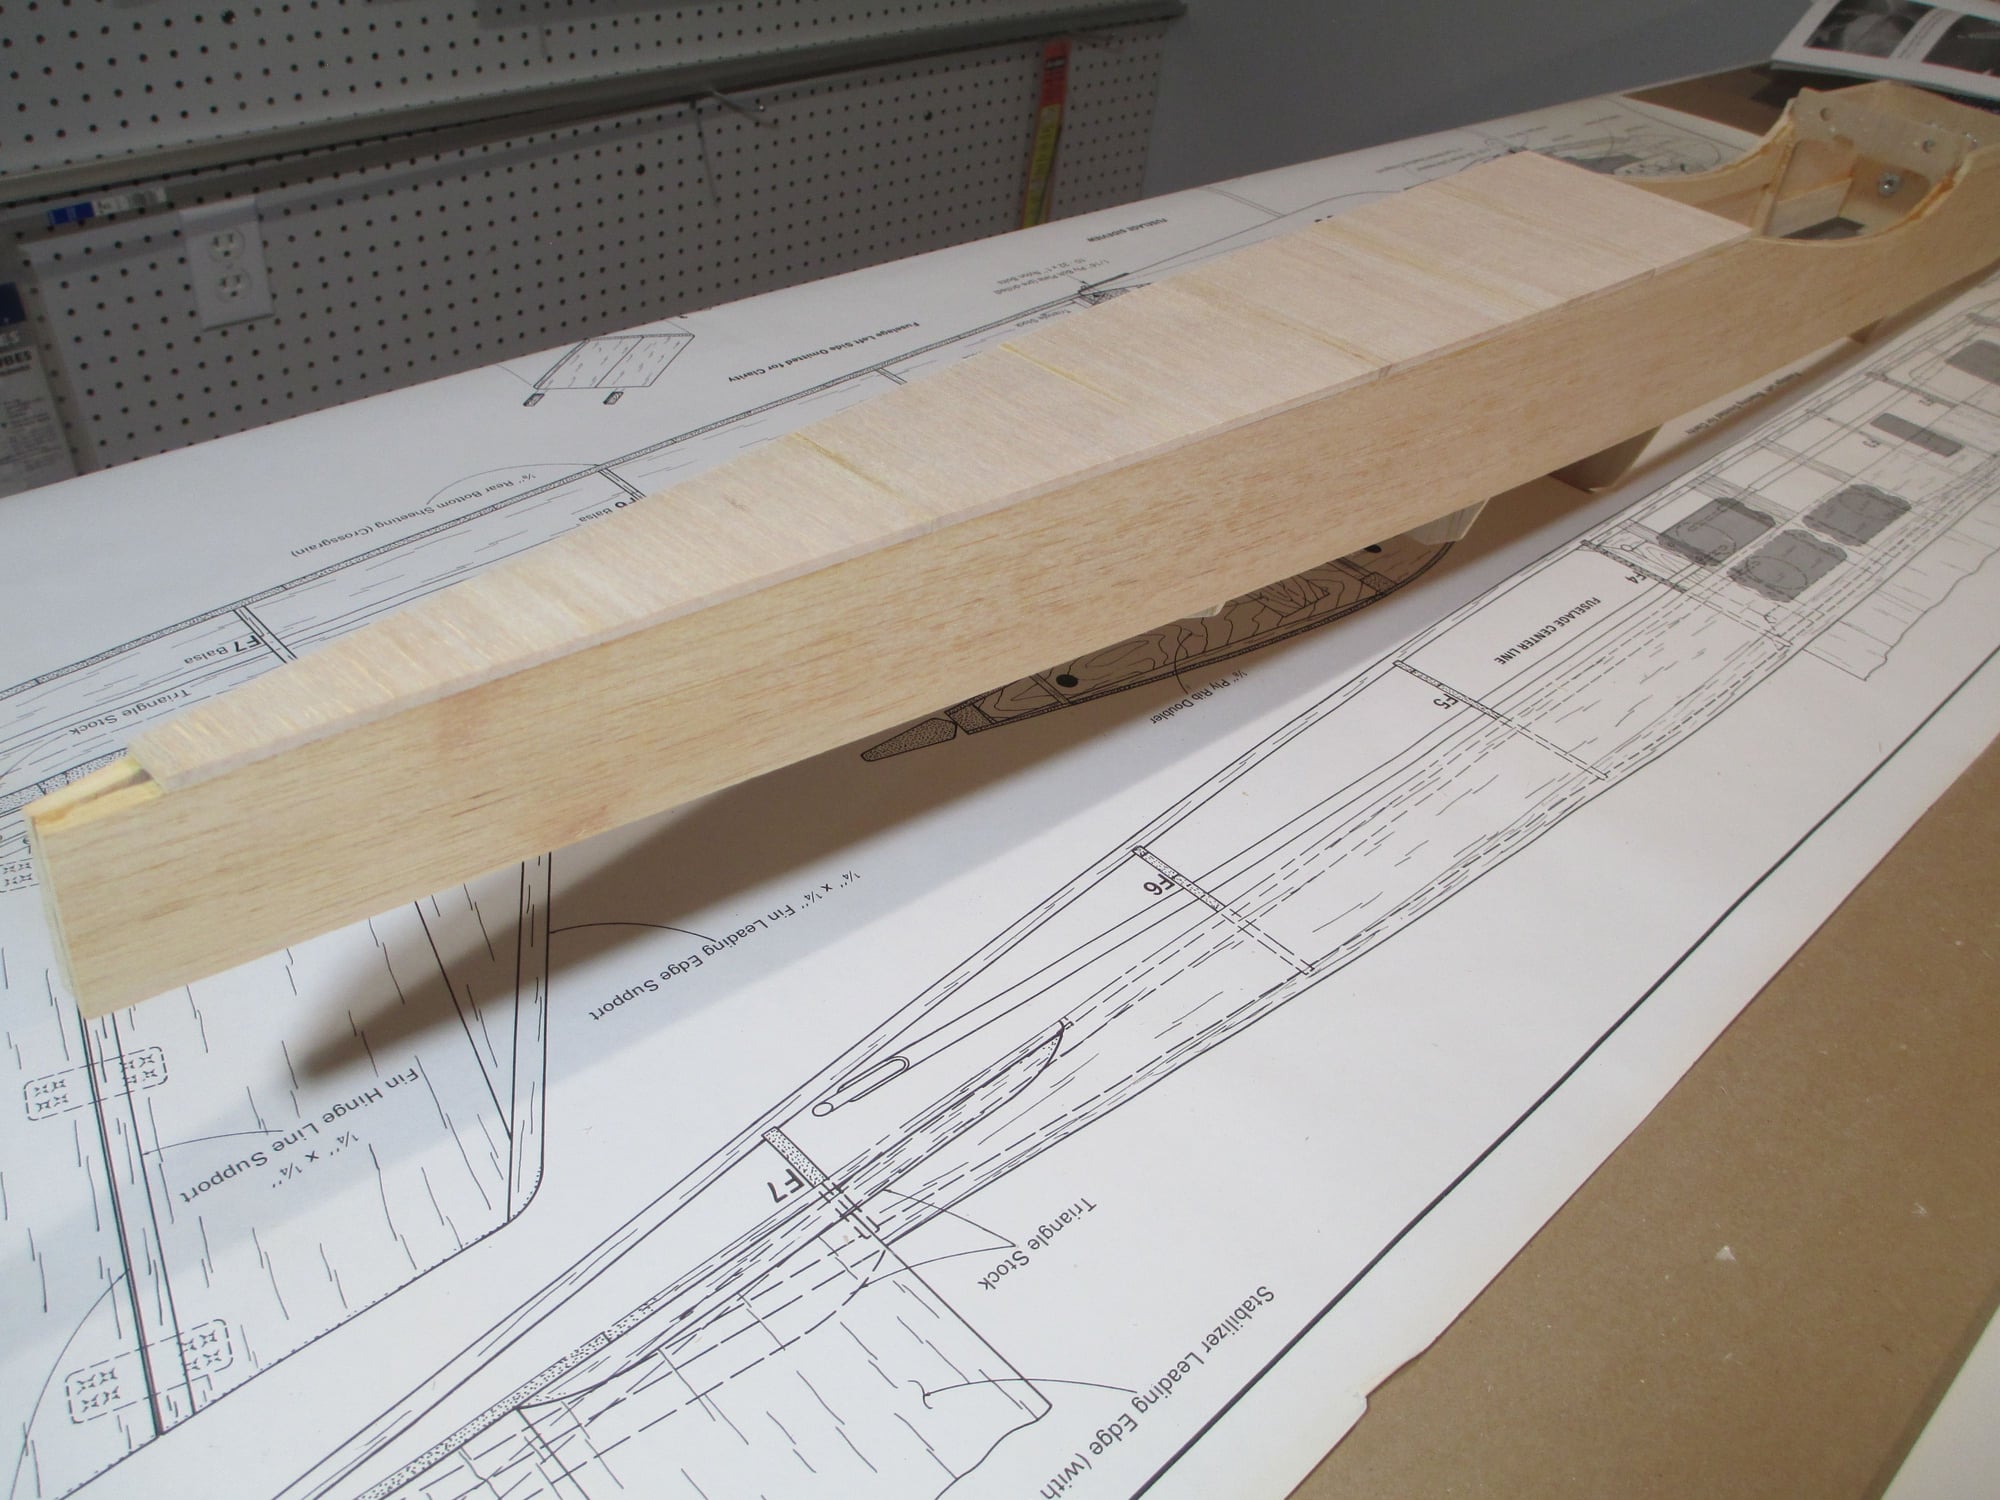
Formers and Firewall are laid out in their respective order. I took the time now to drill and install four 6-32 blind nuts for the engine mount. Easier and more accurate to do it now on the drill press.

The bottom of Formers F4 - F7 are not at 90 degrees, as you can see the fuselage tapers. To matched that angle, I set my disc sander at 93 degrees to make sure that I will have perfect contact between the bottom of each Former and the sheeting.

I find it easier to assemble any fuselage when I take the time to mark the center-line on each Former.

Here's a builders tip: I always take one of my steel rulers and place sand paper on one side of it. Why? When marking the center lines on the face of each Former as an example will prevent the ruler from slipping.
Progress on the right wing panel is coming along nicely. I'm in the process of sheeting the wing and while waiting for the glue to dry, I thought I would start on the fuselage.
Last edited by VincentJ; 08-09-2018 at 05:38 PM.
08-09-2018, 09:58 PM
#58
Hi Vince, i really like airplanes like this. They are right up my alley. 40 size planes are cheap to buy, cheap to build, and cheap to fly. You only need a 4 channel radio and just 4/5 standard servos. Everyone has one. It's their beater plane. I know a jet guy who has 100's of hours on his. Does a whole lot of touch and goes. He has a tower Kaos and OS 55 on it with a tuned pipe. The OS replaced a Jett. I have a Sig Kavalier I'd like to recover. I'm waiting to see what you're going to do with this Sport Air.
08-10-2018, 12:51 AM
#59
Thread Starter
I'm liking a plane of this size as well Mike. While they can be cheaper to build compared to larger models they still can be expensive if you chose to build with "top shelf" components as I've done here for my friend Bob. Good quality servo horns, arms, etc will still cost you, but you're right not as much as I've spent on any of my 1/4 or 1/3 scale builds... I think I will end up building one for myself! Flying however, as far as fuel goes is more expensive if your engine is Glow. Fuel for any of my gas engines is so much cheaper than the price they're getting just for one gallon of Glow fuel.
The colors that I chose for this plane are red and white, but I haven't come up with a design as of yet. Your Sig Cavalier is a good looking and flying plane, I've always liked them. Did you build yours as a trike or tail dragger?
The colors that I chose for this plane are red and white, but I haven't come up with a design as of yet. Your Sig Cavalier is a good looking and flying plane, I've always liked them. Did you build yours as a trike or tail dragger?
Last edited by VincentJ; 08-10-2018 at 12:56 AM.
08-10-2018, 05:25 AM
#60
Thread Starter

Using a block plane is a better choice than using a sanding bar which will give you excellent results, but will make a large amount of balsa dust which can be inhaled...
Needing to trim the sheeting off the trailing edge of this wing panel, my small block plane made quick work of it.
08-10-2018, 10:21 AM
#61
Hi Vince, we'll, you asked for it. Here is my Kavalier. The build actually came out not too bad. I hate the blue though. I hated it as soon as I started putting it on. Blue is hard to see. The covering is ultracote. The blue wrinkled up on me. I don’t know why. At some point I’ll strip and paint the fuselage and use a paintable covering for the wing. I want to see what you are going to do. I’ve never seen a film covered plane that I like. Except for ARF’s. They can do a much better job than I can.
I made the Kavalier a trike following the plans. I’m not religious about trikes vs tail draggers since we fly on a paved runway. I much prefer wire landing gear over the aluminum. I need a little more bounce.
I think a small gas engine would be great for this plane. The wing foil is thick and makes lots of lift. It can cary the extra weight. A gas plane would fly for an hour and a couple of oz’s of fuel.

Here is my Kavalier. It flies great but is hard to see.
The blue really wrinkles.

Same servo installations on the wing. I even made the servo brackets.
Enya 50. The first time I flew it a shim blew off the head. The engine was given to me. I may change it to an OS 55 I have NIB.

I got a little turned around planning the landing gear pushrod. Something to fix. Rudder is push pull.
I made the Kavalier a trike following the plans. I’m not religious about trikes vs tail draggers since we fly on a paved runway. I much prefer wire landing gear over the aluminum. I need a little more bounce.
I think a small gas engine would be great for this plane. The wing foil is thick and makes lots of lift. It can cary the extra weight. A gas plane would fly for an hour and a couple of oz’s of fuel.
Here is my Kavalier. It flies great but is hard to see.
The blue really wrinkles.
Same servo installations on the wing. I even made the servo brackets.
Enya 50. The first time I flew it a shim blew off the head. The engine was given to me. I may change it to an OS 55 I have NIB.
I got a little turned around planning the landing gear pushrod. Something to fix. Rudder is push pull.
08-10-2018, 05:27 PM
#62
My Feedback: (2)
Hi Mike, I am building a Kavalier and plan to power it with a 35 max ax soon. I ve got the fuse framed up and the wing I just need to finish it soon. I have to ARf that look just like your airplane out of the box. I tried seailing it with my iron and it did not like that at all but I hope to get flying again soon
Michael Johnston
Michael Johnston
08-11-2018, 05:46 AM
#63
Thread Starter

Construction of the Sport-Air's fuselage is progressing nicely.

Taking the time to mark all of the center-lines on the Formers can be indexed on the plans to make sure that you build a straight frame.

Wood blocks and clamps to hold everything square while the glue dries.

Side of fuse checked with square to ensure it is perfectly plumb.
Nice Kavalier Mike. My second Tiger was covered in blue and I learned with that plane that I would never have another blue plane again!
Still sheeting the wing panel, but am trying to stay productive by getting a head start on this fuselage...
08-12-2018, 12:57 AM
#65
Thread Starter
Mike, in this case, as soon as I finish building the three sides of the fuselage that being the sides and the bottom. With the top open I will be able to decide where and how I place all the servos and pushrods including where they exit the fuselage. I am hoping to figure out where to fit a pull-pull rudder system, which will mean all of the stock locations for all the servos will have to be shuffled around. In this case easier said than done...
08-12-2018, 11:43 AM
#66
Thread Starter

The fuse is built just as rugged as the wing.

No banana fuse here!

I'm glad I took the time to match the angle at the bottom of the Formers. The result is a perfect fit I think.
Bottom of the fuse is planked with 1/8" balsa. Note the direction of the grain for strength.

View from the other side.

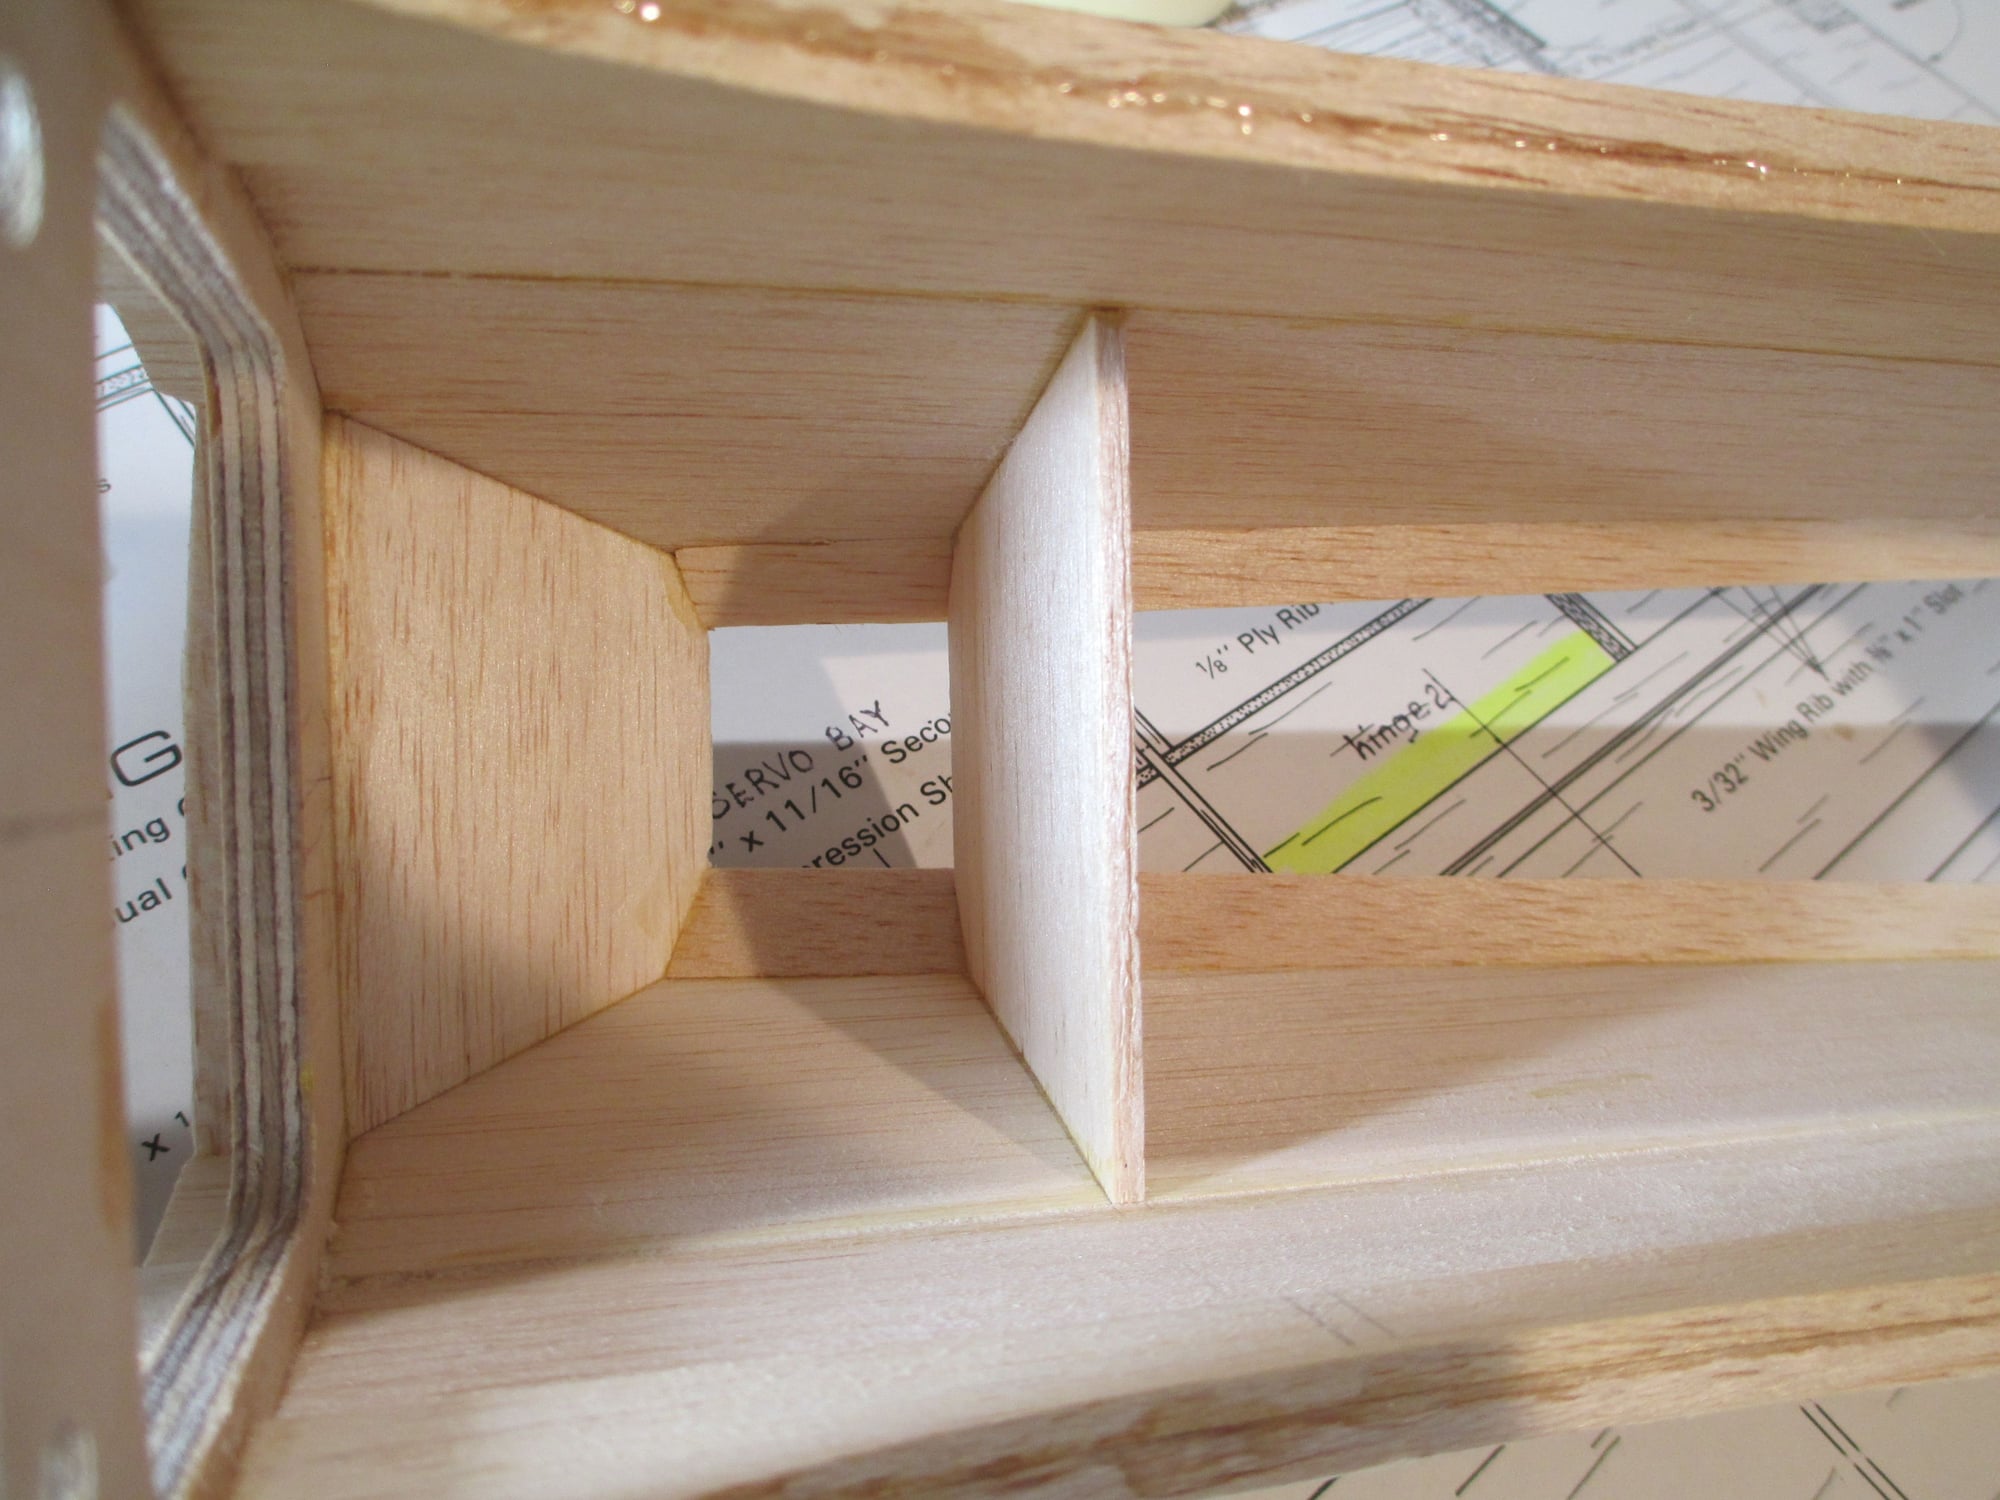
Top view of the right wing panel.

Bottom view of the right wing panel. I need to hinge the aileron, mount the servo and carve a wing tip yet...
Work on both the fuse and right wing panel are progressing. Should be done with the wing in a day or two..Looking forward to mating the right and left wing halves together!
08-13-2018, 02:48 PM
#67
Thread Starter

The left wing panel is sitting flat on my build table. I weighted the top of the wing as well as placed a stop on the wing tip to prevent the wing from sliding.

The 3-1/4" dihedral can be seen now. The right wing panel was held up with a variety of shims to get the desired dihedral.
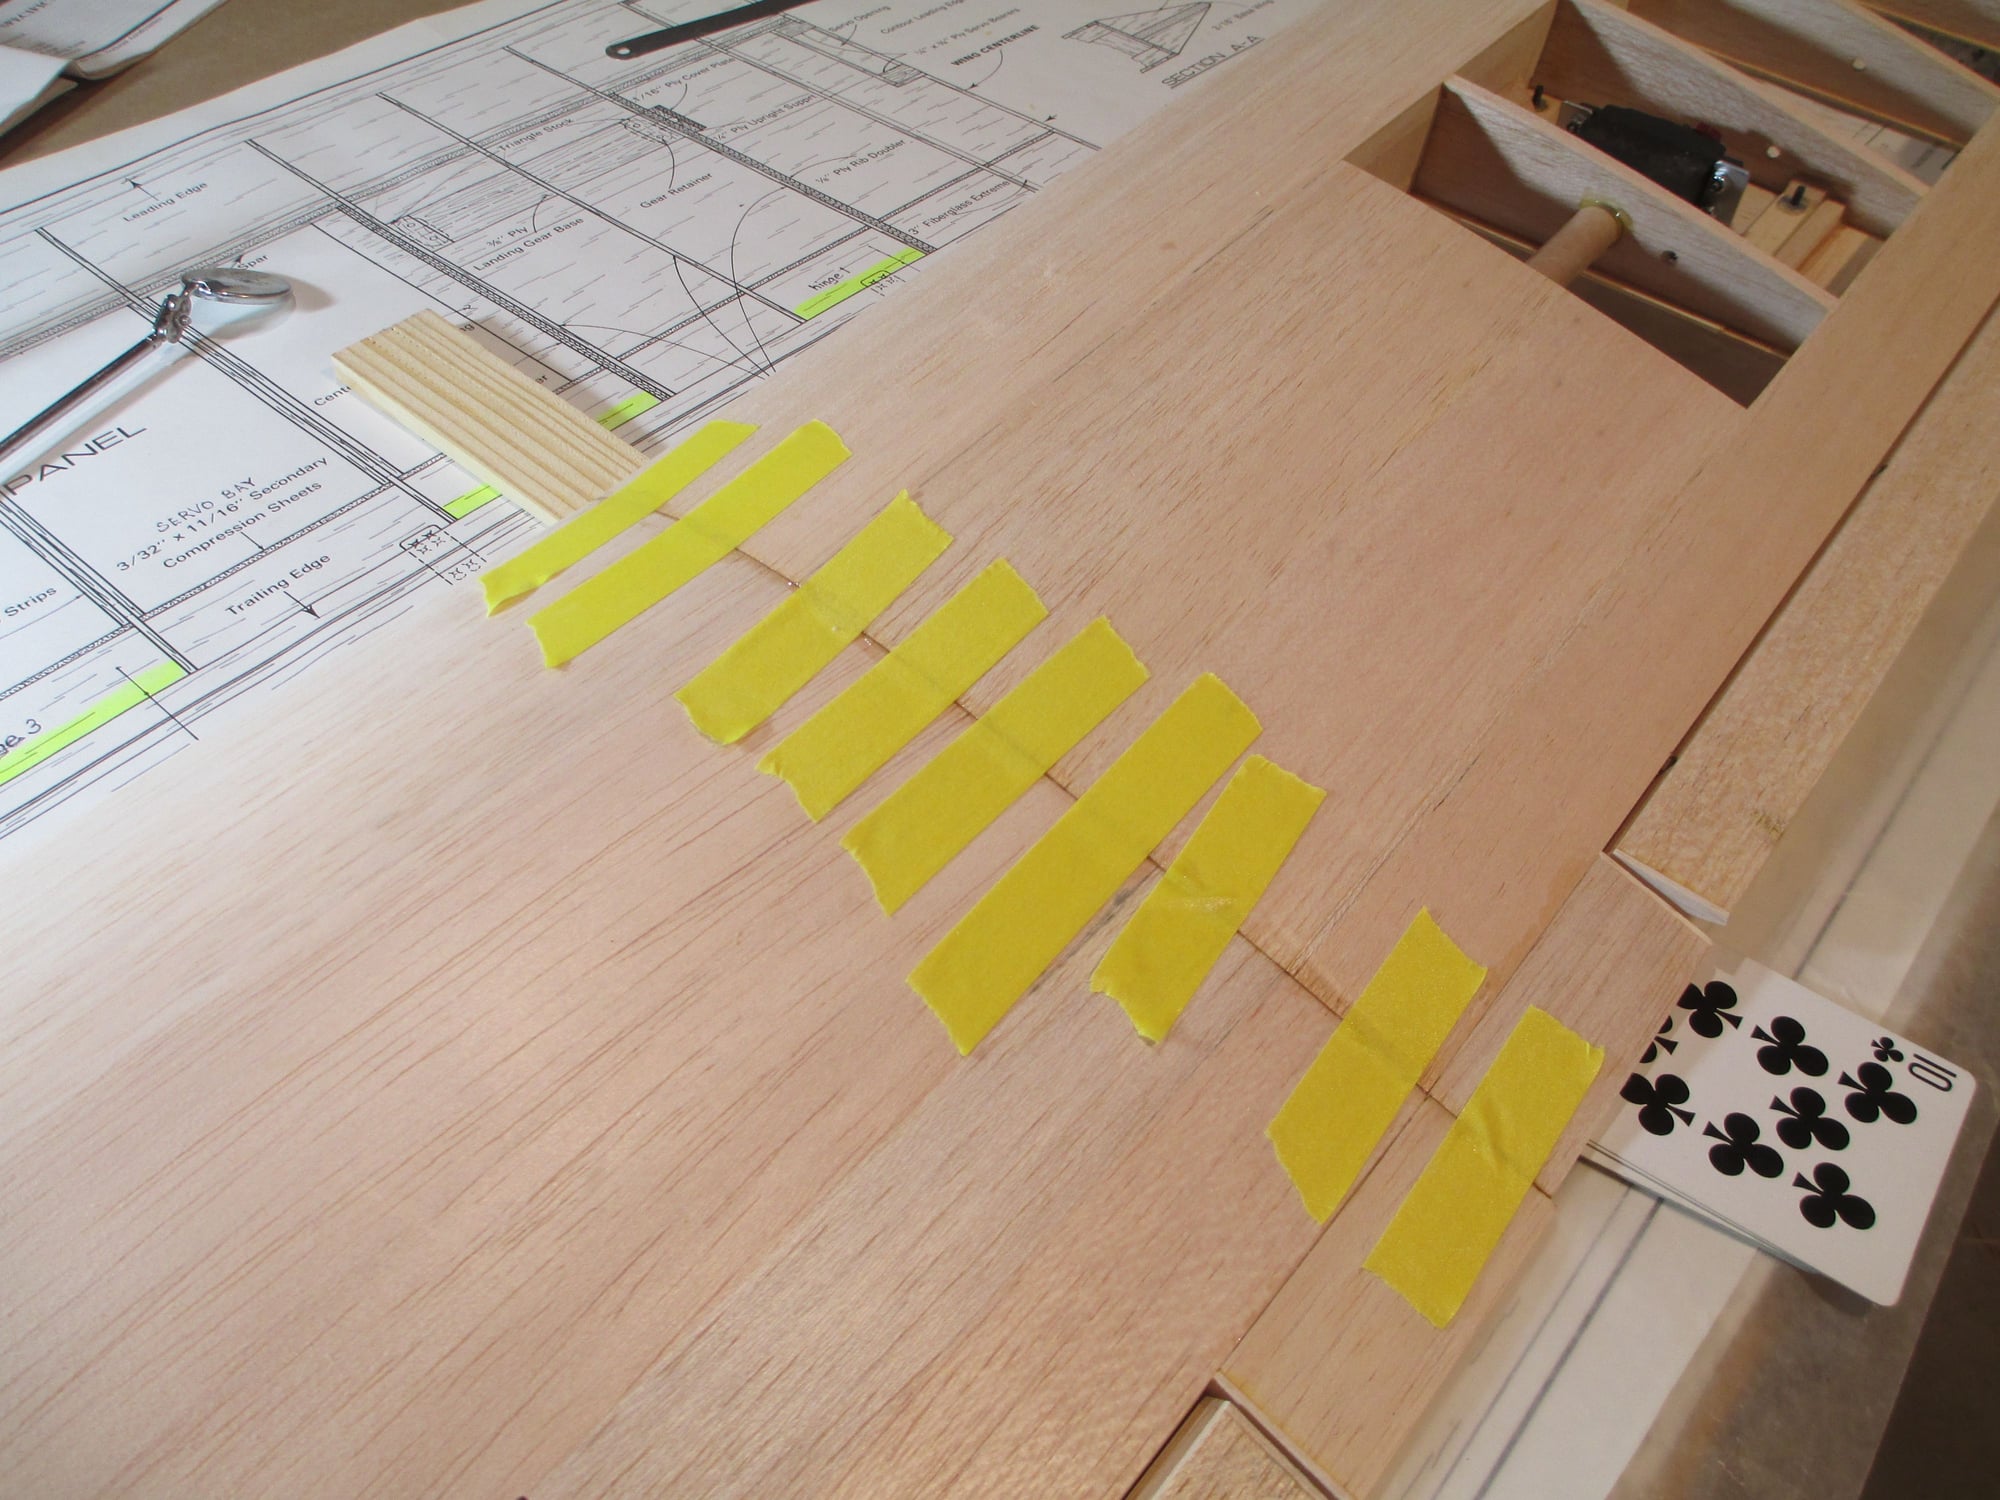
I stretched tape across the wing's centerline to prevent the panels from moving, the tape will also act as a clamp pulling both panels tight. Note the playing card(s) under the trailing edge, this is used to shim up the wing to hold it in its proper position. I find that using old playing cards can be very useful.
Note- I made sure to have waxed paper under the wing center-line to keep any epoxy squeeze-out from getting on the plans.

Now I have to wait for the 30 minute epoxy to cure.
Major milestone reached today, I joined the right and left wing panels!
Last edited by VincentJ; 08-14-2018 at 12:12 AM.
08-14-2018, 12:09 AM
#69
Thread Starter
08-14-2018, 02:20 AM
#70
Thread Starter

Fiberglass tape applied to strengthen joint. One of two coats applied.

Polyester resin is a thing of the past. If you haven't tried this product for your fiber-glassing needs your missing the boat. No smell and it sands easily. I thinned out the mix using Denatured Alcohol, this will allow the resin to really penetrate deep into the wood giving better strength.

With the first coat applied it has to set a while for the resin to dry before the second coat can be applied...
To give additional strength to the wing center-line joint, fiberglass tape was applied around its perimeter.
08-14-2018, 05:20 AM
#71
My Feedback: (2)
Hi Vinnie, That is good idea with the finishing Resin, do you use it to glue the fiberglass tape to the center center section? I am going to try this with my Kavalier wing when Iget it all finished and sanded to the right profile. You build looks fantastic and i strive to become a much better builder as its really a trial and error and lately for me its be more error than anything else.
Thank You
Michael Johnston
Thank You
Michael Johnston
08-14-2018, 06:14 AM
#72
Thread Starter
Thanks Mike, the two wing halves are glued together using 30 minute epoxy. After the epoxy cures the fiberglass tape is bonded to the balsa using the Finishing Resin. The mix is brushed on using a disposable chip brush. I will give it two coats with a light sanding between the coats.
08-14-2018, 06:30 AM
#73
My Feedback: (2)
Hi Vincent, I recently glue a wing to together on a ARF that I assembled. The glue started setting about 10 minutes in and got real hot. I bought it from a hobby shop in town and its been setting for a while for sure. but then I glue the tail on with Devon 5 minute epoxy my favorite glue and it got real hot to as it was going off. It could also be that has been very hot this summer here, in North Texas.
Michael
Michael
08-15-2018, 03:54 AM
#74
Thread Starter


This fuselage has a beautiful graceful curved taper to it.

All that's left is the top planking.

Some peeks underneath. All lot of compound angles to contend with. I got them to fit pretty tight. Tight fitting joints are the key to strength and longevity (for a plane).

Making some good progress on the fuselage. It's a bit trickier than it looks with all those compound angles!
08-15-2018, 08:16 AM
#75
Thread Starter

Modifications made to the supplied wing bolt mount. The original mount was flat and did not take into consideration the wing's dihedral. Not one for leaving well enough alone, I decided to angle the block to match the wing's dihedral.

The block fits much better now!


Since I made the block a bit thinner to compensate for the dihedral, I decided to epoxy additional material to the block to give it more strength. Time for the epoxy to cure...

Front photo of the wing on the fuse.

...and a few views from the side.


Another modification that I made was the addition of this filler block at the tail. The plans call for this space to be open, I decided to use 1/8" balsa and cap this open space. By doing this, it will give more surface area to glue the horizontal stabilizer in place, thus eliminating outside tri-stock that the plans show to give the stabilizer more strength.
Progress made getting the wing married to the fuse...
Last edited by VincentJ; 08-15-2018 at 08:21 AM.

