


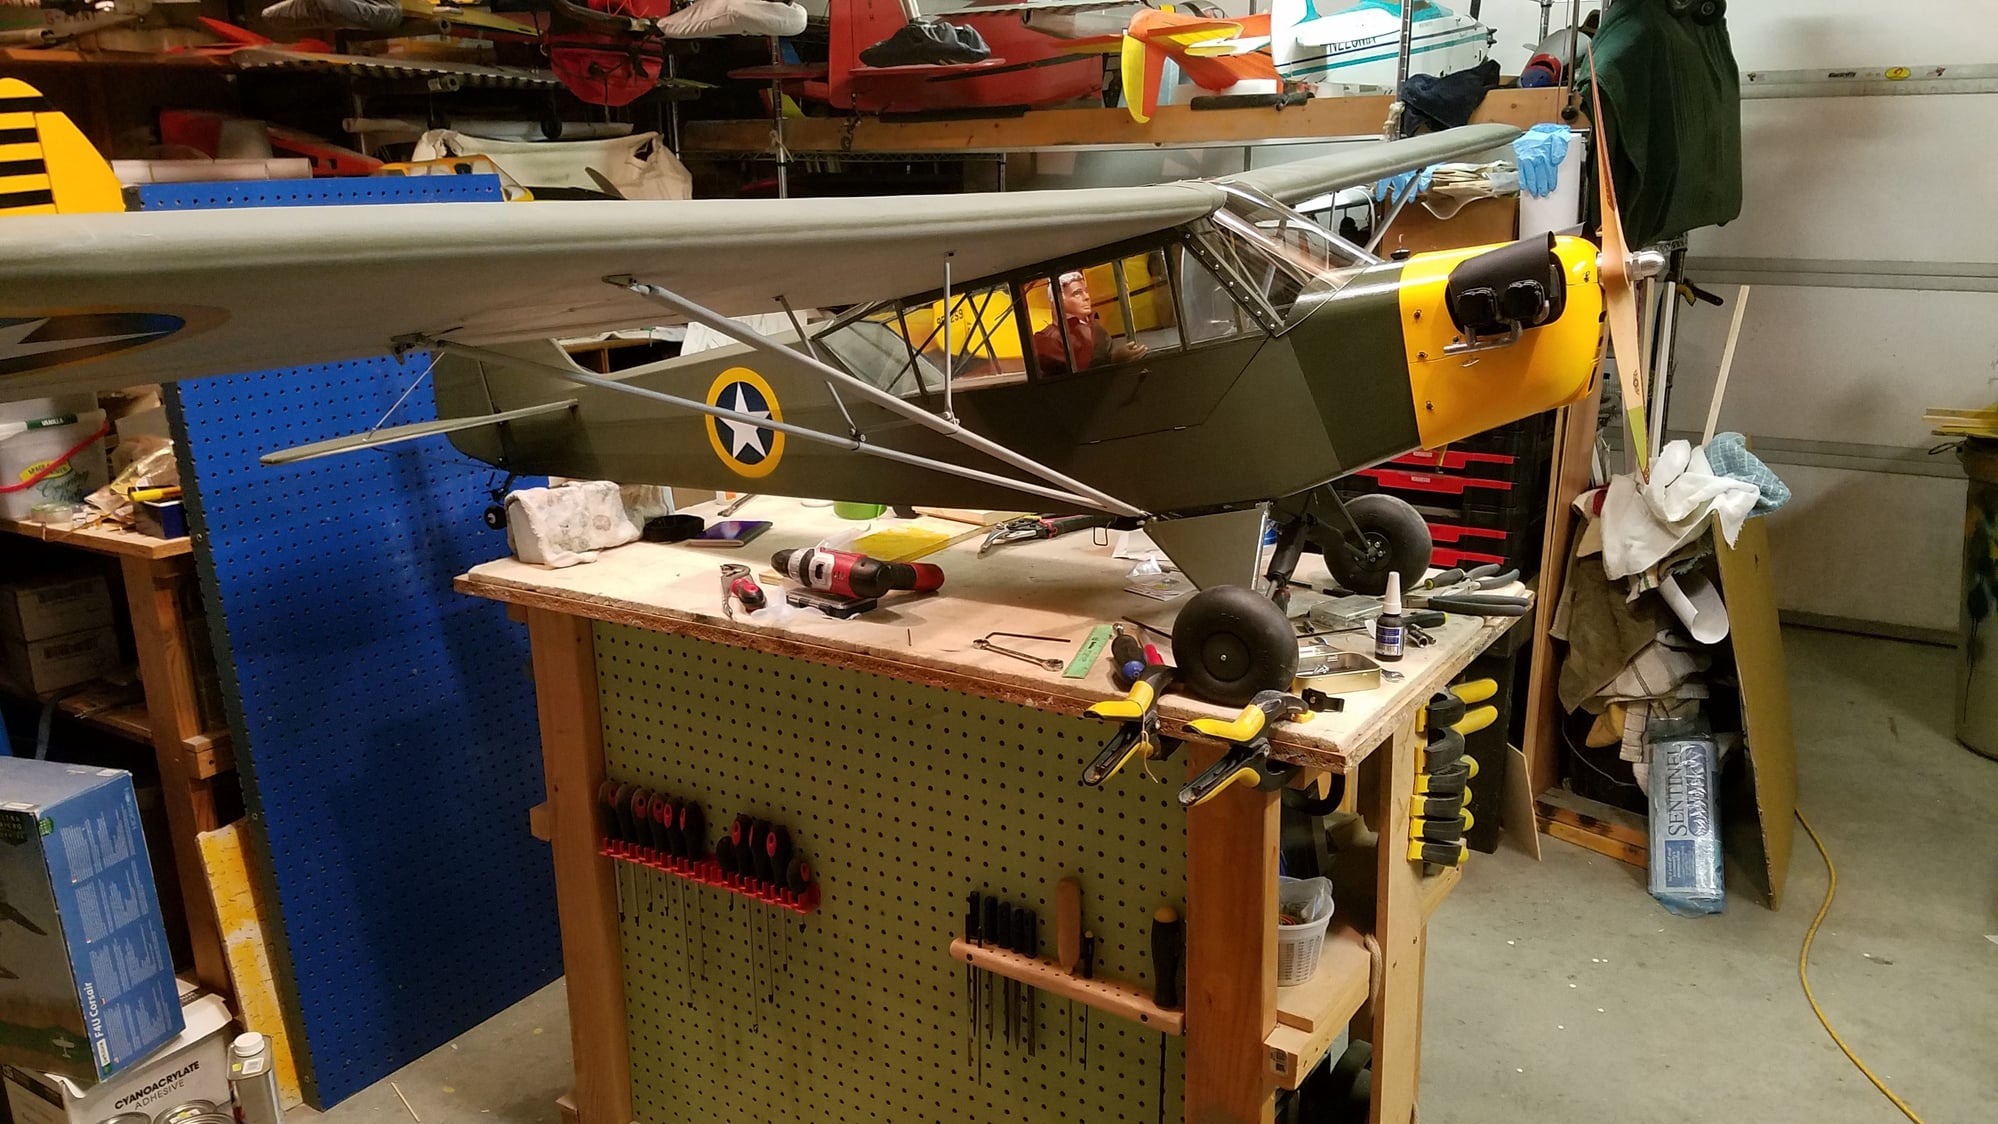
BUSA 1/4 scale L-4 build
 11-29-2022, 03:22 PM
#51
I'm working on the control assembly; it won't do anything for real control, but I'm making it as close as I can to the full scale, minus the actual cable connections to the flight surfaces. Mainly it will allow both sticks to move together, like they do in a dual control system. I haven't made the brackets yet to mount it to the floor, but I do have the linkage between the sticks finished. The control sticks are 1/4" dowels cut to scale length, and I dipped the ends in a rubber material you can get to replace grip handles on tools. Dip them and hang them upside down to allow the rubber to set. The control assembly and linkage is brass tubing of different sizes. The outer ends will swivel to allow the sticks to move side to side for aileron control, and the sticks will also move forward and backwards for pitch control. I'll also made rudder and brake pedals, but they'll just be for looks and won't move. I can only do the rar set anyway, because there is no actual front floor space because of one of the main formers.
Anyway, here's pictures. 1st is a schematic I'm using to make the scale details and properly locate them. The drawing scale is 1 inch equals 2 feet, and you can pick out the piece I'm making:
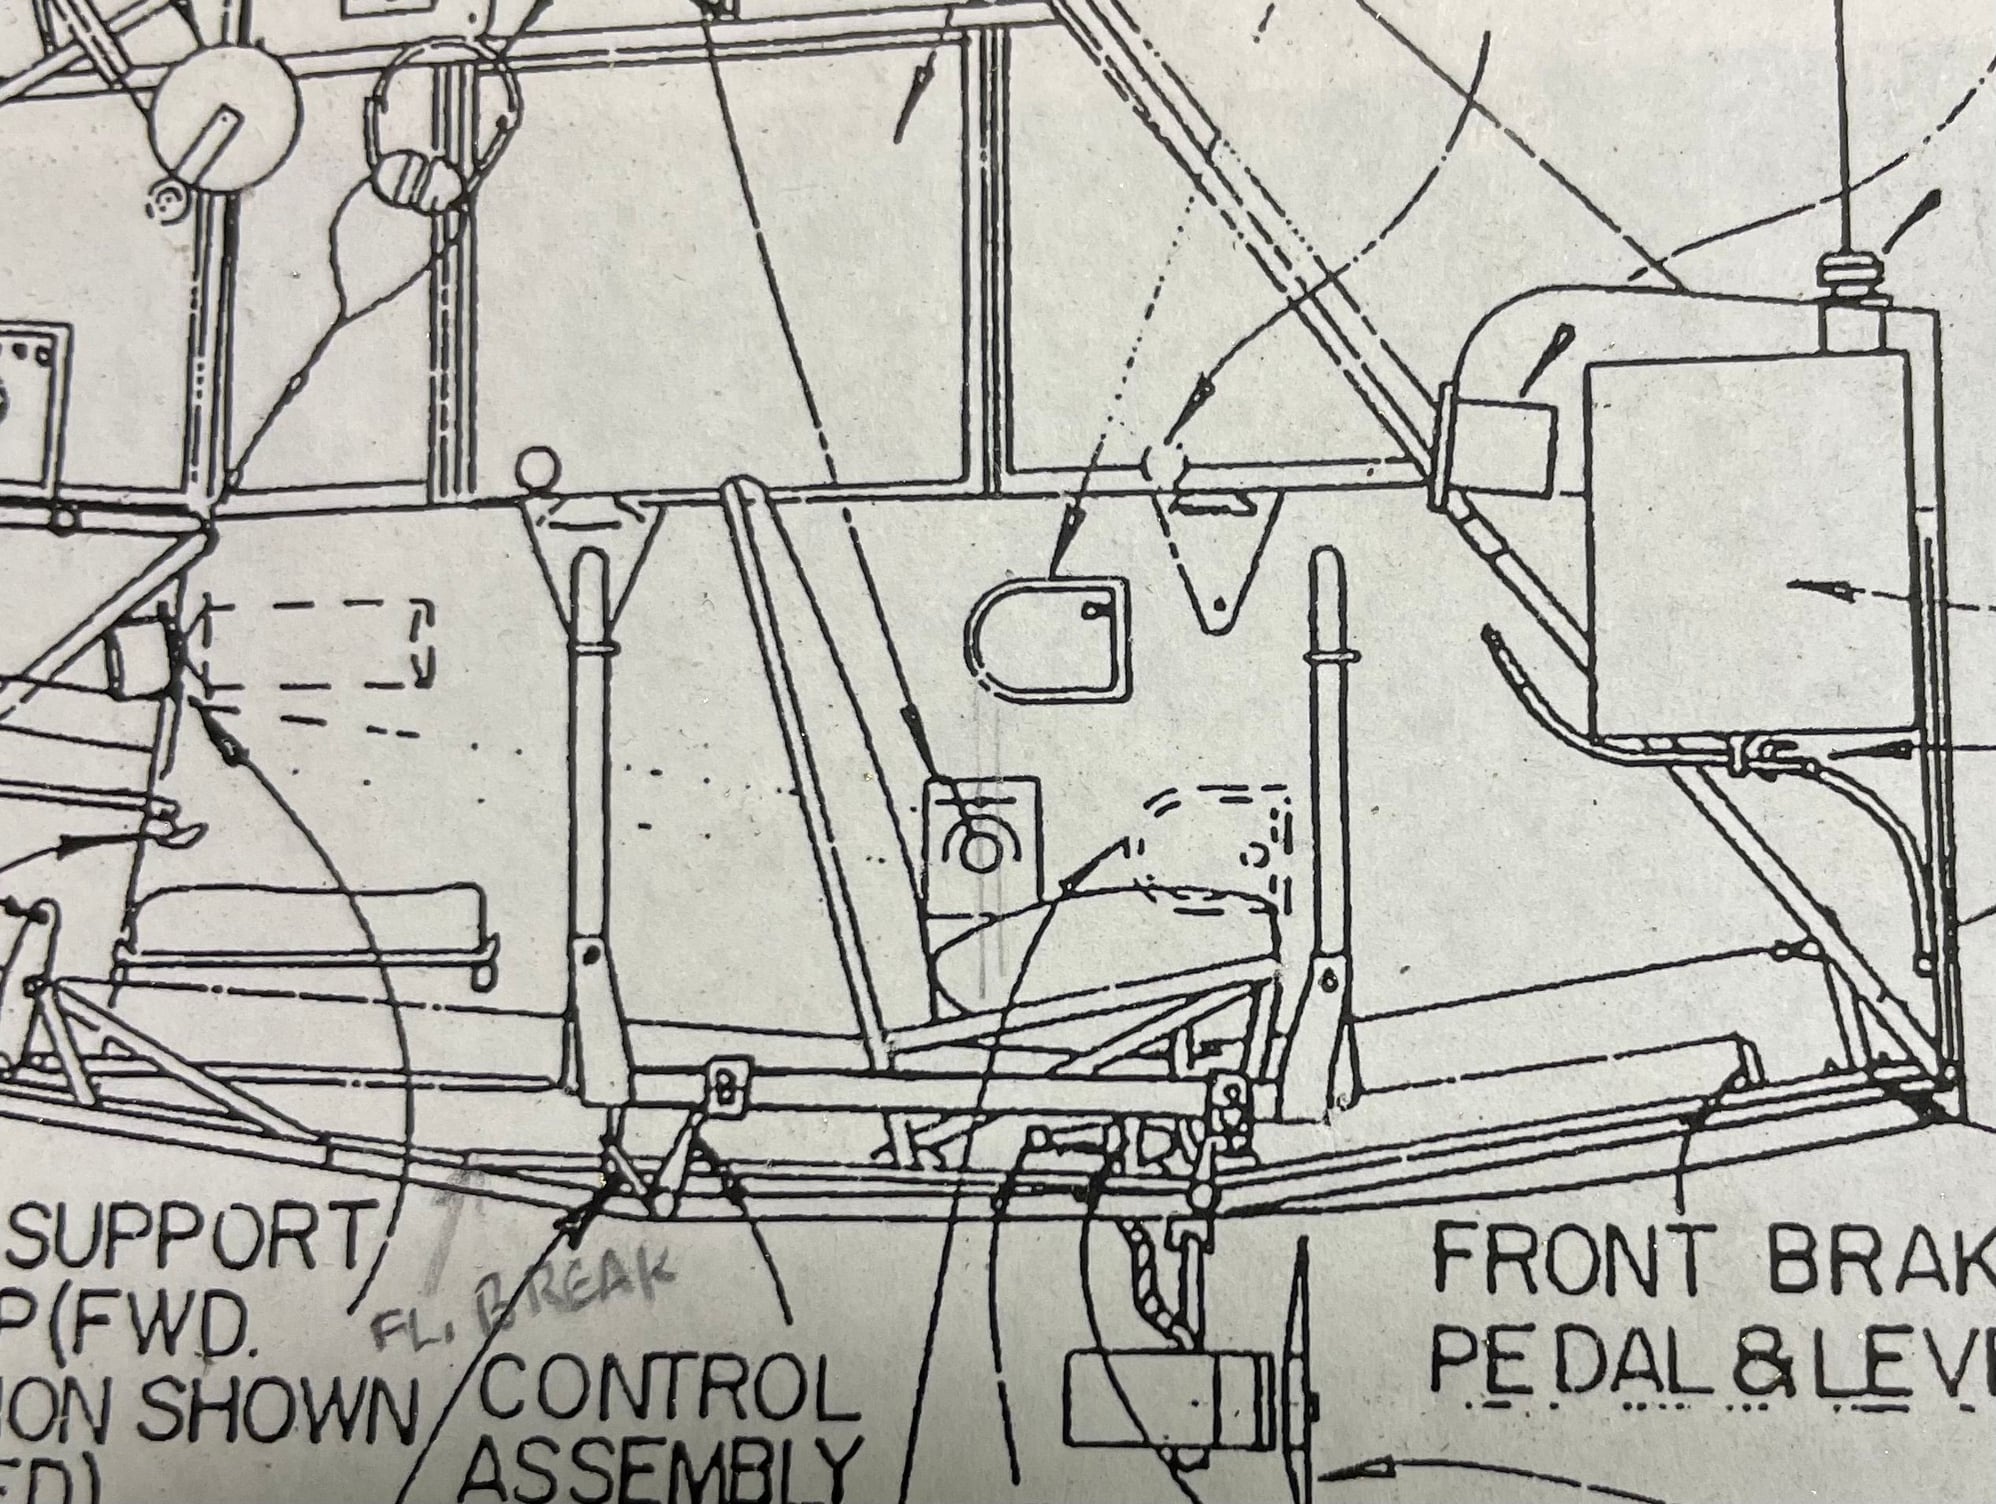
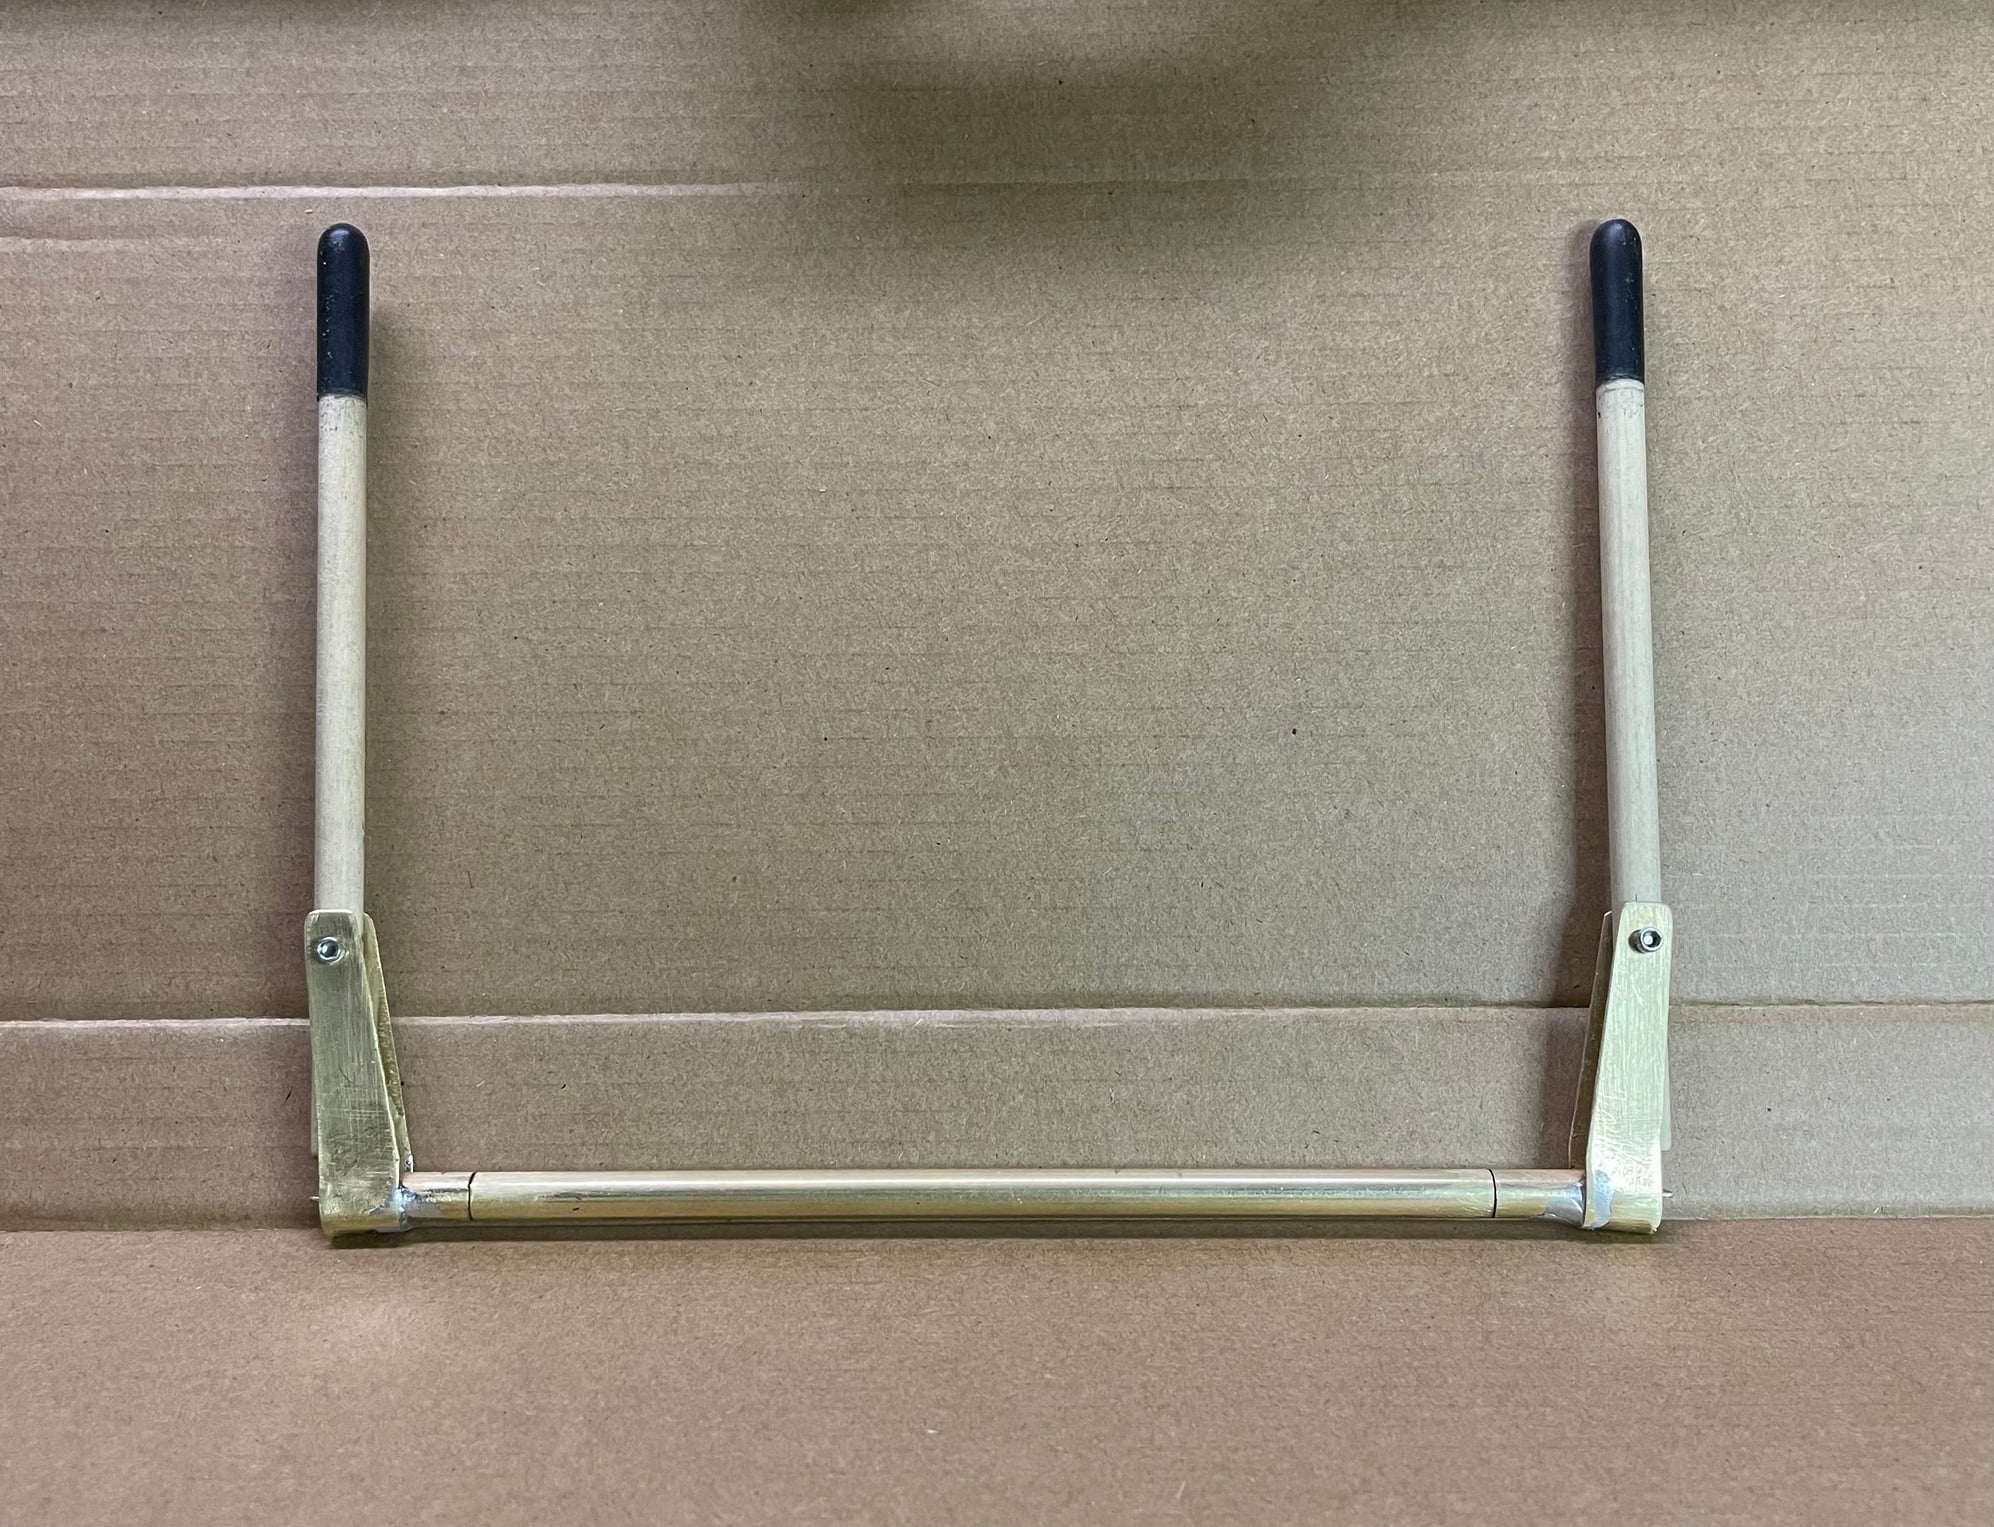
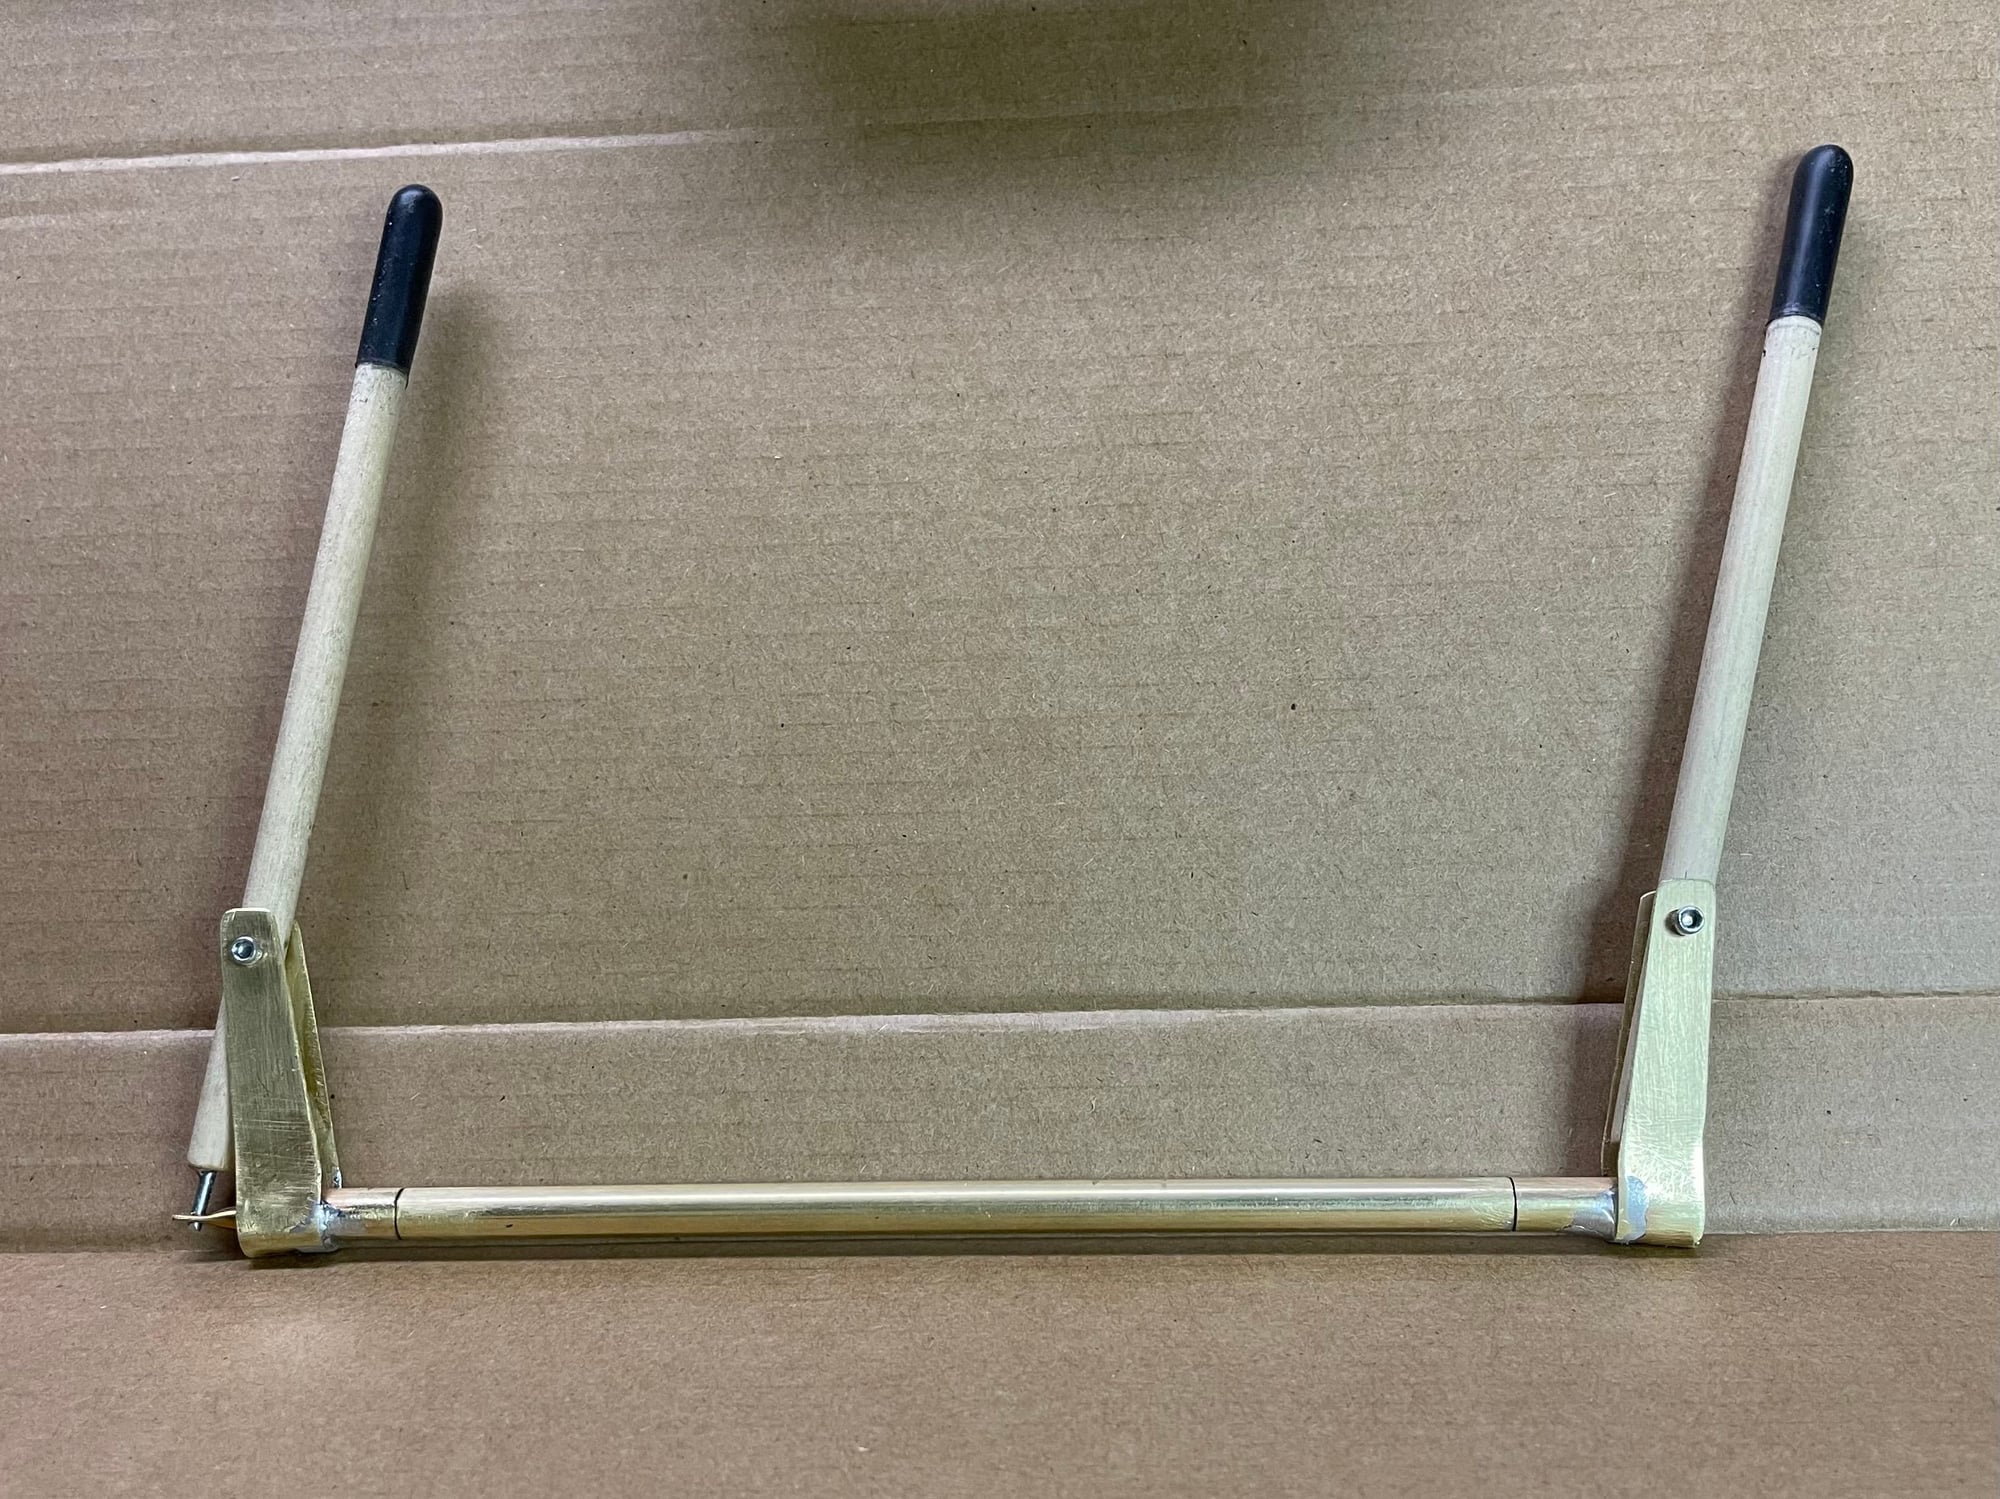
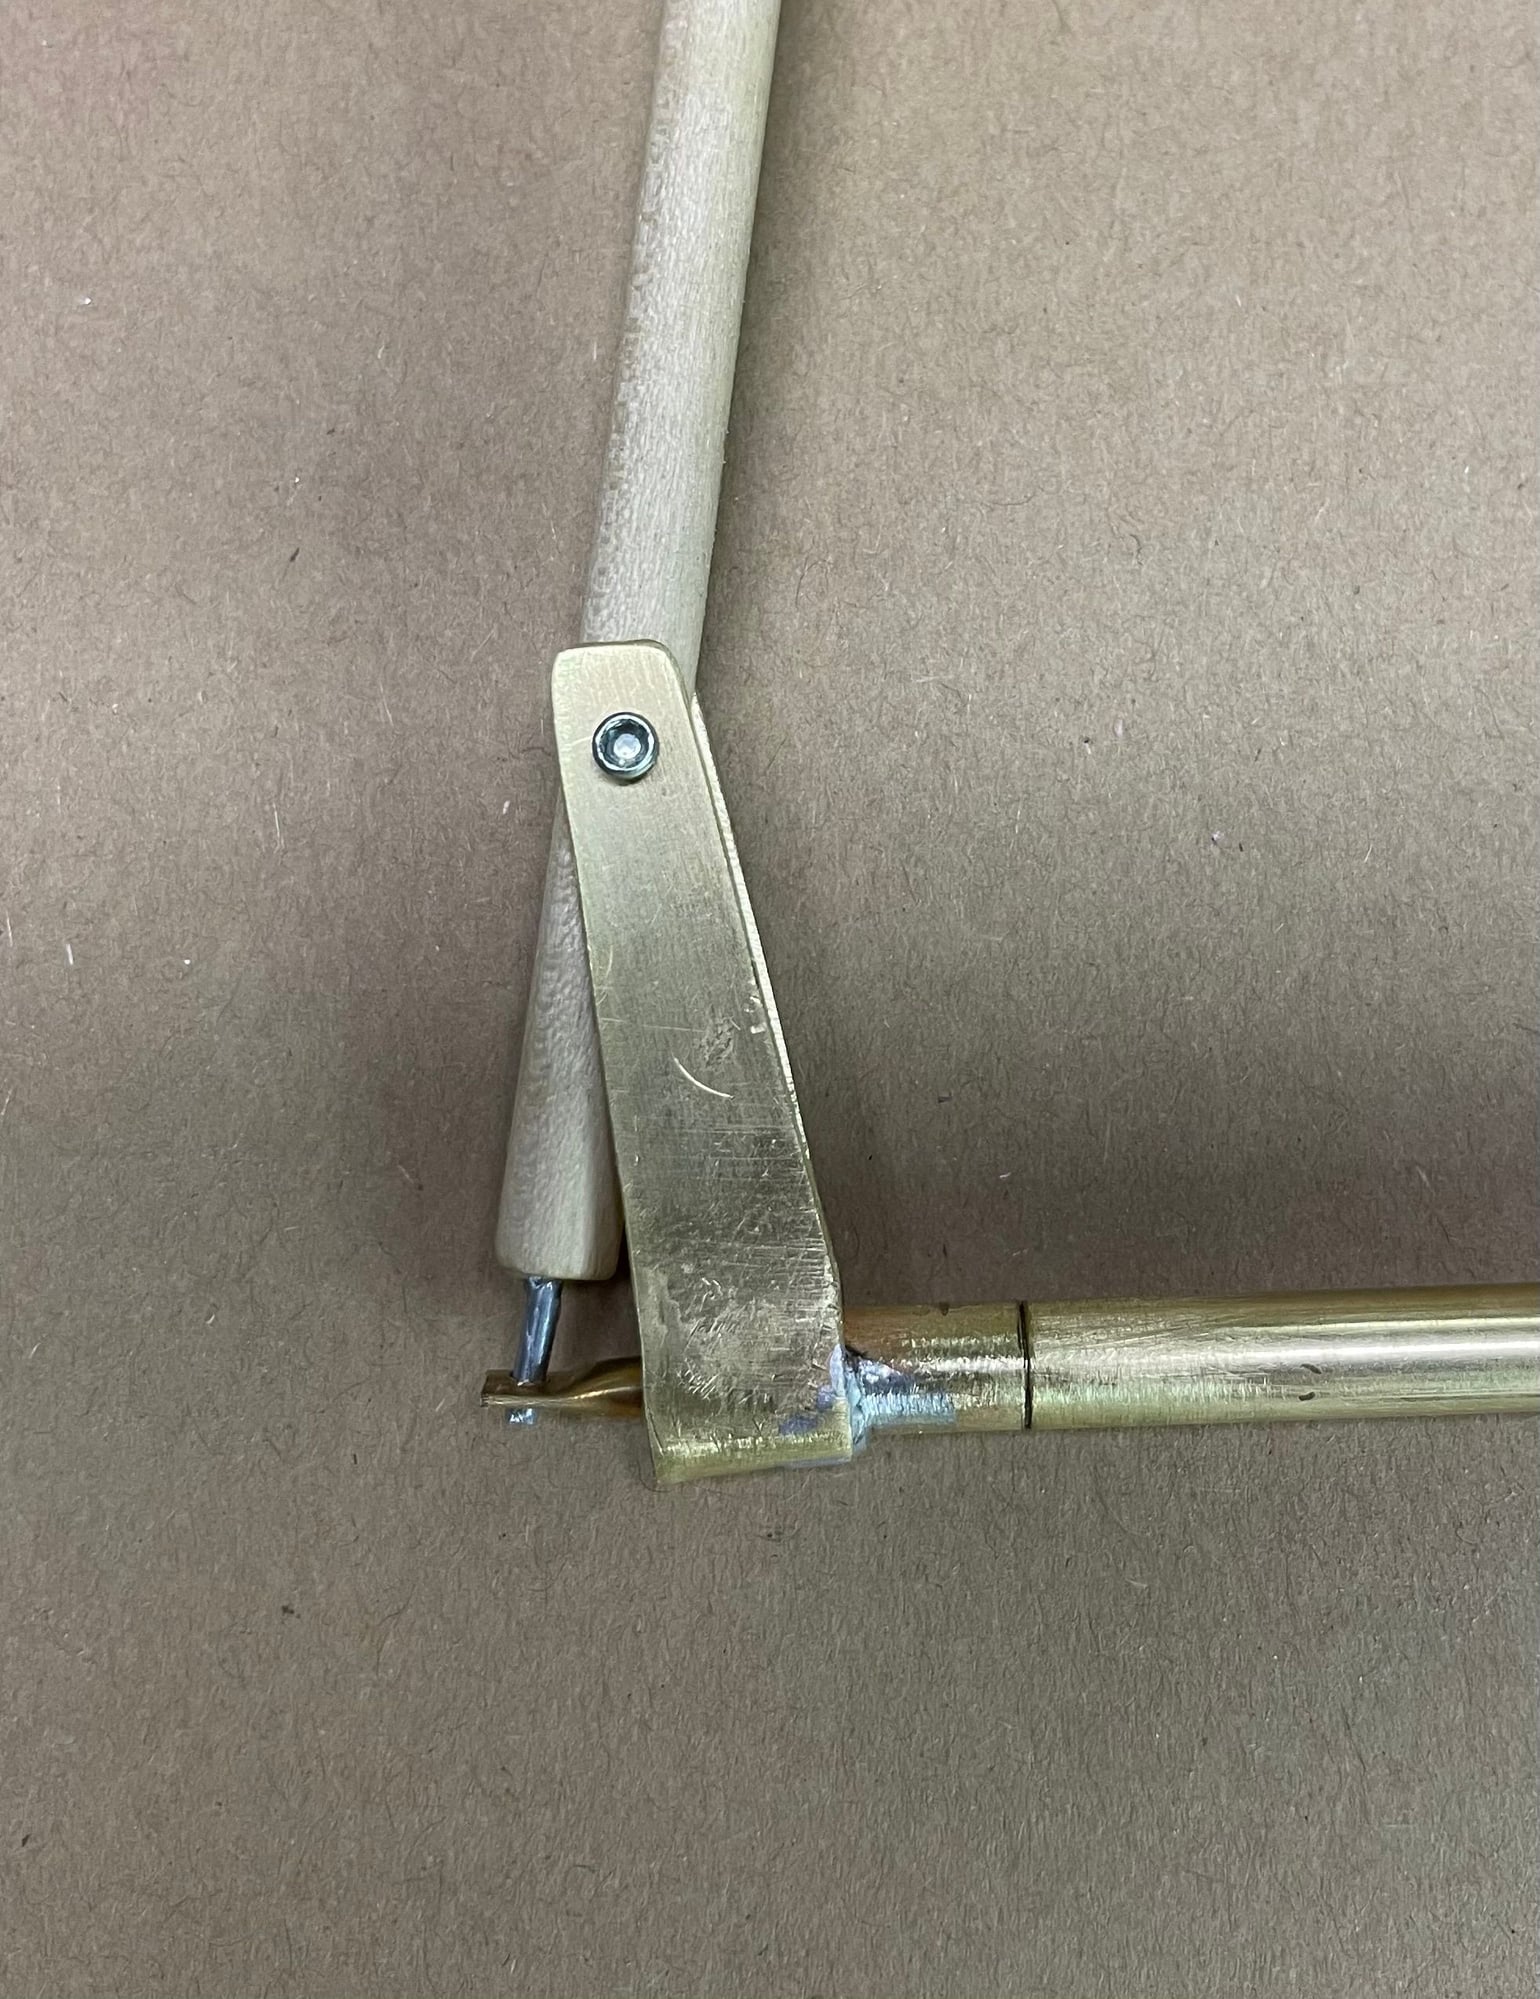
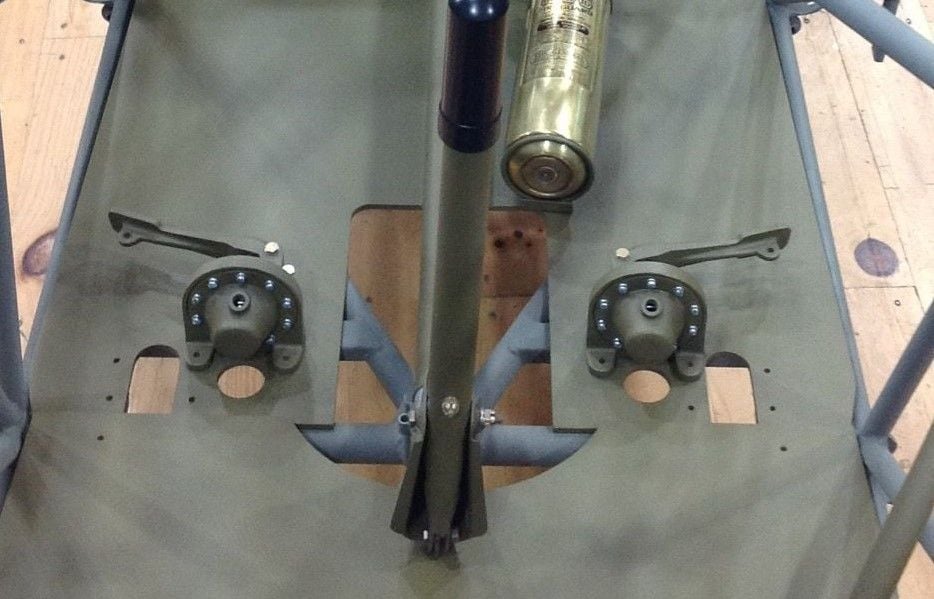
And here is the assembly, with a detail showing the linkage ends that go between the sticks; the center portion will have brackets that mount to the floor, you can see the line where the ends can move left and right. For an idea of actual size, the hex head screw holding the stick in place are #2:
More pictures once I get the mounting brackets made.
Anyway, here's pictures. 1st is a schematic I'm using to make the scale details and properly locate them. The drawing scale is 1 inch equals 2 feet, and you can pick out the piece I'm making:
And here is the assembly, with a detail showing the linkage ends that go between the sticks; the center portion will have brackets that mount to the floor, you can see the line where the ends can move left and right. For an idea of actual size, the hex head screw holding the stick in place are #2:
More pictures once I get the mounting brackets made.
 12-04-2022, 06:29 AM
#52
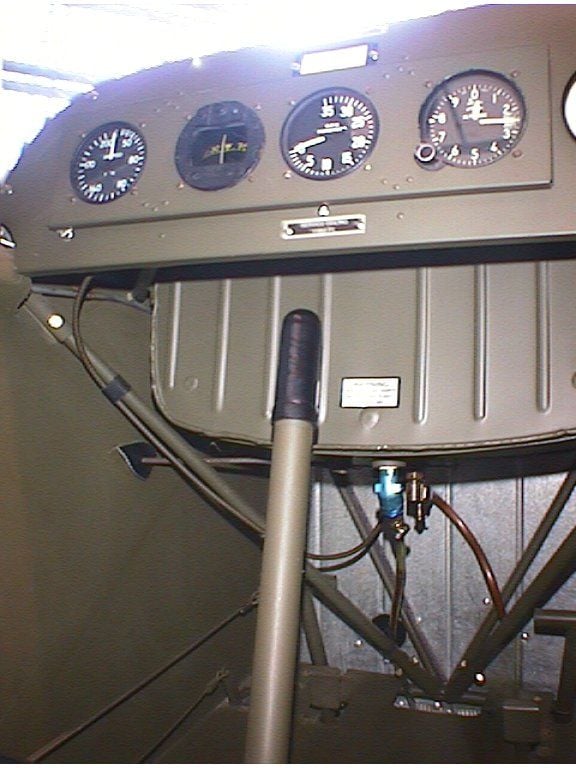
Here's another interior detail. I don't really know why I'm going to all the trouble of detailing this plane to the extent that I am, except for the challenge. These are the brake cylinders and pedals. They fit under the front seat in a position where the rear seat pilot can use them. The rear rudder pedals are just in front of them, and the brake pedal is used with the heel of the foot. A cable attached to each pedal runs forward to the front brake pedal, same as for the rudder pedals. Ist are a couple of pics of the fullscale, that I used to scratch build replicas. A schematic I have gives me the scale.
I decided to paint mine aluminum, just to add some color to the otherwise all olive-drab interior. I also want them to look well-worn, the model is supposed to replicate a wartime aircraft and not a hangar queen. Next pictures are the parts used; the bodies of the cylinders are plywood and wooden dowel, and a few small washers glued together. The pedals are 4-40 steel rod, brass and solder, with epoxy putty to finish the shaping (carved after it cures).
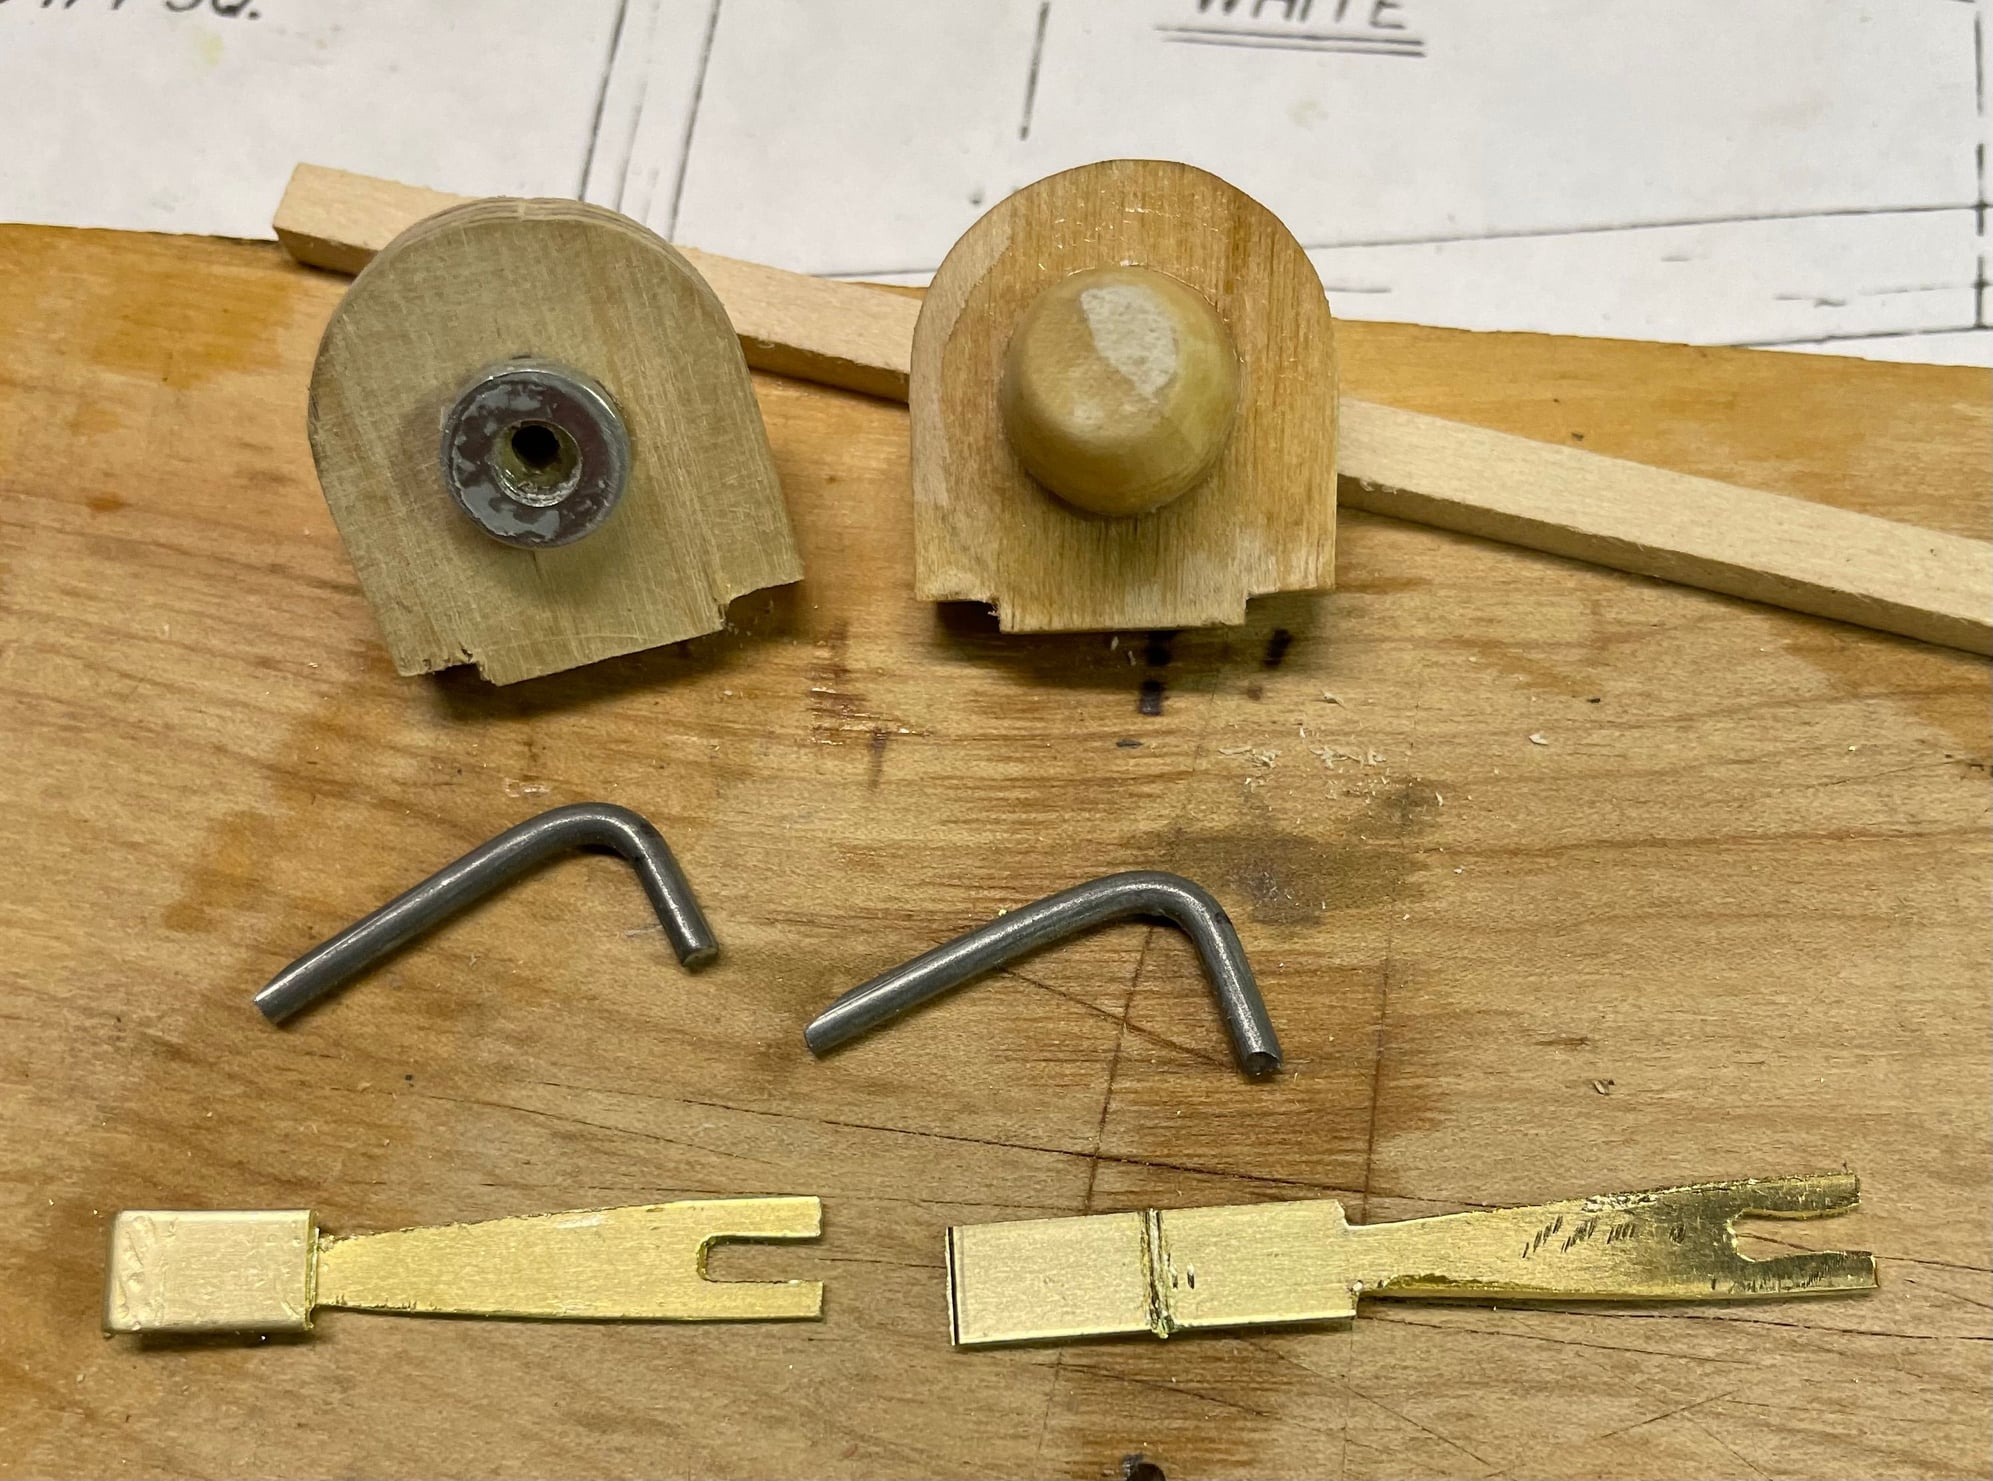
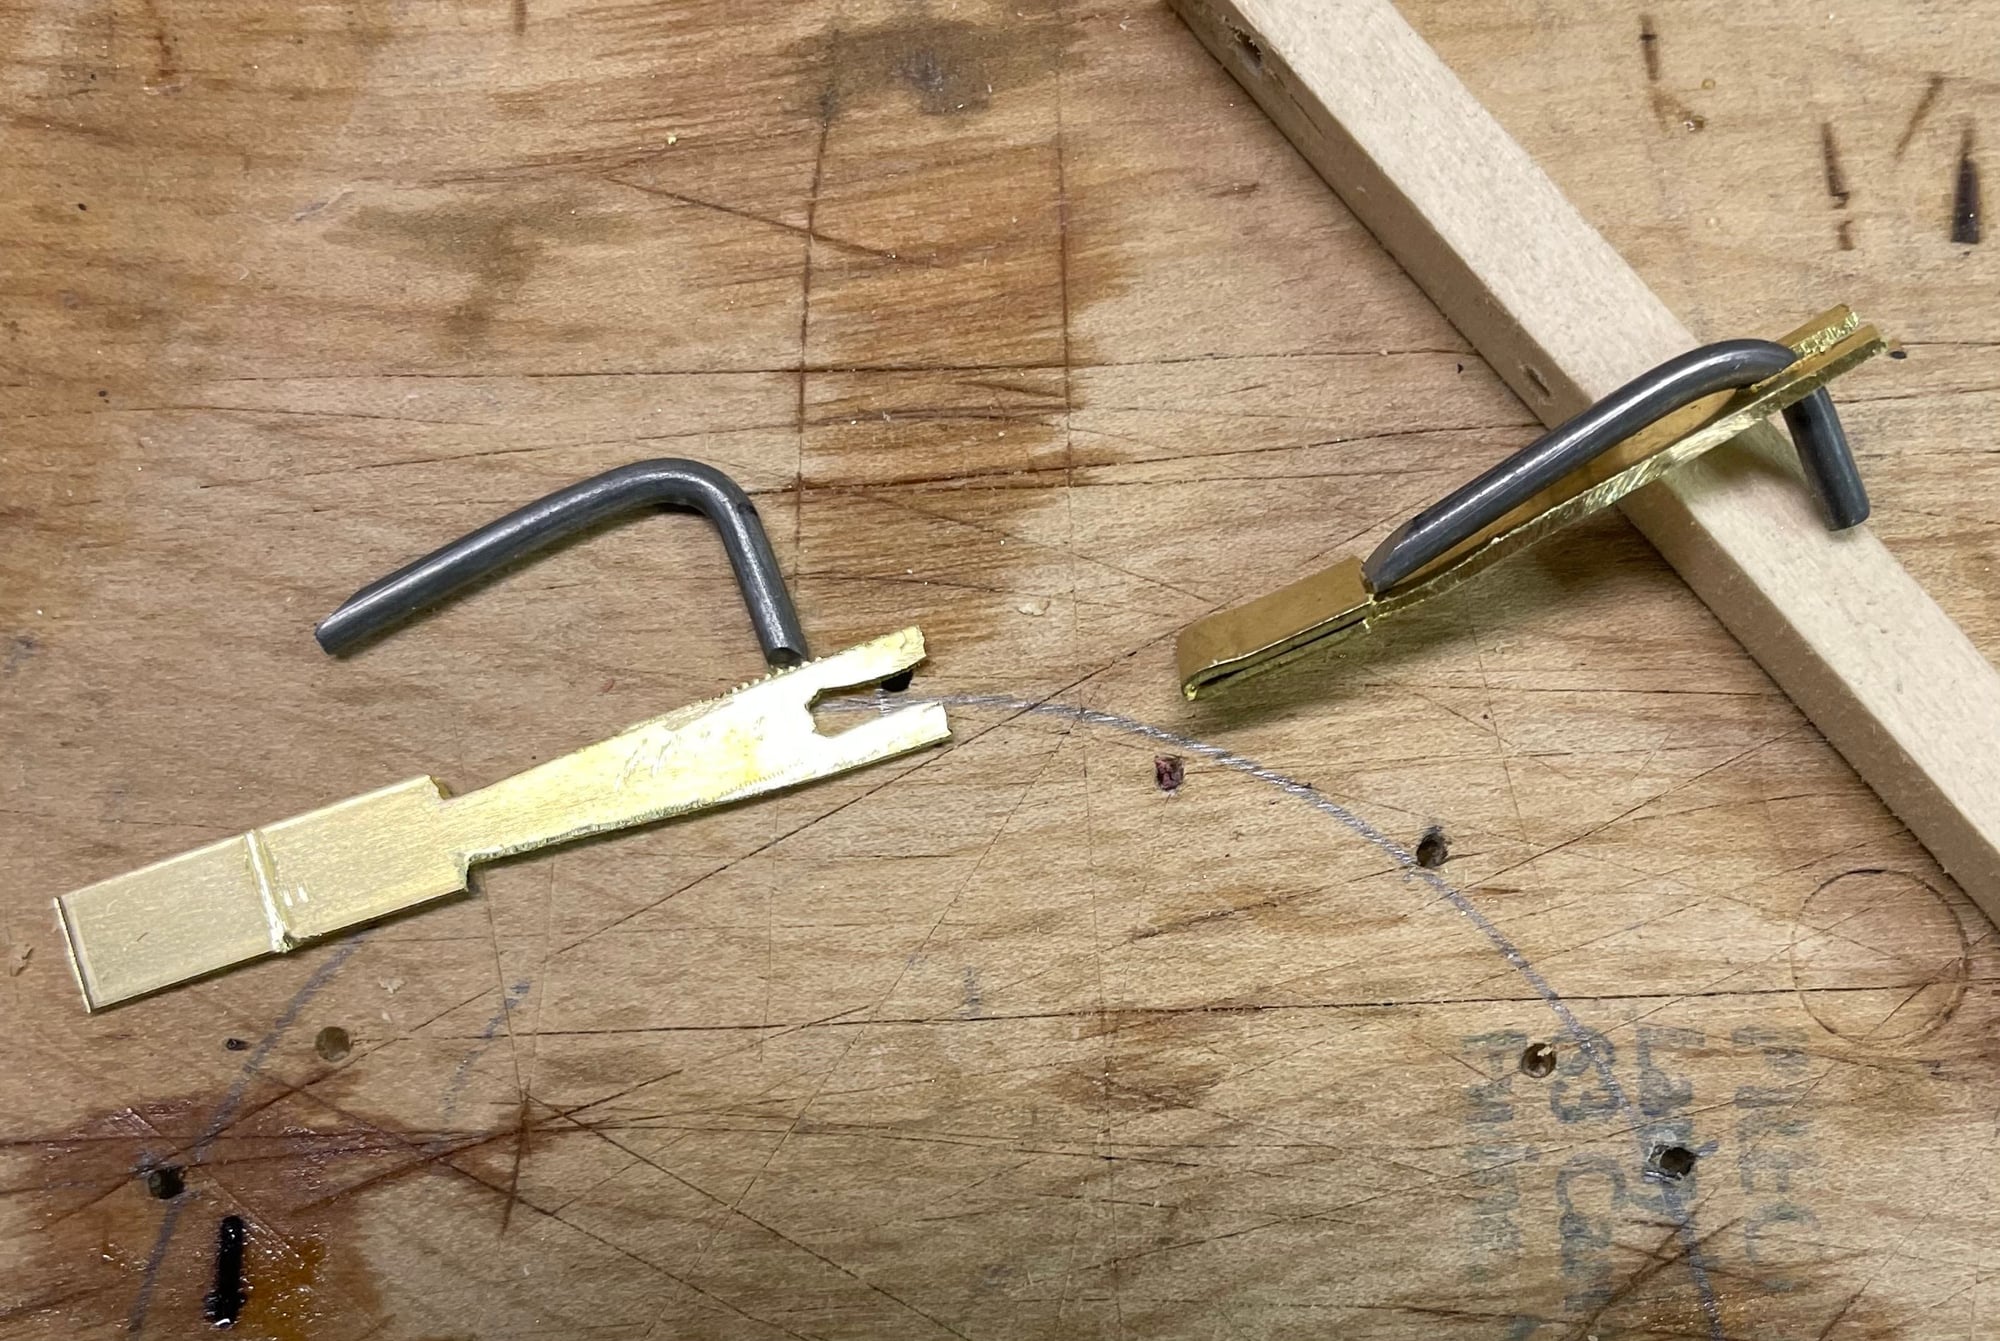


I decided to paint mine aluminum, just to add some color to the otherwise all olive-drab interior. I also want them to look well-worn, the model is supposed to replicate a wartime aircraft and not a hangar queen. Next pictures are the parts used; the bodies of the cylinders are plywood and wooden dowel, and a few small washers glued together. The pedals are 4-40 steel rod, brass and solder, with epoxy putty to finish the shaping (carved after it cures).
12-05-2022, 06:14 PM
#53
I'm taking a step back. Since I started building this plane, there's been one thing in the back of my mind that has bothered me about how the kit's design doesn't really allow for a highly detailed scale model. The reason for this is a practical one as far as the kit goes; it's designed as a sport scale, to be durable and relatively easy to frame up by someone with average to above average skills, and the outside of the plane can be made to look very scale. All the measurements I've made and compared to the full scale dimensions shows this to be a very accurate model.......with the exception of the cabin. The main forward former that is about even with where the instrument panel will be, and the midships former, which is somewhere close to the rear of the cabin are too close together to allow for a full cabin. The rear is close, and would be just fine if the plane were being built as a J-3, but need to be removed to make an accurate L-4 cabin. The front former, if left in place, allows no room for the legs of a scale pilot, nor floorboard room for the forward foot controls. I'm not bashing or poor-mouthing the model at all, it's just that it wasn't designed for what I want to do with it.
So, 2-1/2 months into the build, I've decided to change these formers in order to allow for the complete cabin. I've been measuring and analyzing the structure, and I believe it is possible to put the forward former about 4 inches forward of where it is, allowing for all the space I need while maintaining structural integrity. I have already taken 2/3 of the midship former out, the bottom third will remain, as it is hidden by the rear seat platform. I've determined that the rudder, elevator and throttle servos will be mounted underneath the rear deck that is behind the rear seat. The radio receiver and battery will fit under the floorboard, just barely, if and when they are ever used. I don't intend to fly the plane so I won't install them, but some day, someone else may decide to fly it. I'll take pictures of the modifications as I make them. The hardest part of this whole process is going to be removing the front former. I may have to resort to a rotary rasp and convert the whole thing to sawdust, a square inch at a time.
So, 2-1/2 months into the build, I've decided to change these formers in order to allow for the complete cabin. I've been measuring and analyzing the structure, and I believe it is possible to put the forward former about 4 inches forward of where it is, allowing for all the space I need while maintaining structural integrity. I have already taken 2/3 of the midship former out, the bottom third will remain, as it is hidden by the rear seat platform. I've determined that the rudder, elevator and throttle servos will be mounted underneath the rear deck that is behind the rear seat. The radio receiver and battery will fit under the floorboard, just barely, if and when they are ever used. I don't intend to fly the plane so I won't install them, but some day, someone else may decide to fly it. I'll take pictures of the modifications as I make them. The hardest part of this whole process is going to be removing the front former. I may have to resort to a rotary rasp and convert the whole thing to sawdust, a square inch at a time.
12-06-2022, 04:38 AM
#54

Hey there Ken,
I just wanted to check in and say, i am enjoying the show "build".
I have already learned and/or re-learned a few tricks of the trade.
For the project that you are working... I think your decision to modify the bulkhead is the best choice. If you do not do that, you'd be putting all this time and effort into this build and then always have that thought "why didn't I'
Last edited by RICKSTUBBZ; 12-06-2022 at 04:39 AM. Reason: type-o
 12-06-2022, 05:54 AM
#55
I appreciate your periodic comments, would be nice to hear from others as well, if for no other reason than to tell me I'm crazy for doing all this,.
12-06-2022, 09:51 PM
#56

Great job, you have also inspired me to fix my L-4 which has been sitting since I crashed it in Nov 2021. Flew it 2 weeks ago, you can see some paint mis match from the 3 repair jobs that have been done. Still flies great.
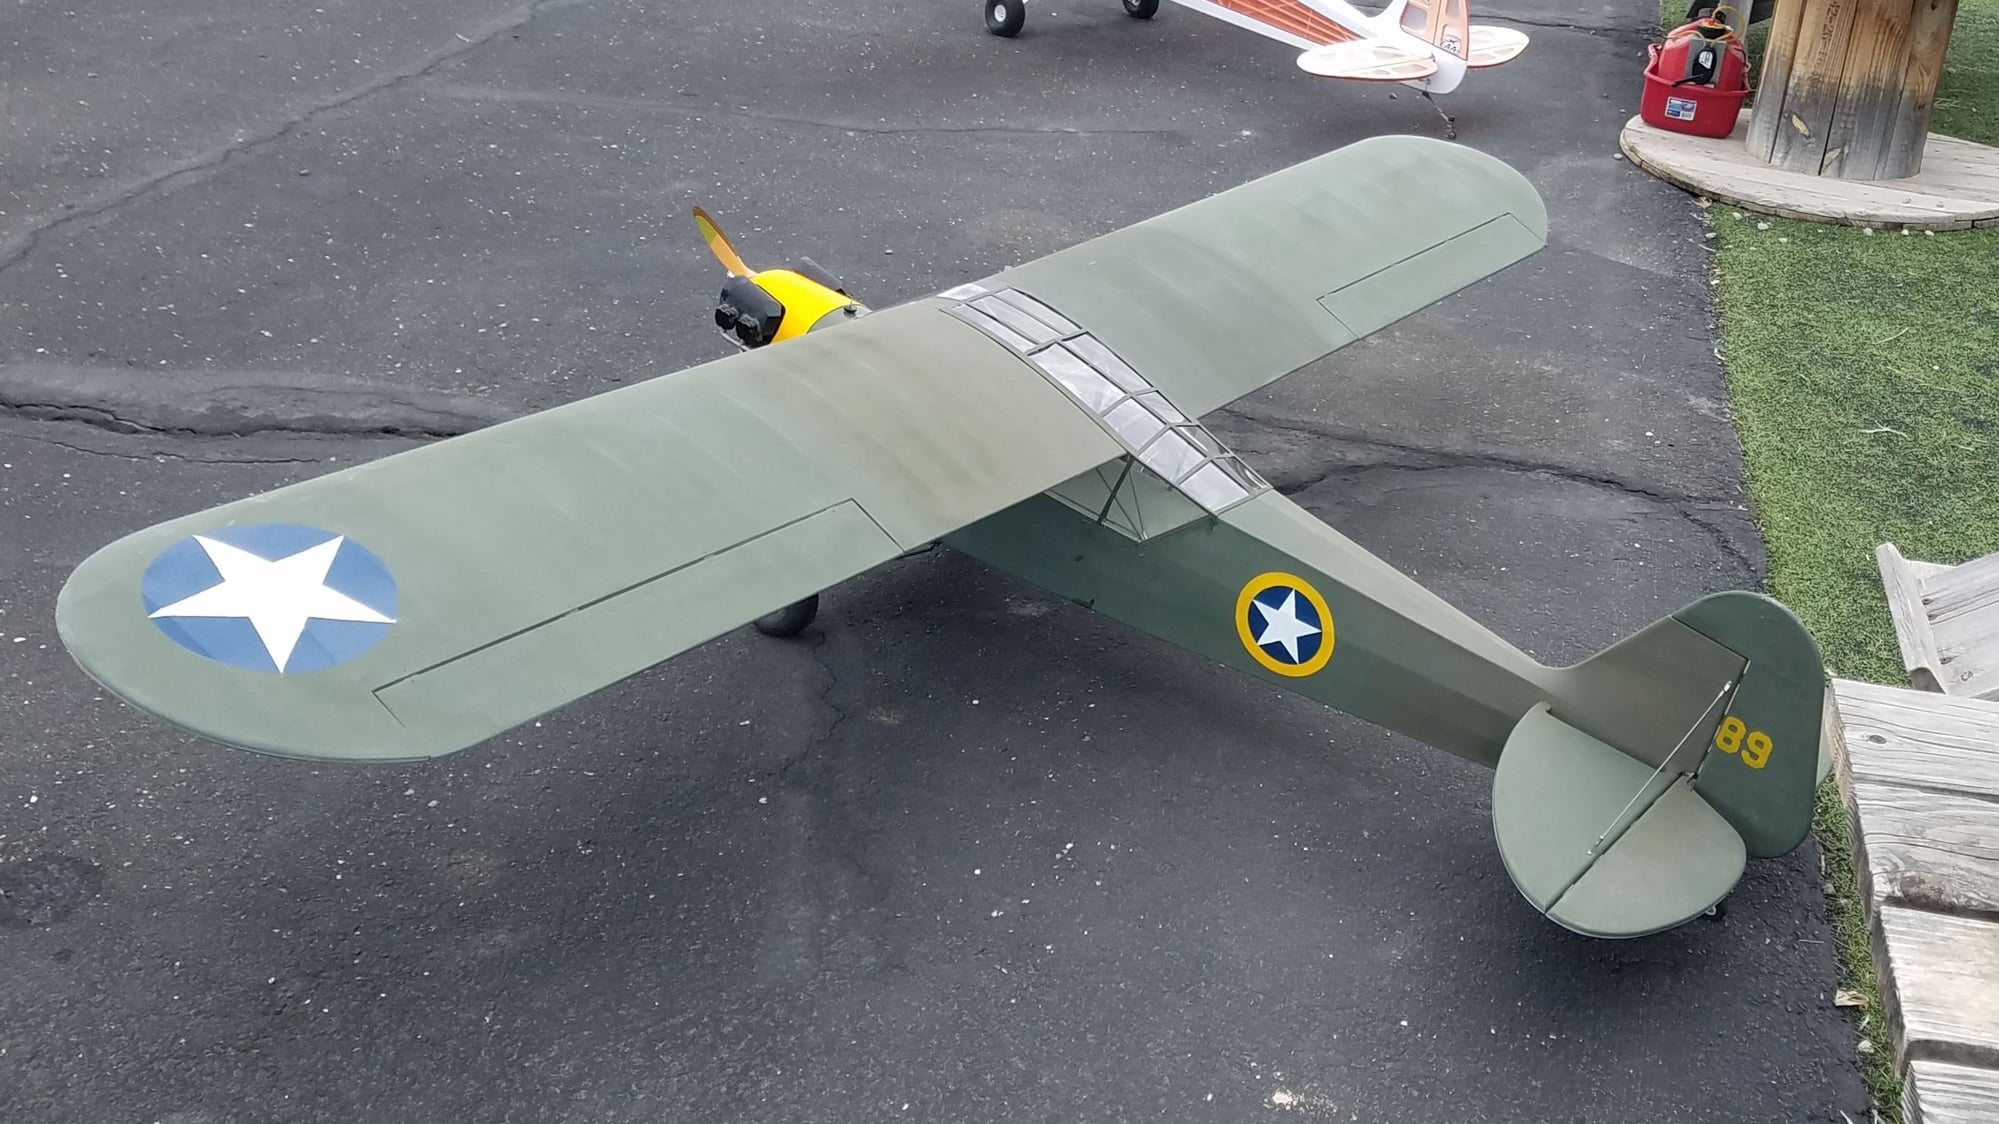
Nov 2022
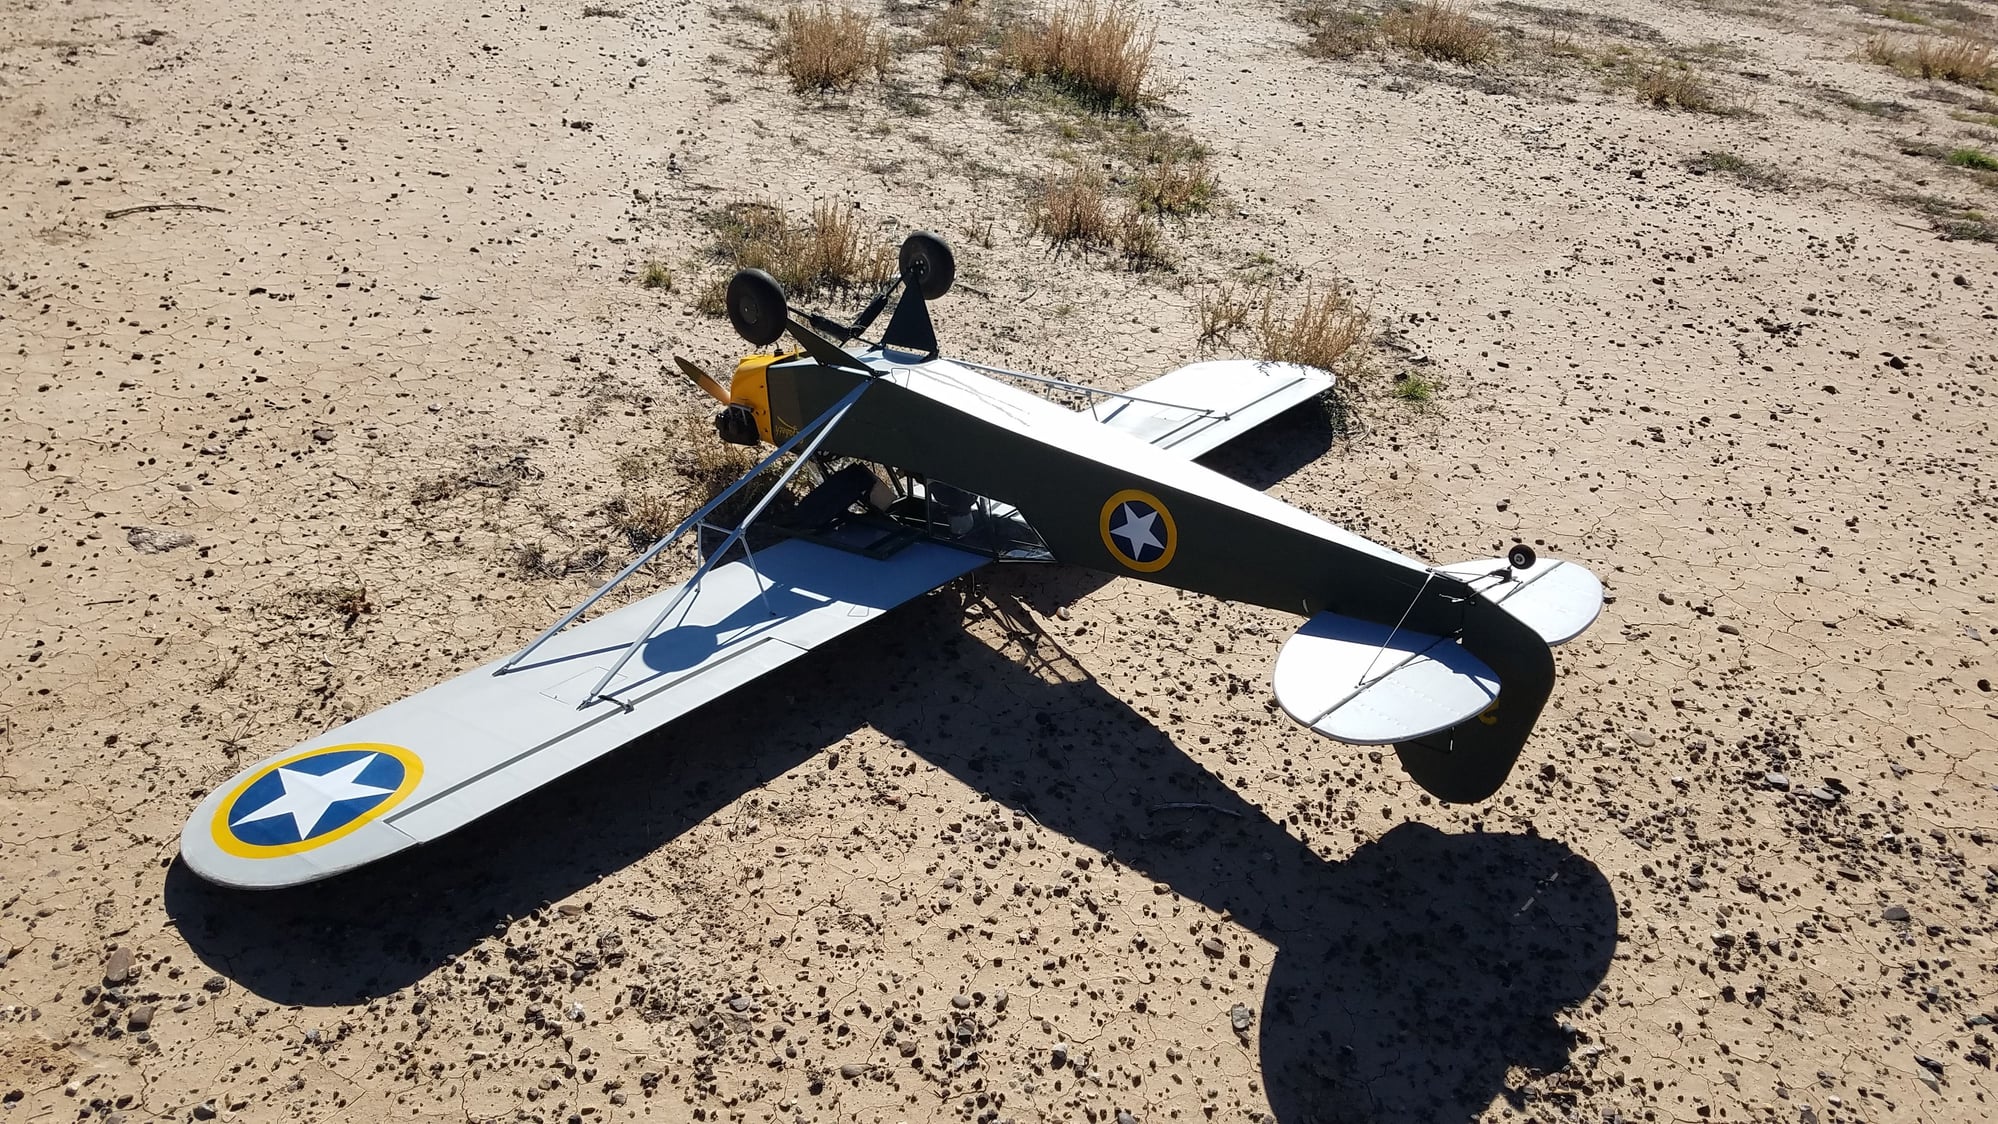
Nov 2021
broken tail, firewall and wing
Nov 2022
Nov 2021
broken tail, firewall and wing
12-07-2022, 09:07 AM
#57
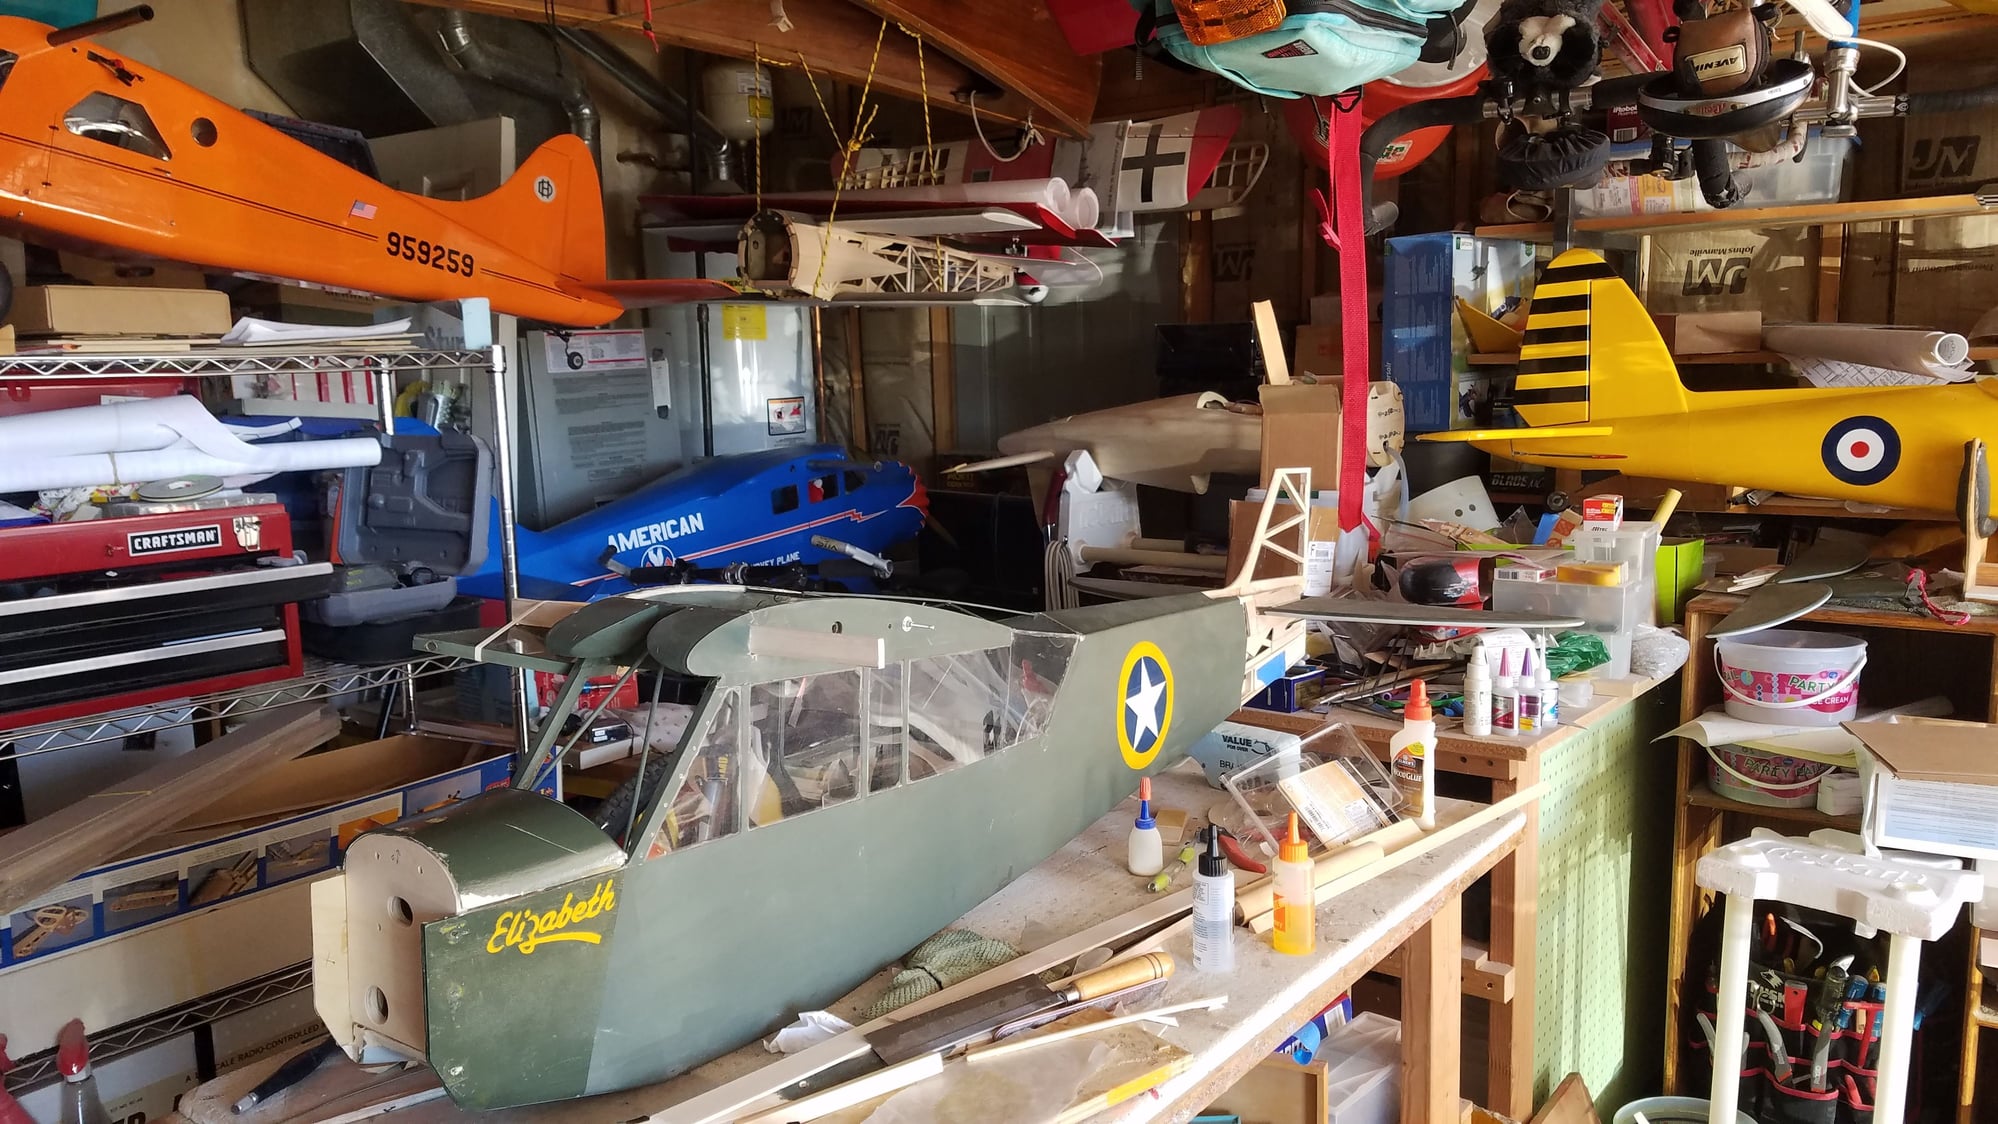
Oh, and I like the looks of your workshop. Mine used to have planes sitting everywhere, too.
Last edited by khodges; 12-07-2022 at 09:09 AM.
12-07-2022, 09:59 AM
#58

Join Date: Jan 2004
Location: lake in the Hills,
IL
Posts: 977
Likes: 0
Received 14 Likes
on
14 Posts
Another great pic series, I'm inspired. +1 bryanmiick
Great shop non close-up, a properly framed in progress shot. I just love it.
Yes, get typing on some more info, we are interested.
Yes, Khodges has really brought some life back to some of us. Great job Khodges!
Great shop non close-up, a properly framed in progress shot. I just love it.
Yes, get typing on some more info, we are interested.
Yes, Khodges has really brought some life back to some of us. Great job Khodges!
12-07-2022, 09:22 PM
#59
That is the Sig 1/4 scale that I've posted some pictures of earlier in this thread. It has an OS 22 in it for power.
I do have too many planes, I don't crash as much as I used to.
I do have too many planes, I don't crash as much as I used to.
12-10-2022, 02:43 PM
#62
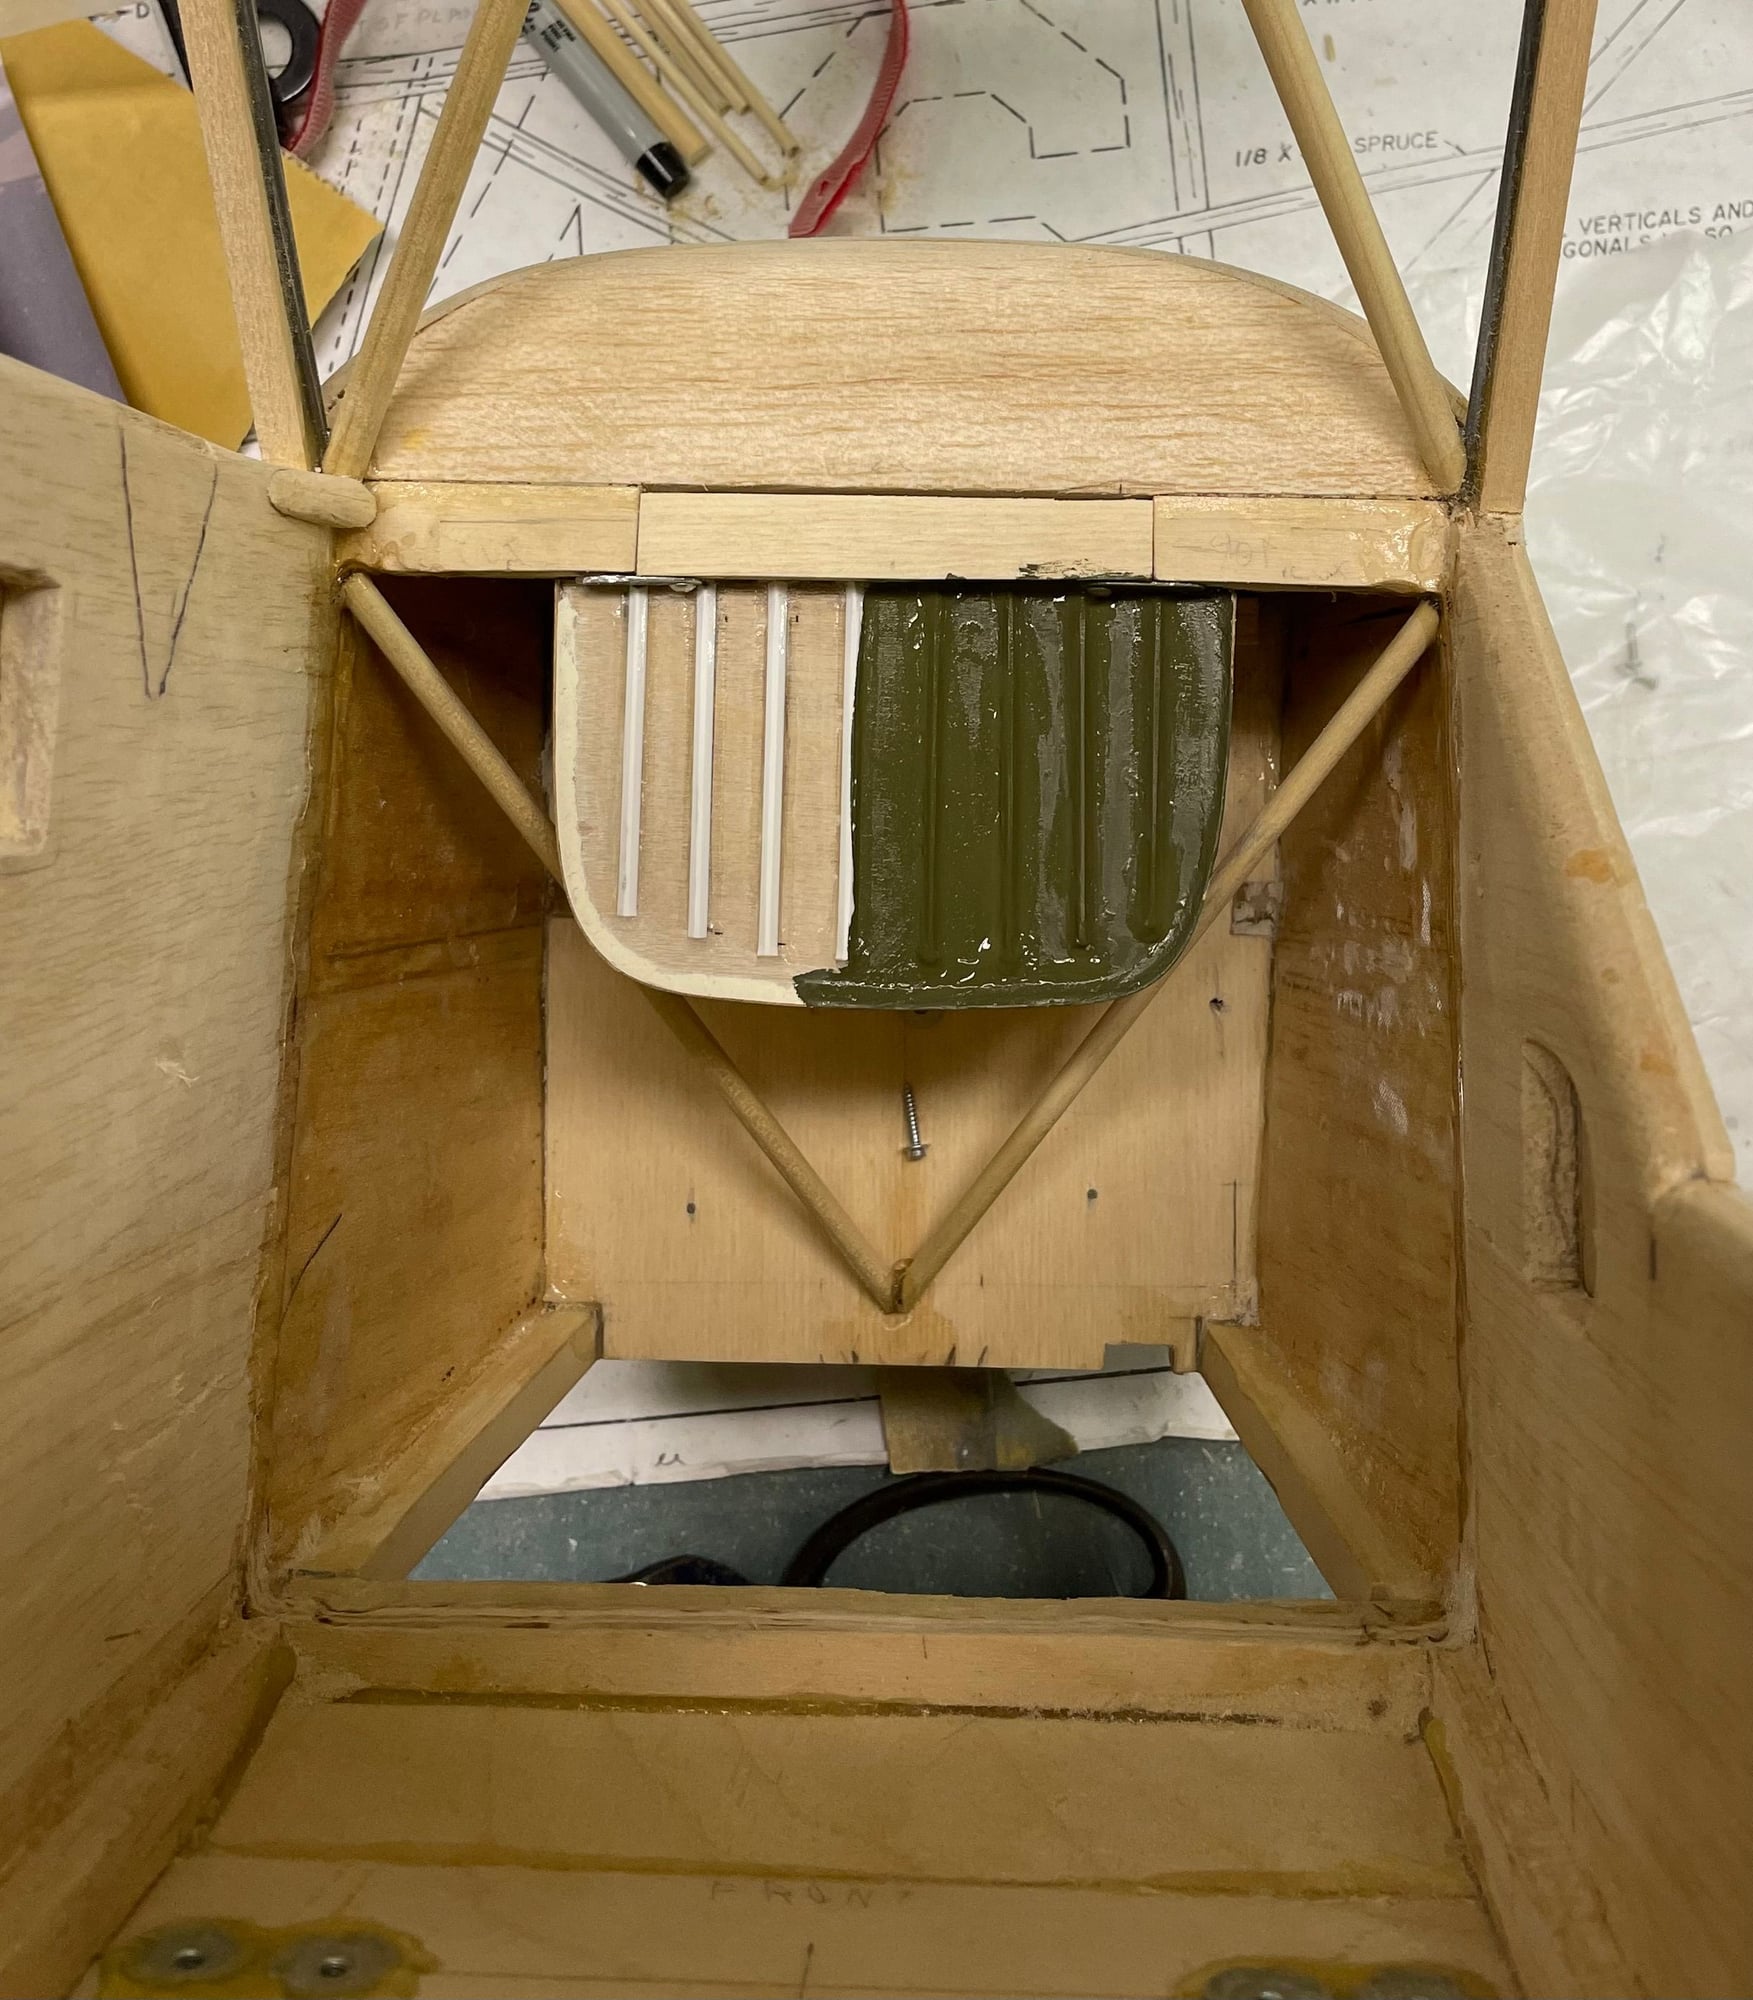
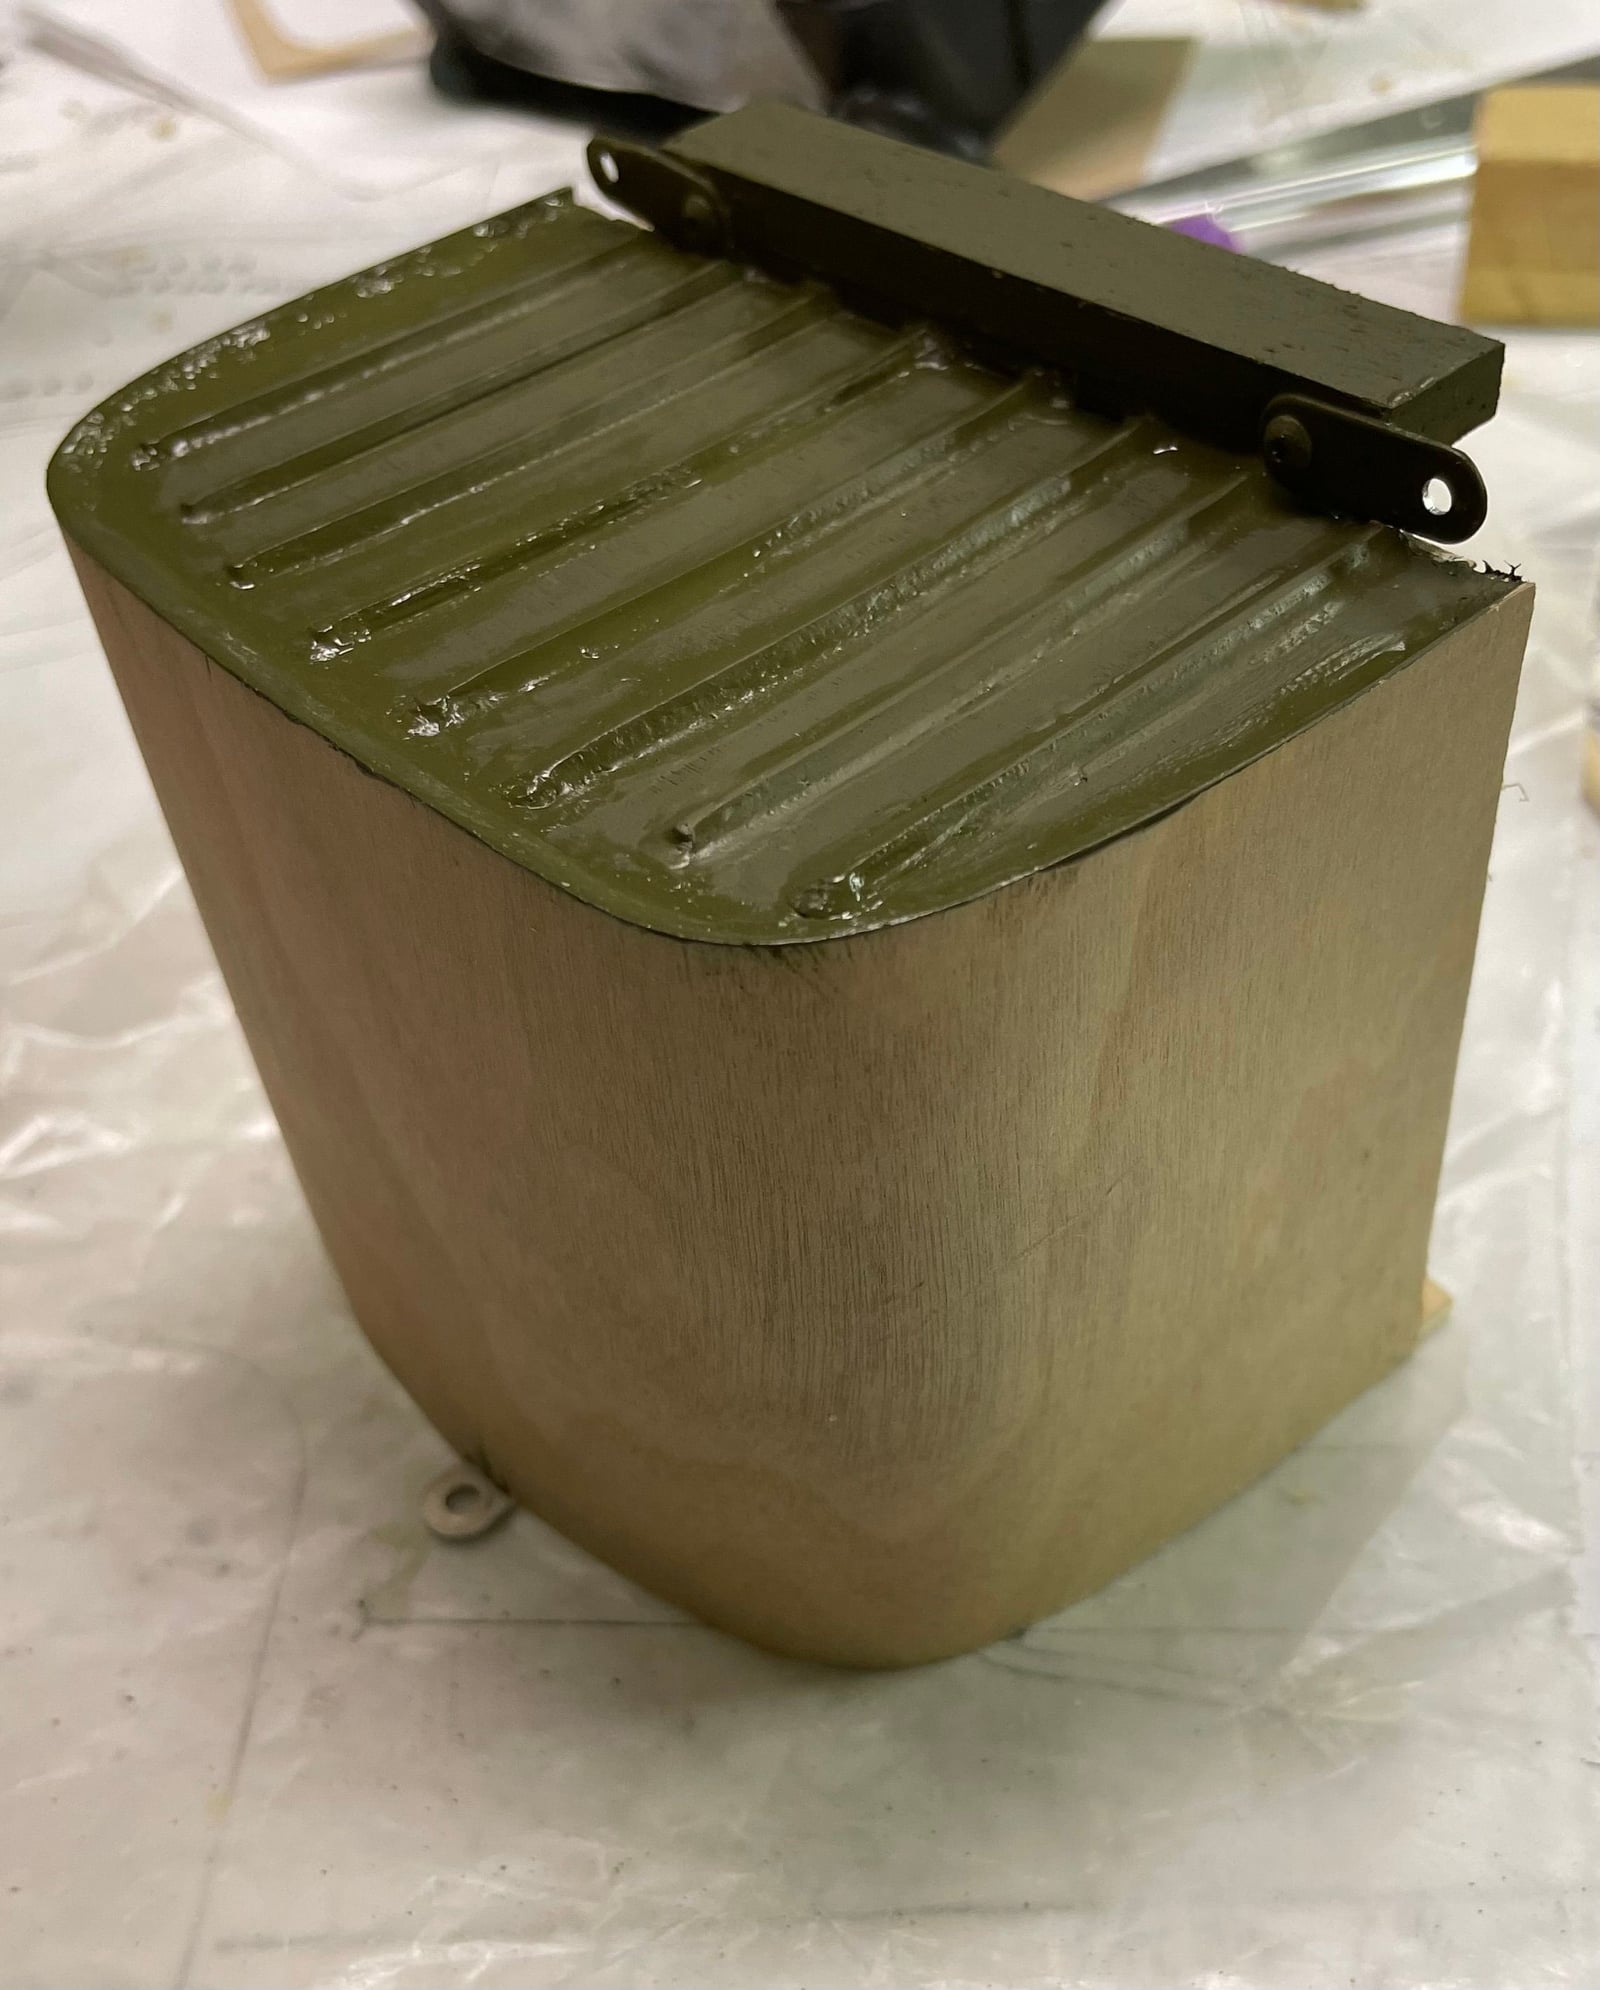
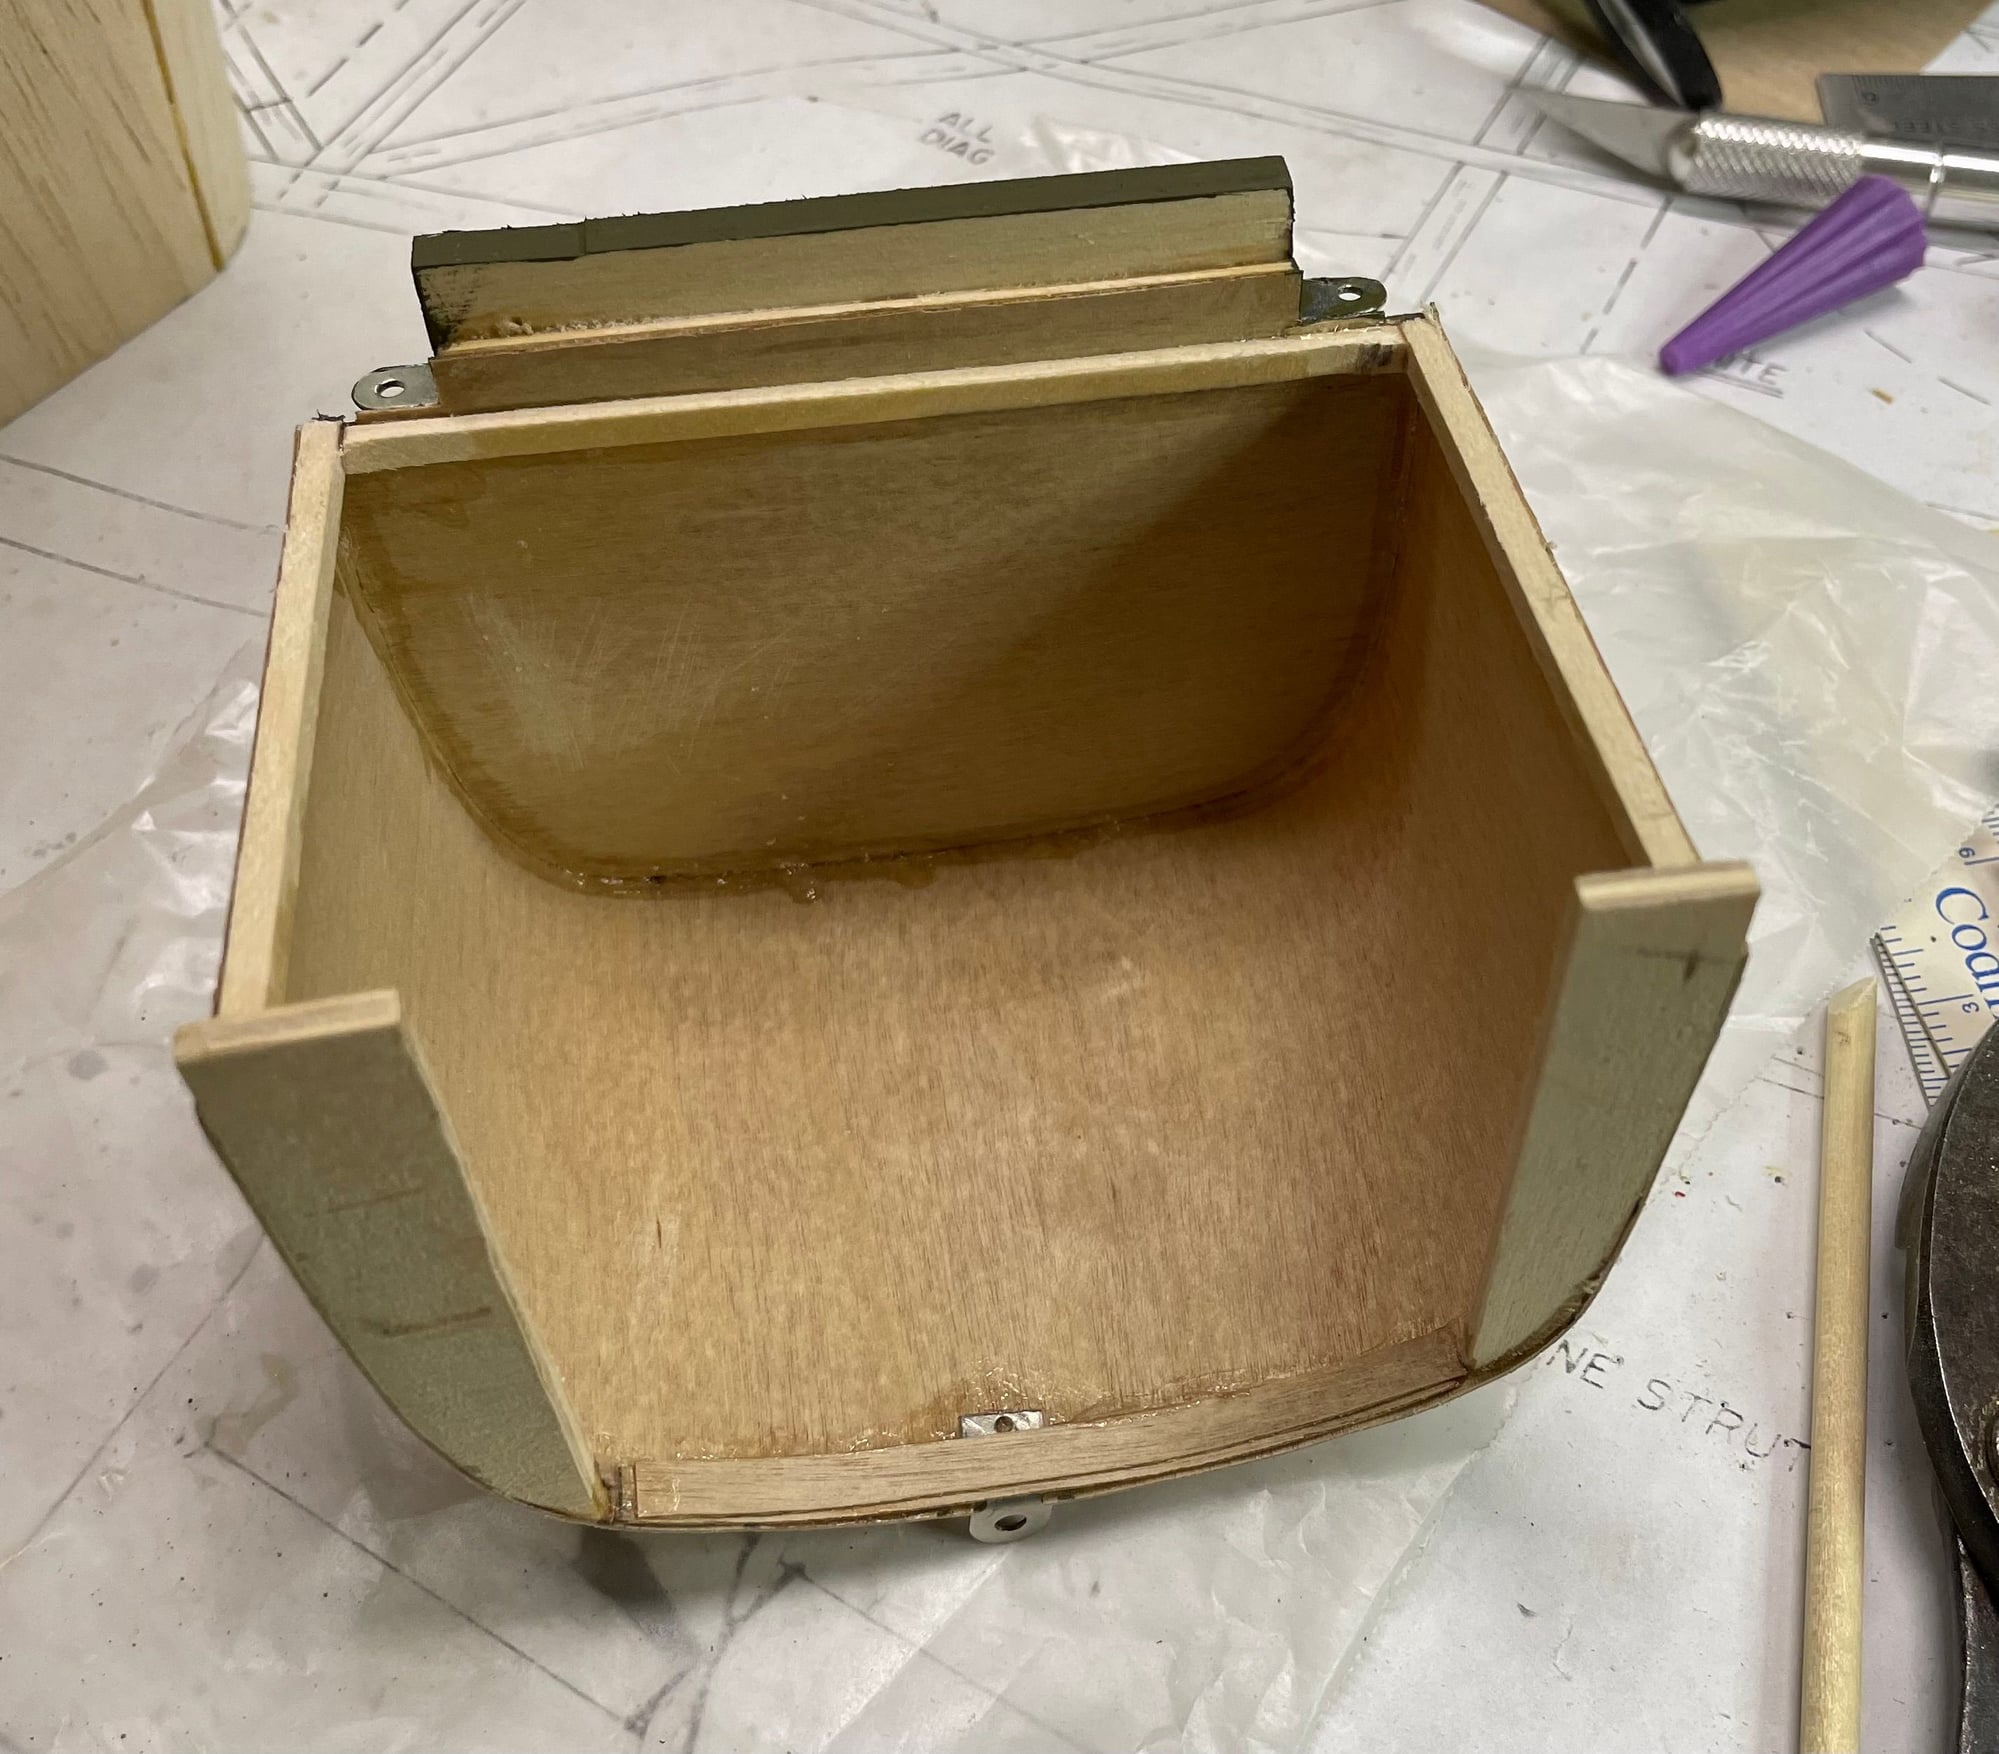
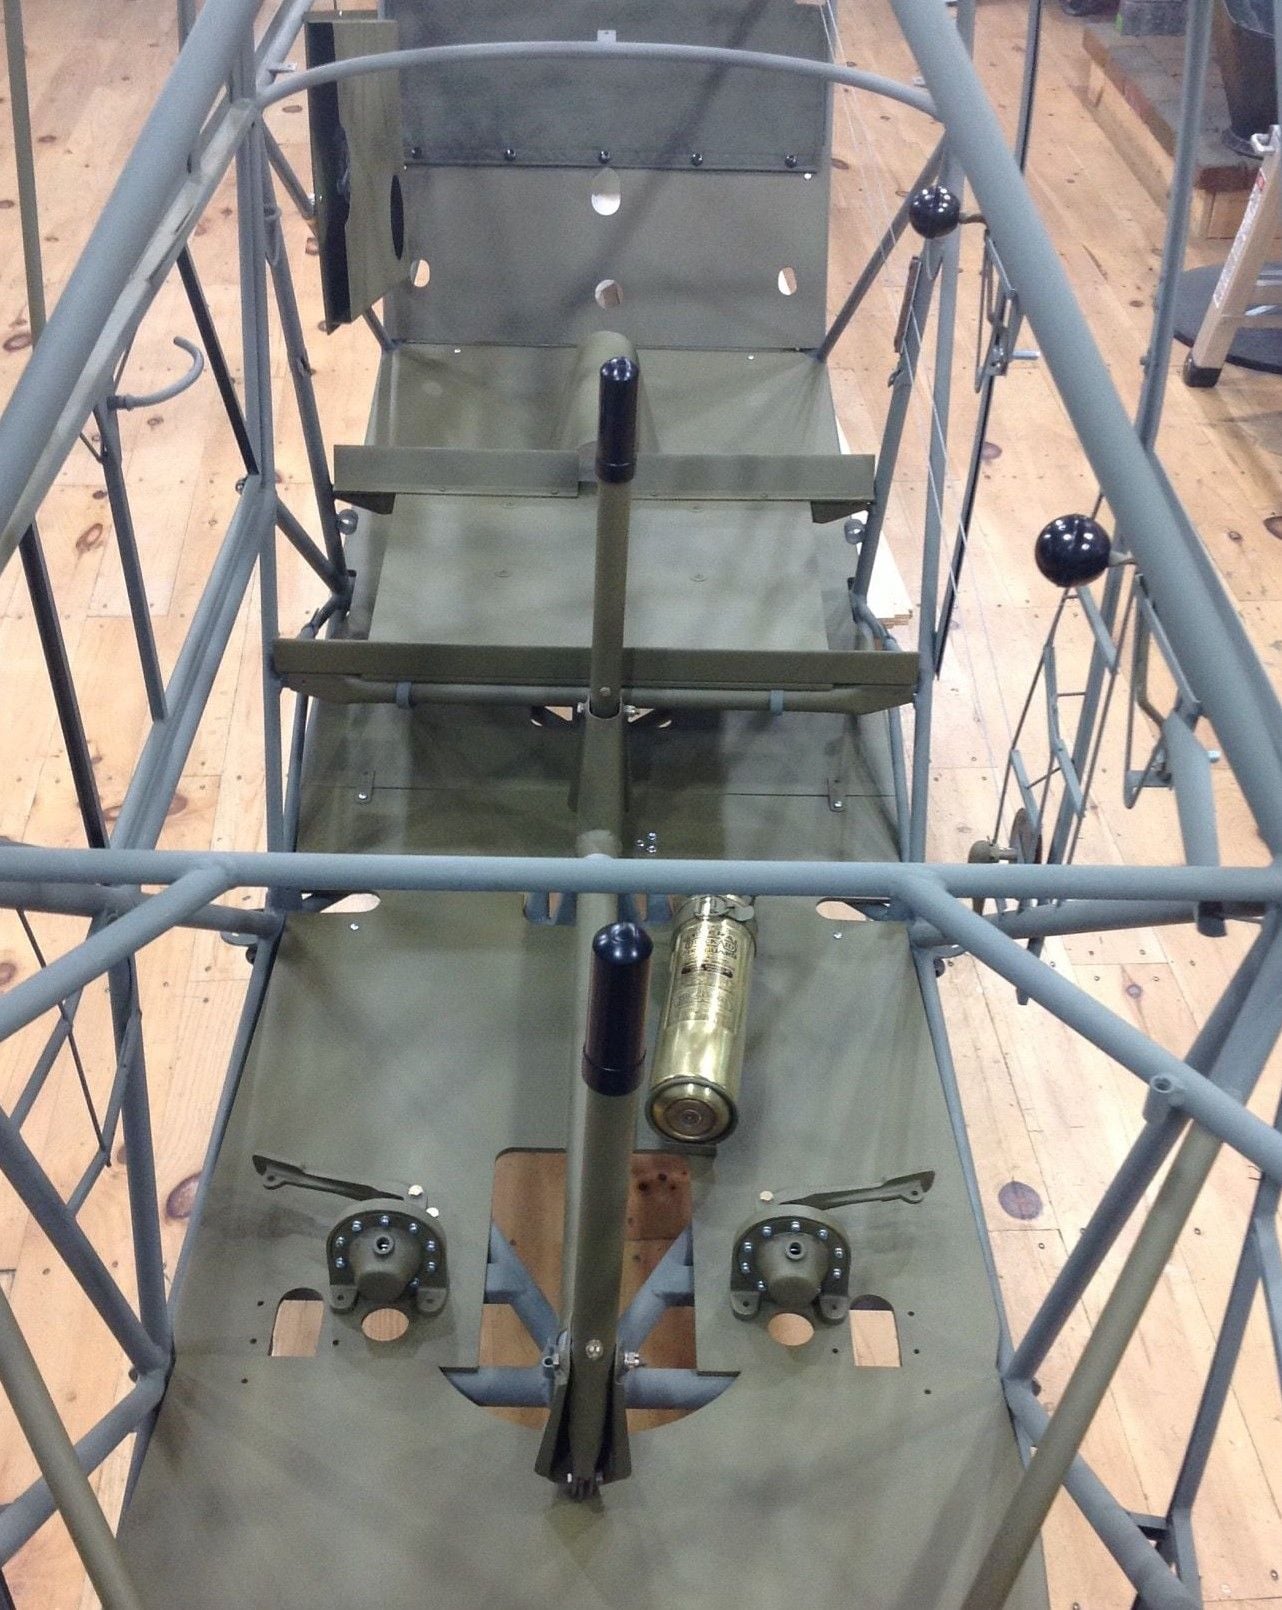
Okay, some progress made. I removed the front bulkhead, it took a while but I didn't destroy the plane in the process. On the full scale plane, the fuel tank is underneath/behind the instrument panel, and coincidently, so is the one on the model; they just don't look the same. I needed to make a cover for the tank on the model that resembles the full-scale tank. I had to deviate a little from actual size, the cover extends a bit further toward the floorboard than the full-scale, and the back end is just a bit further forward. I helped with that dimension by taking my heat gun and heating the rear of the DuBro 14 oz. fuel tank until it started getting soft, then pressed the tank against my work table, flattening the tank rear instead of its sort of bowl shape. It's not enough to cause the clunk to catch, but it gave me a good 1/4 inch more room to move the back of the dummy tank cover forward a little. The rear of the full-scale tank has stiffening ribs, and I simulated them with some plastic "V" strips, and sanded them round, then glued them to the dummy tank, which is made of 1/64" plywood. This stuff is great, you can cut it with scissors and it is thinner than card stock while being much stiffer. Okay, pictures.
Front bulkhead gone, floorboard made and front seat in place to show full legroom. New front bulkhead is in place with platform for fuel tank. This platform will have sides, and I haven't yet flattened the tank rear.:
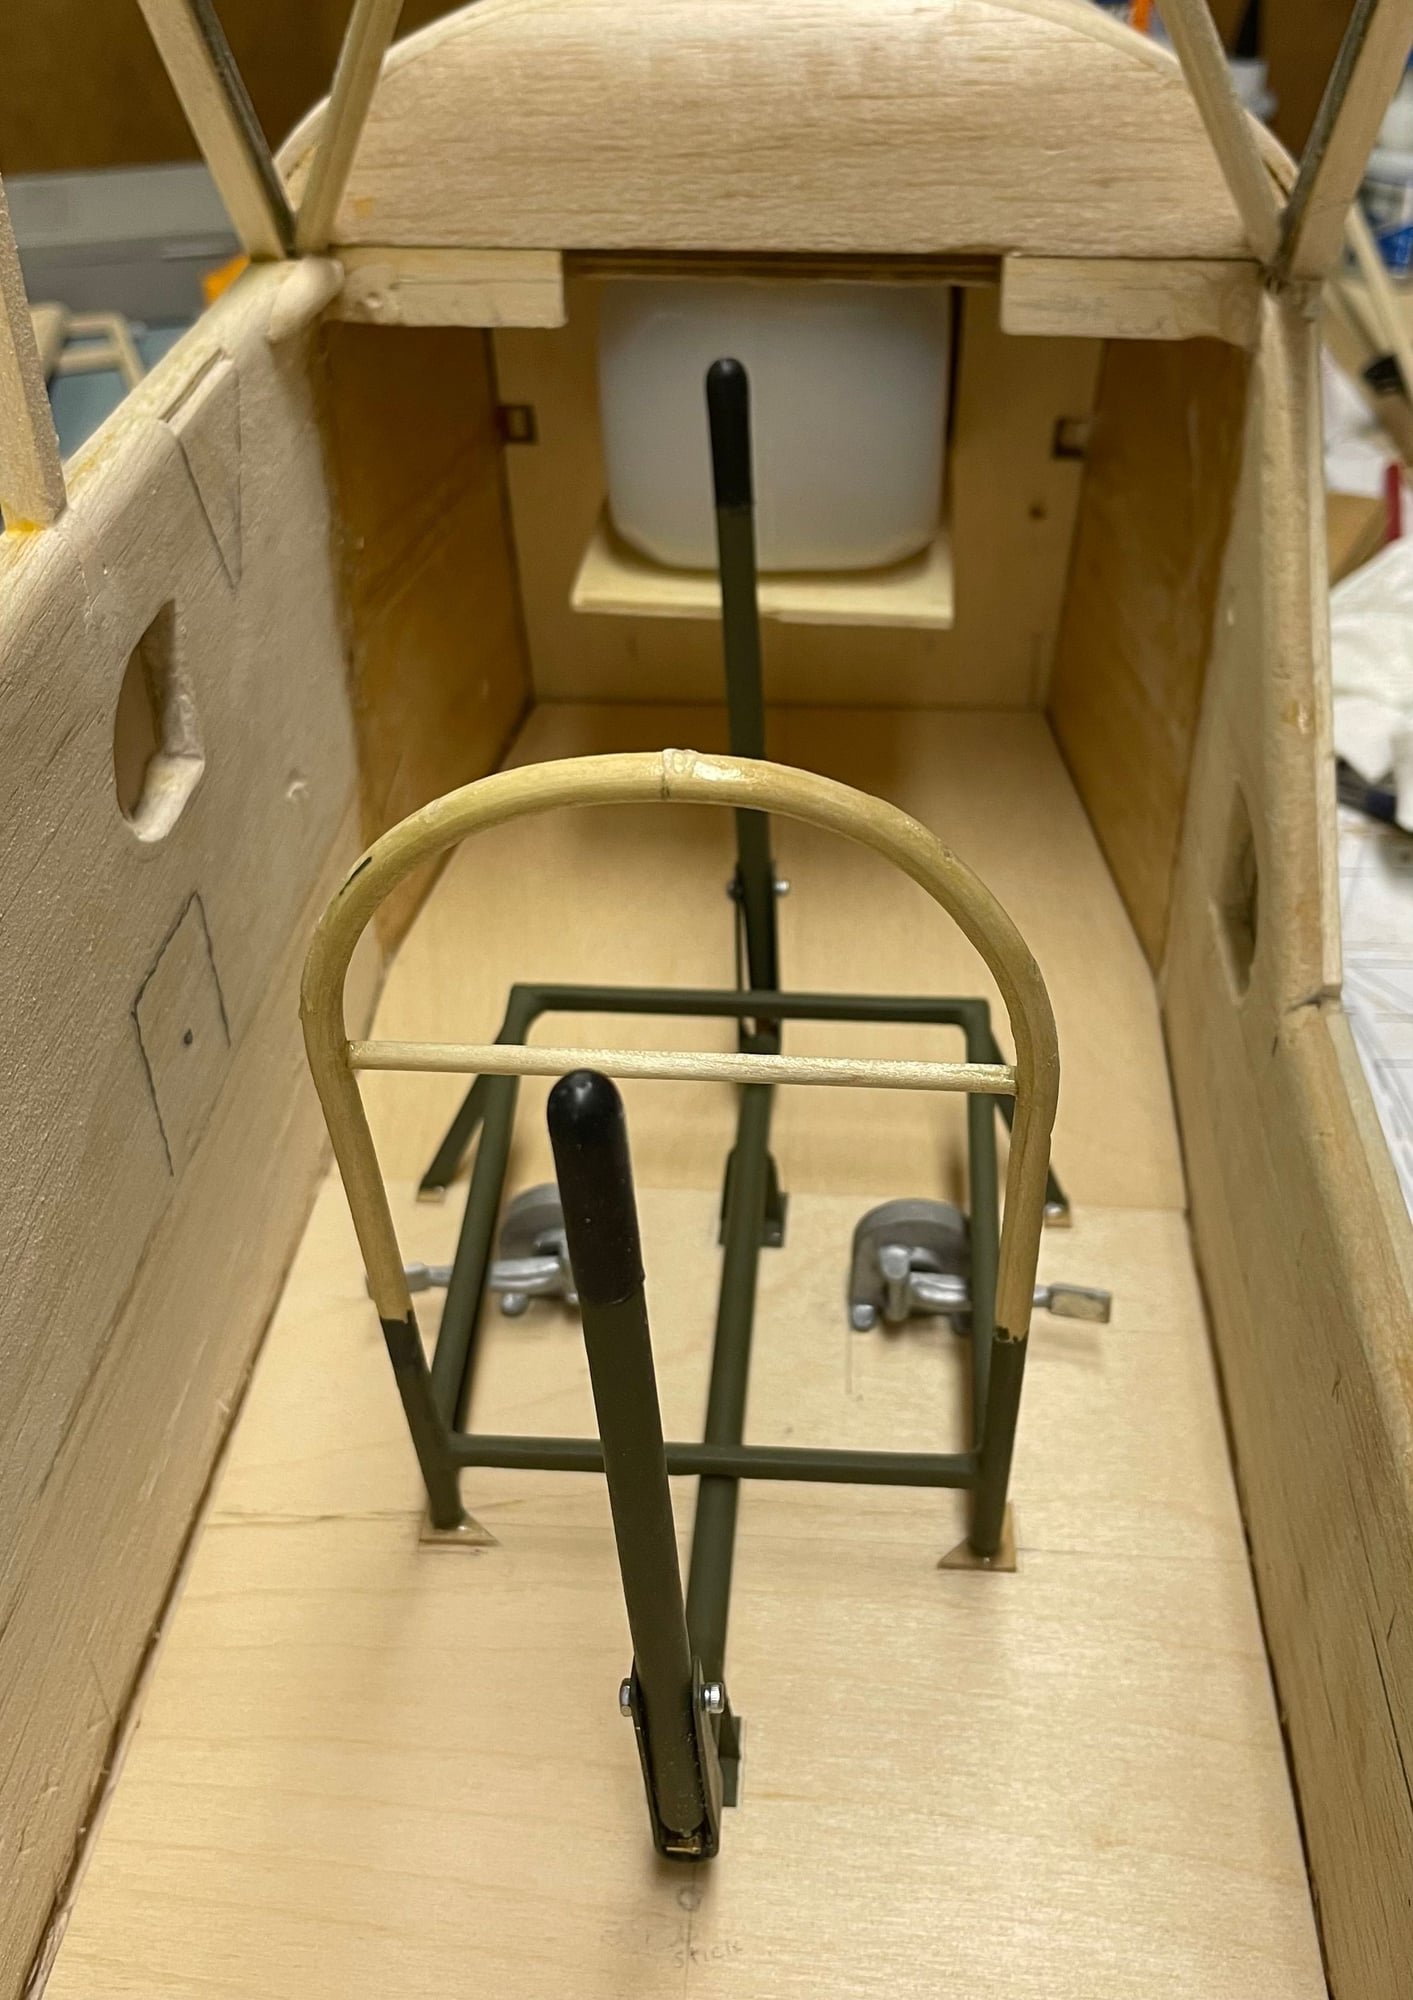
Next shot is made from behind the second bulkhead, which has been partially removed and the area reinforced. You can see how much more room is in the cabin now

Next pictures show the dummy tank in place and partially painted (paint is still wet), I wanted to see if my strips looked right, also included is a picture of the full-scale tank for comparison:
Front bulkhead gone, floorboard made and front seat in place to show full legroom. New front bulkhead is in place with platform for fuel tank. This platform will have sides, and I haven't yet flattened the tank rear.:
Next shot is made from behind the second bulkhead, which has been partially removed and the area reinforced. You can see how much more room is in the cabin now
Next pictures show the dummy tank in place and partially painted (paint is still wet), I wanted to see if my strips looked right, also included is a picture of the full-scale tank for comparison:
12-30-2022, 03:52 PM
#63
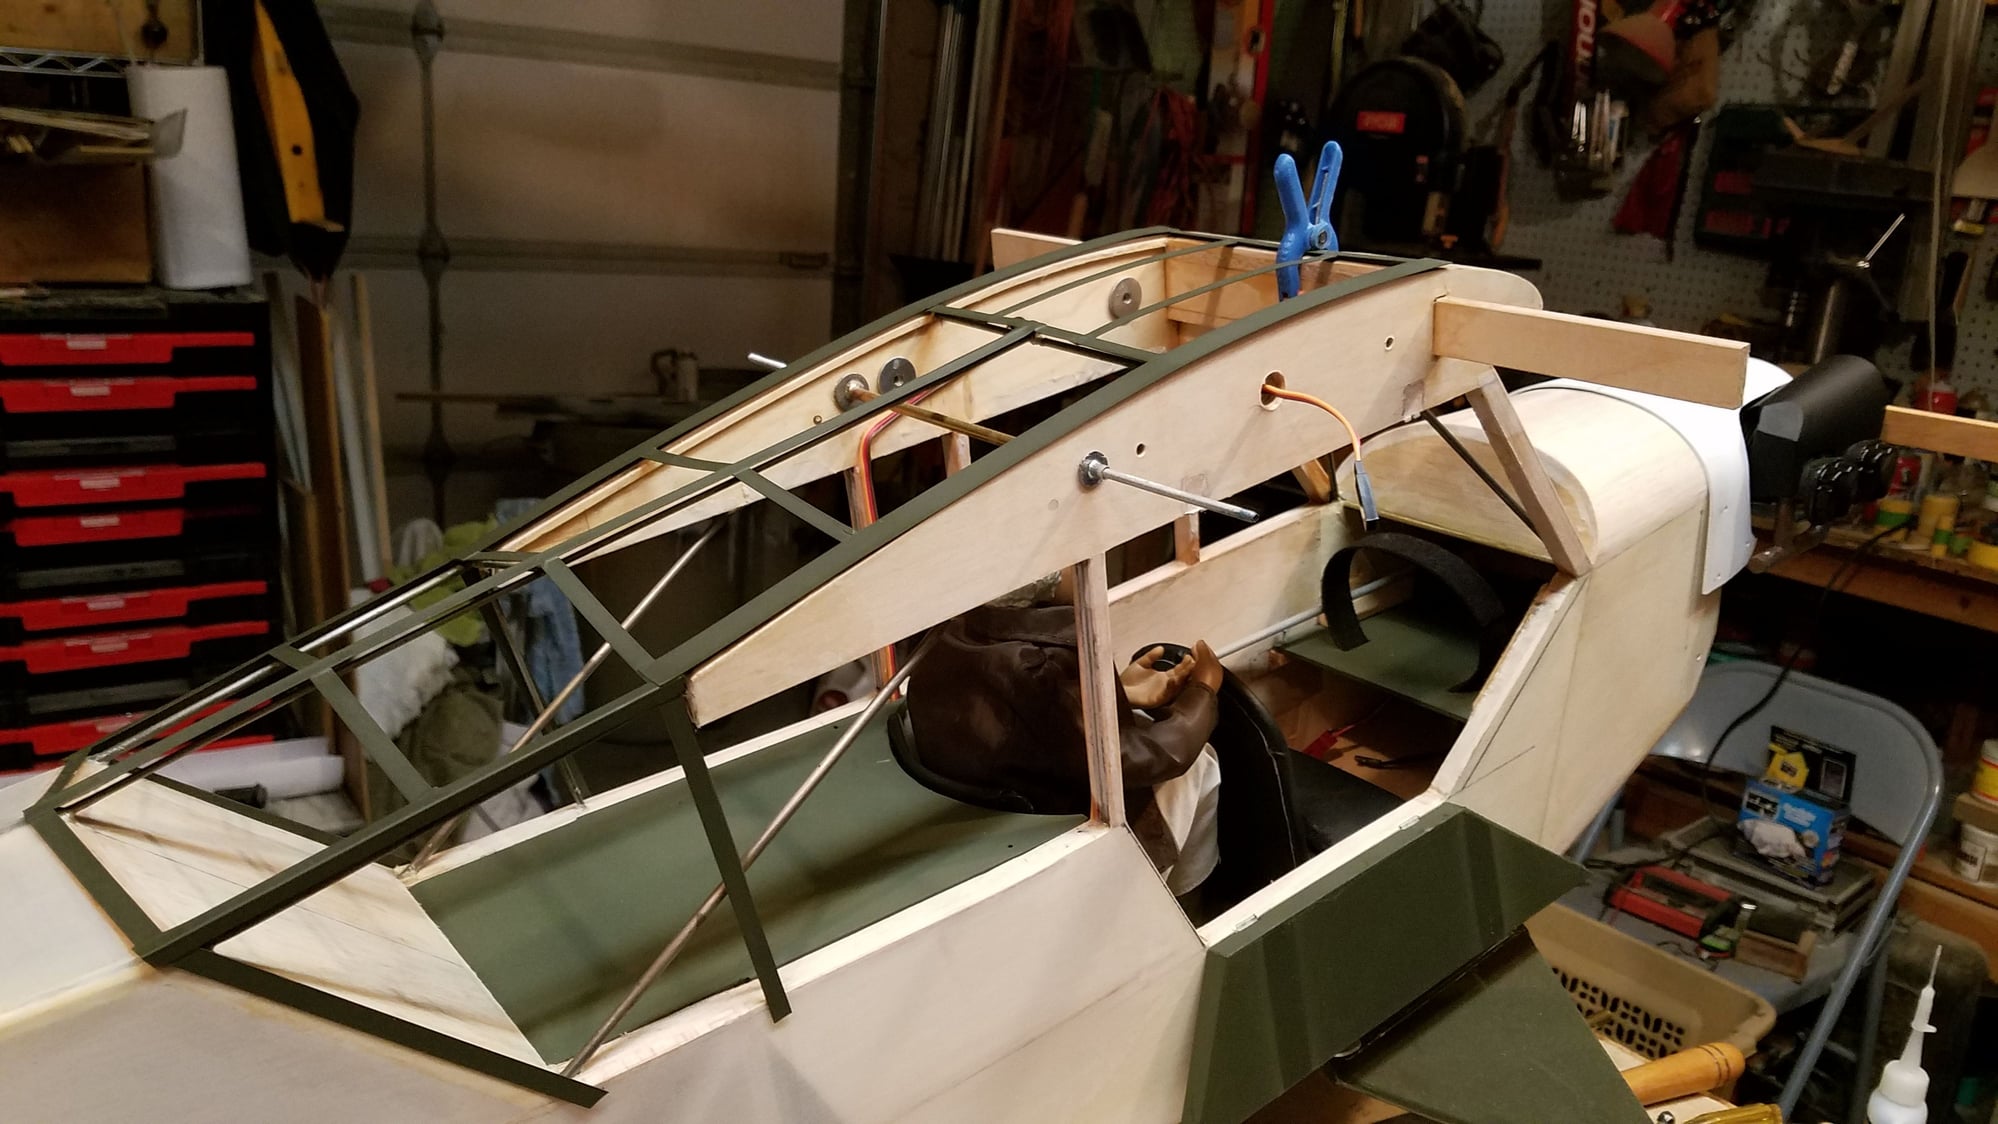
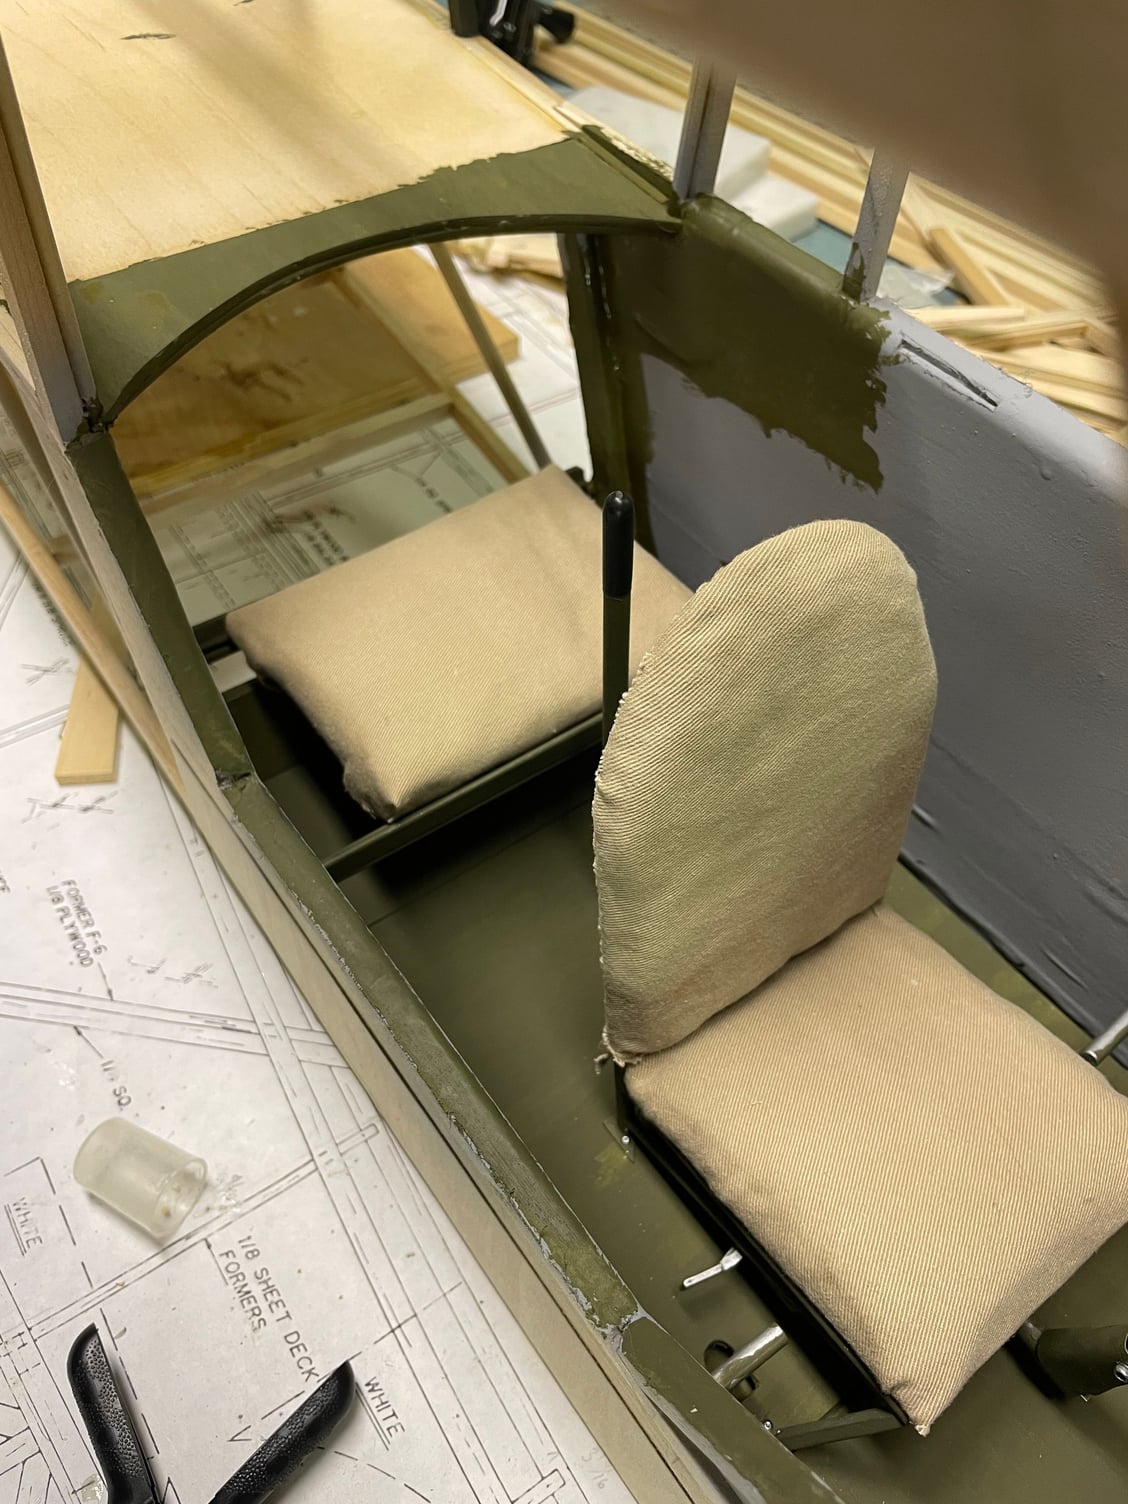
Wow, I haven't posted in over 3 weeks. I don't get to do a lot at one time, and progress has been slow. I have most of the interior detailing done, getting ready to paint the inside walls of the cabin. The L-4, as different from a J-3, was set up so the rear seat could be used either by the pilot or by an observer/artillery spotter. It did not have a full seat back, but had a wide strap that would fit below the shoulders and attached to each side of the cabin. This permitted the rear seat occupant to face forward or backward and have back support, depending on need. An artillery spotter, for instance, could spread his topographic chart on the deck behind the seat, marking coordinates for artillery fire, which he radioed back to the artillery he was spotting for. One detail I haven't yet made is the rather large radio which was mounted on the deck behind the seat. Cubs (and the L-4) generally don't have an electrical system, so this radio was powered either by a heavy battery mounted on the floor just behind the pilot's seat, or by a wind-powered generator that mounted below the plane next to the forward landing gear strut. The antenna for the radio was a trailing wire type; there was a reel on the left side of the rear cockpit near the top, with a small mast sticking through the greenhouse. The wire extended back to the tip of the vertical tail where a small aerodynamic cone was fastened to the end. The spotter could unwind the antenna and let it fly back in the slipstream, stabilized by the small cone. I'll build that later, one of the last details, but I've competed the front seat, and back seat pad. I used some old khaki fabric that looks like canvas on the scale of this plane. Another detail to add will be a set of clips that mount next to the radio, to hold the rear control stick which gets removed when the spotter sits facing the rear. Everything in this interior can be removed, nothing is permanently mounted. I've done it this way incase whoever eventually flies this plane can take it out for weight savings and to place the flight battery and receiver. The rudder, elevator and throttle servo will mount under the rear deck, mostly out of sight once the plane is covered.
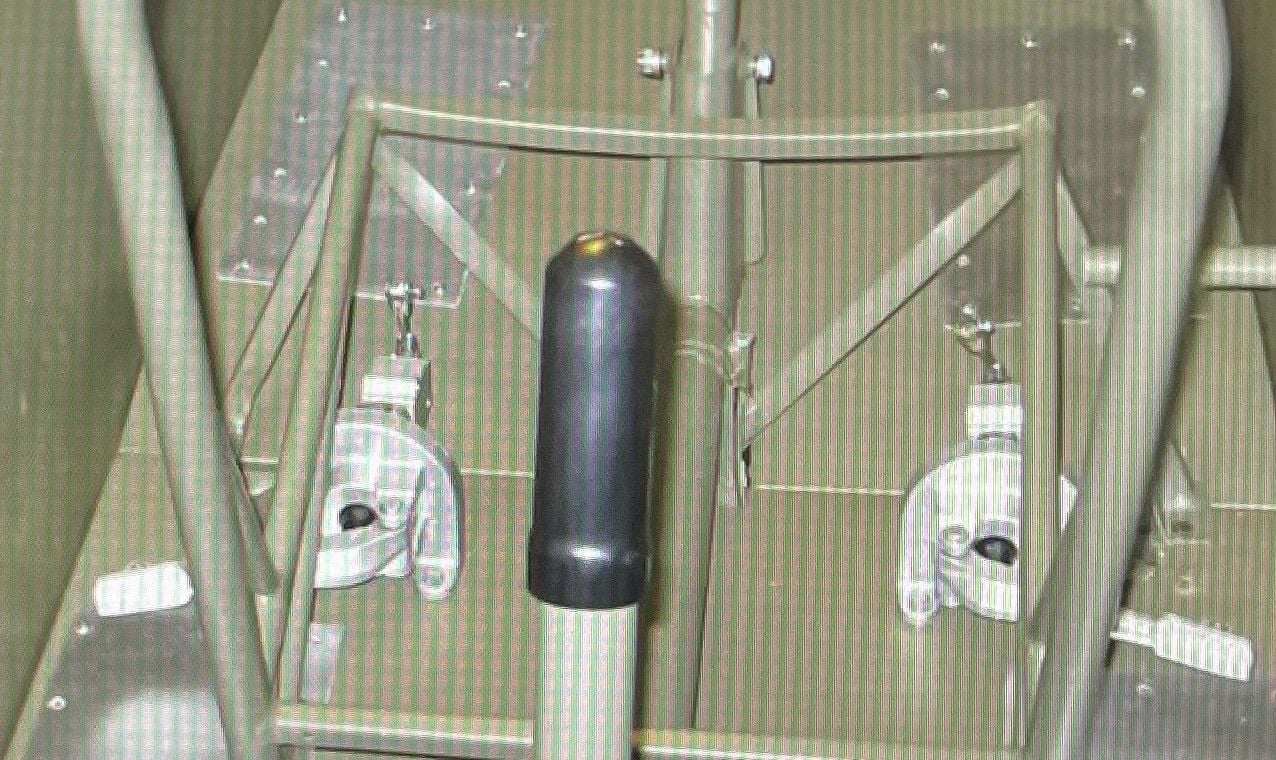
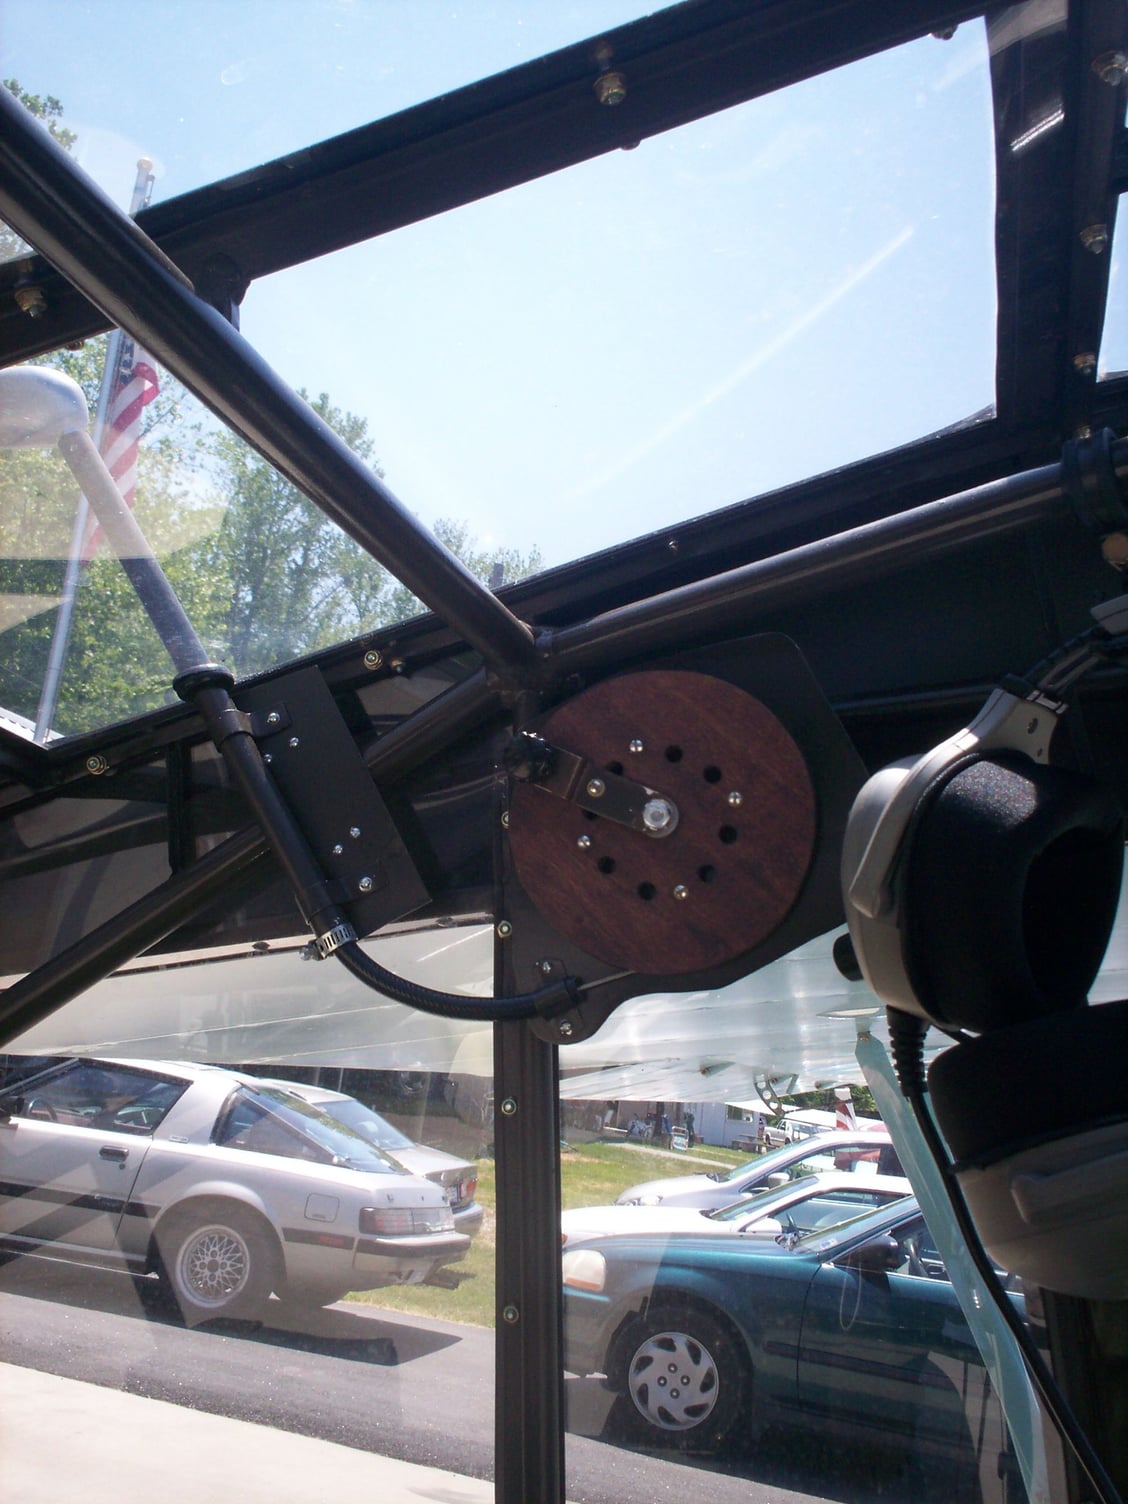
Note the reel inside, and look carefully on top of the tail to see the small cone for the trailing wire antenna:
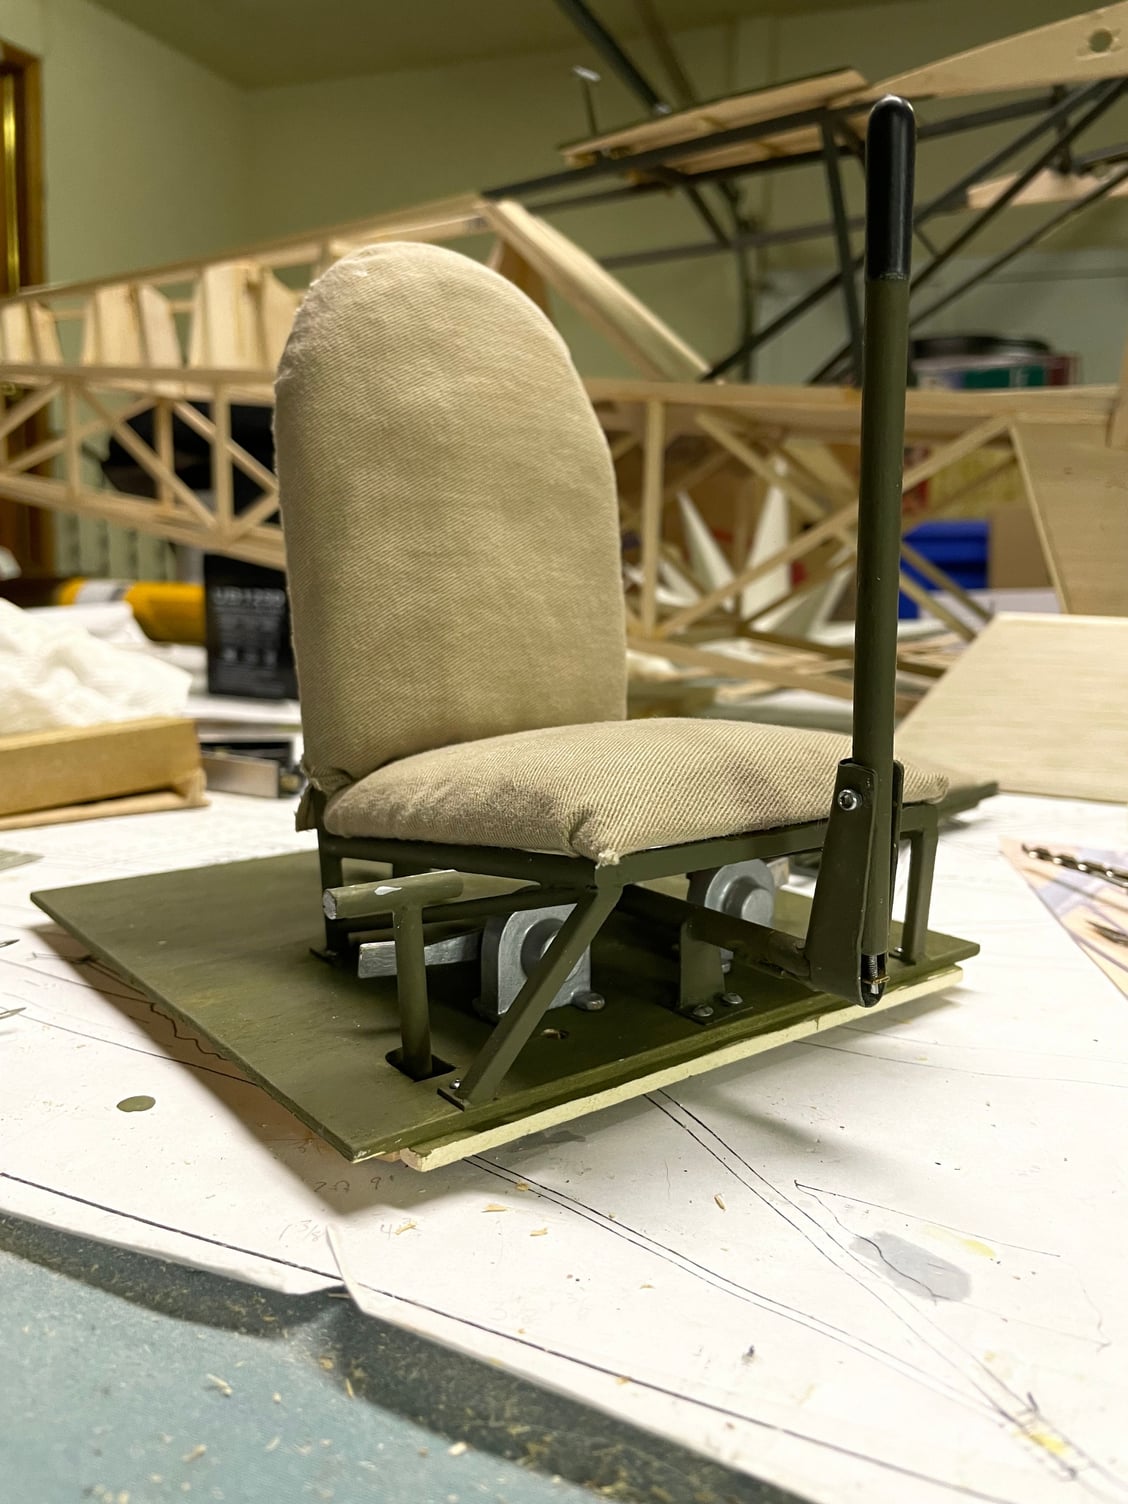
Here's what I used to model the seat covers; note in the picture of the bare frame, the platform behind the rear stick for the rear seat pad; not also there is a floorboard which sits under the rear deck. I won't add that until I mount the servos and run the control rods to the tail, which comes just before covering the plane.
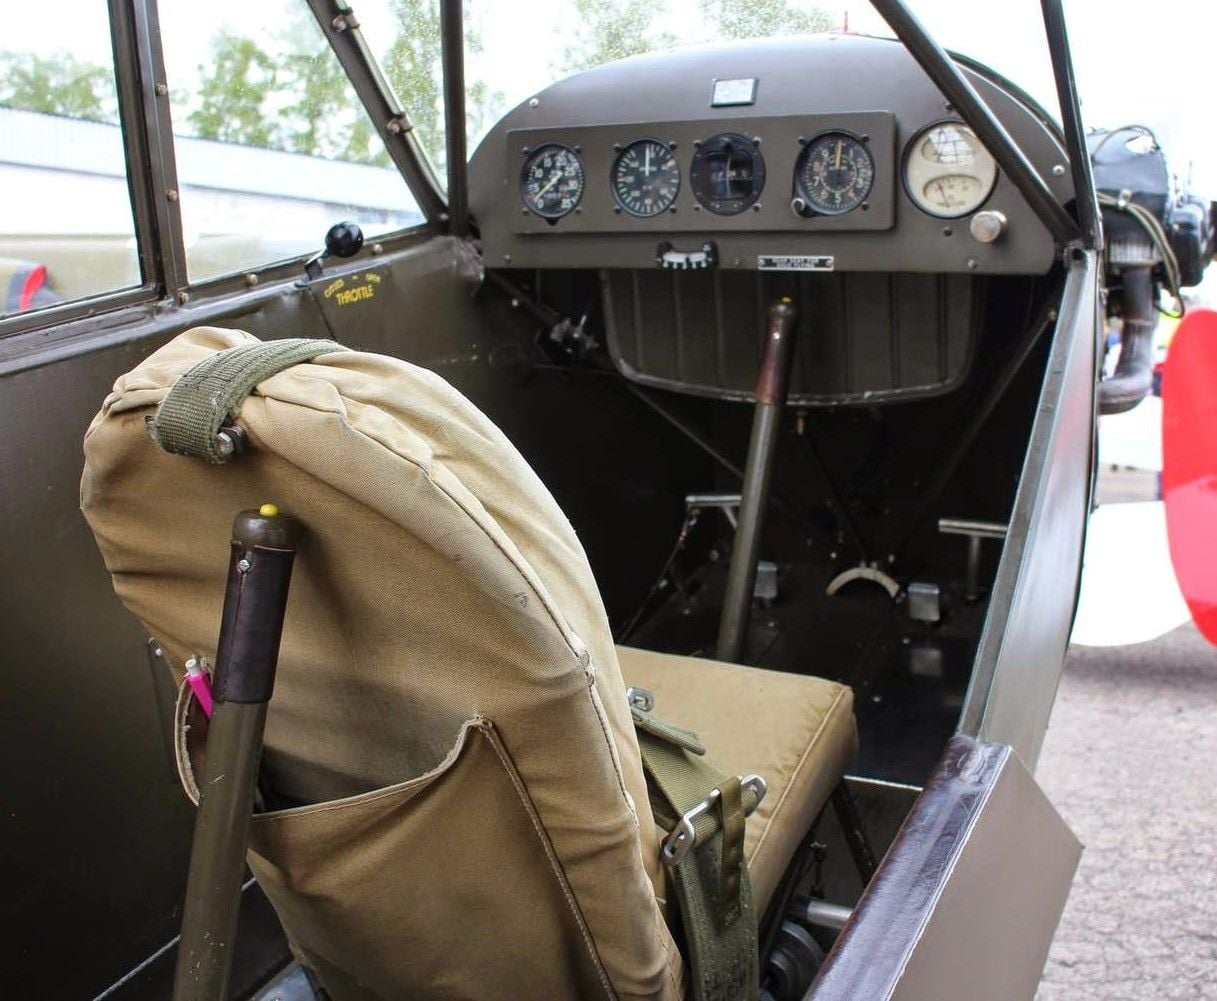
Here's my seats, showing the front seat set on a section of floor bard, with the brake cylinders beneath the seat. and the front and rear seat in place along with the rudder pedals (which may be difficult to see). I'm working on the seat harnesses now, they'll take a while.

The partial paint on the cabin walls is a test section. I'm using acrylic paint and have a couple of different brands of olive drab. Tamiya is too dark, what I'm using will be a Vallejo paint designed for airbrush use. It comes fairly thick and can be used with a brush, or thinned more than 2:1 and airbrushed. Most of the cabin and greenhouse structure will be hand brushed, with a topcoat of airbrushed paint to even the finish. I don't want a really perfect paint job; this isn't going to be a show plane like you see restored at air shows, but a plane that has seen hard use on the battlefield.
Note the reel inside, and look carefully on top of the tail to see the small cone for the trailing wire antenna:
Here's what I used to model the seat covers; note in the picture of the bare frame, the platform behind the rear stick for the rear seat pad; not also there is a floorboard which sits under the rear deck. I won't add that until I mount the servos and run the control rods to the tail, which comes just before covering the plane.
Here's my seats, showing the front seat set on a section of floor bard, with the brake cylinders beneath the seat. and the front and rear seat in place along with the rudder pedals (which may be difficult to see). I'm working on the seat harnesses now, they'll take a while.
The partial paint on the cabin walls is a test section. I'm using acrylic paint and have a couple of different brands of olive drab. Tamiya is too dark, what I'm using will be a Vallejo paint designed for airbrush use. It comes fairly thick and can be used with a brush, or thinned more than 2:1 and airbrushed. Most of the cabin and greenhouse structure will be hand brushed, with a topcoat of airbrushed paint to even the finish. I don't want a really perfect paint job; this isn't going to be a show plane like you see restored at air shows, but a plane that has seen hard use on the battlefield.
 12-31-2022, 08:49 AM
#66
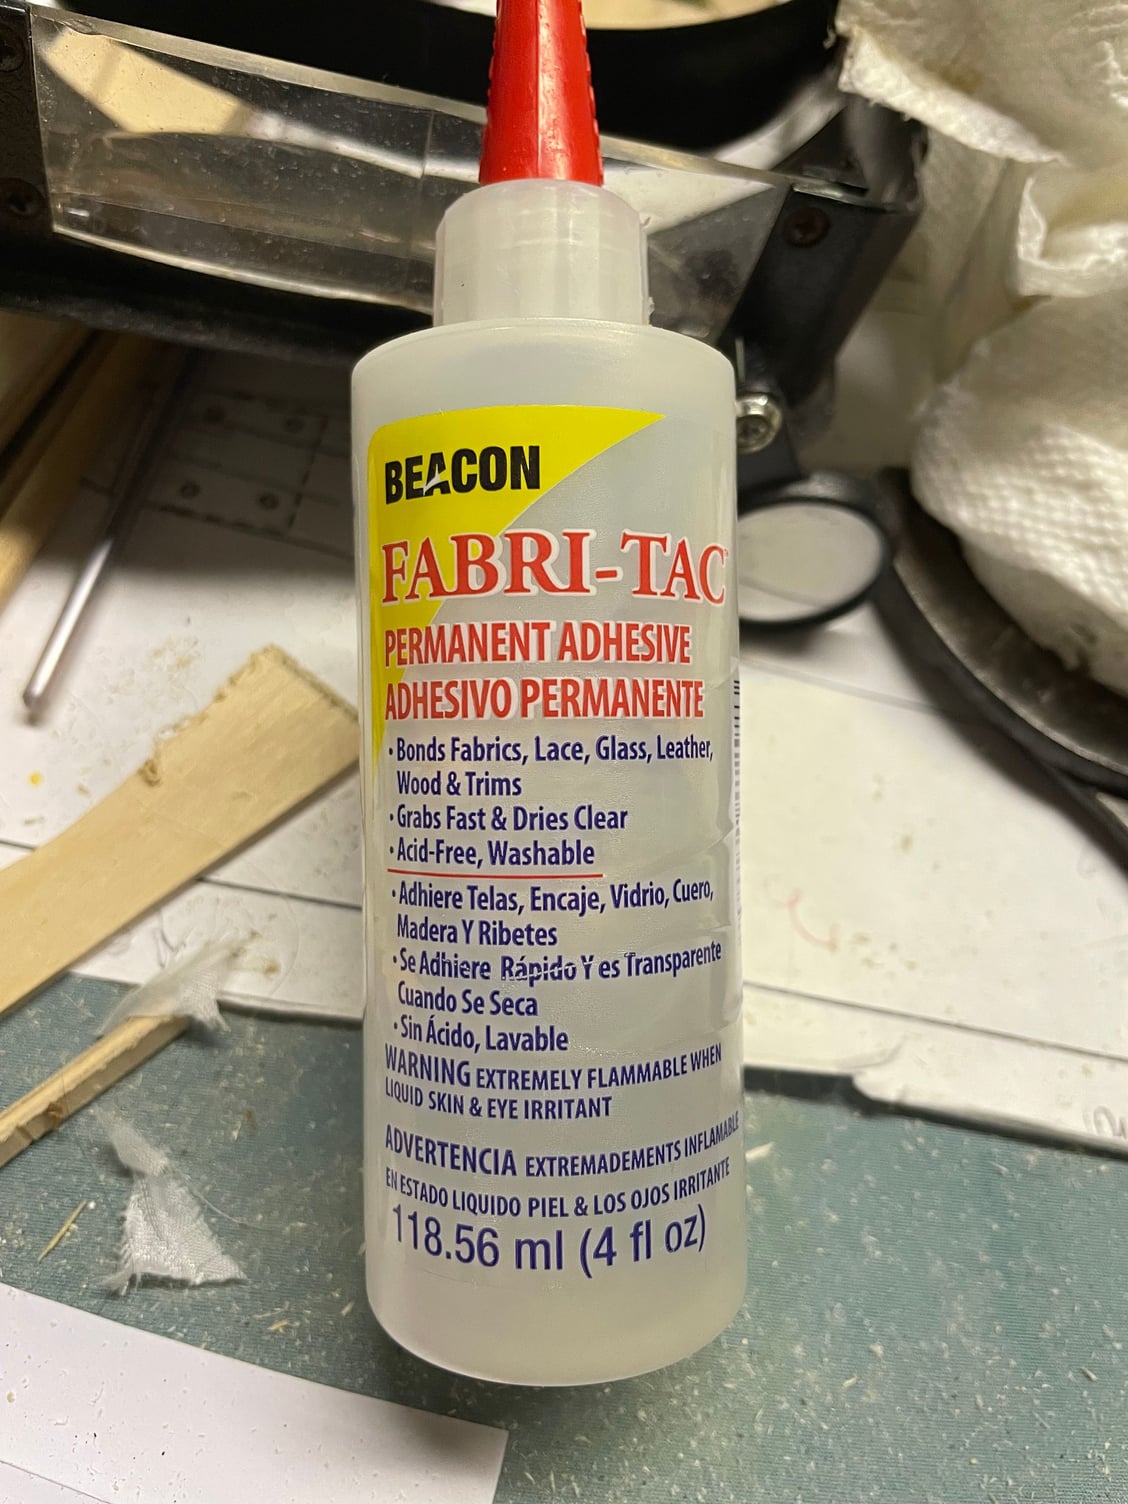
 , especially when you're 68 and have arthritic fingers and have to work through bifocals and a magnifier.
 I used a fabric glue. Any sewing/fabric shop will have several brands, and it is good for more than gluing fabric. It's real sticky and usually has a set time of about 20 seconds before it gets difficult to separate glued parts. Dries clear. You can bond leather, wood and cloth to each other, but I wouldn't use it as a structural cement for wood parts that get any stress at the joints. It remains semi-flexible when cured. This is the brand I use, that size bottle is about $6 and goes a long way:
The following users liked this post:
RICKSTUBBZ (12-31-2022)
02-15-2023, 04:29 PM
#68
Hey there Ken,
I understand having to let the dust settle from Thanksgiving - Christmas - New Years.
crazy thing is we find ourselves in the middle of February and all that seems like yesterday
I understand having to let the dust settle from Thanksgiving - Christmas - New Years.
crazy thing is we find ourselves in the middle of February and all that seems like yesterday
