


Goldberg Extra 300
 09-13-2022, 05:56 AM
#2001
That's a pretty decent fuse assembly and glue job. It's really not rocket science putting the pieces together and there might on occassion be a very slight misalignment but more than likely when its all done, sanded and finished they generally disappear. Very cool pictures and lucky you as I so wish I had that many clamps to use during my building process....lol.
Now I was wondering if I can do something about it, I don't think I can solve it with final sanding.
 09-13-2022, 06:22 AM
#2002

That little issue is really nothing to lose any sleep over. Just glue on a scrap piece to even up the fuse sides and you will be good to go. The important thing is that your alignment /assembly looks to be spot on....good job.
09-14-2022, 05:17 AM
#2004
Sometimes clamping pressure can cause a slight misalignment over time as the glue cures. Happens all the time. That slight twist in the tail is from the clamp pressure. Once you square up the corners from sanding, you can take any twists or misalignments out with the covering.
You should have seen the mess the Rascal 168 tail looked like when I put a piece in wrong and had it all glued up. I wound up having to take it all apart and start over. The kit was NOT ready for prime time when I got it.
You should have seen the mess the Rascal 168 tail looked like when I put a piece in wrong and had it all glued up. I wound up having to take it all apart and start over. The kit was NOT ready for prime time when I got it.
09-14-2022, 09:37 AM
#2005
Sometimes clamping pressure can cause a slight misalignment over time as the glue cures. Happens all the time. That slight twist in the tail is from the clamp pressure. Once you square up the corners from sanding, you can take any twists or misalignments out with the covering.
You should have seen the mess the Rascal 168 tail looked like when I put a piece in wrong and had it all glued up. I wound up having to take it all apart and start over. The kit was NOT ready for prime time when I got it.
You should have seen the mess the Rascal 168 tail looked like when I put a piece in wrong and had it all glued up. I wound up having to take it all apart and start over. The kit was NOT ready for prime time when I got it.
09-14-2022, 09:49 AM
#2006
I spent a lot of time planning how to glue the fuselage to avoid this problem. But I don't have so much experience and moreover it was my first time with the EXtra 300 CG fuselage.
I immediately thought, at least for me, that there was a risk of making a fuselage that was not straight.
I immediately thought, at least for me, that there was a risk of making a fuselage that was not straight.
09-14-2022, 09:59 AM
#2007

I spent a lot of time planning how to glue the fuselage to avoid this problem. But I don't have so much experience and moreover it was my first time with the EXtra 300 CG fuselage.
I immediately thought, at least for me, that there was a risk of making a fuselage that was not straight.
I immediately thought, at least for me, that there was a risk of making a fuselage that was not straight.
Also, a wise ole friend and master craftsman once told me that the definition of a true craftsman is his ability to fix his own mistakes
(his words were more along the line of fix his own F*** - ups)
I worked for him at the time

With a little crafty work, you'll be able to get the plane built with the control surface square and the airplane will fly right...Few people will notice the imperfections once your done and flying it..
The following users liked this post:
Folgore88 (09-15-2022)
09-14-2022, 10:10 AM
#2008
What you can do is place the wing, then once you have the wing perpendicular to the fuse, square up the stab and use a piece of balsa sheet between it and the fuse, and sand the sheet until you get an angle that makes the stab level with the wing. I have had to do that on a couple other builds that just didn't line up square. With top mount wings, I place a level across the wing saddle to level the fuse, then shim the fuse at the stab to match. With under mount, you can pretty much do the same, level the level then place the saddle on the level. With mid mount though, you need a pair of blocks to level across and place the wing tube on those.
The following users liked this post:
Folgore88 (09-15-2022)
09-15-2022, 01:36 AM
#2009
Thanks guys, such helpful posts give me enthusiasm. I really like to work with accuracy and cleanliness, I take a lot of time to think before doing anything. But thinking doesn't avoid mistakes, what reduces them is the experience. For the next few weeks I won't have time to build, but I will restart at the end of October, I will definitely ask you for more advice.
Thanks again to this wonderful, huge, useful thread.
See you soon
Angelo.
Thanks again to this wonderful, huge, useful thread.
See you soon
Angelo.
10-11-2022, 09:27 AM
#2010
Senior Member
Hey guys, Recently acquired an Extra kit and I was wanting to go electric, problem is I am an old school nitro guy and don't know much about choosing a motor / esc combo for this plane. The kit looks like it would adapt well to elect. and I an getting tired of repairing all the damage that nitro can do (covering/ paint peeling ect.). I want this to be a very acrobatic plane and maybe a little 3D. If you guys have any recommendations they would be appreciated Thanks.
10-11-2022, 10:25 AM
#2011
Banned
My Feedback: (788)
Just from doing a Google search on electric conversions for this model.
https://www.rcgroups.com/forums/show...ersion-Article
https://www.rcgroups.com/forums/show...2&postcount=31
https://www.rcgroups.com/forums/show...300-Conversion
https://www.rcgroups.com/forums/show...ersion-Article
https://www.rcgroups.com/forums/show...2&postcount=31
https://www.rcgroups.com/forums/show...300-Conversion
10-11-2022, 10:33 AM
#2012
Think in cc/ci when looking. Think of it as watts. So for aerobatics you want about 100-150 watts per pound, for full 3D 200+ watts. Then there is the KV which equates to speed per volt. The higher the kv, the faster it turns, so as your prop size grows, you want the kv to shrink.
Example I can think of is a .90 2 stroke swinging a 19x10 prop, the brushless would be somewhere around 1900 watts, 320 kv, for a 13 pound plane on an 8S 4500 mah battery, or roughly 145 watts per pound. This is based on Hackers sizing chart. This should give you some idea of what power you would need, and the ESC should be above your peak watts.
Example I can think of is a .90 2 stroke swinging a 19x10 prop, the brushless would be somewhere around 1900 watts, 320 kv, for a 13 pound plane on an 8S 4500 mah battery, or roughly 145 watts per pound. This is based on Hackers sizing chart. This should give you some idea of what power you would need, and the ESC should be above your peak watts.
The following users liked this post:
TheEdge (10-11-2022)
10-13-2022, 05:15 AM
#2016
Axi motor 4130/16, 100 amp. controller, Graupner Elektro prop 16x10, Admiral bat. 45 C. 6S 5.000 mah... savox servos and Frsky Tandem X-20 radio, kit is moddified for be competitive in sport scale. adding stringers to the sides and bottom and other minor mods. is not a new built, rather a electric conversion, before was glow powered with a ST 90 but love now how it flies..
Manolo.
Manolo.
11-03-2022, 05:42 AM
#2018
Good Morning all
been reading this forum for some time.
I dont have a kit just downloaded plans so its entirely scratch built
just cut out the fuse last week and now going to do the wing
One question about the wing formers:
The plans show the formers to be 1/16" and are basla
First - is this correct
I'm thinking of using 1/8" or 5/32 balsa for thickness and to make the sheeting easier to glue to them
Ive got a YS110YZ ready tp power it
Second - question for the electric guys, how long do is the flying time you get with electric, eventually I'll be going to electric so any motor sizes, props and battery sizes
thanks, its an awesome plane, I scratch built a Glodberg Ultimate (46 size) a few years ago and its still awesome as well
11-03-2022, 06:28 AM
#2019

Yes 1/16. No problems.
The secret with this airplane is to build it as light as possible... It's a flyer and the lighter it is, the more dynamic it becomes.
Dave Patrick really knew his stuff, but the secret is resisting the urge to beef it up.
The secret with this airplane is to build it as light as possible... It's a flyer and the lighter it is, the more dynamic it becomes.
Dave Patrick really knew his stuff, but the secret is resisting the urge to beef it up.
Last edited by David Bathe; 11-03-2022 at 12:03 PM.
11-03-2022, 02:31 PM
#2020
thanks, for the info .... just back from the "toy" store and got some stiffer 1/16" balsa before I had read this
At the risk of adding weight also found some 3/32" balsa so I intend to use that for the first 3 wing formers
all the rest can be 1/16"
Plywood is going to be light ply for everything except the diherdral brace and sides of the fuse
for those items I'll use 1/8" maple plywood. thats the only 1/8" ply I could get around here and it was from a speciality wood store 20 miles away
I've got that on the fuse for my 6' ultrastick "test plane" and it with the YS110FZ is 8.5lbs - that crazy motor will prop hang that plane at 3/4 throttle
I might be the last dinosaur that builds with balsa around this area, everyone else buys foamies, balsa and basswood are scarce
anyway for the spars I've had to get some straight 1/2 x 3" x 36" basswood from Lowes (home depot sells prop wood) and cut it to 3/8"x3/8" size on the table saw
More questions -
What was the best way to glue the fuse... epoxy or CA planning on using epoxy
Did everyone glue the entire side joint lengths or just at the tabs
Anyone drill ligtning holes in the ailerons or just use solid balsa, I drilled some on my 5' B25, 6' CUB and built up the ailerons on my 6' ultrastick
but for this plane I wonder if I should just leave them solid
thanks again
11-04-2022, 04:10 AM
#2021
The sides of the fuselage where also light ply on the original with light ply doubles here and there.
As was the the Firewall - Two layer of 1/8 th light ply... then hit all over with thin CA. Holy Moses... more than enough and really light!
The only places I used marine ply was the wing brace and the little doubler that makes up the area where the each wire landing gear hooks onto the inside of the fuselage.
Entire construction built using Thin & Med CA except for firewall, UC blocks, dihedral brace, wing bolt holder etc. All obvious Epoxy places in other words.
Regarding fuselage construction: Instructions say entire fuselage assembly is clipped together and alined using the tabs and held in place with rubber bands and tape.
When you're happy it's square, straight and centrally alined, tack it with thin CA. One last look, remove the bands and then the whole assembled unit shot with CA at every contact point.
Worked an absolute treat!!!!
I'd build the ailerons as and save weight other places, Super light nylon engine mount etc.
11-04-2022, 08:33 AM
#2022
thanks, and yes I wish I could have got some light ply for the sides, again sourcing isnt great
Going to likely be heavy
I'll do as you did with the gluing, so CA except on firewall and landing ger block
just finished cutting out wing parts and after cleaning up the bench fuse gluing will start
2 more changes due to wood supplies:
main bottom and top under the turtle deck will be 1/16" maple ply
cant get any 1/32" ply for the turtle deck so that will have to be 1/16" balsa
11-04-2022, 09:23 AM
#2023
Remember you can make light ply out of balsa sheet/CA sandwich .
I've made large 2x2m aircraft using 1/8 balsa sheet running lengthways down the sides and 1/8 balsa sheet doubler running 45degrees. CA's into one.
Skeletonise it, running tin CA into the grain around the holes.
CA on some balsa longerons and bingo:
Light & Strong!
I've made large 2x2m aircraft using 1/8 balsa sheet running lengthways down the sides and 1/8 balsa sheet doubler running 45degrees. CA's into one.
Skeletonise it, running tin CA into the grain around the holes.
CA on some balsa longerons and bingo:
Light & Strong!
Last edited by David Bathe; 11-05-2022 at 03:18 AM.
11-05-2022, 03:40 AM
#2024
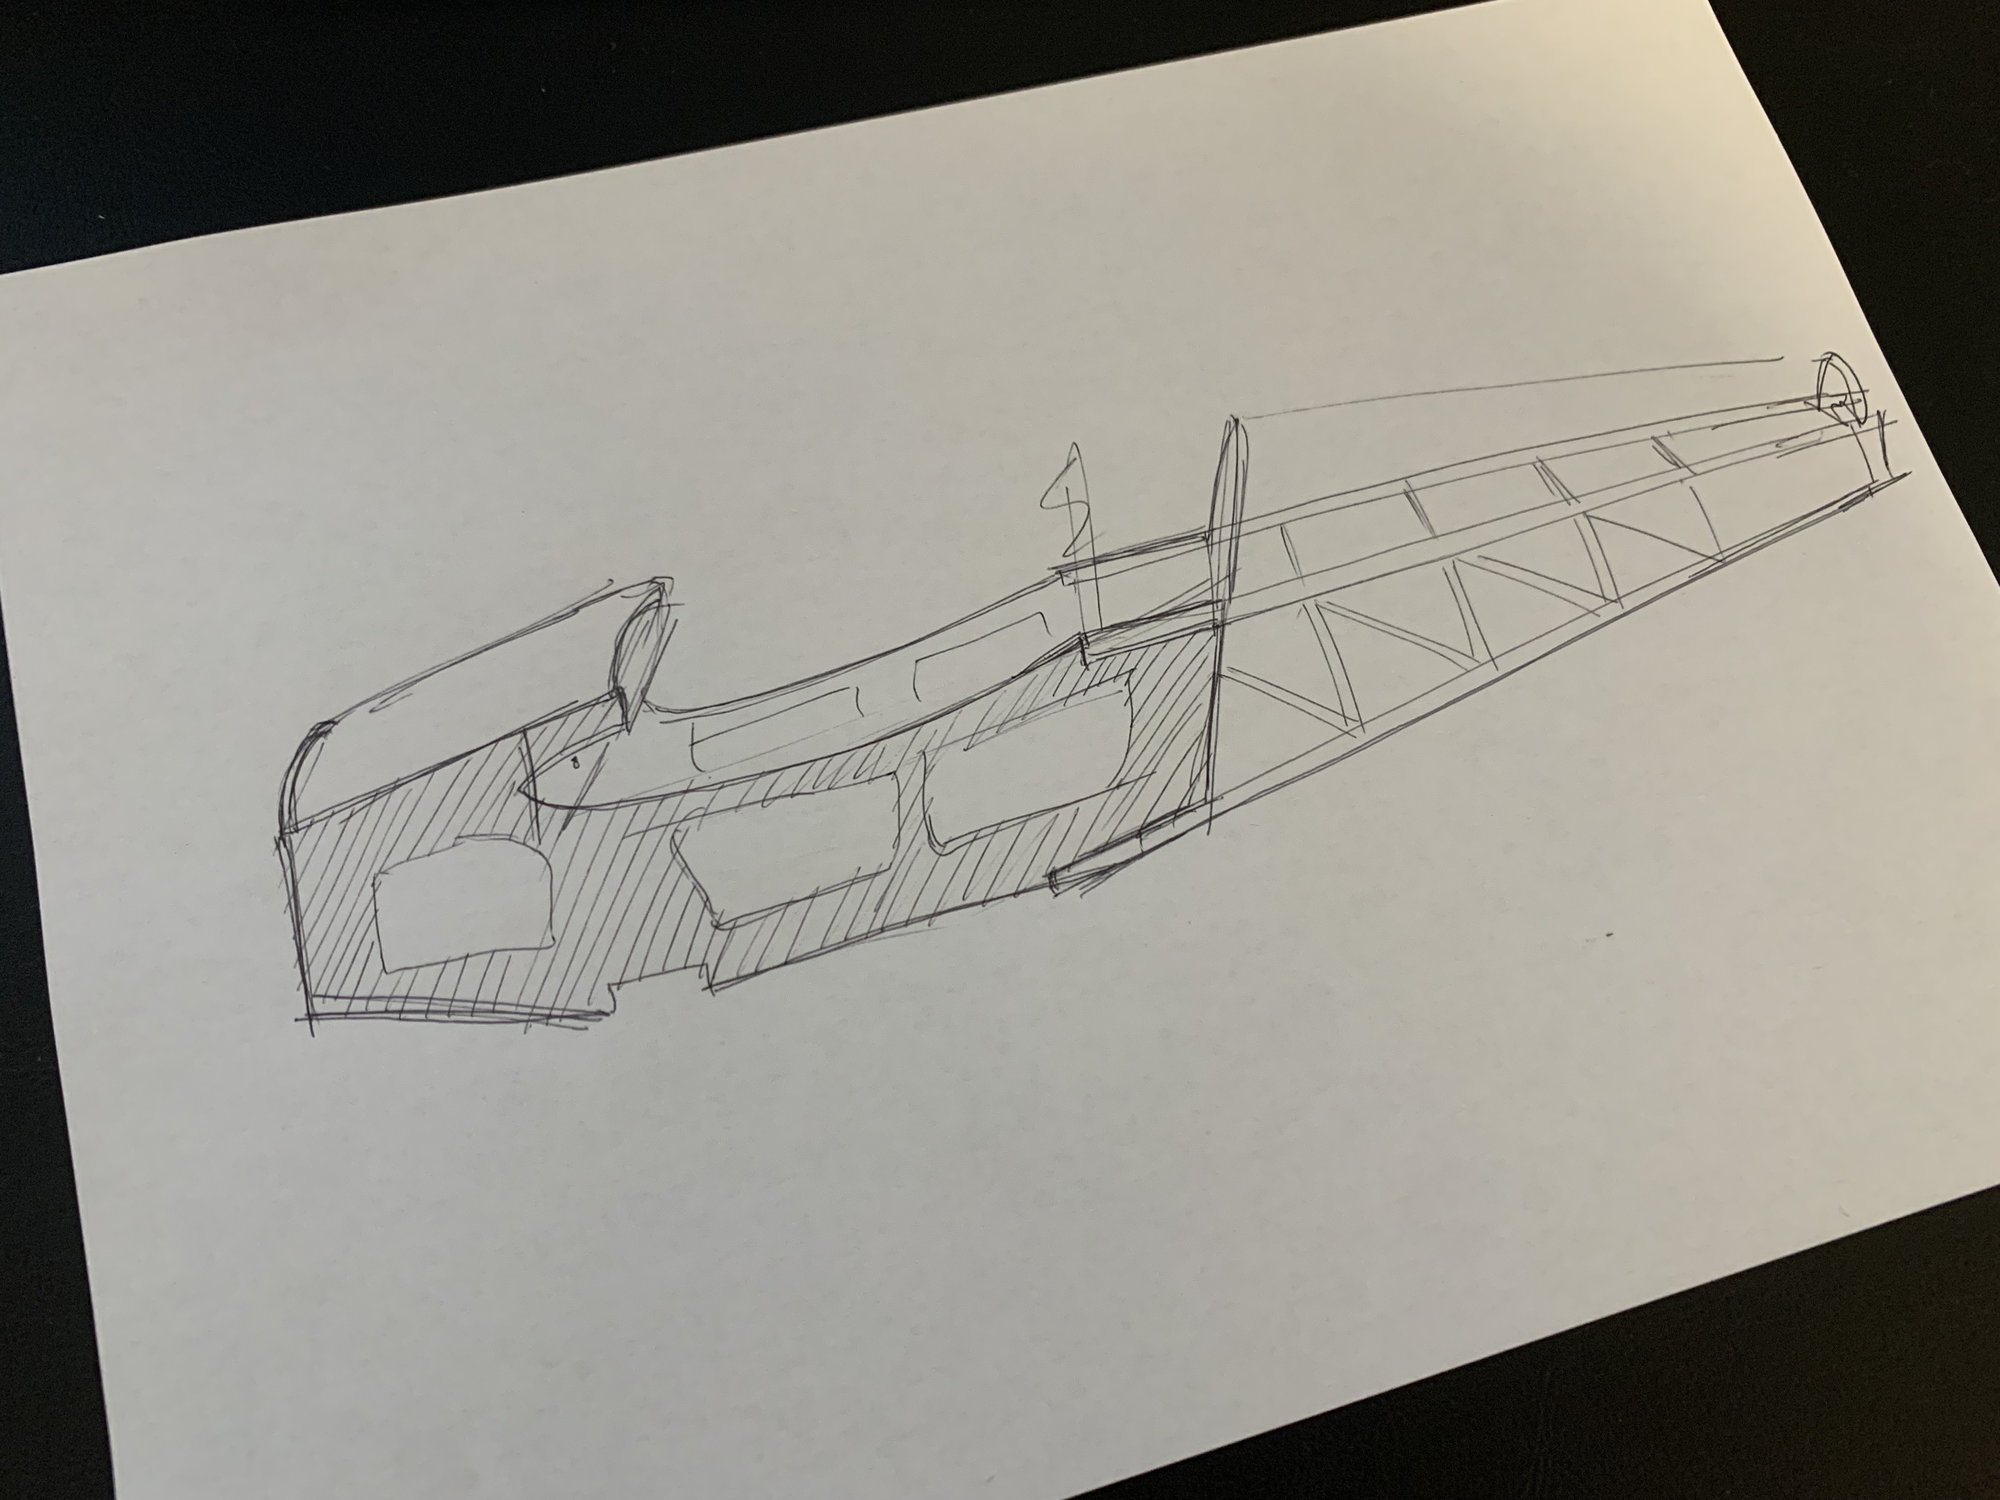
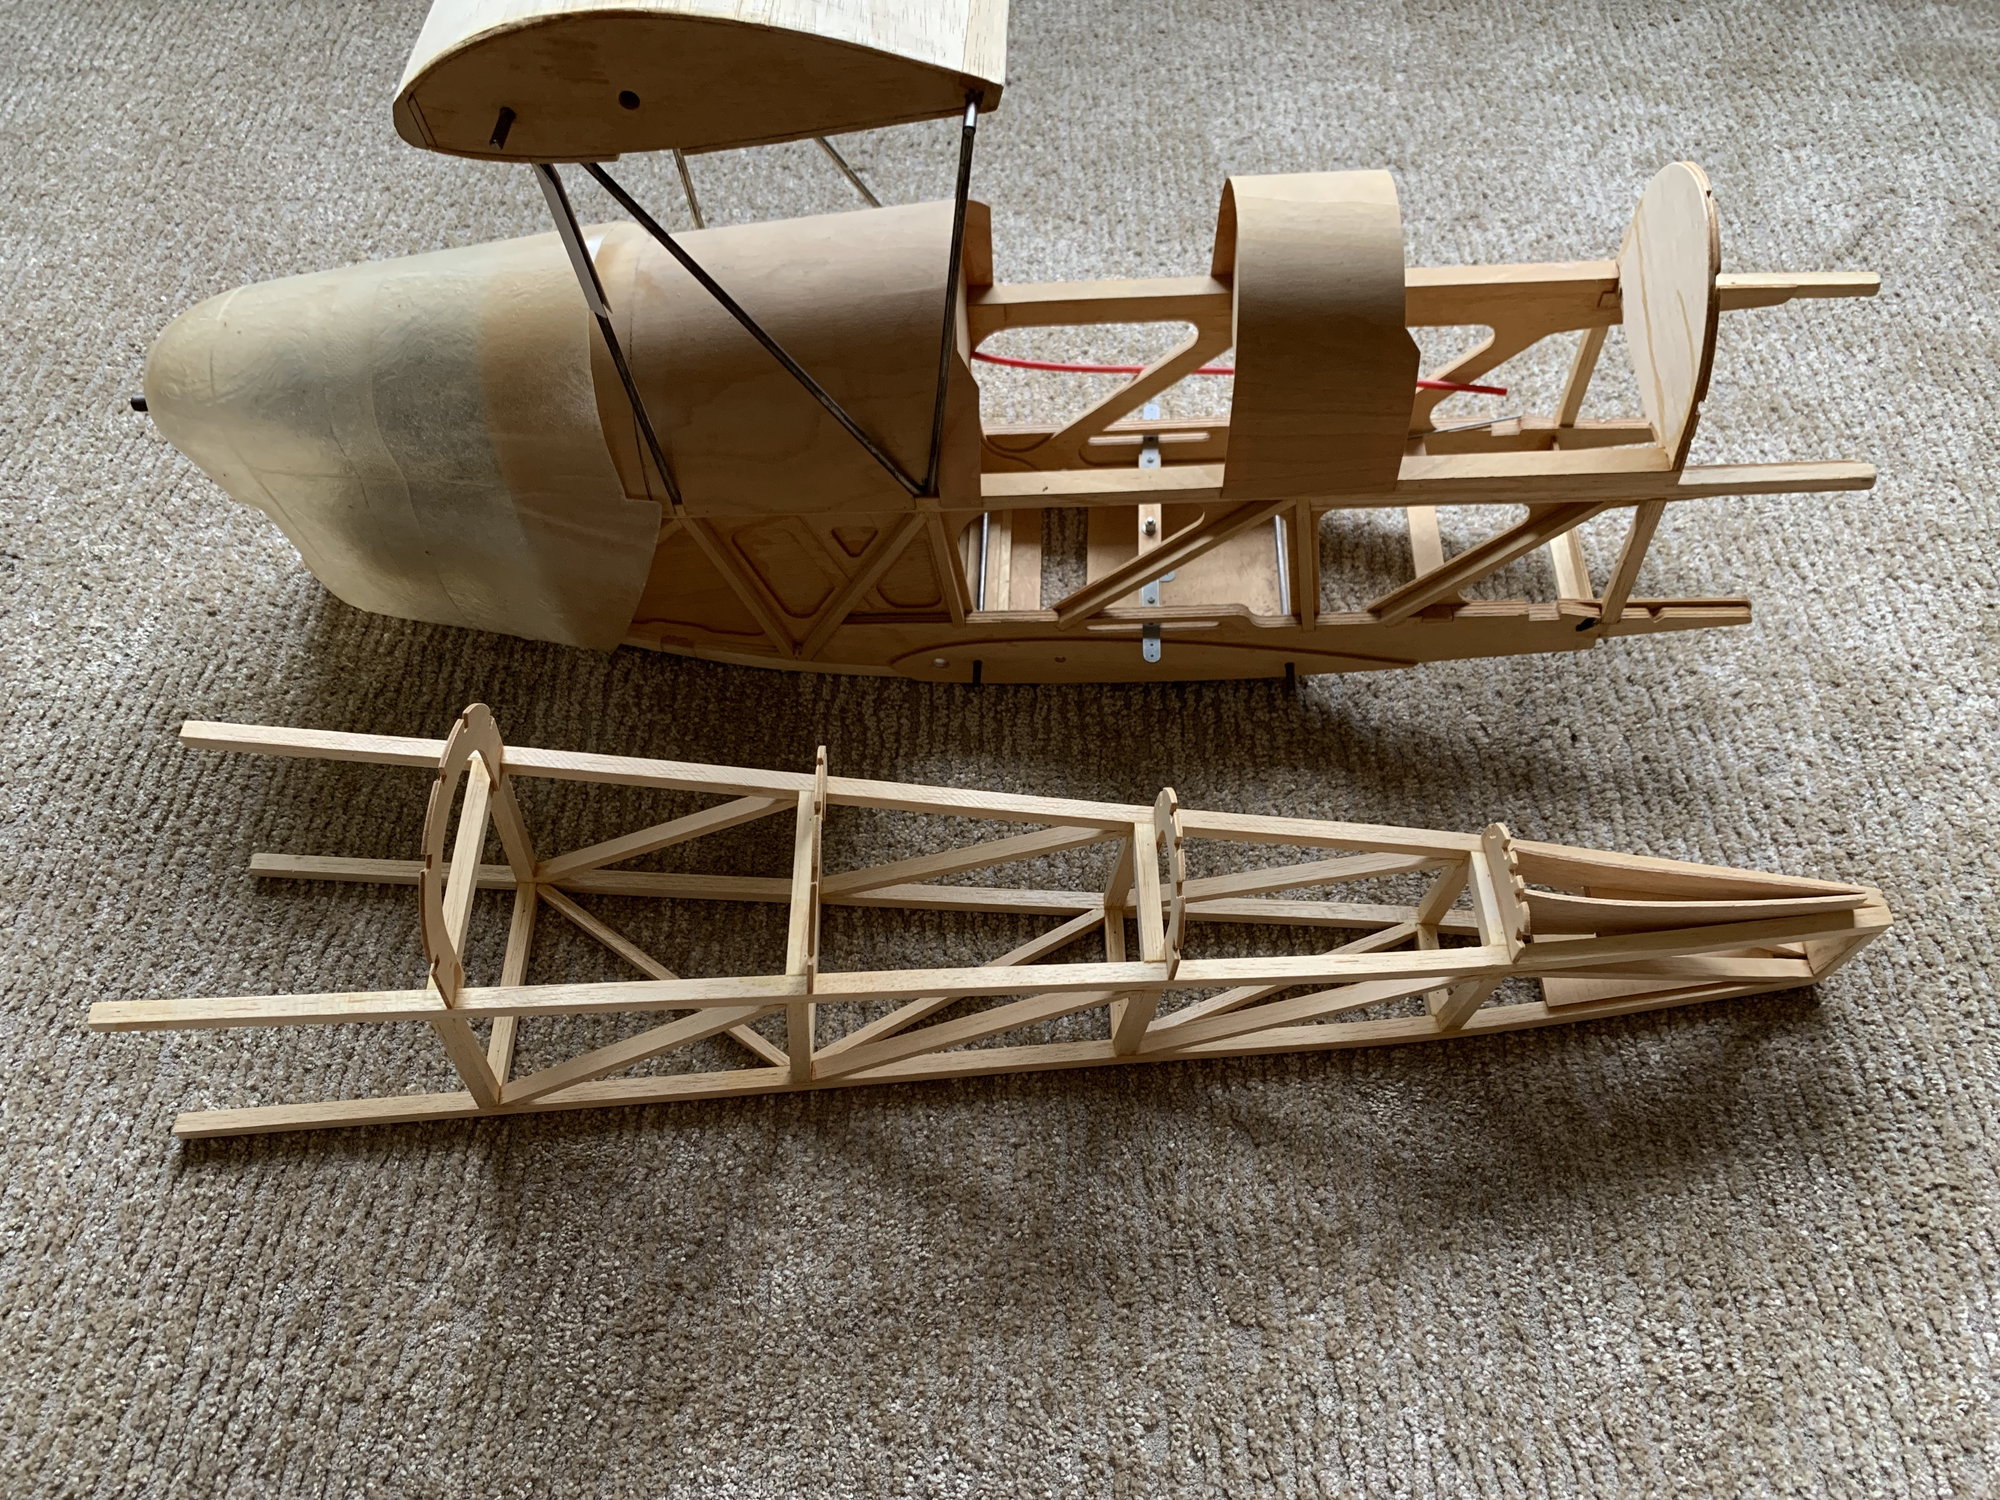
Using all that ply under the turtle deck is over kill... Remember you can just box up the fuselage instead.
See quick drawing
Heres a shot of my 1/4 scale moth using the same principle.
Simple and fast to make and again, VERY Light.
This was the method I would use if I was to build up a fuselage for the foam wing and tail feathers I showed further up the thread.
See quick drawing
Heres a shot of my 1/4 scale moth using the same principle.
Simple and fast to make and again, VERY Light.
This was the method I would use if I was to build up a fuselage for the foam wing and tail feathers I showed further up the thread.
11-08-2022, 08:39 AM
#2025
say thats exactly how my cub is made.
Probably not use the 1/16" ply below the turtle deck, seems like a good idea to use balsa sticks for that bracing
wing halves are almost ready for joining, nice and simple to build
trying desperastely to get the wing joined and fuse glued up
Cold has come to our area 43degF in the garage. electric heater takes some of the dampness off
got until Friday then its damp, cold ,near freezing and generally miserable
good thing I'm retired and not having work interrupt the hobby