


How to cut covering straight
 07-09-2018, 05:11 AM
#1
Moderator
Thread Starter
I've covered a few planes and can get a nice tight look that will last. My only problem is when cutting the seams around a wingtip or other curved surface, I always get this jagged line. I shrink the covering around the tip, which of course causes it to be wavy on the other side, and I just haven't figured out how to cut it so I get a smooth line to iron down on the bottom. What do you guys do?
 07-09-2018, 06:19 AM
#2
When I go around a curve on a wing I slit the covering . The slits dont visually look good but they are always on the bottom. The sharper the curve the more slits broader curve less slits.
07-09-2018, 10:14 AM
#3

Join Date: Aug 2002
Location: Washburn,
ME
Posts: 170
Likes: 0
Received 0 Likes
on
0 Posts
Think you have a problem? I can't even cut a straight line on a straight line cut. LOL.
Might be my age, eyes, or the sometimes twitching arm syndrome. I am always afraid of cutting into the ironed on covering.
Some one must have a good answer for this other than letting someone else cut it for you.
Frank
Might be my age, eyes, or the sometimes twitching arm syndrome. I am always afraid of cutting into the ironed on covering.
Some one must have a good answer for this other than letting someone else cut it for you.
Frank
07-09-2018, 03:21 PM
#4

I think monocote had a tool/knife for this at one time. Top Flight? I might even have one, but never used it. Some day. My planes always look crappy though. http://www.harryhigley.com/index.php?route=product/product&path=33&product_id=59
Last edited by aspeed; 07-09-2018 at 03:29 PM.
07-10-2018, 06:03 AM
#6
Moderator
Thread Starter
I do slit my covering so I don't get wrinkles on the compound curves. I just can't figure out how to get a smooth line where the color transition happens on the bottom. It's just one of those little finishing details that separates a good covering job from an outstanding one.
07-10-2018, 09:13 AM
#7
My Feedback: (20)
After covering and getting the typical wavy line between colors I cut a strip of the darker color about 1/8" wide. Then I iron it along the separation with low heat and some tension to make a straight line. The dark on dark overlap is hard to see, and to me anyhow, looks better than the wavy line.
Chuck
Chuck
07-12-2018, 08:33 AM
#8
I've covered a few planes and can get a nice tight look that will last. My only problem is when cutting the seams around a wingtip or other curved surface, I always get this jagged line. I shrink the covering around the tip, which of course causes it to be wavy on the other side, and I just haven't figured out how to cut it so I get a smooth line to iron down on the bottom. What do you guys do?
Plan for your overlap. The material needs to be pulled and stretched past the point where it will be trimmed for both the underlying section and the overlapping section. Once the material is down against the structure where you want it, you can mark it. In both cases (underlying/overlapping), I use a Sharpie pen and a flexible, plastic straight-edge (a piece of 1/16" balsa sheeting works here too) to mark the line to follow for the cut which will be as straight as you make it. After cutting, seal down the edge (to prevent ink bleeding), then use alcohol or acetone to remove the Sharpie line. For dark colors where a Sharpie pen line won't be visible, use one edge of masking tape to demark the line to follow. Remember to pull the tape back on itself so you don't lift or tear the covering.
Always use a virgin, single edge razor blade for trimming excess covering from the wingtips, place the razor on the Sharpie line and pull the covering against the blade so it doesn't cut into the underlying structure/covering. IOW, place razor blade, pull to shear, move razor blade, pull to shear, move razor, pull to shear... Oh, and make sure the blade is always in contact with the supported covering surface. Its tedious going one inch or less at a time but results in a very straight line.
Passing on a technique learned from expert modelers; hope this helps.
Last edited by H5606; 07-13-2018 at 02:47 AM. Reason: striving to clarify
07-13-2018, 03:59 PM
#9
Moderator
Thread Starter
Yes, that's very helpful. I've thought about doing it that way, but was hoping for a quicker technique. I'll give it a try on my next covering job and hopefully will come up with a bottom that looks as good as the top.
07-13-2018, 04:00 PM
#10
Moderator
Thread Starter
Oh, and I'll offer a tip too. The silver Sharpie markers show up really well on black or other dark coverings. That's easier than tape, but it does require acetone to remove.
07-14-2018, 07:50 AM
#11
Here's another way that takes only seconds to cut after set-up. It requires an unobstructed, smooth, flat surface larger than the part but involves some risk:
1) Cover the part with first side and get the covering down against the structure - up to but not beyond the cut line and leave the excess alone. In this case, call it a wing panel.
2) Level the wing panel on the work surface (usually bottom side down) so LE and TE are at same height above it - if its a one-piece wing with dihedral, you'll obviously work one half at a time. If its tapered in thickness, block up the wing tip to level. Use weights or whatever means you wish to nail it down or immobilize it.
3) Make your cutting tool. I used a block of shimmed wood to get the height necessary to reach the cut line. Glue or screw a new #11 X-Acto blade to the top of the block. Only the tip of the blade the thickness of the material you're cutting should be exposed beyond the edge of the block (a few .000"). Test by laying two stacked scraps down on the work surface and use the tool to check that it cuts the top layer without cutting the lower layer. Shim the edge of the tool with tape to reduce the depth of cut if necessary.
4) Place the tool on the work surface up against the wing panel and cut the excess material free using a light scribing motion. If you "miss" a spot, repeat passes will be exactly on the same line and as straight as the work surface is. The whole perimeter of a part can be done this way if necessary. Tug on the covering during the cutting pass to see if its free.
5) Remove the trimmed panel from the work surface, cover other side and repeat the other three steps. Remember to adjust your cutting tool to account for the overlap. In this case, remove the shim to lower the block (1/8" ~ 3/16") or make a second tool.
The risk: If you push too hard during the overlapping panel cut, you can cut through the underlying covering thus eliminating your overlap. Butted covering panels aren't a good thing. Airflow can lift and blow covering off in flight and that's a bad thing.
Last edited by H5606; 07-15-2018 at 05:33 AM. Reason: Difficulty reading - added spacing; redundancy; correction
07-14-2018, 10:59 AM
#12
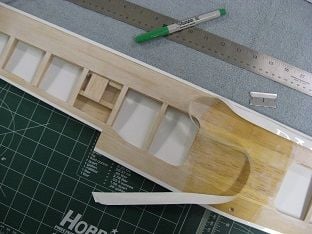
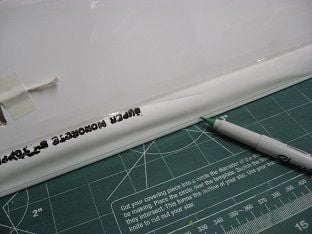
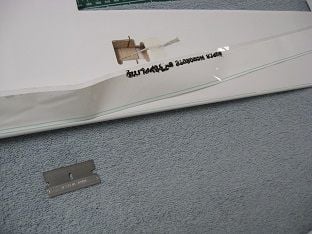
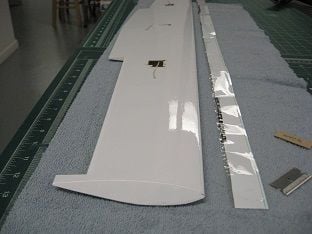
Offering some pictures here documenting the technique described in post #8: following a Sharpie pen line with a single-edge razor blade.
Granted, its not a more technically challenging area like a wingtip but hopefully helps get the idea across.
Change blades before the cut begins to go ragged or is difficult - I go through 3 to 5 blades per covering job. If the covering cut wanders or "tears" off course (luckily, it always wanders onto the material being removed), I found rubbing the blade along the length of the pen line to find a "sweet spot" on the blade while pulling gets the cut started again (sorta' like slicing a piece of bread with a knife)…
BTW, in this particular instance, running the un-shimmed, Sharpie marker along the tabletop surface worked out perfectly to give me a line to follow for the overlapping cut as can be seen in pic #3. Adjusting the height of the Sharpie with a shim will suit other situations.
Last edited by H5606; 07-14-2018 at 02:02 PM. Reason: clarification
07-24-2018, 02:35 PM
#14
My Feedback: (6)
Join Date: Oct 2002
Location: Mountain Home,
AR
Posts: 2,684
Likes: 0
Received 0 Likes
on
0 Posts
A Top Flite Straight cut trim tool makes trimming at wing tips and such places much easier. The most difficult part is adjusting the blades so that they only cut through one layer of covering and not into an underlying layer. It takes some practice but makes trimming covering at wing tips, tail surfaces, etc, much neater with edges that don't look like a drunken rat chewed the ends off.. It looks especially good with contrasting colors.
 07-24-2018, 07:01 PM
#16
Moderator
Thread Starter
chip_MG- I use a straight edge when cutting pieces to go on as do many others. My conundrum was how to get a good cut line when I've gone around a compound curve and need to cut covering at the edge of it. I do a lot of dark bottom/light top color schemes, so a jacked up cut line is very noticeable.
07-26-2018, 07:08 AM
#17
Pretty sure this won't answer any question that you asked, but this came up on Utube as recommended for me. https://www.youtube.com/watch?v=XtMbYxEqgiw Doesn't show too closely for trimming, but was interesting.
07-26-2018, 11:48 AM
#18


I guess this a problem that has plagued modellers for decades. One thing I know for sure, a sharp blade is a must. And single-edge razor blades aren't really that sharp. If you can find replacement blades for safety razors, grab 'em! If not, a bag of Bic disposable razors can be cannibalized for some very sharp blades as well. I use these for cutting Japanese tissue on my rubber jobs.
07-28-2018, 09:04 AM
#19
Pretty sure this won't answer any question that you asked, but this came up on Utube as recommended for me. https://www.youtube.com/watch?v=XtMbYxEqgiw Doesn't show too closely for trimming, but was interesting.
BTW, that's the biggest heat gun I've ever seen in my life.
Last edited by H5606; 07-29-2018 at 06:16 AM. Reason: credit due for skills exhibited in video
