


Tamiya TA05-Build
 01-19-2007, 08:00 AM
#1
Senior Member
Thread Starter
Join Date: Feb 2006
Location: Brisbane Qld, AUSTRALIA
Posts: 720
Likes: 0
Received 0 Likes
on
0 Posts
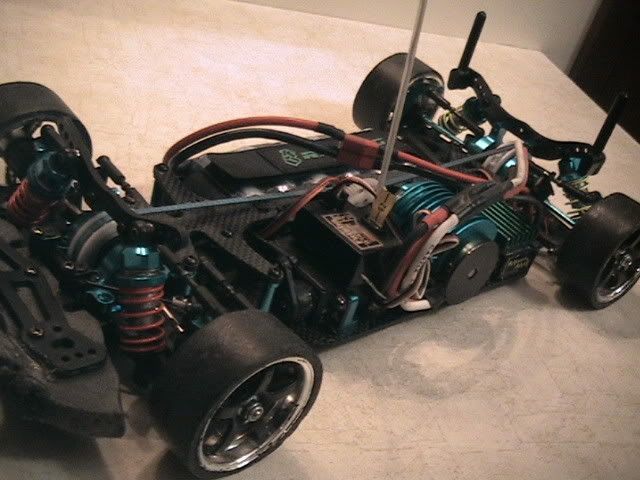
Finished my TA05. Now need to tune.
I Couldnt find a thread on the TA05, so here it is.
Installed LRP TC2 modified motor for second run. Went well but I think a stone hit the centre main spur gear from below denting a couple of teeth. Still works but makes a bit of noise.
Bad design really. Dont know why they have a cutout at the bottom of all three gears. Greatly increases the risk of damage. Will have to look at covering the gap.
Would be interested to hear other mods you have done to the TA05.
Cheers

 01-19-2007, 09:34 AM
#6
Senior Member
Thread Starter
Join Date: Feb 2006
Location: Brisbane Qld, AUSTRALIA
Posts: 720
Likes: 0
Received 0 Likes
on
0 Posts
Thanks.
The yellow wasnt quite what I was after. Painted a buggy in Camel Yellow, color on can looked good but dried orange. So choose a bright yellow. Danm thing dried bright yellow. LOL.
Just a note that caught me out. Before installing the drive shafts you must install little pink foam grommets. I read the instructions incorrectly and cut them in half. Actually two of them you dont cut. Too much play in the drive shaft. lucky I had'nt biffed the two uncut grommets. So installed correctly now.
I ordered a Aluminium motor mount and ball bearings. However the kit came with a metal motor mount and ball bearings throughout.
01-19-2007, 10:09 AM
#7


Join Date: Sep 2006
Location: Midlands, UNITED KINGDOM
Posts: 8,217
Likes: 0
Received 0 Likes
on
0 Posts
think of the holes as a good thing as well, because there are other ways for stones to get in, and if there were no holes, the stones could do more damage, if that makes sense?
01-19-2007, 10:22 AM
#8
Senior Member
Thread Starter
Join Date: Feb 2006
Location: Brisbane Qld, AUSTRALIA
Posts: 720
Likes: 0
Received 0 Likes
on
0 Posts
lee172,
I did think of that. If they had filled it in there would be very little clearance. However a rearward slopeing design with a hole at the rear would be best if it remains open. The gap for the centre gear is fairly big. Only second time out with the car and the spur damaged. Very unlucky.
Will look to modify somehow.

 01-19-2007, 06:04 PM
#10
Senior Member

Join Date: Dec 2005
Location: Belmont,
MA
Posts: 3,589
Likes: 0
Received 0 Likes
on
0 Posts
wow that makes me feel like I'm neglecting my TA05. It doesn't have any upgrades and has been shelfed for a while, but soon it'll be converted to rally style!
 01-19-2007, 06:56 PM
#12
Senior Member
Join Date: Dec 2005
Location: Belmont,
MA
Posts: 3,589
Likes: 0
Received 0 Likes
on
0 Posts
ORIGINAL: rcxboy
Nice, awesome build! Any chance of a photo of these gears? Could you use scrap lexan to cover them up?
Nice, awesome build! Any chance of a photo of these gears? Could you use scrap lexan to cover them up?
01-19-2007, 09:44 PM
#13
Senior Member
Join Date: Jan 2005
Location: nacouver,
BC, CANADA
Posts: 345
Likes: 0
Received 0 Likes
on
0 Posts
Heres mine
They're a little bit dark, sorry. Anyways. It weighs a heafty 1054g without the batteries. I needs front CVDs since rhe topcads I had infront snapped like tigs from the power of my brushless. Also planning to buy Ti screw kit, and ti kingpins so I can install aluminum steering arms. Its pretty much done after another 70 bucks.
They're a little bit dark, sorry. Anyways. It weighs a heafty 1054g without the batteries. I needs front CVDs since rhe topcads I had infront snapped like tigs from the power of my brushless. Also planning to buy Ti screw kit, and ti kingpins so I can install aluminum steering arms. Its pretty much done after another 70 bucks.
01-19-2007, 10:25 PM
#14
Senior Member
Thread Starter
Join Date: Feb 2006
Location: Brisbane Qld, AUSTRALIA
Posts: 720
Likes: 0
Received 0 Likes
on
0 Posts
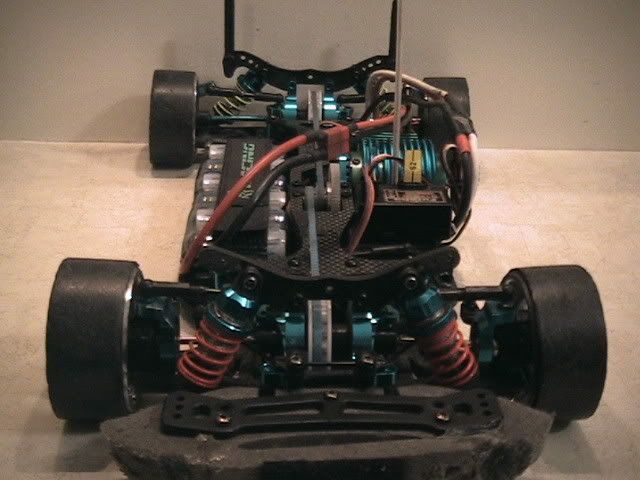
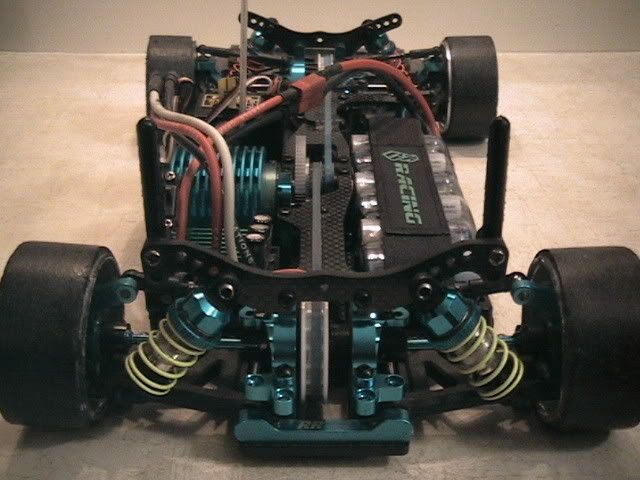
rcxboy
Here the photos.
Note very little clearance between the bottom of the car and the gear.
It may not have been a stone, but something brushed against the gear from below?.
Its still driving, just making some noise.
Will have to mod it somehow to prevent it happening again.
Here the photos.
Note very little clearance between the bottom of the car and the gear.
It may not have been a stone, but something brushed against the gear from below?.
Its still driving, just making some noise.
Will have to mod it somehow to prevent it happening again.
01-19-2007, 10:49 PM
#16
Senior Member

Join Date: Jul 2006
Location: , IL
Posts: 2,902
Likes: 0
Received 0 Likes
on
0 Posts
ORIGINAL: PlaneHeli
rcxboy
Here the photos.
Note very little clearance between the bottom of the car and the gear.
It may not have been a stone, but something brushed against the gear from below?.
Its still driving, just making some noise.
Will have to mod it somehow to prevent it happening again.
rcxboy
Here the photos.
Note very little clearance between the bottom of the car and the gear.
It may not have been a stone, but something brushed against the gear from below?.
Its still driving, just making some noise.
Will have to mod it somehow to prevent it happening again.
01-19-2007, 10:59 PM
#17
Senior Member
Thread Starter
Join Date: Feb 2006
Location: Brisbane Qld, AUSTRALIA
Posts: 720
Likes: 0
Received 0 Likes
on
0 Posts
Yeah, Thats probably all it needs.
It would be good to have a gap at the back though. as if a stone came in from the top and dropped down, it would be stuck there, and as there is little clearance it would damage the gear.
It would be good to have a gap at the back though. as if a stone came in from the top and dropped down, it would be stuck there, and as there is little clearance it would damage the gear.
01-20-2007, 12:01 AM
#18
Senior Member
Join Date: Jan 2005
Location: nacouver,
BC, CANADA
Posts: 345
Likes: 0
Received 0 Likes
on
0 Posts
Im getting 45-48mph with 6cell gp3300. Geared at 21/72 I think Im gearing it high since it gets too hot to touch. I haven't tested it with my new IB4200WB 6 cell pack. Its been a really wet winter. Should be breaking the 50 mark with that.
01-20-2007, 12:32 AM
#19
Senior Member
Thread Starter
Join Date: Feb 2006
Location: Brisbane Qld, AUSTRALIA
Posts: 720
Likes: 0
Received 0 Likes
on
0 Posts
How do you guys measure the speed. Can you get cheap radar guns or have a car run along side.
Wouldnt have a clue how fast mine goes except to say, never fast enough.
Wouldnt have a clue how fast mine goes except to say, never fast enough.
01-20-2007, 03:17 AM
#22
Senior Member
Thread Starter
Join Date: Feb 2006
Location: Brisbane Qld, AUSTRALIA
Posts: 720
Likes: 0
Received 0 Likes
on
0 Posts
I have a problem with the front left drive shaft.
Its very loose sliding between the diif and wheel joint. Cant see what I did wrong for it to be like that. Both diffs assembled the same. Ive stuffed an extra urethane grommet in there. According to instructions I shouldnt need to.
Anyone with a TA05 know what Ive done wrong. its almost like the drive shafts are too short, but know Tamiya wouldnt do that.
01-20-2007, 03:23 AM
#23
Senior Member
Join Date: Dec 2005
Location: Belmont,
MA
Posts: 3,589
Likes: 0
Received 0 Likes
on
0 Posts
ORIGINAL: PlaneHeli
I have a problem with the front left drive shaft.
Its very loose sliding between the diif and wheel joint. Cant see what I did wrong for it to be like that. Both diffs assembled the same. Ive stuffed an extra urethane grommet in there. According to instructions I shouldnt need to.
Anyone with a TA05 know what Ive done wrong. its almost like the drive shafts are too short, but know Tamiya wouldnt do that.
01-20-2007, 04:19 AM
#24
Member
Join Date: Mar 2006
Location: BunburyW.A, AUSTRALIA
Posts: 68
Likes: 0
Received 0 Likes
on
0 Posts
I had the same problem. Just check the pink foam stopper, It maypush too far.
Here Is my TAO5, All stock and ready for up grades, but unsure on what to do. Will be raced this season.
Here Is my TAO5, All stock and ready for up grades, but unsure on what to do. Will be raced this season.
01-20-2007, 04:30 AM
#25
Senior Member
Join Date: Jan 2005
Location: nacouver,
BC, CANADA
Posts: 345
Likes: 0
Received 0 Likes
on
0 Posts
i use rubber o-rings. Solved the problem for me. If one o-ring doesn't work try 2 o-rings. That will fix the problem 99.9% of the time...unless your r/c addict.