


The eSSpi build begins.....
 12-16-2007, 05:55 PM
#26
Member
Join Date: Mar 2005
Location: Godshill Isle of Wight, UNITED KINGDOM
Posts: 80
Likes: 0
Received 0 Likes
on
0 Posts
Excellent thread, keep it up  . I got so involved with the build up of mine, that I couldn't be bothered with taking photo's.
. I got so involved with the build up of mine, that I couldn't be bothered with taking photo's.
 12-16-2007, 06:09 PM
#27

Join Date: Jul 2006
Location: Earth,
NC
Posts: 1,108
Likes: 0
Received 0 Likes
on
0 Posts
ORIGINAL: Johnnysplits
Hey Dave, are you gonna be using the stock bearings or are you gonna upgrade them now? Im just asking because i'll be getting the ss when I get my tax returns. Ive been debating about which bearings to get. Either the ones from teamfasteddy or the lightning ceramics from boca. It's the price difference....$80 compared to $330 Kinda leaning toward the boca bearings. What do you think? Oh by the way, I might take a ride up there in the spring and show ya the ford gt.
John
Wow thats quite a price difference for bearings. I'm hoping that is an error.
[X(] DID YOU SAY FORD GT?????????????? Do you have any pics? Me likey Ford GTs

Great build Dave. Looks good. I see you're a big fan of coffee. Just dont spill any on the SS
JiminyPeak in Massachewwwwwsits, lol. Where in MA is it?
12-16-2007, 06:18 PM
#28

Thread Starter

Join Date: Nov 2005
Location: Rotterdam,
NY
Posts: 1,769
Likes: 0
Received 0 Likes
on
0 Posts
MOTHBALLS.
[:@] the smell makes me want to puke...........
The tires smell like mothballs. so I had to combat the smell of it..... WITH > ?
More GETTIN' HIGH: fumes[8D][sm=bananahead.gif]
I painted the rims gunmetal and the beadlocks are the candy purple that will match the body and the regular HPI purple.
The rear wheels came with molded inserts. the front.... 2 pieces of length foam that needed to be glued inside the tire. What a P.I.T.A. getting it all even and equaled out. You have to crumple it in the tire, then basicly work it around with your hands to even out the pressure. The method I found best is to just sourt of squeeze the tires and let the foam squeak around in it untill it is even, then glue the 2 ends together and put a few spots up at the edge under the beadlock area of the tire.
The SS comes with a super nice stiffy rear shock cross member brace. The front shocks took me a about an hour, the rears a little less than 35 minutes to put together. Much easier than doing 1/10th scale ! Nearly shat my pants when I was putting in one of the lock retaining rings to the shock base and heard it go " PINGG!" and fly across the table and bounce off a few places and a box or 2. [X(] I figured " yeah...... as if HPI would include a spare one of these...... Luckily I found it in a sort of "sound triangulation" of whre it bounced from (Kindalike in the Movie- Predator when Arnold tosses the rock, and the alien figures out where it came from... LOL)
Pix in a few minutes......
I took a break, and Creamy cat is holdong my place in the instructionmanual under the 150 watt light"warming station" AKA: napzone of my worktable.. hahah
TIG, its in Hancock ( just over the MA/NY state line near Pitsfield MA.)
Johnny, sure anytime


10th scale front shock, 5th scale front shock. Just for size comparison [X(]
* and NO, I'm not selling the classic associated gold shocks, so DON'T ASK.
however I do have to rebuild them still...grumble grumble grumble. [:@]

New HPI beefy metal rear shock tower brace.

Breaktime..... I walk away to add some stuff to the thread, and I come back to see this !


^ This may be my new avatar nextmonth

I'm going to start a contest when I get done with my build thread....
HOW MUCH DOES MY GARBAGE CAN WEIGH ?
Prize for the winner......... hmmm I'll make it something good
[:@] the smell makes me want to puke...........
The tires smell like mothballs. so I had to combat the smell of it..... WITH > ?
More GETTIN' HIGH: fumes
[8D][sm=bananahead.gif] I painted the rims gunmetal and the beadlocks are the candy purple that will match the body and the regular HPI purple.
The rear wheels came with molded inserts. the front.... 2 pieces of length foam that needed to be glued inside the tire. What a P.I.T.A. getting it all even and equaled out. You have to crumple it in the tire, then basicly work it around with your hands to even out the pressure. The method I found best is to just sourt of squeeze the tires and let the foam squeak around in it untill it is even, then glue the 2 ends together and put a few spots up at the edge under the beadlock area of the tire.
The SS comes with a super nice stiffy rear shock cross member brace. The front shocks took me a about an hour, the rears a little less than 35 minutes to put together. Much easier than doing 1/10th scale ! Nearly shat my pants when I was putting in one of the lock retaining rings to the shock base and heard it go " PINGG!" and fly across the table and bounce off a few places and a box or 2. [X(] I figured " yeah...... as if HPI would include a spare one of these...... Luckily I found it in a sort of "sound triangulation" of whre it bounced from (Kindalike in the Movie- Predator when Arnold tosses the rock, and the alien figures out where it came from... LOL)
Pix in a few minutes......
I took a break, and Creamy cat is holdong my place in the instructionmanual under the 150 watt light"warming station" AKA: napzone of my worktable.. hahah
TIG, its in Hancock ( just over the MA/NY state line near Pitsfield MA.)
Johnny, sure anytime
10th scale front shock, 5th scale front shock. Just for size comparison [X(]
* and NO, I'm not selling the classic associated gold shocks, so DON'T ASK.
however I do have to rebuild them still...grumble grumble grumble. [:@]
New HPI beefy metal rear shock tower brace.
Breaktime..... I walk away to add some stuff to the thread, and I come back to see this !
^ This may be my new avatar nextmonth
I'm going to start a contest when I get done with my build thread....
HOW MUCH DOES MY GARBAGE CAN WEIGH ?
Prize for the winner......... hmmm I'll make it something good
12-16-2007, 07:21 PM
#30
Join Date: Oct 2007
Location: Tampa,
FL
Posts: 1,067
Likes: 0
Received 0 Likes
on
0 Posts
Hey TIG Sorry, but I wasn't kidding. The lightning ceramic bearings from boca for the ss are in fact $330 for the set. But, they are the fastest you can get. If you plan on racing, which I do, you want every "edge" you can get no matter what the cost. I think I might actually buy one bearing from boca and one from team fast eddy and do a side by side comparison....just to be sure. Now as for pics of the ford gt, I do have a digital camera but lack the knowledge as to getting them on here. Any help would certainly be appreciated. The car is cool for bashing around, but a race car it's not. The plastic is crap. Very brittle. This is my first AND LAST purchase of a "clone". It might take a while longer to save up for, but from now on im gonna buy the real thing. But i'll tell ya one thing, the CY motor screams!! I really dont know why people knock it.
John
John
12-16-2007, 08:15 PM
#31
Join Date: Jul 2006
Location: Earth,
NC
Posts: 1,108
Likes: 0
Received 0 Likes
on
0 Posts
Wow Johnny, being a basher I dont think I would need bearings of that quality. But, I hear you on every edge you can get, especially in the racing scene.
LOL, you're going to think I'm a doofus. I thought you meant an actuall Ford GT. I hear you on the whole "clone" deals though. You really do get what you pay for.
Now, to the CY, I have a 30.5 in my Leo, it was in my MT as well. I have nothing but good things to say about it. It has performed flawlessly for me so far, I have had it for over a year now.
As to posting pics with the digi cam. My camera came with a disc to download. Pop that in follow the directions and you should be able to plug in that port plug thingy and download away.
12-16-2007, 09:43 PM
#32

Join Date: Oct 2007
Location: naugatuck, CT
Posts: 189
Likes: 0
Received 0 Likes
on
0 Posts
Looks great! Seeing those pictures reminds me how much I miss building kits. I think everything should be availiable as a kit option. Those tools look really good for being supplied with the kit. I see your cat is like mine and likes to be right in the middle of things when your working on something. I agree with using the "funtime" silicone stuff I also use it on the faucet cartrige in my kitchen sink. Faucet is smooth as silk for at least 6mo or more. I'll be waiting to see some video of that thing rippin' around when your done.
12-17-2007, 12:18 AM
#33
Thread Starter
Join Date: Nov 2005
Location: Rotterdam,
NY
Posts: 1,769
Likes: 0
Received 0 Likes
on
0 Posts
Jim, no doubt, the silicone is one of my "Oldschool" tricks 
Also, I won't be "running it around"..... look up the destruction I do with my FGMT.... this is headded for no easy treatment either...... She may be nice looking now, but I give it less than 3 tanks of gas before it is beat to hell and back.


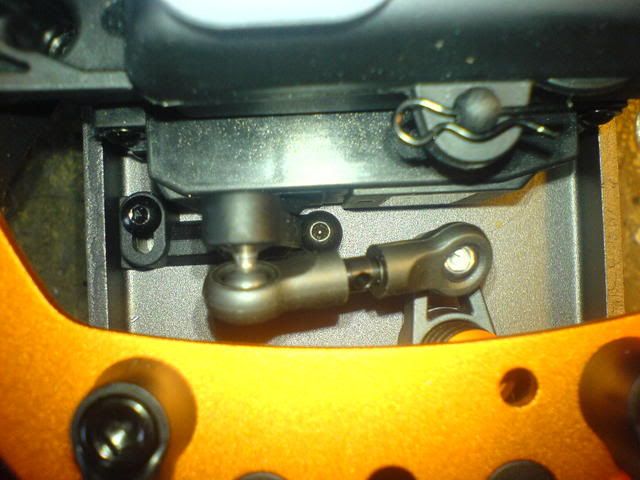
Not really sure the purpose of this part. It fits under the servo horn up front near the steering blocks. I can't find the screw they are calling for in the bin O' metal, so I'll wait till later to put it on. I also seem to be missing 3 of the pieces to teh bell crank linkage ( the gunmetal plastic parts)


Such a rookie mistake... argh.

Be sure to thread lock these. the screws are not really long enough.

ok, this is the WORST part of the kit sofar. teh little screws that they have holding the servo in place are completely crap. I feared striping the allan head out on them, and due to the black enamel on them, the key fell out a few times and rounded the head on one screw. Luckily, I replaced them with regular philips scres from another tamiya servo I had lying around. No more crappy hex heads.


These just did not want to line up .... MC HAMMERTIME !


How I know it is BEDTIME... LOOK ... AT... THAT .. FACE !!!!
screams I NEED ATTENTION NOW !
Tomorrow the dif and final assembly.... well except for a few parts, and I'm getting a new motor.
Then paint the body
Also, I won't be "running it around"..... look up the destruction I do with my FGMT.... this is headded for no easy treatment either...... She may be nice looking now, but I give it less than 3 tanks of gas before it is beat to hell and back.
Not really sure the purpose of this part. It fits under the servo horn up front near the steering blocks. I can't find the screw they are calling for in the bin O' metal, so I'll wait till later to put it on. I also seem to be missing 3 of the pieces to teh bell crank linkage ( the gunmetal plastic parts)
Such a rookie mistake... argh.
Be sure to thread lock these. the screws are not really long enough.
ok, this is the WORST part of the kit sofar. teh little screws that they have holding the servo in place are completely crap. I feared striping the allan head out on them, and due to the black enamel on them, the key fell out a few times and rounded the head on one screw. Luckily, I replaced them with regular philips scres from another tamiya servo I had lying around. No more crappy hex heads.
These just did not want to line up .... MC HAMMERTIME !
How I know it is BEDTIME... LOOK ... AT... THAT .. FACE !!!!
screams I NEED ATTENTION NOW !
Tomorrow the dif and final assembly.... well except for a few parts, and I'm getting a new motor.
Then paint the body
12-17-2007, 12:26 AM
#34
Moderator

Great stuff man
I dont know what it is about skidplates not lining up with bulkheads. Happens in almost every car or truck I have.
I dont know what it is about skidplates not lining up with bulkheads. Happens in almost every car or truck I have.
12-17-2007, 05:22 AM
#36
Member
Join Date: Mar 2005
Location: Godshill Isle of Wight, UNITED KINGDOM
Posts: 80
Likes: 0
Received 0 Likes
on
0 Posts
ORIGINAL: Dave ESPI
jpg[/img]
Not really sure the purpose of this part. It fits under the servo horn up front near the steering blocks. I can't find the screw they are calling for in the bin O' metal, so I'll wait till later to put it on. I also seem to be missing 3 of the pieces to teh bell crank linkage ( the gunmetal plastic parts)
Hey Dave, I've found a use for this part, it might not be right but it solves a problem. I found that when the steering was at full left lock the servo arm could travel too far, allowing the steering to lock up, then I noticed this mystery part lined up perfectly, and with a M4 button head screw in the empty hole, no more lock up.
 12-17-2007, 05:38 AM
#37
Senior Member
Join Date: Apr 2007
Posts: 851
Likes: 0
Received 0 Likes
on
0 Posts
Also, I won't be "running it around"..... look up the destruction I do with my FGMT.... this is headded for no easy treatment either...... She may be nice looking now, but I give it less than 3 tanks of gas before it is beat to hell and back.
ok, this is the WORST part of the kit sofar. teh little screws that they have holding the servo in place are completely crap. I feared striping the allan head out on them, and due to the black enamel on them, the key fell out a few times and rounded the head on one screw. Luckily, I replaced them with regular philips scres from another tamiya servo I had lying around. No more crappy hex heads.
Nice to see consumers doing the "impact testing" on product...HPI should pay you for your "testing" time!
Dave, You didn't rely on HPI making quality Allen keys, did you?
As our German programmer says, "No good tools = no good job!"
use screwdriver type hex keys, good ones.
Your cap screws will last a hell of a lot longer
Have a Merry Christmas, mate
12-17-2007, 12:49 PM
#38
Join Date: Oct 2007
Location: Tampa,
FL
Posts: 1,067
Likes: 0
Received 0 Likes
on
0 Posts
TIG...wish I could afford a REAL ford gt!!!! But then again, if I had one my driver's licence would have been revoked. LOL So i'll stick to the r/c one. Cant get a speeding ticket with that.
12-17-2007, 04:39 PM
#39
Thread Starter
Join Date: Nov 2005
Location: Rotterdam,
NY
Posts: 1,769
Likes: 0
Received 0 Likes
on
0 Posts
[:@] Had a set back with the dif. spent like 40 minutes looking around for 2 O-rings...... dug through garbage, and looked through everything... nowhere to be found.
FINALY I looked under the bottom of chassis....... they were "siliconed" to it and stuck ti it, so when I lifted it, they were stuck under out of my line of sight.
Pix in a few.
FINALY I looked under the bottom of chassis....... they were "siliconed" to it and stuck ti it, so when I lifted it, they were stuck under out of my line of sight.
Pix in a few.
12-17-2007, 06:41 PM
#40
Thread Starter
Join Date: Nov 2005
Location: Rotterdam,
NY
Posts: 1,769
Likes: 0
Received 0 Likes
on
0 Posts


all metal dif.... sooo nice.

Thread locker on the set pins. a nice "Through the case" pin design with small O-rong gaskets on the plug holes.

I did have a very minor piece of chipped edge ont he case, bu the gasket held just fine. HPI provides 3 gaskets (2 spare) so repairs will be easily done as the old gasket will be compressed with the ring and set screws on the case.


Use 1/2 the tube of grease, evenly smear it around the gears, and save some for inside the drive cups and if needed in the future with dig repair should be about 1/4 tube left at the end of all assembly.

Slip the boots on, and I use a small hex key to lift the boot up over it. There is a lip that will seat the boot in the inside of the drive ring near the case and outdrive shaft. VERY NICE ENGINEERING !

Sneek a bolt in from through the uprights.

Rear is done.

Bolt it up to the frame. 4 screws on bottom BE SURE TO USE THREAD LOCK !


SOON TO BE REPLACED.
FOR SALE: stock bearing set:

$ 25.00 ?

Completed sub frame.
Next is Engine mods !
12-17-2007, 09:41 PM
#42
Thread Starter
Join Date: Nov 2005
Location: Rotterdam,
NY
Posts: 1,769
Likes: 0
Received 0 Likes
on
0 Posts
I was rummaging around in my 10th scale bin, and I came across his beauty....
Traxxas - Servo - High Torque 2055. It fit in the throttle spot nicely. Not sure if it is any good, but last I checked (if memory serves) it is fien (or else I would have labled it as bad- use as parts)
Towah-hobbah specs read this:
-This is the Replacment High Torque Servo for the Traxxas T-Maxx and E-Maxx
or any other vehicle that you would like to mount this in.
This part goes between the receiver and hooks to the steering or motor or
engine to provide the power to either of these.
FEATURES: Yields Increased Power and Speed.
SPECS: Length: 1.6" (40.5mm)
Width: .8" (20.5mm)
Height: 1.43" (36mm)
Torq: 80 oz/in
Weight: 1.58oz (45g)
Will it work for now ? The manual really does not give any minimum specs for servos. I think the Hitec one I intend to use is 133 oz strength.
 12-17-2007, 11:15 PM
#44
Thread Starter
Join Date: Nov 2005
Location: Rotterdam,
NY
Posts: 1,769
Likes: 0
Received 0 Likes
on
0 Posts
Nathan, yeah, I'm going to sell it Modded up, then replace the components later.
I hate having to take them apart to work on them... so I'm assuming other people are thinking the same, so "Plug and Play" is the way to go with selling it.
I figure 350.00 shipped is fair for it.
http://www.rcuniverse.com/market/item.cfm?itemID=350817
ENGINE ITEM LISTED ^
EDIT: Stock set of Ball Bearings- SOLD.
 12-19-2007, 08:32 PM
#47
Thread Starter
Join Date: Nov 2005
Location: Rotterdam,
NY
Posts: 1,769
Likes: 0
Received 0 Likes
on
0 Posts
Kurt, I'm working on the body right now.
Takes time to do this sort of paint job, so I don't want to let the cat out of the bag yet
Still waiting on some parts to come in also, but it sits on my table next to the FGMT lookin' purdy
Takes time to do this sort of paint job, so I don't want to let the cat out of the bag yet
Still waiting on some parts to come in also, but it sits on my table next to the FGMT lookin' purdy
12-19-2007, 11:09 PM
#49
Thread Starter
Join Date: Nov 2005
Location: Rotterdam,
NY
Posts: 1,769
Likes: 0
Received 0 Likes
on
0 Posts
CSP, I was debating swapping a chassis out for a purple one, but the gunmetal works "OK" also, and the color scheme matches my soon to be done paintjob, so I'm not worried
12-20-2007, 12:48 AM
#50
I didn't realize that the chassis was gunmetal. I had it in my mind it was orange. Looks cool!
I hate painting bodies. Can never decide what to do. I finally just painted mine a solid red......how original.
I hate painting bodies. Can never decide what to do. I finally just painted mine a solid red......how original.