


Scratch Designed/Built Sailplane Fuselage
 10-22-2012, 06:48 PM
#26

Thread Starter

Join Date: Feb 2012
Location: Fairfield, CT
Posts: 416
Likes: 0
Received 0 Likes
on
0 Posts
One month later...
Okay I'm done building my silly Piper Cub Sailplane, time to get back to working on a "real" sailplane. So where were we? Building a pod-n-boom fuselage that's right.
I taped up the top profile template...
Then using the belt sander (love that tool) sanded to my marks...
Set the sander's guide plate to 45° then began the rounding process...
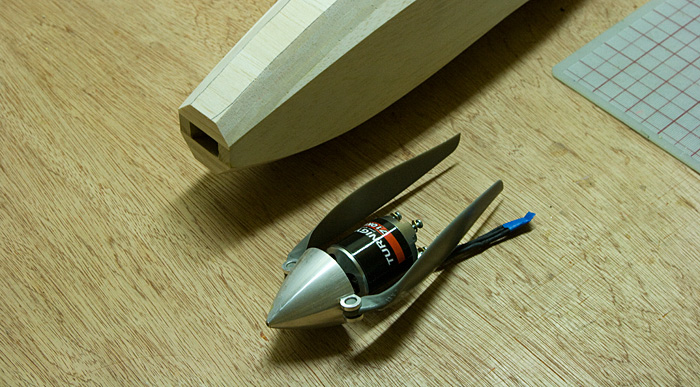
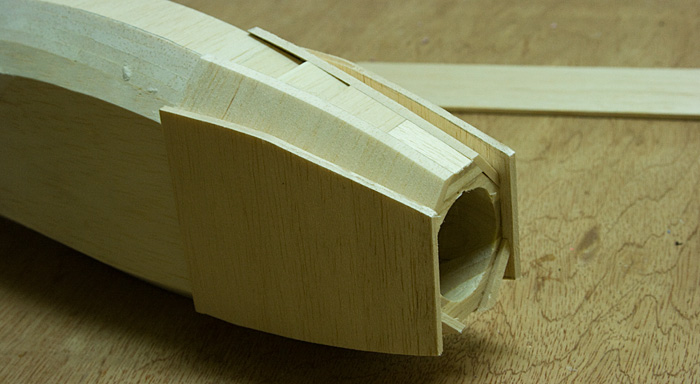
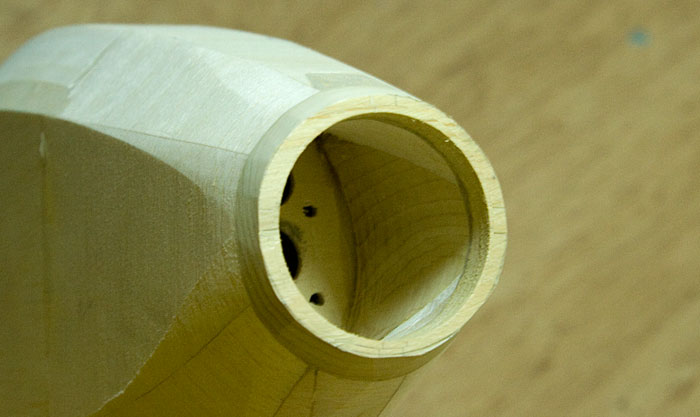
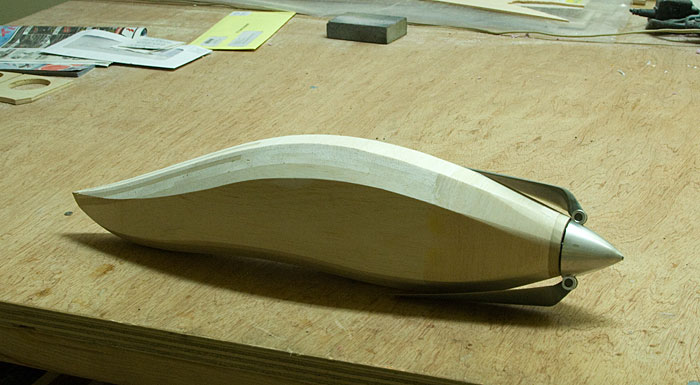
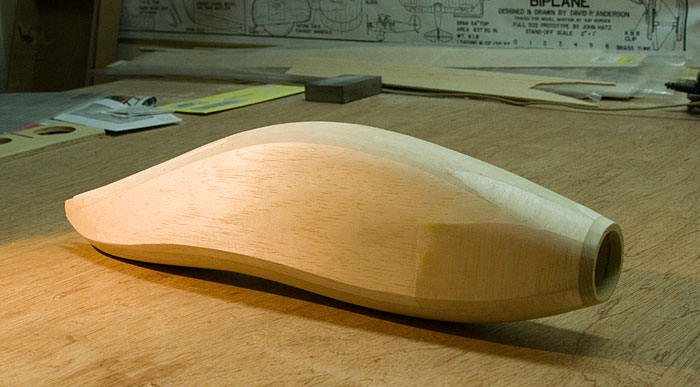
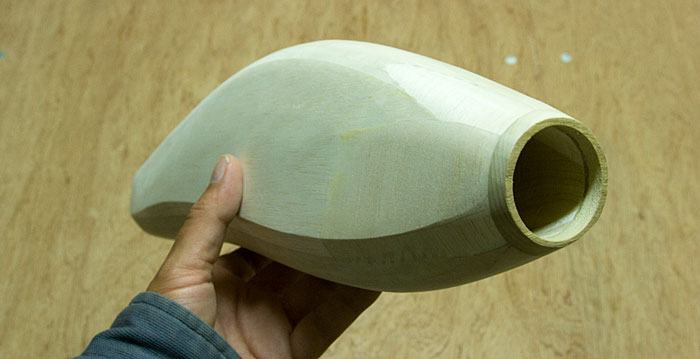
I need to get the motor installed so I can shape the nose so it blends nicely with the spinner. I broke out the Dremal & started carving out the nose...
Major OOPS!
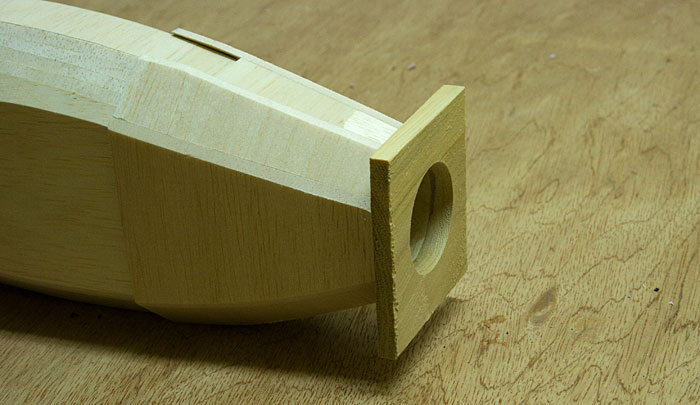
I got the motor in & then to my dismay discovered that some nit-whit (me) had installed the firewall way to far forwards. Look at the size of that gap! NOT GOOD!..
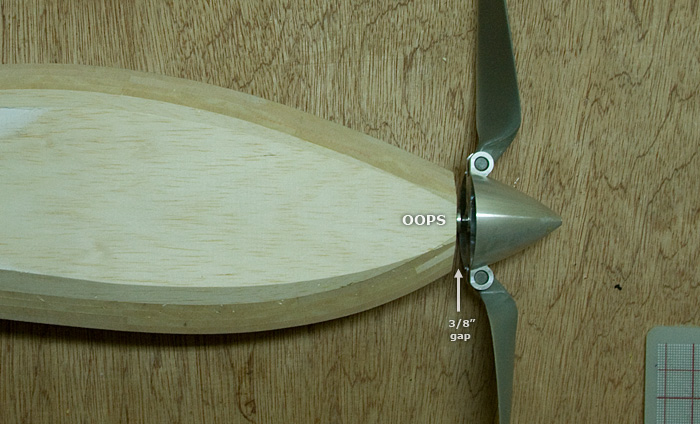
Move the firewall back? ...not happening. So the next best thing is to build up the nose so it matches the spinner's new position...
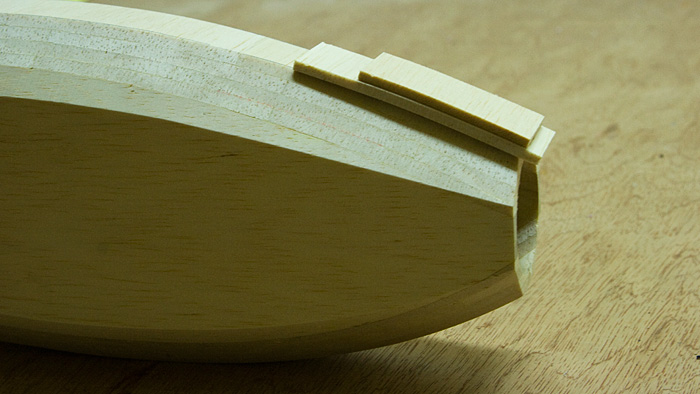
One nice thing about the belt sander is that it makes nice clean flat surfaces that I can easily glue scrap balsa too...
Glue scrap wood in place, trim with the sander...
...& glue more wood in place...
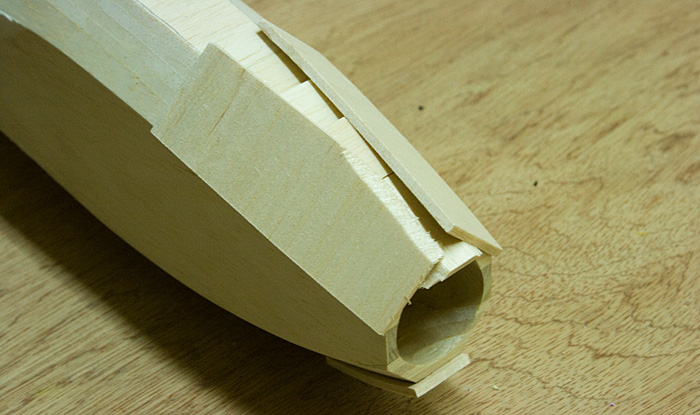
Now to take care of the gap. Added a piece of hard-wood to the nose...
Some more sanding & we're looking good...
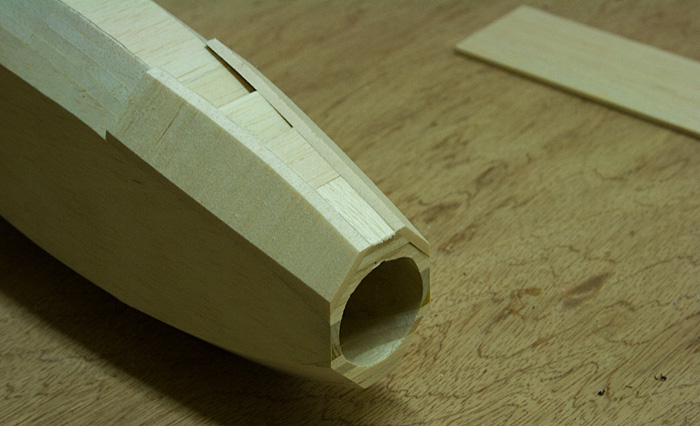
That looks better!..
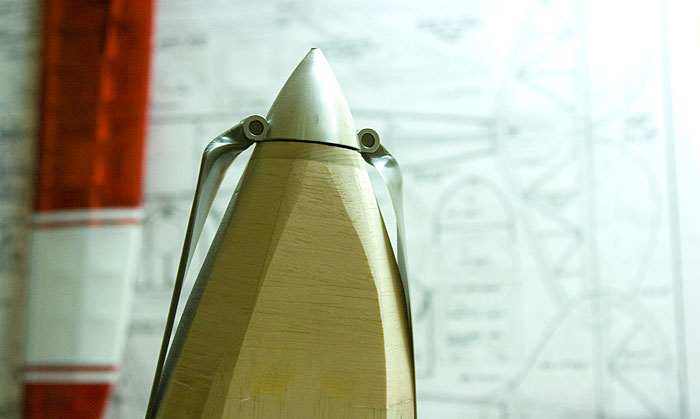
I still have lots more shaping to do but I'm happy with today's progress...
That was a bit of a PITA but on the up side I now have a nicely reinforced nose. Its good to be back working on this, fingers crossed there'll be no more distractions or hick-ups.
Okay I'm done building my silly Piper Cub Sailplane, time to get back to working on a "real" sailplane. So where were we? Building a pod-n-boom fuselage that's right.
I taped up the top profile template...
Then using the belt sander (love that tool) sanded to my marks...
Set the sander's guide plate to 45° then began the rounding process...
I need to get the motor installed so I can shape the nose so it blends nicely with the spinner. I broke out the Dremal & started carving out the nose...
Major OOPS!
I got the motor in & then to my dismay discovered that some nit-whit (me) had installed the firewall way to far forwards. Look at the size of that gap! NOT GOOD!..
Move the firewall back? ...not happening. So the next best thing is to build up the nose so it matches the spinner's new position...
One nice thing about the belt sander is that it makes nice clean flat surfaces that I can easily glue scrap balsa too...
Glue scrap wood in place, trim with the sander...
...& glue more wood in place...
Now to take care of the gap. Added a piece of hard-wood to the nose...
Some more sanding & we're looking good...
That looks better!..
I still have lots more shaping to do but I'm happy with today's progress...
That was a bit of a PITA but on the up side I now have a nicely reinforced nose. Its good to be back working on this, fingers crossed there'll be no more distractions or hick-ups.
 10-23-2012, 11:50 AM
#27
Thread Starter
Join Date: Feb 2012
Location: Fairfield, CT
Posts: 416
Likes: 0
Received 0 Likes
on
0 Posts
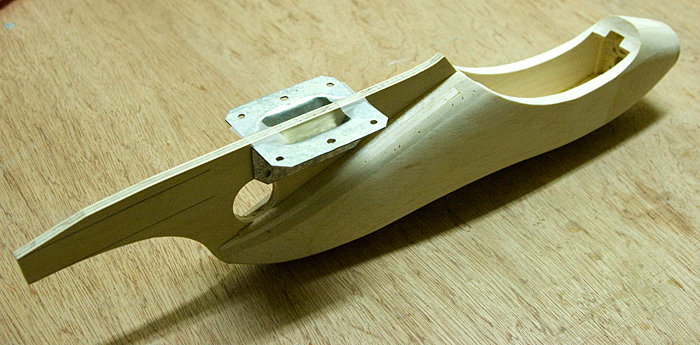
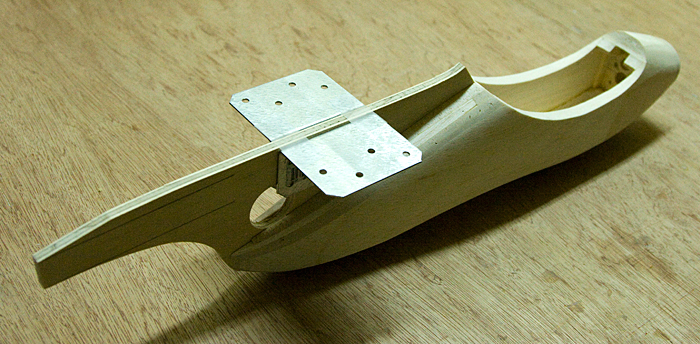
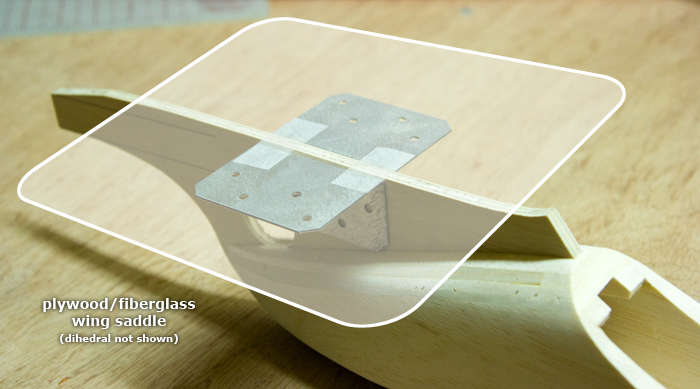
Thinking Ahead - Wing-Saddle
I should probably start planning how I'm going to mount the wing to the fuselage. Here's roughly how she'll look...
The challenge here is to securely but temporally mount this huge wing to a dinky piece of 1/4" plywood...
Whatever I use to mate these two together needs to be bullet-proof strong but lightweight at the same time...
Traditionally this sorta thing is done with a wing-saddle...

Making a wing-saddle from fiberglass & thin plywood shouldn't be a problem. What I need to figure out is how to attach that to the 1/4" plywood pylon so its strong. Any ideas would be appreciated.
I should probably start planning how I'm going to mount the wing to the fuselage. Here's roughly how she'll look...
The challenge here is to securely but temporally mount this huge wing to a dinky piece of 1/4" plywood...
Whatever I use to mate these two together needs to be bullet-proof strong but lightweight at the same time...
Traditionally this sorta thing is done with a wing-saddle...
Making a wing-saddle from fiberglass & thin plywood shouldn't be a problem. What I need to figure out is how to attach that to the 1/4" plywood pylon so its strong. Any ideas would be appreciated.
10-23-2012, 03:07 PM
#28
Senior Member
Join Date: Apr 2010
Location: Fort St. John,
BC, CANADA
Posts: 122
Likes: 0
Received 1 Like
on
1 Post
Hi Nodd, boy is that ever looking sweet!!
I saw over on RCgroups some guys had suggested using small screws and fiberglass to get the strength on the pylon/saddle joint. Iagree with you that the length of the wing may cause the glass to crack, or perhaps even delaminate from the wood over time. The screws idea is nice though. Here is a little picture I drew up quick to show you how I would do it.
Look at Pic #1, you will see Iadded some large triangle stock, you could probably even get away with hard balsa to keep it light. The, in pic #2, you will see Ihave neatly "rounded" the triangle stock. This would give you a lot more "glue" area for that saddle/pylon joint, a fairly nice brace, and possibly even provide a bit of aerodynamic help by giving a smooth radius where the two pieces meet. Probably would add less weight than glassing the whole thing too.
Idon't know, just a suggestion
10-23-2012, 04:47 PM
#29
Senior Member
Join Date: Jan 2011
Location: Cody,
WY
Posts: 294
Likes: 0
Received 0 Likes
on
0 Posts
Cover the bottom of the wing with packing tape and wax it. Laminate 3 layers of 6 ounce glass to the bottom of the wing. Once cured scuff the bonding area and bond the 1/4" plywood to the glass laminate. You want to build a fillet at the junction between ply and glass laminate. You can make a filleting compound by mixing your laminating resin with micro-spheres. Then glass the joint with 1 or two layers of 6 ounce glass on each side. If you glass the entire side of the wood then you could use 1/4 balsa instead of the ply to lighten things up. The glass would go up the side of the balsa, around the corner and extend to the edge of the glass laminate wing saddle. The saddle laminate would end up being 5 layers thick and the sides of the balsa would be two layers. When you are all done, the wing should release from the laminated saddle.
Use a true laminating resin to fabricate the saddle and joint. A "minute" epoxy, that is used for bonding, will perform rather poorly in this scenario.
Use a true laminating resin to fabricate the saddle and joint. A "minute" epoxy, that is used for bonding, will perform rather poorly in this scenario.
10-23-2012, 06:48 PM
#30
Thread Starter
Join Date: Feb 2012
Location: Fairfield, CT
Posts: 416
Likes: 0
Received 0 Likes
on
0 Posts
Good suggestions for the wing-saddle, thank you. I still have lots of other stuff to do before I tackle that job so will think on it some more, appreciate the advice.
Shaping
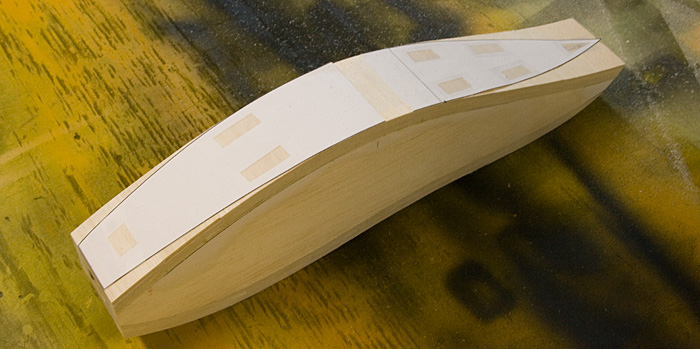
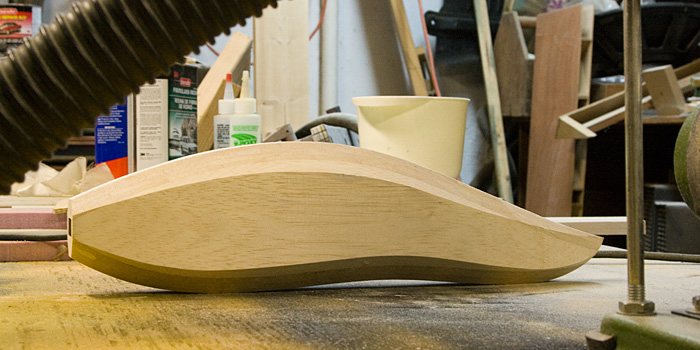
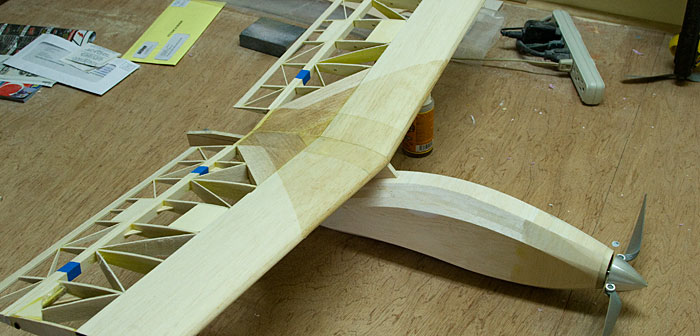
I spent a couple of hours today rounding off the pod...
You'll notice I deliberately didn't round off the line running along the lower edge. I kinda like the ways it looks, helps accent the pod's curves...
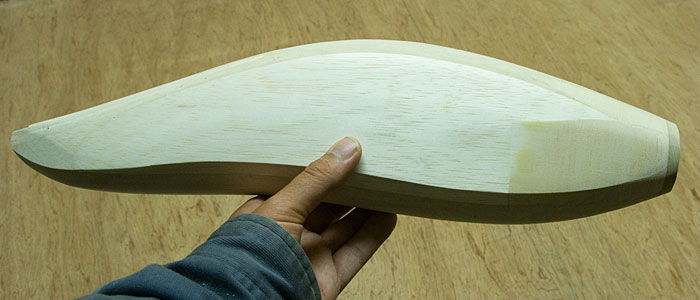
Looks a little like a flying boat hull in some ways. Remind me not to try landing on the water though...
Canopy
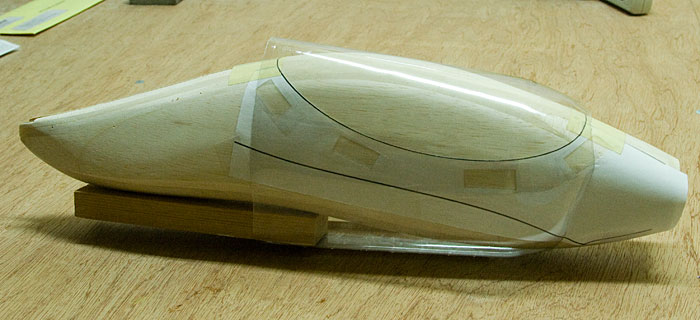
Those that have seen my other build threads will be familiar with my canopy making process. First I start by outlining the canopy...
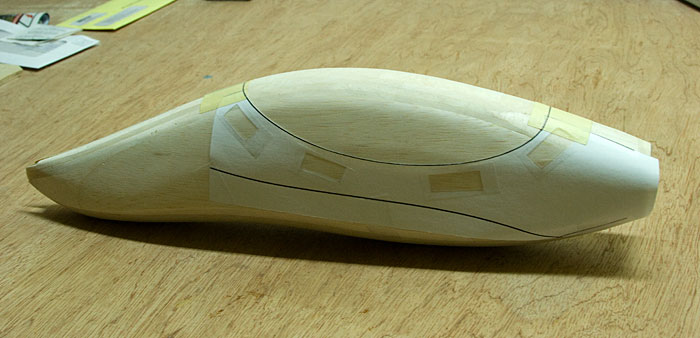
Then on goes the two liter soda-bottle...
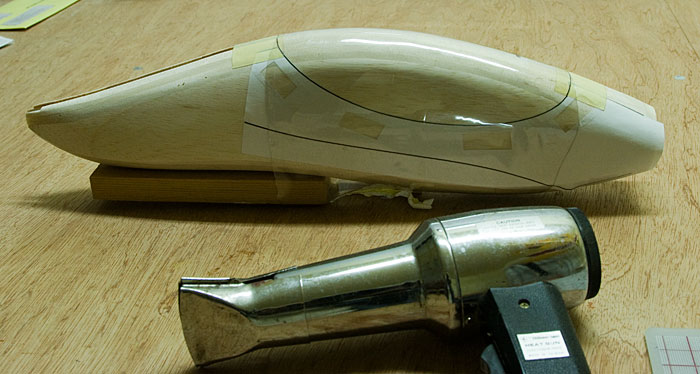
Starting along the bottom the bottle is heat-shrunk around the fuselage...
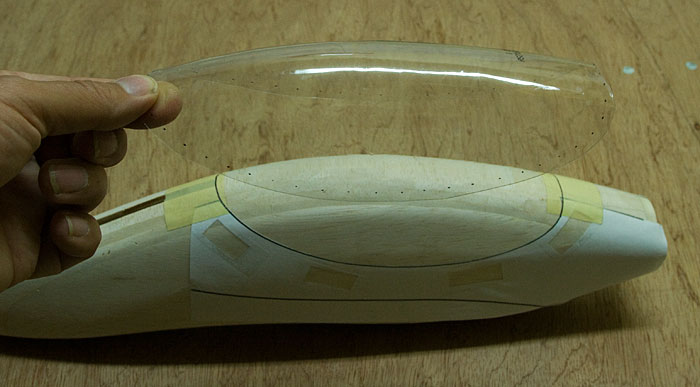
Draw some dots with a permanent marker before removing then cut her out...
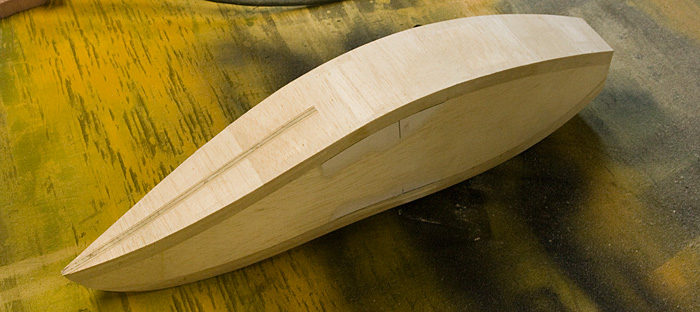
Rough cut the fuselage...
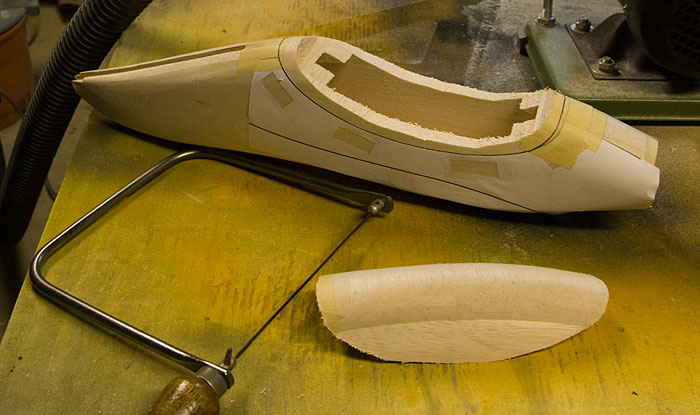
Sand to the template & test fit...
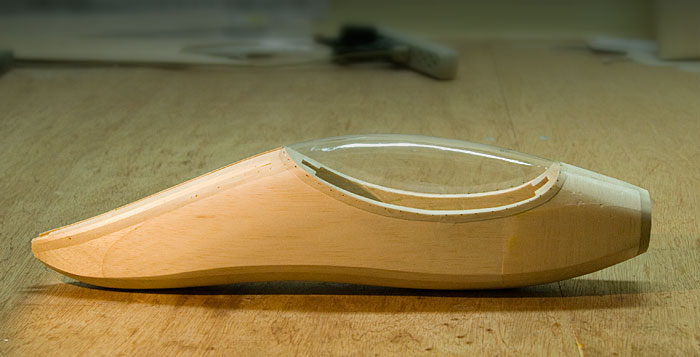
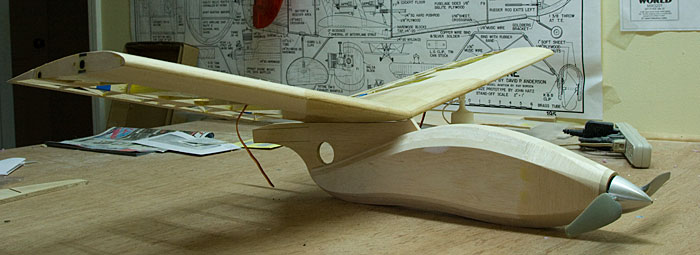
Now she's starting to look more like a sailplane, getting excited.
Shaping
I spent a couple of hours today rounding off the pod...
You'll notice I deliberately didn't round off the line running along the lower edge. I kinda like the ways it looks, helps accent the pod's curves...
Looks a little like a flying boat hull in some ways. Remind me not to try landing on the water though...
Canopy
Those that have seen my other build threads will be familiar with my canopy making process. First I start by outlining the canopy...
Then on goes the two liter soda-bottle...
Starting along the bottom the bottle is heat-shrunk around the fuselage...
Draw some dots with a permanent marker before removing then cut her out...
Rough cut the fuselage...
Sand to the template & test fit...
Now she's starting to look more like a sailplane, getting excited.
 10-25-2012, 04:31 PM
#32
Senior Member

Join Date: Nov 2009
Location: , ON, CANADA
Posts: 974
Likes: 0
Received 0 Likes
on
0 Posts
I reckon you could fly that thing through 30 missions to 1940's Berlin and there wouldn't be a scratch; Looks tough !
10-26-2012, 06:21 PM
#33
Thread Starter
Join Date: Feb 2012
Location: Fairfield, CT
Posts: 416
Likes: 0
Received 0 Likes
on
0 Posts
Like my old man taught me, build it strong or don't build it at all *grin*
[ ( { brackets } ) ]
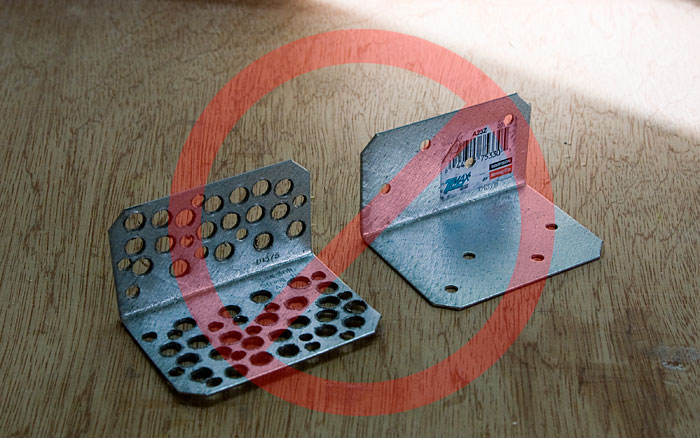
So I took a leisurely stroll around the Home Depot today & stumbled upon these nifty little steal brackets...
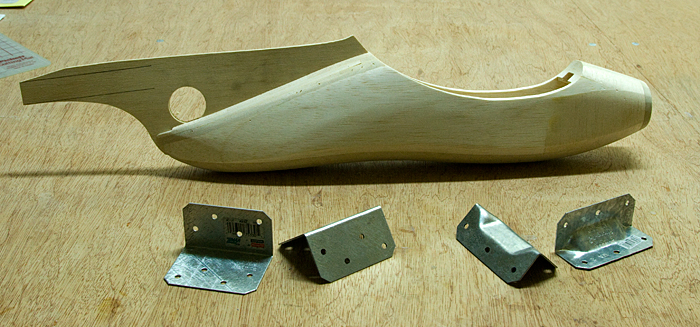
I really like these as they have a bump that should add significant strength...
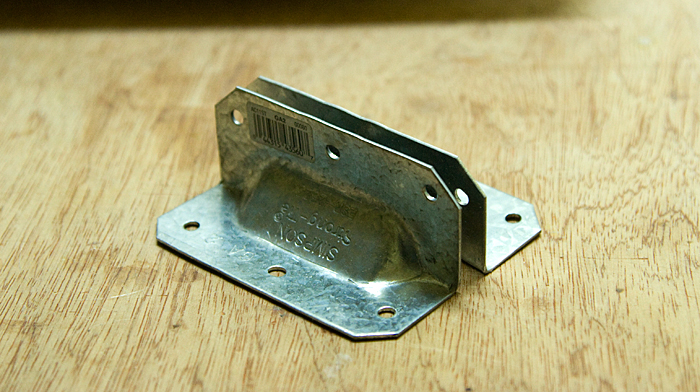
These are a little longer, no bump but they still feel really strong...
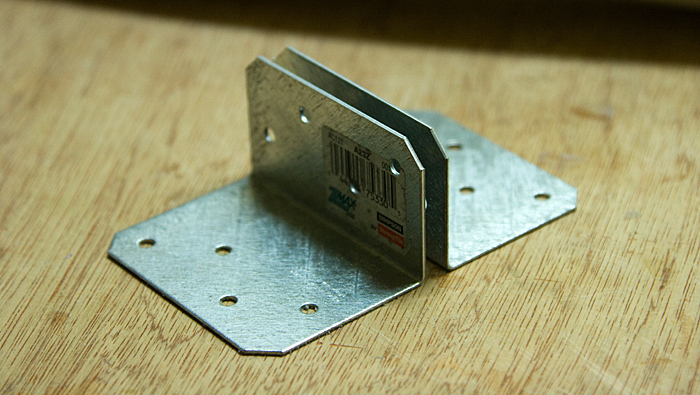
I'm liking the look of that. Simple, relatively lightweight & should be very strong...
These look like they'd work nicely too...
So not sure which of the two I'll use but I figure if I glue the brackets to a plywood wing-saddle then embed the whole thing in fiberglass I should be good to go...
The brackets are fairly lightweight but I can see maybe drilling some lightening holes here & there. That'll save some weight & give the fiberglass/epoxy more to grab a hold of. Simple, strong, sounds like a plan to me. Talk me out of it if you like.
[ ( { brackets } ) ]
So I took a leisurely stroll around the Home Depot today & stumbled upon these nifty little steal brackets...
I really like these as they have a bump that should add significant strength...
These are a little longer, no bump but they still feel really strong...
I'm liking the look of that. Simple, relatively lightweight & should be very strong...
These look like they'd work nicely too...
So not sure which of the two I'll use but I figure if I glue the brackets to a plywood wing-saddle then embed the whole thing in fiberglass I should be good to go...
The brackets are fairly lightweight but I can see maybe drilling some lightening holes here & there. That'll save some weight & give the fiberglass/epoxy more to grab a hold of. Simple, strong, sounds like a plan to me. Talk me out of it if you like.
10-27-2012, 02:50 AM
#34
Senior Member
Forget the STEEL brackets. Simple fiberglas reinforcement would work and is going to be much lighter. Remember how the dense foamy flew? How would it have flown with additional stiffening. Or more exactly, how did it fly with additional stiffening that could have been lighter.
Read up on interference drag. It's the problem aircraft designers have with unstreamlined, 90 degree interior corners. The solution is often fairings. The fairings are perfect where you want the corner brackets for providing reinforcement that is economic of weight.
Consider also a wider structure from the fuselage to the wing saddle. The present slab of plywood introduces an interference drag where it joins to the fuselage, and compounds the problem just above there where the wing is going to be strapped on.
Remember the WWII Corsair? It used the identical engine the Hellcat used. The Hellcat's wing to fuselage joint had an interference drag problem along the upper connection. The Corsair, thanks to it's distinctive bent wing, joined the wing to the fuselage at right angles. Right angles aren't the perfect solution, faired joints are. Yet, the Corsair was significantly faster than the Hellcat. Everything else was basically equal. Not only was the Corsair faster, but it easily carried significantly more stores at higher speed as well. It wasn't the gull wing, because they actually are less efficient. Was it the Hellcat's less efficient wing to fuselage convergence? There really isn't anything else that differs between the two.
Consider again the TWO joints. Fuselage to pylon. Pylon to wing.
BTW, interference drag is also a minor consideration when deciding on where a wing's dihedral breaks should be. Every little thing can matter.
10-28-2012, 03:41 PM
#35
Thread Starter
Join Date: Feb 2012
Location: Fairfield, CT
Posts: 416
Likes: 0
Received 0 Likes
on
0 Posts
Stubborn Bugger
I've not weighed the brackets but they're nothing I'm worried about, especially once I've "Swiss-cheesed" them. I'm getting lots of suggestions to just use fiberglass & I do intend to FG the heck out of the joint but I want something else in there too.
Fiberglass is good stuff no doubt but from experience I know it also has its limitations. For example look at what happened to my fiberglass four meter sailplane after a moderately bumpy landing...
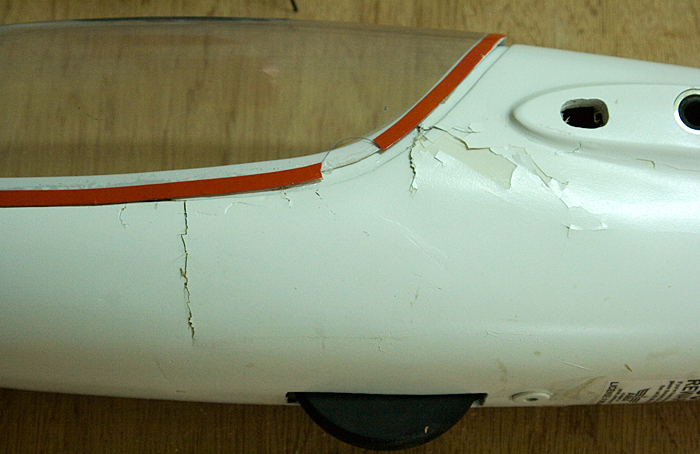
Fiberglass is rigid & cracks, metal is substantially inflexible but when it does move it just bends. I think a combo of both will be perfect for this application.
I know you folks already know this stuff but I'd like to explain my thinking here:
This all comes down to leverage. Archimedes famously said, "If you give me a lever long enough and a place to stand, I can move the world." While I have no Earth moving aspirations, my understanding is because I have just 1/4" of pylon to work with here Vs a normal fuselage with its wide wing mounting area, there's going to be a lot more force on this joint than usual...
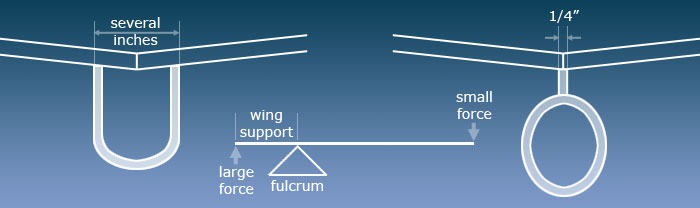
I did a little math & was astonished to learn...
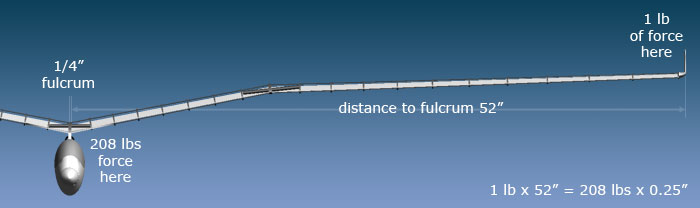
So with that in mind, yeah I'm going to stick some steal in there along with some fiber-glassing.
So here's a rough diagram of what I'm building...

Anyway not sure exactly when I'll get to this. Situated directly in the path of hurricane Sandy I'm expecting some "interesting" weather over the next few days. At the very least I expect I'll lose power for a while, will have to see how I feel about working in the dark *grin*. Anyway see you all later this week I hope. Stay safe.
I've not weighed the brackets but they're nothing I'm worried about, especially once I've "Swiss-cheesed" them. I'm getting lots of suggestions to just use fiberglass & I do intend to FG the heck out of the joint but I want something else in there too.
Fiberglass is good stuff no doubt but from experience I know it also has its limitations. For example look at what happened to my fiberglass four meter sailplane after a moderately bumpy landing...
Fiberglass is rigid & cracks, metal is substantially inflexible but when it does move it just bends. I think a combo of both will be perfect for this application.
I know you folks already know this stuff but I'd like to explain my thinking here:
This all comes down to leverage. Archimedes famously said, "If you give me a lever long enough and a place to stand, I can move the world." While I have no Earth moving aspirations, my understanding is because I have just 1/4" of pylon to work with here Vs a normal fuselage with its wide wing mounting area, there's going to be a lot more force on this joint than usual...
I did a little math & was astonished to learn...
So with that in mind, yeah I'm going to stick some steal in there along with some fiber-glassing.
So here's a rough diagram of what I'm building...
Anyway not sure exactly when I'll get to this. Situated directly in the path of hurricane Sandy I'm expecting some "interesting" weather over the next few days. At the very least I expect I'll lose power for a while, will have to see how I feel about working in the dark *grin*. Anyway see you all later this week I hope. Stay safe.
10-28-2012, 05:20 PM
#36
Senior Member
ORIGINAL: Nodd
Stubborn Bugger
I've not weighed the brackets but they're nothing I'm worried about, especially once I've ''Swiss-cheesed'' them. I'm getting lots of suggestions to just use fiberglass & I do intend to FG the heck out of the joint but I want something else in there too.
Fiberglass is good stuff no doubt but from experience I know it also has its limitations. For example look at what happened to my fiberglass four meter sailplane after a moderately bumpy landing...
[img][/img]
Fiberglass is rigid & cracks, metal is substantially inflexible but when it does move it just bends. I think a combo of both will be perfect for this application.
Anyway, some fiberglass IS rigid and cracks. Very few modelers make theirs with polyester resin. What we reinforce with it really isn't going to be brittle. And that's not the real problem here. And it's not the more important detail of the structure you're wanting to create either.
Just like having carbon fiber reinforcement anywhere in a model like a glider that normally flexes visibly in lots of places, having absolutely rigid structures anywhere in the glider fights that normal bending. Where the absolutely rigid support stops is where you're going to find your next crash damage. And sometimes it happens very shortly before the crash.
But what the heck. I'm not a terminally stubborn bugger. I'd like to see how your steel works out for you. I'll still suggest stubbornly that there is absolutely no value in having all that steel in the brackets. Drilling more holes in them than there will be steel left really would be worth the effort.
BTW, if your fibergalss 4M sailplane broke like the picture shows as a result of a moderately bumpy landing, I got twenty bucks says it was made with polyester resin. And the exposed section of cloth at the forward most damage suggests polyester as well. Good thing is that epoxying inside the fuselage from the wing mount forward with a couple of layers of cloth will cover the area where the stress risers from the impact did the most damage, and you'll be not only reinforcing where the stress won the previous battle, but you'll be moving the place where the next stress risers might happen farther out, reducing their leverage.
10-28-2012, 05:42 PM
#37
Senior Member
The real problem isn't at the very center of the wing, but everywhere along the wing that resists the wing from naturally dealing with the forces from root to tip.
Using the 208 lbs for a start, where the unmovable cradle stops a couple of inches out from the center of the wing there is going to be pretty close to 208 lbs of force trying to snap that wing off right there where the most vicious stress riser will be. There will also be some mean stress risers out on the dihedral joint outboard on the wing.
Everywhere we reinforce the hell out of things, those things experience hell when the entire system is stressed. The hell will be focused where the flexing is stopped.
BTW, the saddle will of course be strong enough to shift a lot of stress elsewhere. (the stress isn't absorbed by absolutely rigid structures) So where could the stress go? How about where the pylon enters the fuselage? and there is no steel to completely pass the stress to somewhere else.
10-28-2012, 06:02 PM
#38
Senior Member
Hey, Fairfield is right on the ocean. Hope you live on a hill.
All kidding aside, hope the really important things work out for you and family.
All kidding aside, hope the really important things work out for you and family.
10-28-2012, 06:09 PM
#39
Thread Starter
Join Date: Feb 2012
Location: Fairfield, CT
Posts: 416
Likes: 0
Received 0 Likes
on
0 Posts
I should probably clarify the "Stubborn Bugger" title is in reference to my die-hard insistence on using these metal brackets. I'm the stubborn bugger not you. Re-reading my post I can see how that'd easily be taken the other way which was not my intent. My other mirror threads are worded exactly the same (RC Groups, Wattflyer). My apologies.
Yeah I'm no expert when it comes to fiberglass but I've sure seen my fair share of beat up, cracked, weathered, & UV'ed to death glass in my day. Just to add to my distrust my flying buddy just shattered his rather expensive DG 1000's glass fuselage yesterday during an aborted aerotow. The stuff while lightweight is far from indestructible. I like indestructible.
After spending a lot of time building a bullet-proof Kevlar wrapped carbon-fiber wing-spar, I think it'd be daft to not continue at least some level of overkill in joining that wing to the fuselage. A strong wing does me no good if its not attached to the plane *grin*
As far as drilling holes in the brackets to keep them light, if you notice in my last post's first sentence I cryptically alluded to doing just that (Swiss-cheesed).
My four meter Discus has been repaired & is flying great. Two layers of heavy glass inside fixed her up.
Anyway enough time spent explaining my self. Time to get back to the workshop.
10-28-2012, 06:50 PM
#44

My Feedback: (98)

Join Date: Feb 2002
Location: The Villages, Florida NJ
Posts: 4,677
Likes: 0
Received 0 Likes
on
0 Posts
I wouldn't use the steel brackets for a couple of reasons:
When the steel part is stressed it will bend, now that you have a bent piece of metal in the center of your structure how do you straighten it?
When you make the structure out of different materials the part will bend, vibrate, expand and contract all differently.
You part is really only be as strong as the strongest part. All the rest is just weight. Let's take stiffness for example, CF is stiffer than glass, glass is stiffer than steel. The CF is going to take all the load until it fails, then the glass get all the load and it's not as stiff as CF so it immediately fails, then steel the weakest get all the load and fails immediately.
I'd stay away from Kevlar on anything you might have to sand, unless you like that tennis ball look.
10-28-2012, 06:54 PM
#45
My Feedback: (98)
Join Date: Feb 2002
Location: The Villages, Florida NJ
Posts: 4,677
Likes: 0
Received 0 Likes
on
0 Posts
ORIGINAL: soarrich
I wouldn't use the steel brackets for a couple of reasons:
When the steel part is stressed it will bend, now that you have a bent piece of metal in the center of your structure how do you straighten it?
When you make the structure out of different materials the part will bend, vibrate, expand and contract all differently.
You part is really only be as strong as the strongest part. All the rest is just weight. Let's take stiffness for example, CF is stiffer than glass, glass is stiffer than steel. The CF is going to take all the load until it fails, then the glass gets all the load and it's not as stiff as CF so it immediately fails, then steel the weakest get all the load and fails immediately.
I'd stay away from Kevlar on anything you might have to sand, unless you like that tennis ball look.
10-28-2012, 06:57 PM
#46
Thread Starter
Join Date: Feb 2012
Location: Fairfield, CT
Posts: 416
Likes: 0
Received 0 Likes
on
0 Posts
Good points but I'm using the steal brackets. Here's why...
Maybe someone who knows what they're doing with fiber-glass could make a reasonably strong joint but I'm going to be a lot happier using those brackets instead.
You're correct, combining materials with different properties can be bad news. However I'm not sure I'm really combining things here. The brackets are the main load baring members & will be doing most of the work holding the wing-saddle square to the pylon. The balsa filleting & other stuff is there mainly for aerodynamic & aesthetic reasons.
Yeah if something harsh enough to bend those brackets occurs, bent brackets will be the least of my problems.
Addressing some of da rock's concerns...
He was worried that the end of my wing-saddle might be a stress point & he has a point. If we look at my wing-saddle design you'll notice its made of three layers of ply, each one slightly larger than the next. Kinda like a leaf-spring, this tapers the strength & hopefully should "soften" the end of the saddle.
As far as where the 1/4" plywood enters the fuselage, yes that's the next weak point but its not a joint, its continuous 1/4" plywood running deep into the fuselage. If the plywood breaks, the plywood breaks, not much I can do about that. Again I'm fairly confident its up to the task.
I do appreciate advice & I take it all into consideration. Please realize I'm a stubborn bugger & often I like to do things my way. Actually I'm inclined to occasionally do things differently just for the sake of being different. Its one of the main reasons I enjoy the freedom of scratch designing/building. I'm at least 51% sure I know what I'm doing *grin*. The other 49% I rely on you folks for. Anyway I'm going to go watch TV while we still have power. Looking forward to getting back to this soon I hope.
10-29-2012, 02:36 AM
#47
Senior Member
Join Date: Aug 2003
Location: Bogota, COLOMBIA
Posts: 322
Likes: 0
Received 0 Likes
on
0 Posts
Why not do it the other way around?
Attach the pilot permanently to the wing, with internal dowels or even just a pilon that includes the center rib. Off course that would mean mayor surgery to the wing, but it'll be rock solid. On the other end you have a nice huge area of support between the sadwiched-in pilon and the wood. I guess a couple of nylon wing screws from the underside of the fuse and into the pilon will work great just to hold it in there.
Attach the pilot permanently to the wing, with internal dowels or even just a pilon that includes the center rib. Off course that would mean mayor surgery to the wing, but it'll be rock solid. On the other end you have a nice huge area of support between the sadwiched-in pilon and the wood. I guess a couple of nylon wing screws from the underside of the fuse and into the pilon will work great just to hold it in there.
11-10-2012, 08:24 PM
#49
Thread Starter
Join Date: Feb 2012
Location: Fairfield, CT
Posts: 416
Likes: 0
Received 0 Likes
on
0 Posts
Yeah I like Kevlar, great stuff. I used it extensively in the wing & as you'll see, I'm also using it in the fuselage.
Yeah colmo, I'd considered permanently mounting the pylon to the wing. It slots so nicely into my fuselage, that'd be a great way to do things except as you guessed, it'd mean taring the wing apart. If I'd know I was going to do something like this when I was building the wing, then yeah I'd have probably done things the other way around. Something to consider if/when I make the plans available.
Hurricanes are zero fun!
Six days without power! Yeah that sucked but I can't complain. Lots of folks in my area don't even have houses anymore. Other than losing everything in the refrigerator there's no real damage at my place. The power finally came on a few days ago so I'm back in my workshop futzing with my airplane again.
Okay fine
I still feel these metal brackets would have been an elegant, effective, simple & strong solution for attaching the wing to the pylon but enough of you have grunted & grumbled about them that I've decided to go with a more traditional plywood/glass approach...
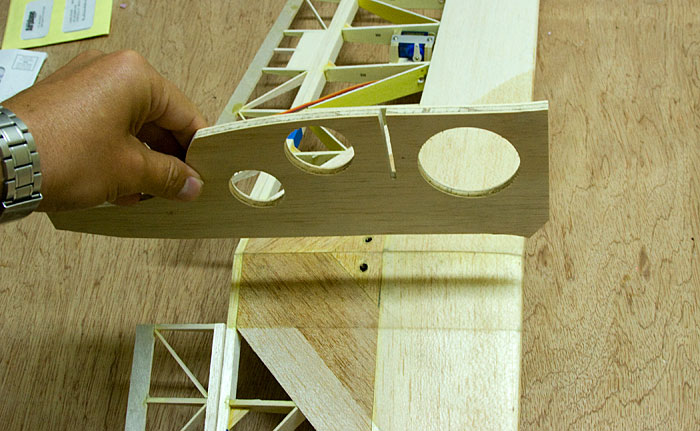
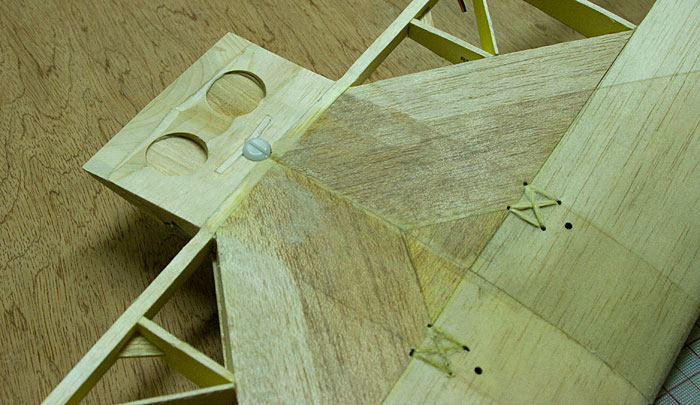
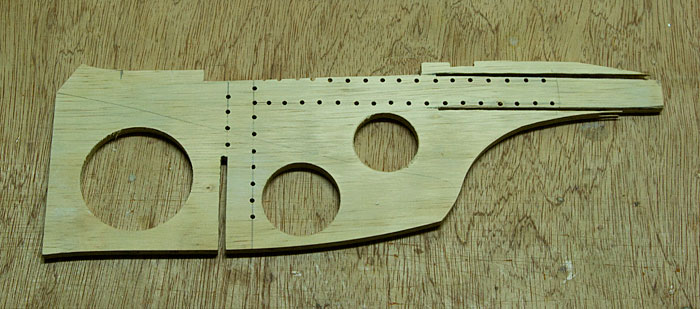
Before I can even start building the wing-saddle though, I need to figure out my wing-bolt system. I chose to install three hard-points on the wing, two right at the spar & one buried in the trailing-edge...
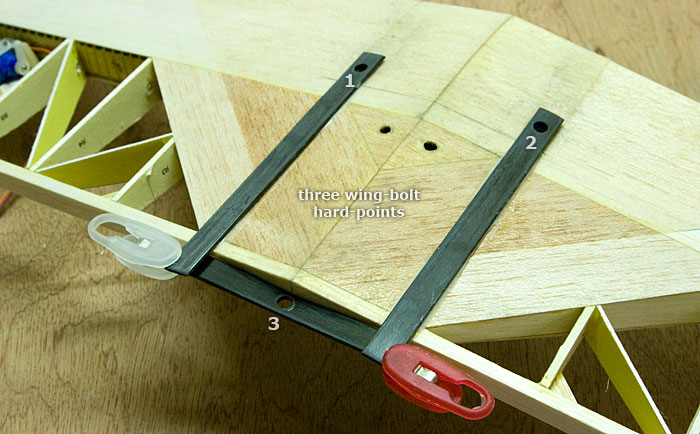
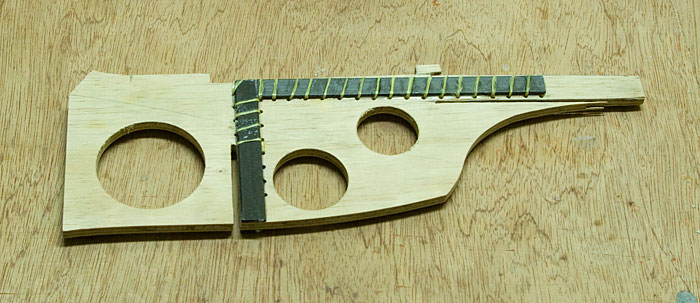
The carbon-bars are firmly attached to the structure using epoxy & Kevlar thread. This all looks a bit ugly right now but it'll get pretty again once its integrated into the wing-saddle...
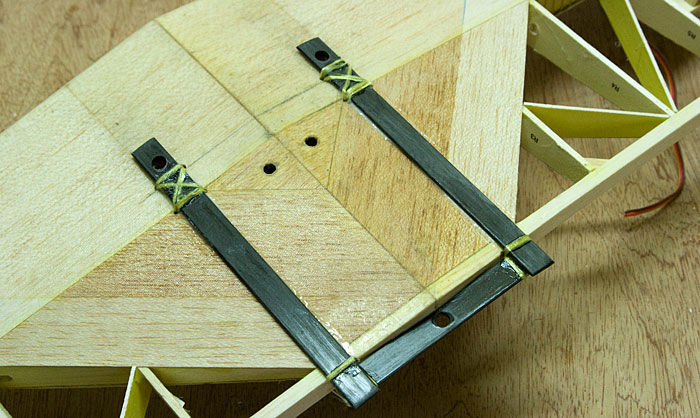
Added the trailing edge & test fitted the rear wing-bolt. In this top view you can still see how the Kevlar is wrapped around the main-spar...
Wing Saddle
With my mounting system in place it was time to turn my attention towards the wing-saddle...
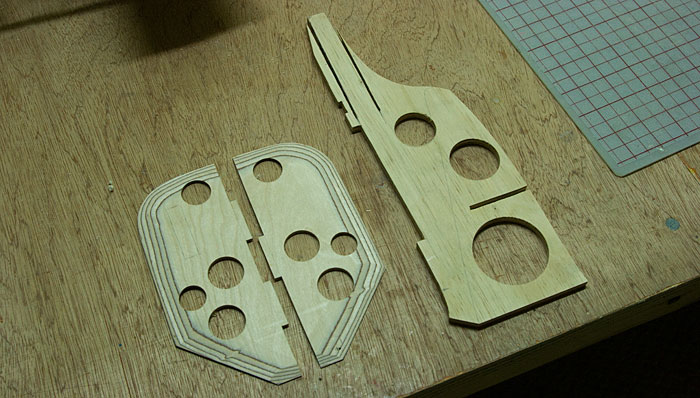
Testing fitting...
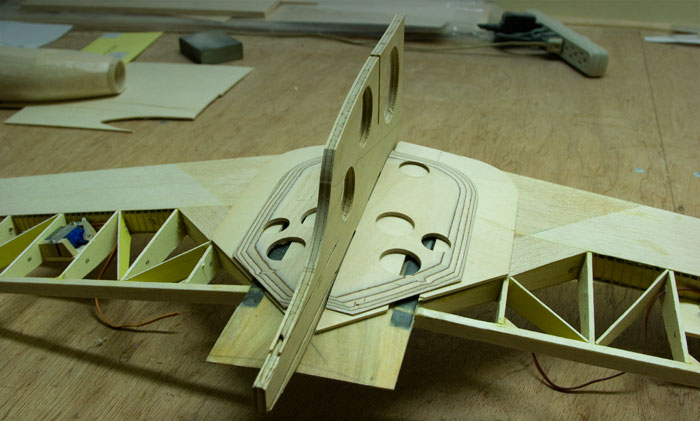
Before I can start adding fillets & glass, I need to get the tail-boom mounted. I'm using a double slot technique here which has worked nicely for me in the past...
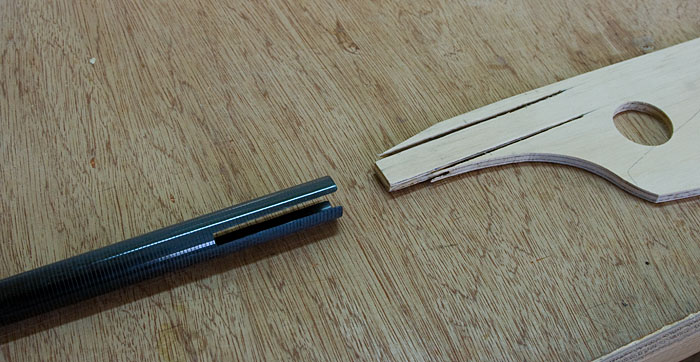
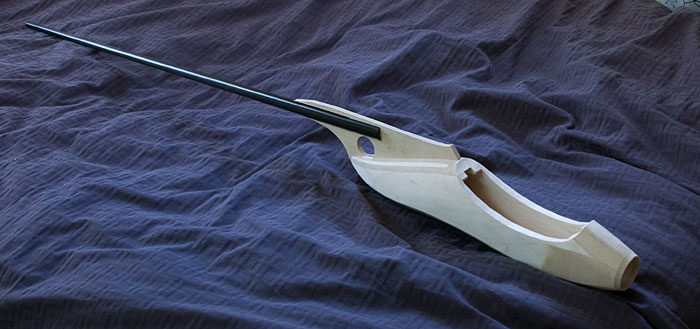
Here's how she looks with a Bubble Dancer tail-boom attached...
Lets make this chunk of wood even more complicated...
Added some Kevlar wrapped carbon-fiber. The horizontal one to reinforce where the tail boom mounts, the vertical one to give the pylon some added support...
Here's how the wing-saddle is looking...
Gluing the pylon to the saddle...
The next step is to lay down some fiber-glass. Then I'll add some 1/2" balsa either side of the pylon & do some shaping. Will post more soon.
Yeah colmo, I'd considered permanently mounting the pylon to the wing. It slots so nicely into my fuselage, that'd be a great way to do things except as you guessed, it'd mean taring the wing apart. If I'd know I was going to do something like this when I was building the wing, then yeah I'd have probably done things the other way around. Something to consider if/when I make the plans available.
Hurricanes are zero fun!
Six days without power! Yeah that sucked but I can't complain. Lots of folks in my area don't even have houses anymore. Other than losing everything in the refrigerator there's no real damage at my place. The power finally came on a few days ago so I'm back in my workshop futzing with my airplane again.
Okay fine
I still feel these metal brackets would have been an elegant, effective, simple & strong solution for attaching the wing to the pylon but enough of you have grunted & grumbled about them that I've decided to go with a more traditional plywood/glass approach...
Before I can even start building the wing-saddle though, I need to figure out my wing-bolt system. I chose to install three hard-points on the wing, two right at the spar & one buried in the trailing-edge...
The carbon-bars are firmly attached to the structure using epoxy & Kevlar thread. This all looks a bit ugly right now but it'll get pretty again once its integrated into the wing-saddle...
Added the trailing edge & test fitted the rear wing-bolt. In this top view you can still see how the Kevlar is wrapped around the main-spar...
Wing Saddle
With my mounting system in place it was time to turn my attention towards the wing-saddle...
Testing fitting...
Before I can start adding fillets & glass, I need to get the tail-boom mounted. I'm using a double slot technique here which has worked nicely for me in the past...
Here's how she looks with a Bubble Dancer tail-boom attached...
Lets make this chunk of wood even more complicated...
Added some Kevlar wrapped carbon-fiber. The horizontal one to reinforce where the tail boom mounts, the vertical one to give the pylon some added support...
Here's how the wing-saddle is looking...
Gluing the pylon to the saddle...
The next step is to lay down some fiber-glass. Then I'll add some 1/2" balsa either side of the pylon & do some shaping. Will post more soon.