


Jeti-duplex-ds-16-2.4-ghz
 12-22-2013, 10:01 AM
#201
Hasn't been much activity lately, I ran across the following videos for those of you who like to see how its made...
http://www.youtube.com/watch?v=sK0sdkU5Q8U
http://www.youtube.com/watch?v=O03uhxtuDhs
http://www.youtube.com/watch?v=zDJdxsdKd0c
http://www.youtube.com/watch?v=tBS16GRIU7o
http://www.youtube.com/watch?v=fjxkT0O5q-k
http://www.youtube.com/watch?v=sK0sdkU5Q8U
http://www.youtube.com/watch?v=O03uhxtuDhs
http://www.youtube.com/watch?v=zDJdxsdKd0c
http://www.youtube.com/watch?v=tBS16GRIU7o
http://www.youtube.com/watch?v=fjxkT0O5q-k
Last edited by RCISFUN; 12-22-2013 at 10:06 AM.
 12-23-2013, 08:01 AM
#204
Senior Member
Join Date: Jun 2013
Location: , FL
Posts: 423
Likes: 0
Received 0 Likes
on
0 Posts
I do not know if you guys have seen this:
http://blog.espritmodel.com/early-20...ystem-1090-00/
Zb/Jeti USA
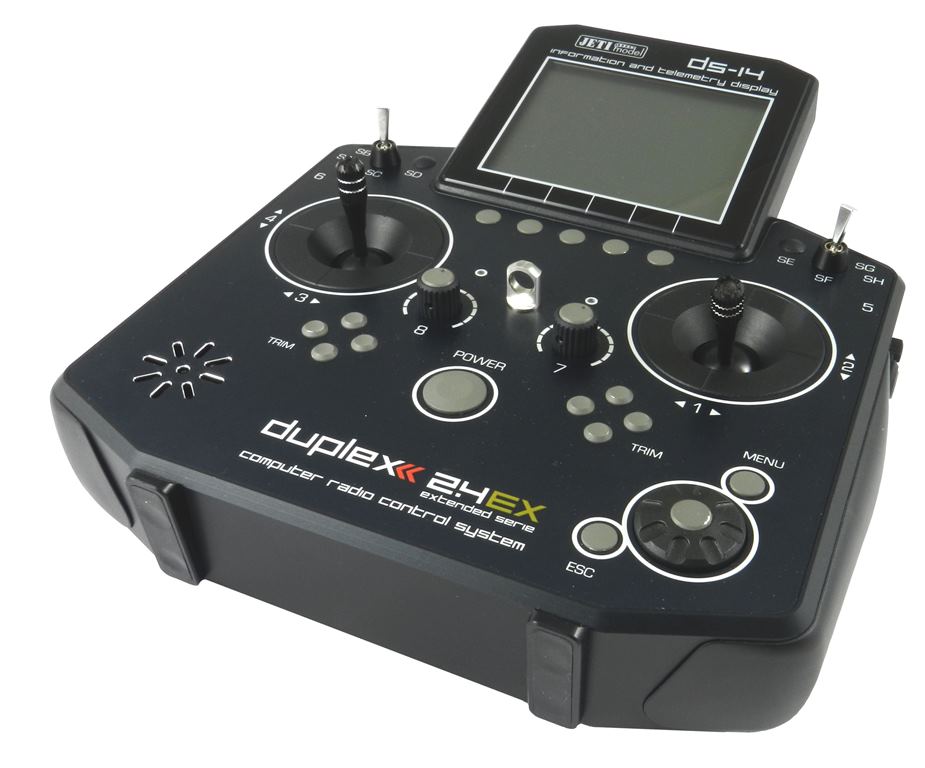
Early 2014, Jeti Duplex DS-14 2.4GHz Radio System ($1090.00)!!!
This revolutionary, digital, 14 Channel, 2.4GHz, frequency hopping radio system is based on very successful DS-16. The complete line of radio systems has been designed and manufactured by Jeti Model in the Czech Republic. The DS-14 is one of the most advanced radio systems on today’s market. With solid CNC aluminum case, large LCD display with a fully integrated antennas, a mini USB port, built-in speaker, headset jack, plastic transmitter gimbals with Hall sensors (4096 step resolution) and 9 ball bearings for precision movement, a large 320�240 backlight display and many other features of the Jeti DS-14 is sure to become the new standard for transmitter performance.
The Jeti DS-14 2.4GHz Radio System is Expected Early 2014, Price $1090.00!!!

http://blog.espritmodel.com/early-20...ystem-1090-00/
Zb/Jeti USA
Early 2014, Jeti Duplex DS-14 2.4GHz Radio System ($1090.00)!!!
This revolutionary, digital, 14 Channel, 2.4GHz, frequency hopping radio system is based on very successful DS-16. The complete line of radio systems has been designed and manufactured by Jeti Model in the Czech Republic. The DS-14 is one of the most advanced radio systems on today’s market. With solid CNC aluminum case, large LCD display with a fully integrated antennas, a mini USB port, built-in speaker, headset jack, plastic transmitter gimbals with Hall sensors (4096 step resolution) and 9 ball bearings for precision movement, a large 320�240 backlight display and many other features of the Jeti DS-14 is sure to become the new standard for transmitter performance.
The Jeti DS-14 2.4GHz Radio System is Expected Early 2014, Price $1090.00!!!
12-23-2013, 11:02 AM
#205

The Jeti DC/DS-16 system seems to be a fundamental step ahead of other systems we’ve previously used. The capabilities of the system, particularly the Dual Path and telemetry, provide the modeler with increased reliability and awareness of how the system is performing. Additionally, the radio is flexible in that it offers the modeler several Tx/Rx configurations allowing the user to choose the setup that best meets their needs.
Dave Brawley - GooseF22 and myself (Jim McEwen – rcjets_63) have recently been experimenting with various receiver configurations to further learn this system and to determine which setups we like the best. We have discovered some of the pros/cons associated with the different receiver/setup options. What we found is that there are trade-offs for every setup and we’d like to present what we’ve learned in plain/simple language in the hopes that other Jeti users can use this information to make an informed choice of which setup would work best for them and their model.
Regards,
Dave (GooseF22) & Jim (rcjets_63)
Last edited by rcjets_63; 12-23-2013 at 11:08 AM.
12-23-2013, 11:03 AM
#206
Before getting to these, let’s briefly discuss a few basics which will be referred to when discussing the configurations.
Receiver Modes & Diversity:
Receivers actually perform several tasks as follows:
Receivers have two modes: Normal (default) and Clone mode as explained below.
Normal mode is pretty much what you expect. The receiver performs the three functions listed above. A receiver in Normal mode can be used on it's own or as a satellite (when using two or more receivers).
Note: A satellite receiver is essentially a backup that receives the RF signals and converts them into a PPM string where they are sent (over a 3-conductor servo cable) to another receiver.
Clone mode can be used for a satellite receiver. When a receiver is in clone mode, it does not transmit telemetry data. Since the clone has one-way communication with the Tx (only receives info from the Tx but doesn't send telemetry info back to the Tx) the clone can be bound to multiple Tx modules which are already bound for two-way communication with other receivers.
Other Receiver Info
Binding
Unlike most other transmitters, the Jeti DC/DS-16 has two RF modules transmitting the radio signals to your model. A receiver can be bound to one of the Tx modules or to both modules depending on your selected configuration/setup.
Regards,
Dave (GooseF22) & Jim (rcjets_63)
Receiver Modes & Diversity:
Receivers actually perform several tasks as follows:
- Receive signals from the Tx, de-multiplexes the signals, and sends commands to the individual output ports for the servos.
- Receives signals from the Tx, and converts them into a PPM stream which can be sent to other receivers via a 3-conductor servo cable
- Transmits (back to the Tx) any telemetry information generated within the receiver (such as Rx voltage and antenna strength) and from sensors plugged into the receiver EXT port.
Receivers have two modes: Normal (default) and Clone mode as explained below.
Normal mode is pretty much what you expect. The receiver performs the three functions listed above. A receiver in Normal mode can be used on it's own or as a satellite (when using two or more receivers).
Note: A satellite receiver is essentially a backup that receives the RF signals and converts them into a PPM string where they are sent (over a 3-conductor servo cable) to another receiver.
Clone mode can be used for a satellite receiver. When a receiver is in clone mode, it does not transmit telemetry data. Since the clone has one-way communication with the Tx (only receives info from the Tx but doesn't send telemetry info back to the Tx) the clone can be bound to multiple Tx modules which are already bound for two-way communication with other receivers.
Other Receiver Info
- All receivers (R3 – R18) receive all 16 channels and can send out all 16 channels in a PPM stream.
- Only receivers R7 through R18 have Sat ports that can accept the PPM stream.
- When setting up the satellite receiver, you’ll want to set the receiver speed and number of channels to match the primary receiver.
- You need to turn off the failsafe of the satellite receiver.
- A table in the Rx manual shows which output port on a receiver can be used to send the PPM stream.
Binding
Unlike most other transmitters, the Jeti DC/DS-16 has two RF modules transmitting the radio signals to your model. A receiver can be bound to one of the Tx modules or to both modules depending on your selected configuration/setup.
Regards,
Dave (GooseF22) & Jim (rcjets_63)
Last edited by rcjets_63; 12-23-2013 at 12:18 PM.
12-23-2013, 11:06 AM
#207
Receiver Setups
Although Dave and I have experimented with seven different types of setups (yeah, wow, that seems complicated), presented below are the setups which we’d expect would be most commonly used.
Single receiver
In this case, you have a single receiver (in normal/default mode) installed in the plane. The receiver is bound to both RF modules in the transmitter. The transmitter receives telemetry data including the signal strength of both antennas mounted to the receiver.
While this is a very simple setup, it really doesn’t take advantage of the capabilities of the system. The receiver is communicating with both Tx modules (giving you transmitter redundancy) but you have only one receiver (and thus no receiver redundancy).
Pros:
Cons:
This is the setup recommended for first-time users in something reasonably inexpensive like a foamy where you aren't worried about having a lot of redundancy. It's simple and easy and will help you get into the air without having to set up additional receivers. You can concentrate on trying out your brand new shiny transmitter, how it feels, if you want to move any switches, and how the transmitter is programmed.
Regards,
Dave (GooseF22) & Jim (rcjets_63)
Although Dave and I have experimented with seven different types of setups (yeah, wow, that seems complicated), presented below are the setups which we’d expect would be most commonly used.
Single receiver
In this case, you have a single receiver (in normal/default mode) installed in the plane. The receiver is bound to both RF modules in the transmitter. The transmitter receives telemetry data including the signal strength of both antennas mounted to the receiver.
While this is a very simple setup, it really doesn’t take advantage of the capabilities of the system. The receiver is communicating with both Tx modules (giving you transmitter redundancy) but you have only one receiver (and thus no receiver redundancy).
Pros:
- simple and inexpensive (since you only are using one receiver)
- redundancy of the transmitted signal (in case one of the two TX modules fails)
- you can plug more than one battery into the receiver
Cons:
- no receiver redundancy
- there is no isolation between multiple batteries plugged into the same receiver
This is the setup recommended for first-time users in something reasonably inexpensive like a foamy where you aren't worried about having a lot of redundancy. It's simple and easy and will help you get into the air without having to set up additional receivers. You can concentrate on trying out your brand new shiny transmitter, how it feels, if you want to move any switches, and how the transmitter is programmed.
Regards,
Dave (GooseF22) & Jim (rcjets_63)
Last edited by rcjets_63; 12-23-2013 at 12:43 PM.
12-23-2013, 11:11 AM
#208
Receiver Setups
Dual Receivers – Dependent - Clone
This setup adds another receiver to provide receiver redundancy. The second receiver is also bound to both Tx modules.
You use a (typically larger) “primary” receiver (R7 though R18) bound in Normal mode to both Tx modules. All servos are plugged into this receiver. You then set up a second receiver (typically an R3 through R6) as a satellite. The satellite is first bound to both Tx modules and is set as a clone with its failsafe turned off. The satellite receiver provides a continuous PPM stream unless it completely loses signal reception at which point the PPM stream stops. A male-to-male servo connector is used to connect the clone’s PPM out port to the primary receiver’s Sat port.
Setup Notes: During the setup, you have to tell the primary receiver to expect PPM data at its Sat port. Also, since the clone doesn’t transmit telemetry data (including the signal strength at its antennas) you’ll want to set up an alarm in the primary receiver to let you know if the PPM stream from the satellite stops (which means the satellite receiver has lost signal)
This setup has the primary receiver watching both Tx modules and provides datalink and antenna strength on the primary receiver only. The clone is also watching both Tx modules but remains in the background giving PPM signal backup to the primary receiver. While you can’t see the antenna strength of the clone, you still know it is functioning since there is an alarm if its PPM signal stops.
Pros:
Cons:
This setup has the primary advantage that both receivers are each bound to both Tx modules. The primary disadvantage is that you can't see the signal strength of the antennas on the clone receiver (although you do have an alarm is the clone loses signal).
Regards,
Dave (GooseF22) & Jim (rcjets_63)
Dual Receivers – Dependent - Clone
This setup adds another receiver to provide receiver redundancy. The second receiver is also bound to both Tx modules.
You use a (typically larger) “primary” receiver (R7 though R18) bound in Normal mode to both Tx modules. All servos are plugged into this receiver. You then set up a second receiver (typically an R3 through R6) as a satellite. The satellite is first bound to both Tx modules and is set as a clone with its failsafe turned off. The satellite receiver provides a continuous PPM stream unless it completely loses signal reception at which point the PPM stream stops. A male-to-male servo connector is used to connect the clone’s PPM out port to the primary receiver’s Sat port.
Setup Notes: During the setup, you have to tell the primary receiver to expect PPM data at its Sat port. Also, since the clone doesn’t transmit telemetry data (including the signal strength at its antennas) you’ll want to set up an alarm in the primary receiver to let you know if the PPM stream from the satellite stops (which means the satellite receiver has lost signal)
This setup has the primary receiver watching both Tx modules and provides datalink and antenna strength on the primary receiver only. The clone is also watching both Tx modules but remains in the background giving PPM signal backup to the primary receiver. While you can’t see the antenna strength of the clone, you still know it is functioning since there is an alarm if its PPM signal stops.
Pros:
- receiver redundancy
- antenna diversity (you now have four antennas)
- both receivers are each connected to both Tx modules (quad redundancy?)
- you can plug more than one battery into one or both receivers
Cons:
- added cost of second receiver (not too bad as R3 to R6 receivers are inexpensive)
- there is no isolation between multiple batteries plugged into the receivers
- one receiver is in clone mode so it doesn’t transmit telemetry data including its antenna signal strength.
- a bit tougher to set up as you have to bind the clone to both Tx modules in a separate procedure.
- can’t use the EXT port of the satellite (clone) receiver to plug in sensors.
This setup has the primary advantage that both receivers are each bound to both Tx modules. The primary disadvantage is that you can't see the signal strength of the antennas on the clone receiver (although you do have an alarm is the clone loses signal).
Regards,
Dave (GooseF22) & Jim (rcjets_63)
Last edited by rcjets_63; 12-23-2013 at 12:58 PM.
12-23-2013, 11:17 AM
#209
Now we move on to “Dual Path”. This involves using (typically) two receivers (though more can be used) where each receiver is bound to one Tx module. The receivers can be connected several different ways as explained below.
Dual Path - Dual Receivers – Dependent - Normal
This case is like “Dual Receivers – Dependent – Clone” except that both receivers are in Normal mode. The receivers are bound to the transmitter in Dual Path where each receiver is bound to only one of the two Tx modules as follows: Tx module A bound to primary Rx and Tx module B bound to the secondary Rx. All servos are plugged into the primary receiver. The secondary receiver functions as a satellite to give antenna diversity. Both receivers can be set up via Device Explorer. Otherwise, the setup is the same as above (satellite failsafe off, provide PPM output to the primary Rx, setup primary Rx to receive PPM and alarm if PPM stream stops)
When using two receivers in Normal, you can use both their EXT ports for datalink information; the transmitter can combine the information just fine.
Pros:
This setup is recommended once you've gotten the basics down from flying a simple inexpensive plane (see post #207) like a foamy, and you'd want to add receiver redundancy to help protect a nicer (more expensive) plane such as a jet. It's still pretty simple to set up since you basically are just adding another receiver.
Regards,
Dave (GooseF22) & Jim (rcjets_63)
Dual Path - Dual Receivers – Dependent - Normal
This case is like “Dual Receivers – Dependent – Clone” except that both receivers are in Normal mode. The receivers are bound to the transmitter in Dual Path where each receiver is bound to only one of the two Tx modules as follows: Tx module A bound to primary Rx and Tx module B bound to the secondary Rx. All servos are plugged into the primary receiver. The secondary receiver functions as a satellite to give antenna diversity. Both receivers can be set up via Device Explorer. Otherwise, the setup is the same as above (satellite failsafe off, provide PPM output to the primary Rx, setup primary Rx to receive PPM and alarm if PPM stream stops)
When using two receivers in Normal, you can use both their EXT ports for datalink information; the transmitter can combine the information just fine.
Pros:
- receiver redundancy
- antenna diversity (four antennas) where you can see the signal strength on all of them
- you can plug more than one battery into one or both receivers
- can use the EXT port of the satellite receiver to plug in sensors
- added cost of second receiver (not too bad as R3 to R6 receivers are inexpensive)
- each receiver is only bound to one Tx module.
- there is no isolation between multiple batteries plugged the receivers
This setup is recommended once you've gotten the basics down from flying a simple inexpensive plane (see post #207) like a foamy, and you'd want to add receiver redundancy to help protect a nicer (more expensive) plane such as a jet. It's still pretty simple to set up since you basically are just adding another receiver.
Regards,
Dave (GooseF22) & Jim (rcjets_63)
Last edited by rcjets_63; 12-23-2013 at 12:46 PM.
12-23-2013, 11:22 AM
#210
Dual Path - Hybrid (Triple receivers) – Dependent – Normal/Clone
This is sort of a combination of the above setups for R14 and R18 receivers which have two Sat ports and can thus receive PPM streams from two other receivers for added receiver redundancy and antenna diversity. The receivers are configured as follows:
R14/18: primary receiver.RX1: main, all servos, normal mode
Sat 1: Secondary, Normal mode, Fail Safe off, PPM output, non-computed, plug into Sat1 port
Sat 2: Tertiary, Clone Mode, bound to either Tx, FS off, non-computed, plug into SAT2 port, alarm ”O” or any other open letter
Set up the primary receiver to expect PPM signal in both its Sat ports. Like before, set up an alarm code (“s” is the default) in case of loss of PPM signal from Sat 1. Since there is a second sat receiver, map alarm “o” (or any other unused alarm) to play a wav file saying “Sat 2 signal week” if the Sat 2 PPM signal is not seen.
Pros:
Cons:
This setup is also recommended for a jet using an R14 or R18 receiver where you'd like to make use of the Sat2 port for even greater antenna diversity. It's a bit more trouble to set up since you have to put a receiver in clone mode, but that's a one time penalty and, from then on, you have even greater receiver redundancy and antenna diversity.
Regards,
Dave (GooseF22) & Jim (rcjets_63)
This is sort of a combination of the above setups for R14 and R18 receivers which have two Sat ports and can thus receive PPM streams from two other receivers for added receiver redundancy and antenna diversity. The receivers are configured as follows:
R14/18: primary receiver.RX1: main, all servos, normal mode
Sat 1: Secondary, Normal mode, Fail Safe off, PPM output, non-computed, plug into Sat1 port
Sat 2: Tertiary, Clone Mode, bound to either Tx, FS off, non-computed, plug into SAT2 port, alarm ”O” or any other open letter
Set up the primary receiver to expect PPM signal in both its Sat ports. Like before, set up an alarm code (“s” is the default) in case of loss of PPM signal from Sat 1. Since there is a second sat receiver, map alarm “o” (or any other unused alarm) to play a wav file saying “Sat 2 signal week” if the Sat 2 PPM signal is not seen.
Pros:
- receiver redundancy
- antenna diversity (six antennas). You can see the signal strength on only 4 antennas.
- you can plug more than one battery into the receivers
Cons:
- added cost of second and third receiver (not too bad as R3 to R6 receivers are inexpensive)
- each receiver is only bound to one Tx module.
- there is no isolation between multiple batteries plugged into the receivers
- since one receiver is in clone mode, it doesn’t transmit telemetry data including its signal strength (though it is alarmed if it loses signal)
- more complicated to set up since one receiver has to be set up as a clone.
This setup is also recommended for a jet using an R14 or R18 receiver where you'd like to make use of the Sat2 port for even greater antenna diversity. It's a bit more trouble to set up since you have to put a receiver in clone mode, but that's a one time penalty and, from then on, you have even greater receiver redundancy and antenna diversity.
Regards,
Dave (GooseF22) & Jim (rcjets_63)
Last edited by rcjets_63; 12-23-2013 at 12:40 PM.
12-23-2013, 11:26 AM
#211
Dual Path – Dual Receivers – Independent
This uses two receivers (each in Normal mode) where each is powered by its own battery and where there is no connection between the receivers (Thus the name "Independent") Servos are plugged into both receivers such that the plane is “split”. For a plane that has two aileron servos, two flap servos, two elevator servos, two rudder servos, you would plug one aileron, elevator, rudder, and flap servo into Rx 1, and the other aileron, elevator, rudder, and flap servo into Rx 2. Single controls (throttle, retracts, brakes, etc) are plugged into one of the receivers.
Pros:
This setup isn't really applicable to jets and we wouldn't use it. Perhaps it makes more sense for IMAC or another type of plane.
Regards,
Dave (GooseF22) & Jim (rcjets_63)
This uses two receivers (each in Normal mode) where each is powered by its own battery and where there is no connection between the receivers (Thus the name "Independent") Servos are plugged into both receivers such that the plane is “split”. For a plane that has two aileron servos, two flap servos, two elevator servos, two rudder servos, you would plug one aileron, elevator, rudder, and flap servo into Rx 1, and the other aileron, elevator, rudder, and flap servo into Rx 2. Single controls (throttle, retracts, brakes, etc) are plugged into one of the receivers.
Pros:
- two independent systems (redundancy of Tx and Rx)
- isolation between the batteries plugged into the receivers
- antenna diversity (you have four antennas) and can see their signal strength.
- added cost of second receiver and battery
- transmitter/receiver/battery pseudo-redundancy. If you have a failure of one Tx module, one Rx, or one battery, you’ve lost the ability to control half the servos in the plane. Still, this gives you a better chance of bringing the plane back in one piece than if you had a system with only a single transmitter, single receiver, and single battery where one of these items failed.
This setup isn't really applicable to jets and we wouldn't use it. Perhaps it makes more sense for IMAC or another type of plane.
Regards,
Dave (GooseF22) & Jim (rcjets_63)
Last edited by rcjets_63; 12-23-2013 at 12:54 PM.
12-23-2013, 12:01 PM
#213

Dave and Jim... Thanks for posting your findings... I look forward to see your comments on the CB200 since I will using one very soon..
12-23-2013, 07:48 PM
#214
The Jeti DC/DS-16 system seems to be a fundamental step ahead of other systems we’ve previously used. The capabilities of the system, particularly the Dual Path and telemetry, provide the modeler with increased reliability and awareness of how the system is performing. Additionally, the radio is flexible in that it offers the modeler several Tx/Rx configurations allowing the user to choose the setup that best meets their needs.
Dave Brawley - GooseF22 and myself (Jim McEwen – rcjets_63) have recently been experimenting with various receiver configurations to further learn this system and to determine which setups we like the best. We have discovered some of the pros/cons associated with the different receiver/setup options. What we found is that there are trade-offs for every setup and we’d like to present what we’ve learned in plain/simple language in the hopes that other Jeti users can use this information to make an informed choice of which setup would work best for them and their model.
Regards,
Dave (GooseF22) & Jim (rcjets_63)
Dave Brawley - GooseF22 and myself (Jim McEwen – rcjets_63) have recently been experimenting with various receiver configurations to further learn this system and to determine which setups we like the best. We have discovered some of the pros/cons associated with the different receiver/setup options. What we found is that there are trade-offs for every setup and we’d like to present what we’ve learned in plain/simple language in the hopes that other Jeti users can use this information to make an informed choice of which setup would work best for them and their model.
Regards,
Dave (GooseF22) & Jim (rcjets_63)
12-24-2013, 05:20 AM
#215

My Feedback: (10)

Join Date: Oct 2003
Location: Webster,
NY
Posts: 227
Likes: 0
Received 0 Likes
on
0 Posts
Great work on documenting these options so clearly Jim And Dave!
Regarding the Dependent - Clone version: I have seen about three different versions (Jeti website, Receiver Manuals and posts) on how to set this up and I am still confused because they differ. Is there a simple step by step on this?
Chris
Regarding the Dependent - Clone version: I have seen about three different versions (Jeti website, Receiver Manuals and posts) on how to set this up and I am still confused because they differ. Is there a simple step by step on this?
Chris
Receiver Setups
Dual Receivers – Dependent - Clone
This setup adds another receiver to provide receiver redundancy. The second receiver is also bound to both Tx modules.
You use a (typically larger) “primary” receiver (R7 though R18) bound in Normal mode to both Tx modules. All servos are plugged into this receiver. You then set up a second receiver (typically an R3 through R6) as a satellite. The satellite is first bound to both Tx modules and is set as a clone with its failsafe turned off. The satellite receiver provides a continuous PPM stream unless it completely loses signal reception at which point the PPM stream stops. A male-to-male servo connector is used to connect the clone’s PPM out port to the primary receiver’s Sat port.
Setup Notes: During the setup, you have to tell the primary receiver to expect PPM data at its Sat port. Also, since the clone doesn’t transmit telemetry data (including the signal strength at its antennas) you’ll want to set up an alarm in the primary receiver to let you know if the PPM stream from the satellite stops (which means the satellite receiver has lost signal)
This setup has the primary receiver watching both Tx modules and provides datalink and antenna strength on the primary receiver only. The clone is also watching both Tx modules but remains in the background giving PPM signal backup to the primary receiver. While you can’t see the antenna strength of the clone, you still know it is functioning since there is an alarm if its PPM signal stops.
Pros:
Cons:
This setup has the primary advantage that both receivers are each bound to both Tx modules. The primary disadvantage is that you can't see the signal strength of the antennas on the clone receiver (although you do have an alarm is the clone loses signal).
Regards,
Dave (GooseF22) & Jim (rcjets_63)
Dual Receivers – Dependent - Clone
This setup adds another receiver to provide receiver redundancy. The second receiver is also bound to both Tx modules.
You use a (typically larger) “primary” receiver (R7 though R18) bound in Normal mode to both Tx modules. All servos are plugged into this receiver. You then set up a second receiver (typically an R3 through R6) as a satellite. The satellite is first bound to both Tx modules and is set as a clone with its failsafe turned off. The satellite receiver provides a continuous PPM stream unless it completely loses signal reception at which point the PPM stream stops. A male-to-male servo connector is used to connect the clone’s PPM out port to the primary receiver’s Sat port.
Setup Notes: During the setup, you have to tell the primary receiver to expect PPM data at its Sat port. Also, since the clone doesn’t transmit telemetry data (including the signal strength at its antennas) you’ll want to set up an alarm in the primary receiver to let you know if the PPM stream from the satellite stops (which means the satellite receiver has lost signal)
This setup has the primary receiver watching both Tx modules and provides datalink and antenna strength on the primary receiver only. The clone is also watching both Tx modules but remains in the background giving PPM signal backup to the primary receiver. While you can’t see the antenna strength of the clone, you still know it is functioning since there is an alarm if its PPM signal stops.
Pros:
- receiver redundancy
- antenna diversity (you now have four antennas)
- both receivers are each connected to both Tx modules (quad redundancy?)
- you can plug more than one battery into one or both receivers
Cons:
- added cost of second receiver (not too bad as R3 to R6 receivers are inexpensive)
- there is no isolation between multiple batteries plugged into the receivers
- one receiver is in clone mode so it doesn’t transmit telemetry data including its antenna signal strength.
- a bit tougher to set up as you have to bind the clone to both Tx modules in a separate procedure.
- can’t use the EXT port of the satellite (clone) receiver to plug in sensors.
This setup has the primary advantage that both receivers are each bound to both Tx modules. The primary disadvantage is that you can't see the signal strength of the antennas on the clone receiver (although you do have an alarm is the clone loses signal).
Regards,
Dave (GooseF22) & Jim (rcjets_63)
12-24-2013, 07:38 AM
#216
dWzero
short version
set up and bind clone first and leave plug in it in normal mode. Get it working with no fail safe and ppm out output. All settings done thru device explorer except the final step which is to put it in clone mode via the jeti box emulator. It will stay in normal mode until you pull the bind plug. "Forced normal". When u pull plug it reverts to clone then
then set up the main rx in normal. Open the sat port and set to PPM in and alarm will default to S
when it's working right the main rx will give Alarm s or signal weak anytime the satellite rx isn't plugged in. Look in the rx manul for the designated ppm out port on sat rx. Port 5 on the 5. Port 1or6 on the 6. Etc
if you screw up the receiver and can't talk to it put a bind plug in it and tuen it on. If explorer doesn't see it then the best way is to 1. Plug it inti a jeti box profi or 2. Reload the software update 3.11 or above. It resets it to factory.
You our need to play w it to understand it better. Knowing you can reset it to factory via device explorer or box or update takes the issues away.
I will ill try to look at step by step later but am on the road right now
btw I will be looking at gaspars telemetry system for xicoy for the wren turbines so equipped this spring as well. Jim will be looking at the jetcat options
Last edited by gooseF22; 12-24-2013 at 07:50 AM.
12-25-2013, 01:16 AM
#217

My Feedback: (1)
Join Date: Jun 2005
Location: Hong Kong
Posts: 167
Likes: 0
Received 0 Likes
on
0 Posts
Thanks Gents for that informative info. I just received all my Jeti gear yesterday and I have to say...... What a radio!!! Love it. I'm very excited to get in into a model to play around with.
I've only been playing around with it for a very short time. Just 1 thing though.... how do I assign, for example the tilt right accelerometer function to read out say my speed from the MGps?
I've only been playing around with it for a very short time. Just 1 thing though.... how do I assign, for example the tilt right accelerometer function to read out say my speed from the MGps?
12-25-2013, 02:52 PM
#219
My Feedback: (10)
Join Date: Oct 2003
Location: Webster,
NY
Posts: 227
Likes: 0
Received 0 Likes
on
0 Posts
Dave,
I tried the above as explained. If I unplug the R3 (sat) I don't get a signal loss warning. Does the alarm need to be set up?
This is quite the work-around to solely get an additional antenna running, if I may say so.
Chris
I tried the above as explained. If I unplug the R3 (sat) I don't get a signal loss warning. Does the alarm need to be set up?
This is quite the work-around to solely get an additional antenna running, if I may say so.
Chris
12-26-2013, 01:31 PM
#222
Senior Member
Join Date: Jun 2013
Location: , FL
Posts: 423
Likes: 0
Received 0 Likes
on
0 Posts
RF module #1 bind to Primary RX
RF module #2 bind to Secondary RX
It all makes logic.
Zb/Jeti USA
12-26-2013, 01:58 PM
#223
My Feedback: (10)
Join Date: Oct 2003
Location: Webster,
NY
Posts: 227
Likes: 0
Received 0 Likes
on
0 Posts
Zb,
I was referring to Dave's above explanation,seems like there would be an alarm if the PPM in is lost?
Chris
I was referring to Dave's above explanation,seems like there would be an alarm if the PPM in is lost?
Chris
dWzero
short version
set up and bind clone first and leave plug in it in normal mode. Get it working with no fail safe and ppm out output. All settings done thru device explorer except the final step which is to put it in clone mode via the jeti box emulator. It will stay in normal mode until you pull the bind plug. "Forced normal". When u pull plug it reverts to clone then
then set up the main rx in normal. Open the sat port and set to PPM in and alarm will default to S
when it's working right the main rx will give Alarm s or signal weak anytime the satellite rx isn't plugged in. Look in the rx manul for the designated ppm out port on sat rx. Port 5 on the 5. Port 1or6 on the 6. Etc
if you screw up the receiver and can't talk to it put a bind plug in it and tuen it on. If explorer doesn't see it then the best way is to 1. Plug it inti a jeti box profi or 2. Reload the software update 3.11 or above. It resets it to factory.
You our need to play w it to understand it better. Knowing you can reset it to factory via device explorer or box or update takes the issues away.
I will ill try to look at step by step later but am on the road right now
btw I will be looking at gaspars telemetry system for xicoy for the wren turbines so equipped this spring as well. Jim will be looking at the jetcat options
short version
set up and bind clone first and leave plug in it in normal mode. Get it working with no fail safe and ppm out output. All settings done thru device explorer except the final step which is to put it in clone mode via the jeti box emulator. It will stay in normal mode until you pull the bind plug. "Forced normal". When u pull plug it reverts to clone then
then set up the main rx in normal. Open the sat port and set to PPM in and alarm will default to S
when it's working right the main rx will give Alarm s or signal weak anytime the satellite rx isn't plugged in. Look in the rx manul for the designated ppm out port on sat rx. Port 5 on the 5. Port 1or6 on the 6. Etc
if you screw up the receiver and can't talk to it put a bind plug in it and tuen it on. If explorer doesn't see it then the best way is to 1. Plug it inti a jeti box profi or 2. Reload the software update 3.11 or above. It resets it to factory.
You our need to play w it to understand it better. Knowing you can reset it to factory via device explorer or box or update takes the issues away.
I will ill try to look at step by step later but am on the road right now
btw I will be looking at gaspars telemetry system for xicoy for the wren turbines so equipped this spring as well. Jim will be looking at the jetcat options
12-26-2013, 06:00 PM
#225
My Feedback: (10)
Join Date: Oct 2003
Location: Webster,
NY
Posts: 227
Likes: 0
Received 0 Likes
on
0 Posts
Well I followed the above instructions but when I unplug it I don't get a lost signal warning. I have it connected via the R3 EX port to the Sat on the R9. Any ideas?
Chris
Chris