


Trailer Setup Ideas
 09-23-2014 | 08:06 AM
#1
Thread Starter
Senior Member
My Feedback: (32)
Joined: Feb 2002
Posts: 2,587
Likes: 0
Received 0 Likes
on
0 Posts
From: Pasadena, MD
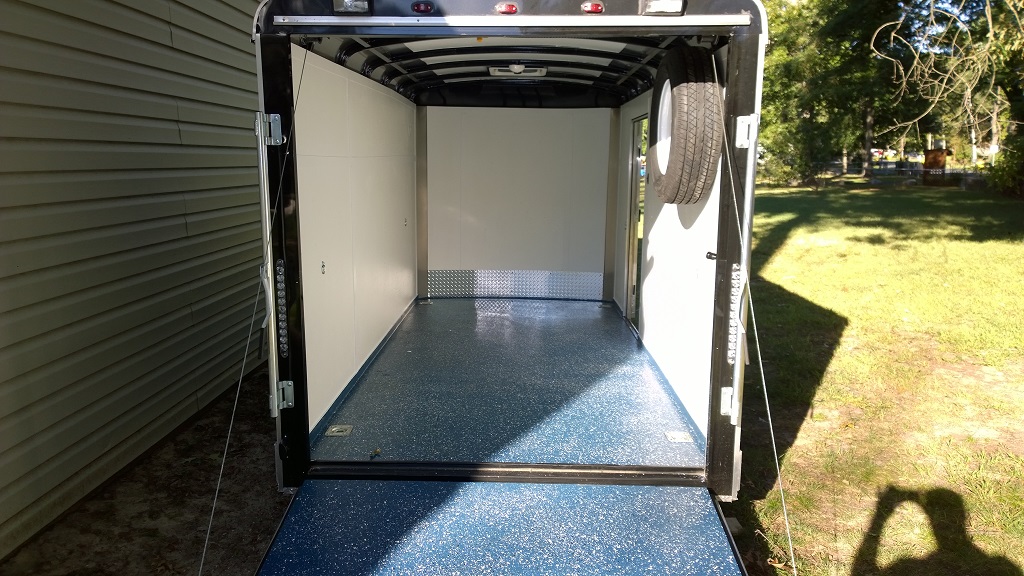
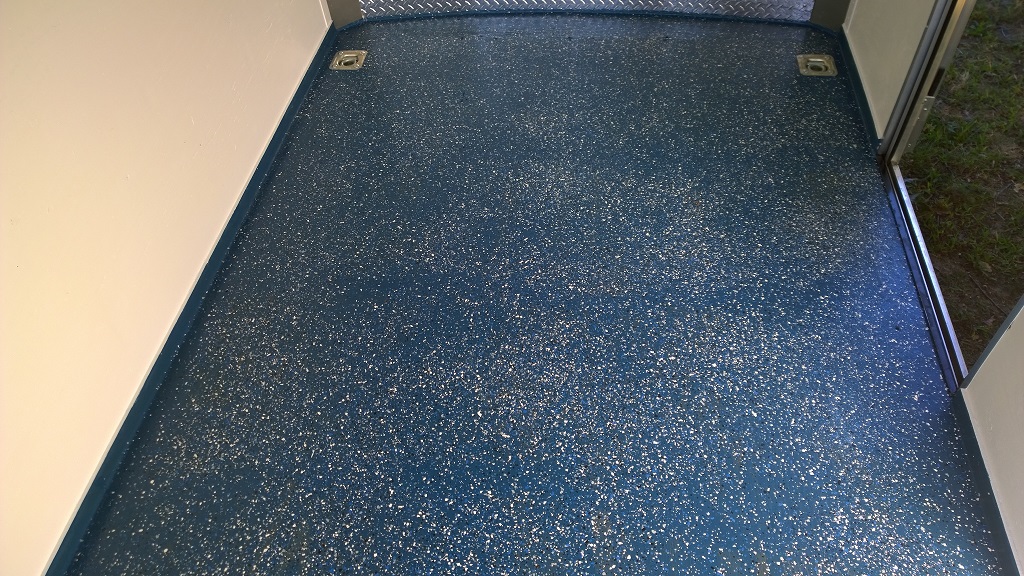
I purchased a 6 x 12 trailer and just finished painting the inside. The walls and ceiling are painted with semi-gloss exterior latex and the floor was finished with garage floor two part epoxy paint and a heavy dusting of paint chips. Then the floor was covered with two coats of semi-gloss polyurethane clear.
I'm looking for ideas on set ups for carrying jets and warbirds. Please show your trailer set ups.
Thanks,
Kirk
I'm looking for ideas on set ups for carrying jets and warbirds. Please show your trailer set ups.
Thanks,
Kirk
Last edited by k_sonn; 09-23-2014 at 09:19 AM. Reason: fix typo
 09-23-2014 | 09:12 AM
#3

K-sonn not sure if your a member of a website called flying giants but they have a great thread on their general thread that has tons of trailer setup ideas. Should be at the top on first page since its a very active thread.
09-23-2014 | 09:24 AM
#6
09-23-2014 | 12:48 PM
#8


My Feedback: (23)
Kirk,
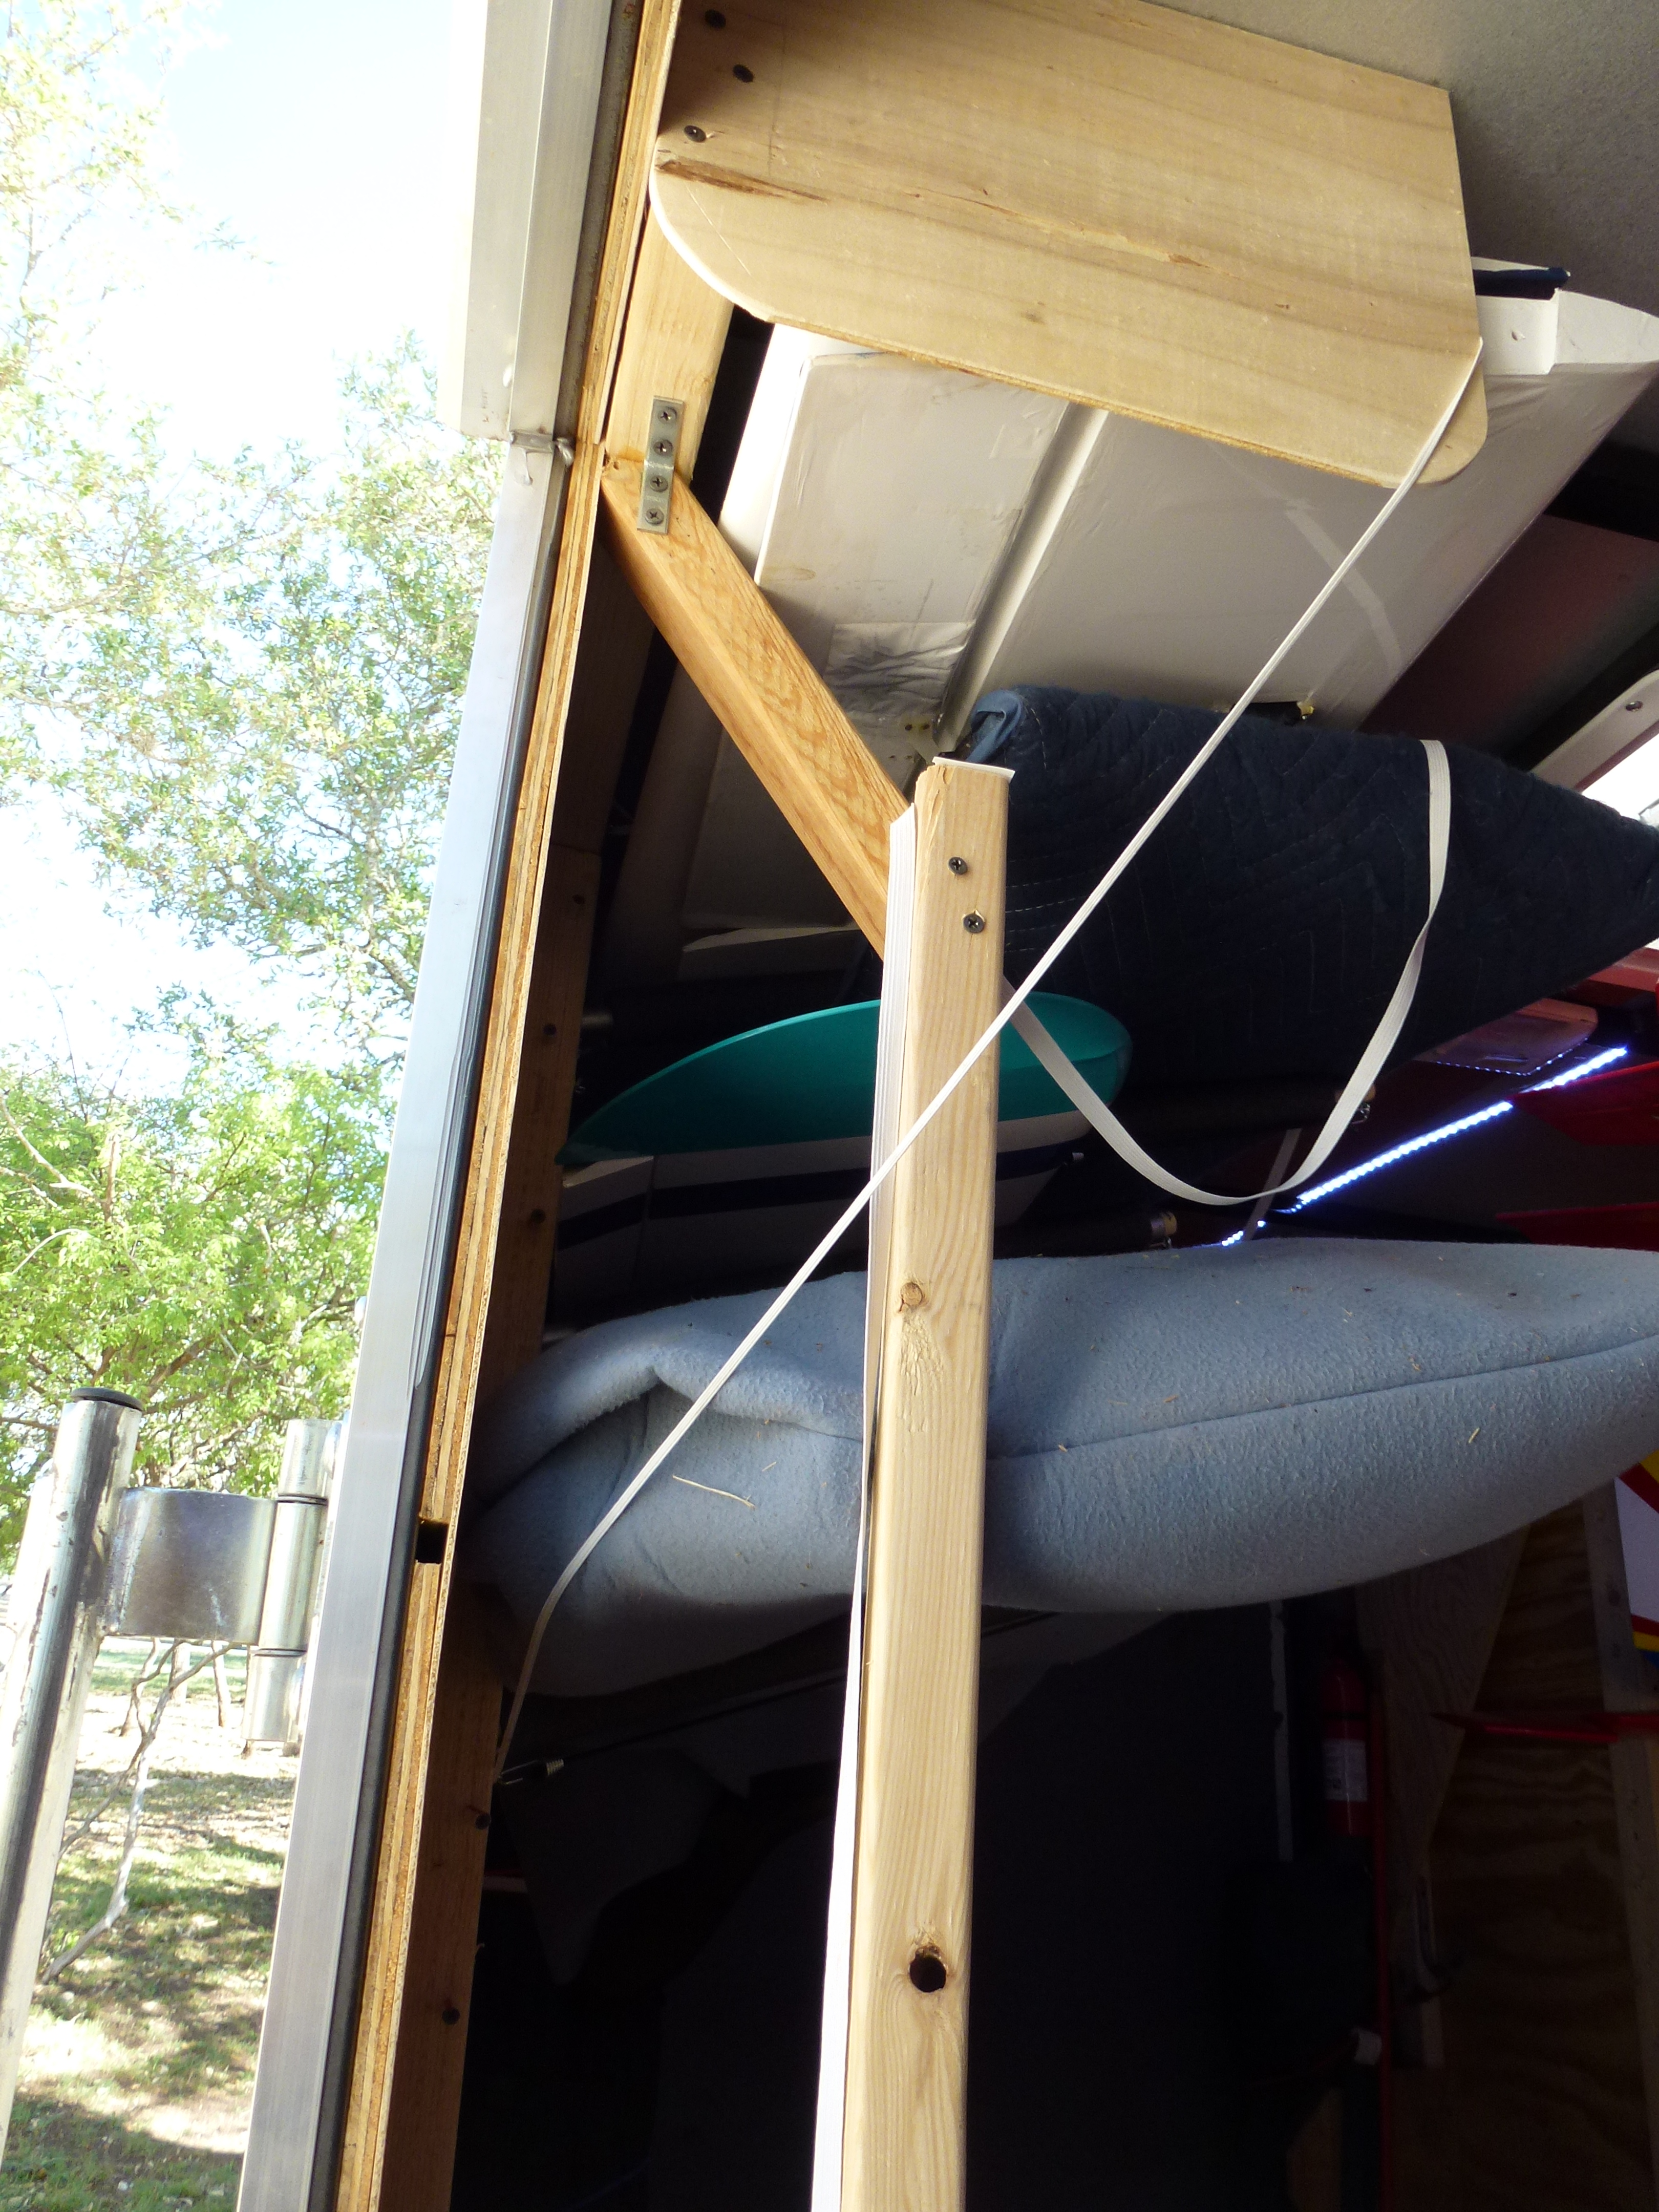
I have a shelf about 24" above the floor that runs from 9" forward of the rear door all the way to the side door. I have it covered in exterior carpet and use foam mattress toppers and velcro straps to hold models down (if they are heavier models, ill run eye hooks into the shelf and use bungee cords around the landing gear)
I have a shelf about 24" above the floor that runs from 9" forward of the rear door all the way to the side door. I have it covered in exterior carpet and use foam mattress toppers and velcro straps to hold models down (if they are heavier models, ill run eye hooks into the shelf and use bungee cords around the landing gear)
09-24-2014 | 07:30 AM
#9
Thread Starter
Senior Member
My Feedback: (32)
Joined: Feb 2002
Posts: 2,587
Likes: 0
Received 0 Likes
on
0 Posts
From: Pasadena, MD
Kirk,
I have a shelf about 24" above the floor that runs from 9" forward of the rear door all the way to the side door. I have it covered in exterior carpet and use foam mattress toppers and velcro straps to hold models down (if they are heavier models, ill run eye hooks into the shelf and use bungee cords around the landing gear)
I have a shelf about 24" above the floor that runs from 9" forward of the rear door all the way to the side door. I have it covered in exterior carpet and use foam mattress toppers and velcro straps to hold models down (if they are heavier models, ill run eye hooks into the shelf and use bungee cords around the landing gear)
Anybody else what to share? How about some photos?
09-24-2014 | 08:08 AM
#11


My Feedback: (38)
yep, I put HK led light strips in mine to brighten it up, and under the shelf, I put a harbor freight solar panel kit on the roof and a battery in the trailer so it always has its own power, plus keeps my flight box charged all the time, lights always work, even when not hooked to a truck.

Pics dont do it justice to how cool it is

Pics dont do it justice to how cool it is
09-24-2014 | 09:04 AM
#12
Senior Member
Joined: Jan 2003
Posts: 4,734
Likes: 0
Received 0 Likes
on
0 Posts
From: Spring Hill,
FL
I have no experience with trailers so take this for what it's worth.
I have a very nice router table that allows me to do all kinds of stuff. My idea could work with a regular router using and edge guide or a straightedge clamped in place.
Basically I want the floor on my future trailer to be T-track. That way i'm not stuck with predetermined mounting points and I can make whatever custom mounts I need. They can slide wherever needed. If I wanted to spend a lot of money I could use knobs to tighten things to the track or go cheap and use nuts and bolts tightened with a socket wrench or whatever.
Since routing directly in the wood will weaken it and cause it to bow I'd probably use 3/4" MDF that in turn is glued to a piece of 3/4 ply. The MDF would have the routed tracks in it. Of course a more expensive way would be to use aluminum T-track screwed in place but considering how many tracks I want that would be really expensive.
If you have something really heavy just have more mounting points for it. Then use bungees or velcro straps or whatever to hold things to the mounting blocks.

 09-24-2014 | 10:24 AM
#14
never mind rcu blocked my flying giant link. You dont have to register to view the thread, just go to general subject thread and its there.
Last edited by FenderBean; 09-24-2014 at 10:55 AM.
09-24-2014 | 10:41 AM
#15

My Feedback: (18)
I put a slider on one bunk. I use E-trac and the slop in the bracket that held the slider allowed the teflon runs to get wiped out. I spent ( I think ) around $250 for the 500lb slides and now they're dead. It was nice to slide the plane out, but not worth the added time and weight. Made taking the racks out or adjusting them a total pain. back to simple.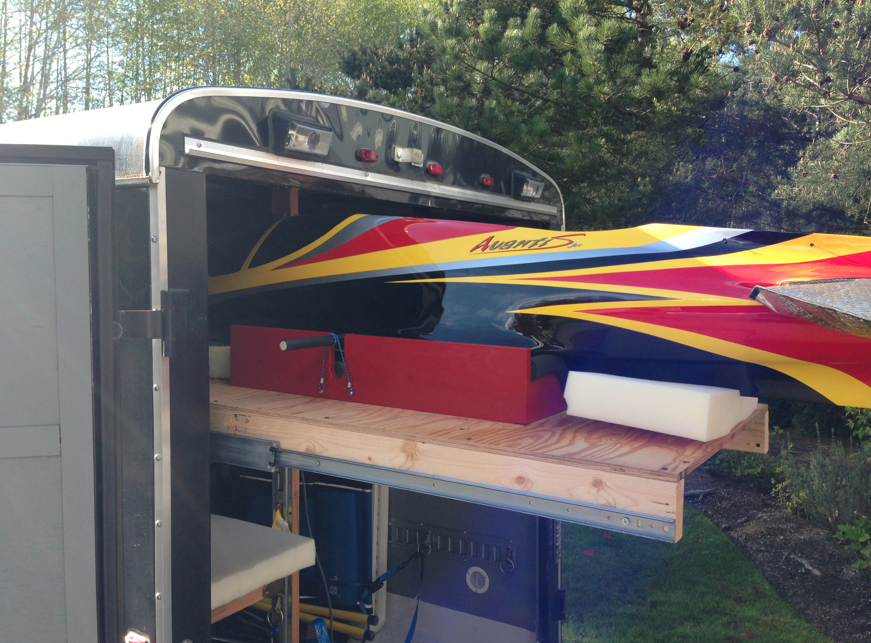
09-24-2014 | 06:59 PM
#17
My Feedback: (3)
Hmmm...
I have a 6X12 V nosed trailer (special built with a torsion axle - got tired of the old one beating my planes up). To start with the wife insisted I do nothing permanent to it, so I spent a lot of money on 1/4-20 screw inserts put in with Gorilla glue. I put a floor covering in that I had intended to screw aircraft down to but discovered that was a mistake and then got fancy.
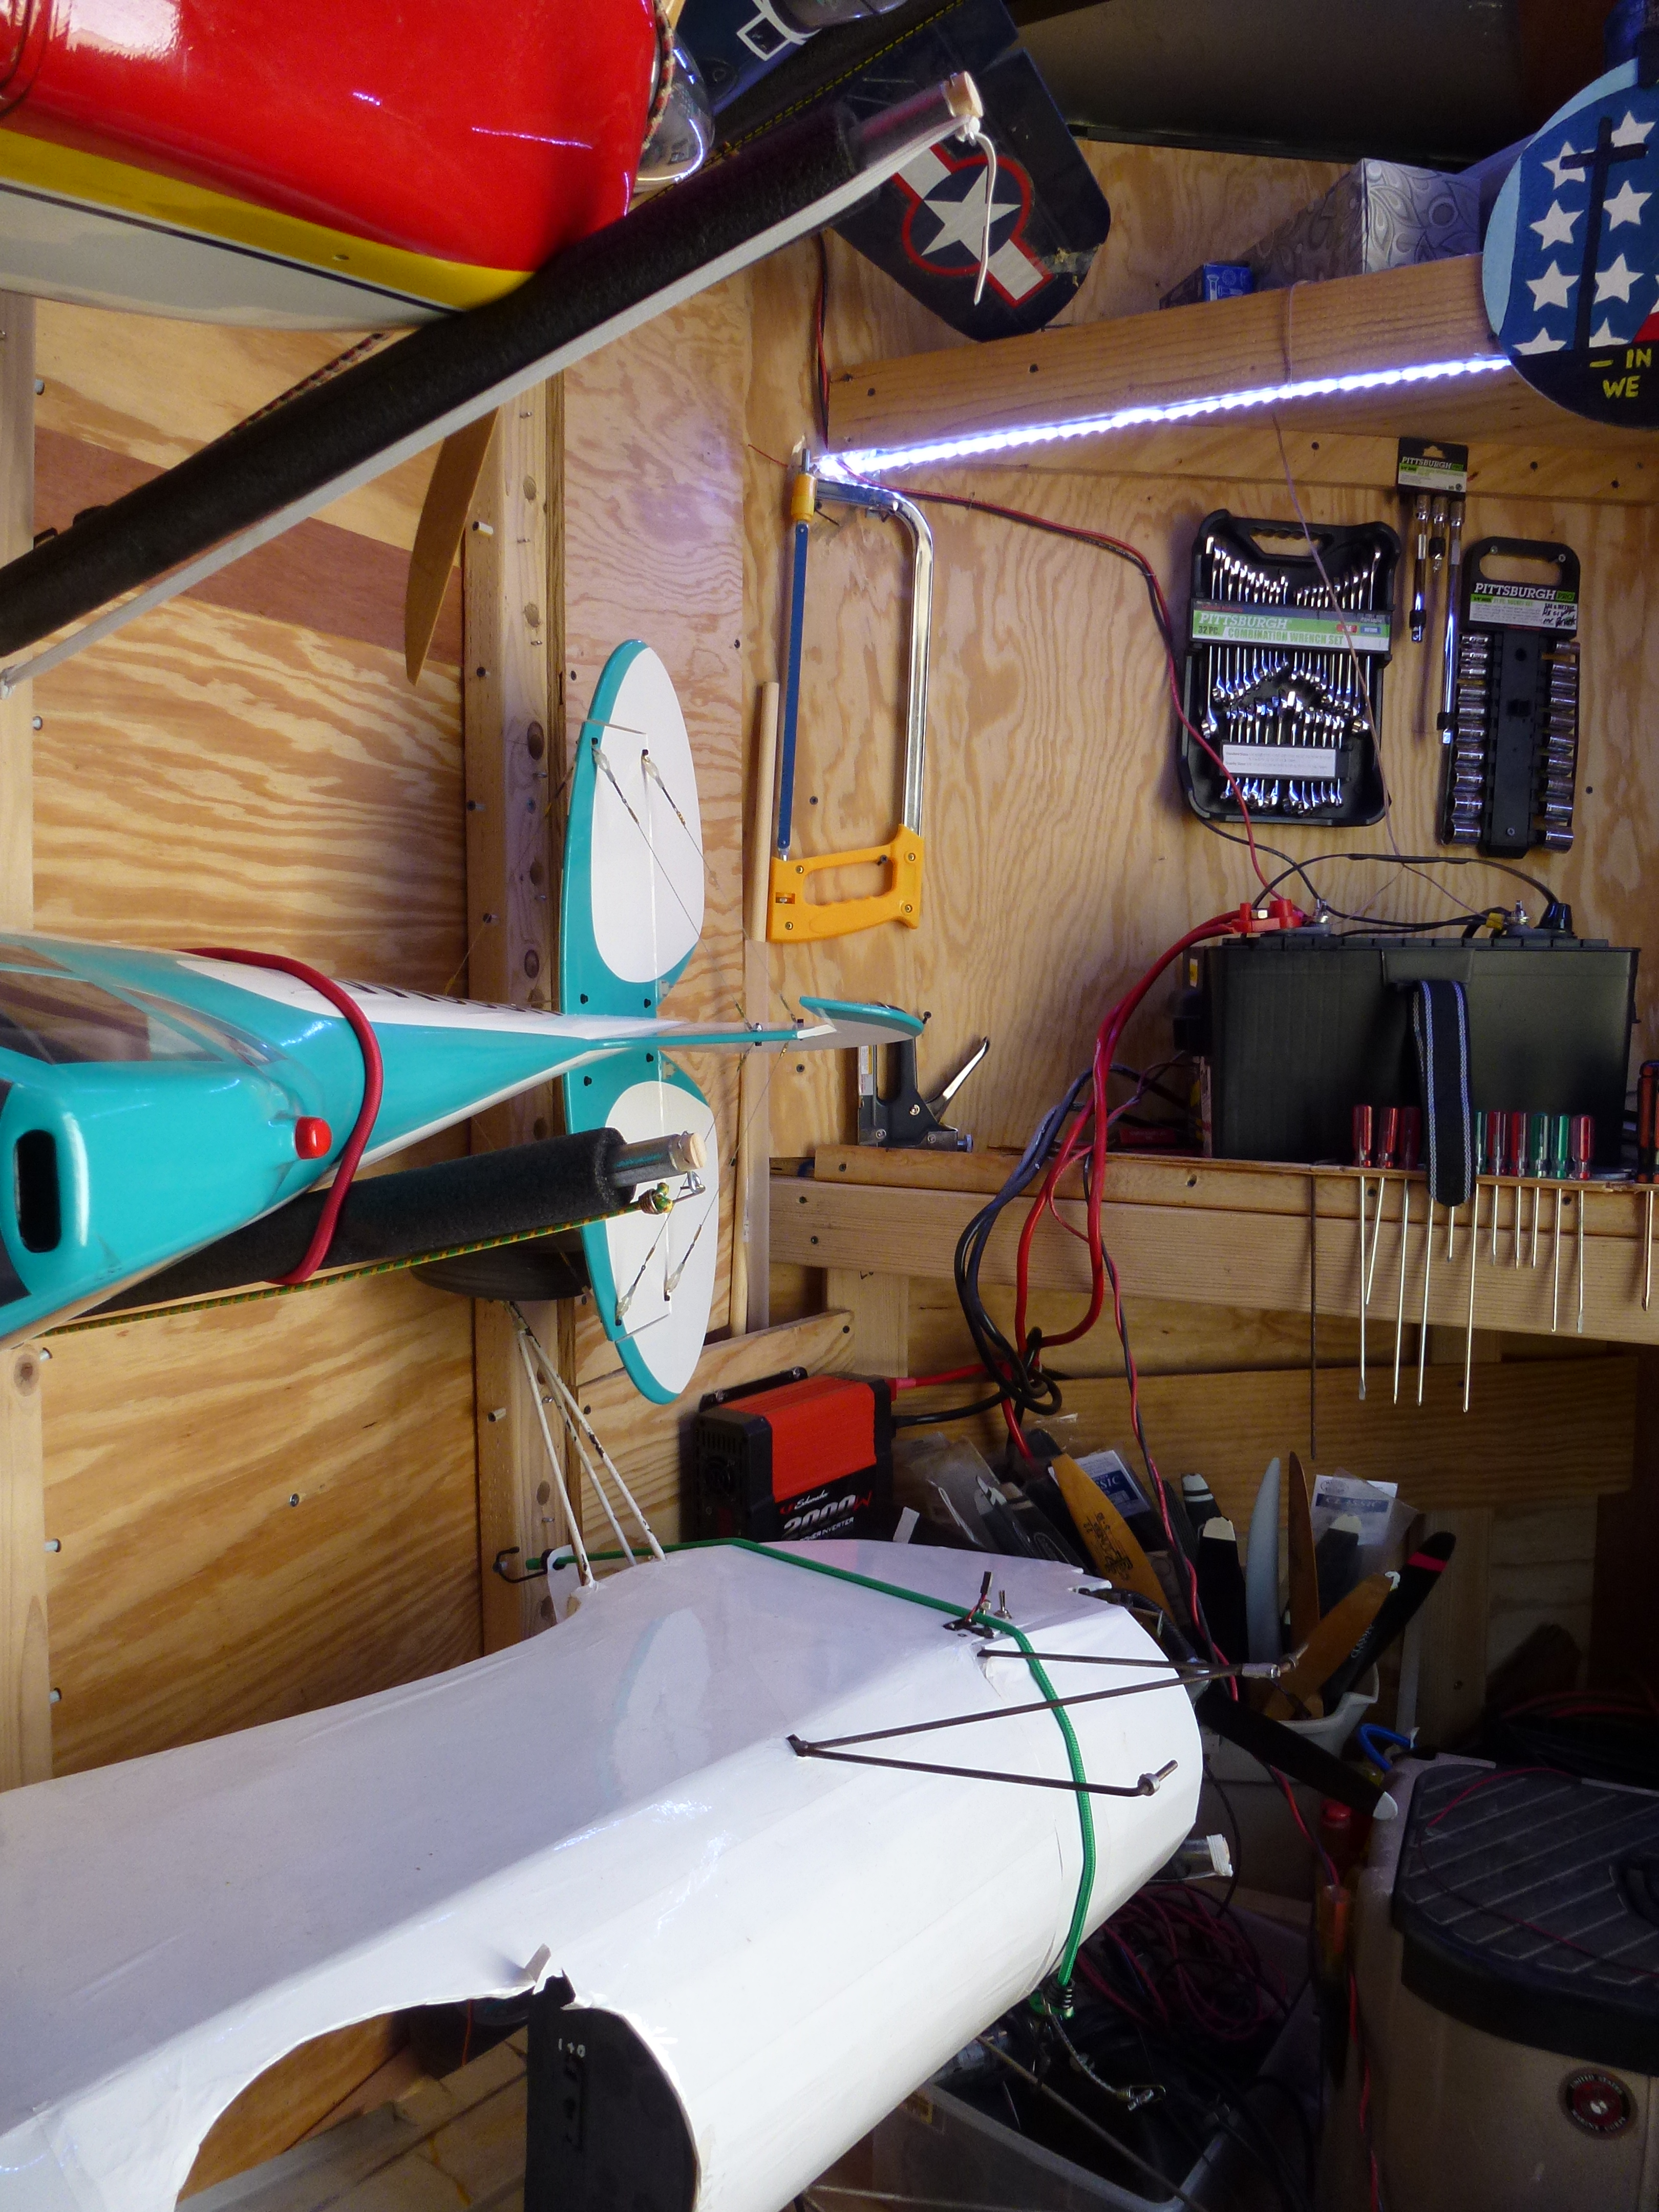
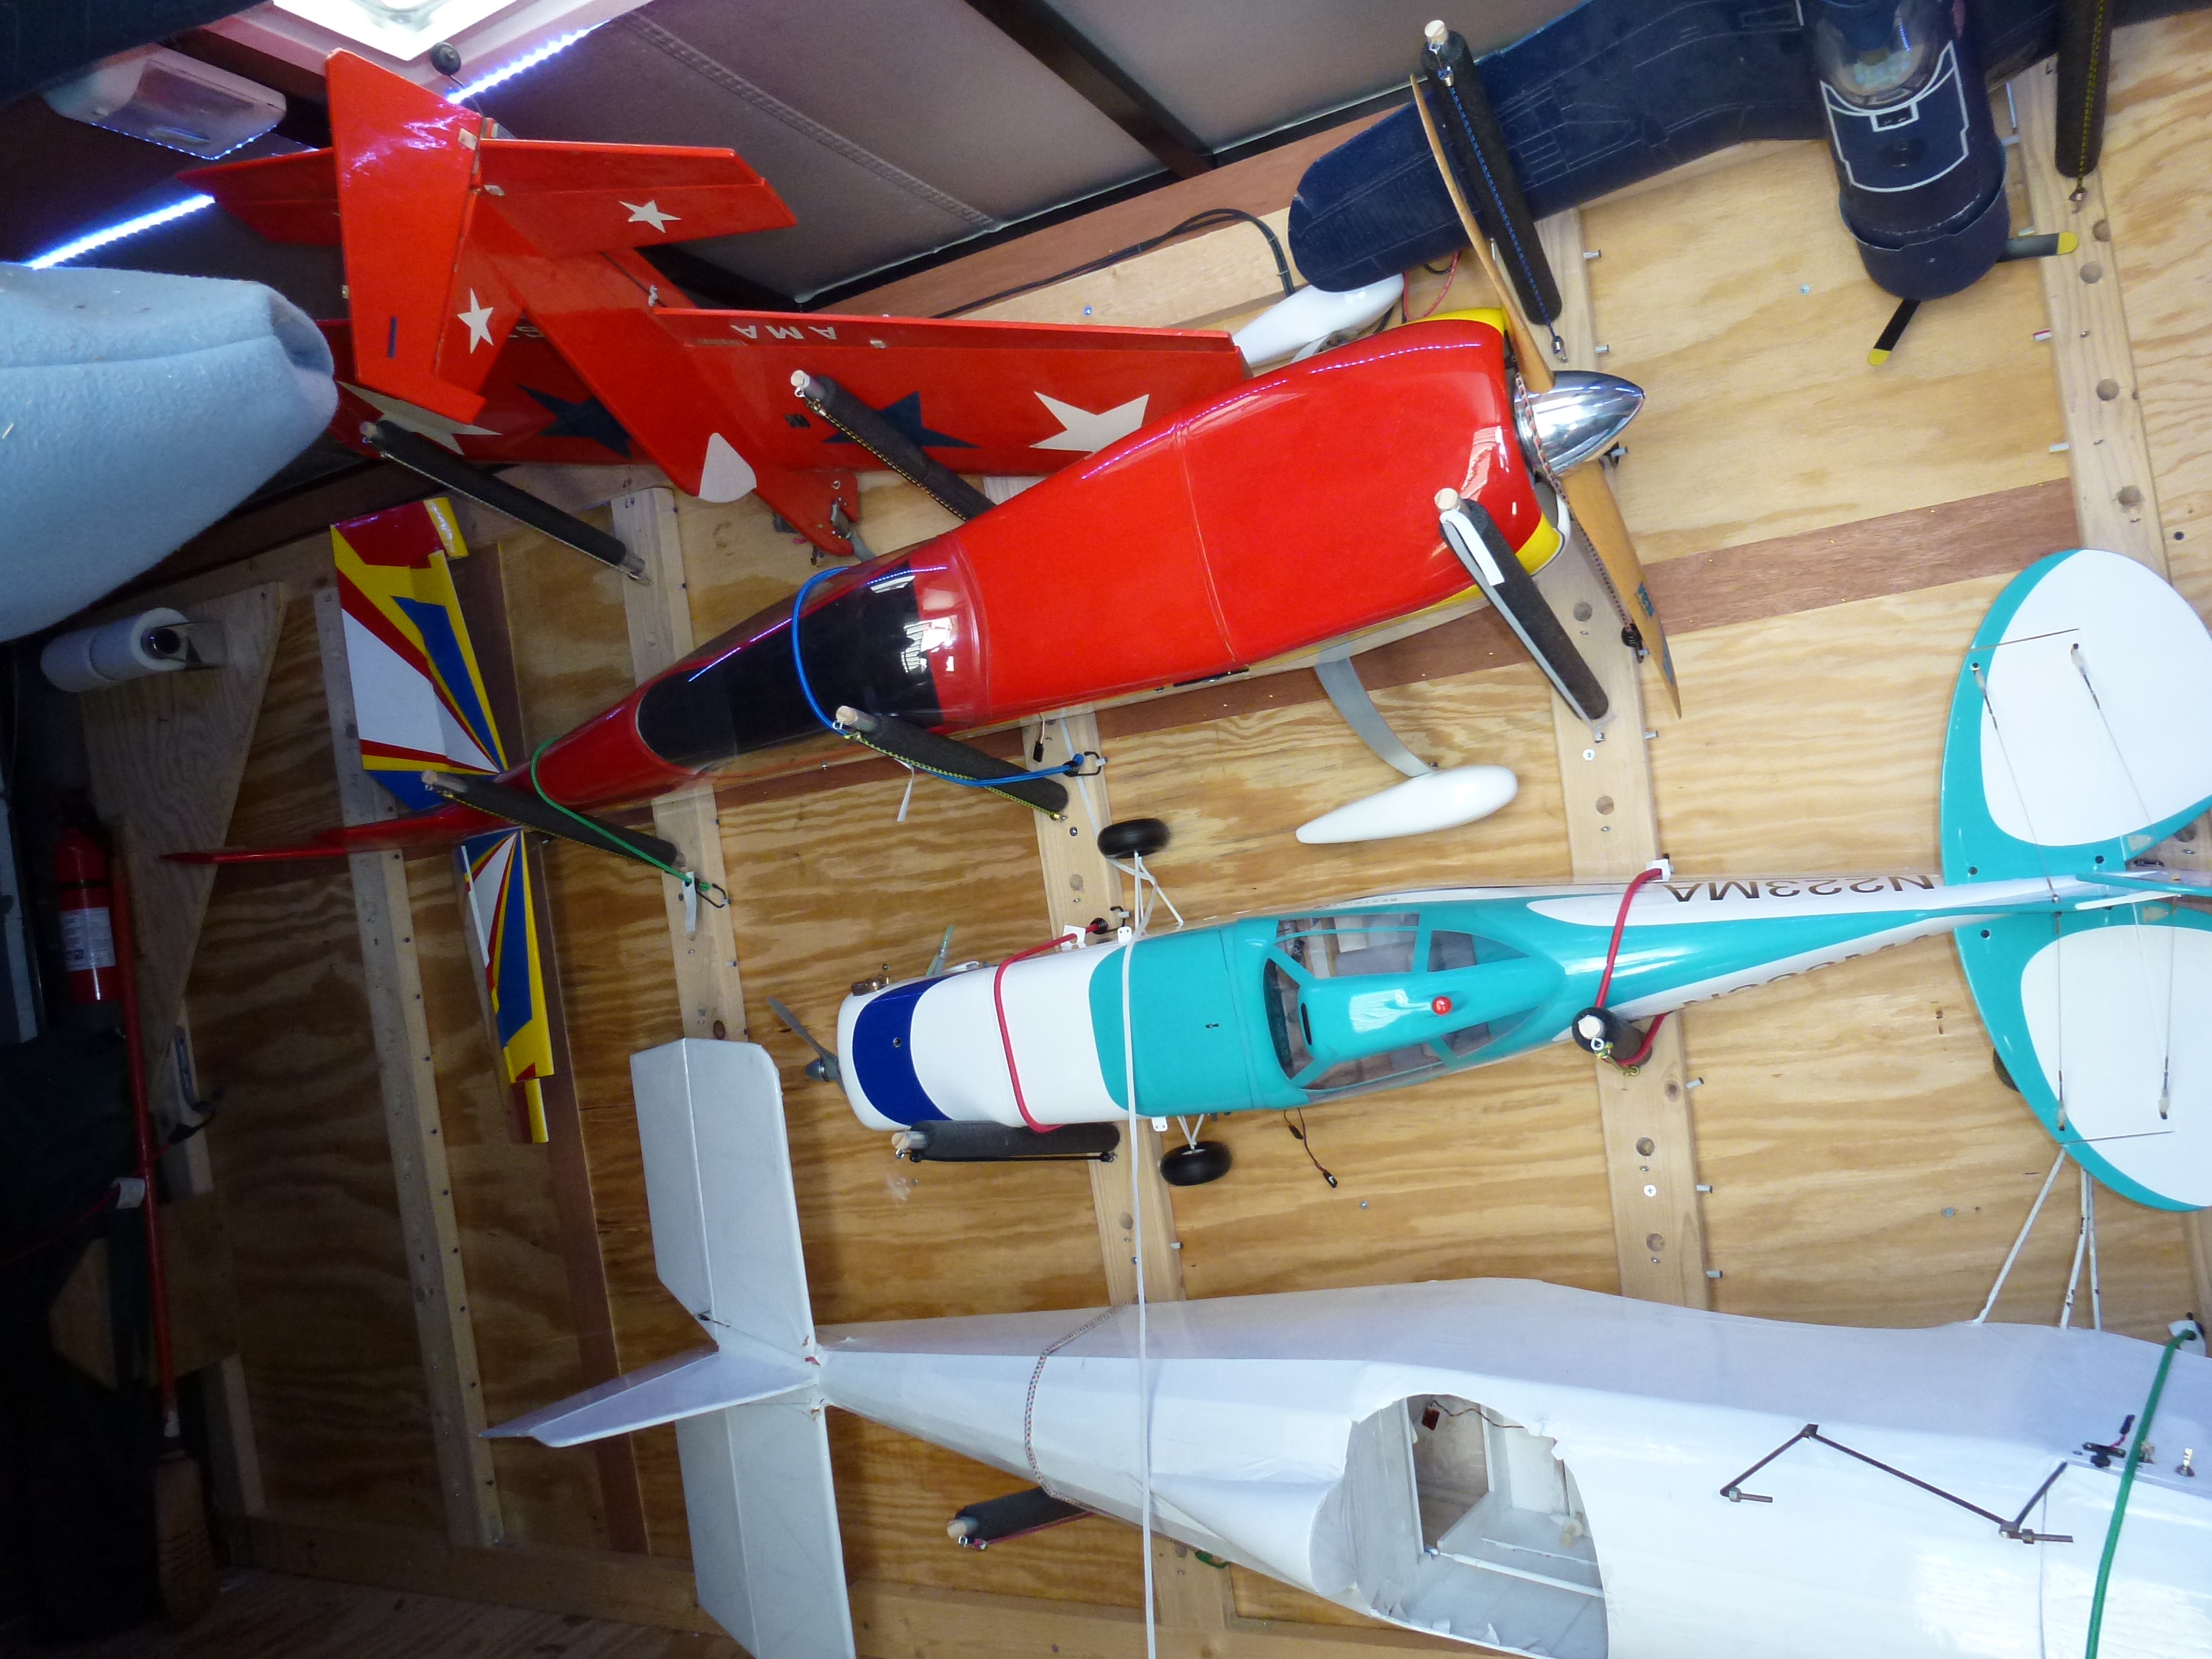
I put a shelf in the V at around 26 inches, and another at about 4ft 6 inches. The battery goes on the lower shelf because I am not Charles Atlas. I have a friend who put his on the upper shelf!
I installed a PV-68 watt peel and stick solar panel on the top to keep the battery up, led lights on the ceiling fed by the battery and a switch for them by the door.
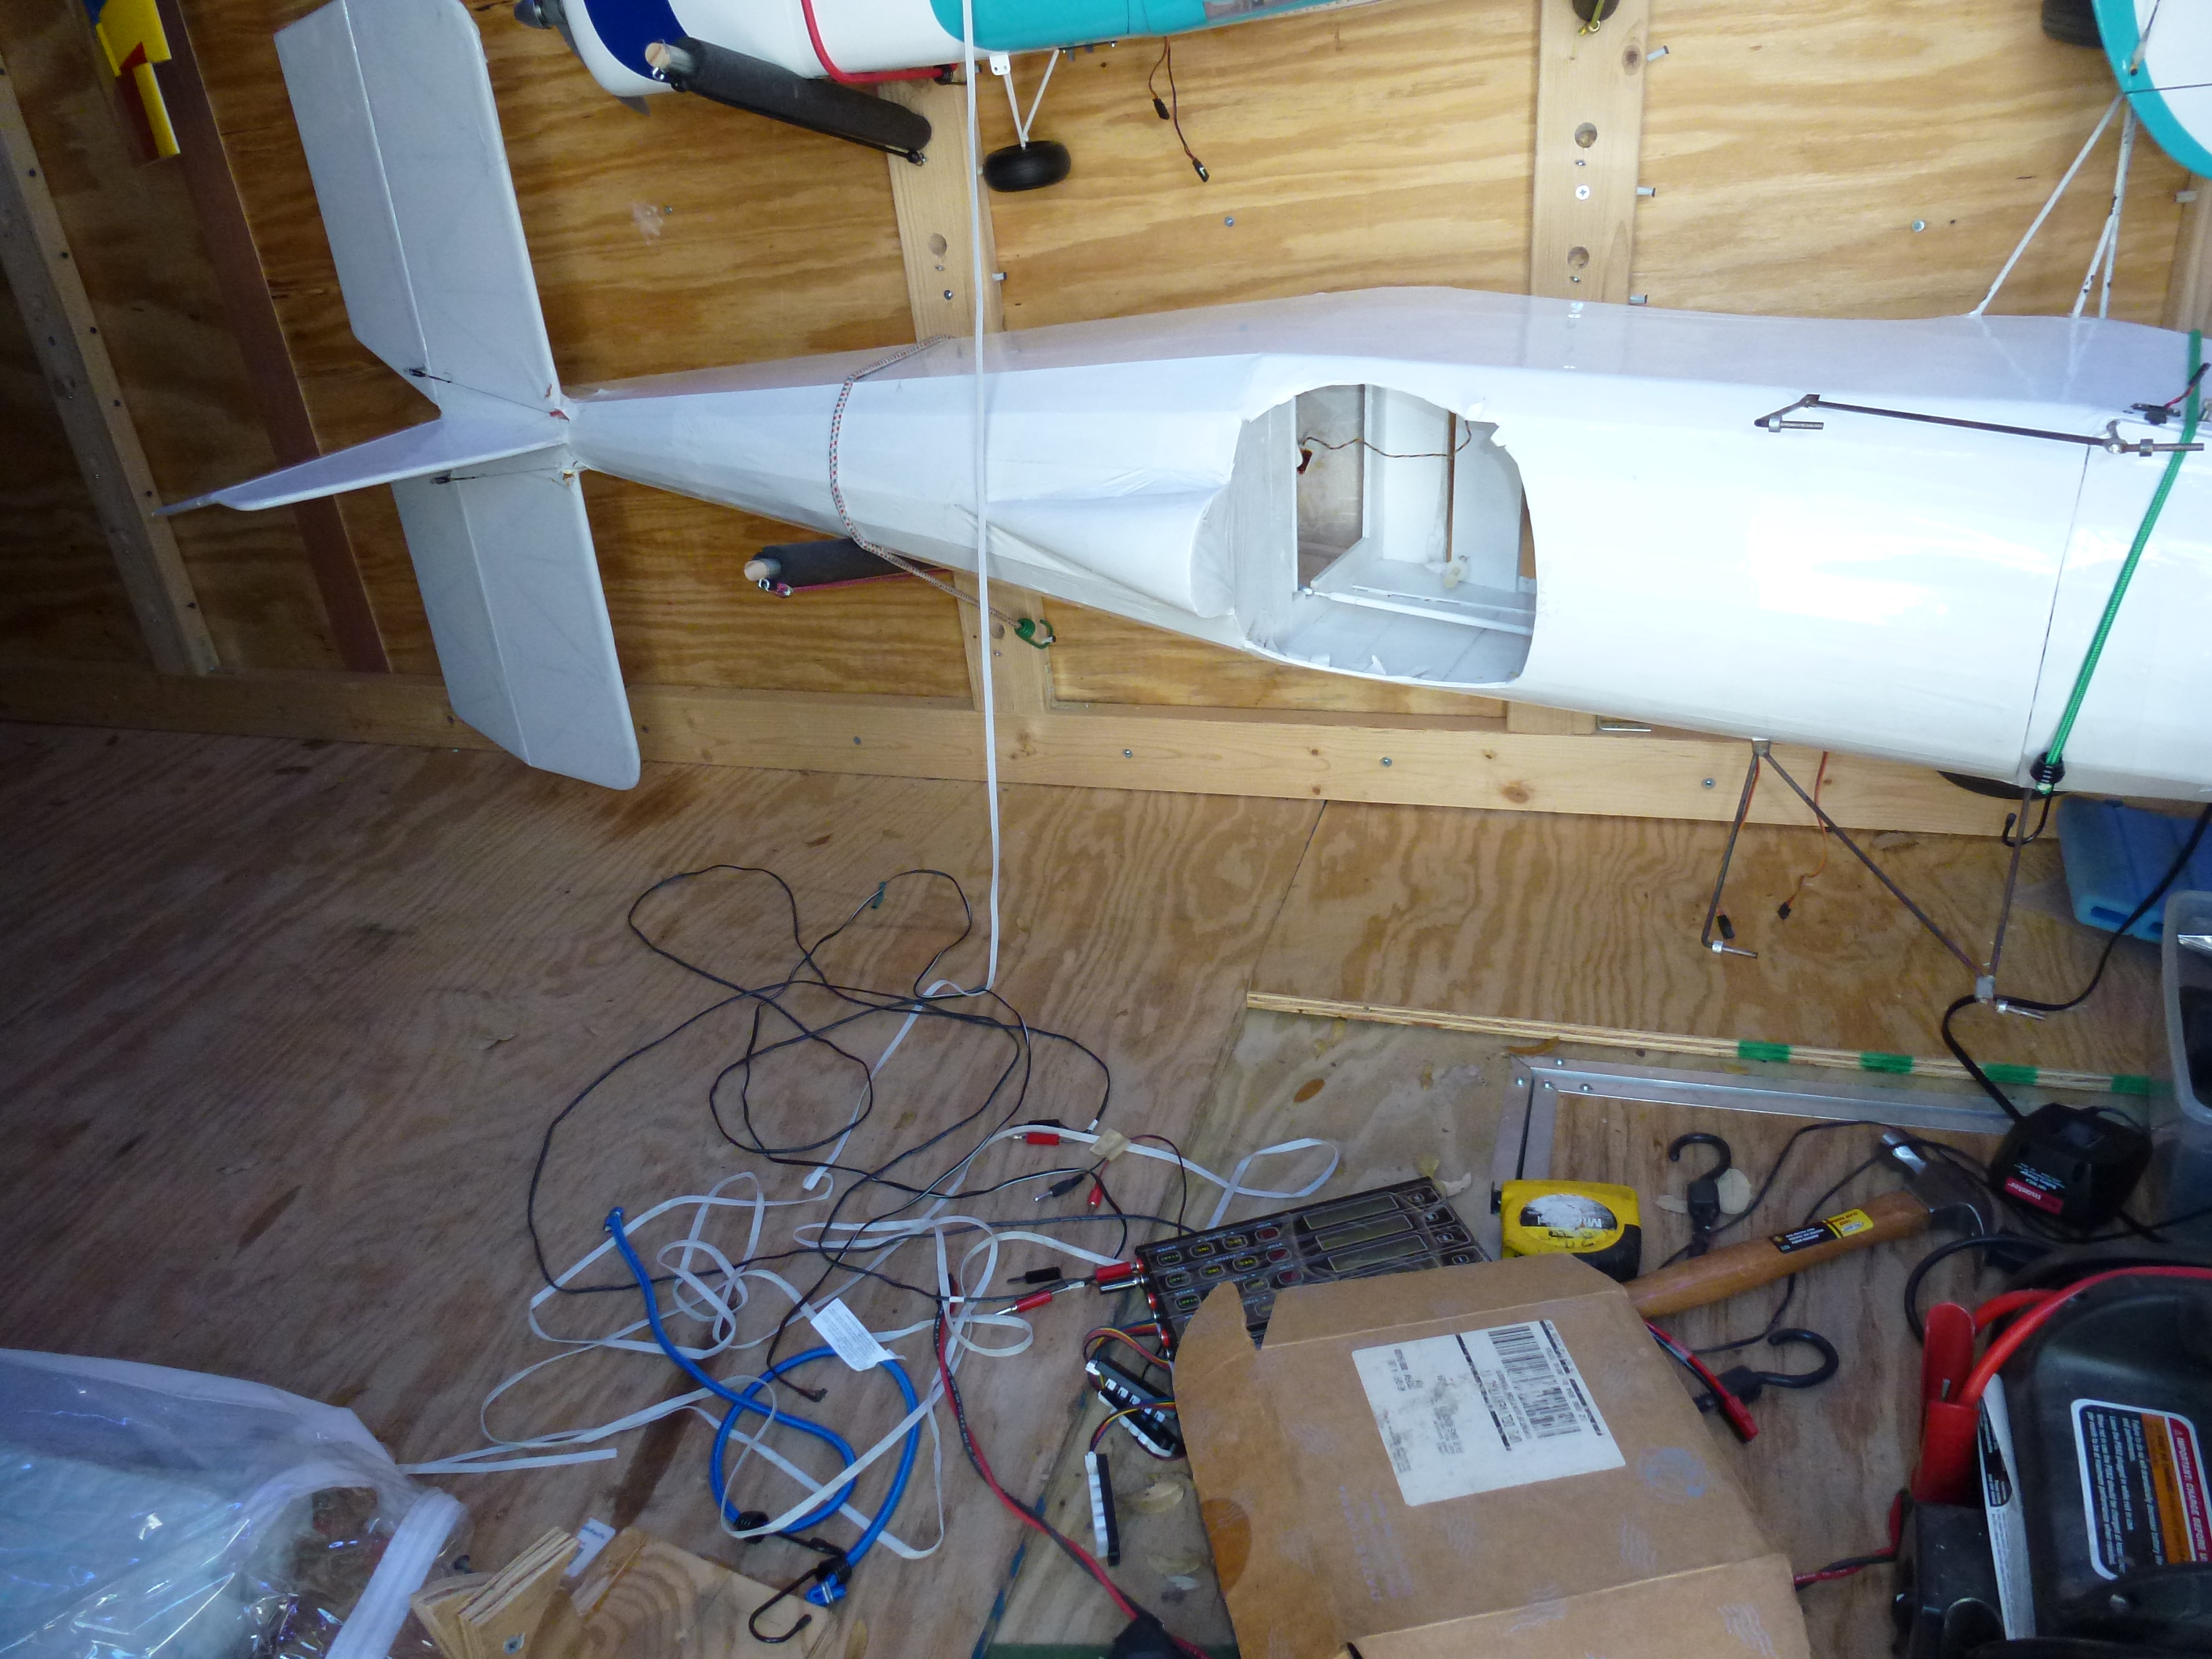
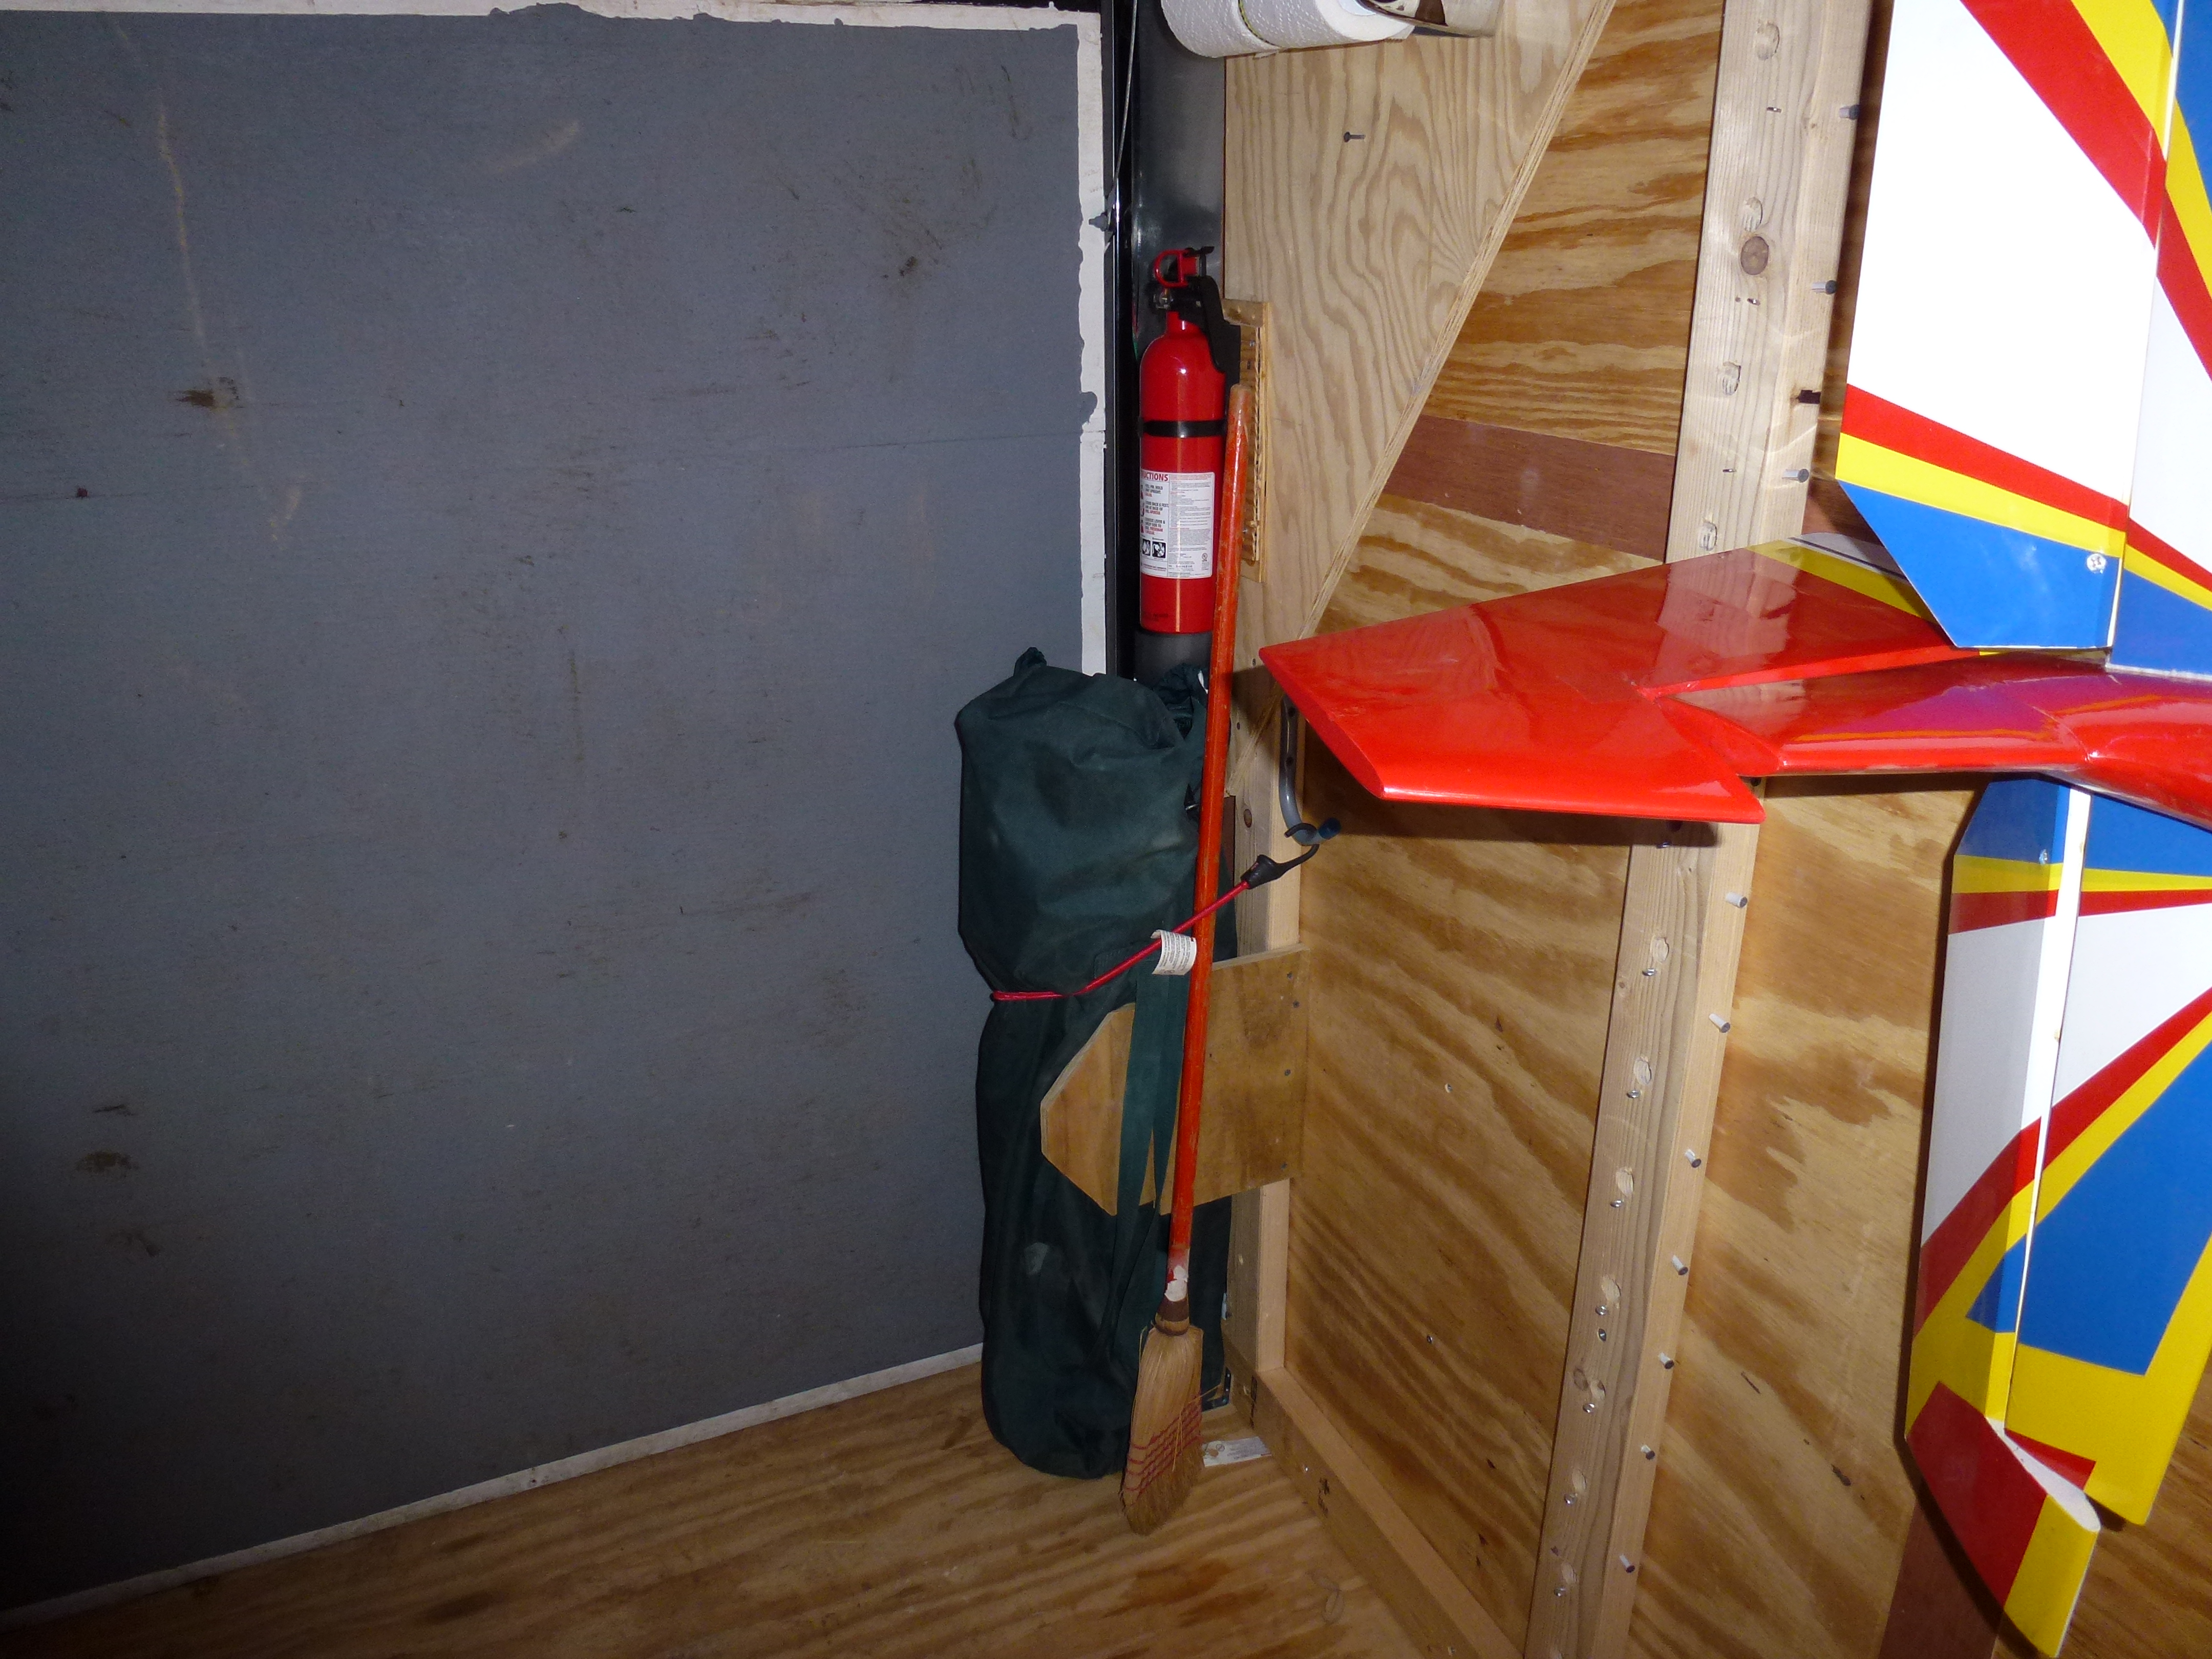
My 2000 watt inverter (the red thing behind the white aircraft nose - a Bud Nosen Gere Sport) went in just below the lower shelf because I want all sparks to be lower than any hydrogen gas released by the battery. If you look closely, you can see a section of the lighting I used.
Then I got 'tricky'.
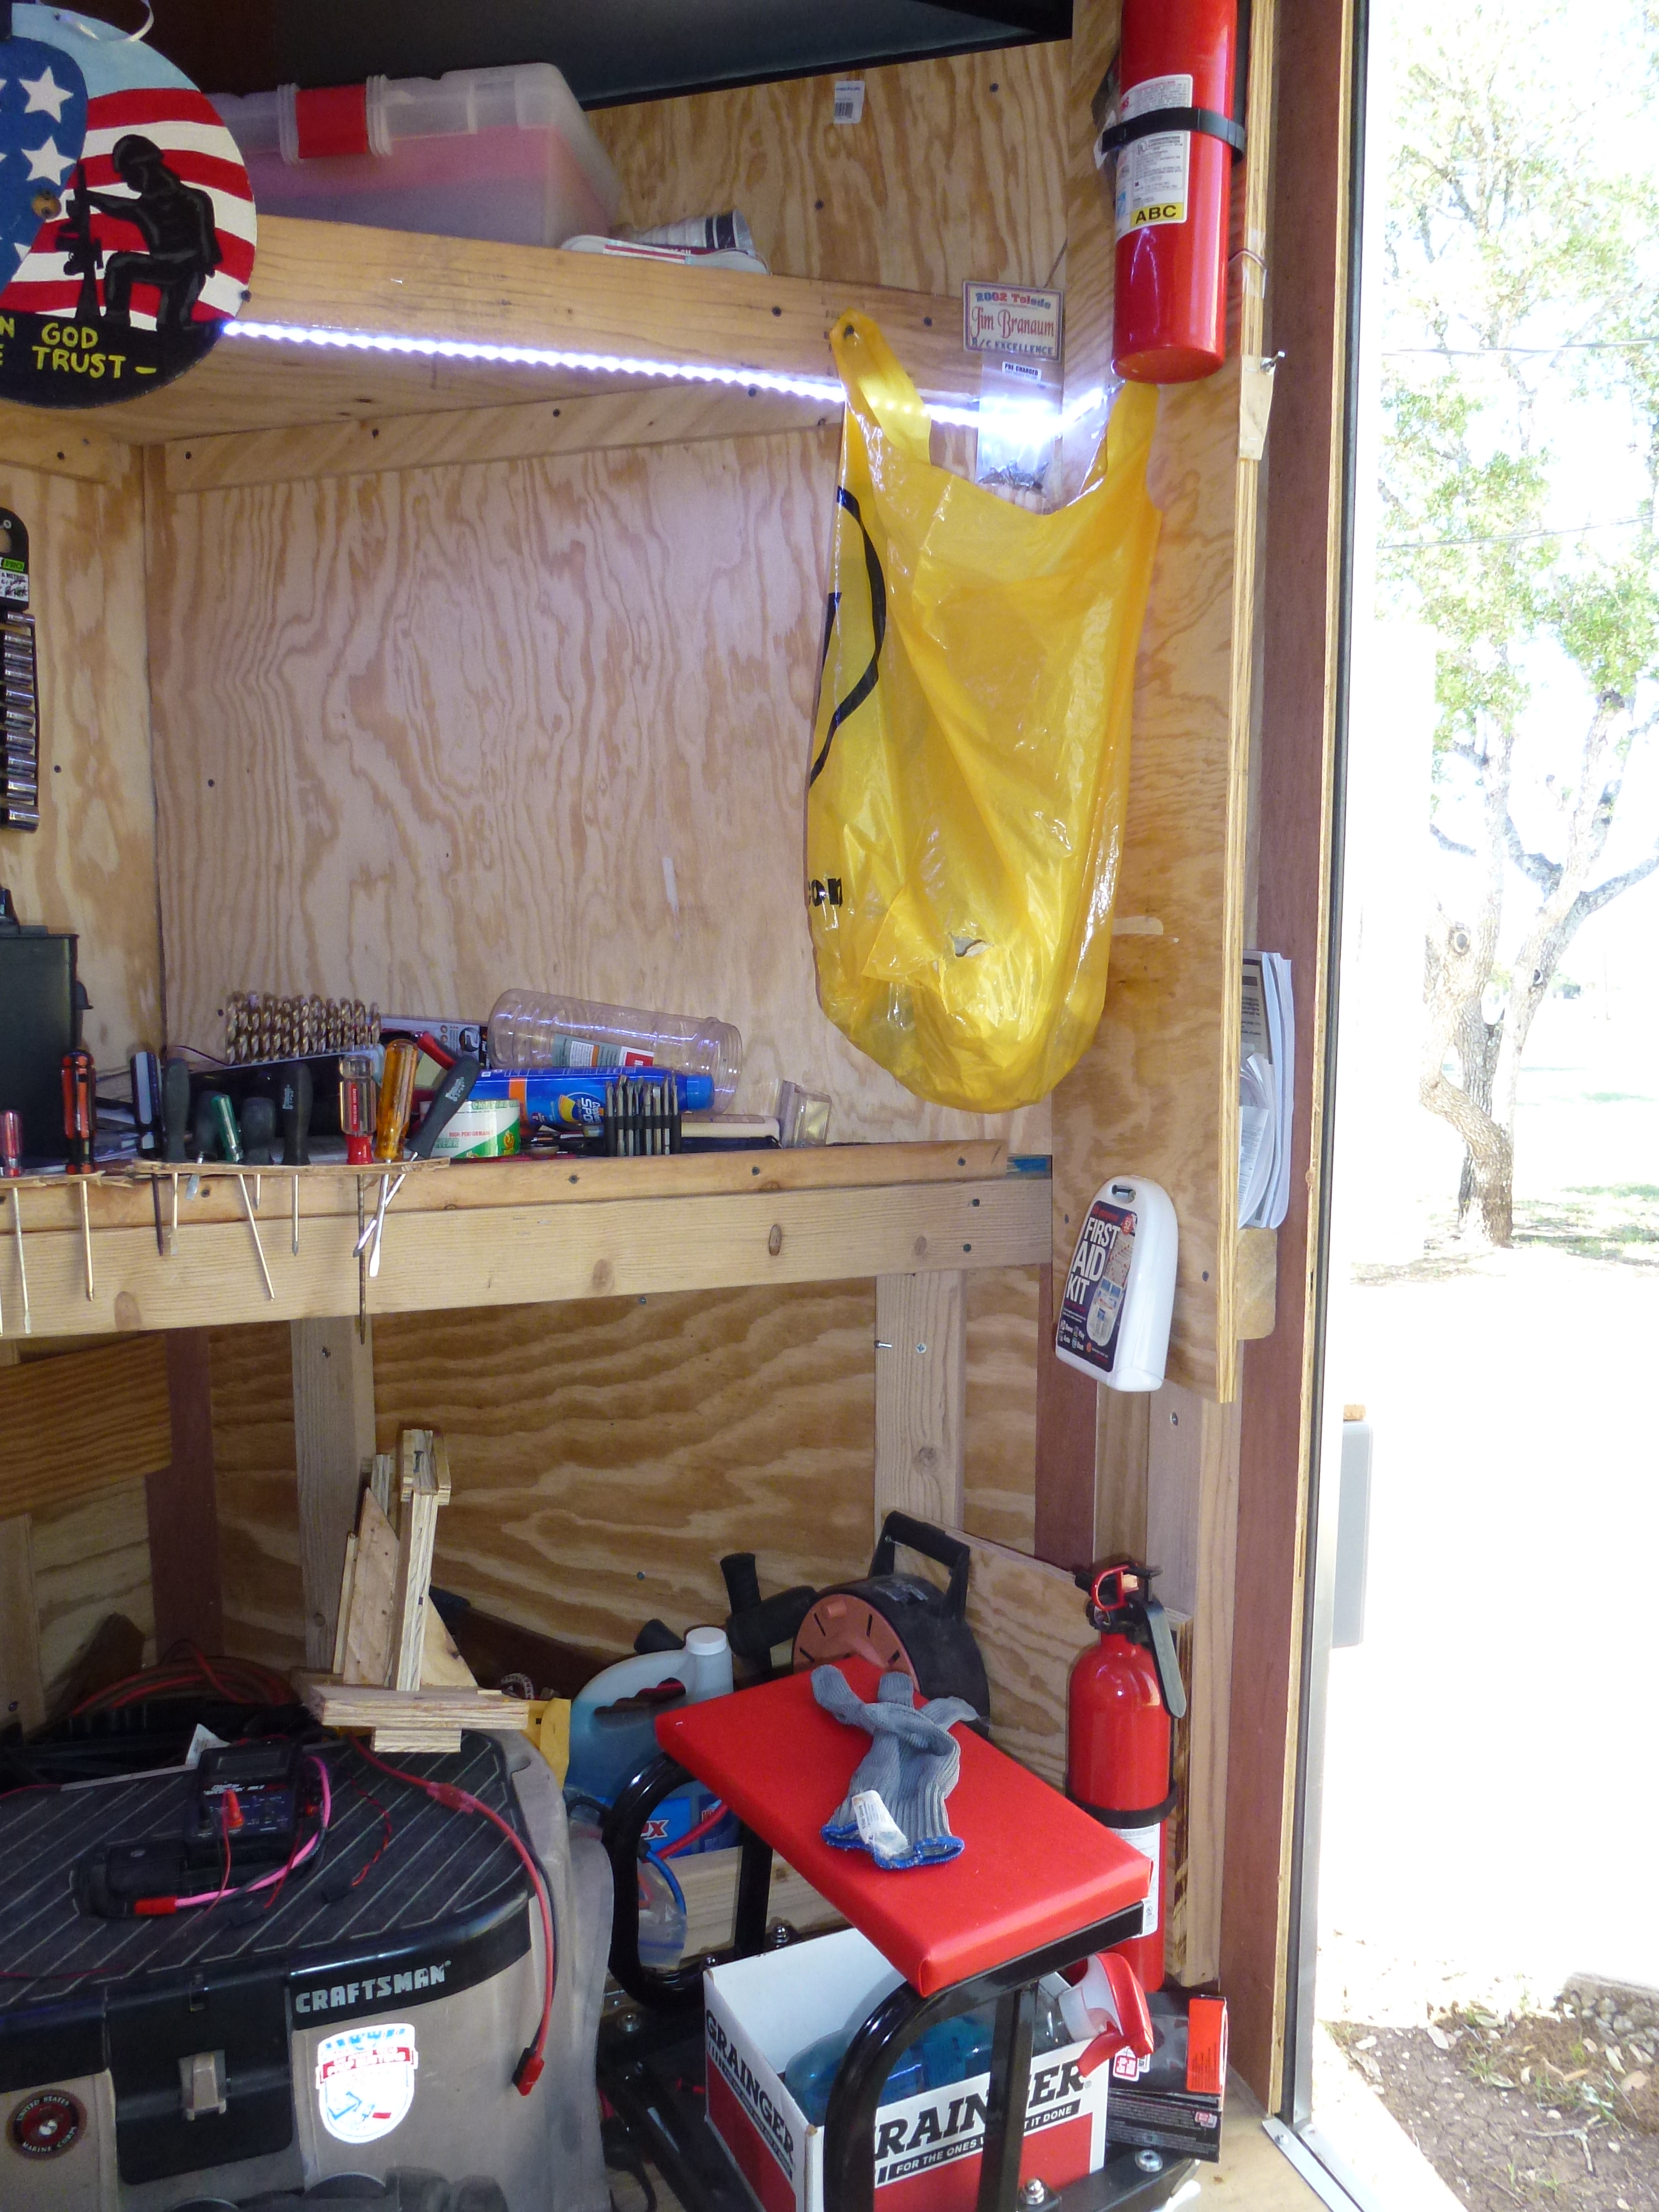
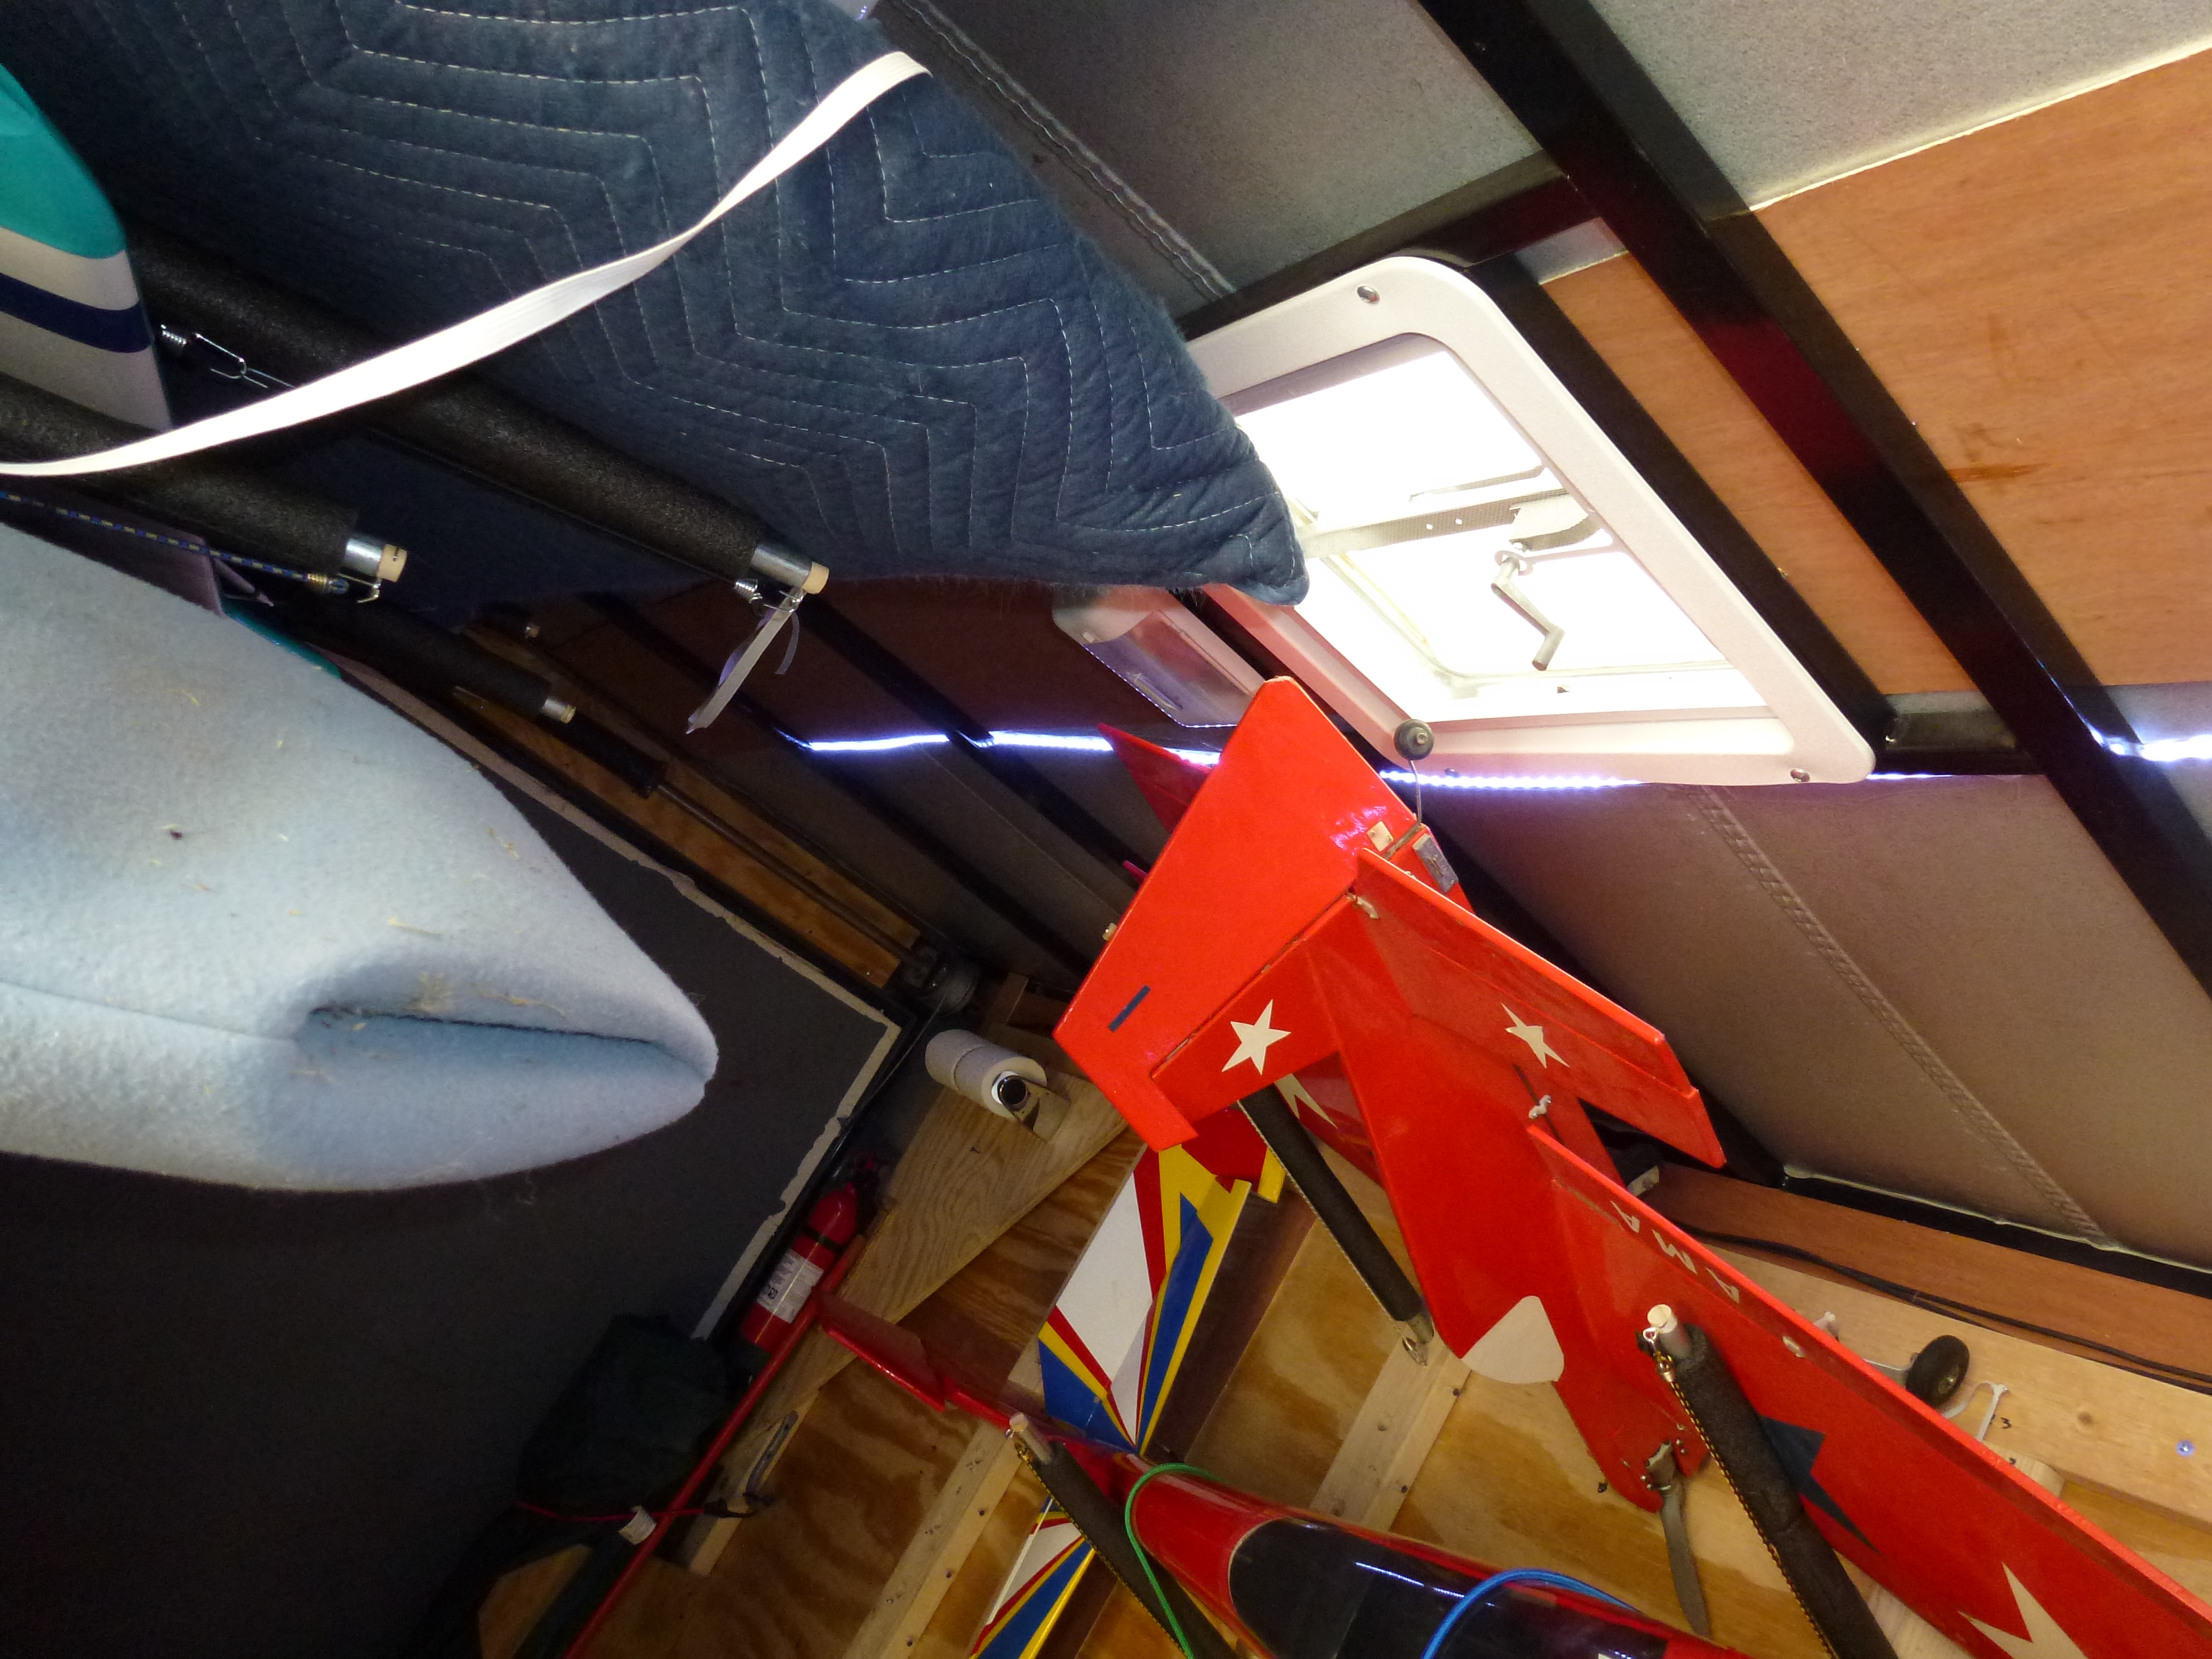
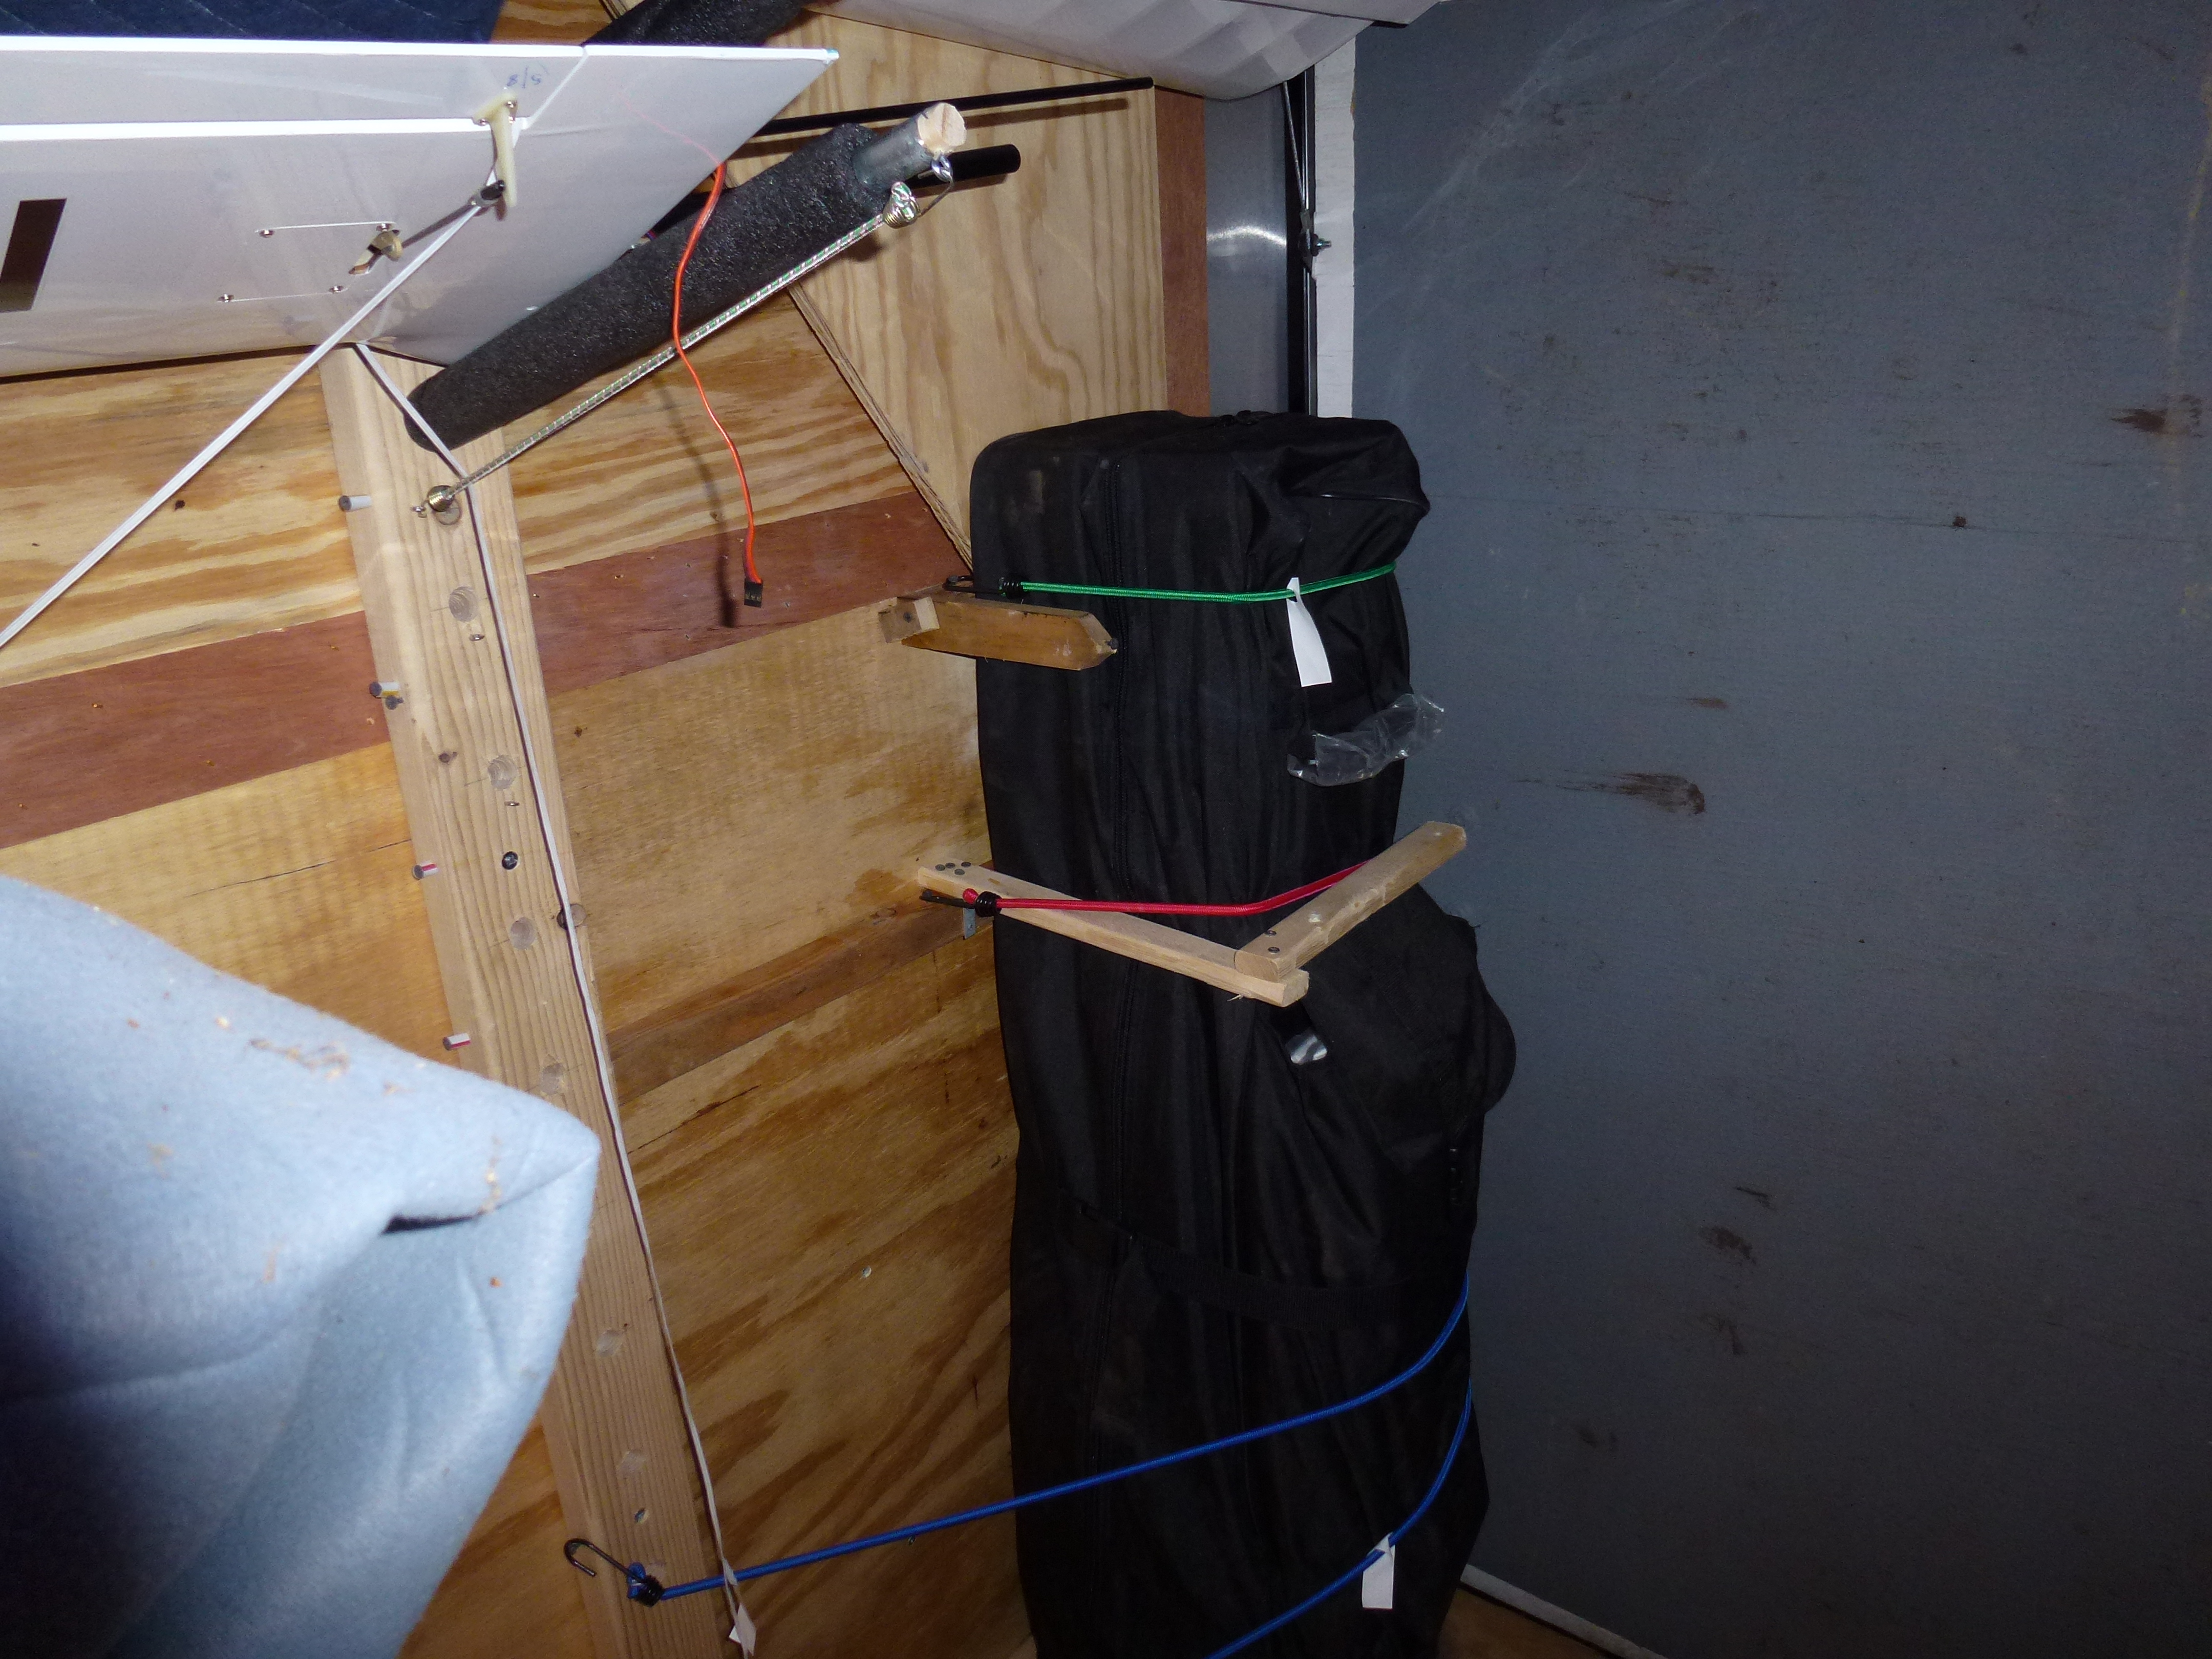
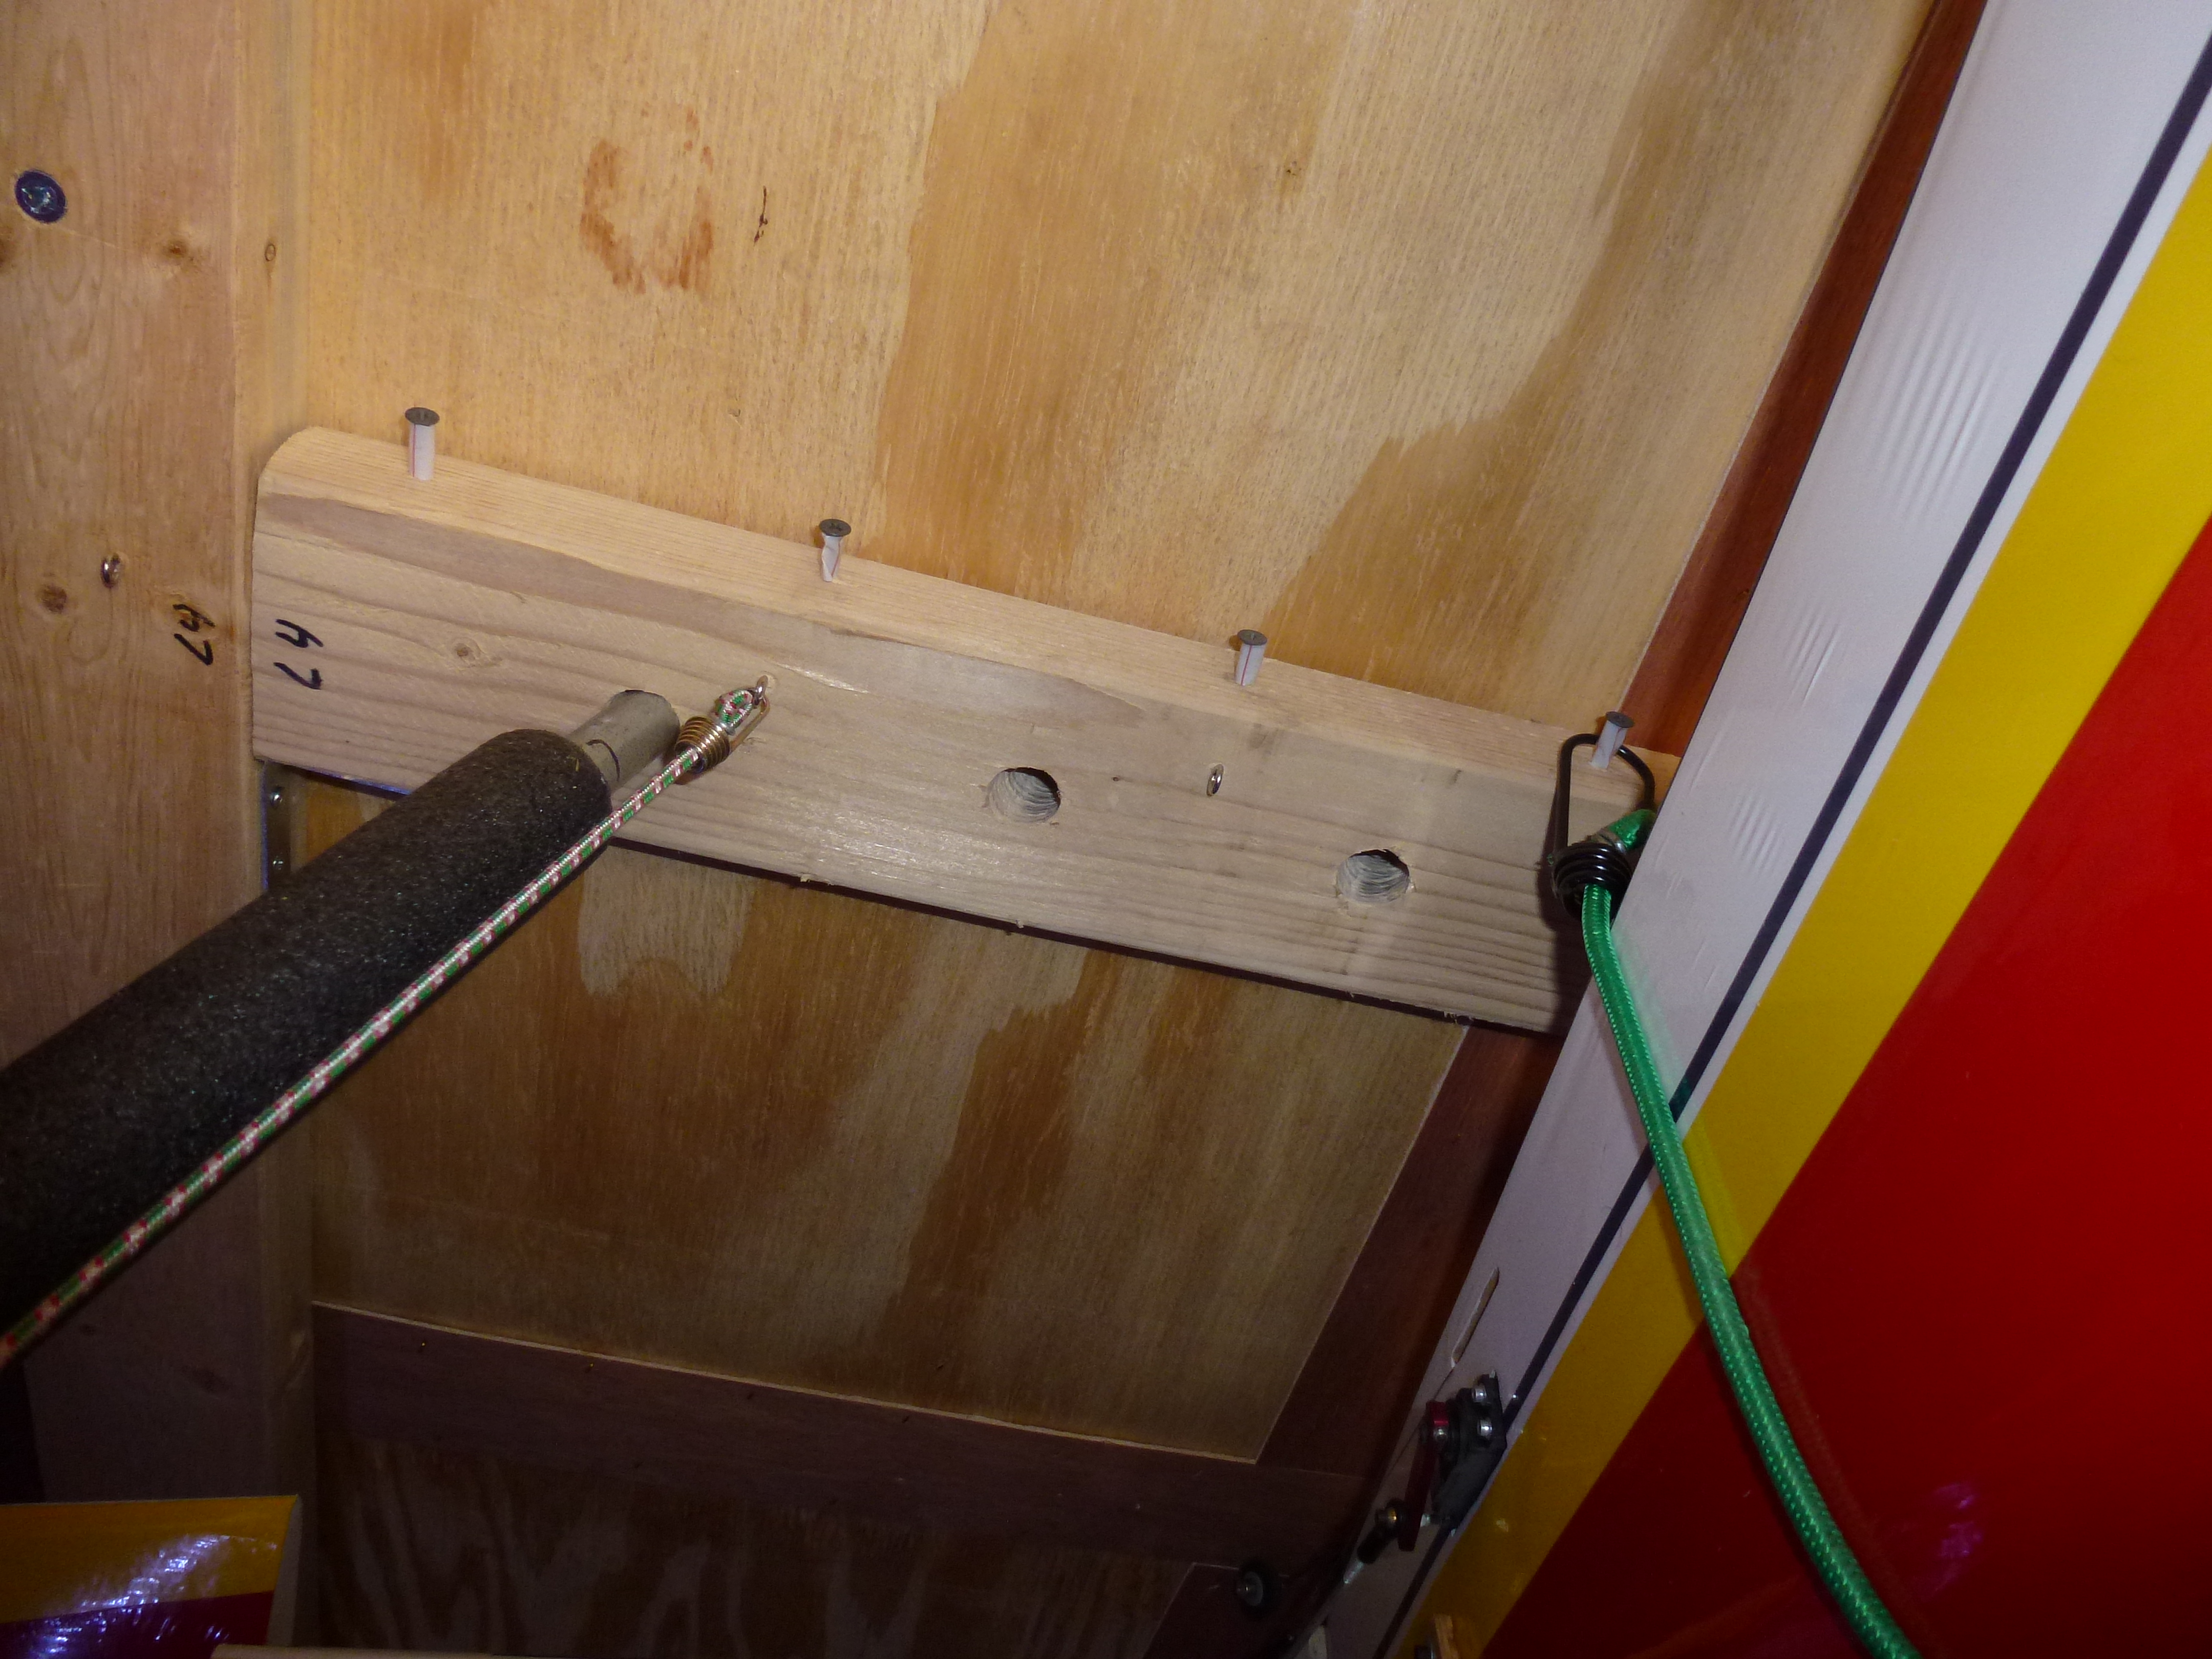
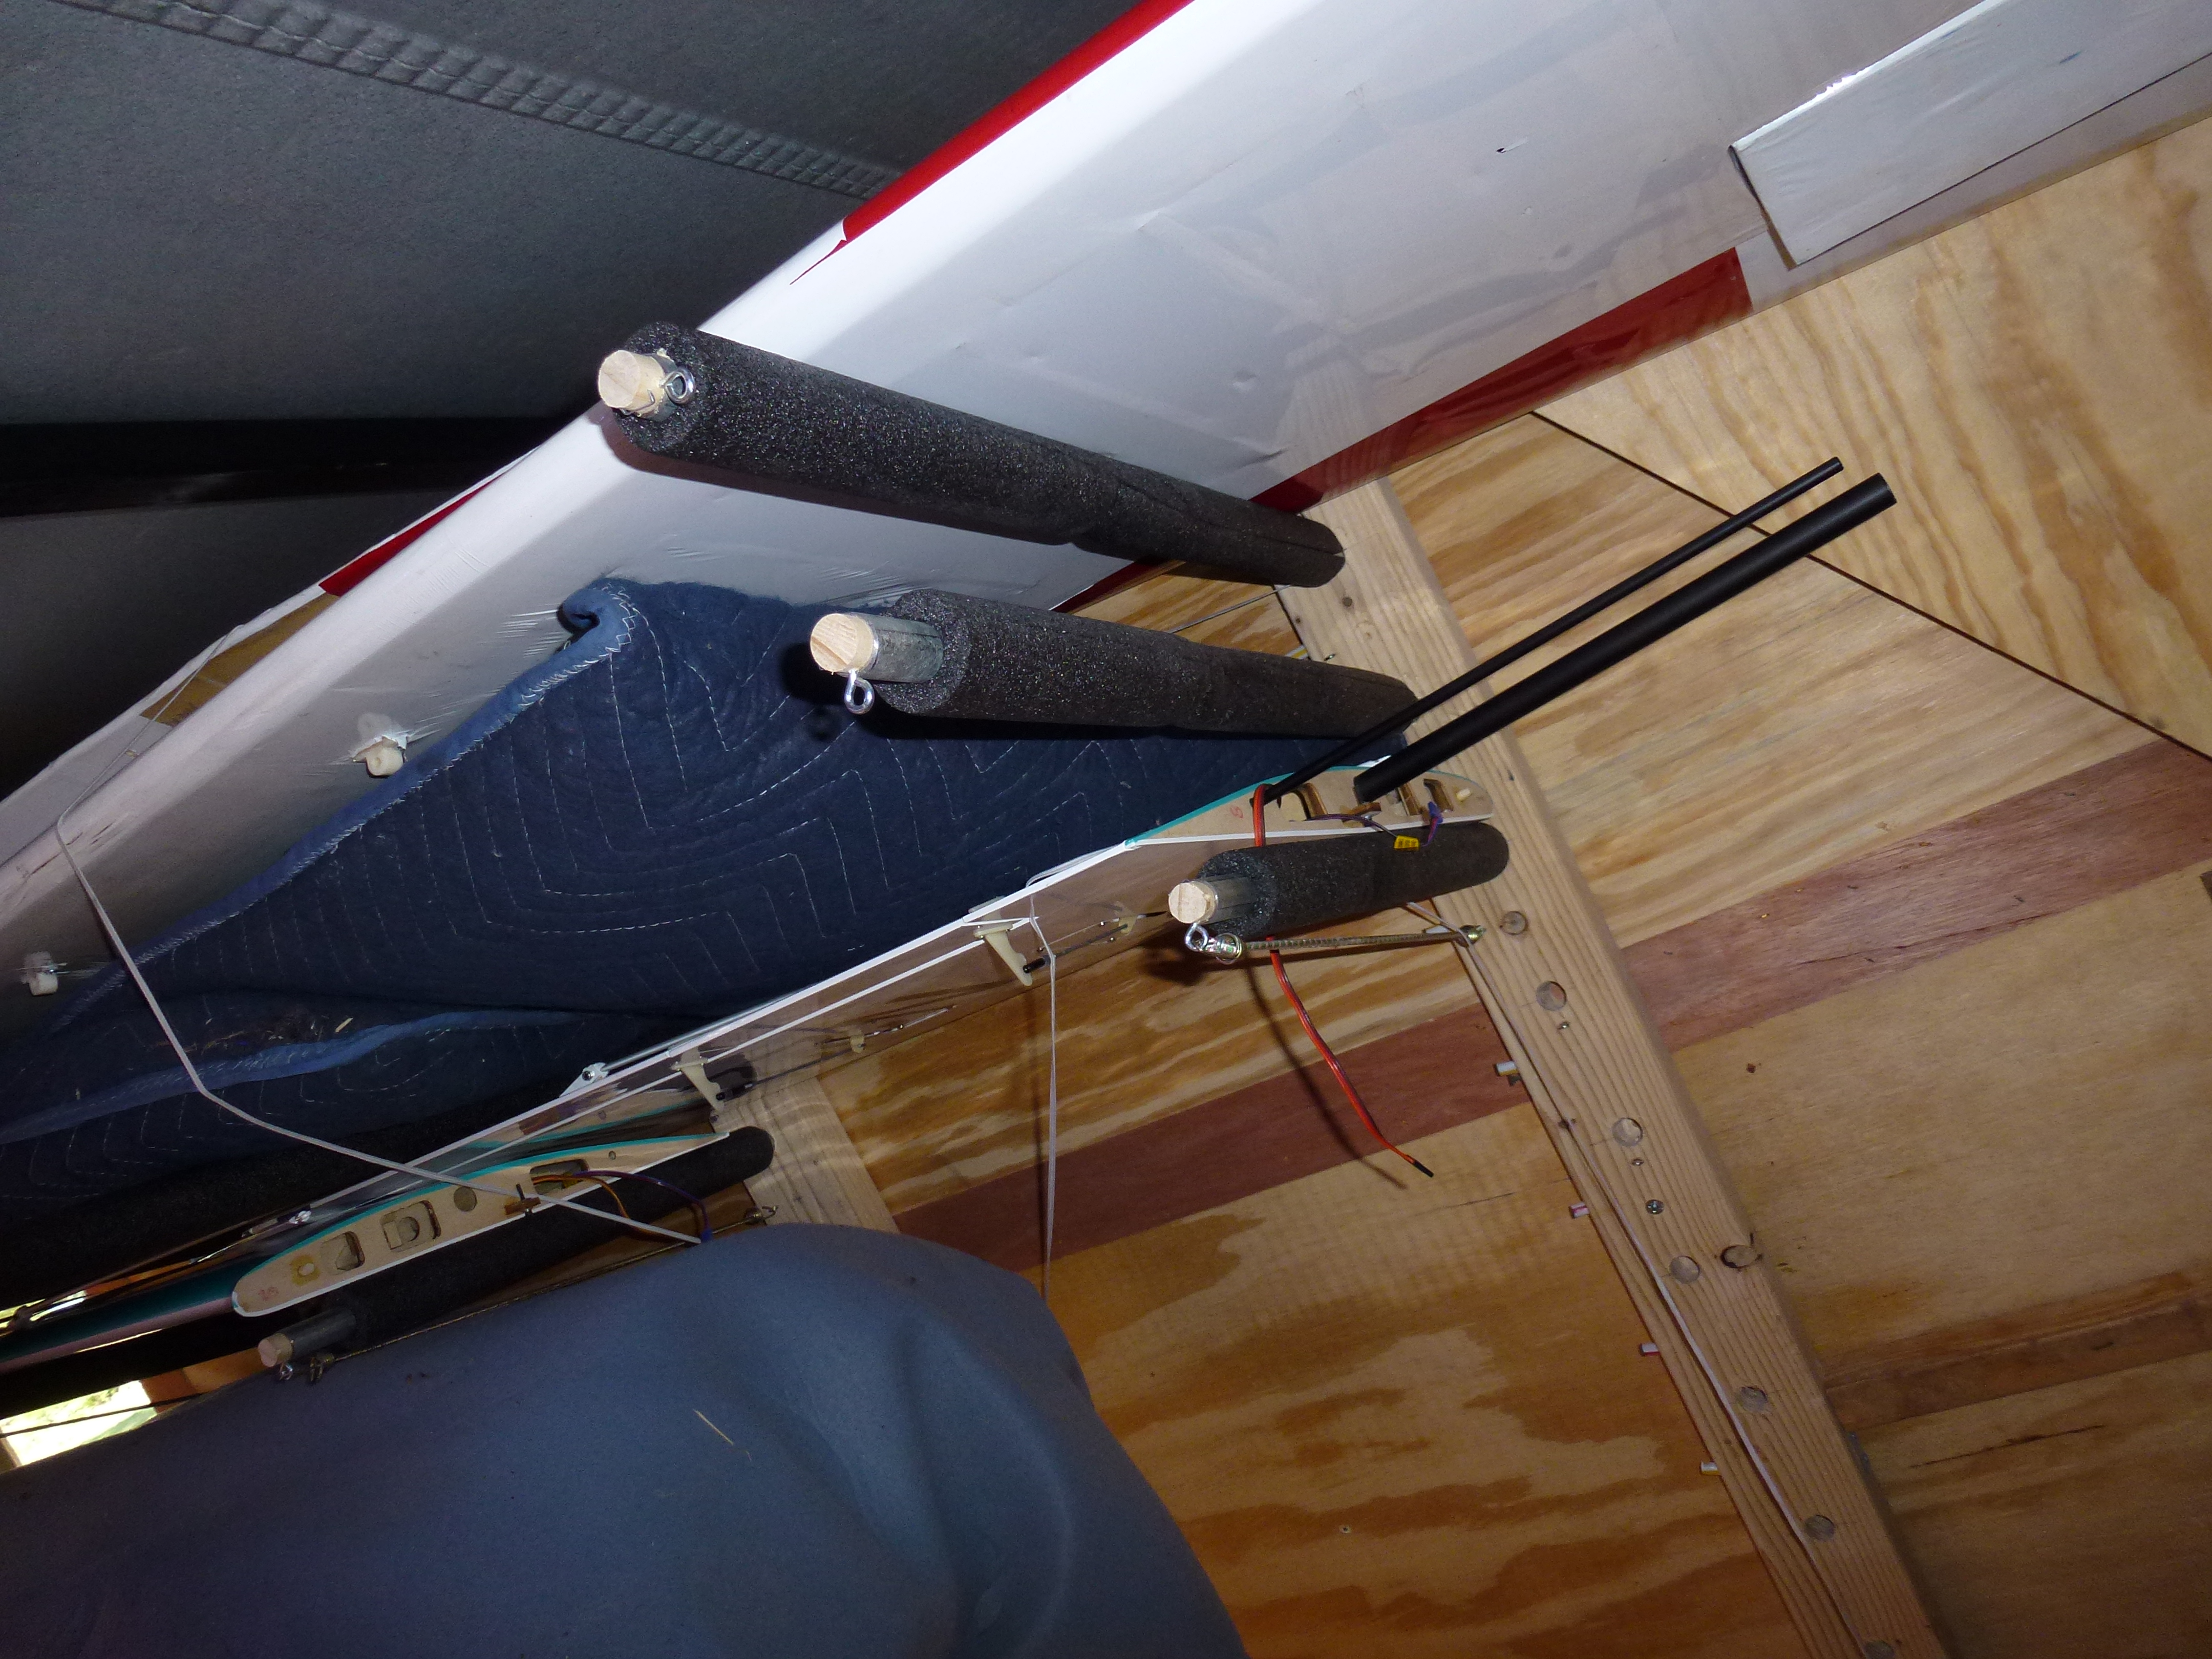
I installed a 2x4 every 2 feet from the front of the box to the back on both sides. Each 2x4 has a 11/16 hole drilled at 15 degrees from horizontal every 2 inches from top to bottom. Those holes are where I put in chunks of 1/2 electrical conduit covered with plumbing foam. Oh I discovered that I needed to use a 1/2 dowel chucked up to a drill and covered in 60 grit sand paper to sand each hole big enough for the conduit to go in. Drilling to 3/4 would have been way too big. The end of each chunk of conduit has a 1/2 dowel plug and an eyelet installed. I use those and small bungee cords to eyelets by each hole in the 2x4 to keep the conduit from wiggling, or falling out. I also went to WalMart and bought a couple cans of racquet balls for the end of the conduit after I cut my head up a couple of times.
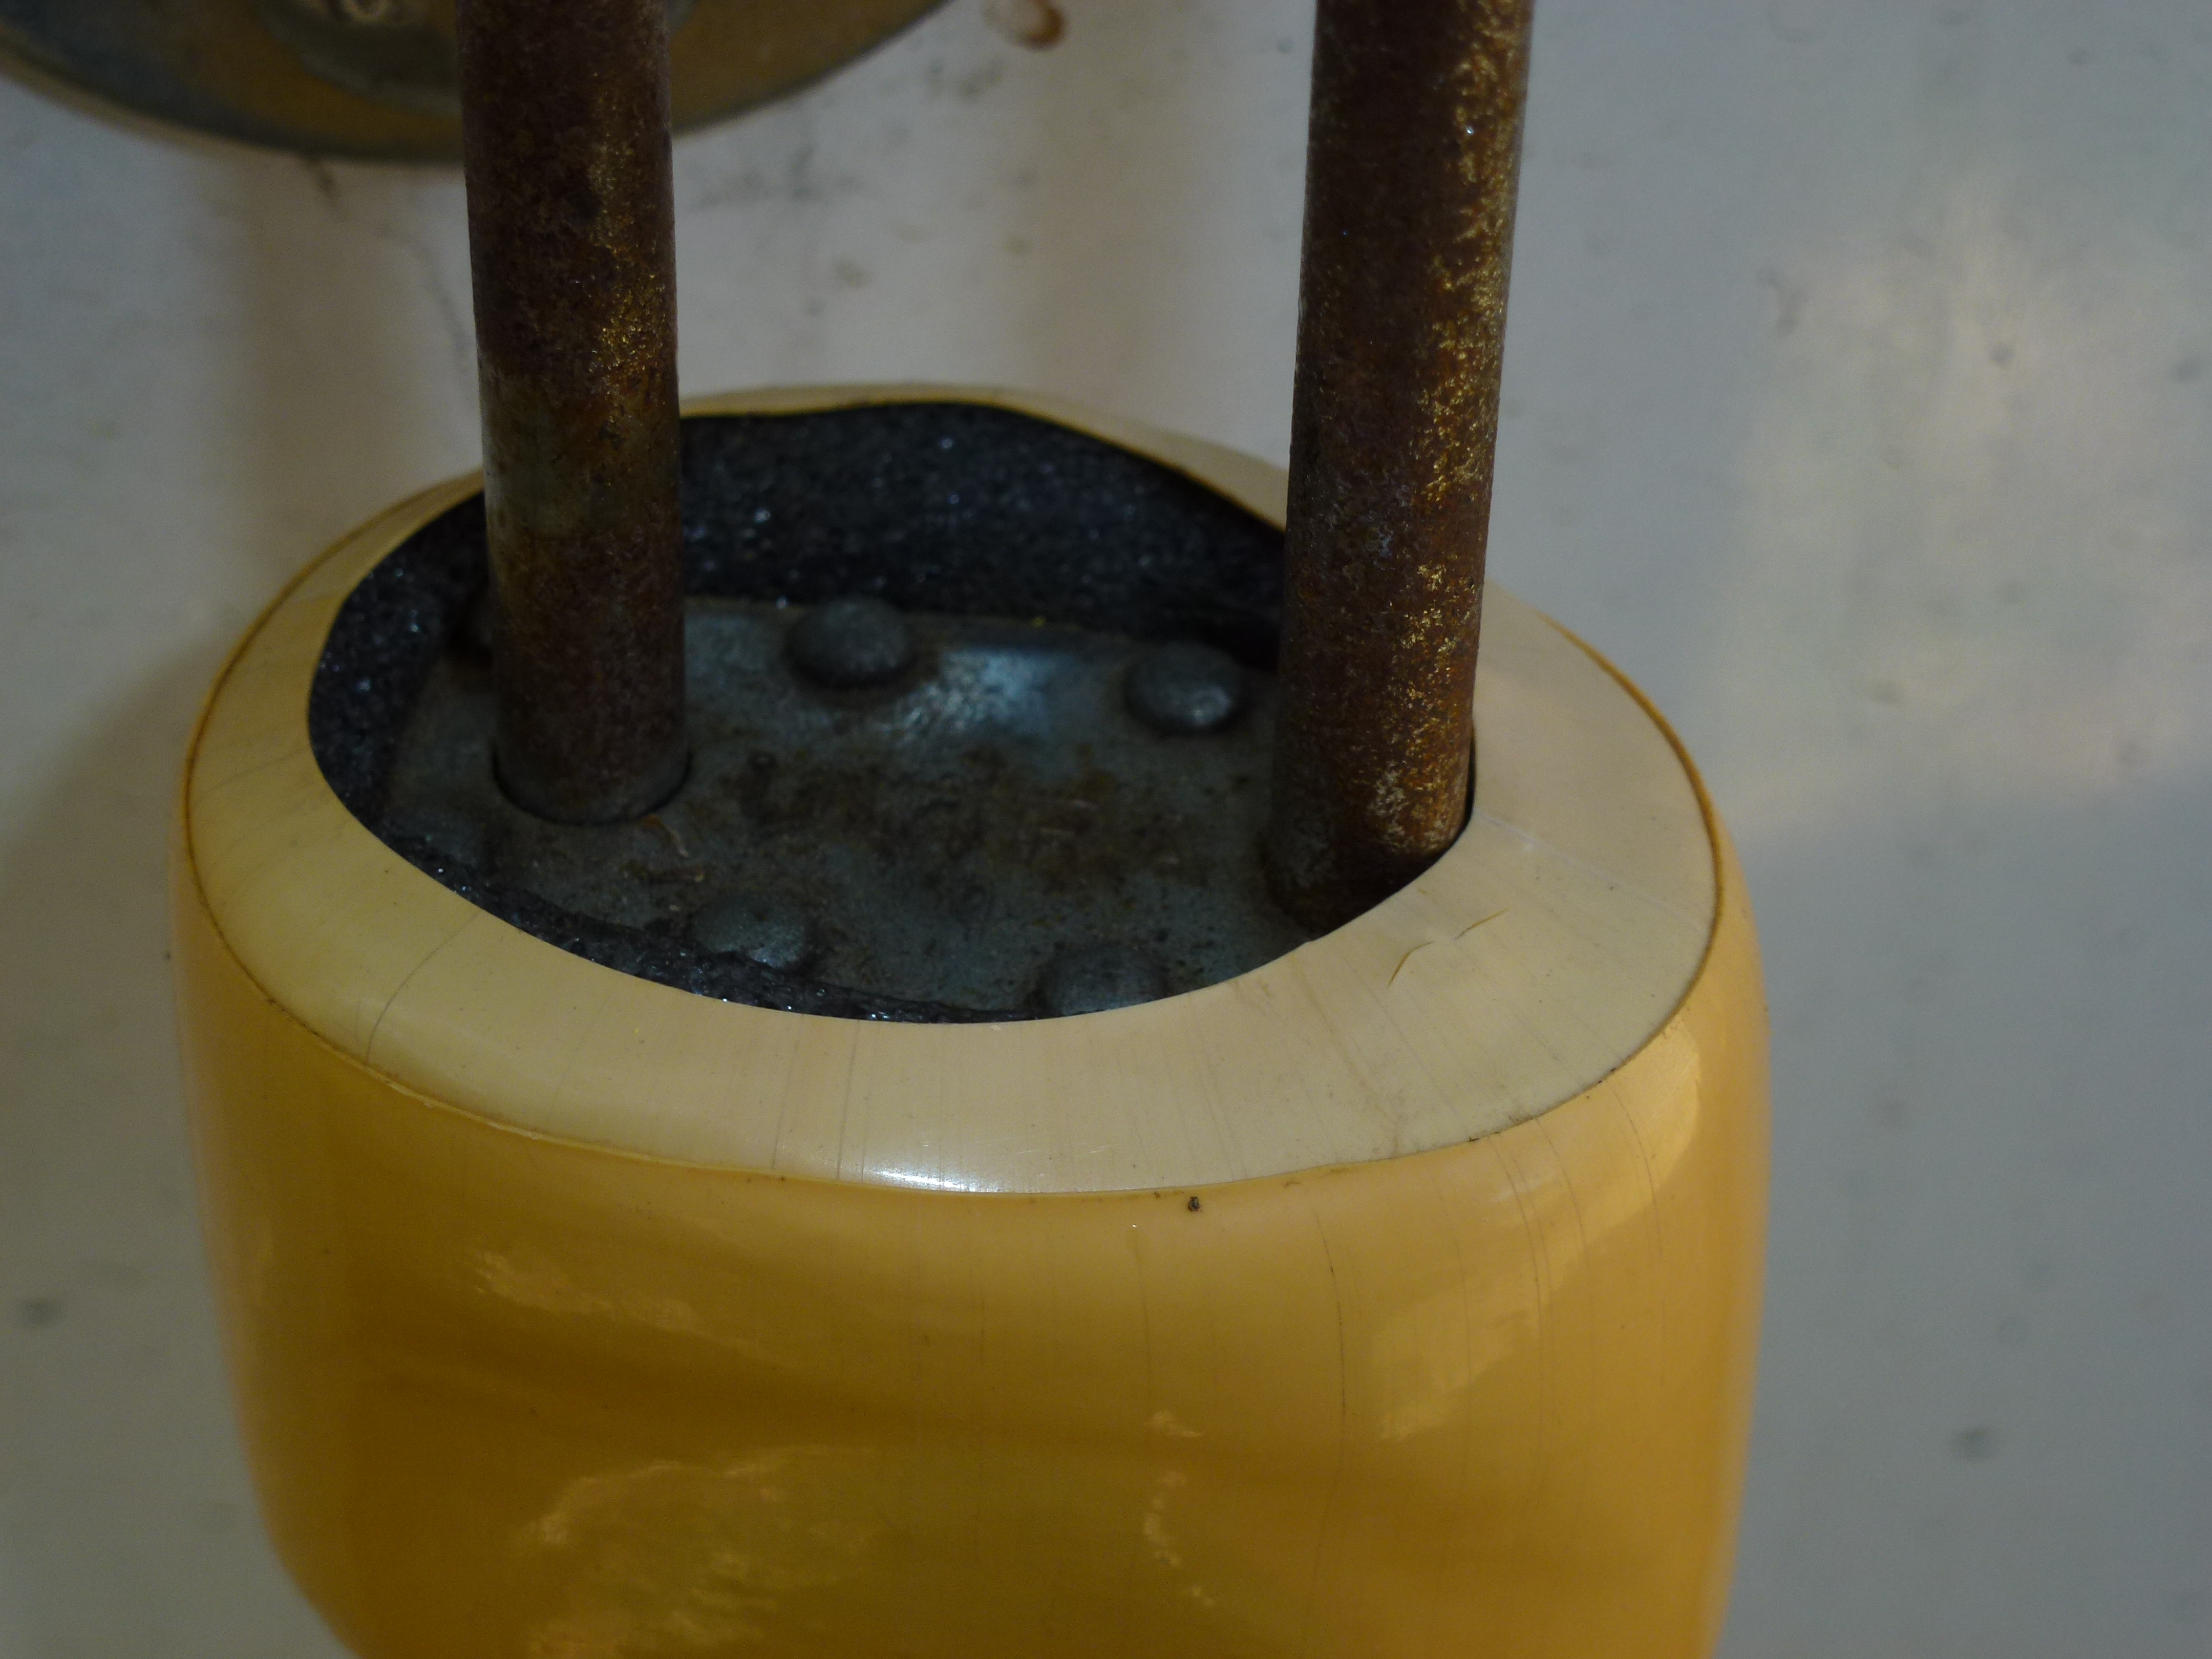
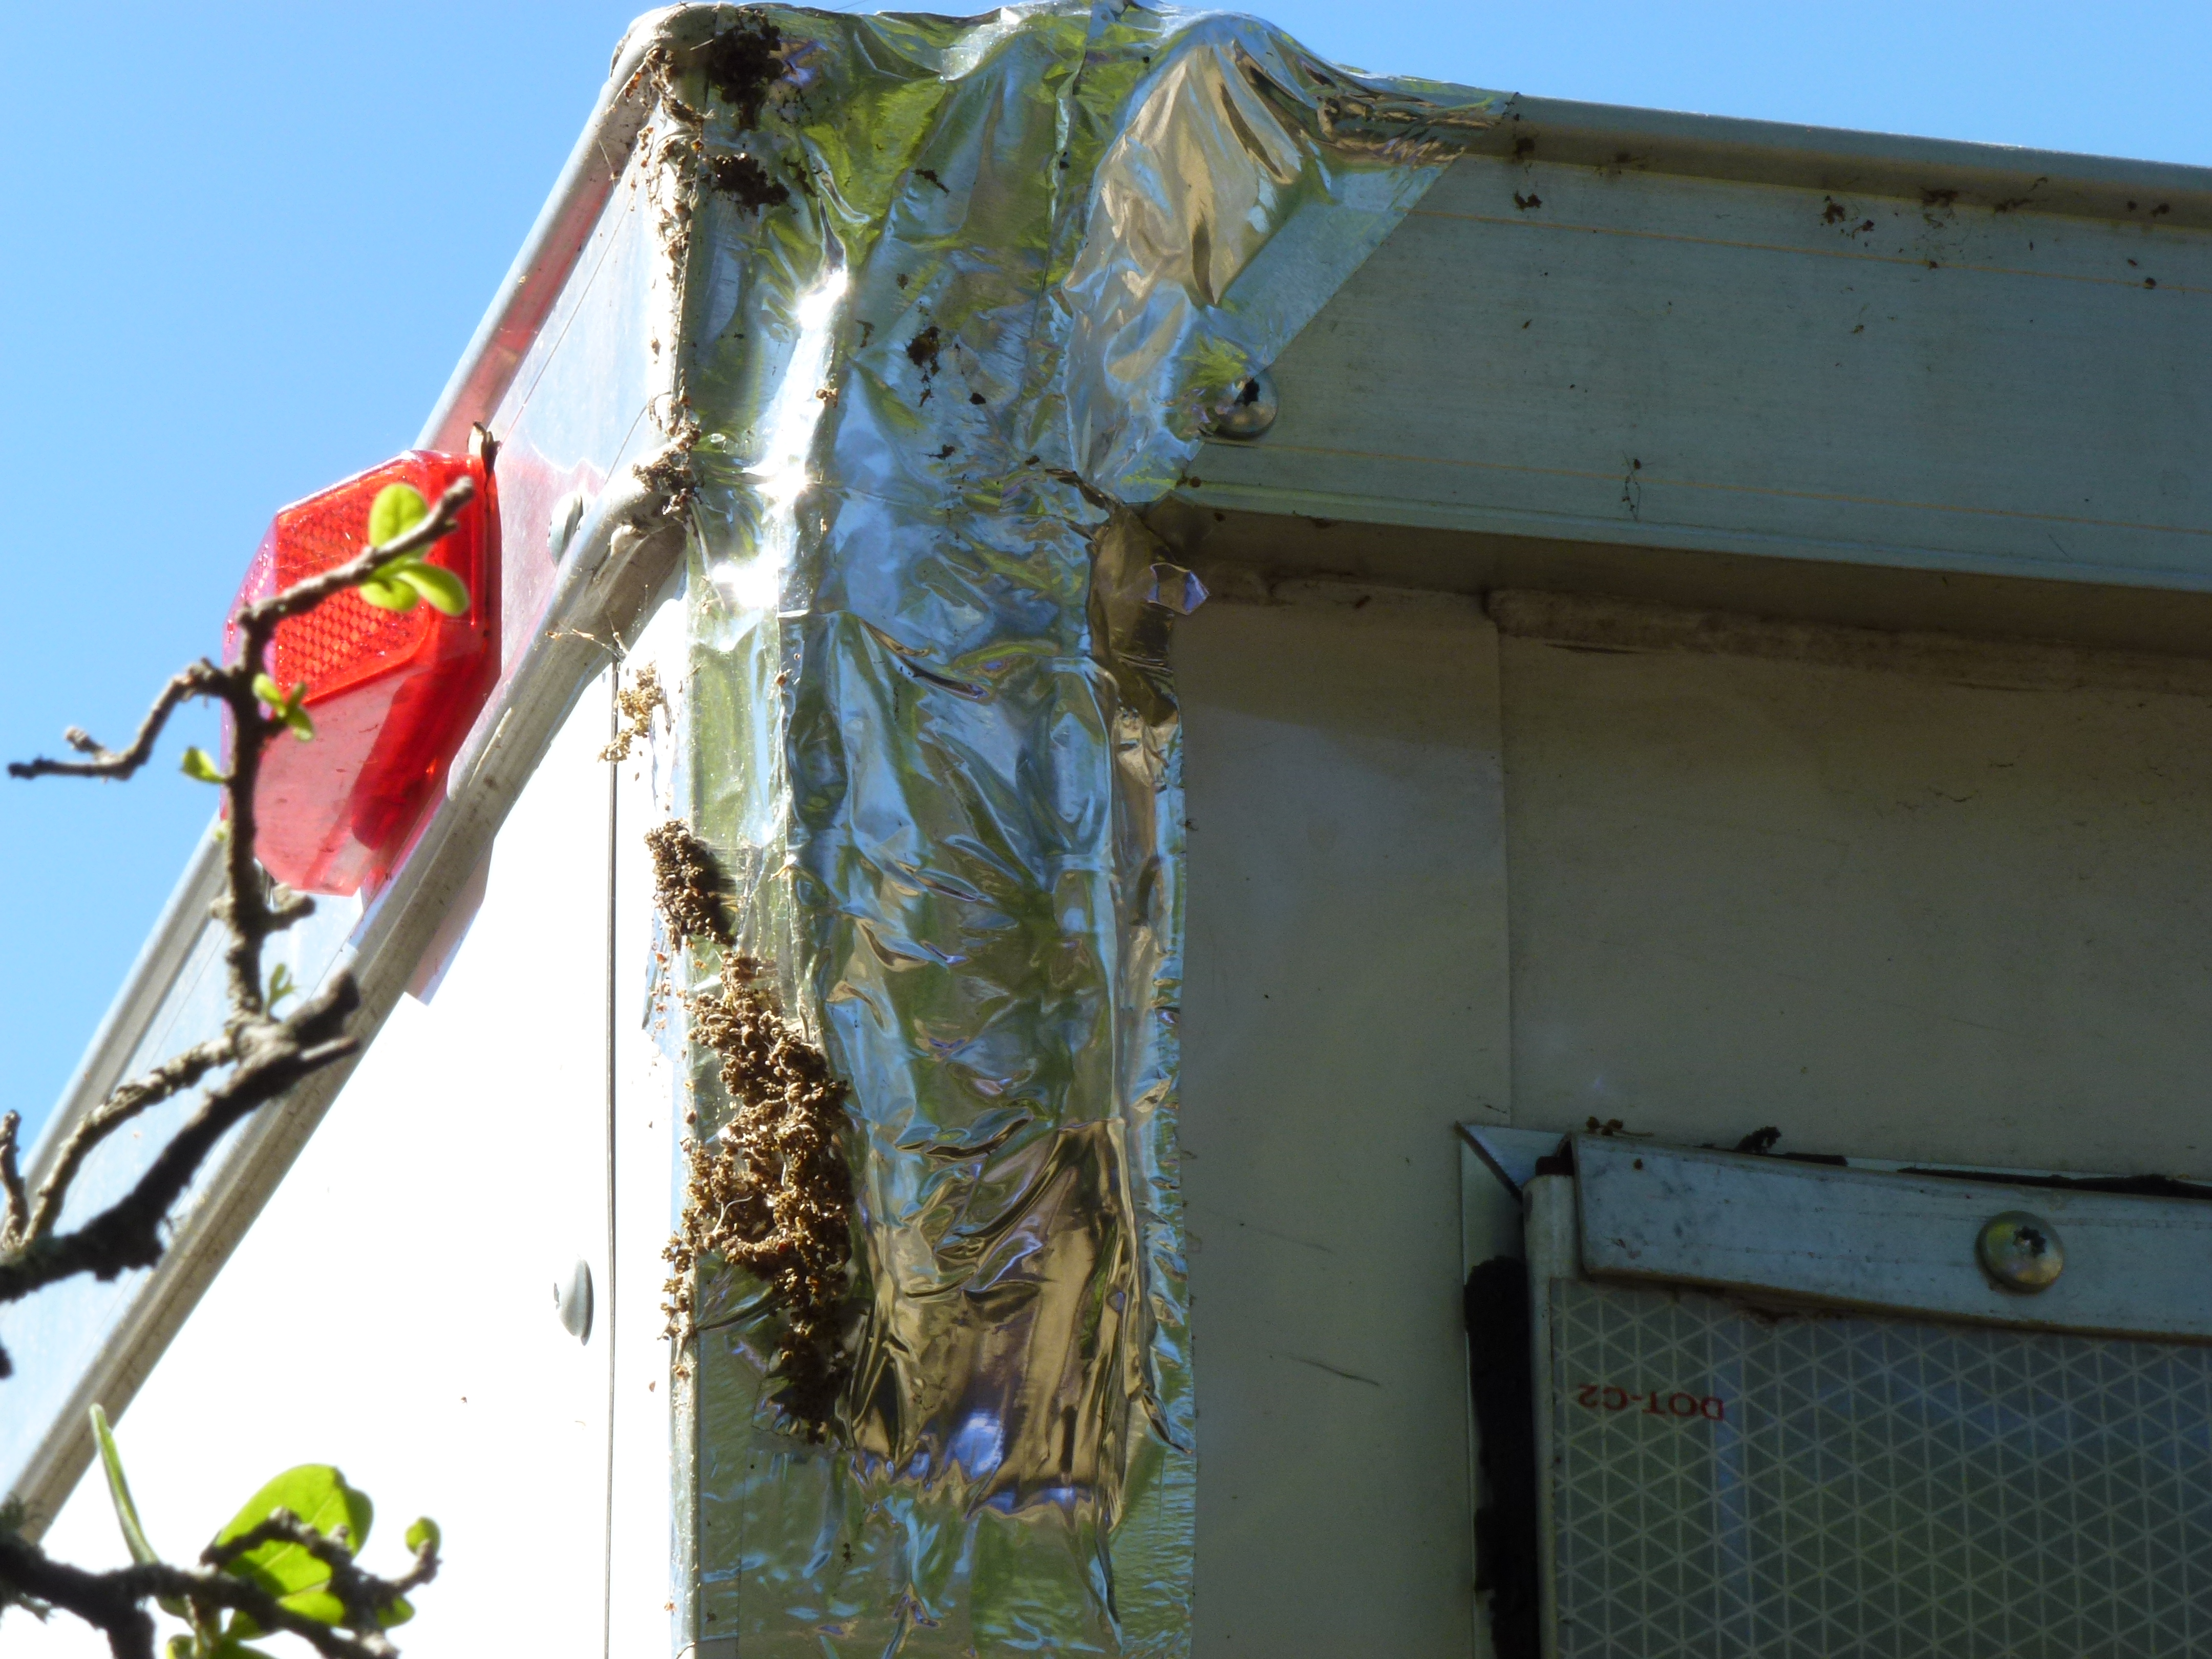
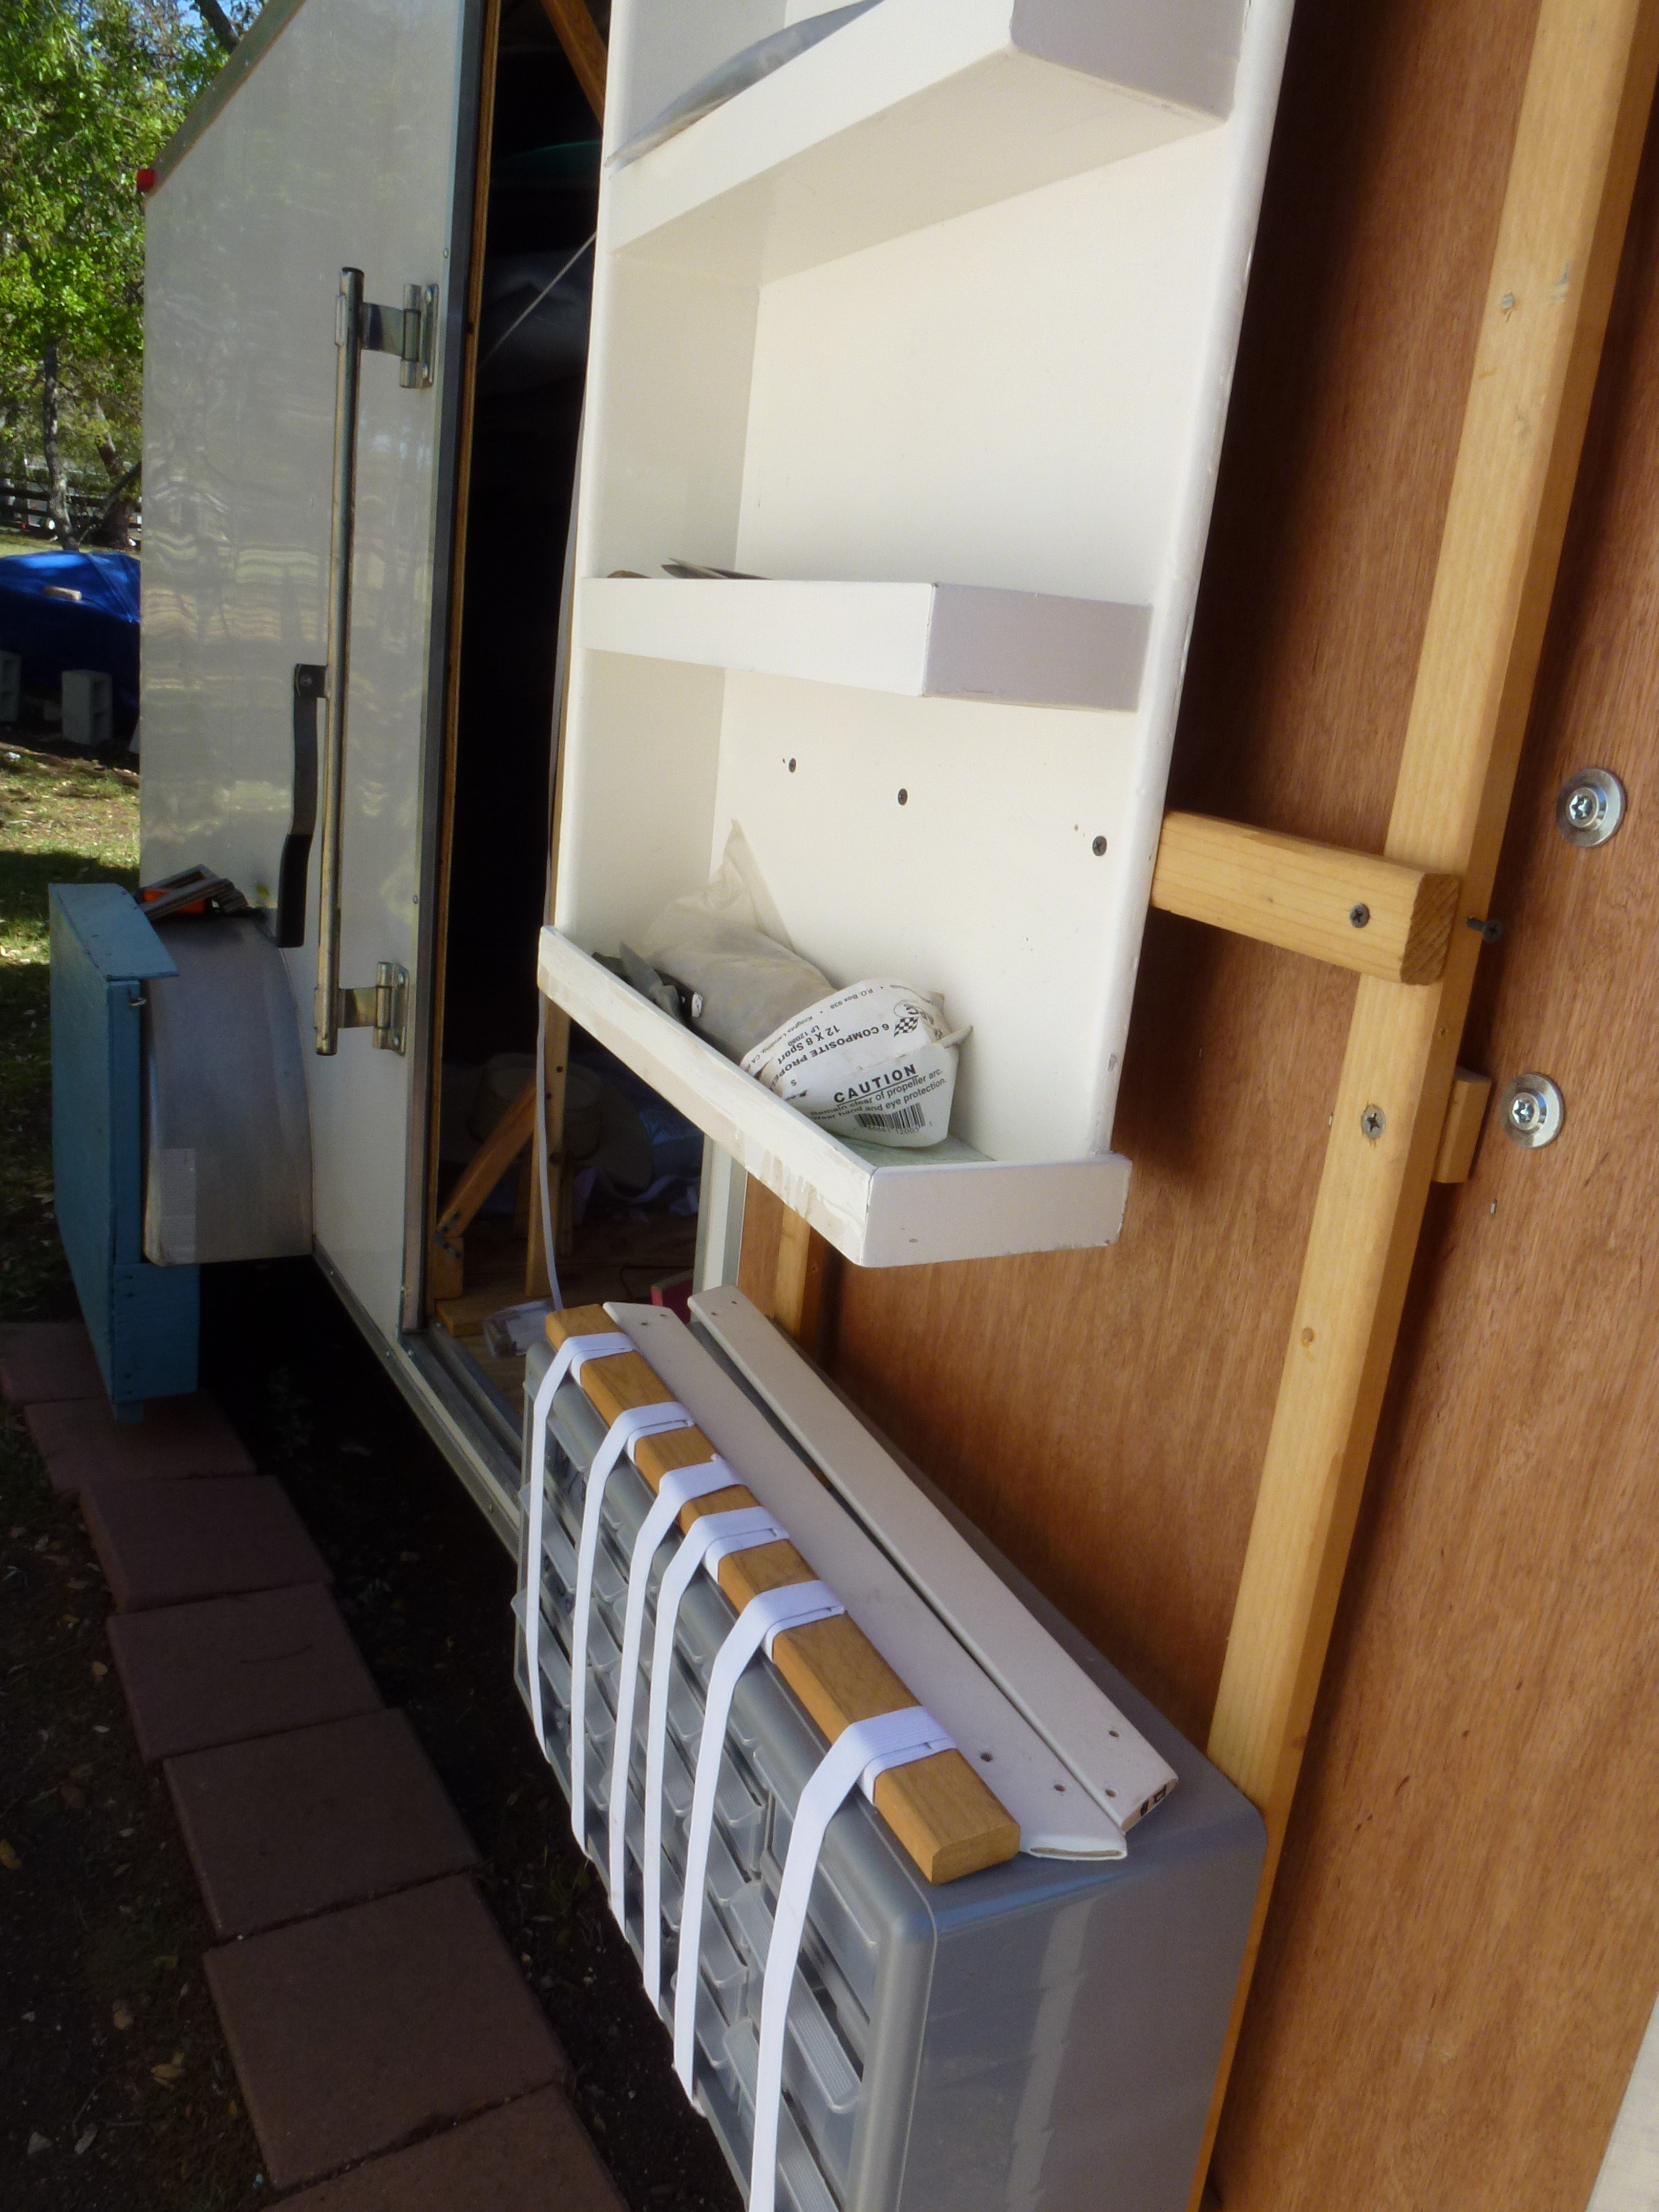
On the side of each 2x4 by each hole I put a 1 inch drywall screw with a chunk of straw over it to provide tie down points for aircraft. In the back, I built a stop to hold a pop-up canopy and one on the other side to hold a couple of chairs. Without the stop, that stuff would always come forward in a sudden stop. I put a couple of chunks of PVC behind that stuff for the tent stakes. I also built by the side door a stop to keep my wings from sliding forward. The yellow thing you see is a lock that was enclosed in 3/4 inch plumbing foam and covered in heat shrink. That keeps the lock from banging and the heat shrink protects the foam. The metal (A/C) tape is to insure the solar panel edges are sealed and in the back to keep the holes I drilled sealed and the wires from sun damage. You can also see the storage system for nuts, bolts, and props I built in the side door. The ramp was primed (white) and coated with grit stuff (grey) from the hardware store. I installed more than one fire extinguisher because I worry about needing one someday for whatever.

I have a 6X12 V nosed trailer (special built with a torsion axle - got tired of the old one beating my planes up). To start with the wife insisted I do nothing permanent to it, so I spent a lot of money on 1/4-20 screw inserts put in with Gorilla glue. I put a floor covering in that I had intended to screw aircraft down to but discovered that was a mistake and then got fancy.
I put a shelf in the V at around 26 inches, and another at about 4ft 6 inches. The battery goes on the lower shelf because I am not Charles Atlas. I have a friend who put his on the upper shelf!
I installed a PV-68 watt peel and stick solar panel on the top to keep the battery up, led lights on the ceiling fed by the battery and a switch for them by the door.
My 2000 watt inverter (the red thing behind the white aircraft nose - a Bud Nosen Gere Sport) went in just below the lower shelf because I want all sparks to be lower than any hydrogen gas released by the battery. If you look closely, you can see a section of the lighting I used.
Then I got 'tricky'.
I installed a 2x4 every 2 feet from the front of the box to the back on both sides. Each 2x4 has a 11/16 hole drilled at 15 degrees from horizontal every 2 inches from top to bottom. Those holes are where I put in chunks of 1/2 electrical conduit covered with plumbing foam. Oh I discovered that I needed to use a 1/2 dowel chucked up to a drill and covered in 60 grit sand paper to sand each hole big enough for the conduit to go in. Drilling to 3/4 would have been way too big. The end of each chunk of conduit has a 1/2 dowel plug and an eyelet installed. I use those and small bungee cords to eyelets by each hole in the 2x4 to keep the conduit from wiggling, or falling out. I also went to WalMart and bought a couple cans of racquet balls for the end of the conduit after I cut my head up a couple of times.
On the side of each 2x4 by each hole I put a 1 inch drywall screw with a chunk of straw over it to provide tie down points for aircraft. In the back, I built a stop to hold a pop-up canopy and one on the other side to hold a couple of chairs. Without the stop, that stuff would always come forward in a sudden stop. I put a couple of chunks of PVC behind that stuff for the tent stakes. I also built by the side door a stop to keep my wings from sliding forward. The yellow thing you see is a lock that was enclosed in 3/4 inch plumbing foam and covered in heat shrink. That keeps the lock from banging and the heat shrink protects the foam. The metal (A/C) tape is to insure the solar panel edges are sealed and in the back to keep the holes I drilled sealed and the wires from sun damage. You can also see the storage system for nuts, bolts, and props I built in the side door. The ramp was primed (white) and coated with grit stuff (grey) from the hardware store. I installed more than one fire extinguisher because I worry about needing one someday for whatever.
09-25-2014 | 02:39 AM
#18

My Feedback: (25)
There is a large thread right here on RCU (74 Pages) with over 1800 replies on trailer layouts.
http://www.rcuniverse.com/forum/tips...yours-too.html
Surely you can find some tips in there somewhere.
http://www.rcuniverse.com/forum/tips...yours-too.html
Surely you can find some tips in there somewhere.
09-25-2014 | 08:23 AM
#19
Thread Starter
Senior Member
My Feedback: (32)
Joined: Feb 2002
Posts: 2,587
Likes: 0
Received 0 Likes
on
0 Posts
From: Pasadena, MD
Thanks guys for the photos and links. I want to be able to use trailer for more than just hauling planes so I've decided to set up the inside to make it easy to use the trailer for other purposes. Global Jet Club used to sell the "Jet Transporter"  but no longer sells them. This would have been a great solution. Being a modeler that still builds, I've come up with solution to make my own "transporter". I purchased a garden cart
 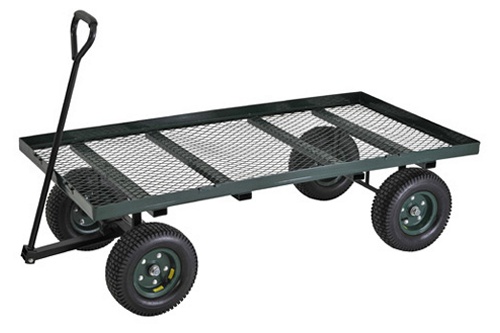 and will use it as a base to make a three-tiered transporter. I'll be able to roll in and out of the trailed and the planes can stay on it for storage. I'm going to install some Etrack to secure it in the trailer. Once again, thanks guys for taking the time to respond.
Kirk
Kirk


