


Sabre XLT – A large scratch built flying wing sport jet
 12-17-2015, 06:05 PM
#126

Thread Starter
My Feedback: (20)
Sabre XLT Removing Glass Parts From Plugs
DEC 2015


Turtle deck removed from foam plug after sanding edged with sanding bar
Nozzle edged sanded before removing from plug
Nozzle edges smooth and straight
Foam cutter removing a layer of foam behind tape
Removing nozzle ring from plug
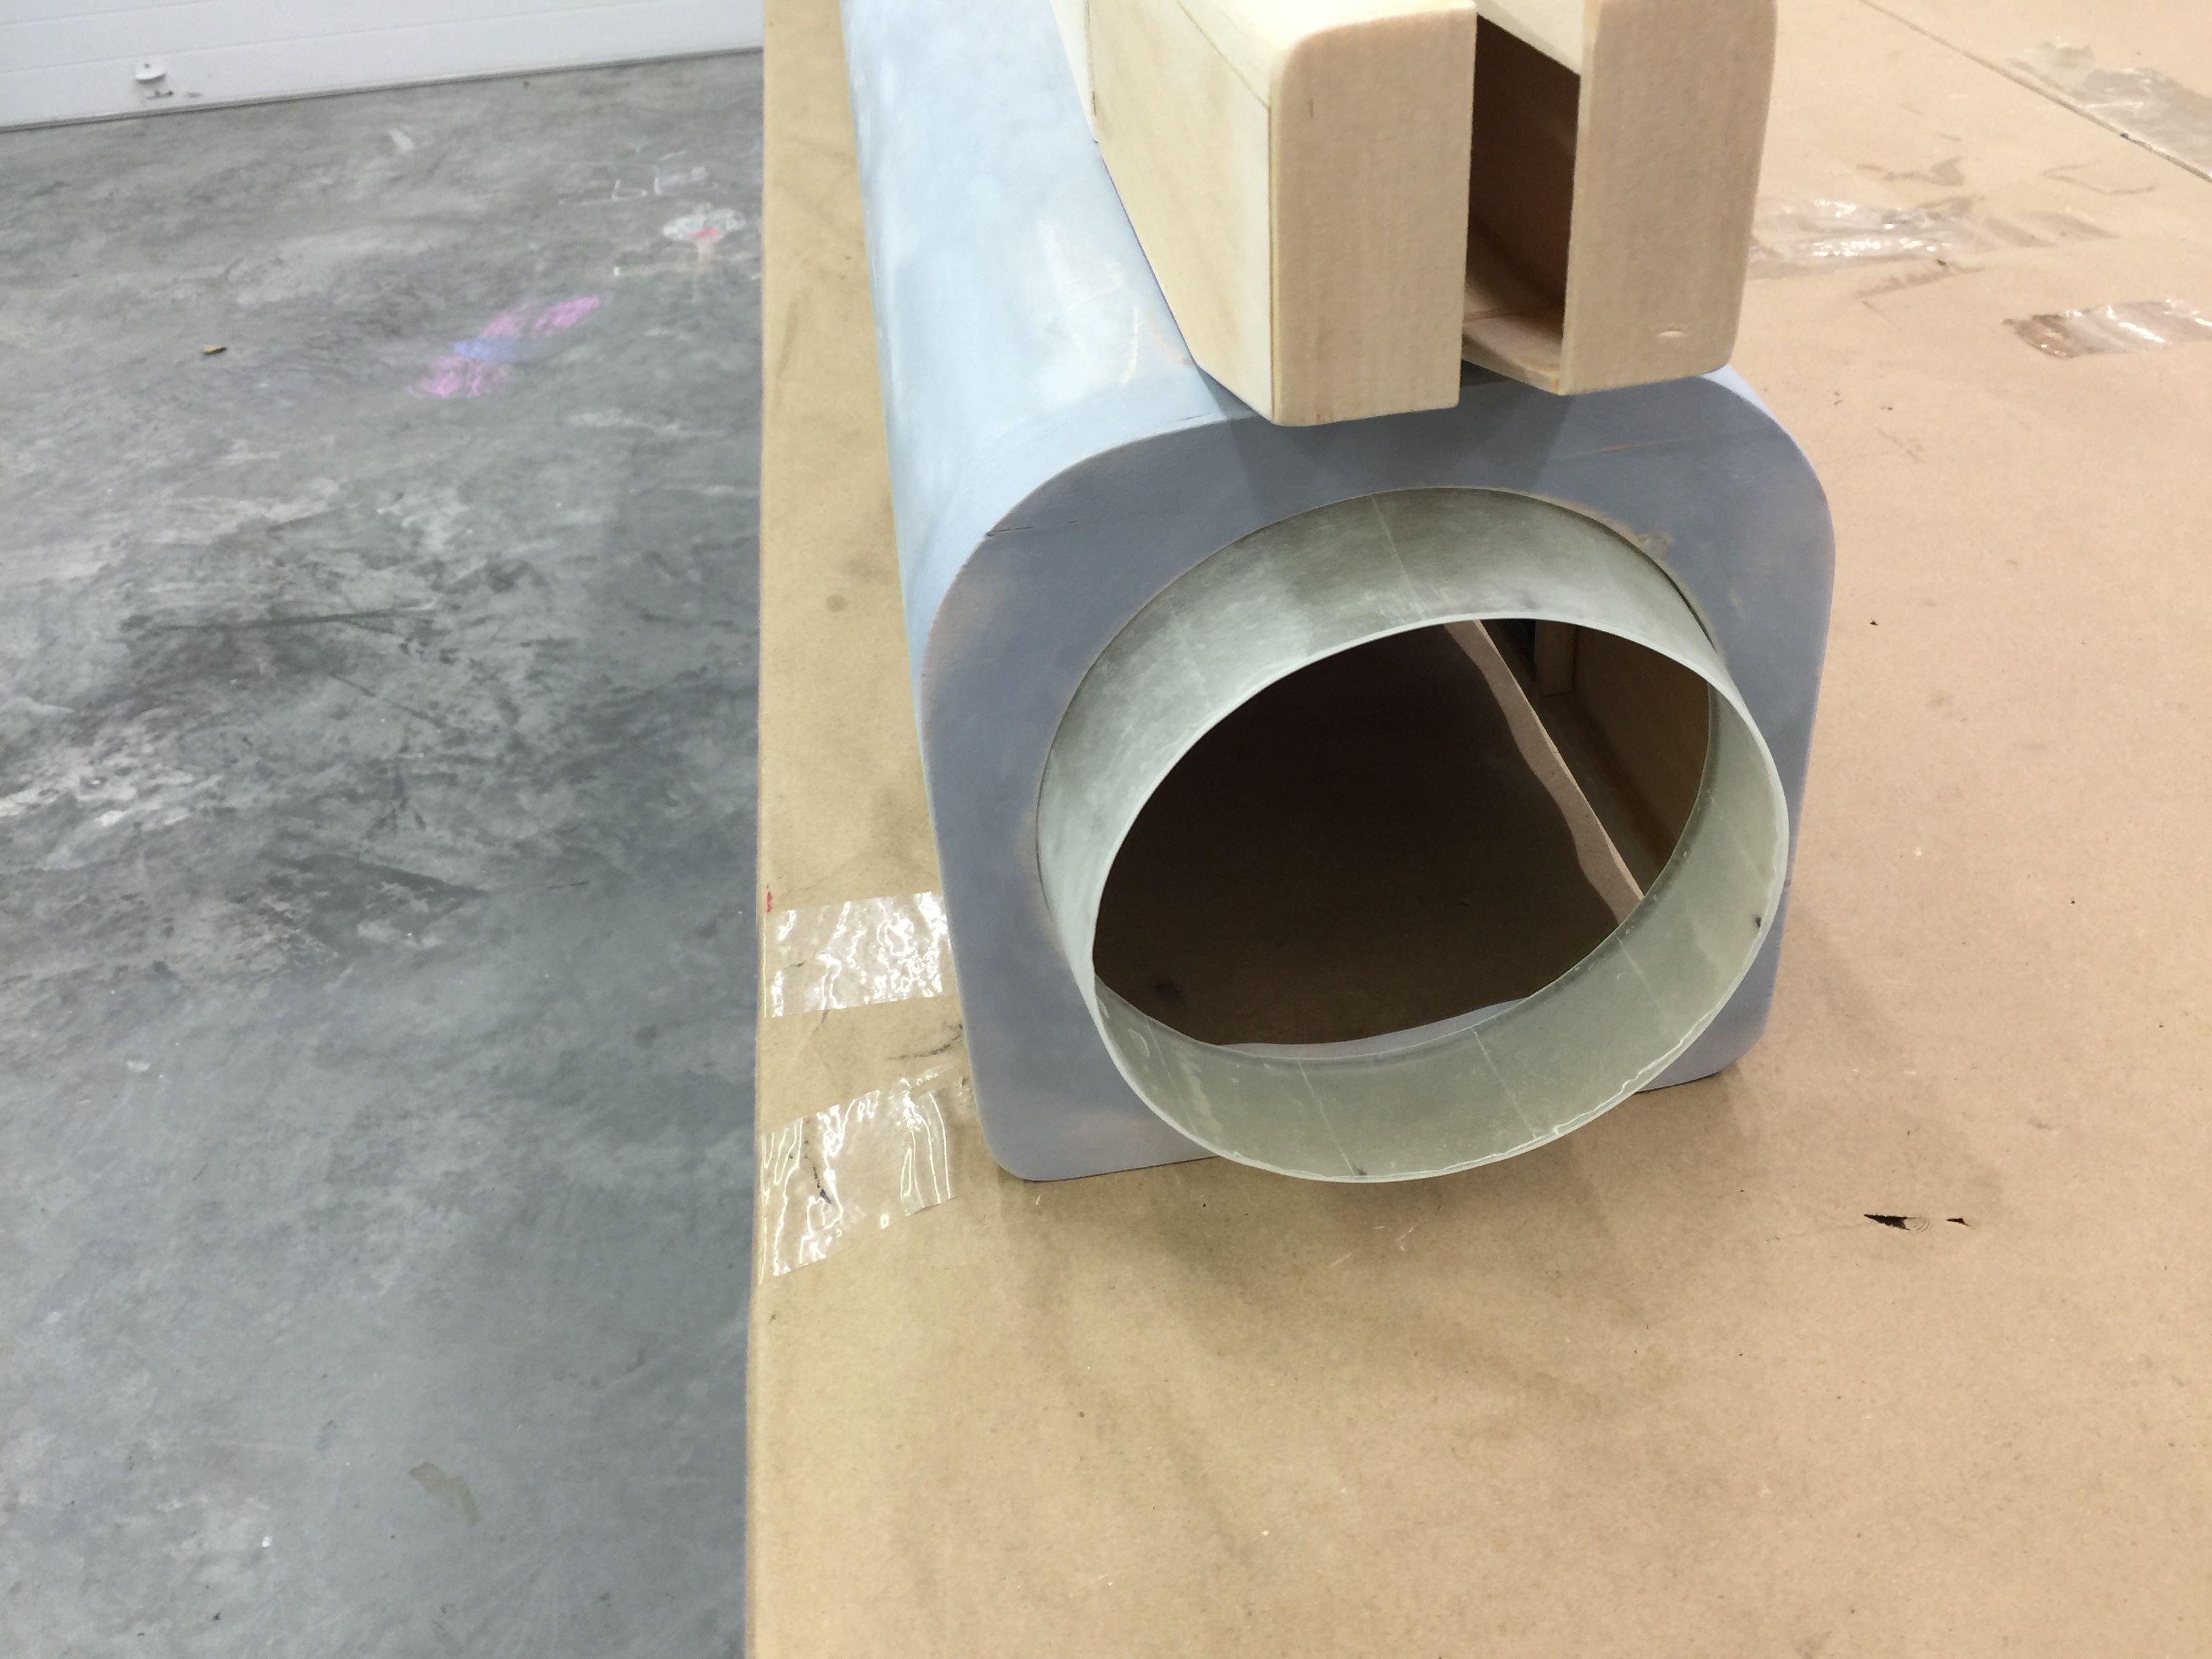


Nozzle ring dry fit in tail
Sanding edge of nose cone
Nose cone removed from plug by using lacquer thinner to dissolve foam
Foam plug remains pulled out


Packing tape removed from inside cone
Nose cone popped out clean
All glass parts ready for use
DEC 2015
Turtle deck removed from foam plug after sanding edged with sanding bar
Nozzle edged sanded before removing from plug
Nozzle edges smooth and straight
Foam cutter removing a layer of foam behind tape
Removing nozzle ring from plug
Nozzle ring dry fit in tail
Sanding edge of nose cone
Nose cone removed from plug by using lacquer thinner to dissolve foam
Foam plug remains pulled out
Packing tape removed from inside cone
Nose cone popped out clean
All glass parts ready for use
Last edited by Viper1GJ; 12-17-2015 at 06:31 PM.


 12-17-2015, 06:17 PM
#128
Thread Starter
My Feedback: (20)
Sabre XLT Fuse Mockup With Fiberglass Parts
DEC 2015
I have never made glass parts before and was very pleased with the first time results. I could have made the nose cone lighter with
less layers of glass but I will need weight in the nose anyway so I made it thicker and stronger. Turtle deck and nozzle are just right.
Note: The turtle deck only had 4 layers of 3oz glass. After finishing and sanding the turtle deck I could see the layers where the packing tape overlapped on the surface. Next time I would cover the foam with low temp film to avoid the lapping marks or use more layers of glass.


Fuse mock up with nose cone, turtle deck, and nozzle ring.


Gluing nose cone to front of fuse with hysol.
DEC 2015
I have never made glass parts before and was very pleased with the first time results. I could have made the nose cone lighter with
less layers of glass but I will need weight in the nose anyway so I made it thicker and stronger. Turtle deck and nozzle are just right.
Note: The turtle deck only had 4 layers of 3oz glass. After finishing and sanding the turtle deck I could see the layers where the packing tape overlapped on the surface. Next time I would cover the foam with low temp film to avoid the lapping marks or use more layers of glass.
Fuse mock up with nose cone, turtle deck, and nozzle ring.
Gluing nose cone to front of fuse with hysol.
Last edited by Viper1GJ; 01-08-2016 at 08:02 PM.
12-19-2015, 05:43 PM
#130
Thread Starter
My Feedback: (20)
Sabre XLT Bodywork
DEC 2015


Spot priming balsa corner sand top for filling and sanding
Filling out edge of front hatch
Speading thinned epoxy on bottom of fuse floor to fuel proof against kerosene and smoke oil leaks
DEC 2015
Spot priming balsa corner sand top for filling and sanding
Filling out edge of front hatch
Speading thinned epoxy on bottom of fuse floor to fuel proof against kerosene and smoke oil leaks
Last edited by Viper1GJ; 01-08-2016 at 08:04 PM.
12-19-2015, 05:51 PM
#131
Thread Starter
My Feedback: (20)
Sabre XLT Nose, Turtledeck, Nozzle
DEC 2015


Making cardboard pattern for turtle deck front former
Marking cut in turtle deck for rear hatch
Cutting turtle deck on scroll saw
Marking turtle deck rear hatch formers
Dry fit turtle deck before gluing to fuse and hatch


Turtle deck tac glued to hatch
Turtle deck tac glued to vertical fin
Nozzle ring glue in place using popsicle stick as gluing guides
Nose cone tip fabricated from balsa and 1/2" dowel. Inside tube is Sullivan Golden Rod outer tube for 1/8" brass pitot tube sliding inside


Nose balsa block rough cut with hand saw
Nose balsa sanded to rough form
Nose balsa hardened with thin CA
Epoxy putty for final shaping of nose block
DEC 2015
Making cardboard pattern for turtle deck front former
Marking cut in turtle deck for rear hatch
Cutting turtle deck on scroll saw
Marking turtle deck rear hatch formers
Dry fit turtle deck before gluing to fuse and hatch
Turtle deck tac glued to hatch
Turtle deck tac glued to vertical fin
Nozzle ring glue in place using popsicle stick as gluing guides
Nose cone tip fabricated from balsa and 1/2" dowel. Inside tube is Sullivan Golden Rod outer tube for 1/8" brass pitot tube sliding inside
Nose balsa block rough cut with hand saw
Nose balsa sanded to rough form
Nose balsa hardened with thin CA
Epoxy putty for final shaping of nose block
Last edited by Viper1GJ; 12-19-2015 at 06:11 PM.
12-19-2015, 05:59 PM
#132
Thread Starter
My Feedback: (20)
Sabre XLT Finished Fuse Assembly
DEC 2015
Three years and 6 months after seeing Mike Osers' Dagger in Model Aviaton and two years and two month after starting to cut wood and foam the
fuse is finally fabricated and ready for finishing. The end of the build is finally insight.


DEC 2015
Three years and 6 months after seeing Mike Osers' Dagger in Model Aviaton and two years and two month after starting to cut wood and foam the
fuse is finally fabricated and ready for finishing. The end of the build is finally insight.
Last edited by Viper1GJ; 12-19-2015 at 06:17 PM.
12-24-2015, 07:04 PM
#136
Join Date: Dec 2004
Location: lincoln park,
NJ
Posts: 201
Likes: 0
Received 0 Likes
on
0 Posts
Hi Dave, I want to build a Lancer and install a small turbine(wren 54) in the back fuselage. Could you please tell me the width of the fuselage, and the wing aera of the Lancer.Thank you, Mark
12-24-2015, 07:19 PM
#137
Thread Starter
My Feedback: (20)
Hi Mark,
Plans for the Mike Oser's Lancer are here. Hope this helps.
http://www.rcgroups.com/forums/showt...ght=Lancer+.95
Gary
Plans for the Mike Oser's Lancer are here. Hope this helps.
http://www.rcgroups.com/forums/showt...ght=Lancer+.95
Gary
12-24-2015, 07:23 PM
#138
Thread Starter
My Feedback: (20)
Sabre XLT First Mockup Assembly of the Sabre XLT
DEC 2015
First complete assembly on the landing gear of the Sabre XLT. Body work and finishing in progress.


Merry Christmas to all.
Gary
DEC 2015
First complete assembly on the landing gear of the Sabre XLT. Body work and finishing in progress.
Merry Christmas to all.
Gary
01-06-2016, 05:07 PM
#139
Thread Starter
My Feedback: (20)
Sabre XLT Wing Fence and Spraying Sanding Sealer
JAN 2015


Cutting wing fences from plywood
Dry fitting wing fences on wings
Setting up homemade spray booth
Air exits from back side of spray booth through 12" duct
Air exhaust through partially raised garage door


Setting up spray racks for parts.
Spraying Zinsser's Seal Coat sanding sealer on wing to keep wood from warping and soaking up excess Polycrylic
Parts ready for spraying
Spraying wing tip rails
Parts drying after spraying
JAN 2015
Cutting wing fences from plywood
Dry fitting wing fences on wings
Setting up homemade spray booth
Air exits from back side of spray booth through 12" duct
Air exhaust through partially raised garage door
Setting up spray racks for parts.
Spraying Zinsser's Seal Coat sanding sealer on wing to keep wood from warping and soaking up excess Polycrylic
Parts ready for spraying
Spraying wing tip rails
Parts drying after spraying
Last edited by Viper1GJ; 01-06-2016 at 05:25 PM.
01-06-2016, 05:16 PM
#140
Thread Starter
My Feedback: (20)
Sabre XLT Glassing With Polycrylic
JAN 2015
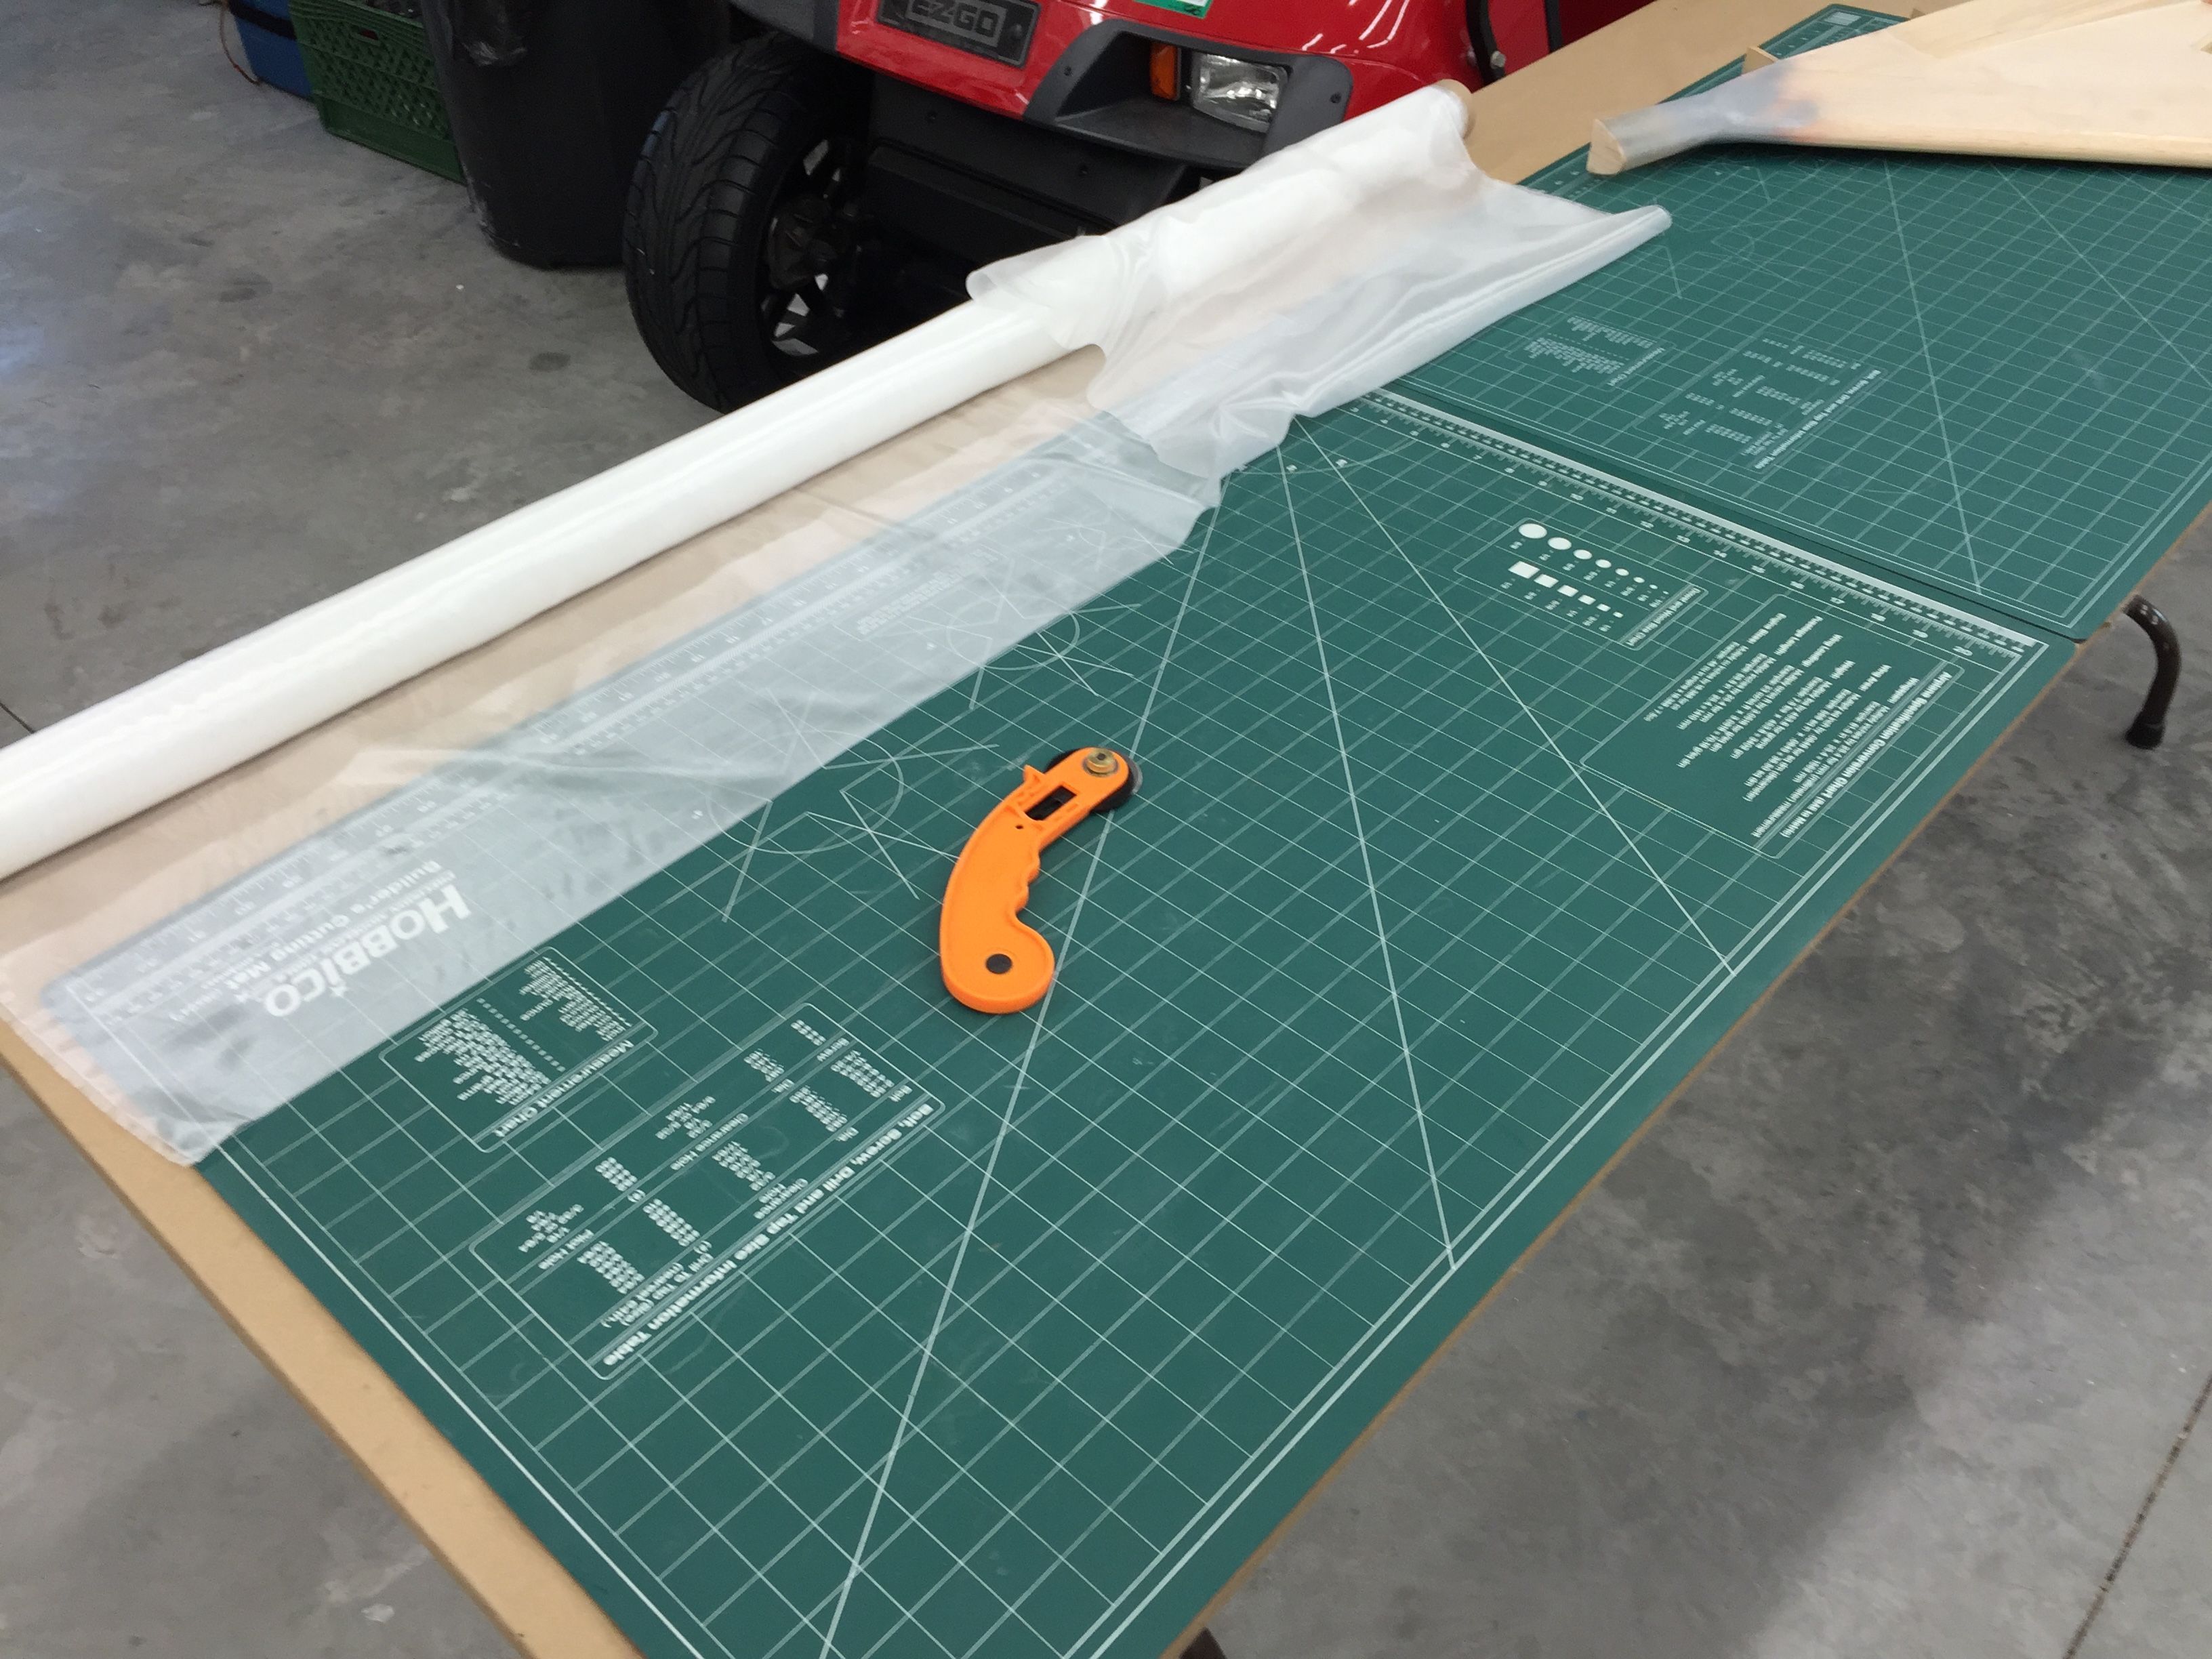


Fiberglass cutting on mat with rotary cutter
Rudder glassed first to see how it worked. Super easy, will never use epoxy again.
Trimming edge after poly dried with sharp blade.
Brushing out glass cloth on wing with a soft dry brush all strokes from center to outside edges
Starting application of Polycrylic from center to edges
Leading edge of wing coated, wing rotated to apply poly to trailing edge


Parts glassed on one side on drying racks
Trimming
Trimming some more…lots of trimming
Glass draped over aft end of fuse
Poly applied to top of fuse and then fuse rolled over to adhere sides
Glass draped over hatches ready for poly
Drying time for poly was about 1 hour
After trimming edges the edges were sanded with 220 paper and parts flipped over to glass the other side


Poly applied to aft hatch
Poly applied to front hatch
Glass laid on vertical fin
Speed brake panels getting glass
Trimming fuse glass edges
JAN 2015
Fiberglass cutting on mat with rotary cutter
Rudder glassed first to see how it worked. Super easy, will never use epoxy again.
Trimming edge after poly dried with sharp blade.
Brushing out glass cloth on wing with a soft dry brush all strokes from center to outside edges
Starting application of Polycrylic from center to edges
Leading edge of wing coated, wing rotated to apply poly to trailing edge
Parts glassed on one side on drying racks
Trimming
Trimming some more…lots of trimming
Glass draped over aft end of fuse
Poly applied to top of fuse and then fuse rolled over to adhere sides
Glass draped over hatches ready for poly
Drying time for poly was about 1 hour
After trimming edges the edges were sanded with 220 paper and parts flipped over to glass the other side
Poly applied to aft hatch
Poly applied to front hatch
Glass laid on vertical fin
Speed brake panels getting glass
Trimming fuse glass edges
Last edited by Viper1GJ; 01-06-2016 at 06:02 PM.
01-08-2016, 05:53 PM
#142
Thread Starter
My Feedback: (20)
Sabre XLT Modifications of Canards, Tips, and Ventrals
JAN 2015
After I finished the main wing construction Mike Oser asked me to send him the exact measurements of the wing since it was slightly larger than the planned wing. The reason was that I cut the foam cores from the plan but did not account for balsa skin overlap at the TE and I used slightly larger wood where the elevons were hinged. The net result was about 3/4" extra chord on the wing.
Mike ran the exact measurements through his stability spread sheet and came back with the neutral point and recommended CG for optimum performance. The calculations required modifications to the surface areas of the canards, wing tips, and ventral fins to obtain the desired neutral point and keep the CG at the optimum position in relation to the main gear. The net result was shifting area forward by reducing the area of the ventral fins and wing tips and increasing the area of the canards. These calculations by Mike give me real confidence that the Sabre XLT will fly well.
I had totally forgotten the first calculations first made a year ago (ref. post #75) when I quickly made the canards in post #113 and ventrals in post #118 from the original Lancer blown up plans. Therefore I had to modify the existing canards and ventrals plus the tips. Mike gave me the new data and I started chopping wood. I was able to use all the existing parts with modifications.
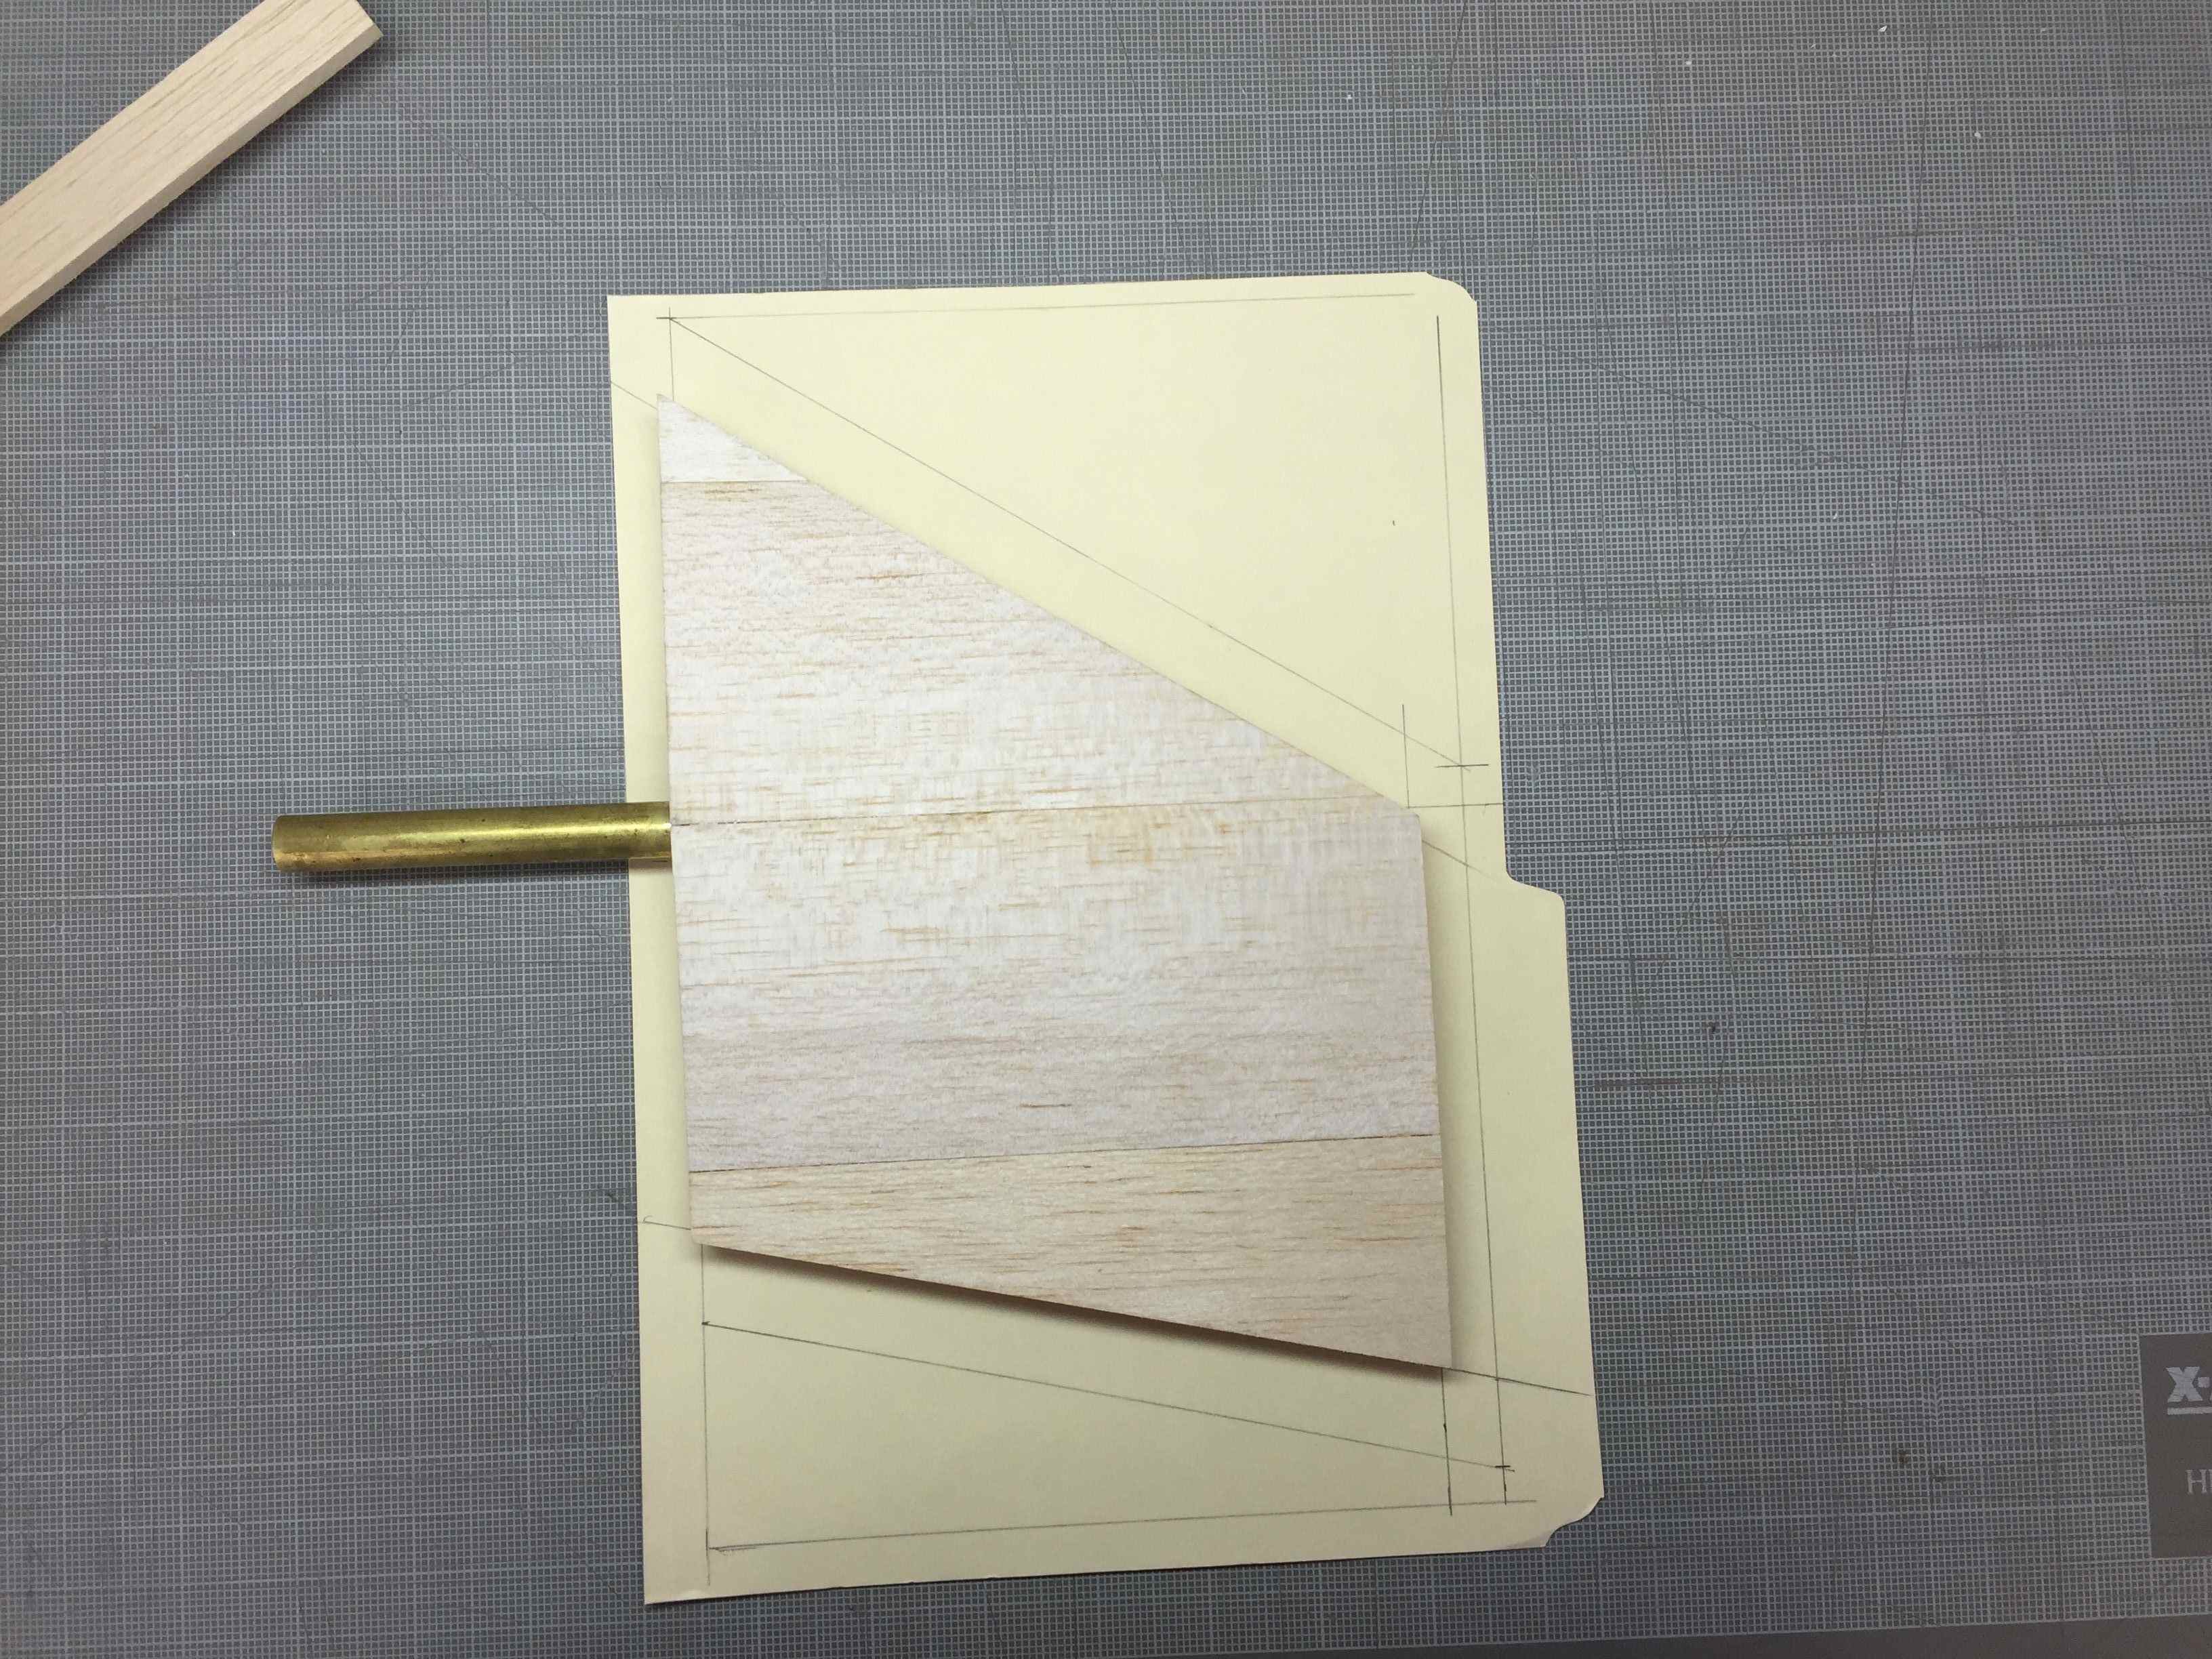


I plotted the new canard shape on file folder cardboard and cut skins from 3/32" balsa sheet
The new skins were glued on top of the existing canards. Then the old canard edges were trimmed to the new shape.
LE, TE, and tip edges of balsa were glued on the new canard frame
Canards were shaped with the Great Planes power planer, rotary sander with 80 grit pad, and final sanding


New canards after shaping
Canards test fit to fuse
New wing tip shape is shorter and more narrow than the original
Rear of old tip slots in the wing tip rail are filled in
New shape of ventral is more narrow that original parts


Ventral fins after cutting to new shape
Ventral fin dry fit to fuse
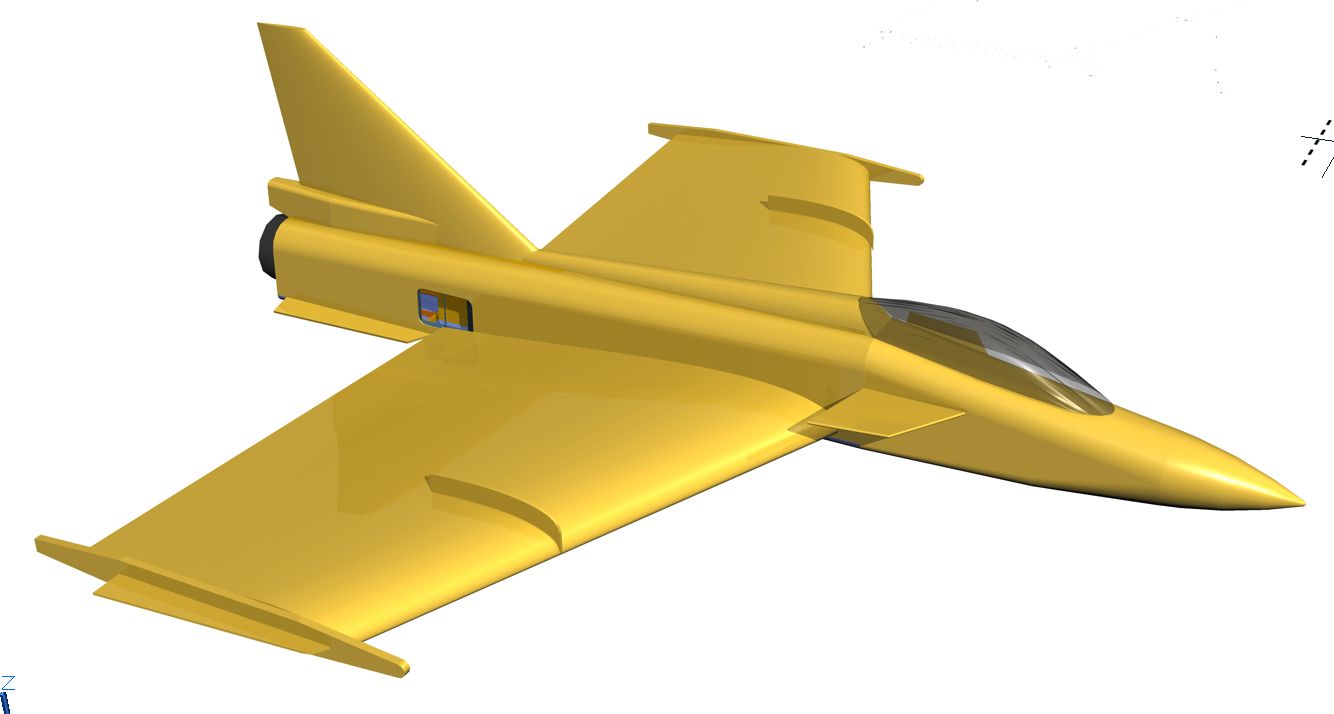
Mike produced a CAD 3D model of the new airframe with the new shaped canards, tip, and ventrals
JAN 2015
After I finished the main wing construction Mike Oser asked me to send him the exact measurements of the wing since it was slightly larger than the planned wing. The reason was that I cut the foam cores from the plan but did not account for balsa skin overlap at the TE and I used slightly larger wood where the elevons were hinged. The net result was about 3/4" extra chord on the wing.
Mike ran the exact measurements through his stability spread sheet and came back with the neutral point and recommended CG for optimum performance. The calculations required modifications to the surface areas of the canards, wing tips, and ventral fins to obtain the desired neutral point and keep the CG at the optimum position in relation to the main gear. The net result was shifting area forward by reducing the area of the ventral fins and wing tips and increasing the area of the canards. These calculations by Mike give me real confidence that the Sabre XLT will fly well.
I had totally forgotten the first calculations first made a year ago (ref. post #75) when I quickly made the canards in post #113 and ventrals in post #118 from the original Lancer blown up plans. Therefore I had to modify the existing canards and ventrals plus the tips. Mike gave me the new data and I started chopping wood. I was able to use all the existing parts with modifications.
I plotted the new canard shape on file folder cardboard and cut skins from 3/32" balsa sheet
The new skins were glued on top of the existing canards. Then the old canard edges were trimmed to the new shape.
LE, TE, and tip edges of balsa were glued on the new canard frame
Canards were shaped with the Great Planes power planer, rotary sander with 80 grit pad, and final sanding
New canards after shaping
Canards test fit to fuse
New wing tip shape is shorter and more narrow than the original
Rear of old tip slots in the wing tip rail are filled in
New shape of ventral is more narrow that original parts
Ventral fins after cutting to new shape
Ventral fin dry fit to fuse
Mike produced a CAD 3D model of the new airframe with the new shaped canards, tip, and ventrals
Last edited by Viper1GJ; 01-08-2016 at 08:08 PM.
01-08-2016, 06:20 PM
#143
Thread Starter
My Feedback: (20)
Sabre XLT Spraying Polycrylic
JAN 2015
After the entire airframe was glassed with .73 oz/yd glass adhered with Minwax Polycrylic brushed on it was time to spray additional coats of poly.


Canopy rear bulkhead added before poly sprayed
Wing carrier and drying racks were made from scrap wood hot glued together with pads from pipe insulation foam scraps
Handles on racks make moving wet wings easy after spraying on one sideF
Fuse nose stand made from scrap wood hot glued together and bolted to NG mount on fuse bottom


Nose stand and foam block hold fuse for spraying
Poly sprayed right from can using gravity fed HVLP sprayer from Harbor Freight with 1.5 needle tip
Fuse is largest part and extends out of front of spray booth, most over spray still goes into the filters
The spray booth was built 20 years ago for smaller planes… the planes have out grown it!
Drying racks for parts in shop, two small space heaters keep shop warm for painting and drying
4 coats of poly sprayed on, sanding after 2nd and then again after 4th
Most fiberglass weave is filled after 4 coats and ready for primer
JAN 2015
After the entire airframe was glassed with .73 oz/yd glass adhered with Minwax Polycrylic brushed on it was time to spray additional coats of poly.
Canopy rear bulkhead added before poly sprayed
Wing carrier and drying racks were made from scrap wood hot glued together with pads from pipe insulation foam scraps
Handles on racks make moving wet wings easy after spraying on one sideF
Fuse nose stand made from scrap wood hot glued together and bolted to NG mount on fuse bottom
Nose stand and foam block hold fuse for spraying
Poly sprayed right from can using gravity fed HVLP sprayer from Harbor Freight with 1.5 needle tip
Fuse is largest part and extends out of front of spray booth, most over spray still goes into the filters
The spray booth was built 20 years ago for smaller planes… the planes have out grown it!
Drying racks for parts in shop, two small space heaters keep shop warm for painting and drying
4 coats of poly sprayed on, sanding after 2nd and then again after 4th
Most fiberglass weave is filled after 4 coats and ready for primer
Last edited by Viper1GJ; 01-08-2016 at 06:55 PM.
01-12-2016, 05:46 PM
#146
Thread Starter
My Feedback: (20)
Sabre XLT Spraying Primer and Sanding
JAN 2015


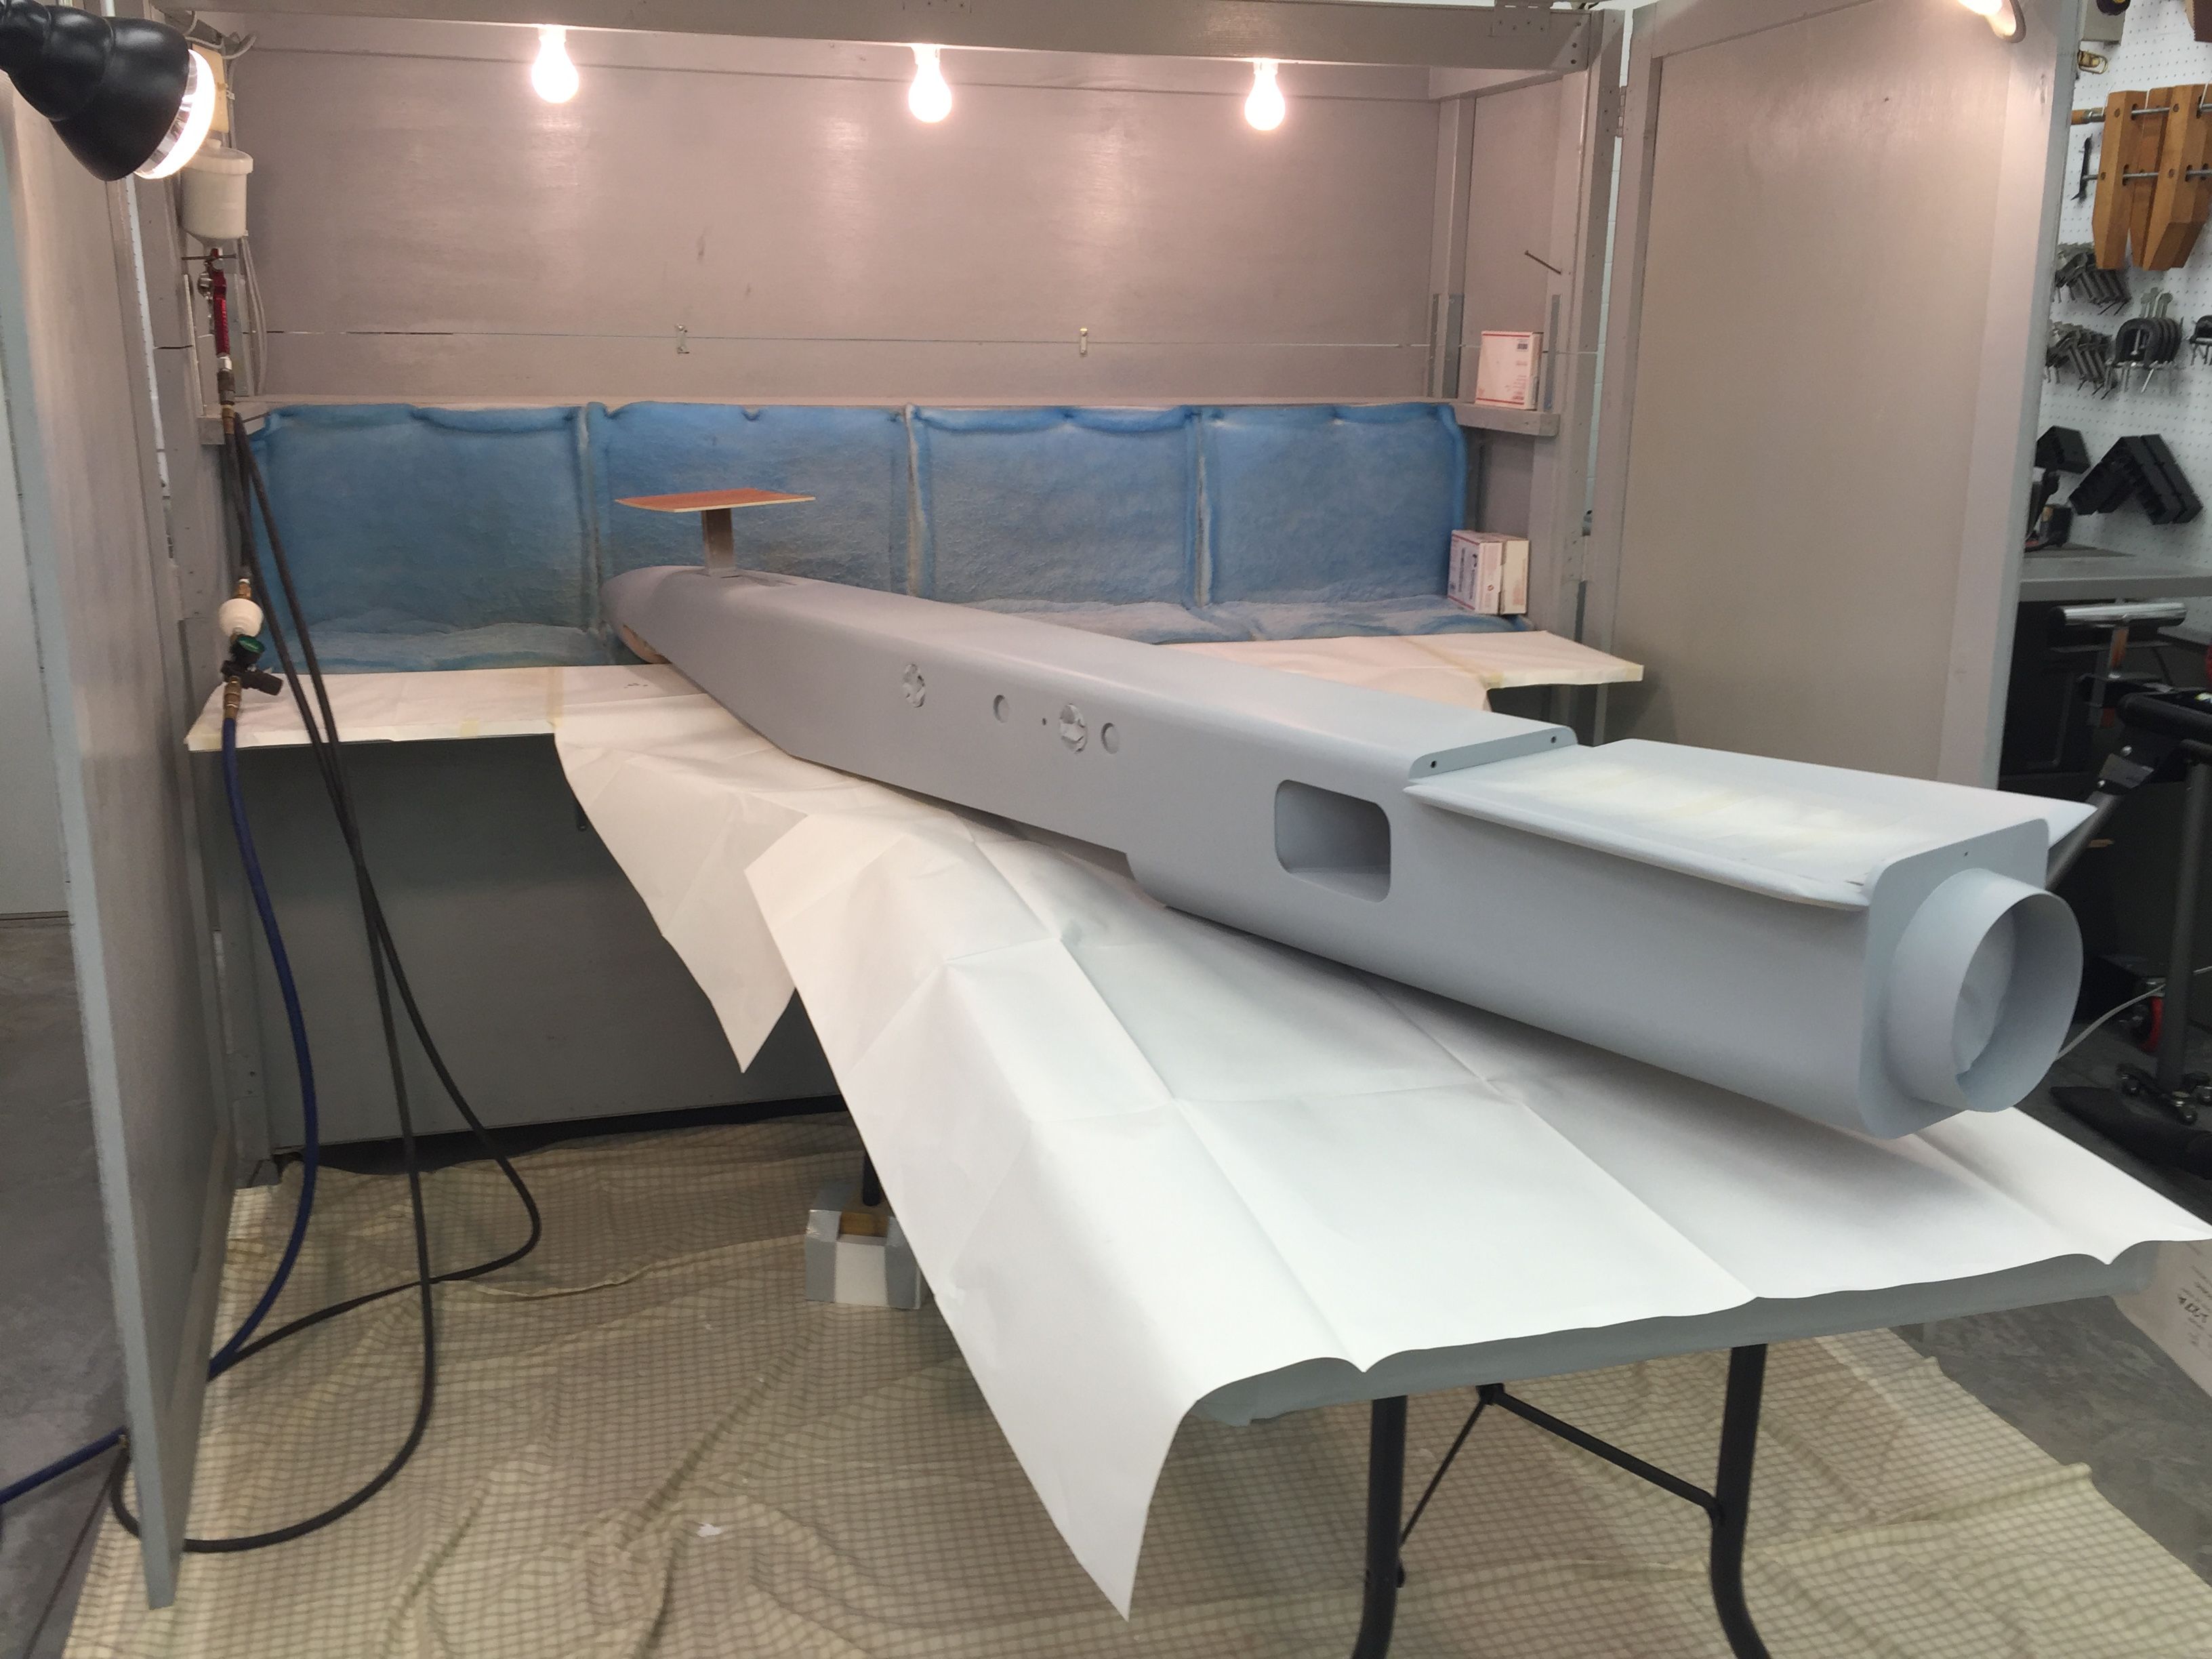
My car painting buddy strongly suggested getting 2 part urethane primer for the job. I'm glad I listened as it is much better than spray can primer.
Fuse masked off for spraying
Primer was mixed 4-1-1 with fast reducer. Starting primer spraying on fuse nose
Completed fuse. Using the fast reducer at inside temp of 70° the primer flashed off and was dry to touch in about 5 min


Started on wheel well on bottom of wing
Front half of wing bottom sprayed.
Sprayed parts drying and curing
Wings completed


Parts sat over weekend to cure
Wet sanding table. With primer sprayed on thin and reduced 320 wet paper was good and finished with 400 wet.
All parts were wet sanded and wiped down with denatured alcohol to remove any remaining dust and grease or oils.


Planned color scheme. Yellow on top and blue on bottom based on the Northrup N-9M flying wing
JAN 2015
My car painting buddy strongly suggested getting 2 part urethane primer for the job. I'm glad I listened as it is much better than spray can primer.
Fuse masked off for spraying
Primer was mixed 4-1-1 with fast reducer. Starting primer spraying on fuse nose
Completed fuse. Using the fast reducer at inside temp of 70° the primer flashed off and was dry to touch in about 5 min
Started on wheel well on bottom of wing
Front half of wing bottom sprayed.
Sprayed parts drying and curing
Wings completed
Parts sat over weekend to cure
Wet sanding table. With primer sprayed on thin and reduced 320 wet paper was good and finished with 400 wet.
All parts were wet sanded and wiped down with denatured alcohol to remove any remaining dust and grease or oils.
Planned color scheme. Yellow on top and blue on bottom based on the Northrup N-9M flying wing
Last edited by Viper1GJ; 01-12-2016 at 06:02 PM.
 01-12-2016, 06:29 PM
#148
Thread Starter
My Feedback: (20)
Hi Joe,
The heaviest I have used is .56 and .73 oz/yd. The .73 was the easiest to work with. I could not much tell the difference after the application. It took each coat about 30 min to 1 hr to dry at about 70° inside temp. I see no reason why you could not go up to around 3 oz/yd if you wanted but i did have not done it.
I brushed on the first coat to adhere the glass and generally waited overnight to trim and feather sand the edges. I used 220 grit dry to do this. After glassing I sprayed on two coats and sanded with 220 grit again dry. Then sprayed on two more coats and sanded with 220 again. I had some runs I did not see till after they dried and the 220 block took them down fairly easily. I just don't like sanding.
Hope this helps.
What weight of glass were you thinking of?
Gary
01-12-2016, 06:54 PM
#150
Thread Starter
My Feedback: (20)
Joe, I think the weave would be more difficult to fill and you may need to use some micro balloons or talc to help fill the heavier weave. I just used straight poly and after 4 sprayed coats and primer it is mostly filled. Lots of guys have done more that me. You may ask on the composites forum and get some more info.
Gary
Gary