


1/6 F-105 Build Thread
 02-02-2019, 07:13 PM
#326

Thread Starter
My Feedback: (20)
Thanks for the compliments guys. They came just in time as today I got real discouraged.
I was waiting for some hysol to cure on a small fin repair so I picked up the wings, flaps, and ailerons to start some hinging prep. After getting the rudder to work pretty well I thought " I've got this hinging stuff, the wings will be a snap." Sorta had thoughts of maybe flying the thing this summer. Not so fast...
I quickly found out that as usual nothing fit right. The aileron counter weights would not fit into the wing notches, the tip and counter weight leading edges were square but should be round to move correctly, the aileron tips would not line up with the wing tips, and the trailing edge of the ailerons would not line up with the trailing edge of the flaps....and of course you cant fit the hinges together because of the swept design and the tab on the root of the wing, similar to the rudder. I'll post some pictures later, too tired now.
I thought what am I doing wrong on this thing. Everything I pick up will not fit. Am I too picky, should I just do it faster and not worry about it, sorta like in the Youtube videos, so I just stopped. (You haven't seen the engine hatch yet!)
I guess I started thinking it was a kit where you go from step to step and things work. ARF parts mostly fit even if you have to work on them. But this is no kit. It is a pile of hand built parts that somewhat look like an F-105 where each thing has to be worked over to fit or work properly.
Tonight I had to go back to my first idea of why I started this project I mentioned in my post #5 and post #13. For the challenge of doing it and to honor the fighter pilots before me that flew these things in combat. No time tables, no deadlines, and no promises of when it will be ready. So I'll just take a break and start over next week, one bite at a time. It's a hobby for me. So is posting the photos.
Thanks again for all the compliments. It gave me fresh motivation.
Gary
 02-03-2019, 12:30 AM
#327


Gary this sadly appears that you are indeed polishing a turd. Fortunately for you the mythbusters proved you can polish a turd. I have no doubt you'll get there. I don't know what you paid for the "kit" but I remember when they were first offered for sale that the price was, should we say significant. Persevere my friend. Take breaks as needed and you will end up with a unique and awesome aircraft.
02-03-2019, 04:50 AM
#328

You’ll get there �� And thanks for sharing the process with us who are stuck at work and not in our sheds getting to work on our own stuff. Just embrace the challenge - you’ve done a great job overcoming the hurdles so far and I have no doubt you’ll continue to do so. No harm in the odd rest and a recovery beer along the way ��
02-03-2019, 05:50 AM
#329

For those of you who dont know Gary you are missing a real master modeler in action. This thing will fly.... fast and straight. The quality of his work is phenomenal. This sports fans, will be the 1 THUD that will be worthy of a "hold my beer" moment. Looking forward to seeing it fly.

 02-03-2019, 12:43 PM
#332
Thread Starter
My Feedback: (20)
Thanks for the encouragement guys. Sorry for the rant. Better attitude toward it today. It will just take some time. This will be a slow week for progress. I am CD for an annual Giant Scale Fly In in Eutawville, SC next week end so I will be getting ready for that during the week. More pics to come.
Thanks again,
Gary
Thanks again,
Gary
02-03-2019, 01:29 PM
#333

Gary,
im amazed at the amount of issues you are having, but your being very tenacious and getting it done.
We all have those projects that languish for awhile for whatever reason and i know the frustration your going through. Take the time you want to get it done and you�ll be happy. Now if someone would light a fire under my butt to finish my F14. Lol
Thomas
02-03-2019, 01:42 PM
#334
Thread Starter
My Feedback: (20)
Thanks Thomas,
I told myself not to make timelines when I started. I'l just keep plugging on it. Part by part. I can see the way through everything now, it's just model airplane grunt work. The real challenge left is to get those huge main gear legs to work and be reliable.
Now about that F-14 I saw when we lived in Virginia...I've got a match! Lol
Thanks
Gary
02-03-2019, 06:21 PM
#335
Thanks Thomas,
I told myself not to make timelines when I started. I'l just keep plugging on it. Part by part. I can see the way through everything now, it's just model airplane grunt work. The real challenge left is to get those huge main gear legs to work and be reliable.
Now about that F-14 I saw when we lived in Virginia...I've got a match! Lol
Thanks
Gary
I told myself not to make timelines when I started. I'l just keep plugging on it. Part by part. I can see the way through everything now, it's just model airplane grunt work. The real challenge left is to get those huge main gear legs to work and be reliable.
Now about that F-14 I saw when we lived in Virginia...I've got a match! Lol
Thanks
Gary
Haha. Once the car project cleara out of the shop (hopefully this summer) the F14 and the T38 will be going into overtime (if you can call it that with a airline pilots job) on getting them done. The F14 is actually pretty far along and just needs a set of gear and a turbine install. Im going to throw some fixed gear legs and a large single in the tail between the nacelles just to get the prototype flying. Its heavy and overbuilt, so its a perfect abuseable test model. Lol
 02-04-2019, 05:00 PM
#337
Thread Starter
My Feedback: (20)
Thanks David,
Taking the long view again. Hope to get the rudder finished this week and start on the wings again next week. This week will be short due to getting ready for the fly in this weekend. After that we'll get back to it.
Gary
Taking the long view again. Hope to get the rudder finished this week and start on the wings again next week. This week will be short due to getting ready for the fly in this weekend. After that we'll get back to it.
Gary
02-05-2019, 04:47 PM
#340
Thread Starter
My Feedback: (20)
Mugu, Thanks man, that means a lot to me from a master scale modeler like you. When I get the F-105 built I"m going to ship it to you and let you detail it and bring it to "scale life." I can not believe how detailed and realistic you Mig-21 looks. Been following your thread closely. I've kicked a lot of nose gears and yours looks exactly like the real deal with all the dirt, grime, grease, hydraulic oil, and chipped paint all fantastically done on your model. Keep it up. Great work.
Appowner, Thanks for the tip. I just watched the trailer. Looks like a great video. Those are the guys I want to honor by building the F-105.
Appowner, Thanks for the tip. I just watched the trailer. Looks like a great video. Those are the guys I want to honor by building the F-105.
02-05-2019, 08:25 PM
#341
Join Date: Sep 2013
Posts: 631
Likes: 0
Received 0 Likes
on
0 Posts
[QUOTE=Viper1GJ;12500294]Mugu, Thanks man, that means a lot to me from a master scale modeler like you. When I get the F-105 built I"m going to ship it to you and let you detail it and bring it to "scale life." I can not believe how detailed and realistic you Mig-21 looks. Been following your thread closely. I've kicked a lot of nose gears and yours looks exactly like the real deal with all the dirt, grime, grease, hydraulic oil, and chipped paint all fantastically done on your model. Keep it up. Great work
Thank you so much for feedback!😊🙏🙏🙏
Thank you so much for feedback!😊🙏🙏🙏
02-06-2019, 10:27 AM
#342
You sir, have taken on a massive re-do of a kit from Hades! I have the utmost respect of how you have looked at each challenge and beat it into submission...lol.
David is spot on...the end results will be greatness. I was w/ the original designer behind the plugs for the molds yesterday.....we wondered if you got 2 rights or 2 lefts on your aileron , flap issues.
Anyway...my favorite part of the day is watching you post your next set of problems and how you solve them! We finally are seeing "real" modeling going on w/ RCU lately! It's a total breath of fresh air compared to ARF builds.......
02-06-2019, 04:44 PM
#343
Thread Starter
My Feedback: (20)
Jetjon, Lol, thanks for the complement. I think I just spent the day beating the rudder into submission. At least its done and I got started again on the flaps.
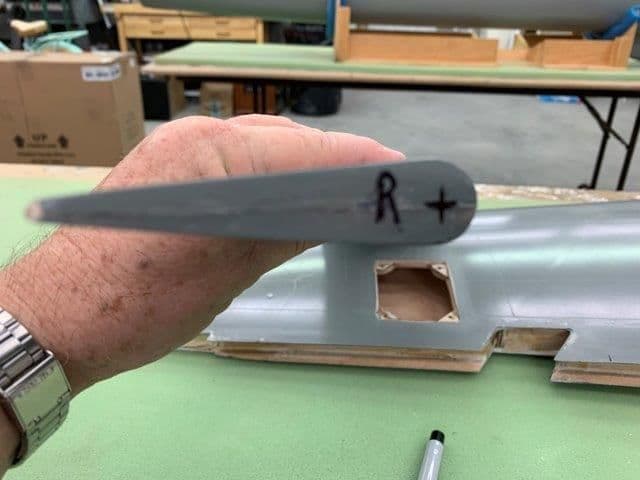
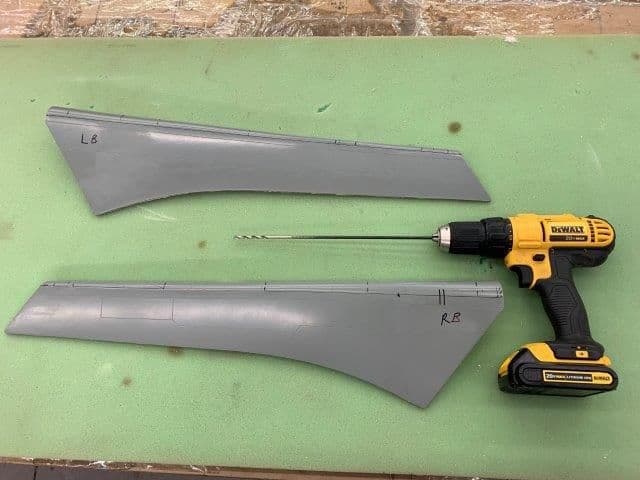
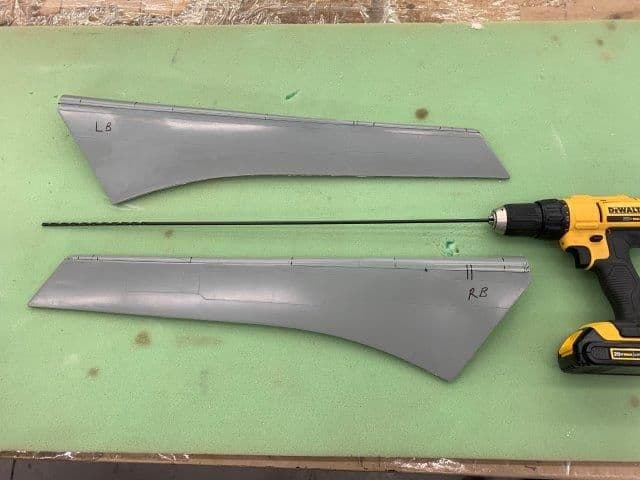
I checked and both the flaps and ailerons and they are identical and seem to be interchangeable. There is no difference on them. The differences are in the wings and that results in different alignments on each side for both the flaps and ailerons. So I just labeled each flap and aileron R and L and started fitting to the right and left wings.
I checked and both the flaps and ailerons and they are identical and seem to be interchangeable. There is no difference on them. The differences are in the wings and that results in different alignments on each side for both the flaps and ailerons. So I just labeled each flap and aileron R and L and started fitting to the right and left wings.
02-06-2019, 05:09 PM
#344
Thread Starter
My Feedback: (20)
Rudder counterweight made removable so rudder can engage hinge forks.
Plywood rudder cap and counterweight removable and held in place by two countersunk screws and dowels.
Screws countersunk and plywood rounded to clear the top of the fin slot when swinging right or left
Some body work needed to fill cracks and hide seams. The rudder trailing edge extends past the fin trailing edge so I will fix that by slightly extending the fin trailing edge when all the body work and filler gets done.
Last edited by Viper1GJ; 02-06-2019 at 06:48 PM.
02-06-2019, 05:24 PM
#345
Thread Starter
My Feedback: (20)
Rudder hinge wire cap completed.
A notch was cut out on top of fin for hinge wire cap. A carbon tube installed to guide wire through the top of the fin.
Carbon tube guided wire into the rudder and hinges
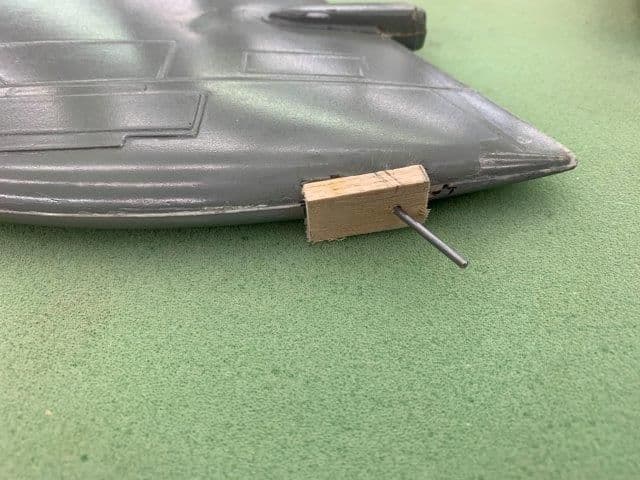
Hinge wire cap made from balsa block
Wire cut off and CA glued to balsa block

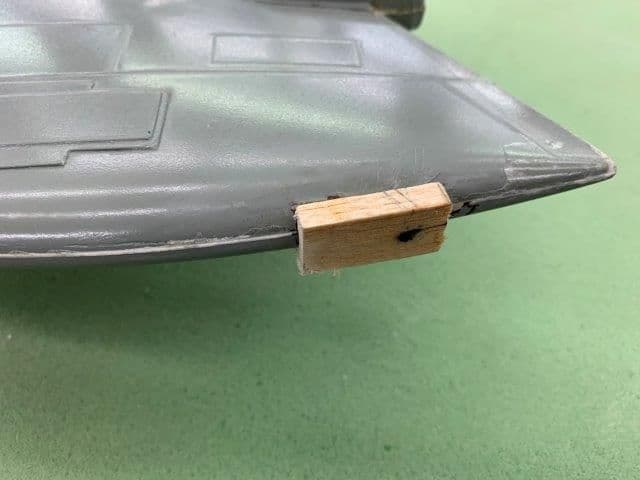
Balsa block sanded to shape, drilled and countersunk. Balsa was CA hardened before screw installed.
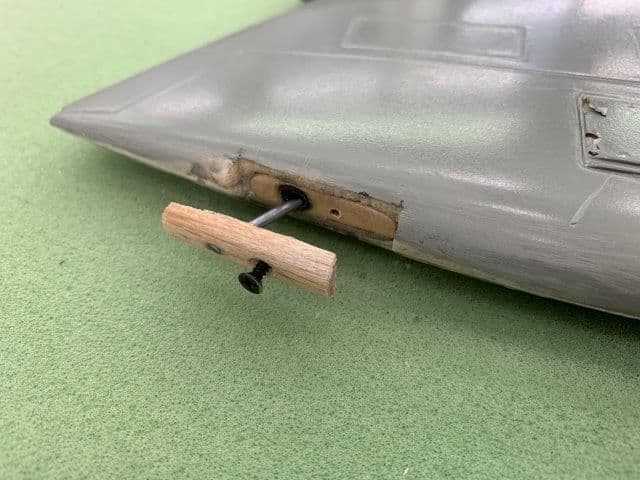
Rudder is removed by taking out screw and pulling out hinge wire.
Done with cap.

Rudder complete and ready for filler and body work.
Rudder system parts ready to finish. A little more work but I wanted to have removable surfaces so I can paint all the parts later and make repairs if needed.
A notch was cut out on top of fin for hinge wire cap. A carbon tube installed to guide wire through the top of the fin.
Carbon tube guided wire into the rudder and hinges
Hinge wire cap made from balsa block
Wire cut off and CA glued to balsa block
Balsa block sanded to shape, drilled and countersunk. Balsa was CA hardened before screw installed.
Rudder is removed by taking out screw and pulling out hinge wire.
Done with cap.
Rudder complete and ready for filler and body work.
Rudder system parts ready to finish. A little more work but I wanted to have removable surfaces so I can paint all the parts later and make repairs if needed.
02-06-2019, 06:04 PM
#346
Thread Starter
My Feedback: (20)
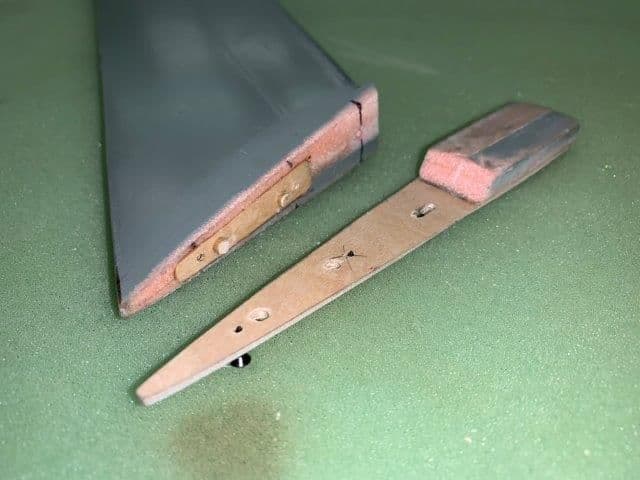
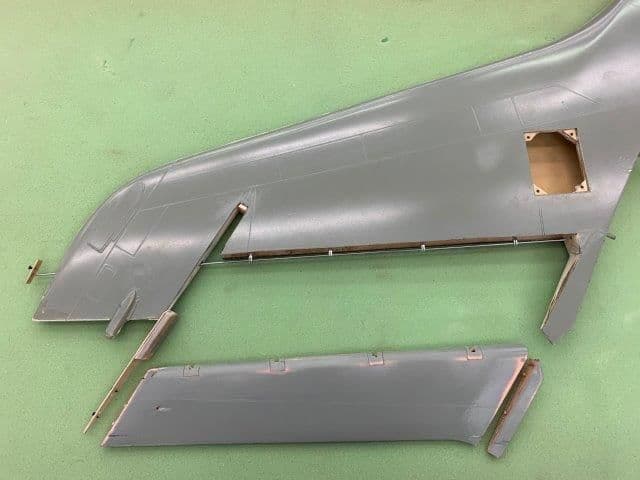
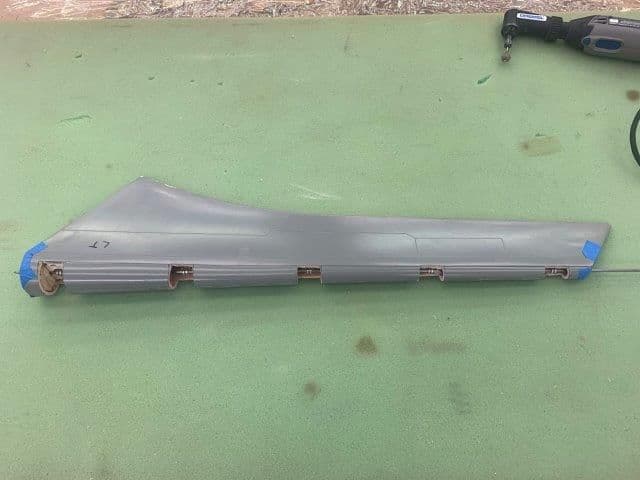
I checked alignment of flaps and ailerons on wings. I initially checked to see if there was a left and right flap and aileron. It seems that they are identical on both sides and are interchangeable. Good idea, one mold for each and make two copies. Great for easy battle damage replacements and repairs. However that only works when the wings are the same on both sides also. Well... nuf said. This is where i got frustrated last week.
First problem was left wing would not accept the aileron except by pushing it in where it would lock firm in place in neutral. So I had to open up the counter weight notch to get it to fit. This was not easy even with power tool.
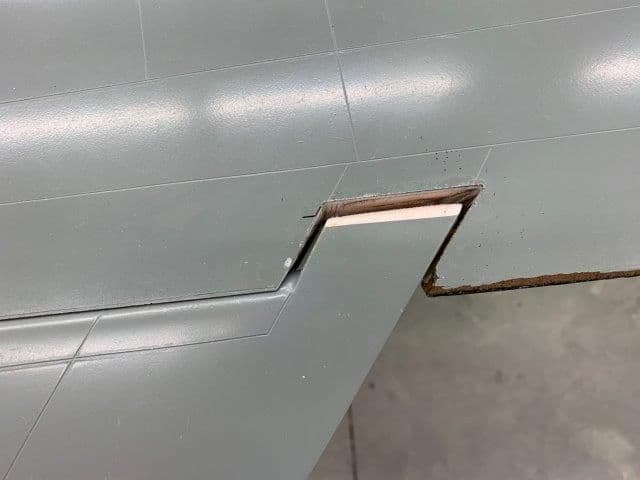
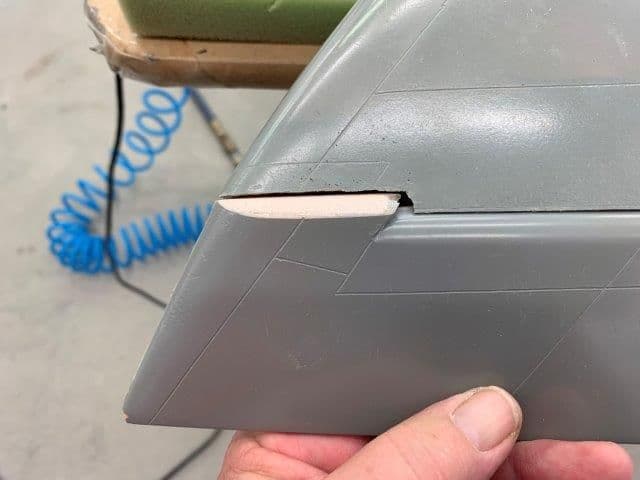
Notch opened up on left aileron, Here is when I noticed the trailing edged did not line up between the aileron and flap.
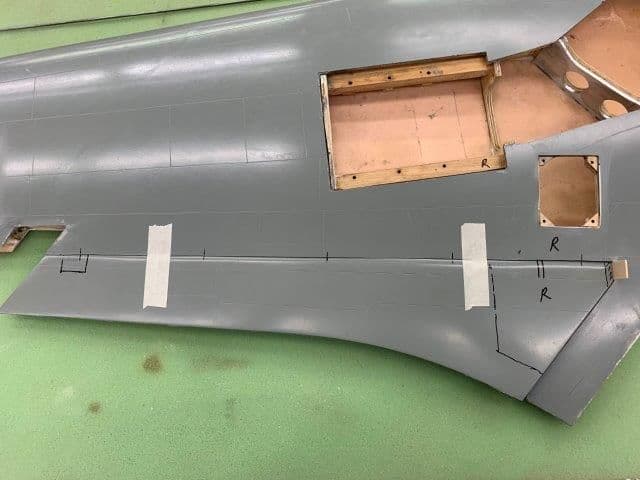
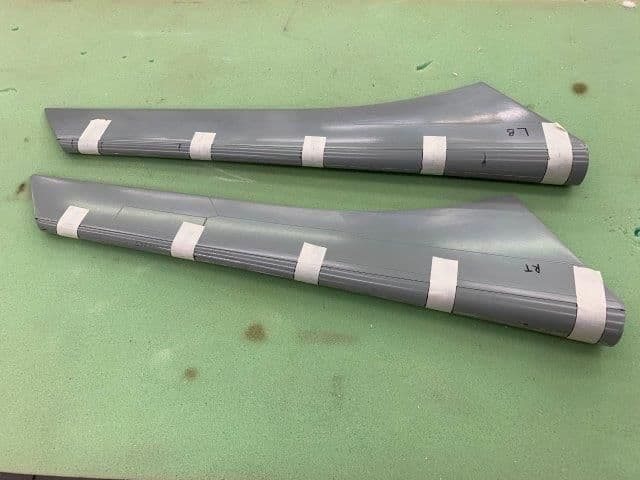
So, I taped all of the flaps and ailerons to the wings and check alignments
Inboard left flap to wing root...
Inboard right flap to wing root...again. This is not an easy fix because the wing roots plug into the fuse and can not be widened. The flaps will have to be modified some how.
Right aileron and flap TE mis-match. And, the wing tip does not align with the aileron tip. There is no give left or right on the aileron because of the notches. This is where threw up my hands and quit last week.
First problem was left wing would not accept the aileron except by pushing it in where it would lock firm in place in neutral. So I had to open up the counter weight notch to get it to fit. This was not easy even with power tool.
Notch opened up on left aileron, Here is when I noticed the trailing edged did not line up between the aileron and flap.
So, I taped all of the flaps and ailerons to the wings and check alignments
Inboard left flap to wing root...
Inboard right flap to wing root...again. This is not an easy fix because the wing roots plug into the fuse and can not be widened. The flaps will have to be modified some how.
Right aileron and flap TE mis-match. And, the wing tip does not align with the aileron tip. There is no give left or right on the aileron because of the notches. This is where threw up my hands and quit last week.
02-06-2019, 06:21 PM
#347
Thread Starter
My Feedback: (20)
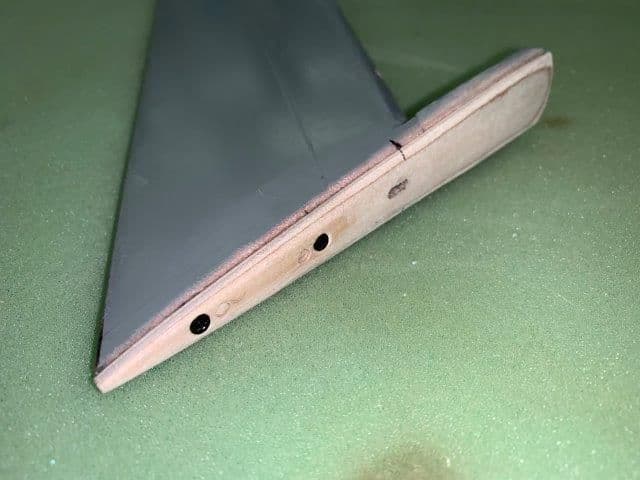
Shaping ailerons
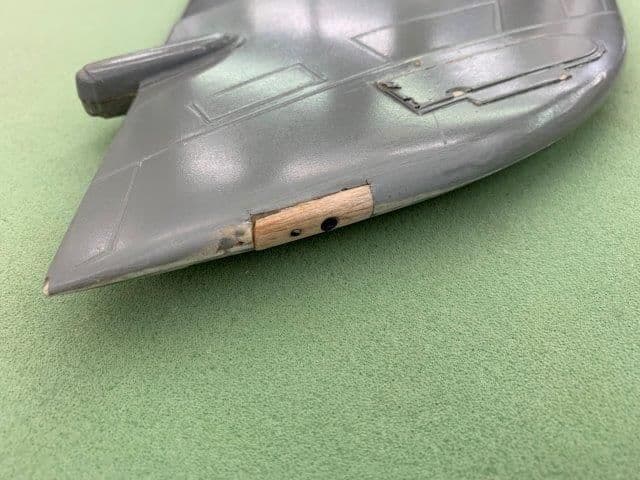
Once I got the aileron set inside the gapless hinge the leading edge of the counterweight rubbed the notch in the wing so I had to sand it to fit.
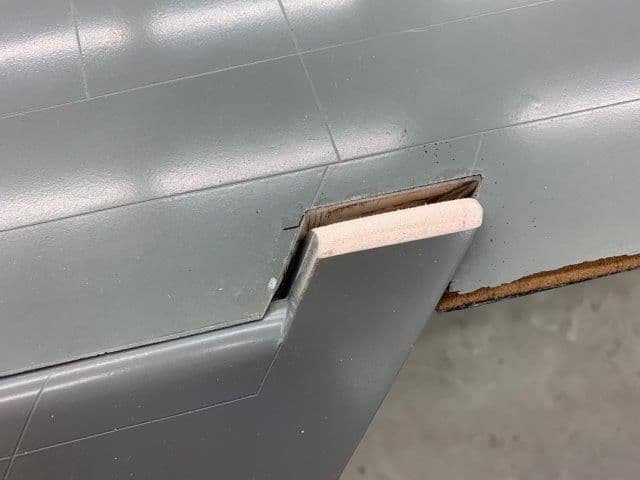
The motion requires the front of the counterweight to be rounded so as not to hit the wing. The original shape was squared off.
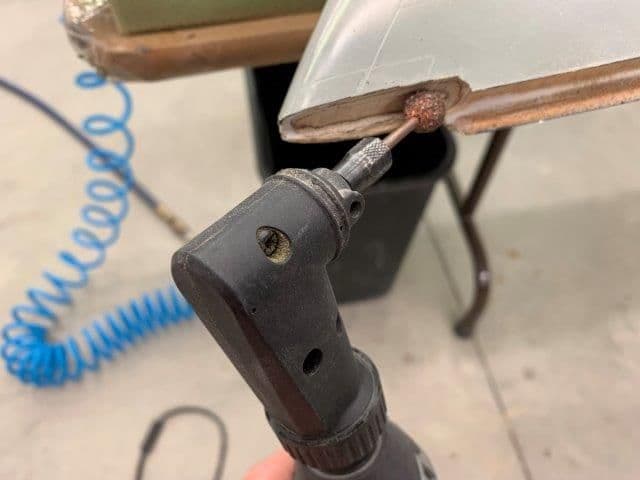
The tip notch had to be recessed to a concave radius to fit the movement of the aileron.
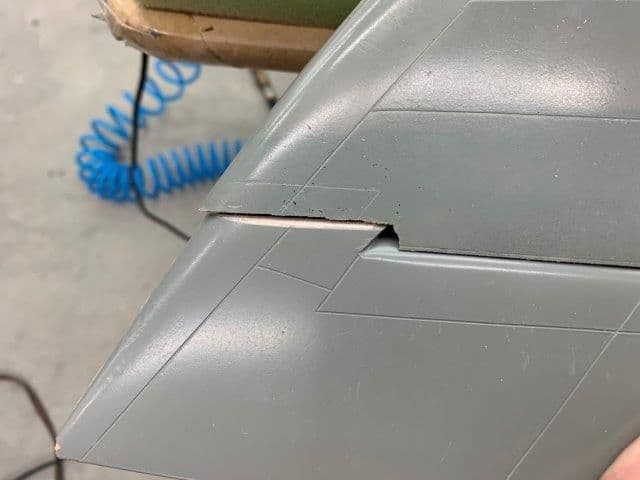
The aileron tip had to be shaped to match
Aileron tip counterweight had to have a curved radius to match the motion in the wing notch
Once I got the aileron set inside the gapless hinge the leading edge of the counterweight rubbed the notch in the wing so I had to sand it to fit.
The motion requires the front of the counterweight to be rounded so as not to hit the wing. The original shape was squared off.
The tip notch had to be recessed to a concave radius to fit the movement of the aileron.
The aileron tip had to be shaped to match
Aileron tip counterweight had to have a curved radius to match the motion in the wing notch
02-06-2019, 06:46 PM
#348
Thread Starter
My Feedback: (20)
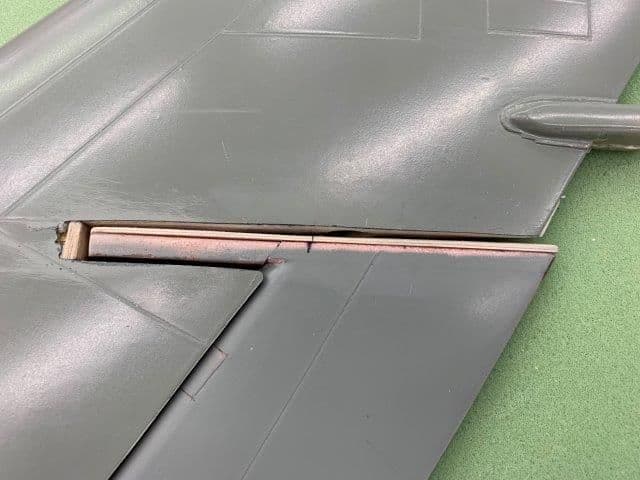
Hinging flaps.
I decided to just go ahead and just hinge everything where it was and fix the alignment later, possibly even after a test flight, but not now.
First step was to lay out hinge locations and check range of motion of flap. A 1/16" spacer is on the inboard edge.
Thankfully it only has to move down.
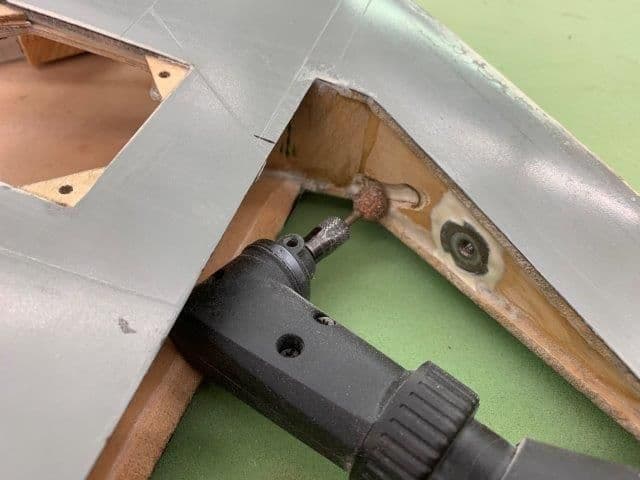
However, when moving the flap down the inside corner rubbed the inside of the wing root and pushed the flap outboard about 5mm. So I had to grind a relief cut out in the wing root to clear the flap top corner.
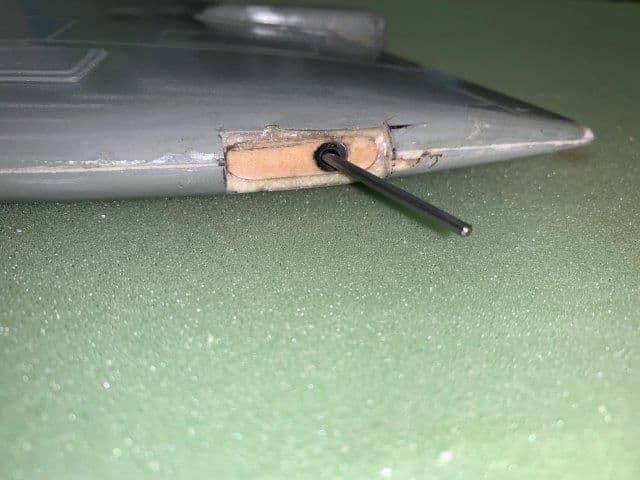
Next was to drill the hinge holes on center. I had to drill through the epoxy seam in the center so I first used a dremel milling bit to make a starter hole to keep the drill on center
Next I used a step drill to open the hole to 6mm for the metal hinge pin
Next I used a 6mm bit to drill the depth of the hinge pin in 3 of 5 holes where I actually hit wood inside. The other two holes will have to be opened up to insert a wood hinge anchor like I did on the rudder.
Hinge pin shank dry fit into the hole
Next is to mark the center of the flap hinge radius on each end. Outboard tip here.
Flap root tip here. Next is the fun part... trying to drill through the flap for the hinge wire while staying on center for each end. This will be next week as I am CD for a Giant Scale Fly In this weekend. Not any shop time till next week. Cheers!
I decided to just go ahead and just hinge everything where it was and fix the alignment later, possibly even after a test flight, but not now.
First step was to lay out hinge locations and check range of motion of flap. A 1/16" spacer is on the inboard edge.
Thankfully it only has to move down.
However, when moving the flap down the inside corner rubbed the inside of the wing root and pushed the flap outboard about 5mm. So I had to grind a relief cut out in the wing root to clear the flap top corner.
Next was to drill the hinge holes on center. I had to drill through the epoxy seam in the center so I first used a dremel milling bit to make a starter hole to keep the drill on center
Next I used a step drill to open the hole to 6mm for the metal hinge pin
Next I used a 6mm bit to drill the depth of the hinge pin in 3 of 5 holes where I actually hit wood inside. The other two holes will have to be opened up to insert a wood hinge anchor like I did on the rudder.
Hinge pin shank dry fit into the hole
Next is to mark the center of the flap hinge radius on each end. Outboard tip here.
Flap root tip here. Next is the fun part... trying to drill through the flap for the hinge wire while staying on center for each end. This will be next week as I am CD for a Giant Scale Fly In this weekend. Not any shop time till next week. Cheers!
02-10-2019, 05:35 PM
#349
Thread Starter
My Feedback: (20)
The giant scale fly this weekend had cold temps and cross winds that kept the attendance low but the hard core showed up and we had fun. At least it was warm beside the fire pit.
I had a couple of hours Thursday before going out to prep the field and started the flap hinging process.
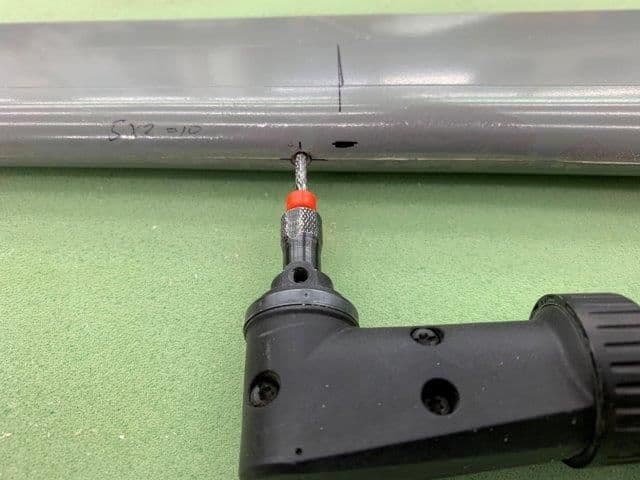
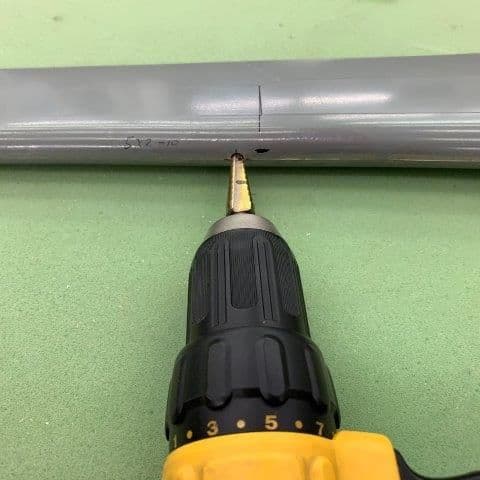
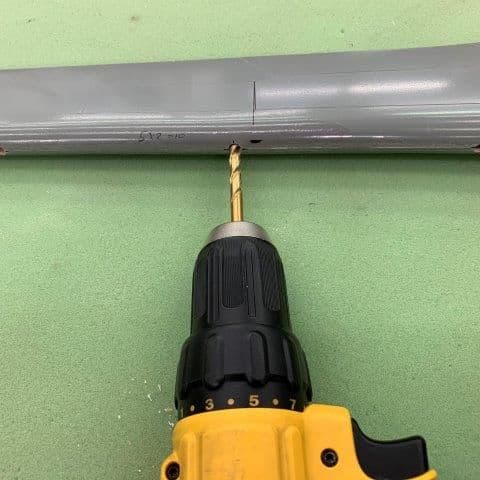
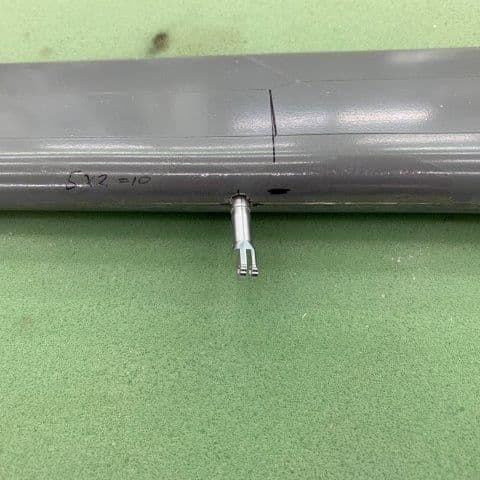
I laid out the hinge locations and drilled 6mm holes in the leading edge of the flaps at each location. Then I drilled from each end with the 12" bit shown and almost got it right but the hole centers were slightly off and the hinge wire was binding.
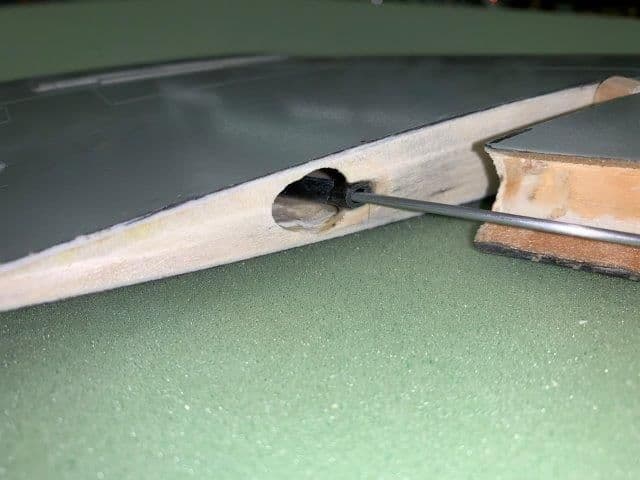
I was ready to drill with a longer bit but realized it would not really help much. As I looked into the hinge pin holes on the flap leading edge I realized the wire was recessed so deep into the flap that I would never be able to insert the hinge coated with hysol, get it set that deep inside, and insert the hinge wire, without getting hysol all over the hinge forks and wire. It would be impossible to clean off working thru the 6mm hole. Since there was no wood behind two of the hinge holes anyway, decided to go ahead and open each hole like for the rudder.
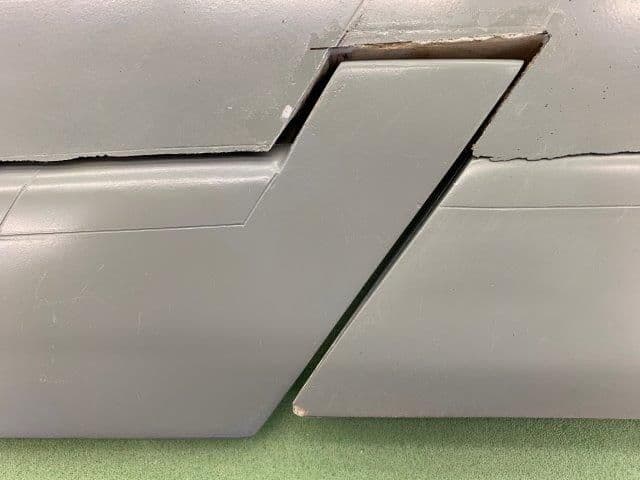
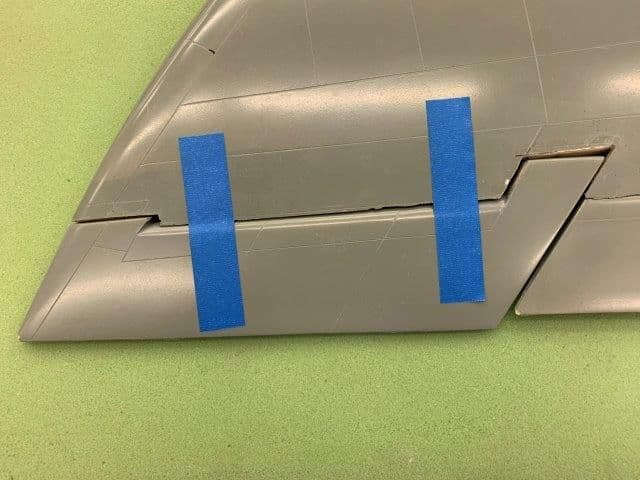
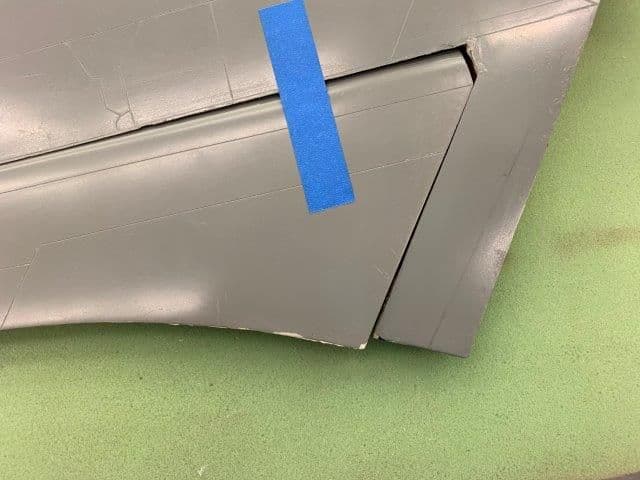
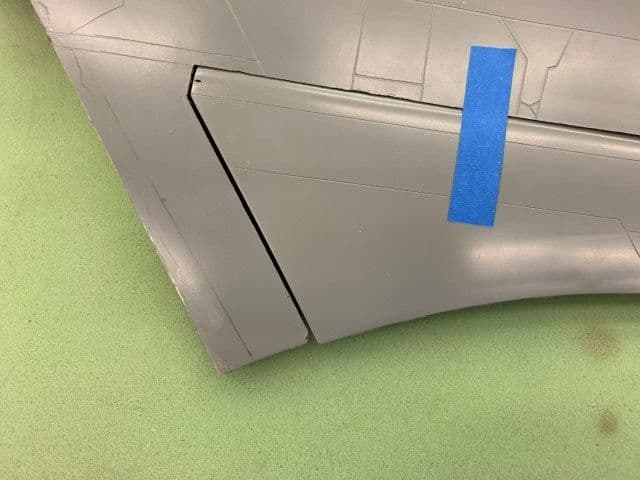
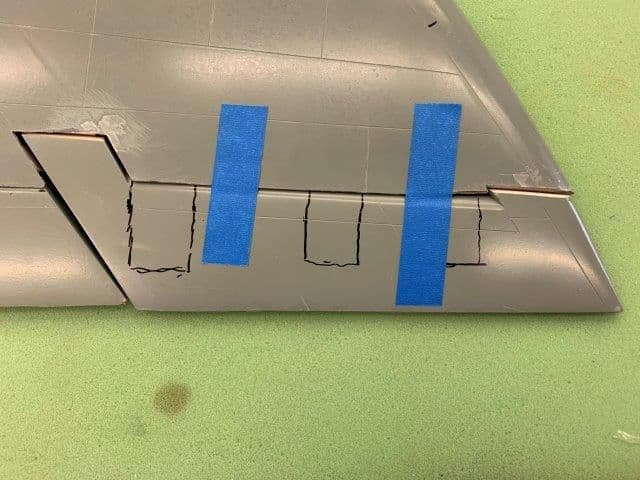
I used tape to mark the places for the cuts.

Cut outs marked.
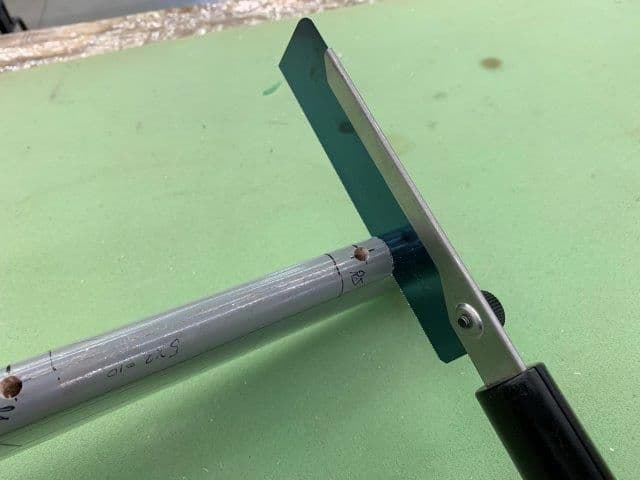
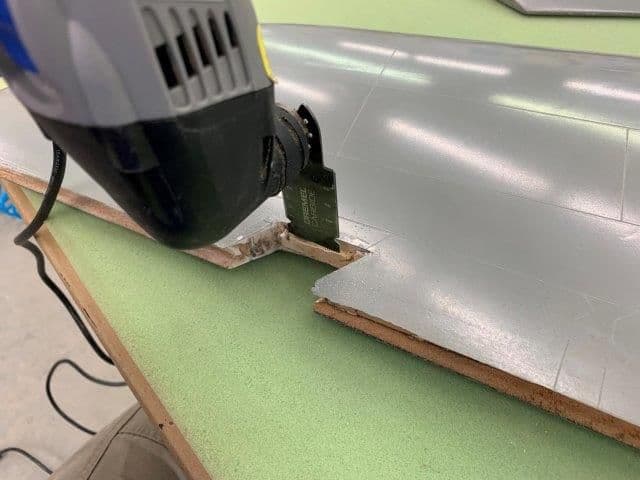
Razor saw used for the vertical cuts
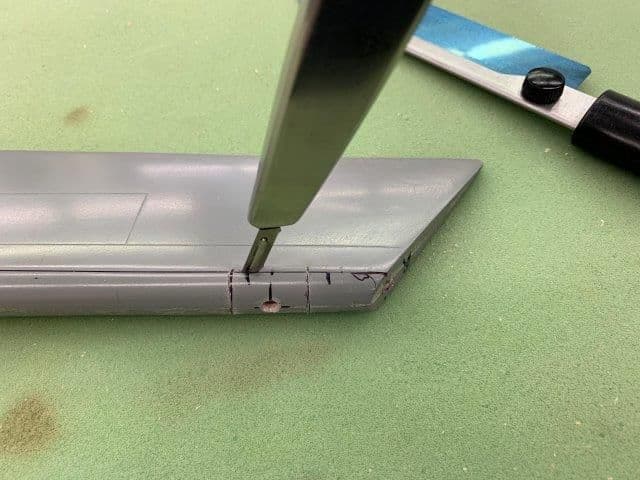
Knife use for side cuts except for the root hinges. Had to use a dremel oscillating saw to get through the epoxy inside.
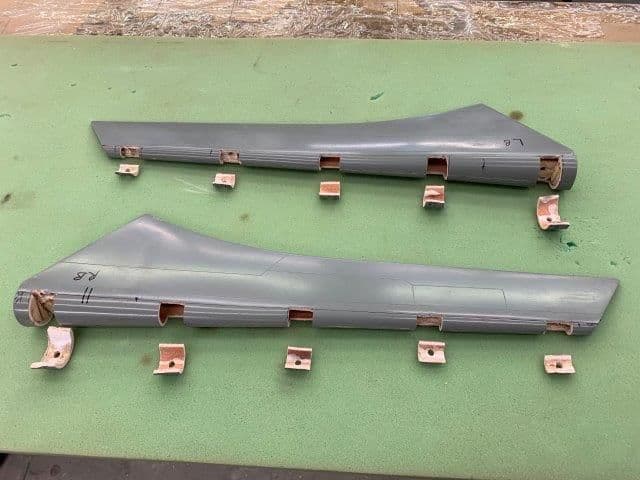
Flap hinge openings cleaned up ready for hinge pins. Wood has to be glued into the two inner positions first.
I had a couple of hours Thursday before going out to prep the field and started the flap hinging process.
I laid out the hinge locations and drilled 6mm holes in the leading edge of the flaps at each location. Then I drilled from each end with the 12" bit shown and almost got it right but the hole centers were slightly off and the hinge wire was binding.
I was ready to drill with a longer bit but realized it would not really help much. As I looked into the hinge pin holes on the flap leading edge I realized the wire was recessed so deep into the flap that I would never be able to insert the hinge coated with hysol, get it set that deep inside, and insert the hinge wire, without getting hysol all over the hinge forks and wire. It would be impossible to clean off working thru the 6mm hole. Since there was no wood behind two of the hinge holes anyway, decided to go ahead and open each hole like for the rudder.
I used tape to mark the places for the cuts.
Cut outs marked.
Razor saw used for the vertical cuts
Knife use for side cuts except for the root hinges. Had to use a dremel oscillating saw to get through the epoxy inside.
Flap hinge openings cleaned up ready for hinge pins. Wood has to be glued into the two inner positions first.
02-13-2019, 05:14 PM
#350
Thread Starter
My Feedback: (20)
Installing hinge pins in flaps

Balsa wedges cut for hinge pin hard points.

Hinge hard points epoxied into flaps. Pin used as a handle.
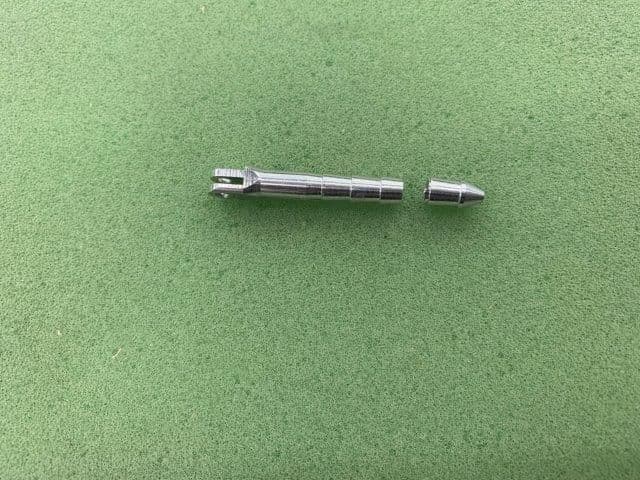
Hinge pins cut to fit inside the flaps
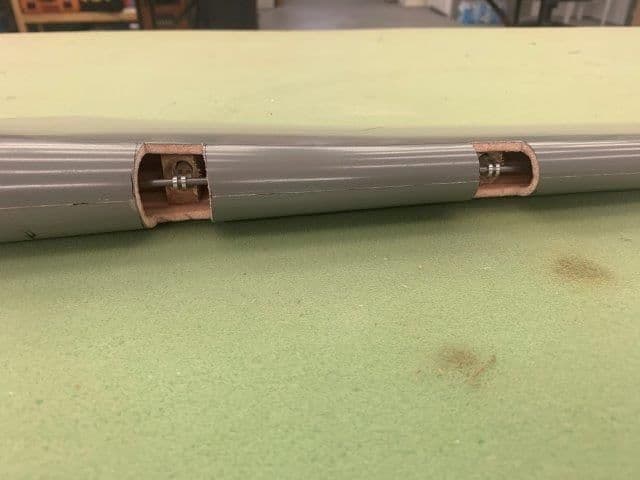
Hinge pins installed and hinge wire inserted through the flap.
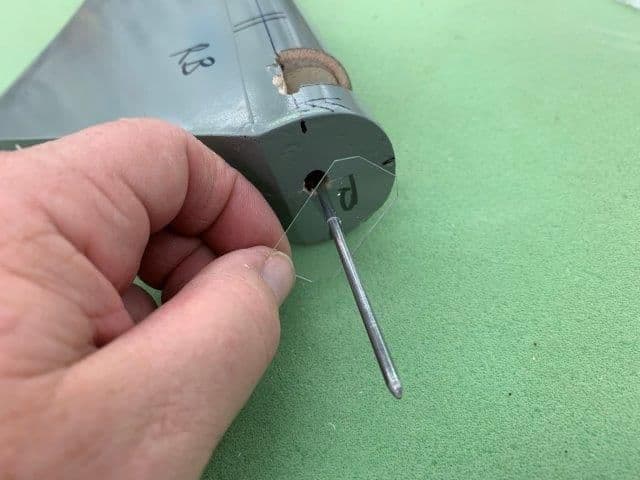
Piece of clear acetate plastic used to center wire on end of flap
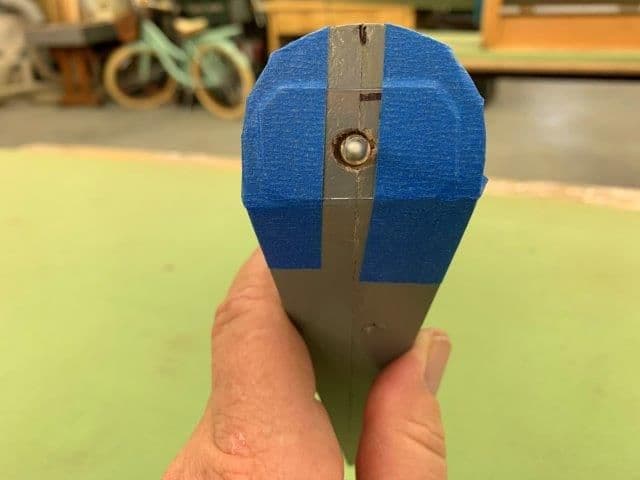
Hinge wire held in center by plastic template and tape
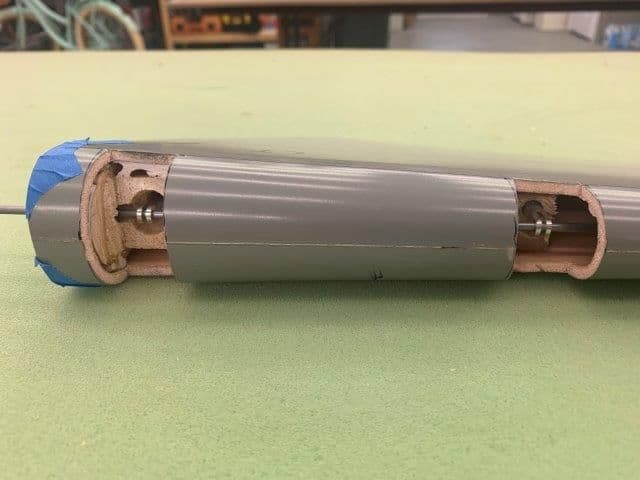
Hinges holes recessed into balsa hard points with perma grit ball grinder
Flap hinge pins ready for hysol epoxy. Looked easy but it took about 3 hours to cut and fit again and again to get it all lined up. Second flap was a little faster after the learning curve on the first one.
Balsa wedges cut for hinge pin hard points.
Hinge hard points epoxied into flaps. Pin used as a handle.
Hinge pins cut to fit inside the flaps
Hinge pins installed and hinge wire inserted through the flap.
Piece of clear acetate plastic used to center wire on end of flap
Hinge wire held in center by plastic template and tape
Hinges holes recessed into balsa hard points with perma grit ball grinder
Flap hinge pins ready for hysol epoxy. Looked easy but it took about 3 hours to cut and fit again and again to get it all lined up. Second flap was a little faster after the learning curve on the first one.