


1/7 Scale Blackburn Buccaneer All Composite Scratch Build
 02-08-2021, 10:26 AM
#601

What length of servo arm on the tail servo? Servo torque is always at 1cm...even if a servo actually produces the stated torque. We are finding servos now measured at the spline too.
(Ok, I have read the details properly now! Can see the arm length)
A video at the quality of the stills photography would answer many questions.
I hope you stay motivated, that’s a huge kick in the ‘danglies’
(Ok, I have read the details properly now! Can see the arm length)
A video at the quality of the stills photography would answer many questions.
I hope you stay motivated, that’s a huge kick in the ‘danglies’
Last edited by Dave Wilshere; 02-08-2021 at 12:37 PM.
 02-08-2021, 11:09 AM
#602
Hello Paul,
I am sorry to hear of the hull loss...
A common bond that we modelers share is the often unwritten creed �"The Comeback is Always Better than the Setback"!
Your most certainly on to something with this marvelous project. There are 'no' other large scale Buccaneer model jets anywhere on the planet other than your shop!
We are all rooting for you man!
Third time will be magnificent.
Franko
The following users liked this post:
Ron S (02-10-2021)
02-08-2021, 11:16 AM
#603
My Feedback: (1)
Paul,
First let me say, sorry for the loss of your Buccaneer. I know you have put your life into this project for the last 2 years.
I found this picture of your elevator servo mounting:
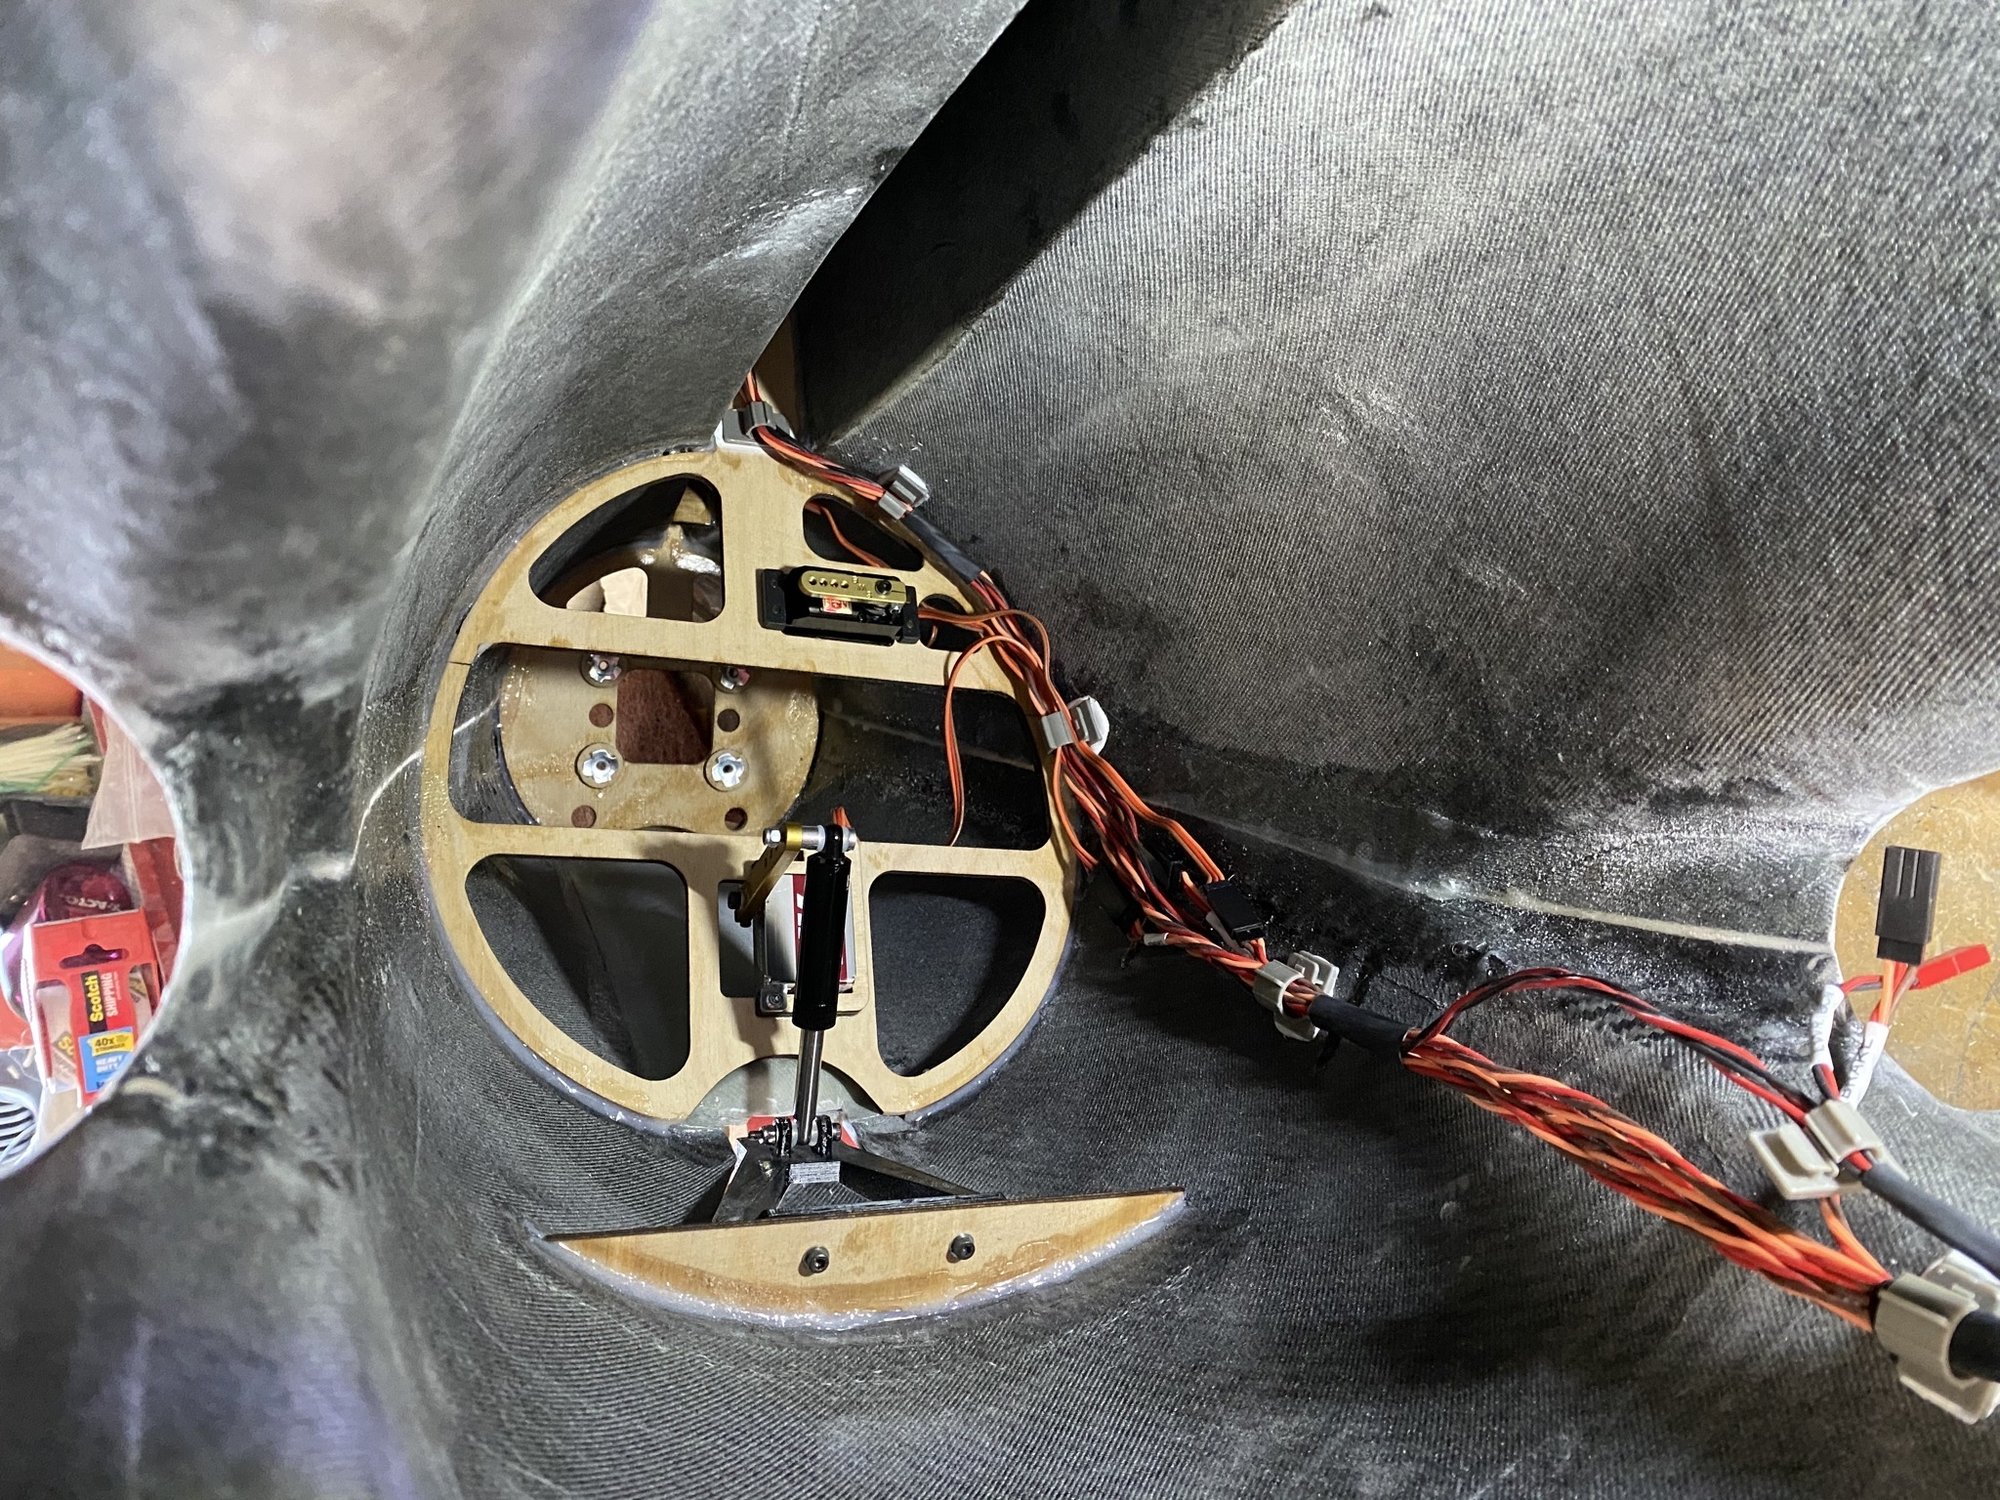
Just spitballing here, but do you think it would have been possible that the servo might have broken (or partially broken) loose under the high loads with full flaps?
If the bottom servo screws had pulled out of the plywood, the servo could have rolled upward (top screws being the fulcrum), the resulting poor linkage geometry would explain both your loss of elevator control, and the very high amperage spikes.
First let me say, sorry for the loss of your Buccaneer. I know you have put your life into this project for the last 2 years.
I found this picture of your elevator servo mounting:
Just spitballing here, but do you think it would have been possible that the servo might have broken (or partially broken) loose under the high loads with full flaps?
If the bottom servo screws had pulled out of the plywood, the servo could have rolled upward (top screws being the fulcrum), the resulting poor linkage geometry would explain both your loss of elevator control, and the very high amperage spikes.
02-08-2021, 12:04 PM
#605

David,
Maybe just your wording, but I think you are assuming that the only pitch control for the model were the small tailplane flaps.
That is incorrect - the primary pitch control is an all-moving tailplane. The small tailplane trailing edge flaps only deflect (up) as a flap when the wing flaps deploy (down) to act as a trim device. The trailing edge flaps do not respond to pitch control inputs.

Paul
Maybe just your wording, but I think you are assuming that the only pitch control for the model were the small tailplane flaps.
That is incorrect - the primary pitch control is an all-moving tailplane. The small tailplane trailing edge flaps only deflect (up) as a flap when the wing flaps deploy (down) to act as a trim device. The trailing edge flaps do not respond to pitch control inputs.
Paul
In which case I withdraw that possibility but it is always possible the stab. was stalled for whatever reason, either aerodynamically or electrically.
 02-08-2021, 12:55 PM
#606

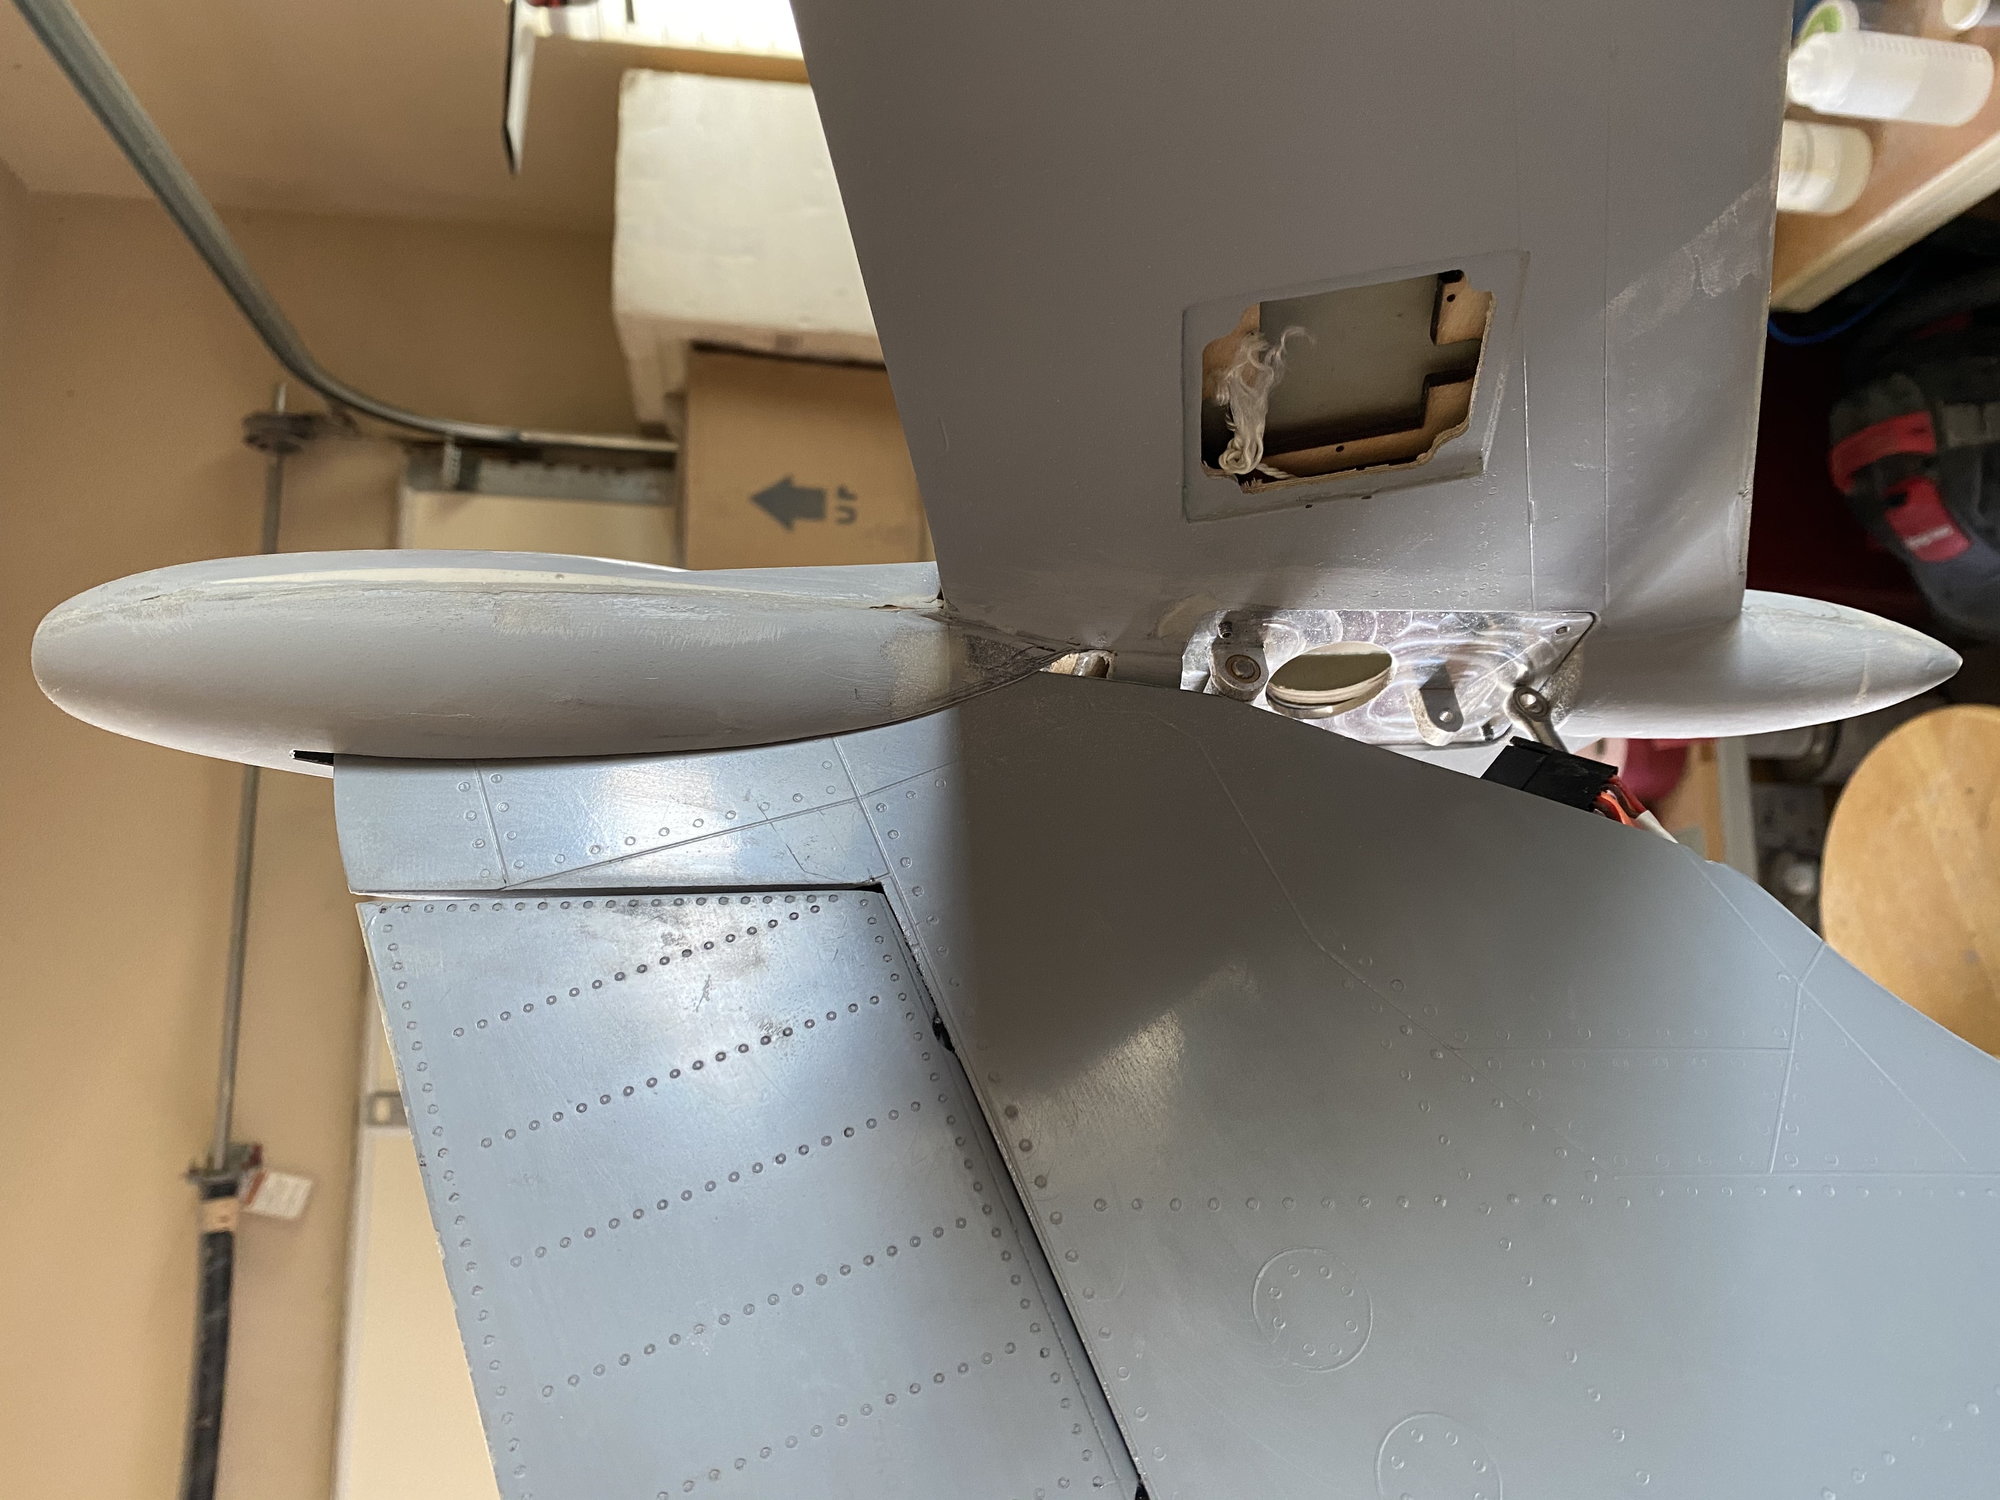
You say you have a full moving stab. If so the pictures show the trailing edge elevator in an up position with full flaps. The up elevator in the picture shows would be acting as an anti balance tab and thus fighting with the full flying stab. That would cause your 9A spike.
02-08-2021, 01:46 PM
#607

Tom,
Very good point.
The LTMA calculations assume a simple all-moving tailplane. Not one with a significant camber due to trailing edge flaps.
The pivot point is close to the quarter-chord position, but the servo torque calcs doesn't take into account the additional pitching moment on the tail caused by the trailing edge flaps, which, as you say, would account for the extra current draw for the servo, and potentially stalling it.
Time to add a much bigger servo, along with Dave's great observation about the mounting orientation to give greater servo mounting stability.
Paul
02-08-2021, 01:57 PM
#609

A 10 sec delay also sounds a ***** much between flight modes. 2 secs have always been my go to timing.
This thread build was/is so epic it hurts to see so much literally go up in smoke. But its taking these risks and putting sunshine on the bottom of the tires that makes us feel alive!
The single worst thing to do to an airframe is let it sit on the ground. The second worst thing is flying it!
I can't wait to see some more of your incredible building skills sir!
02-08-2021, 02:11 PM
#610
Another good point. I'll have to think about that one for a while.
Ideally they will be 90deg to each other. I will try to re-do the structural layout of the rear fuselage on the next one to improve the geometry, just in case.
The LTMA guidelines doesn't specify a pushrod angle - the formula they provide generates a servo torque requirement, not a pushrod load, and it is based on the ratio of the control and servo arm lengths.
The LTMA wording below;The minimum torque requirements for a full flying control surface is calculated as follows.
Minimum torque = A * Area * Servo Arm/Control Arm
A = Airspeed factor (see Table 1)
Area = planform area of the control surface
All measurements are in inches, area is in square inches
The minimum torque is in oz.in
A, the airspeed factor is 6 for this application.
Paul
Last edited by JSF-TC; 02-09-2021 at 03:46 AM.
 02-08-2021, 02:17 PM
#612

Paul,
You must be devastated at the loss of that magnificent model. It is a great pity to see such a lovely model destroyed on its maiden flight.
I just came across your build thread today - I don't know why I didn't see it before as I love to read about such amazing scratch builds. I've spent much of the day skimming through the thread, and I agree with Dave Wilshere's comment of "builder of the year award".
I have learned a great deal from your thread, and others like it. Mainly that there is no way I can ever build such a complex model. I have dreamt for many years of building a large jet airliner but I came to realise that it is beyond my capabilities, so I have sought professional help. I am trying to get Fighteraces to build it for me.
However I have been busy building a smaller scale (proof of concept) model. I started it after talking to Phil Clark, as I realised that I didn't know enough to go straight to a seventh scale model.
So in October last year I started on a scratch built twentieth scale model of a HS Trident airliner, with a single micro turbine in the tail.
Having seen your crash video I am really glad that I did. I could just imagine my giant scale Trident coming down on its maiden flight in a deep stall or something, but I can check that out on the little one.
I noticed in post #537 that you intended anyway to build a second airframe, lighter and better, so since you have the moulds it should not be too onerous a task. You have my best wishes, and I hope to see the second prototype fly on video this year some time.
02-08-2021, 02:22 PM
#613
The faster you went in the dive just added more resistance against the servo trying to move the stab. Up trim for the stab with full flaps in addition to the elevator trim tab may have been too much. A little "down" elevator with up stab would reduce the servo power requirement
02-08-2021, 02:25 PM
#614
Join Date: Jul 2005
Location: TroonAyrshire, UNITED KINGDOM
Posts: 97
Likes: 0
Received 0 Likes
on
0 Posts
Hi Paul,
Very sorry to learn your loss and hope to see V2 in the future. I note that you say the small tab on the elevator deflects up to counter the flaps. I cannot recall in this thread whether the Bucc flaps have been discussed. When selecting the flaps down the tab deflected up and flap and tab movement was indicated by a pair of rotary indicators - resembling a round cheese with a cut out and called cheeses - one for tab and one for flap. As the flap travelled the pilot's job was to monitor simultaneous deployment. He was checked by the Nav who wanted to hear 'cheeses cheeses' as they moved to show that the pilot was paying attention. If any asymmetry was noted all movement was stopped by hitting a switch. More than one Bucc was lost because the tab did not balance the flap - nose down pitch on deflection and nose up pitch on retraction. just thought that this would be of interest if not covered before if it has apologies.
Very sorry to learn your loss and hope to see V2 in the future. I note that you say the small tab on the elevator deflects up to counter the flaps. I cannot recall in this thread whether the Bucc flaps have been discussed. When selecting the flaps down the tab deflected up and flap and tab movement was indicated by a pair of rotary indicators - resembling a round cheese with a cut out and called cheeses - one for tab and one for flap. As the flap travelled the pilot's job was to monitor simultaneous deployment. He was checked by the Nav who wanted to hear 'cheeses cheeses' as they moved to show that the pilot was paying attention. If any asymmetry was noted all movement was stopped by hitting a switch. More than one Bucc was lost because the tab did not balance the flap - nose down pitch on deflection and nose up pitch on retraction. just thought that this would be of interest if not covered before if it has apologies.
02-08-2021, 03:23 PM
#616
Alasdair,
Thank you for your kind comments.
That's exactly what I said before I embarked on this endeavor. I hadn't done anything more with composites than skin the occasional wing, nor had I scratch built anything before. It was just something I WANTED to do. I needed to learn CAD, laser cutting, 3D scanning and 3D printing, plus all the various composite skills. I'm still learning.
If you WANT to be able to build something outside of your comfort zone, just dive straight in and don't admit defeat. You know it can be done, so just keep trying. Start with simple parts and build up in complexity. Don't be afraid to fail either.
It is interesting, regarding your comment about being devastated at the loss of the model. To be honest, I am not devastated at all. Maybe it is just realistic acceptance of the risks. I know that if I had just written a $10k+ check for a large scale model (say BVM 1/5 F-16 or similar) and to see it go in on an early flight I would have been suicidal. As a bottom line, I could have bought a very nice PNP scale model for what I've spent on the Buccaneer and have change left over. But, on the Buccaneer, I see the journey of developing, building and learning as 90% of the experience. The flying part is just the culmination of that journey. Plus spreading out the costs over 3 years limits the apparent financial impact.
When I look at it, while all the avionics and exhaust pipes were destroyed and the engines significantly damaged and will cost quite a bit to replace, the airframe can be rebuilt cheaply with glass/ carbon/ epoxy/ plywood that I have on hand, with just some effort on my part.
The new build has already started, and I've laid up new parts today.
The Bucc will be back......
Paul
Thank you for your kind comments.
I have learned a great deal from your thread, and others like it. Mainly that there is no way I can ever build such a complex model.
If you WANT to be able to build something outside of your comfort zone, just dive straight in and don't admit defeat. You know it can be done, so just keep trying. Start with simple parts and build up in complexity. Don't be afraid to fail either.
It is interesting, regarding your comment about being devastated at the loss of the model. To be honest, I am not devastated at all. Maybe it is just realistic acceptance of the risks. I know that if I had just written a $10k+ check for a large scale model (say BVM 1/5 F-16 or similar) and to see it go in on an early flight I would have been suicidal. As a bottom line, I could have bought a very nice PNP scale model for what I've spent on the Buccaneer and have change left over. But, on the Buccaneer, I see the journey of developing, building and learning as 90% of the experience. The flying part is just the culmination of that journey. Plus spreading out the costs over 3 years limits the apparent financial impact.
When I look at it, while all the avionics and exhaust pipes were destroyed and the engines significantly damaged and will cost quite a bit to replace, the airframe can be rebuilt cheaply with glass/ carbon/ epoxy/ plywood that I have on hand, with just some effort on my part.
The new build has already started, and I've laid up new parts today.
The Bucc will be back......
Paul
The following users liked this post:
yeahbaby (02-08-2021)
02-08-2021, 05:14 PM
#618
Junior Member
Hi Paul,
It's heartbreaking to see the loss of the Bucc. It is one of my all-time favorite aircraft, and one that I was actually half-way through building an all-wood model of just before I quit the hobby some years ago.
I've been away from RCU for many years, but started lurking again a few months ago when I heard of your incredible project. I've always enjoyed doing the less commonly modeled aircraft, and enjoyed the engineering challenge that comes with such models - but I never quite mustered the drive / guts to take on something nearly as daunting as you have done here. Hope it doesn't sound too creepy, but you are the kind of modeller I wanted to be when I grew up. :-)
Regarding the loss of equipment in your model - after I lost my Sepecat Jaguar model, some of the manufacturers whose equipment I had used, stepped up to the plate and helped out - e.g. for the radio gear, a JR rep generously allocated me a 'get out of jail free' card - when I sent that in to JR along with my destroyed JR parts, I received something like 14 brand new (and not cheap) servos along with other accessories that I had lost. That was just a fraction of the $17k that I had in the model, but it all helps. Perhaps some of the manufacturers of the radio / turbine gear you used, may also have some similar programs / promotions, and be willing to help you out.
I look forward to your next build, and a successful subsequent flight.
All the best,
Gordon
 02-09-2021, 01:17 AM
#621

Nooo....that's sooo sad!!! This is the worst that can happen after sooo many building hours. Only a few people may understand the full impact of the time, effort, sweat and blood used in a scratch build project like this. To see it ending like this....bummer!
As many said here, try to see the positive things, all the designing and prototyping/testing has not wasted at all and will be used by you in future development, I'm sure of that!
By no means any critics at all but please be careful next time using gyro's and servo slow settings. On the first 10 flight tests of a new model I never use any servo slow on any flight control modes. This may not look scale but what the heck, any undesirable controllability issues can be solved right away by selecting the previous mode. Also I never use any gyro functions as well on first flights as they can mask controllability issues which you definitely want to see at this stage. Most models will start to wobble or dutch roll on stall onset which you will not see or recognise on an augmented stabilized airframe. I've seen many jets crash on landing, coming in dead steady and rock stable before having a massive wing dip into the ground because the gyro's couldn't hold it anymore.
That said, I'm sure you will recover, you must as this is such a beautiful aircraft and very well engineered as well, much compliments for the job done so far!
Cheers,
Gerald
02-09-2021, 04:06 AM
#623
When I look at it, while all the avionics and exhaust pipes were destroyed and the engines significantly damaged and will cost quite a bit to replace, the airframe can be rebuilt cheaply with glass/ carbon/ epoxy/ plywood that I have on hand, with just some effort on my part.
The new build has already started, and I've laid up new parts today.
The Bucc will be back......Paul
The new build has already started, and I've laid up new parts today.
The Bucc will be back......Paul
I am amazed at the speed at which you accomplished the original build, and dived into the mark 2 while still fitting in work.
I take forever to build anything, even an ARTF, and I retired 16 years ago. I built more when working. But I'm over 70 now and too old to learn new tricks like 3D CAD and printing, and glass vac-moulding.
Do you ever fly at Florida Jets? I used to attend and take photos for UK magazine articles, but haven't been back since I stopped writing.
Best wishes,
Alasdair
P.S. This morning I glassed the lower part of my mini Trident's rear fuselage - painstakingly planked in 1.5mm balsa over laser-cut formers, my first double curvature planking job
02-09-2021, 04:23 AM
#624
A more considered analysis.
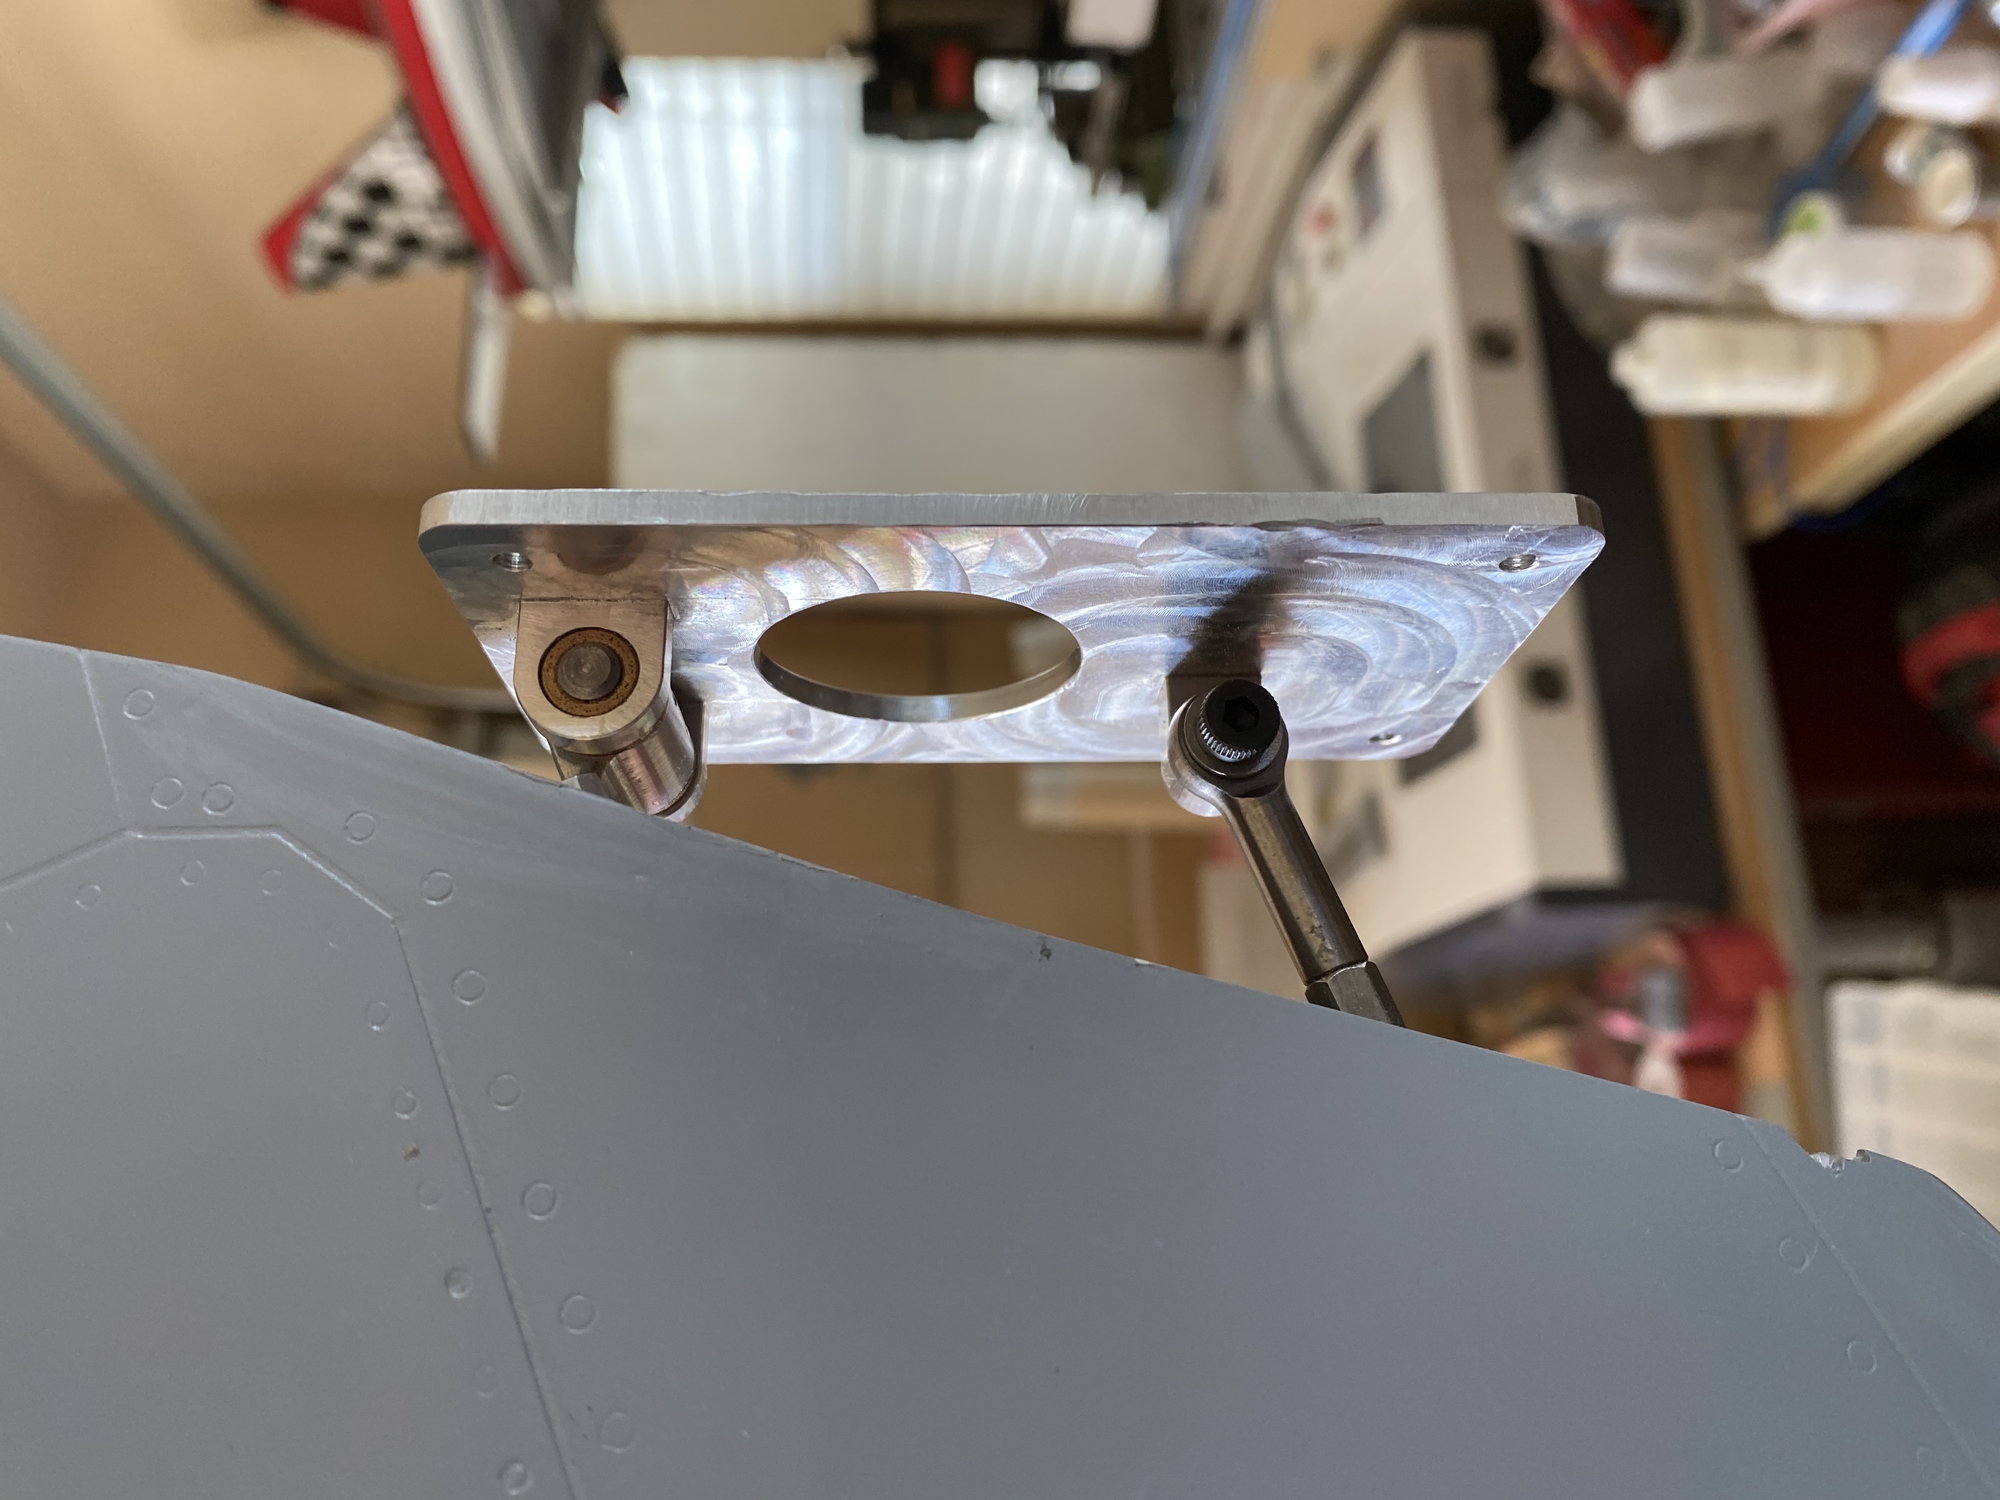
If we assume that the LTMA calculations assume perfect 90deg linkage geometry, so that all the servo torque is available as an input to drive the control surface, then with the Buccaneer tailplane geometry, where the pushrod is set up so that it is at an angle of 19.35deg, I should have accounted for the loss in the effective control arm radius, which is shown below.
At the servo end, the geometry was set up with the pushrod at 90deg to the servo arm.
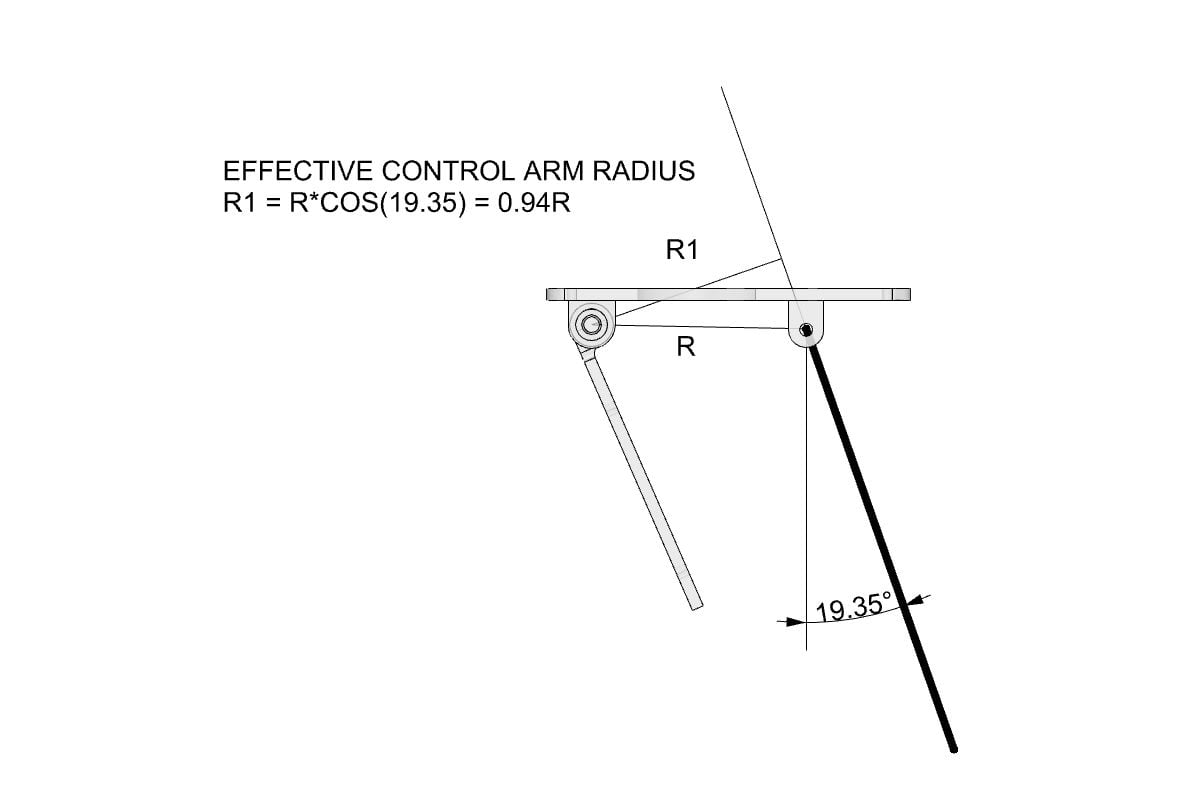
The basic LTMA calculation suggested a requirement of 306oz.in (using R for the control arm radius).
Correcting for the 'effective control arm radius - R1' would give a minimum torque requirement of 325oz.in.
I had used an MKS 777+ servo, with a torque of 506oz.in at 7.4V.
So, even accounting for the incorrect calculation of servo torque, the above suggests that I should still have had plenty of margin to the minimum requirements.
I feel better now for having worked through the geometry calculations. I still think that Tom's suggestion of the tailplane pitching moment with the trailing edge flap deflected helped overpower the servo is a primary cause, and with the resulting dive and increasing speed, the forces only got greater with no recovery possible. The only way out would have been to retract the flaps, which I initiated, but with the 10sec travel time there was not sufficient time before impact.
I think next time I will keep the tailplane trailing edge flaps on a separate knob and only start to investigate their effect once the basic model is understood, and not have them mixed in with the flaps from the very beginning.
Paul
02-09-2021, 05:15 AM
#625
Paul,
Can you email me the log file from the accident flight? The file you posted earlier keeps getting corrupted when I download it.
Danny
[email protected]
Can you email me the log file from the accident flight? The file you posted earlier keeps getting corrupted when I download it.
Danny
[email protected]