


Juniaer K45TP Tucano from Brazil?
 10-15-2022, 06:11 PM
#226

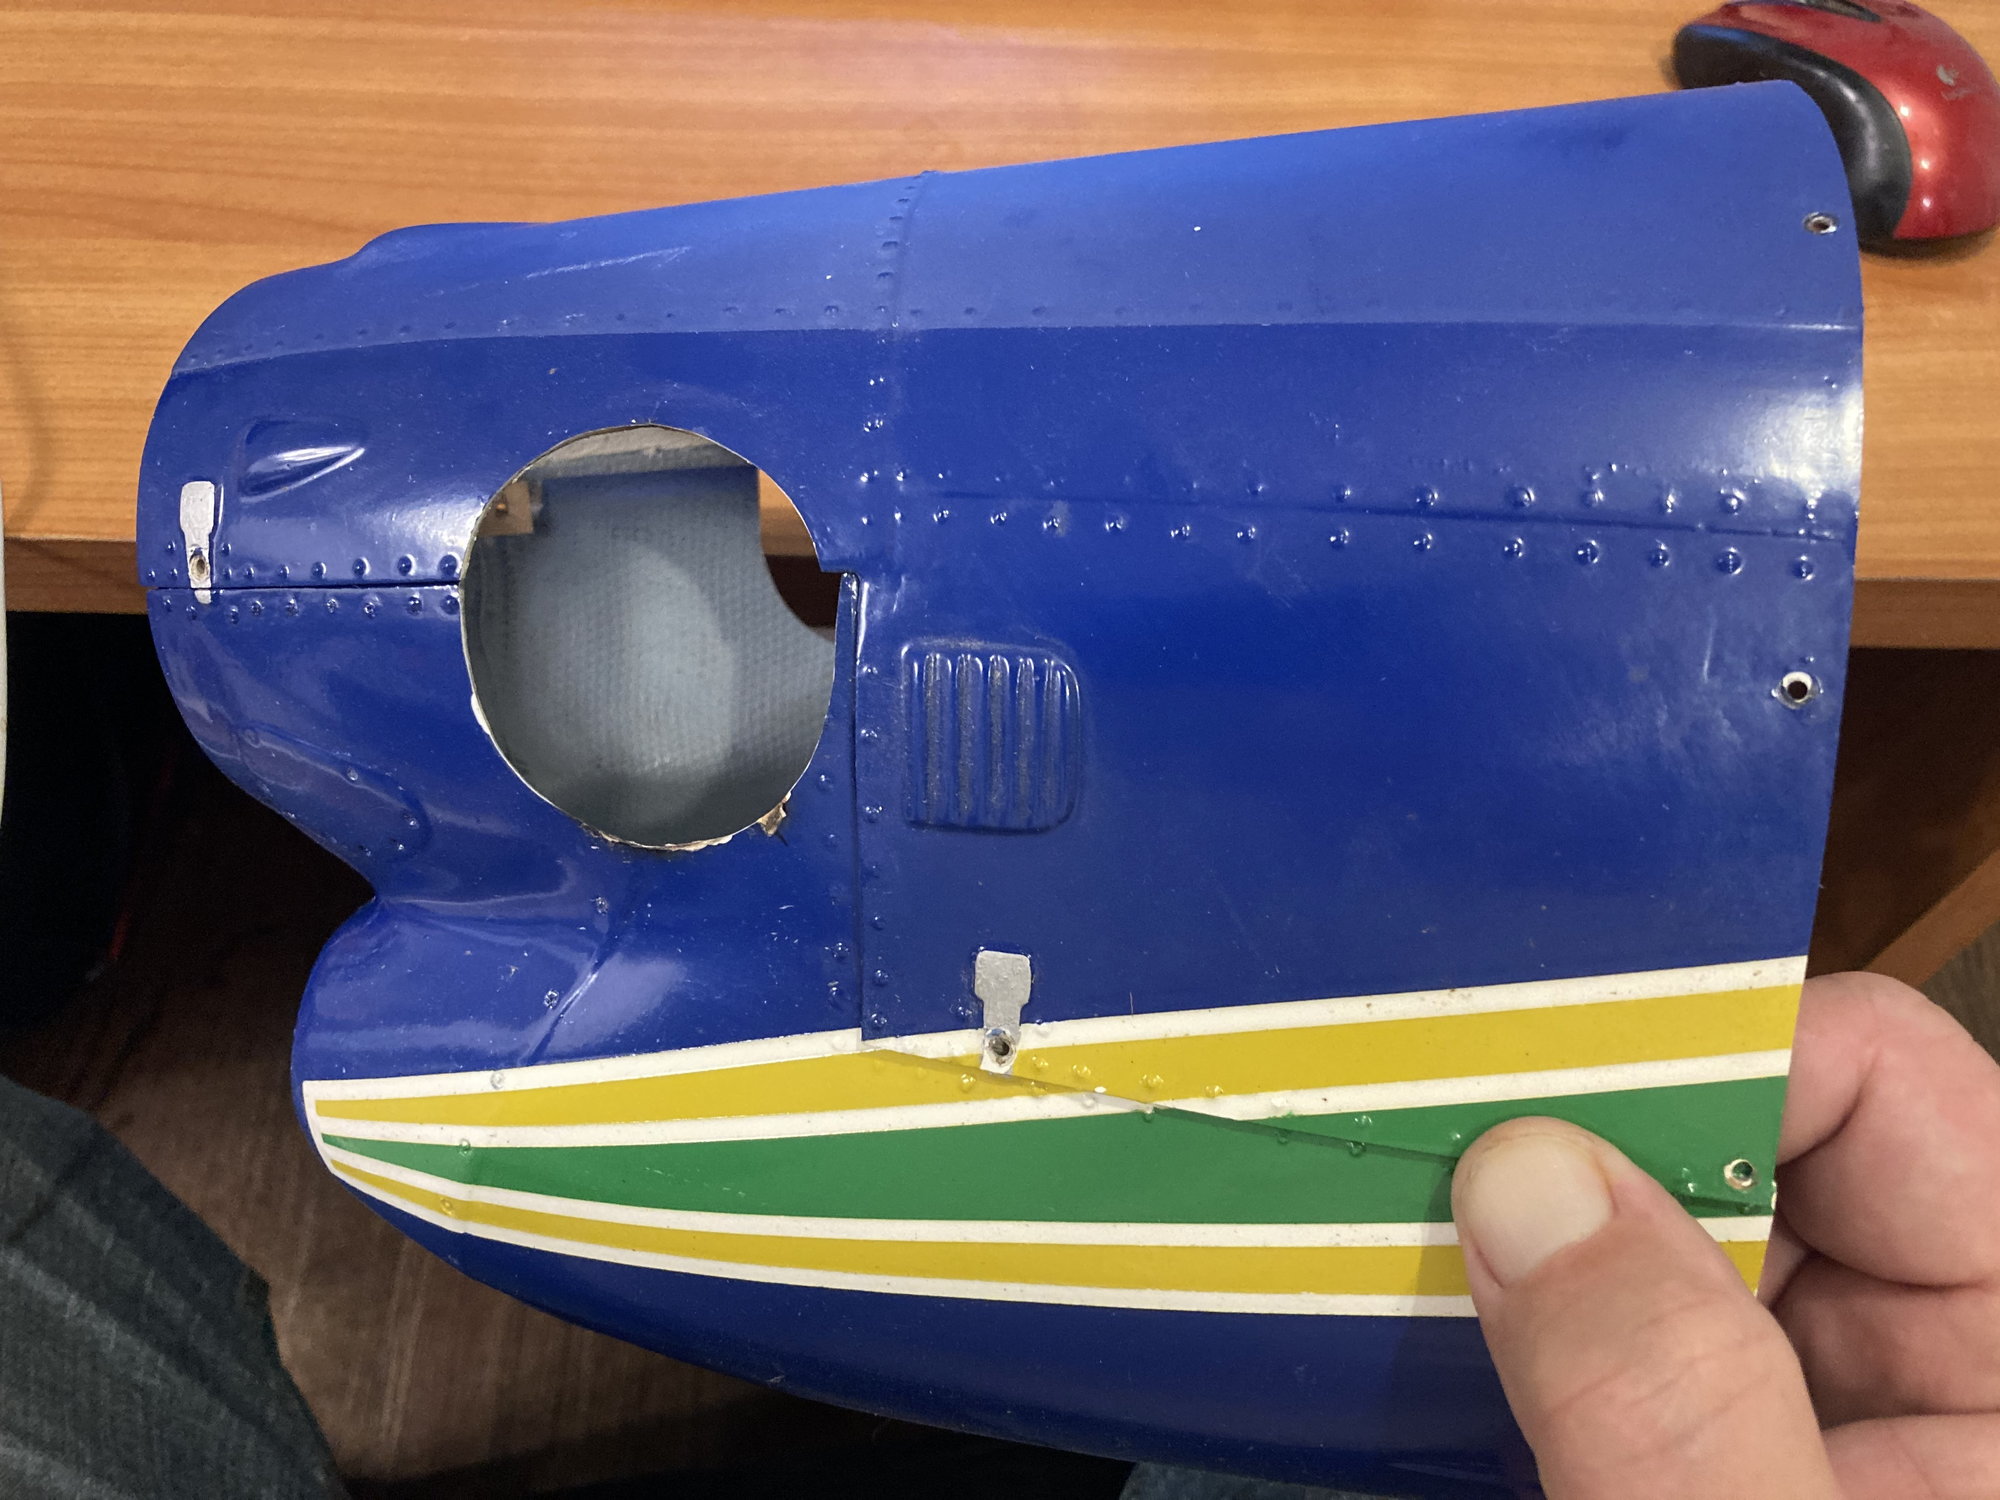
Heat Shielding and Exhaust Extensions
I thought i saw a post where guys used ceramic blankets to shield the fuselage from the turbine heat. I simply brushed on put two coats of BVM heat shield paint in the engine mount tray and a portion of the upper cowl. Problem solved.
I also saw some discussion about horizontal extensions to the exhaust tubes to get the exhaust further away from the outside of the fuselage. I've been using the Zimmerman elbows without any extension before the elbow and haven't had any problem with heating the fuselage or blistering any paint. In examining the photos, I see that there are a couple of hot spots around the openings for the exhaust tubes. My cowl has only a minimum a clearance cut around the exhausts so maybe I'll open them up a 1/16" or so.

Regards,
Jim
I thought i saw a post where guys used ceramic blankets to shield the fuselage from the turbine heat. I simply brushed on put two coats of BVM heat shield paint in the engine mount tray and a portion of the upper cowl. Problem solved.
I also saw some discussion about horizontal extensions to the exhaust tubes to get the exhaust further away from the outside of the fuselage. I've been using the Zimmerman elbows without any extension before the elbow and haven't had any problem with heating the fuselage or blistering any paint. In examining the photos, I see that there are a couple of hot spots around the openings for the exhaust tubes. My cowl has only a minimum a clearance cut around the exhausts so maybe I'll open them up a 1/16" or so.
Regards,
Jim

The following users liked this post:
shrek514 (10-15-2022)
10-15-2022, 06:22 PM
#227
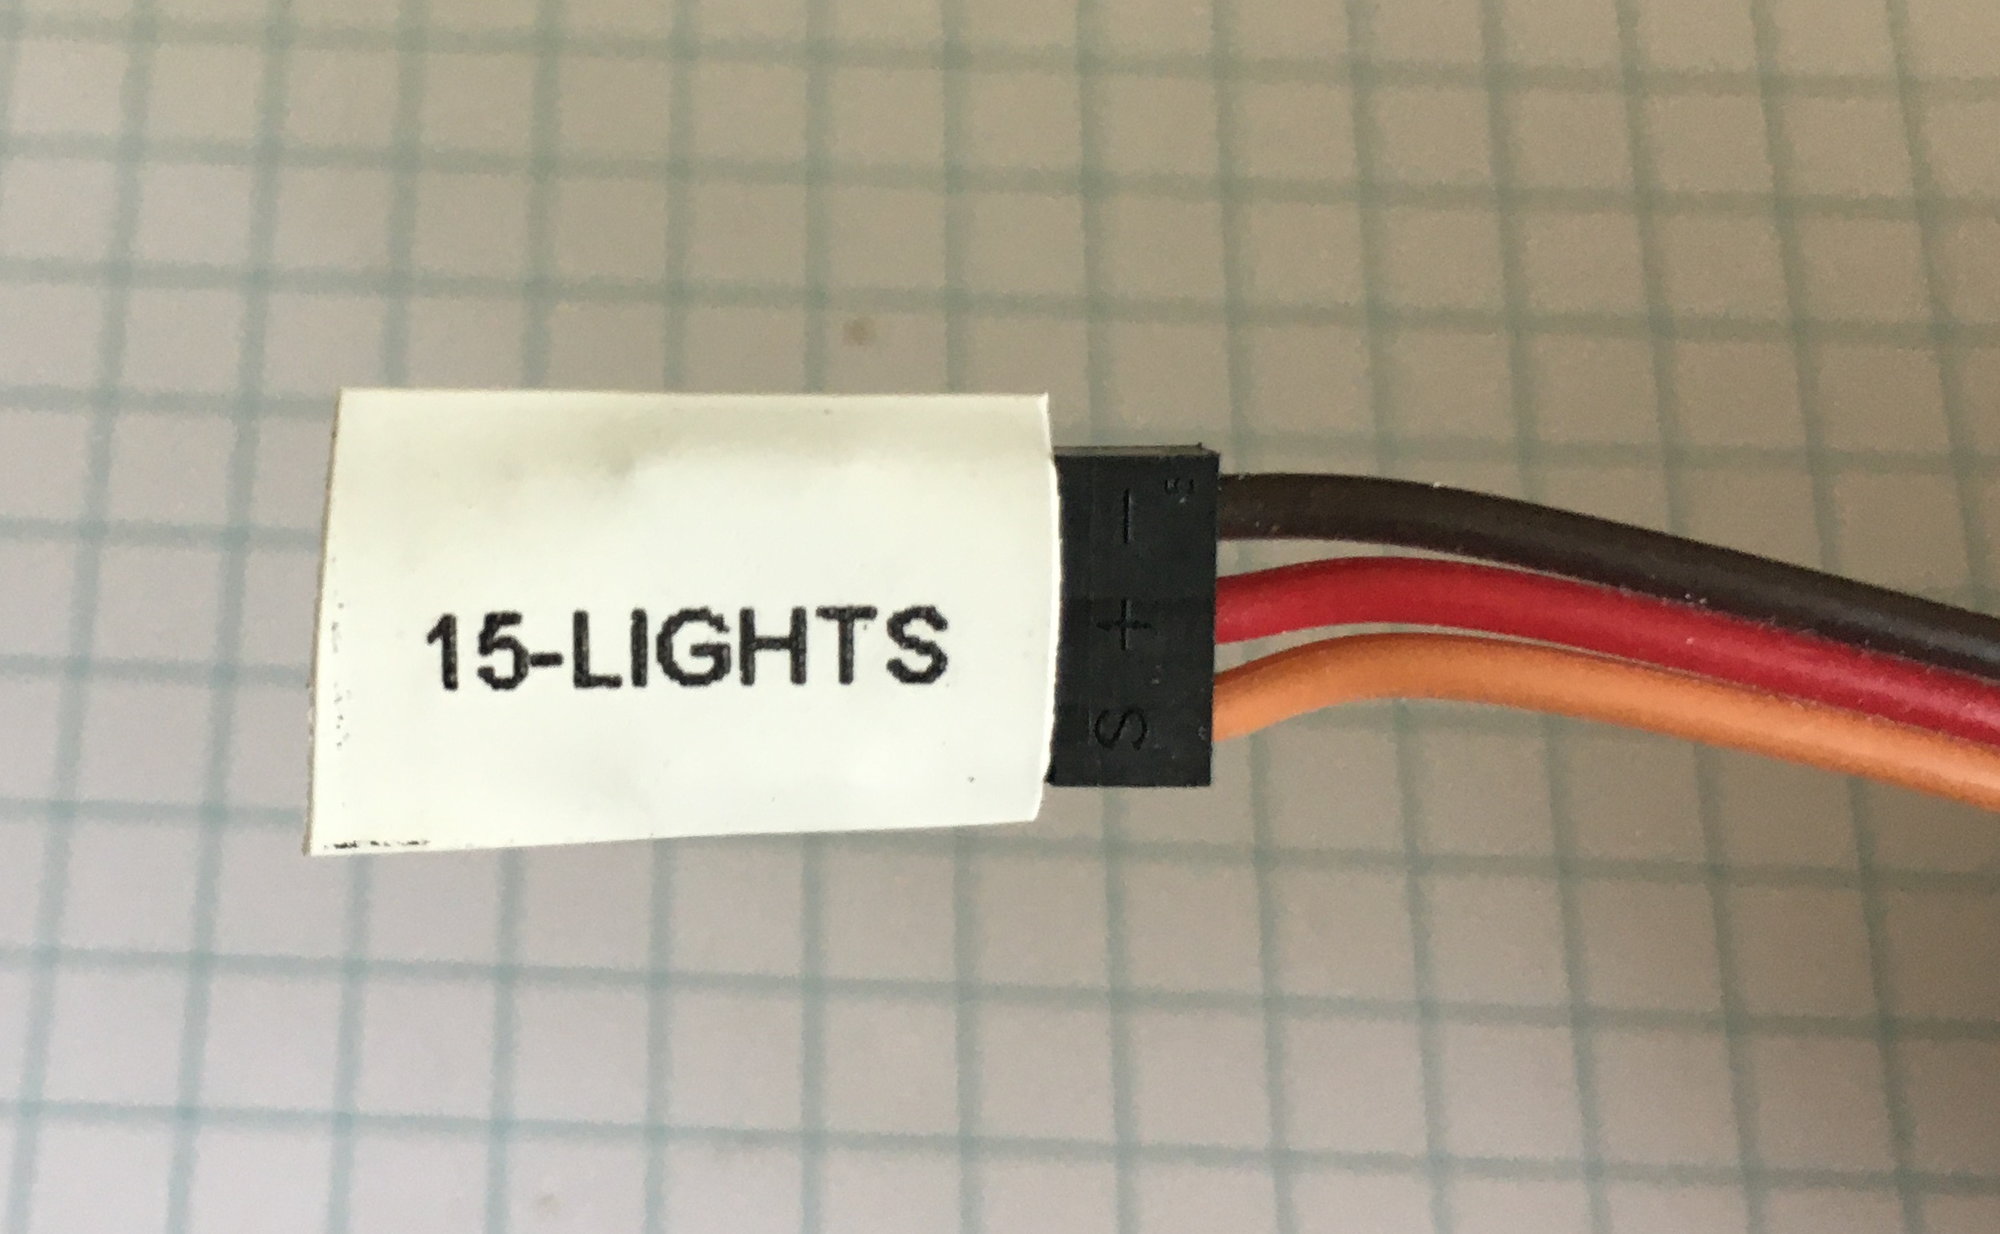
Servo Wire Marking
We've all had the problem of figuring out which servo wire is which (particularly at the Rx). Some guys use masking tape around the wires to mark them but that doesn't necessarily look great. A buddy found a solution to this problem and recommended it to me and I heartily agree.
Meet the Dymo Rhino 4200 which prints on high shrink white heat shrink tubing. Once you print on the tubing (in a variety of fonts and sizes), you can cut the tubing and it fits over a female or male JR connector yet shrinks down to the servo wire.
The unit and tubing are shown below and are available on Amazon for about $50-$60.


Regards,
Jim
We've all had the problem of figuring out which servo wire is which (particularly at the Rx). Some guys use masking tape around the wires to mark them but that doesn't necessarily look great. A buddy found a solution to this problem and recommended it to me and I heartily agree.
Meet the Dymo Rhino 4200 which prints on high shrink white heat shrink tubing. Once you print on the tubing (in a variety of fonts and sizes), you can cut the tubing and it fits over a female or male JR connector yet shrinks down to the servo wire.
The unit and tubing are shown below and are available on Amazon for about $50-$60.
Regards,
Jim
Last edited by rcjets_63; 10-15-2022 at 06:31 PM.
The following users liked this post:
shrek514 (10-15-2022)
10-15-2022, 06:28 PM
#228
It's getting late and I'm tired so I will pick this up tomorrow morning.
I want to add posts about
- main retracts and doors
- hinging the doors and workaround for excess glue
- door warpage and linkages
- reinforcing the closeout at the rear of the fixed wing (in front of the flaps & ailerons)
- canopy hold downs
Good night,
Jim
I want to add posts about
- main retracts and doors
- hinging the doors and workaround for excess glue
- door warpage and linkages
- reinforcing the closeout at the rear of the fixed wing (in front of the flaps & ailerons)
- canopy hold downs
Good night,
Jim
Last edited by rcjets_63; 10-15-2022 at 06:31 PM.
The following users liked this post:
shrek514 (10-15-2022)
 10-16-2022, 01:03 PM
#230
The Tucano canopy is quite large and I haven't been too thrilled with the various methods used to hold the canopy down on similar models. I've seen canopies lost in flights, or the use of socket head screws (which require a ball driver to open/close than playing around with a ball driver near a spinning prop didn't seem like a good idea.
As such, I used a couple of pieces of 1/8" carbon fibre pins and Hysol'd them to the canopy frame, rounded the ends, and drilled 1/8" holes in the fuselage to accept the pins.
At the mid-point of the canopy, I Hysol'd two 1/2" long pieces of G10 plates to the canopy frame and cut two slots in the fuselage (just outside the front cockpit) to receive the plates. Don't forget to add these plates as they prevent the canopy from bowing outwards and potentially coming loose.
For the back of the canopy, I Hysol'd two BVM hatch latches glued into the rear fuselage and Hysol'd the two little carbon receivers (that come with the hatch latch) to the canopy frame.


That's it, in 200+ flights, I've never had a canopy issue nor have I had to frig with a ball driver to get the canopy on or off.
Regards,
Jim
As such, I used a couple of pieces of 1/8" carbon fibre pins and Hysol'd them to the canopy frame, rounded the ends, and drilled 1/8" holes in the fuselage to accept the pins.
At the mid-point of the canopy, I Hysol'd two 1/2" long pieces of G10 plates to the canopy frame and cut two slots in the fuselage (just outside the front cockpit) to receive the plates. Don't forget to add these plates as they prevent the canopy from bowing outwards and potentially coming loose.
For the back of the canopy, I Hysol'd two BVM hatch latches glued into the rear fuselage and Hysol'd the two little carbon receivers (that come with the hatch latch) to the canopy frame.
That's it, in 200+ flights, I've never had a canopy issue nor have I had to frig with a ball driver to get the canopy on or off.
Regards,
Jim
The following users liked this post:
shrek514 (10-16-2022)
10-16-2022, 01:56 PM
#231
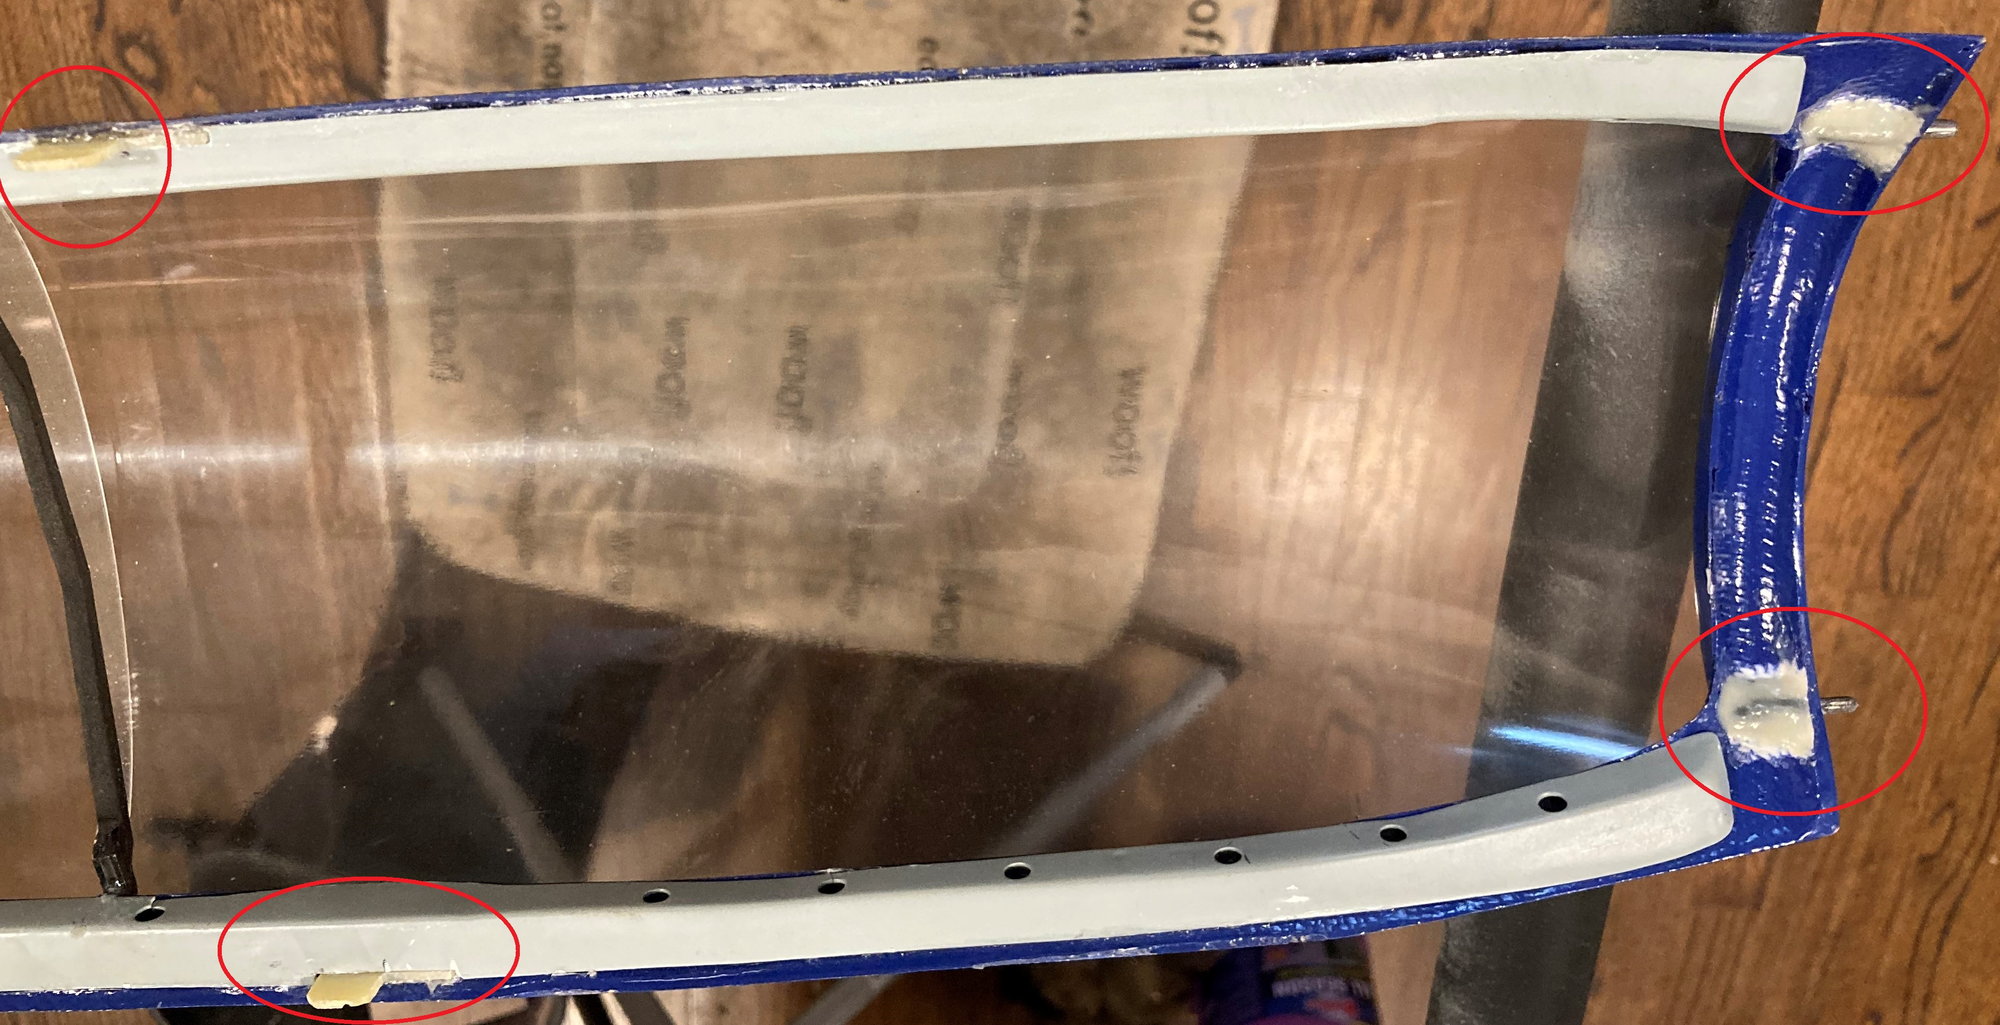
Wing Rear Closeout
This is a major issue with my kit (but hopefully not yours). The rear closeout (sort of like a wing spar) at the rear of the fixed portion of the wing (in front of the flap) has cracked.
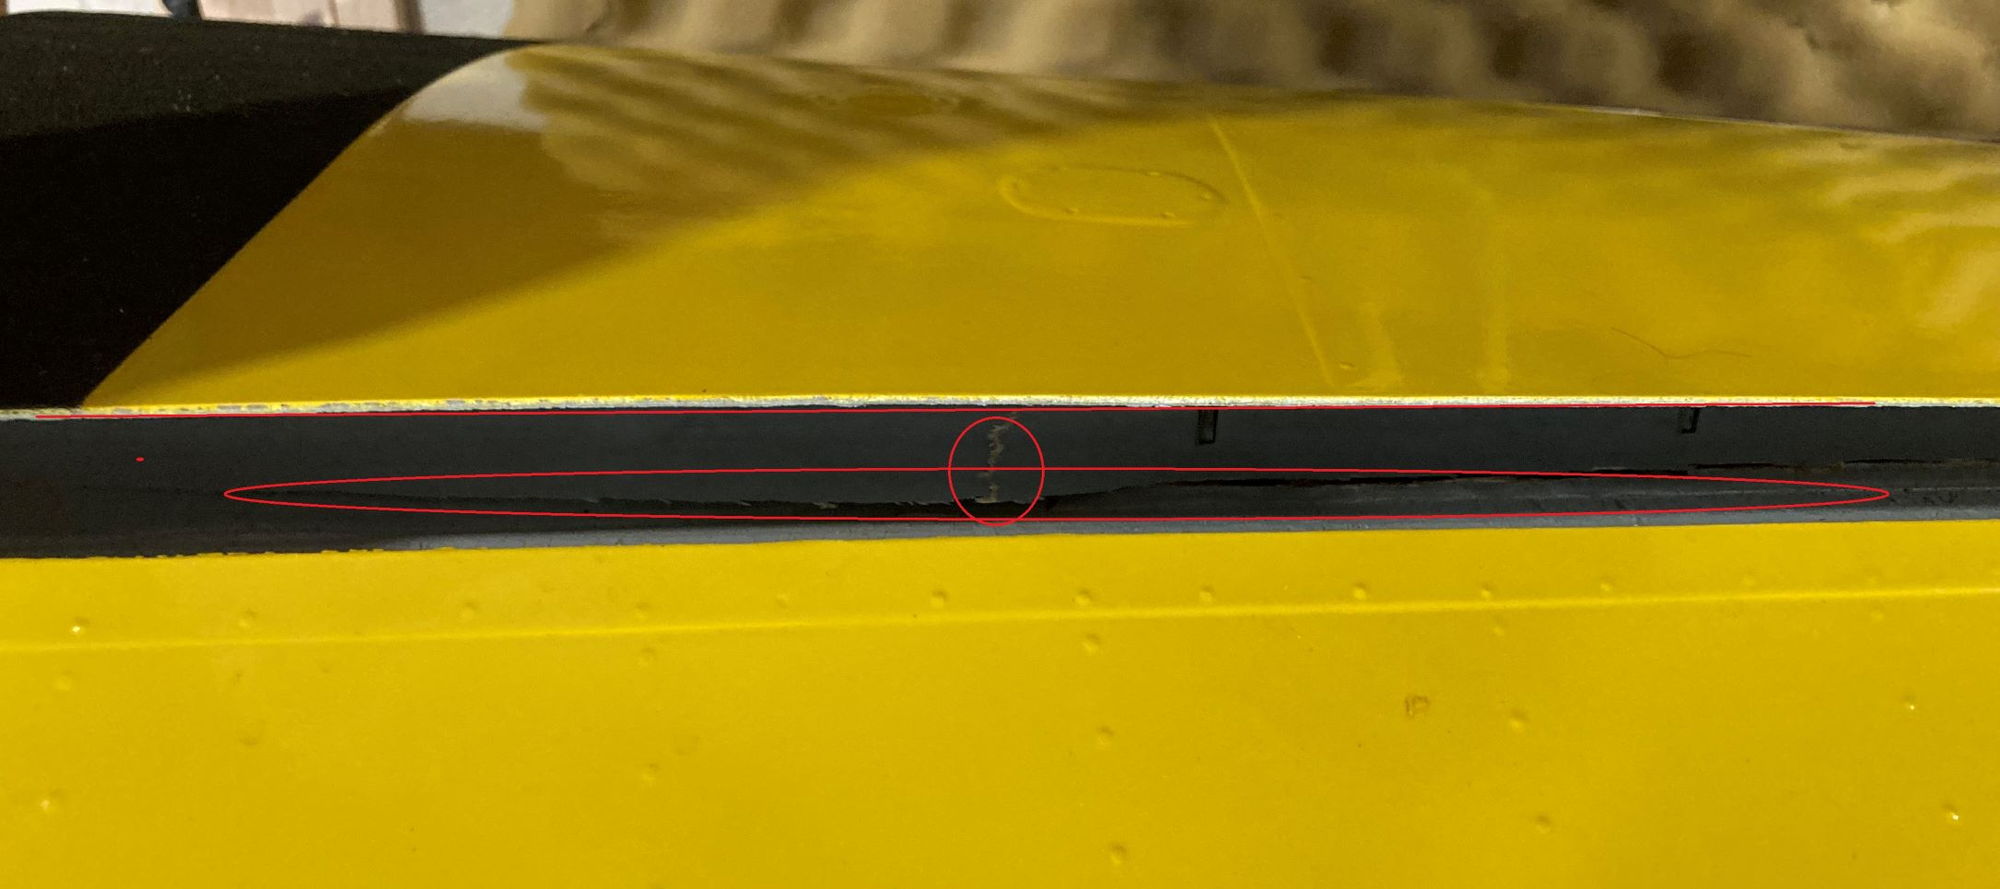
It's tough to see in the photo which gives a view looking forward into the rear of the wing (with the flap down). The two red ellipses indicate the cracks. The top wingskin begins to curve upwards. The top red line is actually a straight line and you see that the top wingskin is bowed slightly upwards.
The solution is use CA glue to repair the cracks and then to cut two strips of 4oz fiberglass cloth approximately 5/8" wide x the length of the flap to reinforce the area. When glassing the lower piece, you will want to position the edge of one strip just forward of the flap live hinge (don't get resin into the hinge) and extending forward and up the closeout. After you have glassed the lower piece into position, glass the second strip to the upper wingskin and down the closeout so that it overlaps the first strip and forms a "C" shape as indicated by the red line in the below pic.
I found that both of my wings had developed cracks in this area and needed to be repaired.
Regards,
Jim
This is a major issue with my kit (but hopefully not yours). The rear closeout (sort of like a wing spar) at the rear of the fixed portion of the wing (in front of the flap) has cracked.
It's tough to see in the photo which gives a view looking forward into the rear of the wing (with the flap down). The two red ellipses indicate the cracks. The top wingskin begins to curve upwards. The top red line is actually a straight line and you see that the top wingskin is bowed slightly upwards.
The solution is use CA glue to repair the cracks and then to cut two strips of 4oz fiberglass cloth approximately 5/8" wide x the length of the flap to reinforce the area. When glassing the lower piece, you will want to position the edge of one strip just forward of the flap live hinge (don't get resin into the hinge) and extending forward and up the closeout. After you have glassed the lower piece into position, glass the second strip to the upper wingskin and down the closeout so that it overlaps the first strip and forms a "C" shape as indicated by the red line in the below pic.
I found that both of my wings had developed cracks in this area and needed to be repaired.
Regards,
Jim
Last edited by rcjets_63; 10-16-2022 at 01:58 PM.
10-26-2022, 06:58 AM
#232

My Feedback: (21)
Join Date: Aug 2005
Location: EdmontonAB, CANADA
Posts: 571
Likes: 0
Received 0 Likes
on
0 Posts
Hi ,
Brakes used are XICOY Electric Brakes FT 36mm. Power supply LiPo 2S : https://www.xicoy.com/catalog/produc...roducts_id=477
Didier and I manage the gears / doors / brakes with Digitech CRU, which is fully interfaced with JETI transmiter : https://www.digitech-aerosports.nl/p...uplex-2-4-jeti
St�phane
10-27-2022, 06:10 AM
#233

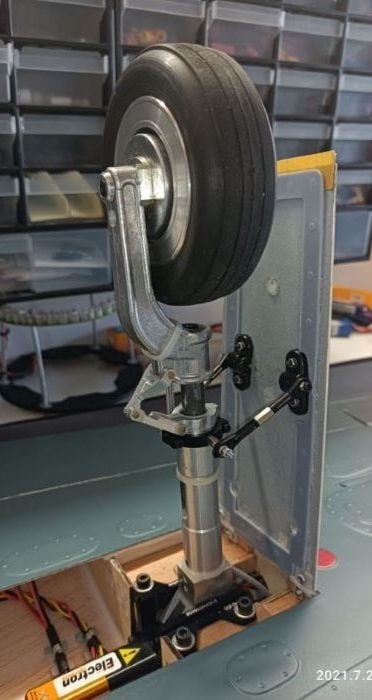
They are the stock wheels, axles and legs as bought from Juniaer in 2019.
By memory, no particular problems to disassemble them (just unscrew the bolt that maintain the wheel axle).
May be parts are slightly different now�
St�phane
By memory, no particular problems to disassemble them (just unscrew the bolt that maintain the wheel axle).
May be parts are slightly different now�
St�phane
12-29-2022, 07:24 AM
#235
My Feedback: (50)
I ran into that problem also so I made a custom fiberglass tank to fit between the spar and the steering servo and will use the rear stock tank for smoke if i decide to add it
also made the front tank larger so i could get more flight time with my xicoy tp45 can now hold 1850 ML
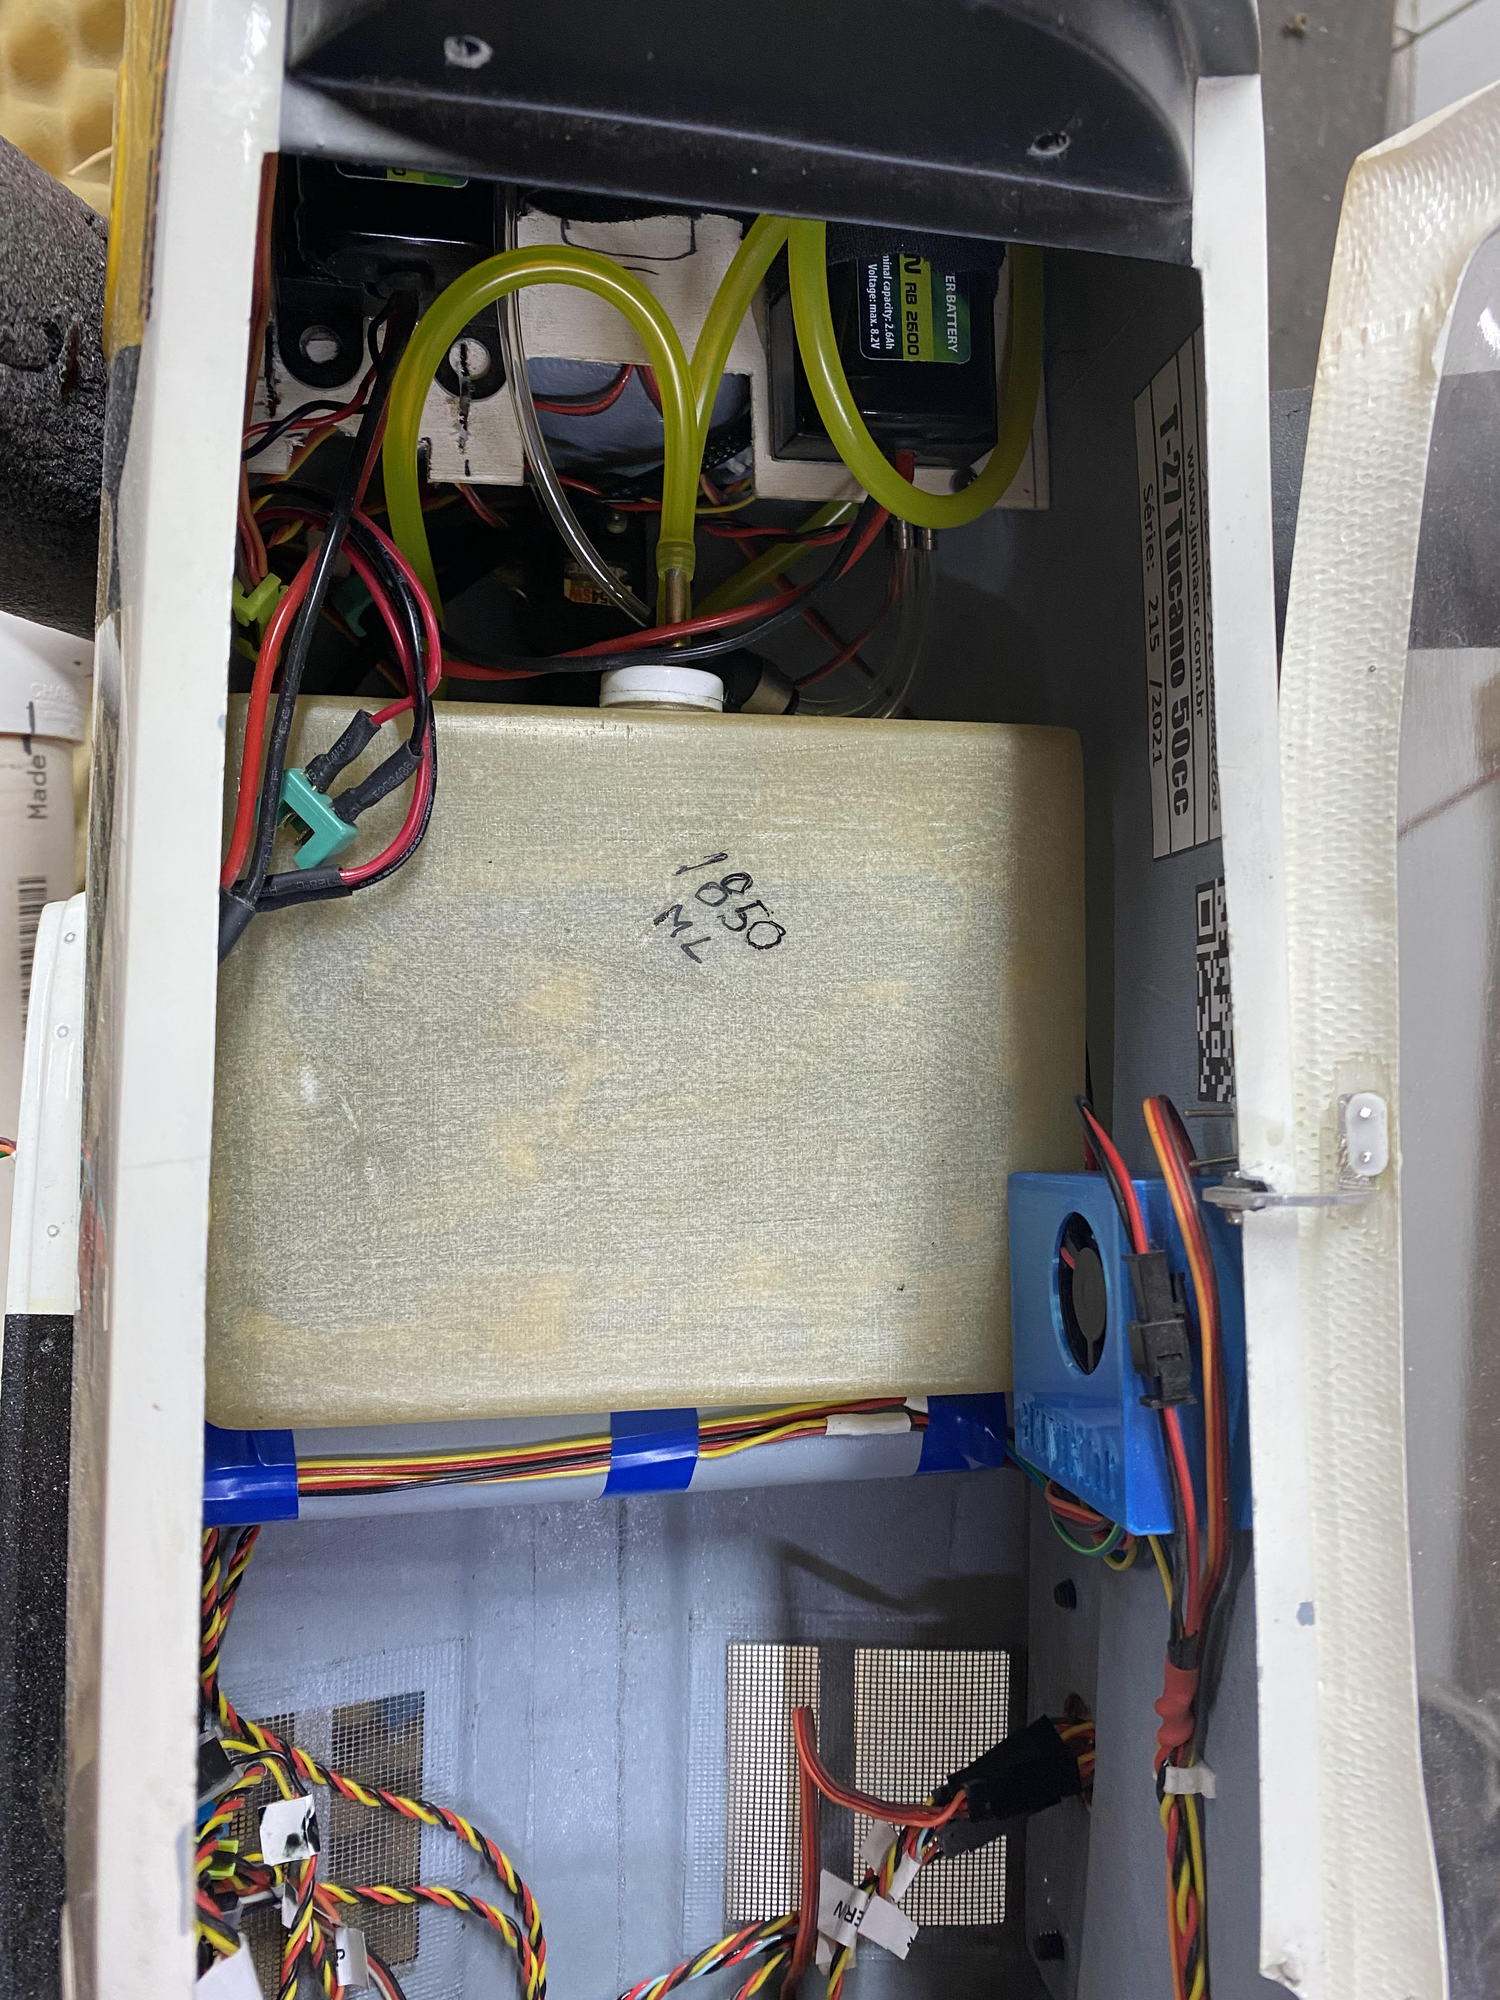
also made the front tank larger so i could get more flight time with my xicoy tp45 can now hold 1850 ML
01-01-2023, 10:21 AM
#237

Hello, here the Kevlar tank for this fantastic model:
https://cmjets.com/109-juniaer
BR from Spain.
Carlos
CMJETS.com
https://cmjets.com/109-juniaer
BR from Spain.
Carlos
CMJETS.com
01-11-2023, 07:16 AM
#238
My Feedback: (21)
Join Date: Aug 2005
Location: EdmontonAB, CANADA
Posts: 571
Likes: 0
Received 0 Likes
on
0 Posts
Hello, here the Kevlar tank for this fantastic model:
https://cmjets.com/109-juniaer
BR from Spain.
Carlos
CMJETS.com
https://cmjets.com/109-juniaer
BR from Spain.
Carlos
CMJETS.com
Anyway I will contact you for the size I need
 01-16-2023, 05:54 PM
#240
My Feedback: (21)
Join Date: Aug 2005
Location: EdmontonAB, CANADA
Posts: 571
Likes: 0
Received 0 Likes
on
0 Posts
Not really - but I can fit a small 24oz dubro tank under the tray which should be enough. Or make a more complex non-rectangular tank. The stock tank is way too small for sure.
01-16-2023, 11:49 PM
#241
The solution, a tank with the exact shape of the place, 2.5L of capacity. Thanks to Darren Waters for the info.
In short the new tank available in CMJETS.com.
Thansk
Carlos
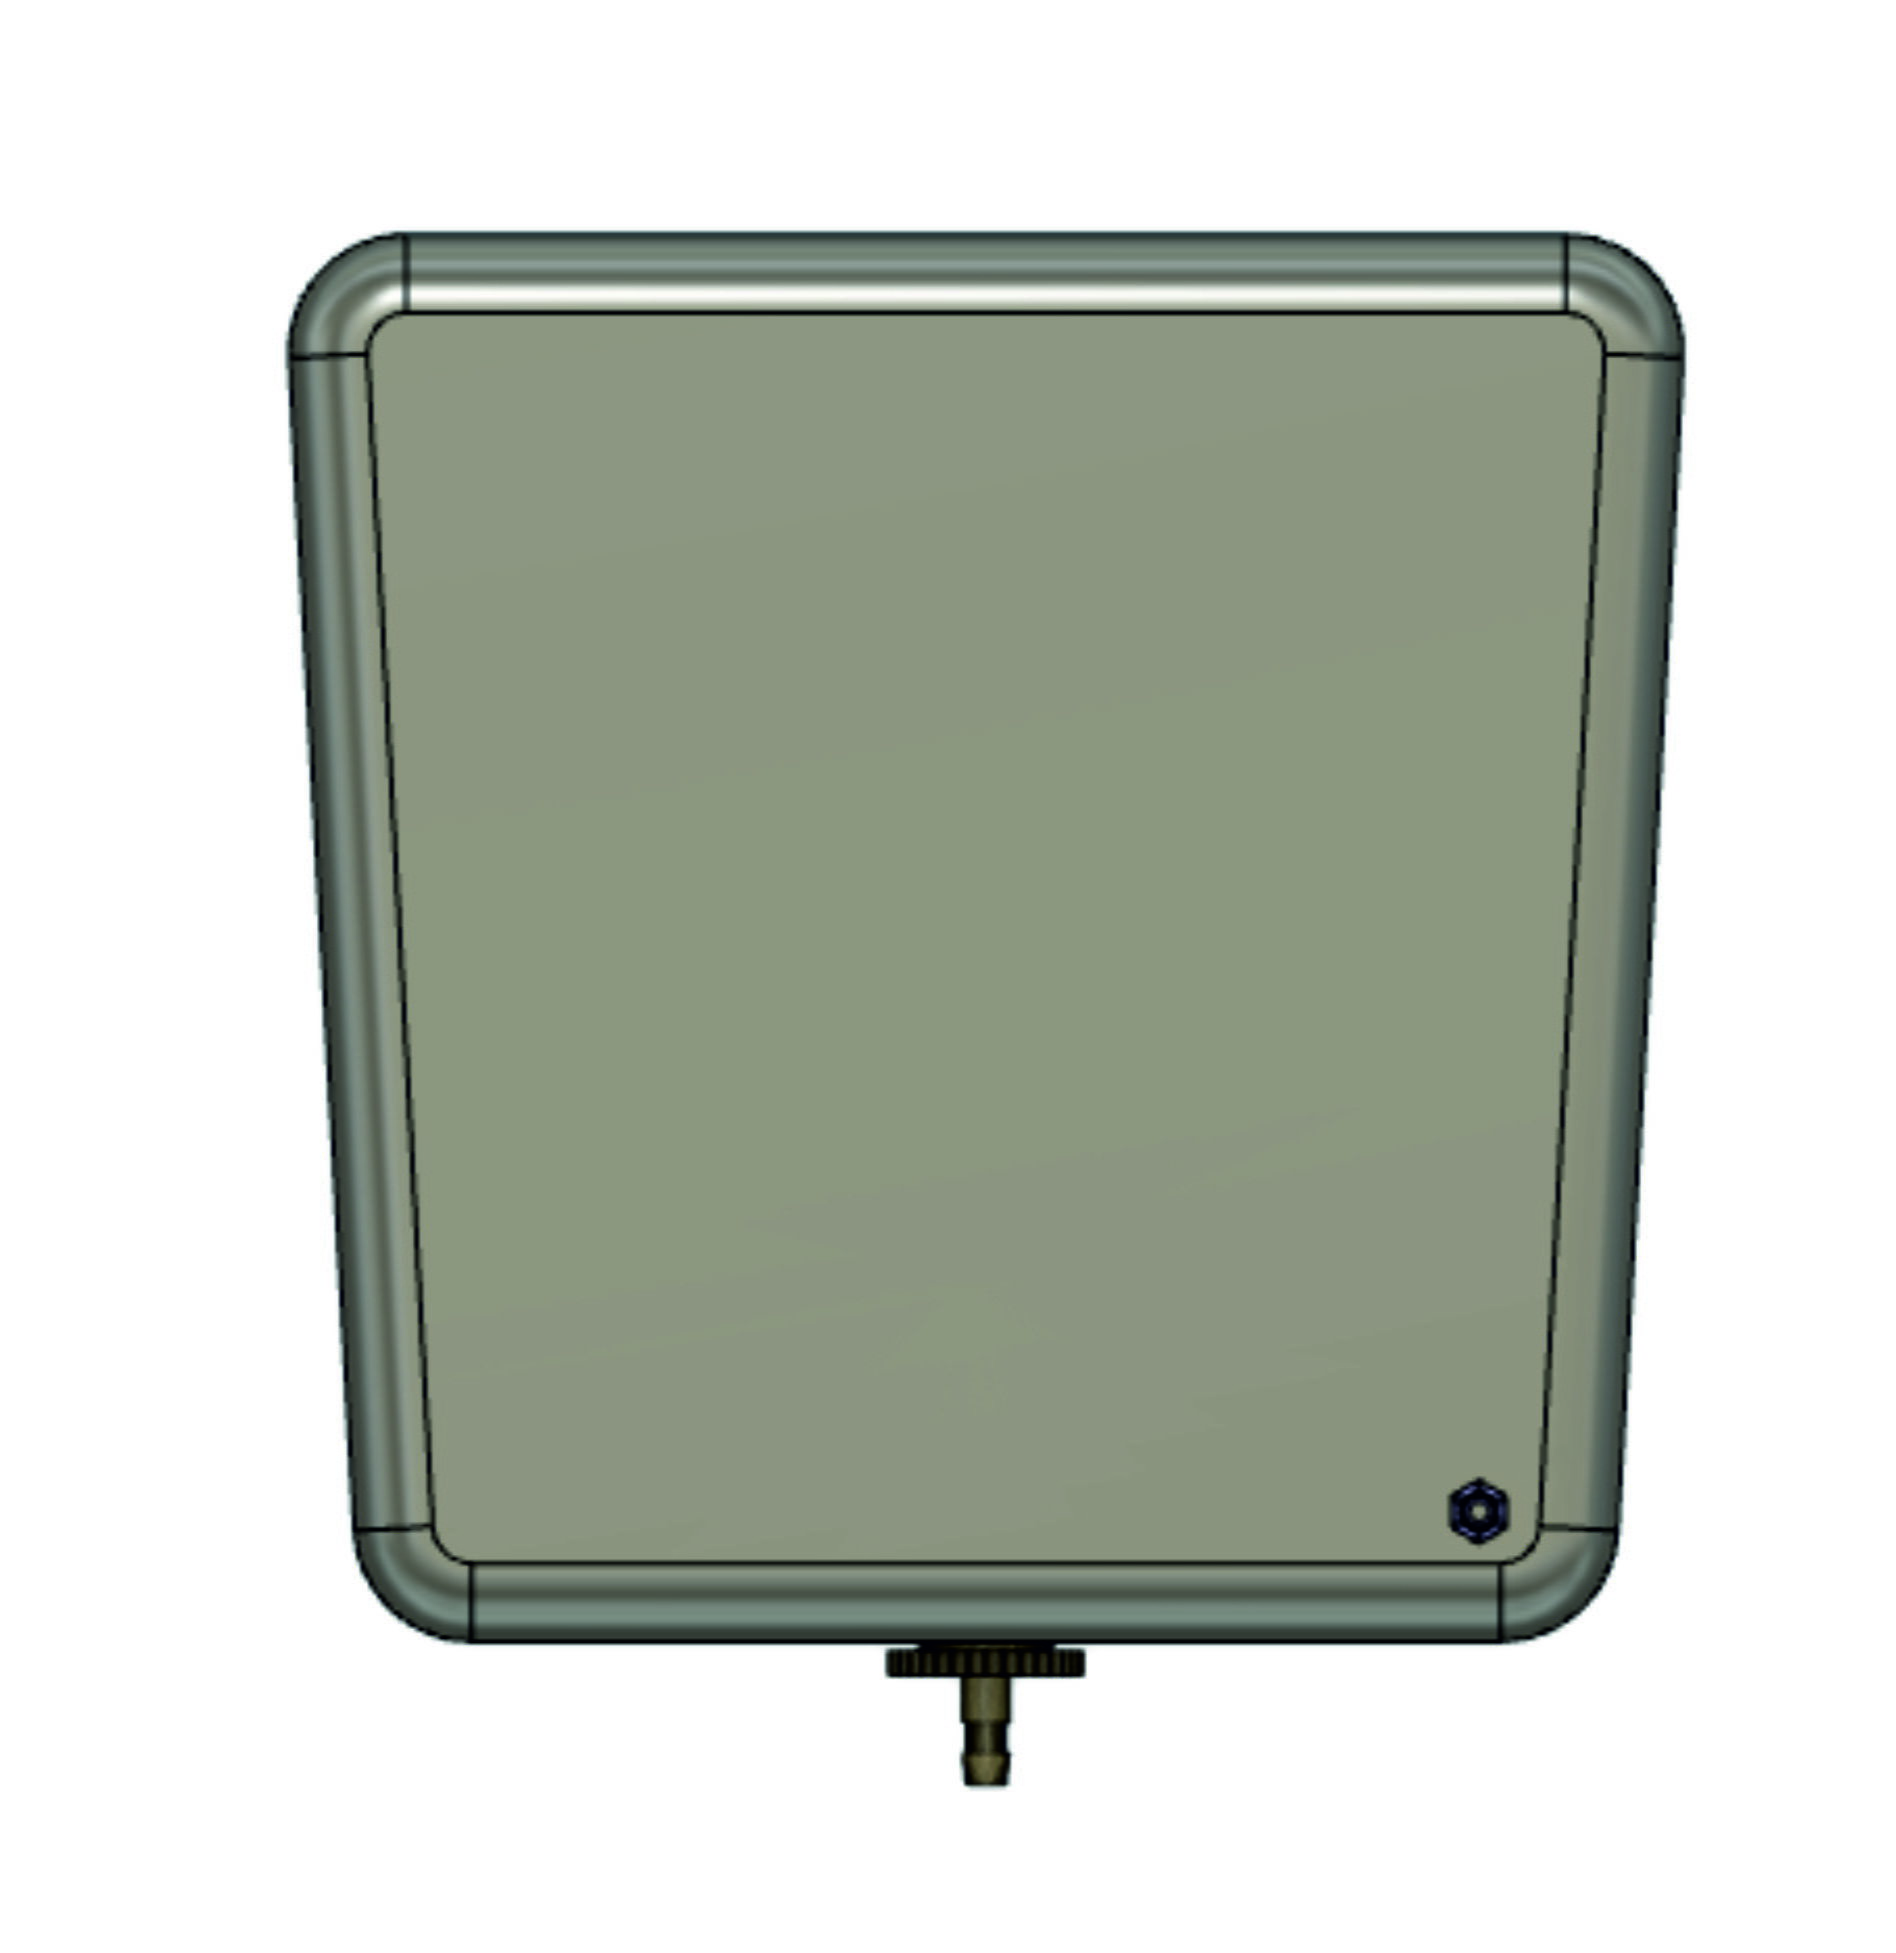


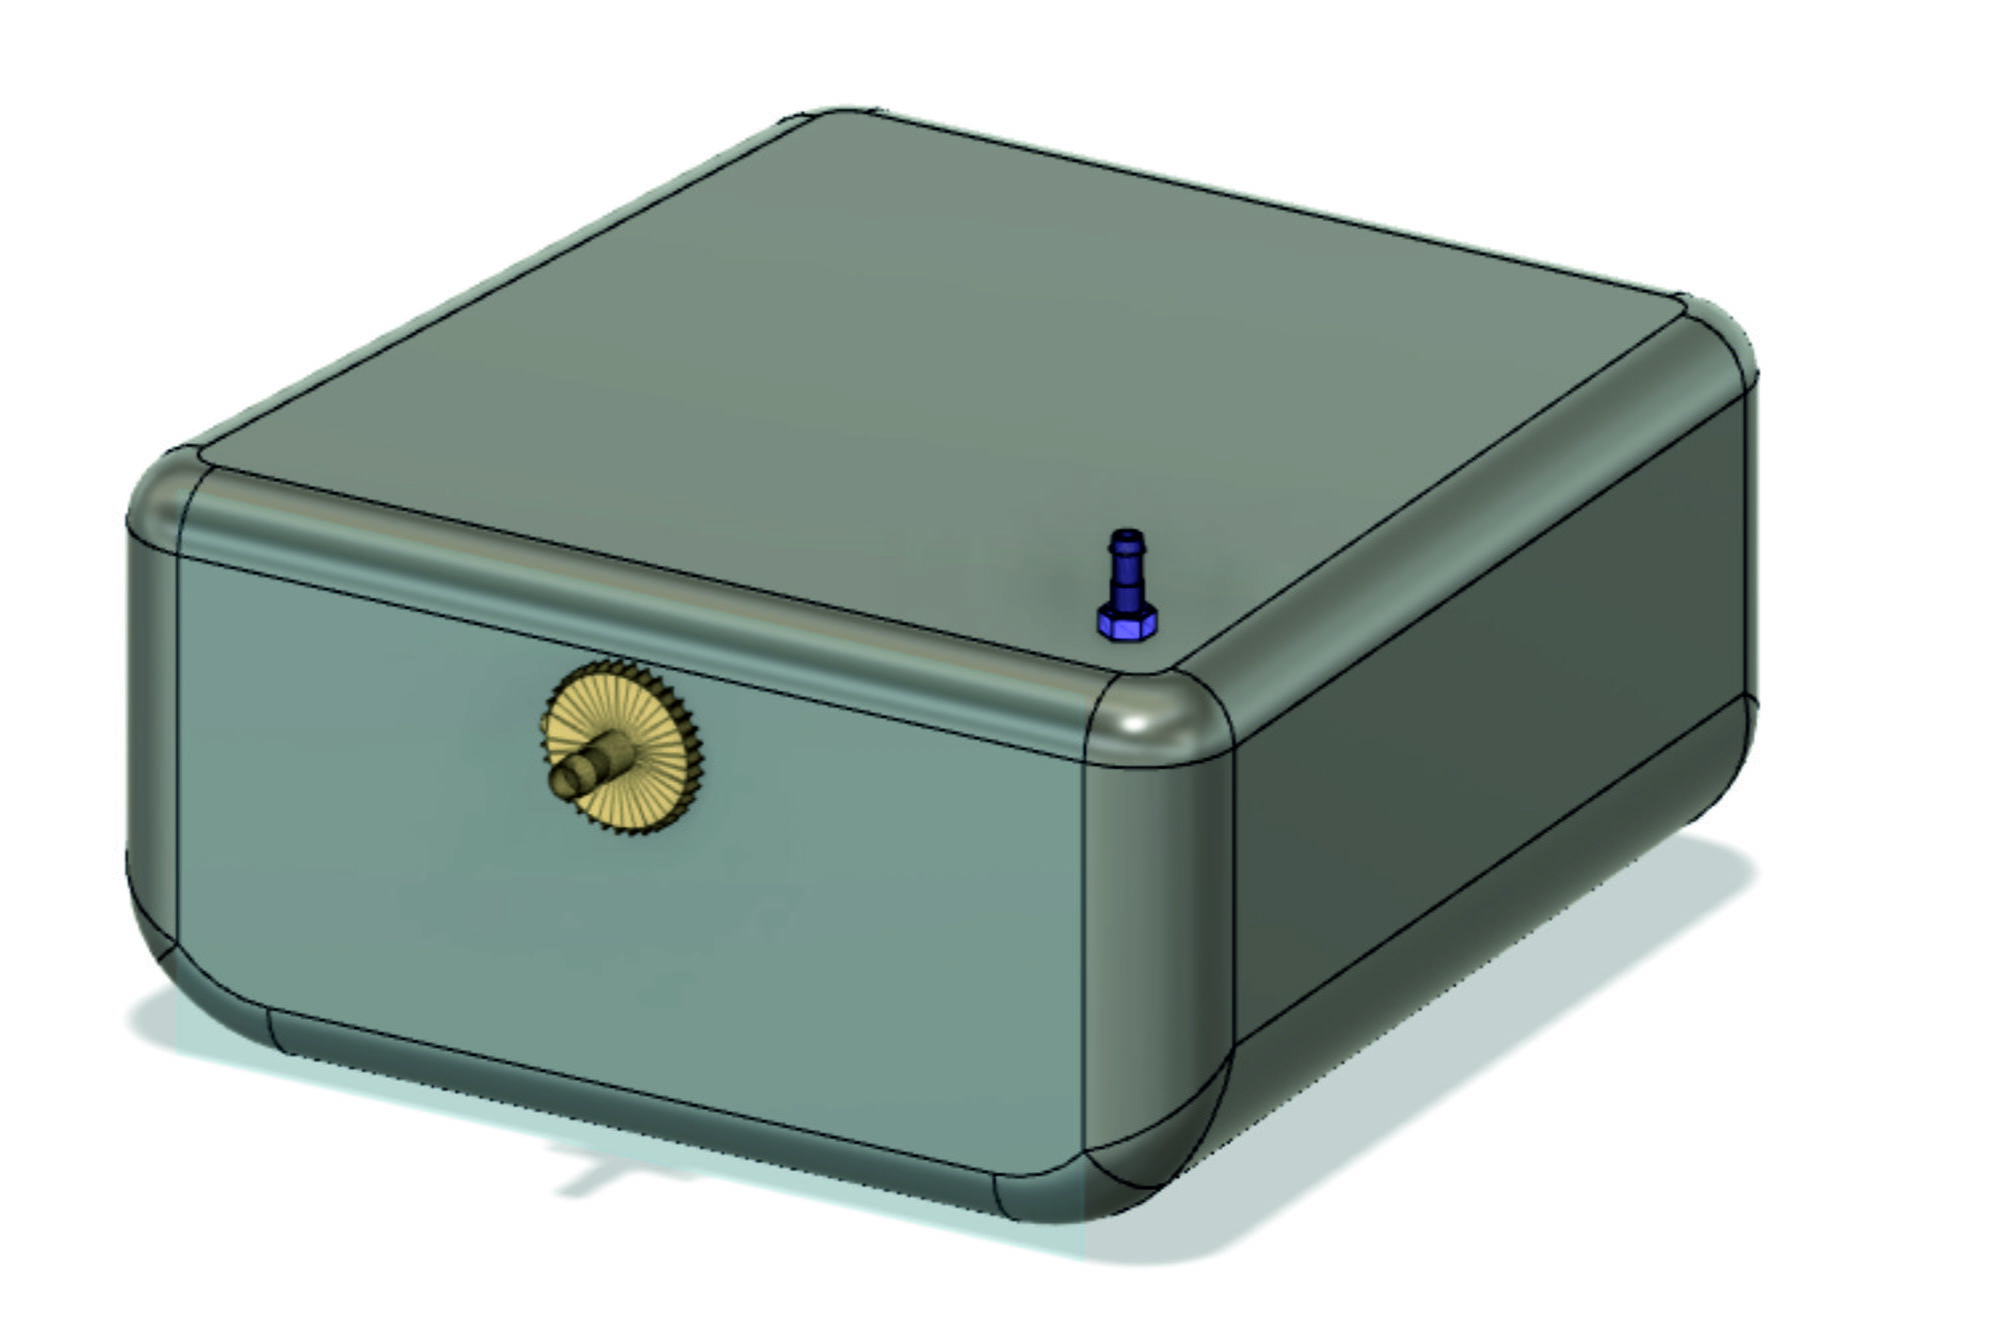
In short the new tank available in CMJETS.com.
Thansk
Carlos
Last edited by cmjets; 01-17-2023 at 01:16 AM.
01-22-2023, 08:20 AM
#242
My Feedback: (21)
Join Date: Aug 2005
Location: EdmontonAB, CANADA
Posts: 571
Likes: 0
Received 0 Likes
on
0 Posts
This shape looks great. Can you confirm the dimensions Carlos? On your site it says it is 26cm long - I have no more than 15cm room in front of my wing tube. Is this designed for in front of or behind the wing tube? And is this for the small Tucano or the new Super Tucano?
04-23-2023, 11:16 PM
#243

Join Date: Sep 2005
Location: Frankfurt, GERMANY
Posts: 30
Likes: 0
Received 0 Likes
on
0 Posts
Hello,
I�m interestet of this beauty.
Can you tell me, if you need extra weight in the nose for ballancing?
If yes I thing about installing a Kingtech K60TP, it is 600g heavier as the K45TP.
Best regards
Thomas
I�m interestet of this beauty.
Can you tell me, if you need extra weight in the nose for ballancing?
If yes I thing about installing a Kingtech K60TP, it is 600g heavier as the K45TP.
Best regards
Thomas
04-23-2023, 11:20 PM
#244
Senior Member
No extra weight. I have even my rudder servo in the tail.
the K45TP is already a tight fit. I don�t think the K60TP will fit and/or dissipate heat properly enough.
the K45TP is already a tight fit. I don�t think the K60TP will fit and/or dissipate heat properly enough.
04-24-2023, 05:41 AM
#245
IMHO, trying to install a K60TP would be a bad idea. First of all, it wouldn't fit (without substantial modifications), secondly at 454g/lb you would have essentially have 1-1/3 lbs of extra nose weight which you would have to balance, thirdly, your would need extra fuel (which is more weight), and finally fourthly, you would likely have enough power to blow the wings off the plane. I fly mine at half power and only go to full power at take-off or in a substantial up line.
If you want a fire-breathing dragon of a turbo prop, might I suggest the Skymaster (avail from BVMjets.com) PC-21 with a Kingtech 100TP. I had my Tucano flying at Bob Belluomini's event a couple of Octobers ago. OMG, the PC-21 was amazing. It was incredibly fast, sounded fantastic, and damn near blew the doors off of everything at the event. Now that I had put about a 100+ flights on my Tucano, I was "Jonesing" to magically trade the Tucano for one of these 100TP PC-21's. It was seriously that impressive.
Regards,
Jim
04-24-2023, 08:07 AM
#246
Join Date: Sep 2005
Location: Frankfurt, GERMANY
Posts: 30
Likes: 0
Received 0 Likes
on
0 Posts
Thanks for your reply
ok I will use a Xicoy TP
Is the scale landinggear from Jonny strong enough for rough gras airfild or better use the JP Hobby gear?
https://www.jphobby.eu/en/struts-set...ontroller.html
or maybe the scale struts will fit to JP Retracts?
Best regards
Thomas
ok I will use a Xicoy TP
Is the scale landinggear from Jonny strong enough for rough gras airfild or better use the JP Hobby gear?
https://www.jphobby.eu/en/struts-set...ontroller.html
or maybe the scale struts will fit to JP Retracts?
Best regards
Thomas
Last edited by mcr01; 04-24-2023 at 11:46 AM.
05-27-2023, 02:31 PM
#247
My Feedback: (1)
Join Date: May 2005
Location: SAN ANTONIO,
TX
Posts: 40
Likes: 0
Received 0 Likes
on
0 Posts
I finally got my Tucano maidened today, very nice flying model!
Some observations/impressions I have so far.
I Have mine set up with a HK RotoMax 50cc and their TP 3-bladed prop, way too much power on 12s, I flew at 50% for most of the flight albeit too short (3-4 min) but the plan is to install a KT or Xicoy TP since I'm a AMA Turbine Waivered pilot and mostly fly turbines it's a no brainer for me.
I CG'd at the factory recommend location, I had to add some down elevator trim since it wanted to climb. Aileron trim was not needed.
Flaps are VERY effective!! Wants to float forever.
I set up my electronics to facilitate for turboprop conversion (I also have the Juniaer TP fuel tanks).
I do have a question for you guys with TP engines, what times are you getting with the Juniaer fuel tanks?
should I go with Xicoy or KT? Thanks in advance
05-27-2023, 04:05 PM
#248
My Feedback: (50)
I am using a xicoy tp45 in mine turning a 22x12 biela 3 blade prop,
had to cut down the power of the turbine to limit rpm to 6500 rpm, at full.power it went to 8900 rpm prop sounded like it was going to explode at that speed
i was afraid that the tip speed would be going past the speed of sound when it unloads,6500 rpm is very happy at that speed very fast
i did not use the stock fuel tank,i made a 1850 ml tank that gives me 12 mins flight time
The following users liked this post:
PaulD (09-15-2023)
05-28-2023, 01:05 AM
#249
Hi. IMHO one of the fuel cells that come with the kit is more than enough for a 45 drive train. Capacity is about 1,4 ltr which gives you easily 10min of flight time plus ample reserves.
I don�t see the need for a larger engine at all! Got the Xicoy45LR installed, Biella 20x14. Max RPM 7500 limited by ECU, which is absolutely fine. Ample power & dead quiet.
I use Johnny struts with Electrons & Xicoy wheels with electric brakes. Works just fine. Didier did a cool conversion (he retrofitted the orginal scale wheels with elec. brakes).
Factory CG didn�t give me the feel I was looking for. Moved it forward by about 10mm. Now it�s less lively on pitch which I prefer. Still a very capable set-up imho.
The following users liked this post:
PaulD (09-15-2023)
01-30-2024, 03:54 PM
#250
My Feedback: (32)
Join Date: Feb 2002
Location: Tewksbury,
MA
Posts: 400
Likes: 0
Received 0 Likes
on
0 Posts
Hi All,
I�ve had this model for a while, but just finished enough other stuff to finally get to it! Looking at the landing gear mounting, it does not appear that I can get to the backside of the hardwood mounts to place captive nuts. Is that correct? Is the gear secured with wood screws?
Also, what is the best source for the linkage bits I�ll need for the gear doors?
John