


Foamie jet for X45/K45 ?
 07-13-2020, 10:16 PM
#126

My Feedback: (30)
I enjoy looking at some of the conversions to foam airplanes guys are doing but curious why more folks haven’t converted some old DF birds...other than relatively inexpensive cost of foam birds. Especially when you think about the early turbines weighing twice as much if not more than the X45 and putting out roughly same thrust.
A Harlock with retracts is ~ 1000 shipped before anything goes into it
I sold a JHH A-7 for a song 2 years ago ... wish I hand not done that now they've said currently unavailable for years
 07-13-2020, 10:28 PM
#127
My Feedback: (30)
I converted a old BVM F86 to small turbine power and it flew very well. I removed all the old heavy formers that were needed for the OS91/Ramtec fan and was amazed how much lighter the jet was! Generally, anything that flew with a 91 IC engine or a 90-120mm EDF willf fly with a 10lb thrust turbine.
Looks like the 10 lbs motors in the tail will fly anything that's 15 lbs TOW and fly it well.
Saw a 76" long mirage whip around in the 130s minimum with a K45 in the tail and not fighting to get vertical either.
Just wish there were more 60 - 70 inch - ish scale fiberglass military models for these motors ... not a lot of choices right now.
07-14-2020, 02:06 AM
#128

Here is a new video of what we have been discussing, a relatively heavy L39 being flown well with a X45!
Edit, now this is strange! I have included the FB video link to the video, but it dissapears when I post it!!??
Edit, now this is strange! I have included the FB video link to the video, but it dissapears when I post it!!??
Last edited by Aussie1; 07-14-2020 at 02:13 AM.
07-14-2020, 08:33 AM
#129

I converted a old BVM F86 to small turbine power and it flew very well. I removed all the old heavy formers that were needed for the OS91/Ramtec fan and was amazed how much lighter the jet was! Generally, anything that flew with a 91 IC engine or a 90-120mm EDF willf fly with a 10lb thrust turbine.
The following users liked this post:
Aussie1 (07-14-2020)
The following users liked this post:
Aussie1 (07-14-2020)
08-15-2020, 07:32 AM
#131

The fuel system in these new smaller motors like the X45 is so small its easy to clog things so proper fuel filtering is important before it goes in the tank. 2nd people should also make a habit of cleaning the fuel tank with fuel and discarding it once clean when you build the model. This doesnt mean add more filters one filter in the system is plenty, one pump on the suction side between pump and tank or if you have to use a UAT then filter between UAT and pump. All UATs are essentially filters so keep that in mind as well and even consider putting something on the vent if possible. Probably the biggest reason for trash in the tank is sucking through the vent and do feel bad about over sizing your vent system.
So what should/ would we use in the vent line to stop this, also what happens inverted will fuel run out? Or clog
noob questions
thanks Doug
08-15-2020, 03:20 PM
#132

I don't do anything crazy, filter when it goes into the jug and filter from the jug to the jet and the supplied filter that comes with the motor. The UAT is just a bonus, its not meant to be a filter but when you use the MAPs like I do they are the same filters that are used in fuel filters. My orig post had a typo, I meant to say dont be afraid to over size your vents to help the motor breathe as well.
08-18-2020, 06:04 PM
#135
My Feedback: (20)
I just recently converted all my jets with fuel and smoke fittings to the Kent Systems quick coupling no drip fittings like the JM fittings. My friend Tim told me where to get them. They come 10 to a pack. I really like the positive shut off on disconnect.
Gary
KENT Systems: Quick Couplings | Tube Fittings | Media Bags
Gary
KENT Systems: Quick Couplings | Tube Fittings | Media Bags
Last edited by Viper1GJ; 08-19-2020 at 07:13 AM.

 08-18-2020, 10:36 PM
#137

There is a genuine market for filters designed to be on the vent side - something big enough for volumetric air to flow well without causing fuek tank cavitation yet traps out the dirt. Think different sizes as well to cater from small to high-flow turbine setups. Keith is correct that despite the best of fuel filtering, the one open source of impurity is from the fuel tank air vent.
08-19-2020, 12:26 AM
#138
There is a genuine market for filters designed to be on the vent side - something big enough for volumetric air to flow well without causing fuek tank cavitation yet traps out the dirt. Think different sizes as well to cater from small to high-flow turbine setups. Keith is correct that despite the best of fuel filtering, the one open source of impurity is from the fuel tank air vent.
08-19-2020, 04:48 AM
#139
Gary like to Kent fittings collection 4
Might also go with bulkhead female open flow for vent but need to think dirt enterance.
Probably use a male end cap also with flag for travel.
Bonus is I could do an equivalent setup to JM closed system.
My jet is using 4mm tube, charts think 5/32 barb .
Thanks Doug
Might also go with bulkhead female open flow for vent but need to think dirt enterance.
Probably use a male end cap also with flag for travel.
Bonus is I could do an equivalent setup to JM closed system.
My jet is using 4mm tube, charts think 5/32 barb .
Thanks Doug
08-19-2020, 07:13 AM
#140
My Feedback: (20)
Gary like to Kent fittings collection 4
Might also go with bulkhead female open flow for vent but need to think dirt enterance.
Probably use a male end cap also with flag for travel.
Bonus is I could do an equivalent setup to JM closed system.
My jet is using 4mm tube, charts think 5/32 barb .
Thanks Doug
Might also go with bulkhead female open flow for vent but need to think dirt enterance.
Probably use a male end cap also with flag for travel.
Bonus is I could do an equivalent setup to JM closed system.
My jet is using 4mm tube, charts think 5/32 barb .
Thanks Doug
I used mine on 1/8” and 3/16” OD Tygon.
Gary
Last edited by Viper1GJ; 08-19-2020 at 07:15 AM.
08-29-2020, 03:15 PM
#141
My Feedback: (20)
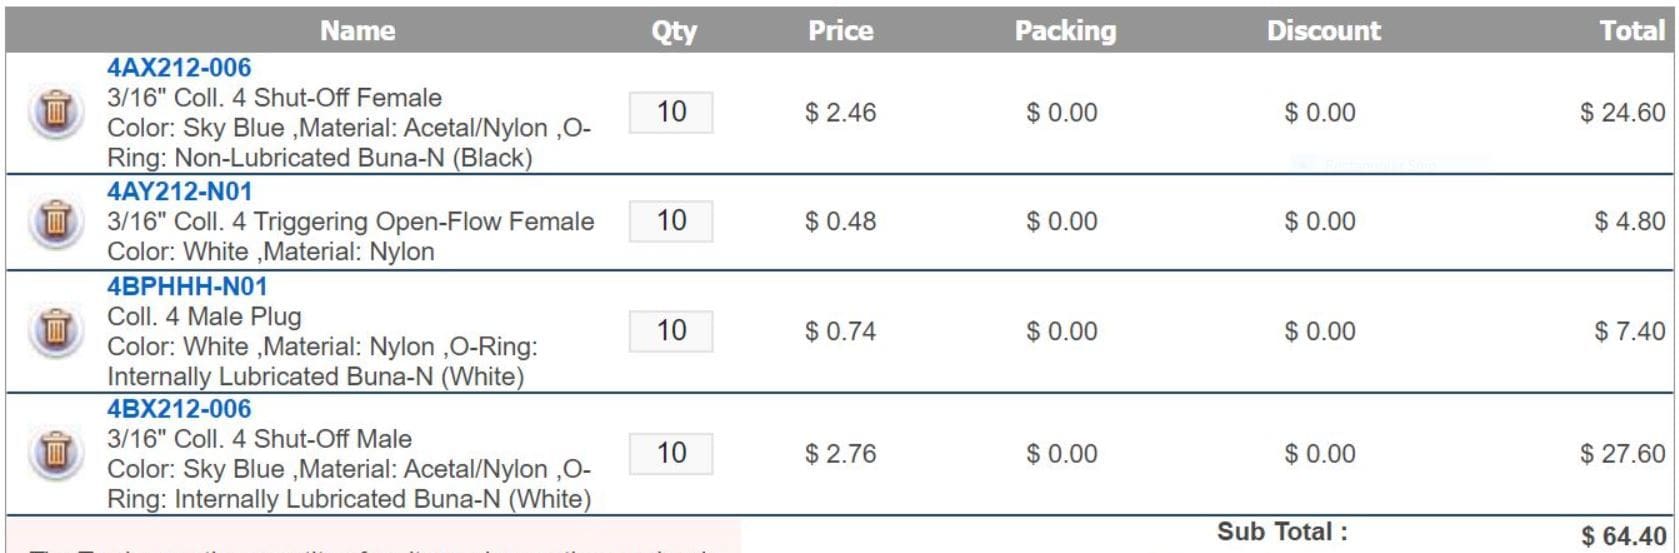
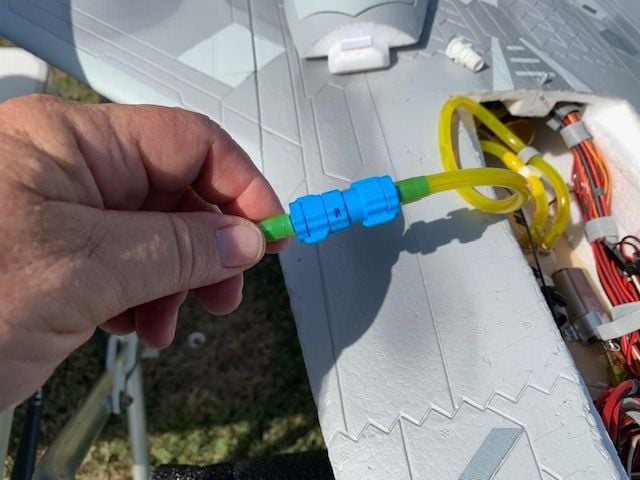
Here are my Kent Systems fittings as used in my FW F-22 with the K-45G3.
I took these photos last week as I was fueling the F-22 for a flight. I'm not sure what the "closed system" mentioned above refers to unless it is the fact that the fittings have a "twist locking" connection that holds them "closed" and also opens the internal ball shut off valve to allow fuel to flow through the connection. Thanks to my flying buddy TIm who showed me these fittings and where to get them. They are not completely drip free, but much better than the aluminum tubing plug I was using before.

In and out fittings from fuel jug. Fuel flows from left to right from pump back into the jug return line. The fitting seen below is just attached to a short length of tubing that I attach to the jet fuel vent. Then I connect the blue fitting to the jug return and allow the overflow fuel to flow back into the jug from the jet.

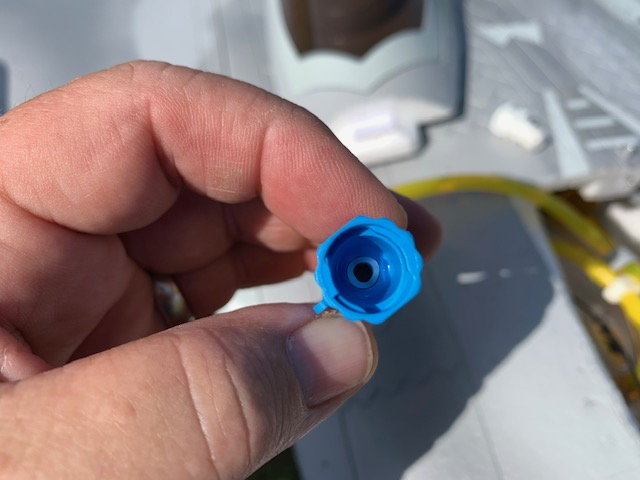
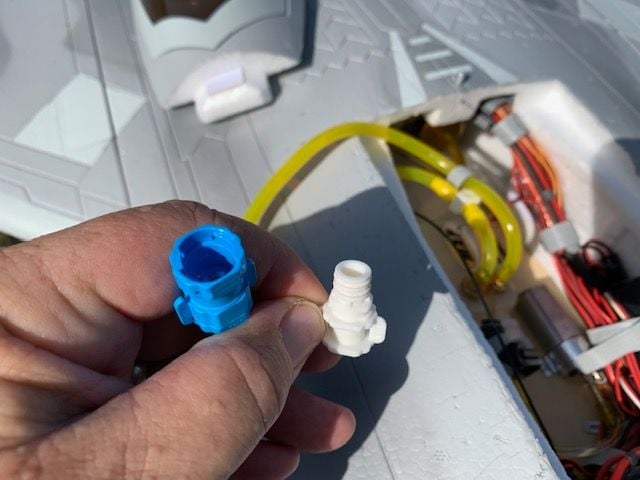
The fuel jug fittings disconnected. You can see the two "forks" in the blue fitting on the left side that are engaged when the fittings are twisted together and that is what opens the internal ball shutoff valve.
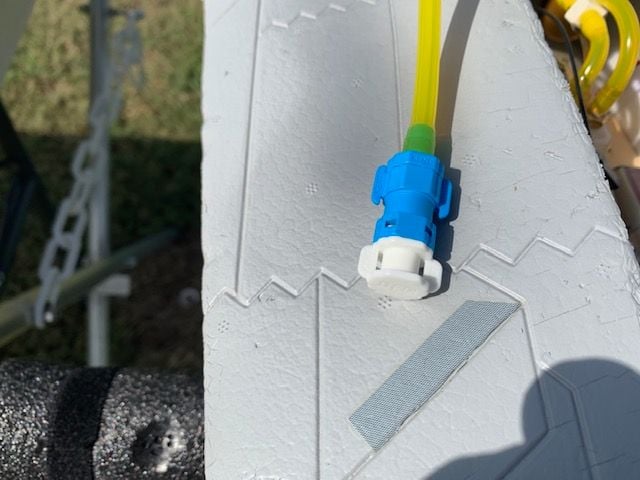
Aircraft fittings pulled out for fueling. The white part is just the cap.
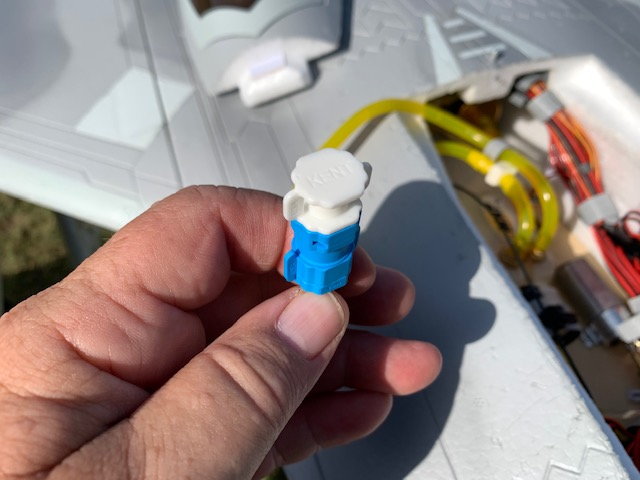
Cap removed showing the two internal "forks" that rotate the ball valve when connected.
Jug pump fitting ready to connect to the aircraft fitting.
Fittings connected and fuel flowing from left to right into the jet.
Jet full and fuel fitting ready to be capped with white cap.
Jet full, fitting capped.
Fittings stowed back in jet, ready to fly.
I took these photos last week as I was fueling the F-22 for a flight. I'm not sure what the "closed system" mentioned above refers to unless it is the fact that the fittings have a "twist locking" connection that holds them "closed" and also opens the internal ball shut off valve to allow fuel to flow through the connection. Thanks to my flying buddy TIm who showed me these fittings and where to get them. They are not completely drip free, but much better than the aluminum tubing plug I was using before.
In and out fittings from fuel jug. Fuel flows from left to right from pump back into the jug return line. The fitting seen below is just attached to a short length of tubing that I attach to the jet fuel vent. Then I connect the blue fitting to the jug return and allow the overflow fuel to flow back into the jug from the jet.
The fuel jug fittings disconnected. You can see the two "forks" in the blue fitting on the left side that are engaged when the fittings are twisted together and that is what opens the internal ball shutoff valve.
Aircraft fittings pulled out for fueling. The white part is just the cap.
Cap removed showing the two internal "forks" that rotate the ball valve when connected.
Jug pump fitting ready to connect to the aircraft fitting.
Fittings connected and fuel flowing from left to right into the jet.
Jet full and fuel fitting ready to be capped with white cap.
Jet full, fitting capped.
Fittings stowed back in jet, ready to fly.
The following users liked this post:
Tay3 (09-06-2020)
08-30-2020, 03:47 PM
#142
My Feedback: (20)
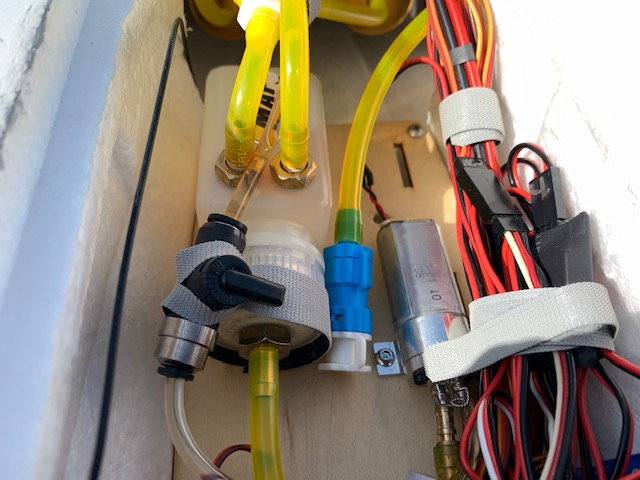
I was asked in a PM what I did for the vent out the bottom of the jet. In the foamies I just use a piece of tygon tubing from the tank routed out the bottom of the jet. I use a plastic barbed nipple to connect the overflow fitting to the tygon and then just pull it out after fueling. No vent filter or anything. So far I have not had any issues with sucking up dirt in the fuel vent.
10-11-2020, 05:48 AM
#143
How do you mate the 4 mm festo tube to the brass feed tube. It seems by putting barb on the plastic would need to stretch quite a bit?
my brass is the same od as the festo.
Guess I could experiment with the fill tube it has barb soldered on, but wonder if there might be a slit in festo down the road.... air!
my brass is the same od as the festo.
Guess I could experiment with the fill tube it has barb soldered on, but wonder if there might be a slit in festo down the road.... air!
10-28-2020, 12:38 PM
#147
I've done several of these micro turbine conversions, 2-Habu32 (one with Kolibri T35, the other with a K30, Habu32x with K30, FW T-45 with K30, and FW T33 with X45 (used Paul's kit). I'm currently working on another FW T-45 with an X45. I've used the JP brakes in all of them. If you want them to work proportionally you have to remove the magnets in the wheel hub. Once the magnets are removed the brakes will work nice a smooth and be fully proportional with the controller that comes with the brakes (no need for an aftermarket controller). For those of you interested, I made a video on how to remove the magnets. The process is slightly different depending on the wheel size but this video will give you an idea:
-Tom
The following users liked this post:
Aussie1 (10-28-2020)
10-28-2020, 01:50 PM
#148
I've done several of these micro turbine conversions, 2-Habu32 (one with Kolibri T35, the other with a K30, Habu32x with K30, FW T-45 with K30, and FW T33 with X45 (used Paul's kit). I'm currently working on another FW T-45 with an X45. I've used the JP brakes in all of them. If you want them to work proportionally you have to remove the magnets in the wheel hub. Once the magnets are removed the brakes will work nice a smooth and be fully proportional with the controller that comes with the brakes (no need for an aftermarket controller). For those of you interested, I made a video on how to remove the magnets. The process is slightly different depending on the wheel size but this video will give you an idea: https://www.youtube.com/watch?v=4OO3tONzJ8Q&t=55s -Tom


