


Reaction 54 Jet Kit
 09-12-2017, 08:40 AM
#3676

My Feedback: (19)
Lightest ones have been in the 17-18 lb range (dry). Lighter the turbine the better - most R54's need nose weight, so add that to the list of items that may help reduce overall weight. Would be tough to reduce weight of the retracts, they are already very light. Also, guys with the lighter R54s report floatiness on landing. They've just never seen a jet land that slow. Reduce overall weight by a pound or two and you will see amazingly slow landings!!!


 10-25-2017, 09:00 PM
#3679
Hello folks,
I am back on this thread. I have been very busy those last months, but now I have time to build. I am curently building the wing panels working on the two panels in the same time (I have fortunatly place enough to do that.) . the top sheetings are placed and I will today turrn them upside down.
I don't feel the need to post pictures or explain what I did because everithing has been builded stock until now.
Rcu is a good place to share knowledges, but it's also a good place to share the mistakes. So I will post the dumb mistakes I made in the assembly of the wing basic structures.
- The assembly manual is extremely clear in the wing subbasemblies section and tell you to build a right and a left lower main spasr assy taking in acount the small angle for a perfect fit of the shear webs. and that's what i did and I wrotte on them" left and right" . BUT I duno how I did that stupid mistakes I inverted them (the right spar is in the left wing and the left spare in the right wing). I take the entire responsability of that stupid error. The only explanation I could find is that you build the panels on the plan of the other wing. For example you build the right wing on a plan marked "left wing panel in big letters. maybe that's why i made this mistake but it's entirly my fault.. When I realised the mistake it was too late to swap (all the ribs and landing support assy were already glued).I glued the shear webs strongly and I don't think this will involve a structure weakness..
- Wait to have your servos before cuting the flaps and ailerons servo plates. Again I duno why but I took a wrong size servo laying in the workshop to make the cuts. This is Something easy to correct as soon you didn't glue the small wood parts that reinforce at the position of the servos screw. Unglue them as been a boring job fortunatly I realised that before gluing the plates in the wings...... If you make that stupid mistake and don't have any spare wood in the shop I can tell you that �poxy misixing sticks will be exclent candidates to rebuild those parts . I was searching for piece of wood in my workshop when I saw those �poxy stick and I tought "Thank you Bruce, I don't have to go searching in my impressive collection of scrap wood and spars.
- don't forget to drill a hole in w7 to route your pneumatic or electric lines into the hatch before gluing them. You can make Something more clean when thay are not glued yet......
Mistakes to be continued)
I am back on this thread. I have been very busy those last months, but now I have time to build. I am curently building the wing panels working on the two panels in the same time (I have fortunatly place enough to do that.) . the top sheetings are placed and I will today turrn them upside down.
I don't feel the need to post pictures or explain what I did because everithing has been builded stock until now.
Rcu is a good place to share knowledges, but it's also a good place to share the mistakes. So I will post the dumb mistakes I made in the assembly of the wing basic structures.
- The assembly manual is extremely clear in the wing subbasemblies section and tell you to build a right and a left lower main spasr assy taking in acount the small angle for a perfect fit of the shear webs. and that's what i did and I wrotte on them" left and right" . BUT I duno how I did that stupid mistakes I inverted them (the right spar is in the left wing and the left spare in the right wing). I take the entire responsability of that stupid error. The only explanation I could find is that you build the panels on the plan of the other wing. For example you build the right wing on a plan marked "left wing panel in big letters. maybe that's why i made this mistake but it's entirly my fault.. When I realised the mistake it was too late to swap (all the ribs and landing support assy were already glued).I glued the shear webs strongly and I don't think this will involve a structure weakness..
- Wait to have your servos before cuting the flaps and ailerons servo plates. Again I duno why but I took a wrong size servo laying in the workshop to make the cuts. This is Something easy to correct as soon you didn't glue the small wood parts that reinforce at the position of the servos screw. Unglue them as been a boring job fortunatly I realised that before gluing the plates in the wings...... If you make that stupid mistake and don't have any spare wood in the shop I can tell you that �poxy misixing sticks will be exclent candidates to rebuild those parts
. I was searching for piece of wood in my workshop when I saw those �poxy stick and I tought "Thank you Bruce, I don't have to go searching in my impressive collection of scrap wood and spars.- don't forget to drill a hole in w7 to route your pneumatic or electric lines into the hatch before gluing them. You can make Something more clean when thay are not glued yet......
Mistakes to be continued
)
Last edited by SALMONBUG; 10-25-2017 at 09:34 PM.
10-25-2017, 11:49 PM
#3680
No doubt. The main point I was making is that I really don't like how light civil pilots are taught to fly the pattern, namely monkeying with the aircraft configuration low to the ground and in a fairly busy phase of flight. Each time the flap setting is changed, it induces a trim change, and now the pilot is busy re-trimming for yet another airspeed ... while making 90 degree turns and trying to concentrate on other aircraft in the pattern, the radios, the landing area, etc.
Whether flying models or full scale, I set my landing configuration on downwind and don't mess with it. I also fly the Navy style pattern, that is a constant radius turn with a constant rate of decent. I find it's easier to judge and easier to stabilize if you're only making minor adjustments to AOB, power, and pitch. I like a nice steady constant radius turn where I give it just jab of power right at touchdown to flare (when flying models).
Whether flying models or full scale, I set my landing configuration on downwind and don't mess with it. I also fly the Navy style pattern, that is a constant radius turn with a constant rate of decent. I find it's easier to judge and easier to stabilize if you're only making minor adjustments to AOB, power, and pitch. I like a nice steady constant radius turn where I give it just jab of power right at touchdown to flare (when flying models).
you will also burn something like 2 tons of jet A1 ( 747 numbers) for nothing
I remember one day I was coming back from holland to brussels belgium in VFR in a piper aztec ( small 6 places twin engine ). My plan was too land before the sunset in a small airfield near my house. Unfortunatly I arrived a bit too late and the airfield was already closed (not equiped for night flight). I switched to IFR and contacted brussels airport to land. They accepted to integrate me in the traffic, gave me radar vectors for a final on the 25 R and asked me to maintain 140 knots on final. That speed is the cruising speed of the aztec............ So I made a flapless approach till the treshold ( not a big concern when you have 9000 ft of concrete in front of you ).
Last edited by SALMONBUG; 10-26-2017 at 01:05 AM.
10-26-2017, 03:44 AM
#3681

Like I use to tell my students, if you haven't made mistakes, you haven't learned anything. You caught them and resolved those mistakes. Of course show photos of those mistakes, they may keep the next soul from doing the same thing. I almost did the same thing of building two same wing panels. Believe it or not - my wife caught the mistake. She said, "They are both the same - she was looking at a side view". I had to take her to Macy's (Large Department Store here in the States) of course. Chic
10-30-2017, 01:26 AM
#3682
Join Date: Dec 2005
Location: Worcester, UNITED KINGDOM
Posts: 3
Likes: 0
Received 0 Likes
on
0 Posts
Hi Guys, big thank you for this thread, I've been dipping in looking for help and whilst not posting, I have managed to find everything I've needed.
Here is my finished Reaction on display at the LMA Gaydon static show.
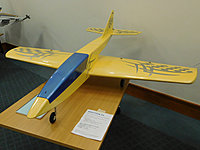
There is a full build blog on my website but I'm not allowed to post URL.
Andy
Here is my finished Reaction on display at the LMA Gaydon static show.
There is a full build blog on my website but I'm not allowed to post URL.
Andy
10-30-2017, 09:35 AM
#3684
Very nice Andy! I'll post your blog: Reaction 54
Also curious about the paint. I see it in primer on your site, but no mention of color paint. Vinyl graphics?
Completions aren't coming as often these days, but there's still plenty of kits out there being built (or stashed away) and it's always exciting to hear about newly-finished R54s!
Also curious about the paint. I see it in primer on your site, but no mention of color paint. Vinyl graphics?
Completions aren't coming as often these days, but there's still plenty of kits out there being built (or stashed away) and it's always exciting to hear about newly-finished R54s!
11-02-2017, 03:08 AM
#3686
Junior Member
Join Date: Nov 2017
Posts: 1
Likes: 0
Received 0 Likes
on
0 Posts
Hi Guys
Blog is a bit behind with finishing details. I use a 2k primer in grey, rubbed back to it was almost gone, then a 2k white, again rubbed back just slightly. I use 2k because it sands away easily (or the stuff my local car paint supplier sells does)
Then a yellow automotive, just picked a colour from the cards that I liked the look of.
Then, and this is a new one on me a fine mist spray of Ziralac a pearlecent pre finish.
The whole air frame was then give a 2k fuel proof lacquer using Klass Kote gloss clear.
I find finishing a model the most difficult part, something always goes wrong, and it did here too, there are some small runs, and an area on the underside (fortunately) where the lacquer is a bit matt in appearance.
The silver are vinyl cut graphics from a UK supplier modelmarkings . com
I have the turbine a Wren 100D, but at the time the photo was taken they'd not sent the fittings for it.
Andy
11-15-2017, 04:20 AM
#3687
Very nice model, I hesitate to go for a painting job but I finaly decided to build with open rib bays beacause it's Something you don't see every day on a jet powered plane.
I am at the end of buiding wing panels and I just made the marks of the wing bolt block on the bottom sheeting. Instead of making marks with pins trough the sheeting as described in the book I used my own method I developed years ago and share it for those who are interested.
Tools required are a good smartphone or a torchlight. Balsa sheeting is so thin that light goes trough and you can see the shaded aera of blocks, spars, access hatch rails, everithing you want.........
Last edited by SALMONBUG; 11-15-2017 at 04:24 AM.
11-16-2017, 05:36 AM
#3689
My Feedback: (48)
I bought the ProLink combo electric set for the PST Reaction ARF for mine and am quite happy with them. They were expensive but have worked flawlessly so far (75 flights).
These struts are longer than what is shown on the plans, so I had to relocate the wheel wells in the wings and revise the nose gear mounting when building. Since yours is already built you should be able to find a Prolink set that will fit with no or slight modification. All the strut dimensions are on Dreamwork's website. You should be able to find a set that will work.
These struts are longer than what is shown on the plans, so I had to relocate the wheel wells in the wings and revise the nose gear mounting when building. Since yours is already built you should be able to find a Prolink set that will fit with no or slight modification. All the strut dimensions are on Dreamwork's website. You should be able to find a set that will work.
11-19-2017, 08:45 AM
#3692

okay for small regional airfields, but if you try to do that in a busy airport the ATC won't be very happy. There are minimum speeds to maintain on the glide. if you join initial approach fix in landing configuration you will take a too long time for approach..........
you will also burn something like 2 tons of jet A1 ( 747 numbers) for nothing
I remember one day I was coming back from holland to brussels belgium in VFR in a piper aztec ( small 6 places twin engine ). My plan was too land before the sunset in a small airfield near my house. Unfortunatly I arrived a bit too late and the airfield was already closed (not equiped for night flight). I switched to IFR and contacted brussels airport to land. They accepted to integrate me in the traffic, gave me radar vectors for a final on the 25 R and asked me to maintain 140 knots on final. That speed is the cruising speed of the aztec............ So I made a flapless approach till the treshold ( not a big concern when you have 9000 ft of concrete in front of you ).
- 3 mile vfr initial at 300 KIAS (allowed by FARs as flight manual calls for it. In formation, 350 allowed)
- At numbers, 4g level turn
- 250KIAS, gear and flaps down
- at approach speed by 180 position
- constant AOA descending 180 degree turn from 180 position to short final
- 18-22 second straight in
- touchdown
It's very efficient. Took 6 plane into vfr pattern at Andrews, some of the busiest airspace in the nation.
As to your approach in the Aztec, flew a 180 into John Wayne. They wanted 100 KIAS or better, low and right of the ILS until over the numbers. Just flew no flap approach, cobbed throttle over the numbers, flared immediately, and just held it off till it stopped flying. Way fun to fly!
 11-19-2017, 01:59 PM
#3694

My Feedback: (18)
Join Date: Jun 2002
Location: New City, NY
Posts: 3,021
Likes: 0
Received 0 Likes
on
0 Posts
I would think that would be marginal at best and if you are flying off of grass on a small field, you might have issues getting off. You might want to ask that in a PST Reaction thread.
11-29-2017, 03:24 AM
#3695
I made this dry fit this morning ( didn't work a lot last weeks because of other projects)
I duno if it was the same for you but when I contemplated this for the first time, there was a kind of jet exhaust smell in the kitchen....
https://photos.app.goo.gl/KN3CFO21LM6xTNad2
I duno if it was the same for you but when I contemplated this for the first time, there was a kind of jet exhaust smell in the kitchen....
https://photos.app.goo.gl/KN3CFO21LM6xTNad2
Last edited by SALMONBUG; 11-29-2017 at 03:31 AM.
01-08-2018, 08:35 PM
#3696
Well, I'm the newest proud owner of a Reaction 54 jet kit  I'm finishing my Turbinator at the moment, I will try to build the Reaction in the summer, this time is not going to take me 10 years to build it like I did with the Turbo
Thank you Bruce.
I'm finishing my Turbinator at the moment, I will try to build the Reaction in the summer, this time is not going to take me 10 years to build it like I did with the Turbo Thank you Bruce.
Last edited by CARS II; 01-12-2018 at 05:31 PM.
01-21-2018, 06:55 PM
#3697
My Feedback: (66)
I started to build my (modified) Reaction 54 December 24 and by now I have the fuselage in the final sanding stage, and, the tail group is built but not sanded yet. I am going to use a JetsMunt 100 BXL turbine and install inlets per Bob Parks mods and a full cockpit with canopy. If there is any interest still, I will gladly post pictures.
01-21-2018, 07:44 PM
#3698
My Feedback: (18)
Join Date: Jun 2002
Location: New City, NY
Posts: 3,021
Likes: 0
Received 0 Likes
on
0 Posts
I started to build my (modified) Reaction 54 December 24 and by now I have the fuselage in the final sanding stage, and, the tail group is built but not sanded yet. I am going to use a JetsMunt 100 BXL turbine and install inlets per Bob Parks mods and a full cockpit with canopy. If there is any interest still, I will gladly post pictures.
01-22-2018, 03:15 PM
#3700
My Feedback: (66)
OK, but I feel a need to explain where I am coming from and what are my goals.
I am 63 years old and have been modelling since the age of 12 - mostly scratch building. As an aviation enthusiast the airplane of my youth was the McDonnell-Douglas F-4 Phantom and my first foray into the field of jets is building a FeiBao, 1/8 scale F4-E. I figured that this is as close as I'll ever come to flying an F-4 and I am so passionate about this aircraft that I decided to go through with this financial commitment. I quickly discovered that a scale jet is a multi faceted nightmare. To begin with: there's hardly room for equipment once you fit the turbine, tailpipe and 3 fuel tanks in the fuselage behind the cockpit area, Most of the air support system controls have to be mounted under the cockpit floor, not to mention Lipo packs, air tanks and substantial radio gear. 10 airlines is enough headache!
Than there is the handling issue, you need two people to move the airplane around, and than - there is the transportation issue, I do not fancy buying a trailer for just hauling one airplane to the flying field.
All that said, my F-4 is almost ready to fly and will be maidened in the very near future. And, oh - one more thing that is a matter of personal need - there is no pride of ownership for me in such highly prefabricated airplane. No pride of creating something with my own hand.
I started looking for another more user friendly jet and after an extended search started zeroing on the reaction 54, mainly for four reasons:
1. The design is superb in my opinion.
2. It has a very wide performance envelope - it can do everything other more complex jets do while not all of them can fly from grass fields as well as the reaction.
3. The kit is fabulous in execution: It is the closest I ever seen a machine cut kit comes to Laser cutting in precision.
4. Being of balsa construction, I can modify it to my heart content.
My goals in building this airplane are two:
1. I want to have a friendly jet that qualifies as a "Sunday Flier". As easy to fly as any pattern plane, something I could easily put 5 flights on during a typical flying day at my club field.
2. A good looking airplane that I can be proud of.
The modifications include:
1. Inlets as designed by Bob Parks. I corresponded with Bob extensively and the end result was that he gave his DXF files to Bob Limey of Laser Design Services (LDS). They are now available to anyone. (My heartfelt thanks to Bob and Bob).
2. I lengthened the nose approx. 12 inches to improve aestethics and provide more room for balancing the airframe without resorting to dead weight.
3. Add a canopy to improve aestethics.
4. Install a 80 Oz. fuel tank instead of the 50 Oz. tank that came with the kit. I will be using a Jets-Munt 100 Newton turbine.
5. Relocate the rudder and elevator servos to the back side of former #6 and use carbon fiber pushrods instead of the original method.
The attached pictures will seve to showcase where I am now, 3 weeks into the build.

