


Giga Crusher DF project begins...

 04-01-2008, 08:03 AM
#57

Thread Starter
My Feedback: (4)

Join Date: Sep 2003
Location: Temecula, CA
Posts: 5,692
Likes: 0
Received 0 Likes
on
0 Posts
Ya, I went with form over function on these ones. Those shocks might be stiff for a T-Maxx, but probably not for this beast that weighs 4-5 pounds more!
04-01-2008, 09:19 AM
#58
Senior Member
My Feedback: (4)
Join Date: Feb 2005
Location: Ellensburg, WA
Posts: 1,598
Likes: 0
Received 0 Likes
on
0 Posts
ORIGINAL: Dale Gribble
Ya, I went with form over function on these ones. Those shocks might be stiff for a T-Maxx, but probably not for this beast that weighs 4-5 pounds more!
Ya, I went with form over function on these ones. Those shocks might be stiff for a T-Maxx, but probably not for this beast that weighs 4-5 pounds more!
04-02-2008, 08:21 AM
#59
Thread Starter
My Feedback: (4)
Join Date: Sep 2003
Location: Temecula, CA
Posts: 5,692
Likes: 0
Received 0 Likes
on
0 Posts
I chose a new steering servo. I am trying on of those TowerPro far east special MG-995s. Metal geared, ball bearings and claimed to have 200+ oz. torque and decent transit times. 2 shipped for <$30.

04-02-2008, 04:24 PM
#61
Senior Member
Join Date: Mar 2007
Location: north platte,
NE
Posts: 522
Likes: 0
Received 0 Likes
on
0 Posts
ORIGINAL: Dale Gribble
I chose a new steering servo. I am trying on of those TowerPro far east special MG-995s. Metal geared, ball bearings and claimed to have 200+ oz. torque and decent transit times. 2 shipped for <$30.
I chose a new steering servo. I am trying on of those TowerPro far east special MG-995s. Metal geared, ball bearings and claimed to have 200+ oz. torque and decent transit times. 2 shipped for <$30.

 04-07-2008, 09:38 AM
#64
Thread Starter
My Feedback: (4)
Join Date: Sep 2003
Location: Temecula, CA
Posts: 5,692
Likes: 0
Received 0 Likes
on
0 Posts
Good timing!
Latest update... I put quite a bit of work into the truck this weekend.
First off, here is a pic of the crank shaft extension I had to mod to hold clutch springs in place. I circled where I had to grind a little groove to hold clutch springs. The stock clutch is MIP style. This is the only way to hold clutch springs in place is to mod the shaft.

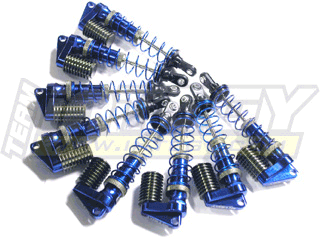
Next was figuring out how to mount those cool Integy MSR5 shocks. First off, I am not super impressed with the shocks. They sure look cool, but I am really apprehensive whether they will work out or not.
The stock Giga Crusher upper mounts are ball ends. So, I had to find a way to get these mounted. I ordered some HPI hellfire shock mounts, and to my luck they worked out. I had to grind the balls off of them and then put a nylon spacer between the mount and the shock. This was a time consuming step (x8)... Here are four of the modded mounts with the nylon spacers.

Here is a shock teaser shot with RC Raven springs.

More to come later today.
Latest update... I put quite a bit of work into the truck this weekend.
First off, here is a pic of the crank shaft extension I had to mod to hold clutch springs in place. I circled where I had to grind a little groove to hold clutch springs. The stock clutch is MIP style. This is the only way to hold clutch springs in place is to mod the shaft.
Next was figuring out how to mount those cool Integy MSR5 shocks. First off, I am not super impressed with the shocks. They sure look cool, but I am really apprehensive whether they will work out or not.
The stock Giga Crusher upper mounts are ball ends. So, I had to find a way to get these mounted. I ordered some HPI hellfire shock mounts, and to my luck they worked out. I had to grind the balls off of them and then put a nylon spacer between the mount and the shock. This was a time consuming step (x8)... Here are four of the modded mounts with the nylon spacers.
Here is a shock teaser shot with RC Raven springs.
More to come later today.
04-07-2008, 11:27 AM
#65
Thread Starter
My Feedback: (4)
Join Date: Sep 2003
Location: Temecula, CA
Posts: 5,692
Likes: 0
Received 0 Likes
on
0 Posts
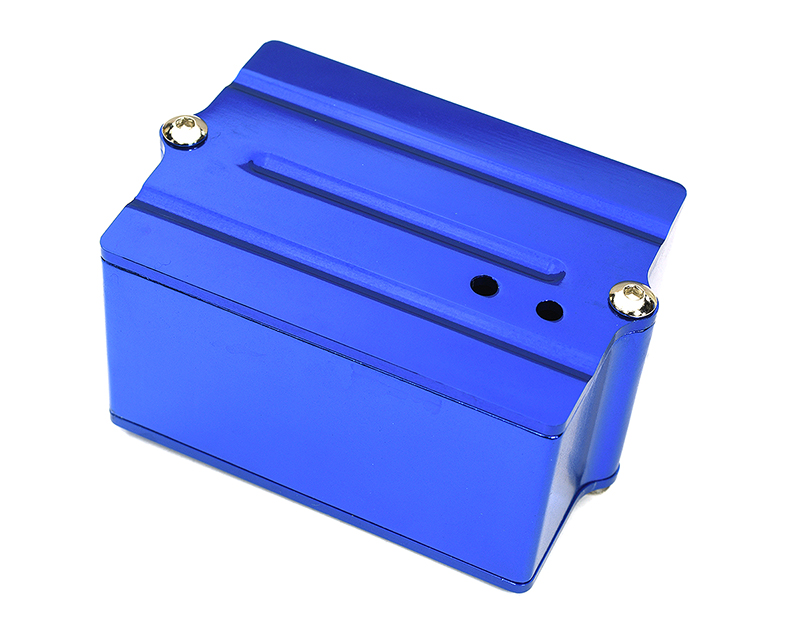
Here is the electronics setup... Many guys won't appreciate the amount of work involved in this... The giga crusher stock has little pods that go on either side of the roll cage setup that hold the battery and receiver. Since I wanted the exhaust to route close to the chassis, they actually rubbed against the stock pods. So, since the exhaust is routed on the OUTSIDE instead of stock on the inside, I put an aluminum T-Maxx receiver box where the stock exhaust used to route. I used some small spacers so I could route the wiring under the box. I had to rework the TMaxx receiver box to access chassis screws underneath too.
I am swapping the rx hump pack to a flat pack and it will secure to the roll cage alongside the transmission.
It turned out very good. I am much happier with the servo wire routing along the chassis now. It is cleaner and more safe then stock.

I am swapping the rx hump pack to a flat pack and it will secure to the roll cage alongside the transmission.
It turned out very good. I am much happier with the servo wire routing along the chassis now. It is cleaner and more safe then stock.
04-07-2008, 11:32 AM
#66
Thread Starter
My Feedback: (4)
Join Date: Sep 2003
Location: Temecula, CA
Posts: 5,692
Likes: 0
Received 0 Likes
on
0 Posts
Here it is gents... Truck is almost complete. I just need one more set of clutch springs for one of the engines. I decided on Mugen 1.1mm springs because I want the engines to build up a little more RPMs before the clutches engage. Should keep the clutches from getting hot and get better launches.
After this, the truck is ready to roll! There is no more mock up... This stuff is all bolted down.
Here it is! I also have a body picked out. The 1/10 body is a hair small, plus you can't see what is in the body with the blacked out windows.
So, body + clutch springs, and it's done!


After this, the truck is ready to roll! There is no more mock up... This stuff is all bolted down.
Here it is! I also have a body picked out. The 1/10 body is a hair small, plus you can't see what is in the body with the blacked out windows.
So, body + clutch springs, and it's done!

 04-07-2008, 07:48 PM
#71
Dale, awesome work man. I still wish you could have found a way to use the boat pipe rear exhaust I hope you can break those suckers in and get a video of that monster ASAP. Impressive stuff, now get to work on your Savage!!!!!!
I hope you can break those suckers in and get a video of that monster ASAP. Impressive stuff, now get to work on your Savage!!!!!!
04-18-2008, 10:58 PM
#72
Thread Starter
My Feedback: (4)
Join Date: Sep 2003
Location: Temecula, CA
Posts: 5,692
Likes: 0
Received 0 Likes
on
0 Posts
Here is the body I just painted. Chevy body for MGT/LST. Truck is pretty big. What do you guys think? I think it's pretty bada55.


04-20-2008, 06:10 PM
#74
Junior Member
Join Date: Apr 2008
Location: Hemel Hempstead, UNITED KINGDOM
Posts: 2
Likes: 0
Received 0 Likes
on
0 Posts
Hey Dale,
Awesome job on the DF Giga.
I've also been working on customising a chassis I bought off ebay. Like you I have tried to do it within a budget and so far have bought majority of the bits I needed off eBay. Giga Crusher parts are difficult to get in the UK and if found are more than twice the cost than in the USA!
I'm running 2 x Kyosho GXR-28's with Nova RC cooling heads. Both have been stripped, cleaned and resealed. Very little clearance with the cooling heads!
Where did you get the GPM Servo mounts? I can't find them anywhere in the UK.
I have bought the engine cheaper mounts but would like the cool blue mounts you have (The blue mounts cost $80 each in the UK.)
I am going to run the exhausts through the back.
Check out the 1st pictures of my project.

