


Scale military build (I hope)
 03-29-2014, 11:41 AM
#1

Thread Starter
Here is the start of what I hope will be a 6wd military looking vehicle(XM963) based off the HPI Wheely King that I modded to 6wd a few years back
I started talking about it in http://www.rcuniverse.com/forum/rc-r...de-bodies.html but figured now it should get its own thread as its still in the planning phase, but I've hit a few roadblocks already.
Here is what I started with


What I hope it will look like in the end

I've already got 8 ripsaw tires off of a SCX10 (found em cheap), and am basing the scale off that.
But here is one of the roadblocks I can't do a true scale build(based off the tire diameter) to that picture as its too long for what I have to work with(think Baja 5b long) I printed up a scale picture of it to check. My WK's 3rd axle as it is located as it is right now is not as far out as the middle axle on that truck.
Now I did think of a solution so far if I chop the truck a bit I can get the wheelbase closer to something like in this pic.(and yes I know that is a shoddy of copy/pasting, but its not the final of what it would look like just a general idea)

Only real issue I'm having is the body(and how to mount it)... I'm going to be honest I SUCK at modeling, and making the front cab might be a bit more then I can chew... I watched the videos, and see how simple it looks... but I know from past things I've tried videos make everything look simple which is why I'm extremely hesitant. I've been contemplating buying a SCX honcho cab, and making the rear based on the above truck(which would probably be pretty simple), or even doing something like this http://www.axialracing.com/blog_posts/5692 with my honcho's body(this I could easily handle), and get a dingo body for my SCX10 the last 2 things are also why the I hope is in the topic in parenthesis.
Anyways now that that the general concept, and potential issues are out of the way on to what I plan to use(and mostly bought)
For the frame I'm planning on using 3mm thick sheet of delrin cut to shape. Would have used metal, but I lack the proper equipment/space to work with it(more on the space side). Also figured delrin is strong, and can easily be cut into shape with a jigsaw. Its basic design will be based off my SCX10's but longer to accommodate the 3rd axle, and where the tranny mounts taller to accommodate the WK tranny mounts.
Shocks... I was going to use MT2 front shocks, then thought about leaf springs, but now plan on using RS4 on-road shocks(which should be here any day) as I'm turning it into a scale truck I figured I won't be needing the extreme travel. Now if I plan to revert back to the monster SCX10 look like in that one link above I figured I could just screw on an extender to use whatever shock I want.
Links I watched http://www.youtube.com/watch?v=gVV8DgZmQz8 and am doing them that way as they seem pretty simple to make. I've already made the steering links, and they seem fine
Servo mount: I got a level 3 axle mid mount servo kit for the crawler king
Tires as I said above SCX10 ripsaws pre-mounted (I got them pretty cheap for 8)
I'll put up current pics when I start on the chassis rails (well might do it when I prototype em out of cardboard)
Will gladly take any feedback, ideas, or comments on this as a lot of this is new territory to me.
I started talking about it in http://www.rcuniverse.com/forum/rc-r...de-bodies.html but figured now it should get its own thread as its still in the planning phase, but I've hit a few roadblocks already.
Here is what I started with
What I hope it will look like in the end
I've already got 8 ripsaw tires off of a SCX10 (found em cheap), and am basing the scale off that.
But here is one of the roadblocks I can't do a true scale build(based off the tire diameter) to that picture as its too long for what I have to work with(think Baja 5b long) I printed up a scale picture of it to check. My WK's 3rd axle as it is located as it is right now is not as far out as the middle axle on that truck.
Now I did think of a solution so far if I chop the truck a bit I can get the wheelbase closer to something like in this pic.(and yes I know that is a shoddy of copy/pasting, but its not the final of what it would look like just a general idea)
Only real issue I'm having is the body(and how to mount it)... I'm going to be honest I SUCK at modeling, and making the front cab might be a bit more then I can chew... I watched the videos, and see how simple it looks... but I know from past things I've tried videos make everything look simple which is why I'm extremely hesitant. I've been contemplating buying a SCX honcho cab, and making the rear based on the above truck(which would probably be pretty simple), or even doing something like this http://www.axialracing.com/blog_posts/5692 with my honcho's body(this I could easily handle), and get a dingo body for my SCX10
the last 2 things are also why the I hope is in the topic in parenthesis.Anyways now that that the general concept, and potential issues are out of the way on to what I plan to use(and mostly bought)
For the frame I'm planning on using 3mm thick sheet of delrin cut to shape. Would have used metal, but I lack the proper equipment/space to work with it(more on the space side). Also figured delrin is strong, and can easily be cut into shape with a jigsaw. Its basic design will be based off my SCX10's but longer to accommodate the 3rd axle, and where the tranny mounts taller to accommodate the WK tranny mounts.
Shocks... I was going to use MT2 front shocks, then thought about leaf springs, but now plan on using RS4 on-road shocks(which should be here any day) as I'm turning it into a scale truck I figured I won't be needing the extreme travel. Now if I plan to revert back to the monster SCX10 look like in that one link above I figured I could just screw on an extender to use whatever shock I want.
Links I watched http://www.youtube.com/watch?v=gVV8DgZmQz8 and am doing them that way as they seem pretty simple to make. I've already made the steering links, and they seem fine
Servo mount: I got a level 3 axle mid mount servo kit for the crawler king
Tires as I said above SCX10 ripsaws pre-mounted (I got them pretty cheap for 8)
I'll put up current pics when I start on the chassis rails (well might do it when I prototype em out of cardboard)
Will gladly take any feedback, ideas, or comments on this as a lot of this is new territory to me.
Last edited by SyCo_VeNoM; 04-04-2014 at 07:20 PM. Reason: change topic slightly
 03-29-2014, 05:12 PM
#2
Member

Join Date: Dec 2006
Location: Lehigh Valley,
PA
Posts: 71
Likes: 0
Received 0 Likes
on
0 Posts
You can start with a premade cab and modify into a military style body, it is much easier.
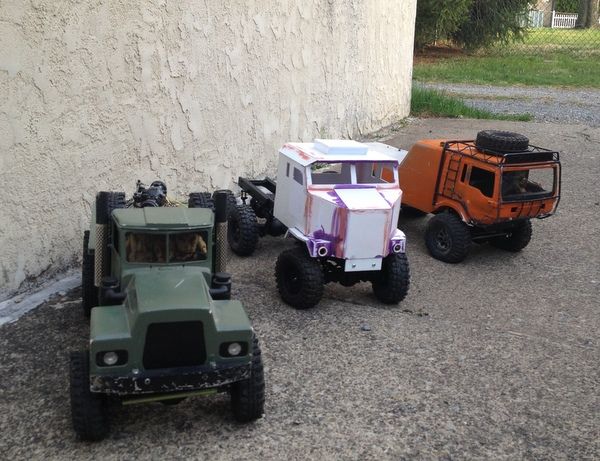
**Warning there are a bunch of pictures***
A Tamiya King Hauler cab is a good place to start, they are under $40

Here is one I have in stock form

This started a King Hauler cab then modified into a Mack
Yes this is my truck


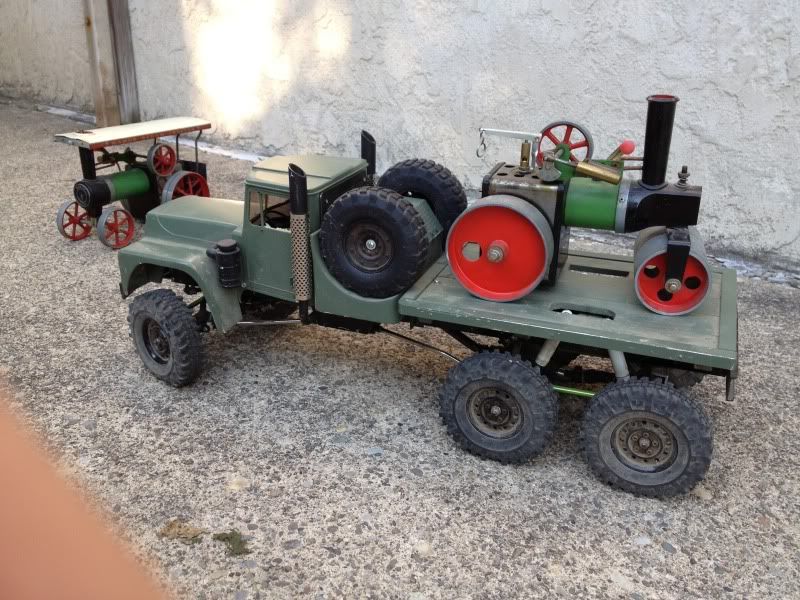
This cab is 100% scratch built, my first scratch built cab
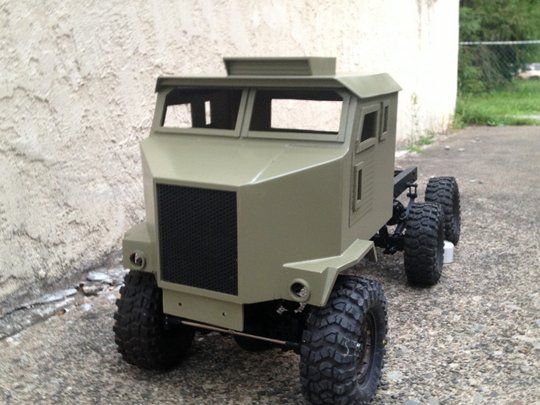

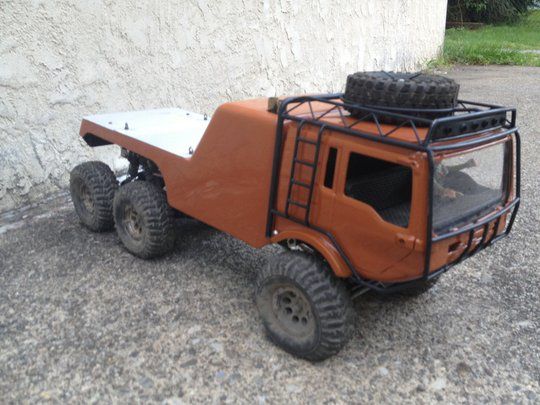
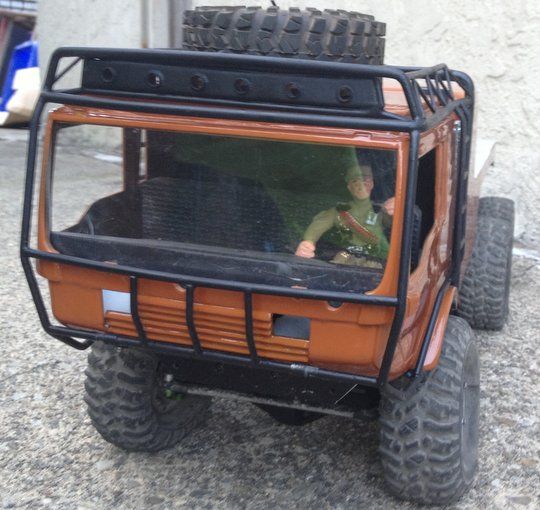
This Orange 6x6 I built uses a modified Man TGX cab
An 8x8 Maz 537 I also built a couple years ago
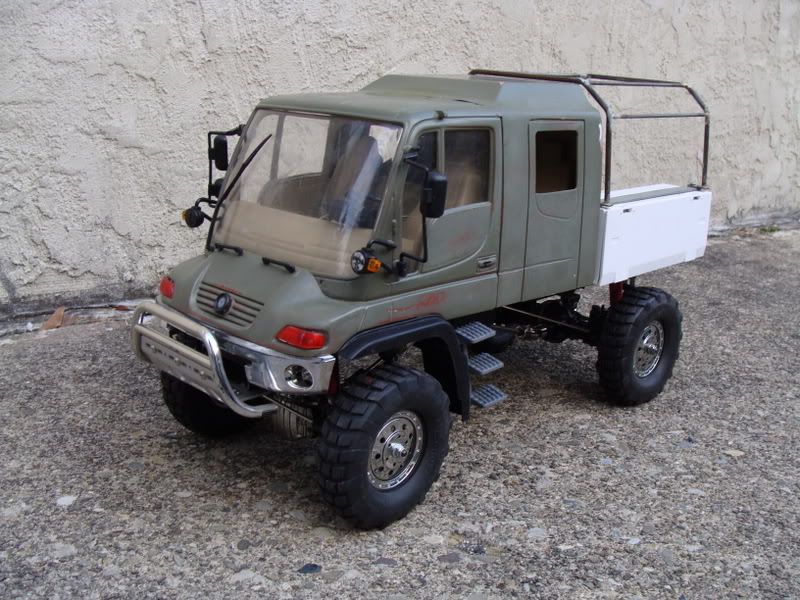
I took a Dickies Unimog single cab and made it a DoKa a few years ago
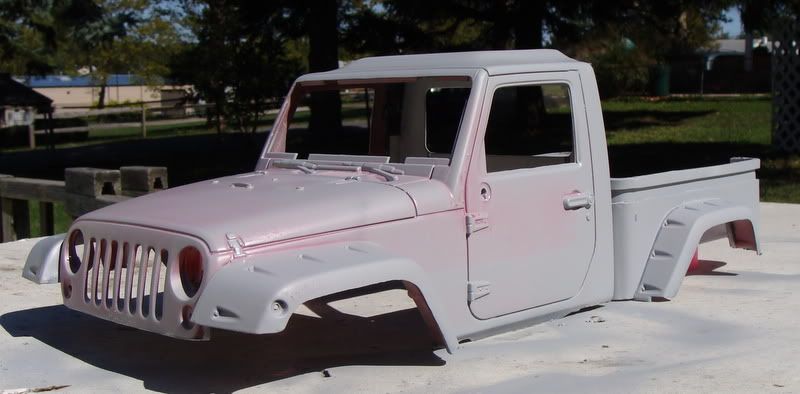
This was another build I did using a Jeep as a donor
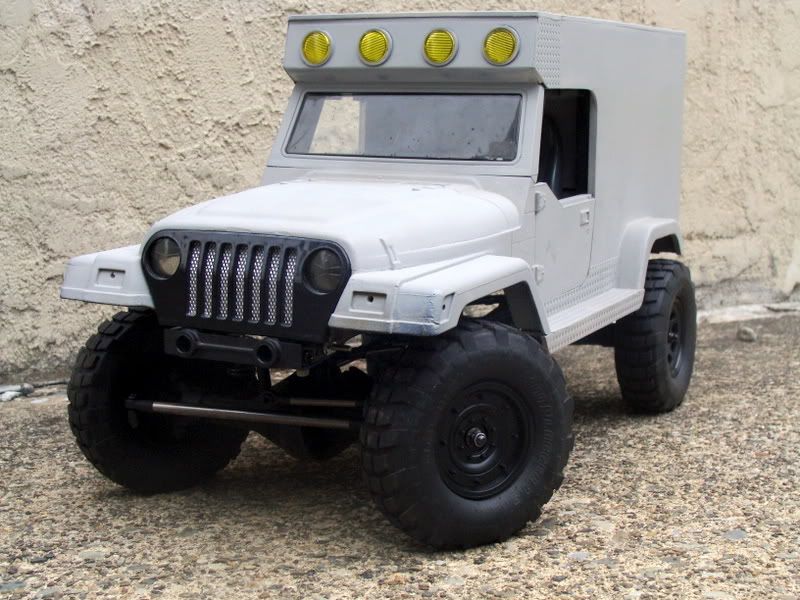
Another Jeep I built
And yet another Jeep build I did a few years ago
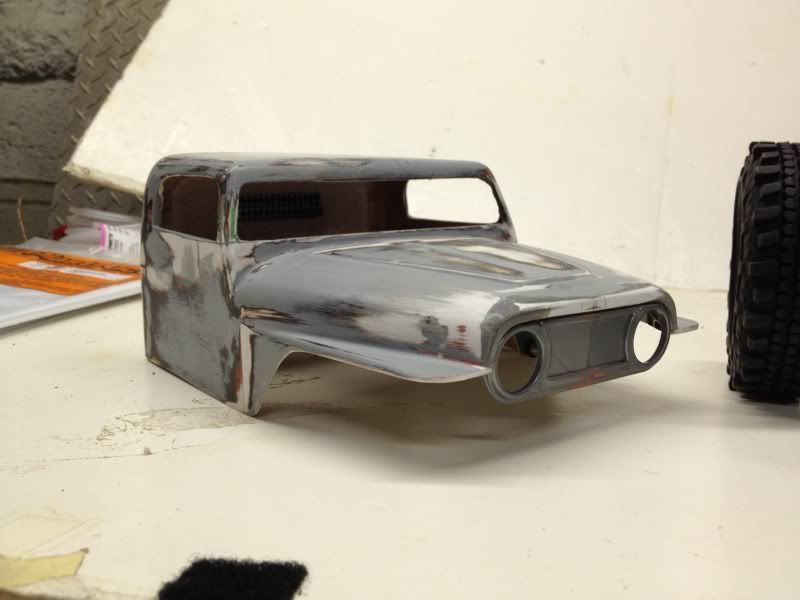
Tamiya Clodbuster body modified into a mid 70's Blazer I did maybe 5 years ago

All it takes is some imagination and determination to make something custom.. I don't care to have the same truck 10,000 other people have.
Sorry to take over your thread, I just wanted to show that a little imagination and plastic can build something out of the ordinary.
**Warning there are a bunch of pictures***
A Tamiya King Hauler cab is a good place to start, they are under $40
Here is one I have in stock form
This started a King Hauler cab then modified into a Mack
Yes this is my truck
This cab is 100% scratch built, my first scratch built cab
This Orange 6x6 I built uses a modified Man TGX cab
An 8x8 Maz 537 I also built a couple years ago
I took a Dickies Unimog single cab and made it a DoKa a few years ago
This was another build I did using a Jeep as a donor
Another Jeep I built
And yet another Jeep build I did a few years ago
Tamiya Clodbuster body modified into a mid 70's Blazer I did maybe 5 years ago
All it takes is some imagination and determination to make something custom.. I don't care to have the same truck 10,000 other people have.
Sorry to take over your thread, I just wanted to show that a little imagination and plastic can build something out of the ordinary.
03-30-2014, 01:59 PM
#3
Thread Starter
Holy crap that king hauler cab looked perfect.
Was originally looking at the unimog body when it 1st entered my head, but the axles were a tad too wide for that as from what I measured they woulda stuck out like almost an inch on each side. But as those look like SCX10 axles with the king hauler cab it would only be like 1/4th of an inch added on each side. I never thought about the semi trucks as I thought they were narrower then that.
Seriously thanks for that post
Now it seems I can get back on track, but might wait till after I get a chance to get that body to make sure the tranny sits in the right spot
03-31-2014, 09:39 AM
#4
Yea, the king hauler cab is pretty much plug and play for this concept. This my King hauler that I use for plowing and tank recovery with trailer and fully r/c'd ramps. Also is a '42 Kenworth wrecker
I've been working off/on for a while now also using the king hauler cab.
I've been working off/on for a while now also using the king hauler cab.
04-02-2014, 03:22 PM
#5
Thread Starter
hmm got the king hauler cab ran into bit of an issue with it that I might be able to correct. The cab is a tad too narrow to the point the outside of the arches actually fit between the tires.
I guess the easiest way to correct this would be to cut it in half, and add on like 4 inches in the middle to make the wells go over the wheels.
Is the cab made from ABS?
I guess the easiest way to correct this would be to cut it in half, and add on like 4 inches in the middle to make the wells go over the wheels.
Is the cab made from ABS?
04-03-2014, 07:46 AM
#6
Member
Join Date: Dec 2006
Location: Lehigh Valley,
PA
Posts: 71
Likes: 0
Received 0 Likes
on
0 Posts
hmm got the king hauler cab ran into bit of an issue with it that I might be able to correct. The cab is a tad too narrow to the point the outside of the arches actually fit between the tires.
I guess the easiest way to correct this would be to cut it in half, and add on like 4 inches in the middle to make the wells go over the wheels.
Is the cab made from ABS?
I guess the easiest way to correct this would be to cut it in half, and add on like 4 inches in the middle to make the wells go over the wheels.
Is the cab made from ABS?

 04-04-2014, 10:12 AM
#8
Thread Starter
Well decided to work on it today, and hit a pretty decent issue with the suspension.
I wanted to connect the 3rd axle to the 2nd axle which would fix one major issue I had in the past of the drive shaft popping out. Cut the links for it(well the threaded rod part), and found out I can't connect the axles together as the link ends are to big to fit in the holes.
Though I could just rotate the mount 90 degrees turns out the axle isn't a square (looks it), but a tad bit of a rectangle, and the flop back and forth. As I want to get the rear axle hooked up properly before I start the rails this kind of is a setback, and might take me a couple of days to figure out(really sucks as I gotta work the next 3 days so I got no time till tuesday really)
Hmm 2nd thought I could just use a longer screw, and mount one of them on the outside of the axle holder. I swear I sometimes over think solutions as my original solution was get another WK axle piece, grind down the ball end on my shock along with the links ball end so they would fit, and mount 2 of the 2 holed pieces.
Also think I'll use the stock WK's links which locks the rear wheels angle on the back axles as this will save me some cash as I can re-use the links I made as there is also a slight geometry issue with the back axles links which doesn't appear on the front(fronts gonna stay metal).
Last edited by SyCo_VeNoM; 04-04-2014 at 12:14 PM.
04-04-2014, 02:03 PM
#9
Thread Starter
Well here we go pictures to date
Here is how I'm hooking the rear axle to the middle(along with 2 of the shocks that I was using to judge the height of them)


As you can see I went on the inside for the rear axle to the middle so it(as I said in the last post) would not not hit the ball end infront of it. I used longer screws so a teeny bit would come out the other side so it would retain some of the strength as being held on by one side I thought would be a tad weak.
I also took off the home made links, and went back to the stock WK plastic parts as you also see.
Now to the front axle I mounted up the level 3 servo mount kit, and made the linkage.


I'm not 100% happy yet with it as I gotta still take a bit off the arm that connects to the servo as it doesn't center when the servo saver is centered, but hey I think its pretty damn close for eyeballing it
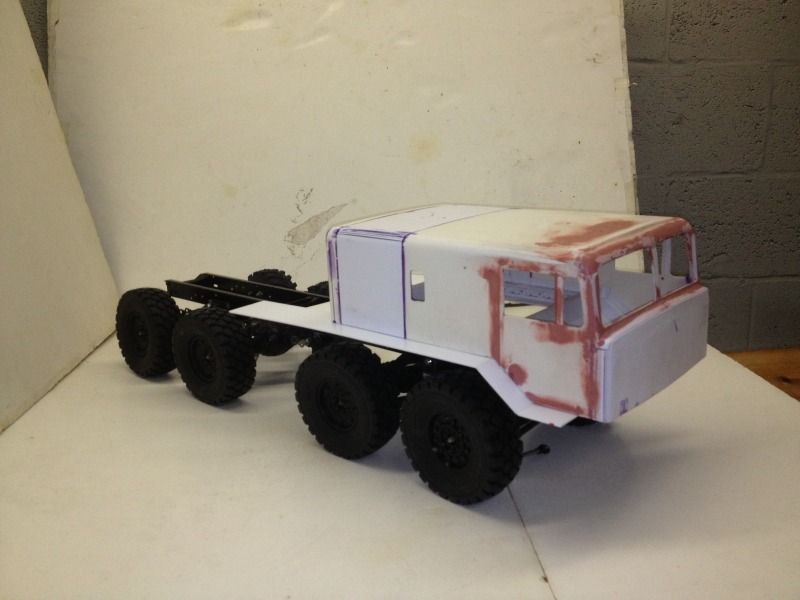
As for why I said I need to cut the body in half, and extend it here is how it looks with the cab sitting on the front axles...

Yea its way too narrow for a scale build, and needs like 4 inches added on for the tires to sit under the body... Now if I was going for more of a MT build it would have been fine. I also think I will also cut the window section out completely, and make the cab more square like in the pic I have in the 1st post while I'm at it as I doubt it would add any more difficulty then widening the body is already is adding.
Next step which I think I need to do (won't be till Tuesday or Wednesday) I'm going to take te rail off my SCX10 trace it, and extend it as I now know where the rear axle will sit exactly, then figure out some way to do the triangular linkage pieces(might cut them out of scrap delrin)
Here is how I'm hooking the rear axle to the middle(along with 2 of the shocks that I was using to judge the height of them)
As you can see I went on the inside for the rear axle to the middle so it(as I said in the last post) would not not hit the ball end infront of it. I used longer screws so a teeny bit would come out the other side so it would retain some of the strength as being held on by one side I thought would be a tad weak.
I also took off the home made links, and went back to the stock WK plastic parts as you also see.
Now to the front axle I mounted up the level 3 servo mount kit, and made the linkage.
I'm not 100% happy yet with it as I gotta still take a bit off the arm that connects to the servo as it doesn't center when the servo saver is centered, but hey I think its pretty damn close for eyeballing it
As for why I said I need to cut the body in half, and extend it here is how it looks with the cab sitting on the front axles...
Yea its way too narrow for a scale build, and needs like 4 inches added on for the tires to sit under the body... Now if I was going for more of a MT build it would have been fine
. I also think I will also cut the window section out completely, and make the cab more square like in the pic I have in the 1st post while I'm at it as I doubt it would add any more difficulty then widening the body is already is adding.Next step which I think I need to do (won't be till Tuesday or Wednesday) I'm going to take te rail off my SCX10 trace it, and extend it as I now know where the rear axle will sit exactly, then figure out some way to do the triangular linkage pieces(might cut them out of scrap delrin)
Last edited by SyCo_VeNoM; 04-04-2014 at 02:14 PM.
04-08-2014, 12:35 PM
#10
Thread Starter
Update ran into an issue when I was making a prototype chassis rail out of cardboard... turns out my Wheely King tranny is too damn tall to work. In the spot it would have to be the motor would be sticking out of the cabs front window, and the back plate out the back of the cab...
Looks like I'm going to have to scrap my one other project I was working on for now(or try and mod it to hold the WK tranny), and grab the SCX transmission I was going to use in it.
So now I have to play the waiting game as I just had to order some more parts While I'm swapping trannies over I figured might as well just get a SXC10 rail kit while I was at it found one for a decent price on ebay. After I get it I guess I'll have to take a trip to the LHS, and get a square tube that will fit in it(or same size) to make the chassis extension piece.
Also ordered TRX4927X, TRX4928X, and TRX4951X as the output on the SCX10 tranny is 5mm vs the 6mm HPI output. The adapter would have set me back $9 per side (+shipping) vs I paid $16 total shipped for the traxxas parts there is also less to go wrong this way which makes it much better IMO.
Damn this idea has cost quite a bit more then I expected at start
04-08-2014, 05:11 PM
#11
Member
Join Date: Dec 2006
Location: Lehigh Valley,
PA
Posts: 71
Likes: 0
Received 0 Likes
on
0 Posts
Update ran into an issue when I was making a prototype chassis rail out of cardboard... turns out my Wheely King tranny is too damn tall to work. In the spot it would have to be the motor would be sticking out of the cabs front window, and the back plate out the back of the cab...
Looks like I'm going to have to scrap my one other project I was working on for now(or try and mod it to hold the WK tranny), and grab the SCX transmission I was going to use in it.
So now I have to play the waiting game as I just had to order some more parts While I'm swapping trannies over I figured might as well just get a SXC10 rail kit while I was at it found one for a decent price on ebay. After I get it I guess I'll have to take a trip to the LHS, and get a square tube that will fit in it(or same size) to make the chassis extension piece.
Also ordered TRX4927X, TRX4928X, and TRX4951X as the output on the SCX10 tranny is 5mm vs the 6mm HPI output. The adapter would have set me back $9 per side (+shipping) vs I paid $16 total shipped for the traxxas parts there is also less to go wrong this way which makes it much better IMO.
Damn this idea has cost quite a bit more then I expected at start
Looks like I'm going to have to scrap my one other project I was working on for now(or try and mod it to hold the WK tranny), and grab the SCX transmission I was going to use in it.
So now I have to play the waiting game as I just had to order some more parts While I'm swapping trannies over I figured might as well just get a SXC10 rail kit while I was at it found one for a decent price on ebay. After I get it I guess I'll have to take a trip to the LHS, and get a square tube that will fit in it(or same size) to make the chassis extension piece.
Also ordered TRX4927X, TRX4928X, and TRX4951X as the output on the SCX10 tranny is 5mm vs the 6mm HPI output. The adapter would have set me back $9 per side (+shipping) vs I paid $16 total shipped for the traxxas parts there is also less to go wrong this way which makes it much better IMO.
Damn this idea has cost quite a bit more then I expected at start
Here is one HauntFreak did years ago

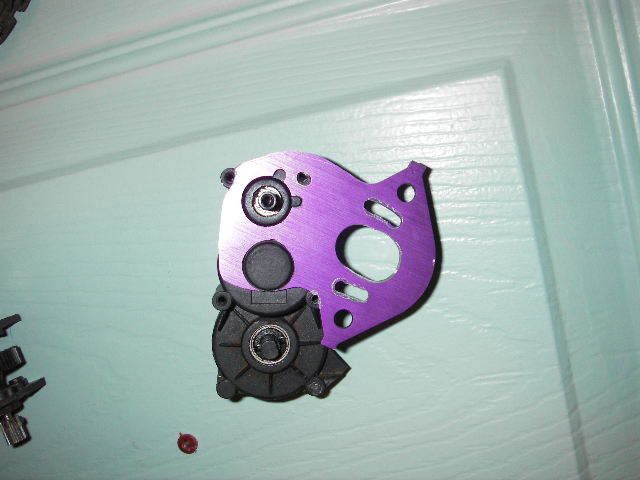
Here is the easy route using a stock plate
Yeah there is nothing cheap about building a 6x6, my 6x6 Mack has $400 in just driveshafts, wheels and tires. I have built 3 6x6's and an 8x8 (and starting another 6x6 before long) they do like their money.
04-08-2014, 06:38 PM
#12
Thread Starter
Hmm that motor plate mod isn't a bad idea might use it for the other project I'm stealing the axial tranny from.
Actually this might help my other project start moving again as if I do that cheap way to mod the tranny it would solve issues I hit on the other monstrosity I kinda stalled working on as the axial tranny kinda forced me to mount the motor on the side I wanted the battery, and screwed up my steering setup. Flipping the motor one way on the WK tranny would move the motor to the side with the steering setup I already had in place... Now I will need the steel gears though for the WK as I doubt the plastic will survive my idea.
Actually building a 6X6 is cheap if you do what I originally did, and just slap a 3rd axle onto a stock WK. I think I spent $55 total on it (axle, tires, and plastic link parts tree). Now going to make a scale RC yea that isn't cheap.
Did find it interesting when I was doing research that the WK, and SCX10's differential gear ratio is exact. So hey I've learned a few things
Also jmx6 thx for the help you been giving as I probably wouldn't have considered some of the ideas you said
Last edited by SyCo_VeNoM; 04-08-2014 at 06:42 PM.
04-10-2014, 10:59 AM
#13
Thread Starter
Well had a pleasant surprise today the rail set I ordered off a SCX10 turns out wasn't pulled from a RTR, and was a retail package that included all the screws. I am SO glad I procrastinated, and didn't order a screw set now as the guys on ebay wanted $15 + shipping for the screw set. This is probably one of the 1st bouts of luck I'm having so far in this build
04-10-2014, 08:07 PM
#14
Thread Starter
Well assembled the chassis, installed the SCX10 tranny I had, and half the drive shafts(the side that goes to the tranny), and ran into some issues.
1st off the yolk issue I had to dremel the yolk's hole that the shaft slips into as the yolk is made for a shaft with 2 flat side, and the SCX10 tranny shaft is round. After that I hit another issue I didn't foreseer I couldn't get the pin through the SCX10 trannys shaft as it was closer to the tranny then the yolk would allow so I had to dremel the yolk down a few millimeters.

Here is the finished product fits like a glove now
Next issue I had to remove the gear cover off the SCX10 tranny I have as that was blocking me from connecting the other side. Basically I took the spur gear off to get down to the plastic piece, and just cut around the arched piece the stock driveshaft would barely touch.
Assembled it, and was like Cool time to rock spun the spur, and hit another pretty big issue... The spur hits the damn yolk on the half shaft... Well I should say it hits the little metal piece that hold the yolk together as it sticks out a fraction of a millimeter...

Yup that is one insanely tight fit. Tomarrow I think I'll goto my LHS and see if they have a smaler spur gear I guess I'll just have to make up for the gearing by either getting a higher turn motor, or a higher tooth pinion. I know axial makes a 80 tooth spur that should give enough room so the spur don't hit.
Also while I'm at the LHS gonna see if they have and square tubing that is the same size as the scx chassis rail so I can make the extension, and see about styrene sheets along with glue, and paint. I really have the long drive to it which is why I order 99% of my stuff (seriously its like 30-40 mins one way)
I also marked one links size for the front, but will most likely cut it tomorrow if I get a chance.

Is the chassis so far
The rear shock tower I just put on as a placeholder for now as I'll probably remove it so I could have the bed sit right.
1st off the yolk issue I had to dremel the yolk's hole that the shaft slips into as the yolk is made for a shaft with 2 flat side, and the SCX10 tranny shaft is round. After that I hit another issue I didn't foreseer I couldn't get the pin through the SCX10 trannys shaft as it was closer to the tranny then the yolk would allow so I had to dremel the yolk down a few millimeters.
Here is the finished product fits like a glove now
Next issue I had to remove the gear cover off the SCX10 tranny I have as that was blocking me from connecting the other side. Basically I took the spur gear off to get down to the plastic piece, and just cut around the arched piece the stock driveshaft would barely touch.
Assembled it, and was like Cool time to rock spun the spur, and hit another pretty big issue... The spur hits the damn yolk on the half shaft... Well I should say it hits the little metal piece that hold the yolk together as it sticks out a fraction of a millimeter...
Yup that is one insanely tight fit. Tomarrow I think I'll goto my LHS and see if they have a smaler spur gear I guess I'll just have to make up for the gearing by either getting a higher turn motor, or a higher tooth pinion. I know axial makes a 80 tooth spur that should give enough room so the spur don't hit.
Also while I'm at the LHS gonna see if they have and square tubing that is the same size as the scx chassis rail so I can make the extension, and see about styrene sheets along with glue, and paint. I really have the long drive to it which is why I order 99% of my stuff (seriously its like 30-40 mins one way)
I also marked one links size for the front, but will most likely cut it tomorrow if I get a chance.
Is the chassis so far
The rear shock tower I just put on as a placeholder for now as I'll probably remove it so I could have the bed sit right.
04-11-2014, 01:57 PM
#16
Thread Starter
Yea there were a few so far
Anyways just got back from the LHS... seriously I miss the old management of that place...
Found 2mm styrene sheets the clerk was like care about the color when he was about to check me out I said I could care less white, black, blue or pink as its being painted anyways. He found a pack of 2mm sheets luckily(in their backroom) after I spent 20 mins looking.
Bought XF-74 tamiya paint or D.green/JGSDF color as the drab green was out of stock (like 85% of their damn paints...) looked close enough though so it should be ok.
Picked up some misc styrene shapes like I beams, and strips so I don't have to play around with the sheet.
Bought 2 oval brass tubes as unfortunately the square tubes they had in stock were too small... the ovals are just about perfect though, and as I only need to attach one shock to them they should do the job well.
Also got the styrene bonding stuff, and some kind of epoxy putty.
Stuff I'll have to order the spur, pinion, and WK axle part I need (I'll use my spare axles parts for now though). Seriously they pulled out their spur gear drawer, and had like 10 total in it...
Hmm if only I could go back in time I would go slap myself, and say order a dingo kit for how much I spent on this so far, but ohh well live and learn too late to change what I started now
04-12-2014, 12:13 PM
#17
Thread Starter
Well did a little work today in getting the 2nd, and 3rd axles hooked up to each other
I was going to go for a 4 point link setup, but issues with how the axle is setup(and how HPI sells parts) kinda squashed that. Instead I decided to make one of those Y pieces, and hook the rear axle to the 2nd, but again there was a bar in the way so I got a little creative, and just hooked the rear axle to the bar that locks the middle axles wheels as there were holes in it already.

Seems I either misjudged the Y-piece I made, or didn't drill the holes perfect so I had to bend the 2 linkages, but hey I think its pretty damn good as I didn't take one single measurement, and did it just by eyeballing it
I know in the pic the wheels don't look aligned all that perfect, but that seems to be just the camera angle as they track in a straight line is I push it. Also I'm going to make a new driveshaft from one of the wheely king ones I'm replacing as its a tad short, and the most extreme angle the rear axle can take it will just barely let the axle pop out. I know it won't hit that angle with the shocks I'm going to use, but I'd prefer it to hold up just in case I decide to ever do something different to it in the future.
Next which is probably Tuesday I will be hooking the front axle to the chassis, and hopefully the rear, and possible do the extension. I already had the front on the chassis, but ran into an issue as I didn't have the axle far enough to the front to fit the body. Now if I was running a axial body it would have been fine, but for the Tamiya body the wheel wells would have been too far back
I was going to go for a 4 point link setup, but issues with how the axle is setup(and how HPI sells parts) kinda squashed that. Instead I decided to make one of those Y pieces, and hook the rear axle to the 2nd, but again there was a bar in the way so I got a little creative, and just hooked the rear axle to the bar that locks the middle axles wheels as there were holes in it already.
Seems I either misjudged the Y-piece I made, or didn't drill the holes perfect so I had to bend the 2 linkages, but hey I think its pretty damn good as I didn't take one single measurement, and did it just by eyeballing it
I know in the pic the wheels don't look aligned all that perfect, but that seems to be just the camera angle as they track in a straight line is I push it. Also I'm going to make a new driveshaft from one of the wheely king ones I'm replacing as its a tad short, and the most extreme angle the rear axle can take it will just barely let the axle pop out. I know it won't hit that angle with the shocks I'm going to use, but I'd prefer it to hold up just in case I decide to ever do something different to it in the future.
Next which is probably Tuesday I will be hooking the front axle to the chassis, and hopefully the rear, and possible do the extension. I already had the front on the chassis, but ran into an issue as I didn't have the axle far enough to the front to fit the body. Now if I was running a axial body it would have been fine, but for the Tamiya body the wheel wells would have been too far back
02-26-2015, 08:04 PM
#18
Thread Starter
Wooo been almost a year since I worked on this. Really wanted to just didn't have time, and when I did have time I couldn't find the parts I had bought ") .
.
Anyways I finally found the parts, and got more threaded rod, bought some screws(home depot SUCKS for metric screws), and made some parts for it. Basically the chassis is now a complete rolling chassis. I need a slightly smaller spur gear though as it was hitting the out drives of the tranny.
Things I had to do I was having issues with the geometry of the drive shaft going to the front, and rear so I went and lowered its ride height which is what those white bars the shocks are screwed into are for. Also now the rear doesn't become decoupled when the shocks compress.
I also changed the shock caps to purple as I kinda thought the orange stuck out
Next I figure out how to mount the body... then after that start making the body... I did hit a snag though body wise the cab I'm gonna use as the base I'm using as a base I'm gonna have to extend almost an inch and a half to cover the spur gear
Just hope I don't need much more material wise as since my last post(actually like 2 weeks after) my LHS that sold RC stuff went out of business so I don't have a supplier for stuff anymore... I might be able to get my stuff from standard model shops though as the body really doesn't really require things that would only be at a RC shop.
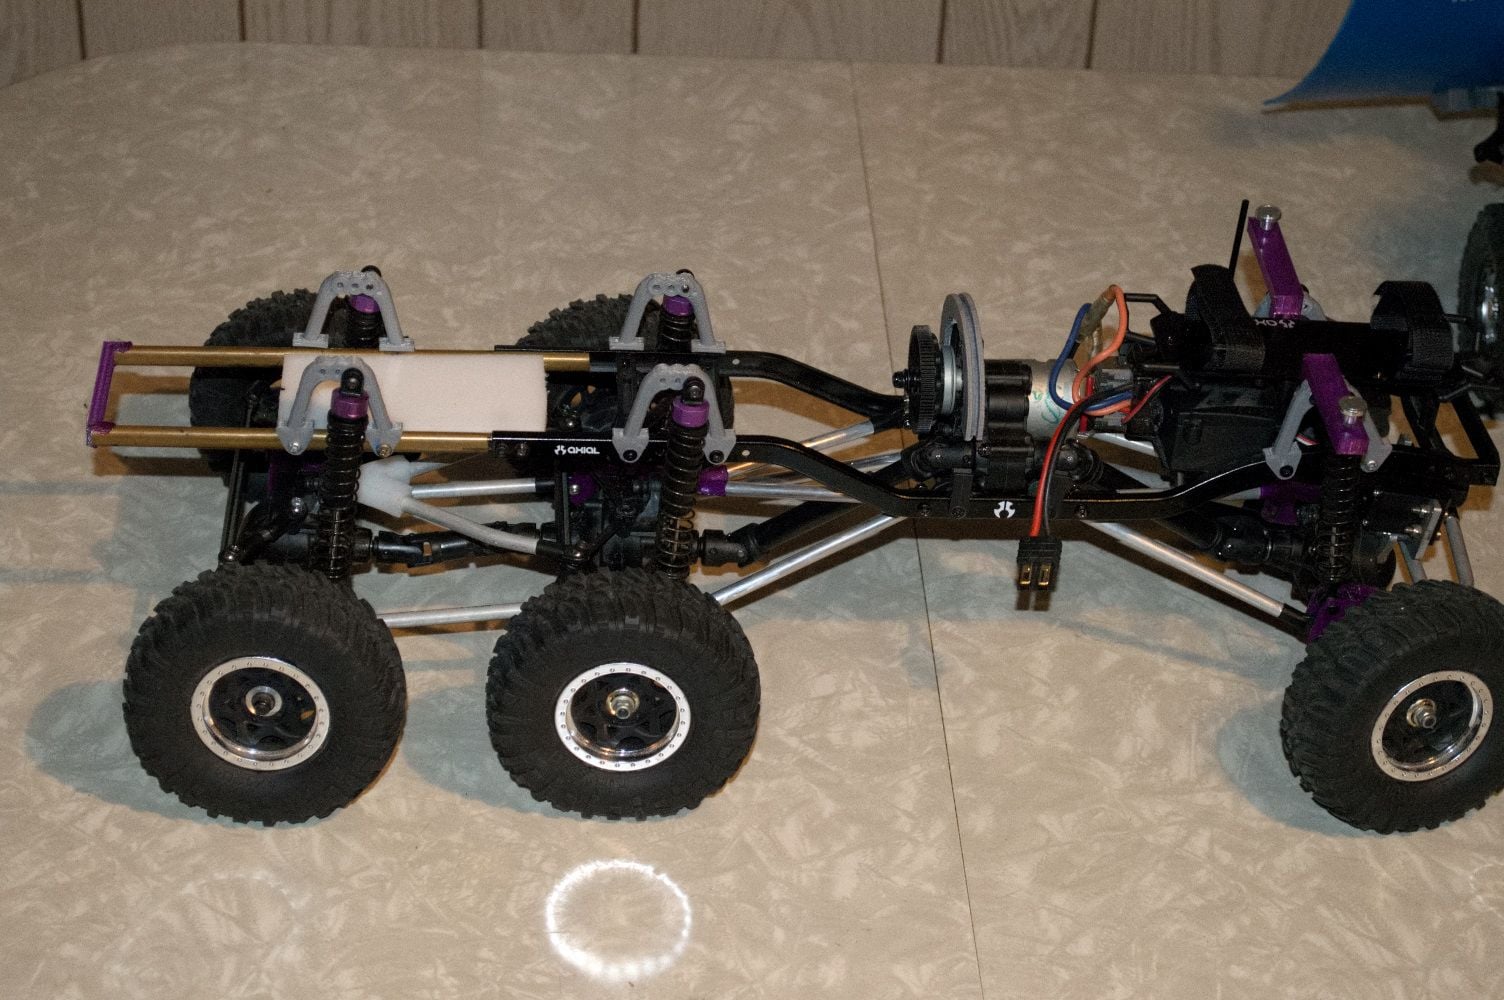
Anyways here are pics of its current state


.Anyways I finally found the parts, and got more threaded rod, bought some screws(home depot SUCKS for metric screws), and made some parts for it. Basically the chassis is now a complete rolling chassis. I need a slightly smaller spur gear though as it was hitting the out drives of the tranny.
Things I had to do I was having issues with the geometry of the drive shaft going to the front, and rear so I went and lowered its ride height which is what those white bars the shocks are screwed into are for. Also now the rear doesn't become decoupled when the shocks compress.
I also changed the shock caps to purple as I kinda thought the orange stuck out
Next I figure out how to mount the body... then after that start making the body... I did hit a snag though body wise the cab I'm gonna use as the base I'm using as a base I'm gonna have to extend almost an inch and a half to cover the spur gear
Just hope I don't need much more material wise as since my last post(actually like 2 weeks after) my LHS that sold RC stuff went out of business so I don't have a supplier for stuff anymore... I might be able to get my stuff from standard model shops though as the body really doesn't really require things that would only be at a RC shop.
Anyways here are pics of its current state
02-27-2015, 05:18 PM
#19

Where ya at in chicagoland Syco?, maybe I can help you out. Lots of places to find parts or metric screws. American Science and Surplus, McMaster-Carr, Hobbytown, and just about any hobby shop that handles model train parts uses metric screws, and stocks styrene for making custom body parts, doesn't have to be an R/C specific store.
02-27-2015, 11:09 PM
#20
Thread Starter
Ohh I''m not too worried about the styrene as I know of 2-3 hobby shops 2 of which I've never been in, the other I know sells trains(if they are still in business been like 7 years since I drove past lol)
I know other places to get metric screws, the home depot thing was more of a rant as they had 4 types of SAE screws in every size, and style you could imagine, but 1 metric screw style. I only looked there as I was there buying the threaded rod for the links already, and didn't wanna drive elsewhere. The few they had worked fine for what I needed though
As for American science and surplus been there quite a few times... funny enough I never noticed they sold screws lol
Main reason I hope I don't need more if the parts I got laying around won't fit I might have to look at parts physically for body mounts. Pretty much that was the only time I went to the LHS that went under was when I needed to see the part in person to determine if it would work(well I used to go more, but management changed, and made a uncomfortable environment)
Last edited by SyCo_VeNoM; 02-27-2015 at 11:12 PM.
02-22-2019, 07:41 PM
#21
Thread Starter
Holy crap it's been over 4 years since I started this project god does the time fly. I gave up making the body from styrene sheets as that was a flop. Turns out I suck at forming the stuff. Also didn't help the stuff I bought was quite thick, and hard as hell to bend, and would warp badly when it shrunk.
Anyways I'll do a few update as I've started working somewhat seriously on this monstrosity again.
1st I finally got a spur gear for it, and hooked up electronics so it does move now this was a big hangup as I tried 5 spurs, and all were hitting the drive shaft. It was some traxxas spur gear I had to attack with my old trusty dremel I had to remove the nubs off the back, and make the holes slightly larger(about 2-3mms) as they were JUST barely off in size from the scx10 spur mounting holes
2nd I re-started making the body as I now have a 3d printer, and for the past 2 years or so since I got it I was looking for files for a deuce body for it, and finally found one someone made 3 months back, and have been scaling it to fit my truck(guy made it for a traxxas model), and printing it slowly. Most of the cab is printed/assembled, but still needs some bondo to smooth it out, and fill in some of the gaps so I'll have to wait till it gets warm out. Planning to start the rear cargo area soon.
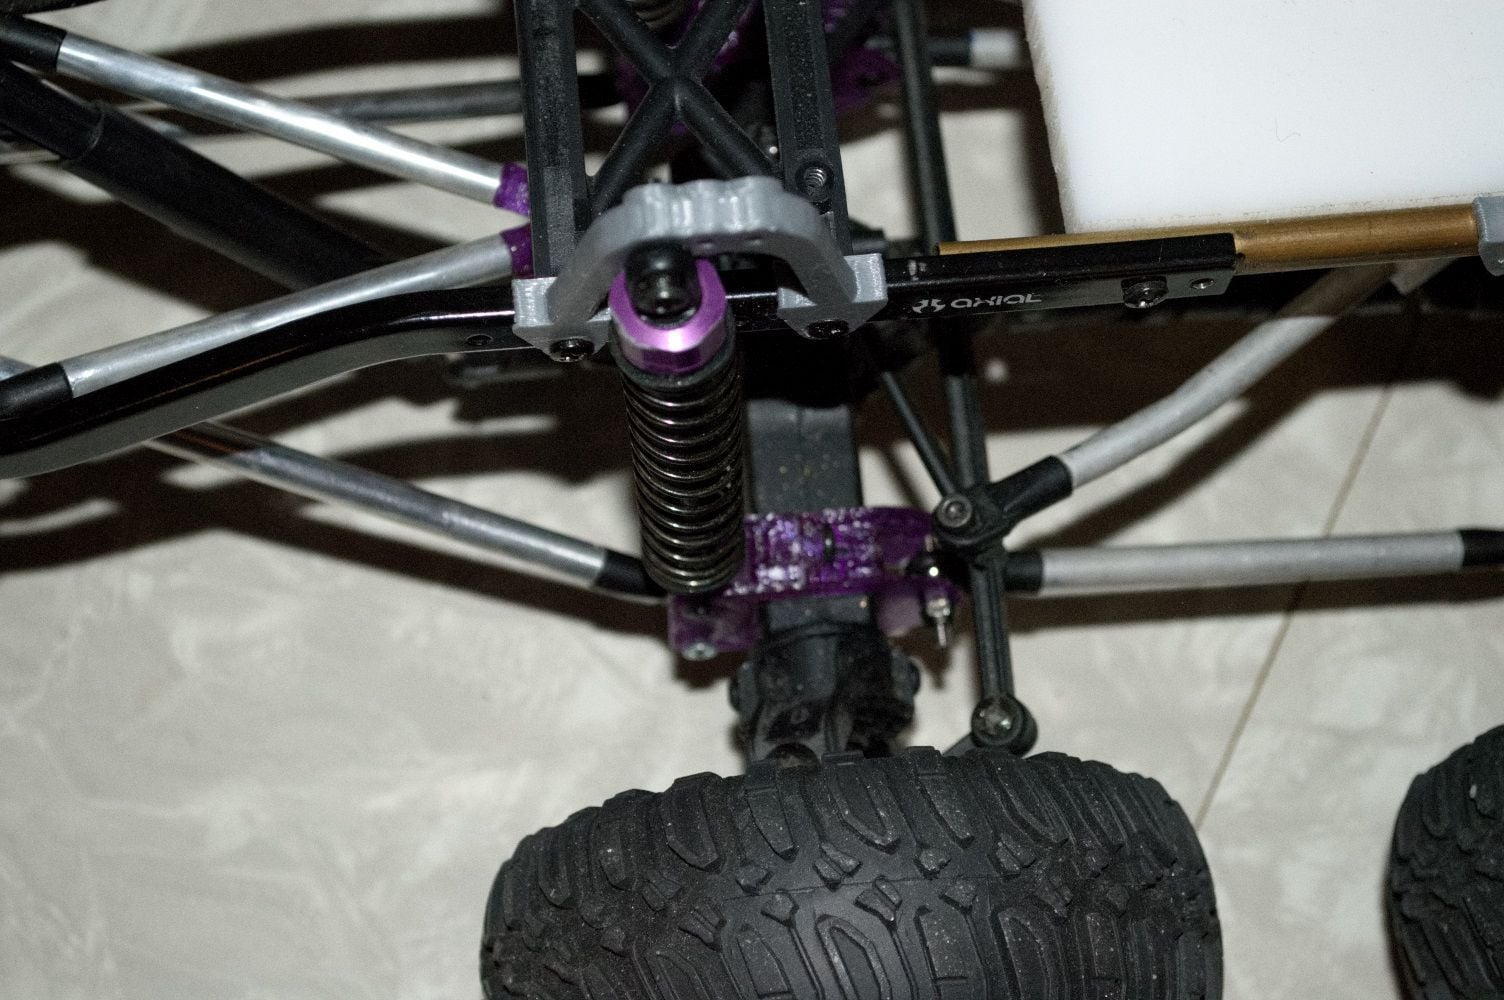
3rd had to figure out how to mount the cab to the chassis specially as it hits the gearbox ended up printing a half moon type cover for the gear box with a groove, and cut a area out of the cab so it can slot in. Still need to do the front mounts which I'm planning on being magnetic which are the purple posts I need to make a piece in the body to allow me to mount metal to it so they have something to grip as it is kinda rounded.
4th I cut down every link some as I changed out how the shocks, and links attach. I made new clamps(I guess it would be called that) which go around the Wheely King axel to make it mount more like a SCX10's.which also fixed a lot of the issues it had with the links angles being too sharp where it had issues moving.
5th Replaced the shocks short RS4 shocks I screwed into the chassis rail with the rears shocks off a MT2 as they are quite a bit longer, and also added 3d printed shock towers so now the axles can move more.
So yea that was mostly the past few weeks of work so hopefully it will be done sooner then later as most the hard stuff is done.
Note the muticolor stuff is due to running out of filament, and the place I was buying filament is now a 40+ miles away drive, but who the hell cares as it will all be painted in the end. Been buying some off Amazon, but the purple stuff so far is the only one I like, and extrudes properly.

Anyways I'll do a few update as I've started working somewhat seriously on this monstrosity again.
1st I finally got a spur gear for it, and hooked up electronics so it does move now this was a big hangup as I tried 5 spurs, and all were hitting the drive shaft. It was some traxxas spur gear I had to attack with my old trusty dremel I had to remove the nubs off the back, and make the holes slightly larger(about 2-3mms) as they were JUST barely off in size from the scx10 spur mounting holes
2nd I re-started making the body as I now have a 3d printer, and for the past 2 years or so since I got it I was looking for files for a deuce body for it, and finally found one someone made 3 months back, and have been scaling it to fit my truck(guy made it for a traxxas model), and printing it slowly. Most of the cab is printed/assembled, but still needs some bondo to smooth it out, and fill in some of the gaps so I'll have to wait till it gets warm out. Planning to start the rear cargo area soon.
3rd had to figure out how to mount the cab to the chassis specially as it hits the gearbox ended up printing a half moon type cover for the gear box with a groove, and cut a area out of the cab so it can slot in. Still need to do the front mounts which I'm planning on being magnetic which are the purple posts I need to make a piece in the body to allow me to mount metal to it so they have something to grip as it is kinda rounded.
4th I cut down every link some as I changed out how the shocks, and links attach. I made new clamps(I guess it would be called that) which go around the Wheely King axel to make it mount more like a SCX10's.which also fixed a lot of the issues it had with the links angles being too sharp where it had issues moving.
5th Replaced the shocks short RS4 shocks I screwed into the chassis rail with the rears shocks off a MT2 as they are quite a bit longer, and also added 3d printed shock towers so now the axles can move more.
So yea that was mostly the past few weeks of work so hopefully it will be done sooner then later as most the hard stuff is done.
Note the muticolor stuff is due to running out of filament, and the place I was buying filament is now a 40+ miles away drive, but who the hell cares as it will all be painted in the end. Been buying some off Amazon, but the purple stuff so far is the only one I like, and extrudes properly.
Last edited by SyCo_VeNoM; 02-22-2019 at 07:44 PM.
02-26-2019, 05:38 PM
#23
Thread Starter
Thanks.
My biggest hangup was the body, but now it is starting to come together. Too bad I have to wait till it warms up to work smoothing out the ripples, and spots where it doesn't 100% fit together properly as I have to do it out in the garage.
3D printer has really helped with this. If only I had this thing years ago, and all the stuff I could have come up with in my prime time for screwing around with RC's.
The rear though is going to be a bit of an issue though as I am going to have to cut it in pieces to print as my print bed is only 240x240, and scaling it is going to be fun as it was designed as a short bed for a 4 wheel version.
02-26-2019, 05:43 PM
#24
Right on, lots of parts and options now available now then years ago too. If your looking to go true military and don't need all that travel could look at the knock off tamiya stuff from Hercules hobbies to do some leaf springs. Would get rid of the shock posts.
02-28-2019, 04:43 PM
#25
Thread Starter
I originally had shorter shocks that didn't have towers, but found the travel from the shocks made the 2 axles.in the back pointless.
So in truth I'm going for functionality over realistic looks.
As for the rear I am planning to do a cover for it so the shock towers will be hid as well as the spur gear as it juts out right into where the bed will be by some bit. Maybe I'll make something like a bench to go cover the shocks to make them harder to see.
I also might make another more modern body for it on the side for when I want to use it for something else
Last edited by SyCo_VeNoM; 02-28-2019 at 06:24 PM.