


Albatros D.III Build along
 01-22-2012, 04:38 AM
#901
Junior Member
My Feedback: (5)
Join Date: May 2004
Location: new holland,
PA
Posts: 8
Likes: 0
Received 0 Likes
on
0 Posts
yesterday i finished the build of the new hort. stab and it came in at 2.1 oz lighter than the stab i had built first from the kit supplied wood type of build. and as for stiffness the new build i believe is going to be stronger with alittle less flex.
as for the fuse i went back to setting up the cabine solder lugs for the top wing and found one of the cabine verticle wires is a little short but still can work . but to be safe i plan to cut a shallow groove in the wire at the solder joint to give it a more positive locking effect when soldered.
as for the engine, when i built the ply fuse box and mounted the firewall i had to recess the firewall 3/4" to allow for the engine which i plan to use the dle 20cc i bought for it. and in the process of mounting the engine i allowed for 2 degrees of down and right thrust. and the reason i went with a 20cc is because i asked funaero about a gas engine size and on his sujestion is why i am using a 20cc gas.
i am trying to find some gages to doctor up the dash aera i plan to have when i place the 12" pilot i purchased for the albi and i found two sources ,one being jtec and the other is from iflytailes.com . put i am still looking !
 01-25-2012, 02:52 PM
#905
Junior Member
My Feedback: (4)
Join Date: Oct 2010
Location: aurora,
CO
Posts: 13
Likes: 0
Received 0 Likes
on
0 Posts
I found some time to start on my build last night, here is what i have so far. Your alby looks really good N11, I cant wait till mine starts looking like an airplane.
 01-31-2012, 01:10 PM
#908
Junior Member
Join Date: Jan 2012
Location: , LA
Posts: 2
Likes: 0
Received 0 Likes
on
0 Posts
Ibuilt one aboutthree years ago. It was beautiful ( Verner Voss paint scheme)and had several GREAT filghts! However, Icrashed it due to suspected FM Radio interference - or too slow a turn into wind { not sure which }; yet plane was destroyed.After Igot over the crying and pain of the loss - Idecided to built TWO more! One with Paul Baumer paint scheme...........and another with Verner Voss paint scheme to replace the one Ilost. Will have Saito 91 in both and 2.4 Radio in both. Did have to add whole lot of nose weight in original plane. My two new Albatros are nowin what I'd call - ARF stage -all parts built, covered , and painted - just waiting for radio installatoin- final assembly - balancing and so on ( been working two years off and on on them). Anyway, I've read this thread many times - yet this is first time posting. So.......Iknow you can add my 3planes to the 5 you say were built. More likely than not many dozens of this fine kit have been built.. Best Wishes...............
02-03-2012, 08:28 AM
#909
Banned
Join Date: Jan 2010
Location: Lacona, NY
Posts: 1,840
Likes: 0
Received 0 Likes
on
0 Posts
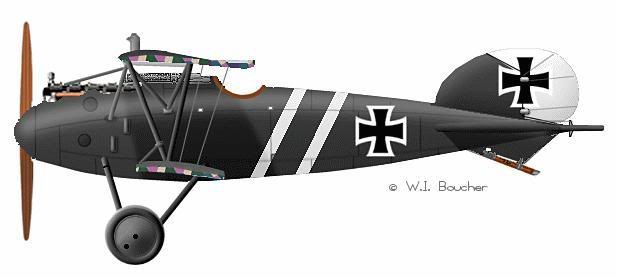
This is the skin I'm going to do since I'm a big Jacobs and Jasta 7 fan, and I'll be covering it in Solartex. It will look nice next to my Jacobs Dr1.
Pete
Pete
02-03-2012, 09:05 AM
#910
Junior Member
Join Date: Jan 2012
Location: , LA
Posts: 2
Likes: 0
Received 0 Likes
on
0 Posts
Great colors! Istained my Fusalages with different wood tones - then put on markings - and then put on 6 or 7 coats of Min-wax polyurathene satin - varnish on top of it all. The varnish is definitely fuel proof -and the wood grain and markings show beautifully through it. I also used Solertex - and Nelson Hobby paint; that stuff is easy to work with = water based enamel. I'm presently working on the dummy engines.
Since Igot a fancy little camera for Christmas, maybe Ican post some photos of finisned planes when done; likly several months from now. Would be great to have a "Fly-in" of these Albatros' somewhere. Too few people seem to be in interested in the smaller planes these days [ not that the FunAero Albatros istiny]. But most people seem to have more interest in Giant Scale and etc. My pholosophy is that if it can't fit in the back of my car or SUV then Idon't want it. Best wishes with your build.
02-03-2012, 02:45 PM
#911
Junior Member
My Feedback: (5)
Join Date: May 2004
Location: new holland,
PA
Posts: 8
Likes: 0
Received 0 Likes
on
0 Posts
to all past builders or ones that are in process ! the instructions drop off at several points of how things go and are not explained, and right now i am at the point of working on the cowl. and having built the two halfs i am finding that they do not match up at the top and i am looking for ideas of how to attach the cowl fast to the fuse. and so far the only thing i can figure out is to screw it to the fuse from the inside, but the screws will be hard to get to when the cowl is sheeted. let alone the problem putting the 2 halfs together
HELP !
i am finding this to be a very hard aircraft to build and i have built over a 100 or so in 30 yrs of modeling !
HELP !
i am finding this to be a very hard aircraft to build and i have built over a 100 or so in 30 yrs of modeling !
02-03-2012, 03:55 PM
#912

My Feedback: (151)
yes the instriuctions are not all there. Ihad called them a few years ago when I was working on mine and asked them about that. They said they were complete.Could have fooled me. They evensent me another set whichwas exactly the same thing I had.Now mine has been sitting for a couple for years. Mostly becuase I lost interest and just have not sat down long enough to figure out what i want to do to overcome the issues Isaw.
However, I did drag it out last week as I am tired of looking at it sitting in the corner and really do want to finish it SoI finallysheeted the center section of both wings andstarted looking at the other issues I saw before. I am currently re-doing the piecesthat hold the struts onto the wing withsome G-10. Some guys here have stated problems with them being weak and breaking. The picture shows where I am at with that andI just need to dothe final rounding to match the originals.
My plan for the cowl is to attachthe bottom half ofthe cowl to the fuse and then find a way to attach the top half to the bottom half. This way i can get at it if I need to. My cowl halvesline up just fine so I don't know what happened when you did yours. The picture shows my cowl and spinner way back when I did it.
I am also looking at the dummy engine to see how to get that on and off if I need to change the glow plug. I know I will need a remote glow but I still need access to get to the glow plug.
I am also looking at how I want to hinge the ailerons. Not sure if i am going to use robarts or some other type. I am just not sure exactly where toput the hinges. From the topon an angle into the wing and aileronordown some so they are in astraight line between the aileron and the TE.After these I will be ready to do the finishing for it.
I am sure the guys who have finished theirswill chime in. This is not the first kit I ever built in 25 plus years either as I have built dozens and have even scratch built a couple but there is a lot left up to the builder on this one.
ORIGINAL: muss51
to all past builders or ones that are in process ! the instructions drop off at several points of how things go and are not explained, and right now i am at the point of working on the cowl. and having built the two halfs i am finding that they do not match up at the top and i am looking for ideas of how to attach the cowl fast to the fuse. and so far the only thing i can figure out is to screw it to the fuse from the inside, but the screws will be hard to get to when the cowl is sheeted. let alone the problem putting the 2 halfs together
HELP !
i am finding this to be a very hard aircraft to build and i have built over a 100 or so in 30 yrs of modeling !
02-03-2012, 05:37 PM
#913
Junior Member
My Feedback: (5)
Join Date: May 2004
Location: new holland,
PA
Posts: 8
Likes: 0
Received 0 Likes
on
0 Posts
i have looked through this forum at all the pictures and can not find how the cowl is attached except for the fibeglass cowl which shows screws. and on the electric ones it looks like the bottom is glued and does not show any holes for the top half. but the ones that have fuel engines there is nothing showing how the cowl is fastened !
02-03-2012, 06:54 PM
#914
My Feedback: (151)
I understand. I think they are going through the nose ring into the firewall with the screws or bolts if they have blind nuts in the fuse. they might have holesdrilled in the nose ring for the ball wrench or screw driver to go through as there is plenty of meat there. That's my guess and hopefully they will chime in to let you know for sure. In my previous post I was just telling you what I think I may do but I won't know for sure until I look at it again.
Good luck on your build....
Good luck on your build....
ORIGINAL: muss51
i have looked through this forum at all the pictures and can not find how the cowl is attached except for the fibeglass cowl which shows screws. and on the electric ones it looks like the bottom is glued and does not show any holes for the top half. but the ones that have fuel engines there is nothing showing how the cowl is fastened !
i have looked through this forum at all the pictures and can not find how the cowl is attached except for the fibeglass cowl which shows screws. and on the electric ones it looks like the bottom is glued and does not show any holes for the top half. but the ones that have fuel engines there is nothing showing how the cowl is fastened !
02-04-2012, 06:45 AM
#915
ORIGINAL: thebluemax
I am sure the guys who have finished theirs will chime in.
I had chose to glue both halves together and directly to the fuse and sheathed it as one piece to keep it a clean appearance. In relation to that I made the cutout on top for the saito to remove and install pretty easy with a certain slight twist pattern as the process - just the fuel lines are a bit tight to hook up. I`m running a glow driver to start (the FA 100 seems to run the flight OK without the driver on). Had to chopped some of the front cylinder off on the dummy engine to clear the 100`s head & plug and that is held in by 4 screws and it does remove with just enough to clear the guns and such. The bottom of the front cowl section was opened up in front of the LG compartment for ventilation of heat. On the wing strut mounting - spruce blocks were glued under the ply mount by the rib and used Dubro`s metal gear straps for the attachment point, nice and strong as the ply ones in the kit just are too weak. There are most definitely problems left to the builder to figure out with the supplied plans and instruction manual and for sure not a quick breeze through project.
Jim
02-04-2012, 08:08 AM
#916
My Feedback: (151)
Hi Jim,
Thanks for the ideas. Ihave a YS-110 in mine and Iplan to be usingthe Switchglo as my onboard glow driver. I still need to work on the exhaust. I might try using a turboheader adapter and a performasnce specialities muffler instead of the tube that is on there. I am afraid that maybe too loud. I also like your Dubro strap idea. Looks easy to do and will be very effective.
Thanks for the ideas. Ihave a YS-110 in mine and Iplan to be usingthe Switchglo as my onboard glow driver. I still need to work on the exhaust. I might try using a turboheader adapter and a performasnce specialities muffler instead of the tube that is on there. I am afraid that maybe too loud. I also like your Dubro strap idea. Looks easy to do and will be very effective.
ORIGINAL: N11
ORIGINAL: thebluemax
I had chose to glue both halves together and directly to the fuse and sheathed it as one piece to keep it as clean appearance. In relation to that I made the cutout on top for the saito to remove and installs pretty easy with a certain slight twist pattern as the process - just the fuel lines are a bit tight to hook up. I`m running a glow driver to start (the FA 100 seems to run the flight OK without the driver on). Had to chopped some of the front cylinder on the dummy engine to clear the 100`s head & plug and that is held in by 4 screws and it does remove with just enough to clear the guns and such. The bottom of the front section was opened up in front of the LG compartment for ventilation of heat. On the wing strut mounting - spruce blocks were glued under the ply mount by the rib and used Dubro`s metal gear straps for the attachment point, nice and strong as the ply ones in the kit just are too weak. There is most definitely problems left to the builder to figure out with the plans and manual supplied is for sure not a quick breeze through project.
Jim
02-04-2012, 08:56 PM
#919
Junior Member
Join Date: Jan 2012
Location: , LA
Posts: 2
Likes: 0
Received 0 Likes
on
0 Posts
Re: HOW IS THE COWL ATTACHED? I use a Saito 91 and here is what I did.
Iused small socket head screws - approx 4 for he top portion of the cowl and approx 3 for the bottom half. Due to the very tight fit - with very little room to work - this is a very tedious job! After all......you must be able to take the cowl off - with the engine in there. Use a ball driver - and socked head screws. Put the ball driver through whatever openings you can find on front of cowl or on top where it is open for engine cylinder. Don't try to use regular slot head or phillips head screws because the regular screw driver will continully slip out in the tight / limited space you have to work. A ball driver really comes in handy with this. Also - - where the cowl meats the bulkhead of the fuselage - I put a rubber washer on each screw between the back of the cowl and where it meets the fuselage - to absorb some shock; it helps keep it tight! It takes "time" - don't try to rush. If you are carefull to line everything up it will look good. I had several flights with it like this and never had a loose cowl. I did have to put some holes in my cowl, however because my Saito 91 was getting too hot. Using the socket head screws and ball driver - it is not difficult to remove and put the cowl back on when needed.
02-06-2012, 03:26 AM
#920
Junior Member
My Feedback: (5)
Join Date: May 2004
Location: new holland,
PA
Posts: 8
Likes: 0
Received 0 Likes
on
0 Posts
thanks you bluemax for the last pictures that you posted,because after i saw how you did your cowl i was able to get my cowl mounted. and also thank you to j_otay which put the icing on how to mount the cowl.
looking like i can not go true to scale on the engine, because of the dle 20cc engine. after measuring i found out that the front cyl. will be right at the location of the spark plug. so i will fly mine as a 5cyl dummy engine. and the dummy engine is planned to be screwed fast to the fuse by its base plate after i first lay down a 1/32 piece of ply before the cylinders .
to get clearance for the exhaust and keep a good fit on the cowl i had to make an exhaust system for the engine out of brass plumbing fittings and the end result looks about like the bluemax's exhaust. and yes it is a little heavier than stock, but everything i have saw so far that weight has to be added up front.
02-06-2012, 07:19 AM
#921
My Feedback: (151)
Good deal. Glad you got it worked out.You just have to take your time and think it out since they really don't tell you anything. Although it would be nice if they had told you somethingso you at least have an idea.I have coveredmy cowl withfiberglass cloth to toughen it up a little. I felt itwas a littleflimsyafter sanding it to shape.
ORIGINAL: muss51
thanks you bluemax for the last pictures that you posted,because after i saw how you did your cowl i was able to get my cowl mounted. and also thank you to j_otay which put the icing on how to mount the cowl.
looking like i can not go true to scale on the engine, because of the dle 20cc engine. after measuring i found out that the front cyl. will be right at the location of the spark plug. so i will fly mine as a 5cyl dummy engine. and the dummy engine is planned to be screwed fast to the fuse by its base plate after i first lay down a 1/32 piece of ply before the cylinders .
to get clearance for the exhaust and keep a good fit on the cowl i had to make an exhaust system for the engine out of brass plumbing fittings and the end result looks about like the bluemax's exhaust. and yes it is a little heavier than stock, but everything i have saw so far that weight has to be added up front.
02-06-2012, 08:30 AM
#922
Senior Member

Join Date: Jun 2002
Location: Louisa,
VA
Posts: 790
Likes: 0
Received 0 Likes
on
0 Posts
Nice build! I always look forward to seeing another Albitri in the air. An item of note:
This is the skin I'm going to do since I'm a big Jacobs and Jasta 7 fan, and I'll be covering it in Solartex. It will look nice next to my Jacobs Dr1.
The color plate you showed is of an Albatros DVa, not a DIII. You can tell by the little strut portruding from the main V-strut and out to the LE of the bottom wing. Of course you can do a DIII in these colors, but if accuracy is your aim, I thought I'd bring it to your attention. But it might not be.....and thats cool too.
Anyway, all the best and keep up the good work!
ZZ.
This is the skin I'm going to do since I'm a big Jacobs and Jasta 7 fan, and I'll be covering it in Solartex. It will look nice next to my Jacobs Dr1.
The color plate you showed is of an Albatros DVa, not a DIII. You can tell by the little strut portruding from the main V-strut and out to the LE of the bottom wing. Of course you can do a DIII in these colors, but if accuracy is your aim, I thought I'd bring it to your attention.
But it might not be.....and thats cool too.Anyway, all the best and keep up the good work!
ZZ.
03-13-2012, 02:02 PM
#923
Junior Member
My Feedback: (4)
Join Date: Oct 2010
Location: aurora,
CO
Posts: 13
Likes: 0
Received 0 Likes
on
0 Posts
I found some more time to continue my build (life got in the way a bit). I now have the rudder, both stab's, and both wings framed out. I'll be starting on the fuse in a couple days. I'll post some pics of my progress so far later today.
03-24-2012, 12:08 AM
#925
Junior Member
Join Date: Jan 2012
Location: aurora, CO
Posts: 3
Likes: 0
Received 0 Likes
on
0 Posts
hey what airfield do you fly at i would like to see that thing fly i bought one about the same time but need to finish some planes first before i start mine and b t w did you get the aloy spinner ? thanks looks good so far