


Panzergruppe Tarraco Battlegrounds: the Panzodrom
 05-04-2018, 09:44 AM
#151
That is super cool guys!
 07-16-2018, 11:54 AM
#153

Thread Starter

Join Date: May 2011
Location: Creixell, SPAIN
Posts: 191
Likes: 0
Received 0 Likes
on
0 Posts
hi again guys
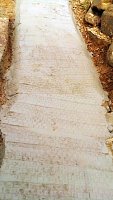
yesterday, the hottest day to date in the Panzodrom, we, the four sufferers made a stand and were able to build almost the full main road. Luckily we used the trees shadows to our health and almost half the time we were covered from the direct sunlight
here you are some pics of the progress:


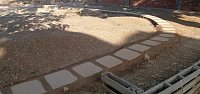
wiping the excess of concrete from the top of the tiles


with the excess of concrete we mixed we build a little bit more of the rocks on the 'high' part of the river
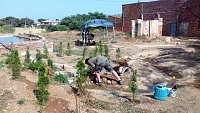


next time we will start to build the secondary roads
best regards
yesterday, the hottest day to date in the Panzodrom, we, the four sufferers made a stand and were able to build almost the full main road. Luckily we used the trees shadows to our health and almost half the time we were covered from the direct sunlight
here you are some pics of the progress:
wiping the excess of concrete from the top of the tiles
with the excess of concrete we mixed we build a little bit more of the rocks on the 'high' part of the river
next time we will start to build the secondary roads
best regards
07-18-2018, 02:15 PM
#154
That is a great idea using paving stones to create you main road!!!
07-20-2018, 03:04 AM
#155
Thread Starter
Join Date: May 2011
Location: Creixell, SPAIN
Posts: 191
Likes: 0
Received 0 Likes
on
0 Posts
hi guys
thanks Maus! these were surplus paving stones i had stored on my house for years, so finally i found a better live for them ;-)
oh. and they are inverted of course, we put them upside down, so the part visible is only the concrete, not the pebbles !
best regards
thanks Maus! these were surplus paving stones i had stored on my house for years, so finally i found a better live for them ;-)
oh. and they are inverted of course, we put them upside down, so the part visible is only the concrete, not the pebbles !
best regards
07-20-2018, 12:04 PM
#156
Yes, I am going to use some of those in my back yard!!!
07-22-2018, 04:39 AM
#158
Wow, amazing work there guys! Wish I could get a closer look and run some tanks on it!
07-22-2018, 09:51 AM
#159
Thread Starter
Join Date: May 2011
Location: Creixell, SPAIN
Posts: 191
Likes: 0
Received 0 Likes
on
0 Posts
07-23-2018, 01:06 PM
#160
Jussek, Will share once I have the layout. Using these stones as the main road will make maintenance a whole lot easier as mos of my back yard is grass.
09-29-2018, 08:55 AM
#161
Thread Starter
Join Date: May 2011
Location: Creixell, SPAIN
Posts: 191
Likes: 0
Received 0 Likes
on
0 Posts
hello guys
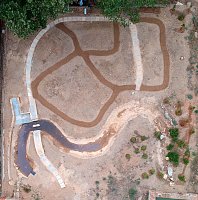
some ore advances... this project is going slow, but it's going!
some weeks ago, we did the first test to build the secondary roads network... and failed. As i said in another post, we planned to do them with a type of sandstone, and them apply a polymeric compound to consolidate the sand.
i think we did it in the wrong way, because the polymers didn't penetrate deep enough, so it became fragile, and we have has several heavy storms in the area these days, so the work is ruined. I will find another way to do these roads...
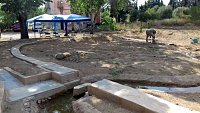
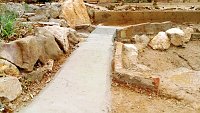
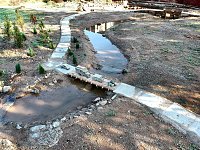
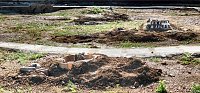
in any case, this is the aerial view just after we finished the roads os the western side of the river...
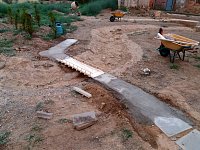
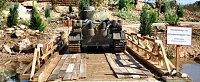
next step, the secondary bridge fittings, these pics are from yesterday
arranging the components on site:
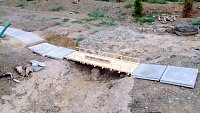
and after the work:


this is all for today!
best regards!
some ore advances... this project is going slow, but it's going!
some weeks ago, we did the first test to build the secondary roads network... and failed. As i said in another post, we planned to do them with a type of sandstone, and them apply a polymeric compound to consolidate the sand.
i think we did it in the wrong way, because the polymers didn't penetrate deep enough, so it became fragile, and we have has several heavy storms in the area these days, so the work is ruined. I will find another way to do these roads...
in any case, this is the aerial view just after we finished the roads os the western side of the river...
next step, the secondary bridge fittings, these pics are from yesterday
arranging the components on site:
and after the work:
this is all for today!
best regards!
09-29-2018, 08:56 AM
#162
Thread Starter
Join Date: May 2011
Location: Creixell, SPAIN
Posts: 191
Likes: 0
Received 0 Likes
on
0 Posts
hello guys
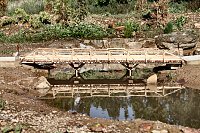
talking about the 'pionierebr�cke'... as I'm a bit of a rivetcounter, i did not like the way it was finished... so after thanking our friend for the work done, i put myself on the way to solve some of the faults...
before:
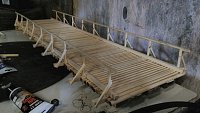
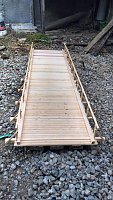
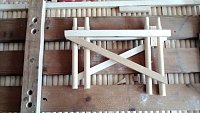
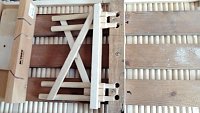
i almost dismantled the bridge, to relocate some of the beams, and cut new ones discarding the ones that were too short...
then i put it on his place, in order to calculate the supports sizes, and cut the logs in situ
building the timber frames for the supports (they will be detachable to save storage/transport space)
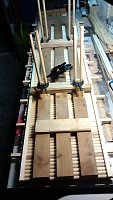


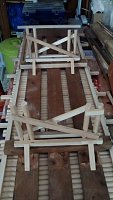
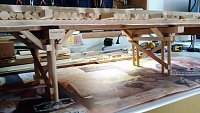
then i completely reconstructed from zero the railing, supports and tensioners...
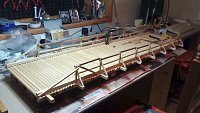
i weathered the wood with a very diluted mix of Judea's bitumen:

say hello to G�nther


at this point I have not decided yet how to finish it, with planks, with a layer of soil, both... or as it is now.
thanks for watching chaps!
best regards
talking about the 'pionierebr�cke'... as I'm a bit of a rivetcounter, i did not like the way it was finished... so after thanking our friend for the work done, i put myself on the way to solve some of the faults...
before:
i almost dismantled the bridge, to relocate some of the beams, and cut new ones discarding the ones that were too short...
then i put it on his place, in order to calculate the supports sizes, and cut the logs in situ
building the timber frames for the supports (they will be detachable to save storage/transport space)
then i completely reconstructed from zero the railing, supports and tensioners...
i weathered the wood with a very diluted mix of Judea's bitumen:
say hello to G�nther
at this point I have not decided yet how to finish it, with planks, with a layer of soil, both... or as it is now.
thanks for watching chaps!
best regards
10-25-2018, 09:44 AM
#163
Thread Starter
Join Date: May 2011
Location: Creixell, SPAIN
Posts: 191
Likes: 0
Received 0 Likes
on
0 Posts
hello sirs
in the last month we have worked hard
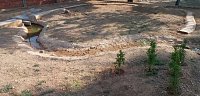
we have extended the 'forest' around the river's headwaters, this time with 20 little Chamaecyparis lawsoniana, we hope they will grow soon to scale...
this is how they look now:


also, we have finished the main road (that is, we have run out of tiles! )


it seems to make an strange twist once converging to the main bridge access, but this point actually is a crossroads, so it lacks still two of the arms, below you will see one of these 'arms' already built


and an old wall from an old cottage, here there will be some ruins soon

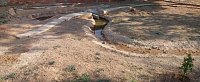
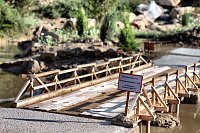
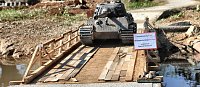
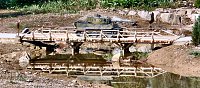
the third 'arm' of the crossroads, leading to the river gorges and the watch path, but then, we have put there a fixed bridge, the third one


the bridge itself
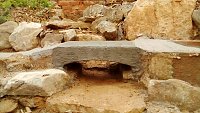

with some textured rollers i tried to print some cobblestone looking
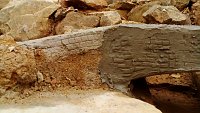


well, this bridge is only 25cm width.. so some ice nerves to the driver who dares to cross this gorge over a 25cm deep river...
and then... the big awaited meeting took place past sunday!
in the last month we have worked hard
we have extended the 'forest' around the river's headwaters, this time with 20 little Chamaecyparis lawsoniana, we hope they will grow soon to scale...
this is how they look now:
also, we have finished the main road (that is, we have run out of tiles! )
it seems to make an strange twist once converging to the main bridge access, but this point actually is a crossroads, so it lacks still two of the arms, below you will see one of these 'arms' already built
and an old wall from an old cottage, here there will be some ruins soon
the third 'arm' of the crossroads, leading to the river gorges and the watch path, but then, we have put there a fixed bridge, the third one
the bridge itself
with some textured rollers i tried to print some cobblestone looking
well, this bridge is only 25cm width.. so some ice nerves to the driver who dares to cross this gorge over a 25cm deep river...
and then... the big awaited meeting took place past sunday!
10-25-2018, 10:14 AM
#164
Thread Starter
Join Date: May 2011
Location: Creixell, SPAIN
Posts: 191
Likes: 0
Received 0 Likes
on
0 Posts
heya guys
as I said in the previous post... the oct-21 we had a meeting in the Panzodorm!
the weather during the days before was awful, including the first hurricane arriving to south europe, although already turned into a tropical storm once touching land... but it generated heavy rains and storms, well, it was raining friday and even saturday! but... sunday 21 dawned with a bright sun so...
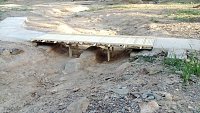
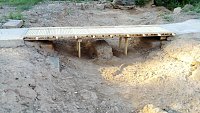
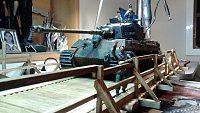
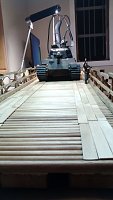
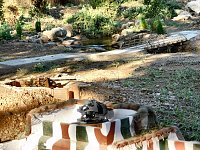
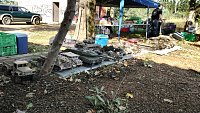
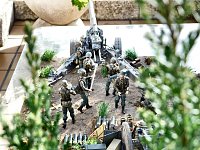
here you are several pics! it was a lot of fun, for the first time we had the three bridges operational, the main road finished, and put almost the 70% of the scenography
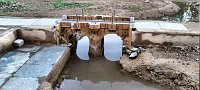
the new pionierebr�cke, with low water on the river

after filling the river
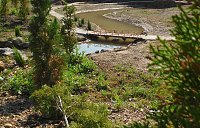
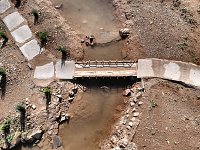
several vehicles were crossing it all day long!


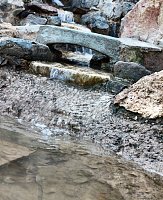
reflections on the water

the fixed concrete bridge over the gorges
after negotiating this small bridge...

and now several panoramic shots of the scenography


more to follow ...
as I said in the previous post... the oct-21 we had a meeting in the Panzodorm!
the weather during the days before was awful, including the first hurricane arriving to south europe, although already turned into a tropical storm once touching land... but it generated heavy rains and storms, well, it was raining friday and even saturday! but... sunday 21 dawned with a bright sun so...
here you are several pics! it was a lot of fun, for the first time we had the three bridges operational, the main road finished, and put almost the 70% of the scenography
the new pionierebr�cke, with low water on the river
after filling the river
several vehicles were crossing it all day long!
reflections on the water
the fixed concrete bridge over the gorges
after negotiating this small bridge...
and now several panoramic shots of the scenography
more to follow ...
10-25-2018, 10:17 AM
#166
Thread Starter
Join Date: May 2011
Location: Creixell, SPAIN
Posts: 191
Likes: 0
Received 0 Likes
on
0 Posts
... the last batch of pics

some accidents happened too


we did some artillery strikes testings...

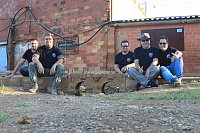
the final pics of the day... we, the assistants !
and the lamps of the bridge on as the light was fading
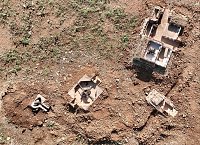
this is the aerial view

soon i will upload some videos we took!
thanks for watching
best regards
some accidents happened too
we did some artillery strikes testings...
the final pics of the day... we, the assistants !
and the lamps of the bridge on as the light was fading
this is the aerial view
soon i will upload some videos we took!
thanks for watching
best regards
10-25-2018, 10:26 AM
#167
Thread Starter
Join Date: May 2011
Location: Creixell, SPAIN
Posts: 191
Likes: 0
Received 0 Likes
on
0 Posts
hi again
we took several videos, some of them are big files, and they are still uploading.. i will post them once completed
but here you are the firsts finished
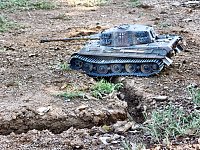
the first test of an artillery strike
a few seconds from the drone views over the river headwaters and the pionierebr�cke
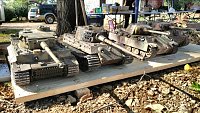
a tamiya leopard fording the river when it was with little water
the K�Ti negotiating the narrow mountain bridge, i've reduced the speed of a part of the video because i liked to watch the way the suspension works...
that's all for now, the other two remaining videos are big, so they will take a while to upload...
best regards
we took several videos, some of them are big files, and they are still uploading.. i will post them once completed
but here you are the firsts finished
the first test of an artillery strike
a few seconds from the drone views over the river headwaters and the pionierebr�cke
a tamiya leopard fording the river when it was with little water
the K�Ti negotiating the narrow mountain bridge, i've reduced the speed of a part of the video because i liked to watch the way the suspension works...
that's all for now, the other two remaining videos are big, so they will take a while to upload...
best regards
10-26-2018, 06:15 AM
#168
Wow!!! Thanks for sharing the photos of the progress. Really like you using a textured roller to create cobble tones in the wet cement!!! Looks like your test runs were successful except for the Kuble and Leo. Was there drunk driving involved? LOL
10-26-2018, 10:00 AM
#170
Thread Starter
Join Date: May 2011
Location: Creixell, SPAIN
Posts: 191
Likes: 0
Received 0 Likes
on
0 Posts
thanks guys!
not actually! they were FPV'ing and dropped from the road 
11-25-2018, 11:59 AM
#171
Thread Starter
Join Date: May 2011
Location: Creixell, SPAIN
Posts: 191
Likes: 0
Received 0 Likes
on
0 Posts
good evening sirs
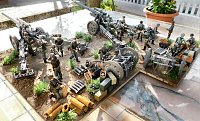
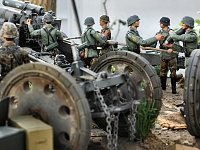
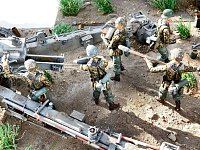
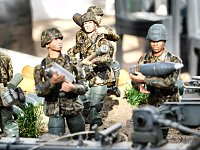
since the meeting i've been doing work at my man's cave. I've gathered almost all the german figures and i have been preparing them to be glued in all the positions we have. that is, glueing equipment, painting some, modifying others, interchanging heads and body parts, and repainting all the 'green' helmets. As most of our figures are from the 21st CT brand, the packs of helmets we bought years ago were those with the clothing cover, without cloth cover we have not too many, all from Dragon. Some time ago I painted a part of the helmets camouflaged, but the ones carried by the figures with green uniforms i wrongly painted them green... but the helmet covers, as far as i know, were camo or mouse grey. So i repainted all the greens to mouse grey... all the lot of them!
i've yet to paint 12 more helmets for the camouflaged soldiers...
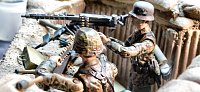
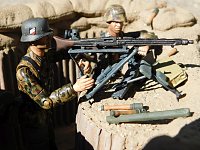
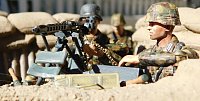
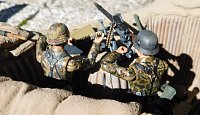
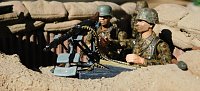
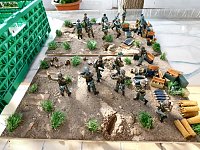
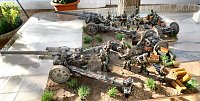
here you are the main body of gun crews who will populate the panzodrom

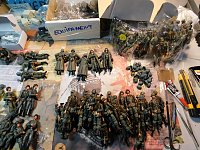

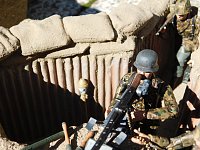
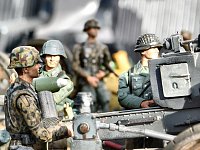
and then started to fill the first positions, the six mg-feuerstellung. I do not have pics of all of them, of course all have different figures and the layout of the components differ, but all are very similar.


next phase, to prepare the 15cm sFH18 guns dio...
best regards chaps!
since the meeting i've been doing work at my man's cave. I've gathered almost all the german figures and i have been preparing them to be glued in all the positions we have. that is, glueing equipment, painting some, modifying others, interchanging heads and body parts, and repainting all the 'green' helmets. As most of our figures are from the 21st CT brand, the packs of helmets we bought years ago were those with the clothing cover, without cloth cover we have not too many, all from Dragon. Some time ago I painted a part of the helmets camouflaged, but the ones carried by the figures with green uniforms i wrongly painted them green... but the helmet covers, as far as i know, were camo or mouse grey. So i repainted all the greens to mouse grey... all the lot of them!
i've yet to paint 12 more helmets for the camouflaged soldiers...
here you are the main body of gun crews who will populate the panzodrom
and then started to fill the first positions, the six mg-feuerstellung. I do not have pics of all of them, of course all have different figures and the layout of the components differ, but all are very similar.
next phase, to prepare the 15cm sFH18 guns dio...
best regards chaps!
12-02-2018, 10:17 AM
#172
Thread Starter
Join Date: May 2011
Location: Creixell, SPAIN
Posts: 191
Likes: 0
Received 0 Likes
on
0 Posts
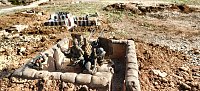
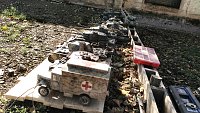
hello chaps
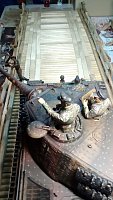
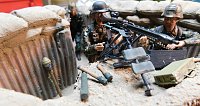
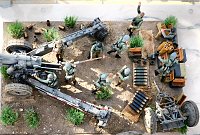
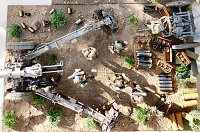
finally, today i call the battery of two 15cm sFH18's emplacements to be finished
in this case, the guns and their carriages will be stored and will travel separately, on her own box. As they are towable they cannot be fixed in any way to the scene's base, not to say it would be a huge piece to be stored! the bases as i made them are 36x55 cm, so figure if i put the guns too!
so i made with a 3cm thick extruded polystyrene plate, and by die cutting it, so the guns could be placed securely to be transported


here you are the guns on her box and the scenes with all the stuff already glued: figures, ammo, ammo boxes, ammo canisters, expenden cartridges, etc...

with the guns in place, i've tried to use slightly different layouts

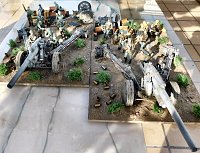


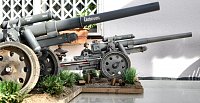


that's all for today sirs
in the next phase i will 'populate' the six 8,8cm FlaK 36... a lot of work there!
best regards and thanks for watching
finally, today i call the battery of two 15cm sFH18's emplacements to be finished
in this case, the guns and their carriages will be stored and will travel separately, on her own box. As they are towable they cannot be fixed in any way to the scene's base, not to say it would be a huge piece to be stored! the bases as i made them are 36x55 cm, so figure if i put the guns too!
so i made with a 3cm thick extruded polystyrene plate, and by die cutting it, so the guns could be placed securely to be transported
here you are the guns on her box and the scenes with all the stuff already glued: figures, ammo, ammo boxes, ammo canisters, expenden cartridges, etc...
with the guns in place, i've tried to use slightly different layouts
that's all for today sirs
in the next phase i will 'populate' the six 8,8cm FlaK 36... a lot of work there!
best regards and thanks for watching
